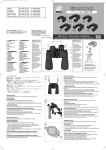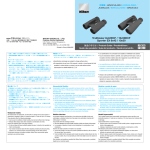
1
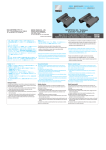
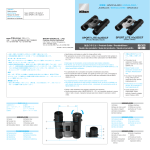
/ BINOCULARS / FERNGLÄSER /
JUMELLES / BINOCULARES / BINOCOLO
Body marking
Beschriftung
Marque du boîtier
Marca en el cuerpo
Marcatura sul prodotto
/MONARCH/MONARCH ATB
Nikon MONARCH
/MONARCH
MONARCH ATB
8x36DCF / 10x36DCF / 8x42DCF / 10x42DCF / 12x42DCF
8.5x56DCF / 10x56DCF / 12x56DCF
NIKON VISION CO., LTD.
Customer Service Department
3-25, Futaba 1-chome, Shinagawa-ku, Tokyo 142-0043, Japan
Tel: +81-3-3788-7699 Fax: +81-3-3788-7698
Printed in China (139k)/9DE
/ Product Guide / Produktführer /
Guide des produits / Guía del producto / Guía del producto
識別マーク
5
Eyecup is turned
counterclockwise to the fully
extended position (for users
with normal eyesight)
Okularmuschel bis zum
Anschlag herausgedreht (für
Anwender ohne Sehhilfe)
1
L’œilleton est tourné dans le
sens anti-horaire en position
entièrement sortie (pour les
utilisateurs à vision normale).
Gire el ocular hacia la
izquierda para alargarlo al
máximo (para las personas
con visión normal)
2
6
Eyecup is turned clockwise to
the fully retracted position (for
spectacle wearers)
Okularmuschel bis zum
Anschlag nach unten gedreht
(für Brillenträger)
7
L’œilleton est tourné dans le
sens horaire en position
entièrement enfoncée (pour les
porteurs de lunettes).
Gire el ocular hacia la derecha
hasta que se retraiga
completamente (para las
personas que utilicen lentes)
8
3
Per portarlo nella posizione
completamente ritratta, il
paraocchio viene ruotato in
senso orario (per utenti con gli
occhiali).
9
Per portarlo nella posizione
completamente estesa, il
paraocchio viene ruotato in
senso antiorario (per utenti con
una vista normale).
4
NOMENCLATURE
1
2
3
4
5
6
7
8
9
!p
1
2
3
4
5
6
7
8
9
!p
ø
ø
Eyecup
Neck strap eyelet
Focusing ring
Objective lens
Interpupillary distance
Diopter ring
Diopter index
0 (zero) diopter position
Central shaft
Mount holes for objective lens caps
(8x42DCF/10x42DCF/12x42DCF/8.5x56DCF
/10x56DCF/12x56DCF)
ø56
BR
BY
BS
EBJ
EBJ
EBN
OAV
OBF
OBD
CAV
CAW
CBU
SAD
SAD
SAA
ITEMS SUPPLIED
Binoculars
Eyepiece lens cap
Objective lens caps
Soft case
Neckstrap
identification marking
ø36
ø42
ø56
BR
BY
BS
EBJ
EBJ
EBN
OAV
OBF
OBD
CAV
CAW
CBU
SAD
SAD
SAA
Tripod adapter TRA-3 is included with 12x56DCF.
Im Lieferumfang
Okularmuschel
Riemenöse
Fokussierring
Objektivlinse
Augenabstand
Dioptrien-Einstellring
Dioptrienindex
Dioptrien-Nullstellung
Mittelachse
Montagebohrungen für
Objektivlinsenabdeckungen
(8x42DCF/10x42DCF/12x42DCF/8.5x56DCF
/10x56DCF/12x56DCF)
Jumelles
Capuchon d’oculaire
Capuchons d'objectif
Etui souple
Bandoulière
Marque d’identification
ø36
ø42
BR
BY
ø56
BS
EBJ
EBJ
EBN
OAV
OBF
OBD
CAV
CAW
CBU
SAD
SAD
SAA
ø42
ø56
BR
BY
BDS
EBJ
EBJ
EBN
OAV
OBF
OBD
CAV
CAW
CBU
SAD
SAD
SAA
Œilleton
Œillet pour courroie
Bague de mise au point
Lentille de l’objectif
Distance interpupillaire
Bague dioptrique
Index dioptrique
Position de “0” (zéro) dioptrique
Axe central
Orifices de montage pour les bouchons
d’objectif
(8x42DCF/10x42DCF/12x42DCF/8.5x56DCF
/10x56DCF/12x56DCF)
Marca de identificación
Binoculares
Tapa de oculares
Tapas de objetivo
Funda blanda
Correa al cuello
ARTICOLI FORNITI
Kennzeichnung
ø36
NOMENCLATURE
1
2
3
4
5
6
7
8
9
!p
ACCESORIOS
SUMINISTRADOS
ø36
ø42
BR
BY
ø56
BS
EBJ
EBJ
EBN
OAV
OBF
OBD
CAV
CAW
CBU
SAD
SAD
SAA
Con el 12x56DCF se incluye el adaptador para trípode TRA-3.
Contrassegno per individuazione
Binocolo
Coperchi di oculari
Copriobiettivo
Custodia morbida
Tracolla
NOMENCLATURA
1
2
3
4
5
6
7
8
9
!p
ø36
ø42
BR
BY
ø56
BS
EBJ
EBJ
EBN
OAV
OBF
OBD
CAV
CAW
CBU
SAD
SAD
SAA
L’adattatore treppiedi TRA-3 è incluso nel 12x56DCF.
Stativadapter TRA-3 gehört zum Lieferumfang von 12x56DCF.
TEILEBEZEICHNUNG
1
2
3
4
5
6
7
8
9
!p
ø42
L’adaptateur pour trépied TRA-3 est fourni avec les 12x56DCF.
Fernglas
Okulardeckel
Objektiv-linsendeckel
Weichtasche
Halsriemen
!p
ELEMENTS FOURNIS
ø36
J E G
F S I
Oculares de goma
Ojo para la correa
Aro de enfoque
Lentes de objetivo
Distancia interpupilar
Anillo de dioptrías
Indice de dioptrías
Posición de cero (0) dioptrías
Eje pivote
Orificios de montaje para tapas de objetivo
(8x42DCF/10x42DCF/12x42DCF/8.5x56DCF
/10x56DCF/12x56DCF)
NOMENCLATURA
1
2
3
4
5
6
7
8
Occiello per tracolla
Paraocchio
Anello di messa a fuoco
Obiettivo
Distanza interpupillare
Anello di regolazione diottrica
Indice di regolazione diottrica
Posizione di 0 (zero) in regolazione
diottrica
9 Albero centrale
!p Fori di fissaggio dei copriobiettivi
(8x42DCF/10x42DCF/12x42DCF/8.5x56DCF
/10x56DCF/12x56DCF)
Fixation de la bandoulière
Fixez la bandoulière comme indiqué sur l’illustration (Fig. 1), en prenant garde de ne pas tordre la courroie.
Pendant l’observation
Fig. 1
Abb. 1
•
•
Utilisation des bouchons d’oculaire
Les bouchons d’oculaire peuvent être écartés des deux manières suivantes pendant l’observation des sujets.
1. Retirez les bouchons d’oculaire des oculaires et laissez-les pendre à partir de la bandoulière.
2. Retirez les bouchons d’oculaire des oculaires, détachez la courroie droite du bouchon et laissez-les pendre de
la bandoulière gauche (Fig. 2).
Détachement des bouchons d’oculaire/bouchons d’objectif de la bandoulière
• Pour détacher les bouchons d’oculaire/bouchons d’objectif, passez la bandoulière par les fentes pour
bandoulière (sur le côté droit dans le cas du bouchon d’oculaire) (Fig. 3; a-b-c).
a-b-c
c-b-a
ø
ø
•
•
ø
Attaching neckstrap
Attach the neckstrap as illustrated (see Fig. 1), paying special attention to avoid twisting the strap.
Fig. 2
Abb. 2
Utilisation des capuchons d’objectif attachés (8x36DCF/10x36DCF)
Vous pouvez faire pendre les bouchons d’objectif de la bandoulière pendant l’observation pour éviter de les perdre. (Fig. 2).
During observation
Utilizing the eyepiece cap
There are two things you can do with the eyepiece cap as you observe your subject.
1. Remove the eyepiece cap from the eyepieces and allow it to hang from the neckstrap.
2. Remove the eyepiece cap from the eyepieces, then detach the right strap from the cap and allow it to hang
from the left neckstrap (Fig. 2).
Detaching the eyepiece cap/objective lens caps from the neckstrap
• To detach the eyepiece cap/objective lens caps, pull the neckstrap through the neckstrap slits (on the righthand side in the case of the eyepiece cap) (Fig. 3; a-b-c).
Attaching the eyepiece cap/objective lens caps to the neckstrap
• Attach the eyepiece cap/objective lens caps to the neckstrap as shown in Fig. 3; c-b-a. To adjust the length
of the straps or loops, pull the neckstrap as shown in Fig. 1.
Utilizing the objective lens caps
Using the built-in objective lens caps (8x42DCF/10x42DCF/12x42DCF/8.5x56DCF/10x56DCF/12x56DCF)
• Caps may become detached due to external pressure or other strong force. Take care to avoid losing them.
• If a cap becomes detached, re-attach as follows (Fig 4): First, position the right-hand hook on the lens caps
tab inside the lip of the mount hole. Next, while squeezing toward the right side, push the left-hand hook on the
tab inside the mount hole. Finally, fully push the tab into the hole while twisting. Confirm the caps are properly
and securely mounted.
Using the attaching objective lens caps (8x36DCF/10x36DCF)
You may wish to hang the objective lens caps from the neckstrap during observation to avoid losing them. (Fig. 2)
Colocación de la correa al cuello
Instale la correa al cuello como en la figura (vea la Fig. 1) con cuidado para que no se enrolle la correa.
Mientras mira
Cómo guardar las tapas del ocular
Hay dos formas de guardar la tapa del ocular mientras observa su objeto.
1. Saque la tapa del ocular y cuelgue de la argolla.
2. Saque la tapa del ocular y suelte la correa derecha de la tapa y deje colgado de la argolla izquierda (Fig. 2).
Para sacar la tapa del ocular/tapa del objetivo de la correa al cuello
• Para soltar la tapa del ocular/tapa del objetivo, tire de la correa al cuello por las ranuras de la correa en el
lado derecho de la tapa del ocular (Fig. 3; a-b-c).
Fig. 3
Abb. 3
Anbringen des Trageriemens
Bringen Sie den Trageriemen wie gezeigt (Abb. 1) an, ohne dabei den Riemen zu verdrehen.
Handhaben der Okularabdeckung
Während der Beobachtung können Sie die Okularabdeckung auf zwei Arten handhaben.
1. Entfernen Sie die Okularabdeckung von den Okularen und lassen Sie sie am Trageriemen hängen.
2. Entfernen Sie die Okularabdeckung von den Okularen, trennen Sie die rechte Riemenseite von der
Abdeckung, und lassen Sie sie von der linken Riemenseite hängen. (Abb. 2)
Handhaben der Objektivlinsenabdeckungen
Verwendung der integrierten Objektivlinsenabdeckungen
(8x42DCF/10x42DCF/12x42DCF/8.5x56DCF/10x56DCF/12x56DCF)
• Die Linsenabdeckungen können sich u. U. aufgrund von äußerem Druck oder der Einwirkung anderer starker
Kräfte ablösen. Achten Sie unbedingt darauf, dass sie nicht verloren gehen.
• Abgelöste Linsenabdeckungen sind wie folgt wieder anzubringen (Abb. 4): Positionieren Sie zunächst die
rechte Klaue der Linsenabdeckung in der Lippe der Montagebohrung. Drücken Sie dann das Ganze nach
rechts und führen Sie dabei gleichzeitig die linke Klaue in die Montagebohrung ein. Zum Schluss drücken Sie
die Klaue bis zum Anschlag in die Bohrung und drehen sie dabei. Stellen Sie sicher, dass die
Linsenabdeckungen einwandfrei und sicher angebracht sind.
Verwendung der angebrachten Objektivlinsenkappen (8x36DCF/10x36DCF)
Sie können die Objektivlinsenabdeckungen am Trageriemen hängen lassen, um sie während der Beobachtung
nicht zu verlieren. (Abb. 2)
Para volver a colocar la correa al cuello en la tapa del ocular/tapa del objetivo
• Vuelva a instalar la tapa del ocular/tapa del objetivo en la correa al cuello como en la Fig. 3 (c-b-a). Para
ajustar la longitud de las correas o bucles, tire de las correas como en la Fig. 1.
Cómo guardar las tapas del objetivo
Utilización de las tapas del objetivo incorporadas (8x42DCF/10x42DCF/12x42DCF/8.5x56DCF/10x56DCF/12x56DCF)
• Las tapas pueden salirse debido a presión externa u otra fuerza considerable. Tenga cuidado de no perderlas.
• Si una tapa se sale, acóplela otra vez de la siguiente forma (Fig. 2): Primero, coloque el gancho derecho en la pestaña
de las tapas del objetivo dentro del borde del orificio de montaje. A continuación, a la vez que aprieta hacia la parte
derecha, empuje el gancho izquierdo en la pestaña dentro del orificio de montaje. Por último, empuje completamente la
pestaña en el orificio a la vez que tuerce. Confirme que las tapas quedaron montadas adecuada y seguramente.
Utilización de las tapas del objetivo acoplables (8x36DCF/10x36DCF)
Puede colgar las tapas del objetivo de la argolla mientras observa, para evitar que se pierdan las tapas. (Fig. 2)
Während der Beobachtung
Trennen der Okularabdeckung/Objektivlinsenabdeckungen vom Trageriemen
• Ziehen Sie den Trageriemen durch die Ösen (im Falle der Okularabdeckung an der rechten Seite).
(Abb. 3, a-b-c)
Anbringen der Okularabdeckung/Objektivlinsenabdeckungen am Trageriemen
• Bringen Sie Okularabdeckung/Objektivlinsenabdeckungen wie in Abb. 3, c-b-a gezeigt am Trageriemen an.
Zum Einstellen der Länge ziehen Sie den Riemen wie in Abb. 1 gezeigt.
Refixation des bouchons d’oculaire/bouchons d’objectif à la bandoulière
• Refixez les bouchons d’oculaire/bouchons d’objectif à la bandoulière comme indiqué sur la Fig. 3; c-b-a.
Tirez sur la bandoulière comme indiqué sur la Fig. 1 pour ajuster la longueur des courroies ou boucles.
Utilisation des bouchons d’objectif
Utilisation des capuchons d’objectif intégrés (8x42DCF/10x42DCF/12x42DCF/8.5x56DCF/10x56DCF/12x56DCF)
• Les capuchons peuvent se détacher suite à une pression extérieure ou une autre force importante. Faites
attention à ne pas les perdre.
• Si un capuchon se détache, remettez-le en place comme suit (Fig 4): D’abord, placez le crochet de droite de la
languette des capuchons d’objectif dans la fente de l’orifice de montage. Puis, poussez le crochet de gauche de
la languette à l’intérieur de l’orifice de montage, tout en serrant vers la droite. Enfin, poussez complètement la
languette dans l’orifice tout en la tordant. Vérifiez que les bouchons sont montés correctement et fermement.
Fissaggio della tracolla
Fissare la tracolla come mostrato (si veda la Fig. 1), prestando particolare attenzione a non attorcigliarla.
Durante le osservazioni
Fig. 4
Abb. 4
Uso del coprioculari
Durante l’osservazione dei soggetti, per il coprioculari sono disponibili le seguenti alternative:
1. rimuovere il coprioculari dagli oculari e lasciarlo pendere dalla tracolla, oppure.
2. rimuovere il coprioculari dagli oculari, staccare da esso la cinghietta destra e lasciarlo pendere dal lato sinistro
della tracolla (Fig. 2).
Distacco del coprioculari / dei copriobiettivi dalla tracolla
• Per staccare il coprioculari / i copriobiettivi dalla tracolla, tirare quest’ultima facendola scorrere attraverso la
relativa fessura (situata sul lato destro nel caso del coprioculari) (Fig. 3, a – b - c).
Fissaggio del coprioculari / dei copriobiettivi alla tracolla
• Fissare il coprioculari / i copriobiettivi alla tracolla, come mostrato nella Fig. 3, c – b - a. Per regolare la
lunghezza delle cinghiette o degli occhielli, tirare la tracolla come mostrato nella Fig. 1.
Uso dei copriobiettivi
Utilizzo dei copriobiettivi incorporati (8x42DCF/10x42DCF/12x42DCF/8.5x56DCF/10x56DCF/12x56DCF)
• È possibile che i copriobiettivi si stacchino a causa della pressione esterna o a causa di altre pressioni e che
possano essere smarriti.
• Se un copriobiettivo dovesse staccarsi, fissarlo nuovamente come indicato (Fig. 4): primo, posizionare il
gancio di destra sulla linguetta del copriobiettivo all’interno del bordo del foro di fissaggio. Quindi, premendo
verso destra, premere il gancio di sinistra sulla linguetta all’interno del foro di fissaggio. Infine, premere a fondo
la linguetta nel foro durante l’avvitamento. Verificare che i coperchi siano fissati correttamente e in modo stabile.
Utilizzo dei copriobiettivi di fissaggio (8x36DCF/10x36DCF)
Durante le osservazioni i copriobiettivi possono venire appesi alla tracolla, per evitare di perderli (Fig. 2).
8x36DCF 10x36DCF 8x42DCF 10x42DCF 12x42DCF 8.5x56DCF 10x56DCF 12x56DCF
(x)
(mm)
(°)
(°)
1000m
(m)
(mm)
(mm)
(m)
(mm)
(mm)
(mm)
(g)
8
10
8
10
12
8.5
10
36
36
42
42
42
56
56
12
56
7.0
6.0
6.3
6.0
5.0
6.2
6
5.5
52.1
55.3
47.5
55.3
55.3
49.4
55.3
59.9
122
105
110
105
87
108
105
96
4.5
3.6
5.3
4.2
3.5
6.6
5.6
4.7
20.3
13.0
28.1
17.6
12.3
43.6
31.4
22.1
17.0
15.0
19.6
15.5
15.4
19.2
17.4
16.3
2.5
2.5
2.5
2.5
2.5
10
10
10
56 ~ 72
56 ~ 72
56 ~ 72
56 ~ 72
56 ~ 72
60 ~ 72
60 ~ 72
60 ~ 72
124
122
146
143
146
197
197
197
129
129
129
129
129
144
144
144
570
575
615
615
625
1,105
1,115
1,140
(°)
•
•
(°)
SPECIFICATIONS
Type: Roof prism central focusing type
Model
Magnification ( x )
Effective diameter. of objective lens (mm)
Angular field of view (real) (°)
*Angular field of view (apparent) (°)
Field of view at 1,000m (m)
Exit pupil (mm)
Brightness
Eye relief (mm)
**Close focusing distance, approx. (m)
Interpupillary distance adjustment (mm)
Length (mm)
Width (mm)
Weight (g)
•
•
8x36DCF 10x36DCF 8x42DCF 10x42DCF 12x42DCF 8.5x56DCF 10x56DCF 12x56DCF
8
10
8
10
12
8.5
10
12
36
36
42
42
42
56
56
56
7.0
6.0
6.3
6.0
5.0
6.2
6
5.5
52.1
55.3
47.5
55.3
55.3
49.4
55.3
59.9
122
105
110
105
87
108
105
96
4.5
3.6
5.3
4.2
3.5
6.6
5.6
4.7
20.3
13.0
28.1
17.6
12.3
43.6
31.4
22.1
17.0
15.0
19.6
15.5
15.4
19.2
17.4
16.3
2.5
2.5
2.5
2.5
2.5
10
10
10
56-72 56-72 56-72 56-72 56-72 60-72 60-72 60-72
124
122
146
143
146
197
197
197
129
129
129
129
129
144
144
144
570
575
615
615
625
1,105 1,115 1,140
*Waterproof models:
All models shown are waterproof, and will suffer no damage to the optical system if submerged or dropped in water to a maximum depth of 1
meter for up to 5 minutes.
These products offer the following advantages:
• Can be used in conditions of high humidity, dust and rain without risk of damage.
• Nitrogen-filled design makes them resistant to condensation and mold.
Observe the following when using these products:
• As the unit does not have a perfectly sealed structure, it should not be operated nor held in running water.
• Any moisture should be wiped off before adjusting movable parts (focusing knob, eyepiece, etc.) of these products to prevent damage and for
safety reasons.
To keep your binoculars in excellent condition, Nikon Vision recommends regular servicing by an authorized dealer.
• Specifications and design are subject to change without notice.
• No reproduction in any form of this "Product Guide," in whole or in part (except for brief quotation in critical articles or reviews), may be made
without written authorization from NIKON VISION CO., LTD.
*tan [(Apparent field of view)/2 (°)] = [Magnification] x tan [(Real field of view)/2 (°)]
**Without diopter adjustment
TECHNISCHE DATEN
Bauart: Dach-Prismentyp mit Mitteltrieb
Modell
Vergrößerung (x)
Effektiver Objektivlinsen-durchmesser (mm)
Sehfeld (objektiv) (°)
*Sehfeld (subjektiv) (°)
Sehfeld auf 1.000 m (m)
Austrittspupille (mm)
Lichtstärke
Abstand der Austritts pupille (mm)
**Mindestdistanz, ca. (m)
Pupillenabstand (mm)
Länge (mm)
Breite (mm)
Gewicht (g)
8x36DCF 10x36DCF 8x42DCF 10x42DCF 12x42DCF 8.5x56DCF 10x56DCF 12x56DCF
8
10
8
10
12
8,5
10
12
36
36
42
42
42
56
56
56
7,0
6,0
6,3
6,0
5,0
6,2
6
5,5
52,1
55,3
47,5
55,3
55,3
49,4
55,3
59,9
122
105
110
105
87
108
105
96
4,5
3,6
5,3
4,2
3,5
6,6
5,6
4,7
20,3
13,0
28,1
17,6
12,3
43,6
31,4
22,1
17,0
15.0
19,6
15,5
15,4
19,2
17,4
16,3
2,5
2,5
2,5
2,5
2,5
10
10
10
56-72 56-72 56-72 56-72 56-72 60-72 60-72 60-72
124
122
146
143
146
197
197
197
129
129
129
129
129
144
144
144
570
575
615
615
625
1.105 1.115 1.140
*Wasserdichte Modelle
Alle gezeigten Ferngläser sind wasserdicht und lassen sich bis zu einer Tiefe von maximal 1 Meter bis zu 5 Minuten lang im Wasser einsetzen,
ohne dass die Optik beschädigt wird.
Diese Modelle bieten die folgenden Vorteile:
• Einsatz unter hoher Luftfeuchtigkeit, Staub und Regen ohne Beschädigungsrisiko.
• Stickstofffüllung verhindert Kondensation und Schimmelbildung.
Bei Einsatz von dieser Modelle zu beachten:
• Da das Produkt nicht hermetisch abgedichtet ist, darf es unter fließendem Wasser weder betrieben noch gehalten werden.
• Zur Verhinderung von Schäden und aus Sicherheitsgründen dürfen die beweglichen Teile (z. B. Fokussierring und Okular) von dieser Modelle
erst dann betätigt werden, wenn etwaige Feuchtigkeit abgewischt ist.
Damit Sie viele Jahre ungetrübte Freude an Ihrem Fernglas haben, empfiehlt Nikon Vision die regelmäßige Wartung durch einen autorisierten
Fachhändler.
• Änderungen der Konstruktion und der technischen Daten bleiben vorbehalten.
• Alle Rechte, auch die des auszugsweisen Nachdrucks (mit Ausnahme kurzer Zitate in technischen Besprechungen), ohne schriftliche
Genehmigung durch NIKON VISION CO., LTD. bleiben ausdrücklich vorbehalten.
*tan [(virtuelles Blickfeld)/2 (°)] = [Vergrößerung] x tan [(reelles Blickfeld)/2 (°)]
**Ohne Dioptrieneinstellung
SPECIFICATIONS
Type: Jumelles à prismes en toit (Dach) au point centrale
Modéle
8x36DCF 10x36DCF 8x42DCF 10x42DCF 12x42DCF 8.5x56DCF 10x56DCF 12x56DCF
Grossissement (x)
8
10
8
10
12
8,5
10
12
Diamètre effectif de la lentille de l’objectif (mm)
36
36
42
42
42
56
56
56
Champ angulaire de vision (réel) (°)
7,0
6,0
6,3
6,0
5,0
6,2
6
5,5
*Champ angulaire de vision (apparent) (°)
52,1
55,3
47,5
55,3
55,3
49,4
55,3
59,9
Champ linéaire perçu à 1.000m (m)
122
105
110
105
87
108
105
96
Pupille de sortie (mm)
4,5
3,6
5,3
4,2
3,5
6,6
5,6
4,7
Luminosité
20,3
13,0
28,1
17,6
12,3
43,6
31,4
22,1
Dégagement oculaire (mm)
17,0
15,0
19,6
15,5
15,4
19,2
17,4
16,3
**Distance de mise au point approx. (m)
2,5
2,5
2,5
2,5
2,5
10
10
10
Ajustement de la distance interpupillaire (mm) 56-72 56-72 56-72 56-72 56-72 60-72 60-72 60-72
Longueur (mm)
124
122
146
143
146
197
197
197
Largeur (mm)
129
129
129
129
129
144
144
144
Poids (g)
570
575
615
615
625
1.105 1.115 1.140
*Modèles étanches
Les jumelles indiquées sont étanches, et ne subiront pas de dégâts si elles sont submergées ou laissées tomber dans l’eau jusqu’à une
profondeur maximale de 1 mètre jusqu’à 5 minutes.
Ces produits ofrent les avantages suivants:
• Elles sont utilisables sous forte humidité, poussière et pluie sans risques de dommages.
• La conception à injection d'azote les rend résistantes à la condensation et aux moisissures.
Observez les règles suivantes à l'emploi de ces produits:
• Comme l’appareil n’a pas une structure parfaitement étanche, il ne doit pas être tenu dans l’eau courante.
• Toute humidité doit être essuyée avant d’ajuster les parties mobiles (bouton de mise au point, oculaire, etc.) de ces produits pour éviter tout
dégât et pour des raisons de sécurité.
Pour maintenir vos jumelles en excellent état, Nikon Vision recommande un entretien régulier par un revendeur agréé.
• Les spécifications et la conception sont sujettes à modification sans préavis.
• Aucune reproduction totale ou partielle, sous quelle que forme que ce soit, (à l'exception de brèves citations dans des magazines) ne peut être
faite sans autorisation écrite de NIKON VISION CO., LTD.
*tan [(Champ de vision apparent)/2 (°)] = [Grossissement] x tan [(Champ de vision réel)/2 (°)]
**Sans réglage dioptrique
ESPECIFICACIONES
Tipo: Tipo enfoque central prismáticos con prisma Dach
Modelo
8x36DCF
Aumento (x)
8
Diámetro efectivo del objetivo (mm)
36
Campo angular de visión (real) (º)
7,0
*Campo angular de visión (aparente) (º)
52,1
Campo de visión a 1000m (m)
122
Pupila de salida (mm)
4,5
Brillo
20,3
Distancia aprox. de la pupila de salida al ocular (mm) 17,0
**Distancia de enfoque de acercamiento (m)
2,5
Ajuste de distancia interpupilar (mm)
56-72
Longitud (mm)
124
Anchura (mm)
129
Peso (g)
570
10x36DCF 8x42DCF 10x42DCF 12x42DCF 8.5x56DCF 10x56DCF 12x56DCF
10
8
10
12
8,5
10
12
36
42
42
42
56
56
56
6,0
6,3
6,0
5,0
6,2
6
5,5
55,3
47,5
55,3
55,3
49,4
55,3
59,9
105
110
105
87
108
105
96
3,6
5,3
4,2
3,5
6,6
5,6
4,7
13,0
28,1
17,6
12,3
43,6
31,4
22,1
15,0
19,6
15,5
15,4
19,2
17,4
16,3
2,5
2,5
2,5
2,5
10
10
10
56-72 56-72 56-72 56-72 60-72 60-72 60-72
122
146
143
146
197
197
197
129
129
129
129
144
144
144
575
615
615
625
1.105 1.115 1.140
*Modelos a prueba de agua
Todos los modelos mostrados son a prueba de agua y su sistema óptico no sufrirá daños si se sumergen o se dejan caer en el agua hasta una
profundidad máxima de 1 metro durante un tiempo máximo de 5 minutos.
Estos productos odrecen las sigjienesventajas:
• Pueden utilizarse en condiciones de alta humedad, polvo y lluvia sin peligro de dañarse.
• El diseño lleno de nitrógeno los hace resistentes a la condensación y al moho.
Observe lo siguiente cuando utilice estos producos:
• Como la unidad no tiene una estructura perfectamente sellada, no debe manipularse ni colocarse bajo el agua que sale del grifo.
• Para evitar daños, y por razones de seguridad, antes de ajustar las piezas móviles (perilla de enfoque, ocular, etc.) de estos products, debe
eliminarse toda la humedad.
Para mantener sus binoculares en excelentes condiciones, Nikon Vision recomienda un servicio regular en un distribuidor autorizado.
• Las especificaciones y el diseño están sujetos a cambios sin previo aviso.
• Se prohibe la reproducción de este "Guía del producto" en cualquier forma, ya sea en su totalidad o en parte (excepto citas breves en artículos
críticos o revisiones), sin la autorización escrita de NIKON VISION CO., LTD.
*tan [(Campo de visión aparente)/2 (°)] = [Aumento] x tan [(Campo de visión real)/2 (°)]
**Sin ajuste de dioptrías
DATI CARATTERISTICI
Tipo: Tipo con messa a fuoco centrale con prisma a tetto (Dach)
Modello
8x36DCF 10x36DCF 8x42DCF 10x42DCF 12x42DCF 8.5x56DCF 10x56DCF 12x56DCF
Ingrandimento ( x )
8
10
8
10
12
8,5
10
12
Diametro effettivo di obiettivo (mm)
36
36
42
42
42
56
56
56
Campo visivo angolare (reale) (°)
7,0
6,0
6,3
6,0
5,0
6,2
6
5,5
*Campo visivo angolare (apparente) (°)
52,1
55,3
47,5
55,3
55,3
49,4
55,3
59,9
Campo visivo a 1.000 (m)
122
105
110
105
87
108
105
96
Pupilla di uscita (mm)
4,5
3,6
5,3
4,2
3,5
6,6
5,6
4,7
Luminosità
20,3
13,0
28,1
17,6
12,3
43,6
31,4
22,1
Accomodamento dell'occhio (mm)
17,0
15,0
19,6
15,5
15,4
19,2
17,4
16,3
**Distanza messa a fuoco primi piani, approx. (m) 2,5
2,5
2,5
2,5
2,5
10
10
10
Regolazione distanza interpupillare (mm)
56-72 56-72 56-72 56-72 56-72 60-72 60-72 60-72
Lunghezza (mm)
124
122
146
143
146
197
197
197
Larghezza (mm)
129
129
129
129
129
144
144
144
Peso (g)
570
575
615
615
625
1.105 1.115 1.140
*tan [(campo visivo apparente)/2 (°)] = [ingrandimento] x tan [(campo visivo reale)/2 (°)]
**Con vista normale senza accomodazione
*Note circai i modelli impermeabili
Tutti i modelli mostrati sono impermeabili, quindi possono essere usati fino a una profondità massima di 1 metro per un massimo di 5 minuti
senza che il sistema ottico si danneggi.
Questi prodotti offrono i seguenti vantaggi:
• Possono essere usati in condizioni di molta umidità, polvere e pioggia senza alcun rischio di danneggiamento.
• Il design a riempimentodi azoto li rende resistenti a condensazione e muffa.
Nell' utilizzare questi prodotti, osservare quanto segue:
• Poiché l’unità non ha una struttura perfettamente sigillata, non deve essere utilizzata né mantenuta sotto l’acqua corrente.
• Prima di regolare le parti mobili (manopola di messa a fuoco, oculare, ecc.) di questi prodotti, per evitare guasti e ai fini della sicurezza, è
necessario rimuovere qualsiasi traccia di umidità.
Per conservare il binocolo in condizioni ottimali, Nikon Vision consiglia una periodica revisione da parte di un rivenditore autorizzato.
• Design e dati caratteristici sono soggetti a variazioni senza preavviso.
• Senza autorizzazione scritta di NIKON VISION CO., LTD., non è possibile riprodurre in nessun modo, in tutto o in parte, il presente manuale
(salvo brevi citazioni in recensioni o articoli critici).