1
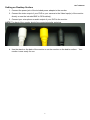
User’s Manual FCC RADIATION NORM: FCC This equipment has been tested and found to comply with limits for Class B digital device pursuant to Part 15 of Federal Communications Commission (FCC) rules. FCC Compliance Statement These limits are designed to provide reasonable protection against frequency interference in residential installation. This equipment generates, uses, and can radiate radio frequency energy, and if not installed or used in accordance with the instructions, may cause harmful interference to radio communication. However, there is no guarantee that interference will not occur in television reception, which can be determined by turning the equipment off and on. The user is encouraged to try and correct the interference by one or more of the following measures: Reorient or relocate the receiving antenna Increase the separation between the equipment and the receiver Connect the equipment into an outlet on a circuit different from that to which the receiver is connected to. CAUTION! The Federal Communications Commission warns the user that changes or modifications to the unit not expressly approved by the party responsible for compliance could void the user’s authority to operate the equipment. 3 User’s Manual PACKAGE CONTENTS: Your new LCD Monitor will ship with the following items. 4 User’s Manual SAFETY INSTRUCTION: 1. Use proper power source. Do not use this product with a power source that applies more than specified voltage (100-240V AC). 2. Never insert any metal into the monitor or any openings. Putting metal into the monitor case can cause danger of electric shock. 3. Do not operate in wet or dusty area. Avoid places like a damp basement or dusty hallway. 4. Do not expose this product to rain or use near water. If this product accidentally gets wet, unplug it and contact technical support immediately. 5. Keep product surfaces clean and dry. To clean the outside case of the monitor, use a lightly dampened cloth (no solvents). Do not use any cleaning solutions or cleaner. 6. Provide proper ventilation. Use in well ventilated area to avoid overheating of the device. 7. Do not attempt to remove the top cover. If any abnormal operation is observed, unplug it immediately and contact technical support. Warning: You may be subjected to severe electrical shock if you remove the cover of the device. 8. Handle box carefully. If you accidentally drop your monitor on any hard surface, it may cause a malfunction. If the device doesn’t work properly due to physical damage, contact an authorized dealer for repair or exchange. 9. Make sure there is good air circulation around the unit. This device generates heat during operation. Do not block air holes/vents that reduce the generated heat while the system is running. Install or place this product in a well ventilated area. 5 User’s Manual LAYOUT Front 1 2 Item Indicators 4 3 Functions 1 Power Press to turn on monitor or to open color adjust menu. Press and hold for 2 seconds to turn off the monitor 2 Video 1/Video 2 Press to switch between channel 1 and channel 2 3 Volume - Decrease the Volume of the Speaker or to lower color settings. 4 Volume + Increase the Volume of the Speaker or to increase color settings. Back 1 Item 2 3 Physical ports Connection method 1 Audio Input Audio Input for Built-in Speaker 2 Video Input 2 Input for Channel 2 3 Video Input 1 Input for Channel 1 4 DC Input DC Power Input Jack 6 4 User’s Manual INSTALLATION Mounting on the Wall 1. Carefully measure and align the two screw mounting hole on the back of your monitor with where you would like to mount your monitor to before drilling. 2. Drill the holes needed to insert the two included wall plugs. 3. Use the included screws to screw into the wall plugs. 4. Connect the power jack of the included power adapter to the monitor. 5. Connect the video output of your DVR or your camera to the Video Input(s) of the monitor directly or use the included BNC to RCA cable(s). 6. Connect your microphone or audio output of your DVR to the monitor. NOTE: The back of the monitor should be connected similar as below. 7. Hang your Monitor to the wall using the two screws secured to the wall in step 3. monitor is now ready for use. 7 Your User’s Manual Setting on Desktop Surface 1. Connect the power jack of the included power adapter to the monitor. 2. Connect the video output of your DVR or your camera to the Video Input(s) of the monitor directly or use the included BNC to RCA cable(s). 3. Connect your microphone or audio output of your DVR to the monitor. NOTE: The back of the monitor should be connected similar as below. 4. Use the stand on the back of the monitor to set the monitor on the desk’s surface. monitor is now ready for use. 8 Your User’s Manual WARRANTY NIGHT OWL, LLC (“Night Owl”) provides the following warranty to the original retail purchaser only (the “Purchaser”) with respect to this product (the “Product”): For a period of one (1) year after the date of sale, the Product shall be free from manufacturing defects in material and workmanship. In the event that the Product is defective, the Purchaser must return the Product at Purchaser’s cost (no CODs) to the address below, with the original proof of purchase receipt. In its sole discretion, Night Owl will either repair or replace the Product at no additional cost to the Purchaser. Any replacement Product (or parts) will be covered by the same warranty as the original Product through the expiration date of the original warranty period. Exclusions: This warranty does not apply to the following parts or upon the following events: Bulbs, LEDs and batteries; The Product was not used or installed in the manner described in the installation instructions; Negligent use of the Product, or misuse or abuse of the Product; Electrical short circuits or power surges; Use of replacement parts not supplied by Night Owl; Product is either tampered with, modified, or repaired by another service provider; Product has not been maintained in accordance with the instructions; Accident, fire, flood or other acts of God; Failure to use Night Owl approved accessories; Defects or damages arising by use of the Product in other than normal conditions (including normal atmospheric, moisture and humidity conditions). EXCEPT AS OTHERWISE PROHIBITED BY LAW, THIS WARRANTY IS IN LIEU OF OTHER WARRANTIES, EXPRESS OR IMPLIED, AND NIGHT OWL NEITHER ASSUMES NOR AUTHORIZES ANY PERSON TO ASSUME FOR IT ANY OTHER OBLIGATION OR LIABILITY IN CONNECTION WITH THE SALE OR SERVICE OF THE PRODUCT. IN NO EVENT SHALL NIGHT OWL BE LIABLE FOR ANY SPECIAL OR CONSEQUENTIAL DAMAGES ARISING FROM THE USE OF THE PRODUCT OR ARISING FROM THE MALFUNCTIONING OR NON-FUNCTIONING OF THE PRODUCT, OR FOR ANY DELAY IN THE PERFORMANCE OF THIS WARRANTY DUE TO ANY CAUSE BEYOND ITS CONTROL. THIS WARRANTY SHALL NOT APPLY TO INSTALLATION OR THE REMOVAL AND REINSTALLATION OF PRODUCTS AFTER REPAIR. Night Owl does not make any claims or warranties of any kind whatsoever regarding the Product’s potential, ability or effectiveness to prevent, minimize, or in any way affect personal or property damage or injury. Night Owl is not responsible for any personal damage, loss or theft related to the Product or to its use for any harm, whether physical or mental related thereto. Any and all claims or statements, whether written or verbal, by 9 User’s Manual salespeople, retailers, dealers or distributors to the contrary are not authorized by Night Owl, and do not affect this provision of this warranty. Returns under this Warranty In order to obtain service, please make sure that you have registered your product on-line no later than thirty (30) days after purchase at www.NightOwlSP.com in the warranty registration section or in any other matter described in the instructions. TOLL FREE CUSTOMER SERVICE North America: 1-866-390-1303 1-774-256-7250 Email: [email protected] Website: www.NightOwlSP.com Email: [email protected] TOLL FREE: 1-866-390-1303 Rev 04-2010 10 User’s Manual 11 User’s Manual 12