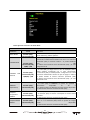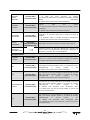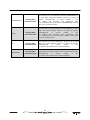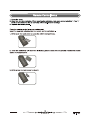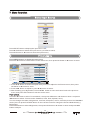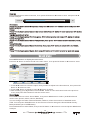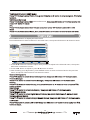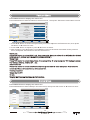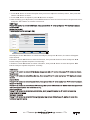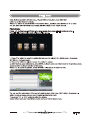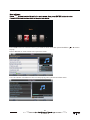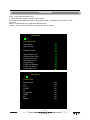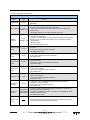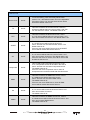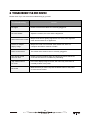
1
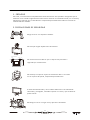
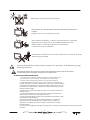
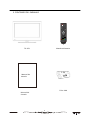
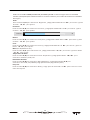
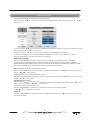
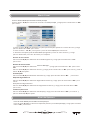
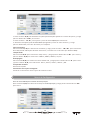
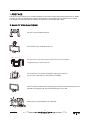
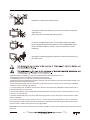
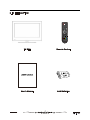
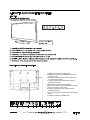
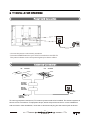
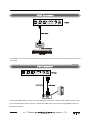
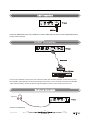
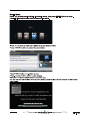
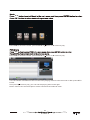
NVR-7402-29HD-N NVR-7402-29HD-B TELEVISOR DLED 29” (77.36CM) CON TDT HD Manual de Usuario 1. PRÓLOGO 2 2. PRECAUCIONES DE SEGURIDAD 2 3. CONTENIDO DEL EMBALAJE 4 4. VISTA FRONTAL Y CONEXIONES TRASERAS 5 5. ESQUEMAS DE LA INSTALACIÓN DE TV Conexión del Cable de Alimentación 6 Conexión de la antena 6 Conexión HDMI 7 Conexión VGA 7 Conexión USB 8 Conexión SCART 8 Conexión de los auriculares 8 Conexión AV 9 Conexión YPbPr 9 6. MANDO A DISTANCIA Mando a distancia en modalidad de TDT 10 Mando a distancia en modalidad Teletexto/Multimedia 12 Configuración de mando a distancia 13 7. MENÚ Seleccionar la Fuente de Entrada Menú de Imagen Menú Menú Menú Menú de de de de 14 14 16 Sonido Canal Opción Configuración 17 17 18 20 Menú Multimedia Grabación (PVR) 24 Modo Hotel 26 8. SOLUCIÓN DE PROBLEMAS Y CONSEJOS 30 9. ESPECIFICACIONES 31 1 1. PRÓLOGO Por favor, lea este manual completamente antes de utilizar este producto. Asegúrese que el televisor no ha sufrido ningún deterioro durante el tránsito. Si está deteriorado, no lo instale y póngase en contacto con su distribuidor. Compruebe que usted tiene todos los accesorios relacionados del modelo. 2. PRECAUCIONES DE SEGURIDAD Ponga el TV en una superficie estable. No coloque ningún objeto sobre el televisor. 20cm Distancia mínima 10cm 10cm 5cm No utilice accesorios del TV que no hayan sido provistos o sugeridos por el fabricante. No obstruya ni tape las rejillas de ventilación del TV. Si usted usa un soporte de pared, compruebe que est é firme. El cable de alimentación y otros cables deben estar correctamente colocados y protegidos, evitando tropezar con ellos y que el televisor pueda caerse. Mantenga el TV en un lugar seco y lejos de la humedad. 2 Mantenga el TV lejos de fuentes de calor. Desenchufe el TV antes de limpiarlo. No utilice disolvente o líquido para la limpieza. Limpie el TV con un trapo blando y seco. Ante cualquier problema, no utilice accesorios que no hayan sido sugeridos por el fabricante. El uso inadecuado de accesorios puede conducir a descargas eléctricas, incendios por cortocircuito u otros incidentes. Desenchufe el TV durante las tormentas eléctricas o cuando no lo utiliza durante largos periodos. Esta señal de advertencia se usa para indicar la presencia de “ alta tensión ” en el dispositivo y el riesgo de descargas eléctricas. Este símbolo advierte al usuario de la presencia de importantes instrucciones de operación y mantenimiento que usted podrá encontrar en las Instrucciones. OTRAS PRECAUCIONES IMPORTANTES: ‐ No mezcle pilas nuevas y usadas ni tampoco de diferentes tipos. ‐ Las pilas tienen que instalarse de acuerdo con la polaridad. ‐ Cuando la pila esté gastada, debe ser retirada del producto. ‐ La pila debe desecharse de forma segura. Utilice siempre los contenedores de recogida disponibles (consulte a su distribuidor) para proteger el medio ambiente. ‐ Si el cable está estropeado, para su reparación debe ponerse en contacto con el fabricante, su servicio técnico o alguien con la debida cualificación, con el fin de evitar cualquier peligro. ‐ El aparato Clase Constructiva I debe conectarse con la toma de corriente con conexión a tierra. ‐ Las pilas (el paquete de pilas o las instaladas) no pueden estar expuestas a calor excesivo como la luz solar y el fuego, entre otras. ‐ El enchufe de alimentación se utiliza como dispositivo de desconexión y debe permanecer accesible fácilmente. ‐ Para reducir el riesgo de incendios o descargas eléctricas, no exponga el aparato a la lluvia ni a la humedad. Éste no debe exponerse a goteos o a salpicaduras. Los objetos que contienen líquidos, como floreros, no deben colocarse sobre él. ‐ Para prevenir la propagación del fuego, mantenga velas u otras llamas expuestas lejanas de este producto todo el tiempo. 3 3. CONTENIDO DEL EMBALAJE POWER MUTE P.MODE S.MODE AUTO DISPLAY NICAM AUDIO 1 2 3 5 6 7 9 TV MENU 4 PROGRAM 8 +10 0 0 -/-LIST SOURCE ASPECT EXIT GUIDE SOURCE ZOOM ENTER OK CH- TEXT TV/RADIO VOL+ CH+ VOL- HOLD INDEX SIZE SUBPAGE REVEAL SUBTITLE REVEAL SUBPAGE SLEEP ZOOM D.SETUP TV/RADIO FAV D.MENU FAV- TITLE D.DISPLAY FAV+ GUIDE SUBTITLE REPEAT MEDIA MEDIA TV LED REC REC Mando a distancia 1.5V Manual de Usuario Pilas AAA Manual de Usuario 4 4. VISTA FRONTAL Y CONEXIONES TRASERAS Vista Frontal (Las fotos son sólo de referencia.) (La muestra está sujeta al producto auténtico.) 1. Pulse “SOURCE” para seleccionar la fuente de entrada. 2. Pulse “MENU” para visualizar el menú principal en la pantalla. 3. Pulse “CH+” o “CH-” para cambiar canales. 4. Pulse “VOL+” o “VOL-” para aumentar o disminuir el volumen de sonido. 5. Pulse el botón “POWER” para encender o apagar el modo de espera. 6. Indicador de ON/OFF LED: Se indica rojo en el modo de espera y, verde cuando el televisor se enciende. 7. Sensor IR: Sensor de infrarrojos para el mando a distancia. Vista trasera y Conexiones de control 1. HDMI: Conectar con toma de salida HDMI (DVD, VCR) . 2. SCART: Conectar con la toma de salida SCART de VCR o DVD. 3. PC AUDIO: Conectar con la toma de salida de PC. 4. VGA: Conectar con la toma de salida PC-RGB de PC. 5. Conexión auriculares 6. RF IN: Conectar con la antena. 7. YPbPr: Conectar con la toma de salida YPbPr de DVD o VCR. 8. CI Port: Conectar con la tarjeta CI. 9. AV: Conectar con la toma de salida Video/Audio de DVD o VCR. 10. USB: Entrada USB para dispositivo externo COAX 1 2 3 4 5 5 6 7 8 9 10 5. ESQUEMA DE INSTALACIÓN DE TV Conexión del cable de alimentación DC12V IN ‐ Conecte correctamente el cable de alimentación como se muestra. ‐ Pulse el POWER de su TV LED para encenderlo. El indicador de corriente en el panel frontal se ilumina en color verde o azul. Conexión de la antena ANTENA VHF ANTENA UHF AMPLIFICADOR DE ANTENA EXTERIOR AMPLIFICADOR DE ANTENA INTERIOR R F I N ENCHUFE DE ANTENA DE 75 OHM ENCHUFE DE CORRIENTE DEL AMPLIFICADOR DE ANTENA Para asegurar imágenes y sonidos de buena calidad, hace falta instalar el sistema de antena de TV. Este sistema se puede adquirir en las tiendas de equipos de TV, donde se proporcionarán servicios de correctas instalaciones y conexiones. Después de la instalación, inserte el enchufe de la antena de 75‐ ohm como se muestra. 6 Conexión HDMI TV Cable HDMI DVD o VCR DVD o VCR La conexión de la entrada de HDMI permite la transferencia digital de audio/vídeo/control de señales a través de un solo cable. Conexión VGA TV atrás Cable de Audio Cable de VGA Audio PC OUTPUT Conecte la salida de RGB de PC con la toma de VGA del TV. Conecte la salida de AUDIO de PC con la toma de PC AUDIO del TV. Seleccione la fuente de entrada de VGA usando el botón INPUT en el mando a distancia. 7 Conexión USB USB Connection COAX USB Port Conecte la unidad flash USB con un puerto USB. Seleccione la fuente de USB con el botón SOURCE en el mando a distancia. Conexión Euroconector (Scart) TV Cable Euroconector (Scart) DVD o VCR DVD o VCR Conecte el aparato de video externo y el TV con el conector SCART. Éste fuciona como una conexión de salida o entrada. Si el TV no selecciona automáticamente la entrada de SCART, selecciónelo usando el botón INPUT en el mando a distancia o el TV. Conexión de auriculares Auriculares COAX TV atrás Conecte los auriculares a través de esta entrada 8 AV Conexión AV Connection COAX TV Conector de entrada de AUDIO Cable de video (RCA) VIDEO L R Cable de transferencia de mini video VIDEO R L DVD o VCR atrás DVD o VCR Conecte las tomas de salida de VIDEO y AUDIO de DVD o VCR con los conectores del TV usando un cable RCA. Haga Coincidir los colores de los conectores: amarillo para video, blanco para audio izquierdo y rojo para audio derecho. Seleccione la fuente AV a través del botón SOURCE en el mando a distancia. Conexión YPbPr COAX TV atrás Conector de entrada de AUDIO Cable de Video (RCA) VIDEO L R Conector de entrada de AUDIO Y Pb Pr Cable de transferencia de mini video Y Pb Pr L R DVD o VCR DVD o VCR Conecte la salida de YPbPr de DVD o VCR con la entrada de YPbPr delTV. Conecte la salida de Audio de DVD o VCR con la entrada de Audio en el TV usando el cable RCA. Haga Coincidir los colores de los conectores: Y es verde, Pb es azul, Pr es rojo, Audio izquierdo es blanco y el derecho, rojo. Seleccione la fuente de Componente a través del botón SOURCE en el mando a distancia. 9 6. MANDO A DISTANCIA Mando a distancia en modo TDT POWER AUTO MUTE P.MODE S.MODE DISPLAY NICAM AUDIO 1 2 3 5 6 7 8 9 0 0 PROGRAM +10 -/-- TV MENU 4 EXIT LIST ASPECT GUIDE SLEEP Determina cuánto tiempo va a funcionar su TV antes de apagarse automáticamente. P.MODE Selecciona la modalidad de imagen. S.MODE SOURCE SOURCE ZOOM POWER Enciende o apaga el TV LED. MUTE Silencia el sonido. Para restaurar el sonido, pulse este botón otra vez o el botón VOL+. Selecciona la modalidad de sonido. DISPLAY Visualiza información de la fuente y los canales. NICAM Selecciona la modalidad de NICAM. AUDIO Selección Audio. BOTONES NUMÉRICOS Los botones de números se usan para seleccionar el canal. ENTER OK Vuelve al canal visionado anteriormente. CH- TEXT VOL+ CH+ VOL- HOLD INDEX SIZE TV/RADIO SUBPAGE REVEAL SUBTITLE REVEAL SUBPAGE SLEEP ZOOM D.SETUP TV/RADIO D.MENU TITLE D.DISPLAY FAVREPEAT MEDIA MEDIA FAV+ GUIDE Acceso al menú de guía de canales. SOURCE FAV Accede a la Lista de canales. TV MENU Accede al menú de configuración. EXIT Salir del Menu OSD GUIDE SUBTITLE REC REC Pulse SOURCE para visualizar la fuente de entrada de OSD. Pulse ▼/▲para seleccionar la fuente de entrada y luego pulse ENTER para confirmar. ▼/▲/◄/►/ ENTER Le permite navegar en los menús de pantalla y ajustar los valores del sistema de acuerdo a sus preferencias. CH+/CH‐ Púlselo para cambiar los canales. VOL+/VOL‐ Sube y/o baja el volumen. 10 Mando a distancia en modo TDT POWER AUTO MUTE P.MODE S.MODE ◄◄ Retroceso rápido en modalidad Timeshift. DISPLAY NICAM AUDIO Avanza rápido en modalidad de Timeshift. . (Timeshift) 1 2 3 5 6 7 8 9 0 0 TV MENU 4 PROGRAM +10 -/-- EXIT LIST SOURCE Inicio función Timeshift. NOTAS: Seleccione la modalidad de Time Shifting "off" en el menú para que el teletexto puede estar disponible. Detiene la reproducción. ZOOM ASPECT GUIDE SOURCE ZOOM Ajusta la escena visualizada. BOTONES DE COLORES Los botones de colores (respectivamente rojo, verde, amarillo y azul) se usan en algunos submenús. TV/RADIO ENTER OK Cambio de una modalidad (TV) a otra (Radio) y viceversa. FAV Muestra los programas favoritos seleccionados. FAV‐ CH- TEXT VOL+ CH+ VOL- HOLD INDEX FAV+ SIZE ZOOM Muestra el programa posterior seleccionado como favorito. SUBTITLE TV/RADIO SUBPAGE REVEAL SUBTITLE REVEAL SUBPAGE SLEEP Muestra el programa anterior seleccionado como favorito. D.SETUP TV/RADIO D.MENU visualización / reproducción de un programa . TITLE D.DISPLAY FAV FAVREPEAT MEDIA MEDIA FAV+ En la modalidad TDT, selecciona el idioma del subtítulo durante la GUIDE SUBTITLE Botón grabación REC REC 11 Mando a distancia en modalidad Teletexto/Multimedia POWER AUTO MUTE P.MODE S.MODE DISPLAY NICAM AUDIO 1 2 3 5 6 7 8 9 0 0 TV MENU 4 PROGRAM +10 -/-- EXIT LIST ASPECT GUIDE SOURCE SOURCE ZOOM ENTER OK BOTONES NUMÉRICOS Pulse 0‐9 para seleccionar una página de teletexto. ▲/ ▼ Página arriba o página abajo. CH+/CH‐ Página arriba o página abajo. SUBTITLE En modalidad Teletexto, Púlselo para visualizar P.100. TEXT Enciende o apaga la modalidad de teletexto. NOTAS: Seleccione la modalidad de Time Shifting "off" en el menú para que el teletexto puede estar disponible . HOLD Mantiene o interrumpe la visualización de la página actual. SUBPAGE Acceso a la página sub‐codificadas. REVEAL Revela u oculta las palabras ocultas. ◄◄ Retrocede rápidamente la reproducción. Avanza rápidamente la reproducción.. INDEX Accede a la página índice. SIZE Cambia la imagen visualizada en modalidad de teletexto. Retroceso Pista. CH- TEXT VOL+ CH+ VOL- HOLD INDEX SIZE TV/RADIO SUBPAGE REVEAL SUBTITLE REVEAL SUBPAGE SLEEP ZOOM D.SETUP TV/RADIO D.MENU TITLE D.DISPLAY FAV FAVREPEAT MEDIA MEDIA FAV+ GUIDE SUBTITLE REC REC Avance Pista. Pausa/Reproducción. Detiene la reproducción. ZOOM Ajusta la escena visualizada. MEDIA Púlselo para acceder al menú Multimedia. BOTONES DE COLORES Los botones de colores ( rojo, verde, amarillo y azul) se usan en algunos submenús. REPEAT Repite el siguiente título o capítulo. 12 Configuración de mando a distancia 1. Abra la tapa. 2. Use dos pilas AAA. Al insertarlas, asegúrese que la polaridad (+ o ‐) de los terminales se instala correctamente. 3. Vuelva a colocar la tapa. Coloque el mando a distancia en una superficie llana e inserte las pilas como se muestra en lo siguiente. 1. Empuje suavemente la tapa posterior para abrir la cubierta de pilas. 2. Inserte 2 pilas AAA, asegúrese de instalarlas con la polaridad correcta (+ o ‐ ) de los terminales. 3. Empuje suavemente la tapa posterior para cerrarla. 13 7. Operaciónde Menú Seleccionarla Fuente de Entrada HDMI1 HDMI2 HDMI3 ▼ Pulseel botón INPUT para visualizarla lista de fuente de entrada; Pulseel botón▼/ ▲ para accedera la la fuente de entrada deseada;Pulseel para entrar en la fuente de entrada. botón OKo el Menú de Imagen Pulseel botón MENU para visualizarel menú principal. Pulseel botón ▼/ ▲para seleccionar Picture en el menú principal, y luego pulse el botón OKo el para entrar. ▲ 1. Pulseel botón ▼/ ▲ para seleccionar la opción que usted quiere ajustaren el menú de Imagen,y luego pulse el botón OKo para entrar. 2. Pulseel botón ▼/ ▲para ajustar o pulse el botón ▼/ ▲para seleccionar. 3. Al terminar susajustes,pulseel botón MENUpara guardary volver al menú anterior, y luego pulse el botón EXITpara salir del menú por completo. Modalidad de Imagen Pulseel botón ▼ / ▲ para seleccionar PictureMode, y luegopulseel botón OKo el para entrar y pulse el botón▼/ ▲ para seleccionar.EnModalidadde Imagenpodrá seleccionarentre Estándar,Vivo, Suave,Óptimo y Usuario. 14 ▲ Puede a su vez modificar el brillo, el contraste, la nitidez y el color cuando la imagen está en la modalidad estándar.(Usted puede pulsar el botón PICTURE en el mando a distancia para cambiar directamente la modalidad de Imagen.) Brillo Pulse el botón ▼/▲ para seleccionar Brightness, y luego pulse el botón OK o el ► p ara entrar y pulse el botón ◄ / ► para ajustar. Contraste Pulse el botón▼/▲ para seleccionar Contrast, y luego pulse el botón OK o el ► p ara entrar y pulse el botón ◄ / ► para ajustar. Contrast ‐ + 50 Nitidez Pulse el botón▼/▲ para seleccionar Sharpness, y luego pulse el botón OK o el ► p ara entrar y pulse el botón ◄ / ► para ajustar. Color Pulse el botón▼/▲ para seleccionar Colour, y luego pulse el botón OK o el ► p ara entrar y pulse el botón ◄/ ► para ajustar. Matiz (No disponible en TDT) Pulse el botón ▼/▲ para seleccionar Tint, y luego pulse el botón◄ / ► para entrar y pulse el botón ◄ / ► para ajustar. Temperatura de Color Pulse el botón▼/▲para seleccionar Colour Temperature, y luego pulse el botón ◄/► para seleccionar estándar, cálido, frío. Reducción de Ruido Pulse el botón▼/▲para seleccionar Noise Reduction, y luego pulse el botón ▼/▲ para seleccionar entre Off, Low, Middle y High (Desactivado, Bajo, Medio y Alto). Reajustar Pulse el botón▼/▲para seleccionar Reset, y luego pulse el botón OK o el ►para entrar en el sub‐ menú de reajuste. 15 Menú de Sonido Pulse el botón MENU para visualizar el menú principal. Pulse el botón ▼/▲para seleccionar Sound en el menú principal, y luego pulse el botón OK o el ► para entrar. 1. Pulse el botón ▼/▲ para seleccionar la opción que usted quiere ajustar en el menú de Sonido, y luego pulse el botón OK o el►para entrar. 2. Pulse el botón ◄/ ►para ajustar o pulse el botón ▼/▲ para seleccionar. 3. Al terminar sus ajustes, pulse el botón MENU para guardar y volver al menú anterior, y luego pulse el botón EXIT para salir del menú por completo. Modalidad de Sonido Pulse el botón ▼ / ▲ button para seleccionar Sound Mode, y luego pulse el botón ◄/ ► para seleccionar. (Modalidades de sonido disponibles: Usuario, Discurso, Música, Película, Estándar) Puede cambiar el valor de agudos, bajos y balance cuando el sonido está en la modalidad de estándar. (Puede pulsar el botón SOUND en el mando a distancia para cambiarlos directamente.) Bass (disponible sólo en la modadlidad de Usuario) Pulse el botón▼/▲ para seleccionar Bass, y luego pulse el botón OK o el ► p ara entrar y pulse el botón ◄/► para ajustar. Triple (disponible sólo en la modalidad de Usuario) Pulse el botón▼/▲ para seleccionar Treble, y luego pulse el botón OK o el ► p ara entrar y pulse el botón ◄/ ► para ajustar. EQ/Balance/Surround Pulse el botón▼/▲ para seleccionar EQ/Balance/Surround, y luego pulse el botón OK o el ► p ara entrar y pulse el botón ◄/► para ajustar. Nivelación Automática del Volumen Pulse el botón▼/▲para seleccionar Auto Volume Level, y luego pulse el botón ◄/►para seleccionar On o Off. Reajuste Pulse el botón▼/▲para seleccionar Reset, y luego pulse el botón OK o el ► p ara entrar en el sub‐ menú de reajuste. 16 Menú Canal Pulse el botón MENU para visualizar el menú principal. Pulse el botón ▼/▲para seleccionar Channel en el menú principal, y luego pulse el botón OK o el ► para entrar. 1. Pulse el botón ▼/▲ para seleccionar la opción que usted quiere ajustar en el menú de Canal, y luego pulse el botón OK o el►para entrar. 2. Pulse el botón ◄/ ►para ajustar o pulse el botón ▼/▲ para seleccionar. 3. Al terminar sus ajustes, pulse el botón MENU para guardar y volver al menú anterior, y luego pulse el botón EXIT para salir del menú por completo. Gestión de los Canales Pulse el botón▼/▲para seleccionar Channel Management, y luego pulse el botón Ok o el ► para entrar. Gestión de los Favoritos Pulse el botón▼/▲para seleccionar Favorite Manager, y luego pulse el botón Ok o ► p ara entrar. País Pulse el botón▼/▲para seleccionar Country, y luego pulse el botón Ok o el ► p ara entrar y pulse el botón ▼/▲ para ajustar. Autobúsqueda Pulse el botón▼/▲para seleccionar Auto Search, y luego pulse el botón Ok o el ► para entrar. Búsqueda Digital Manual Pulse el botón▼/▲para seleccionar Digital Manual Search, y luego pulse el botón Ok o el ►para entrar. Búsqueda Analógica Manual Pulse el botón▼/▲para seleccionar Analogue Manual Search, y luego pulse el botón Ok o el ► para entrar. LCN Activo/Desactivo p ara entrar y Pulse el botón▼/▲para seleccionar LCN On/Off, y luego pulse el botón Ok o el ► pulse el botón ▼/▲ para ajustar. Menú de Opciones Pulse el botón MENU para visualizar el menú principal. Pulse el botón ▼/▲para seleccionar Opciones (Feature) en el menú principal, y luego pulse el botón p ara entrar. OK o el ► 17 1. Pulse el botón ▼/▲ para seleccionar la opción que usted quiere ajustar en el menú de Opción, y luego pulse el botón OK o el►para entrar. 2. Pulse el botón ◄/ ►para ajustar o pulse el botón ▼/▲ para seleccionar. 3. Al terminar sus ajustes, pulse el botón MENU para guardar y volver al menú anterior, y luego pulse el botón EXIT para salir del menú por completo. Control Parental Pulse el botón ▼/▲ para seleccionar Child Lock, y luego pulse el botón ◄/►para seleccionar On o Off(cuando el Bloqueo de Niños está activo, introduzca la contraseña por defecto 0000) Temporizador p ara entrar y Pulse el botón▼/▲ para seleccionar Sleep Timer, y luego pulse el botón OK o el ► pulse el botón ▼/▲ para seleccionar 15Mins, 30Mins, 45Mins, off, etc. Autoapagado Pulse el botón▼/▲para seleccionar Auto Power Off, y luego pulse el botón OK o el ► para entrar y pulse el botón ▼/▲ para seleccionar 1Hour, 2Hours, 3Hours, 4Hours y Off. Incapacidad auditiva Seleccione On/Off. Información de Tarjeta inteligente Visualiza la información de la tarjeta de interfaz común. MENU Return Menú de Configuración Pulse el botón MENU para visualizar el menú principal. Pulse el botón ▼/▲para seleccionar Setup en el menú principal, y luego pulse el botón OK o el ► para entrar. OK Enter 18 1. Pulse el botón ▼/▲ para seleccionar la opción que usted quiere ajustar en el menú de Configuración, y luego pulse el botón OK o el►para entrar. 2. Pulse el botón ◄/►para ajustar o pulse el botón ▼/▲ para ajustar. 3. Al terminar sus ajustes, pulse el botón MENU para guardar y volver al menú anterior, y luego pulse el botón EXIT para salir del menú por completo. Temporizador de OSD Pulse el botón ▼/▲para seleccionar OSD Timer, y luego pulse el botón OK o el ► p ara entrar y pulse el botón▼/▲ para ajustar. Auto SCART Seleccione On/Off. Configuración de PC (Selecione la fuente de PC) Auto Ajuste: Pulse el botón▼/▲ para seleccionar Auto Adjust, y luego pulse el botón ►, el menú aparecerá unos segundos después. Posición H: Pulse el botón▼/▲ para seleccionar H Position, y luego pulse el botón ► p ara entrar y pulse el botón ◄/ ►para ajustar. Ajustará la imagen horizontalmente. Position V: Pulse el botón▼/▲ para seleccionar V Position, y luego pulse el botón ► p ara entrar y pulse el botón ◄/ ►para ajustar. Ajustará la imagen verticalmente. Modalidad de HDMI p ara entrar y Pulse el botón▼ / ▲ para seleccionar HDMI Mode, y luego pulse el botón OK o el ► pulse el botón ▼/▲ para ajustar. Pantalla Azul Pulse el botón▼ / ▲ para seleccionar Blue Screen, y luego pulse el botón OK o el ► p ara entrar y pulse el botón ▼/▲ para seleccionar On/Off. Relación de Aspecto p ara entrar y Pulse el botón▼ / ▲para seleccionar Aspect Ratio, y luego pulse el botón OK o el► pulse el botón ▼/▲ para ajustar. Reconfiguración de TV Pulse el botón▼ / ▲ para seleccionar Reset TV Setting, y luego pulse el botón OK o el► p ara introducir la contraseña (Por defecto es 0000) el menú aparecerá (cuando el bloqueo de niños está activo). Auto‐instalación Pulse el botón ▼ / ▲ para seleccionar Auto Installation, y luego pulse el botón OK o el► para entrar en el menú de auto‐instalación. Actualización de Software Pulse el botón▼ / ▲para seleccionar Software Upgrade, y luego pulse el botón OK o el► para entrar en el menú de Actualización de Software. 19 Menú Multimedia Notas: Antes de operar el menú Multimedia, conecte el dispositivo USB y luego pulse el botón SOURCE para seleccionar Media como fuente. Pulse el botón ▼/▲ para seleccionar MEDIA en el Menú de Source, y luego pulse ENTER o ► p ara entrar. Usted también puede entrar en Media pulsando el botón MEDIA en el mando a distancia. Men ú de Foto Pulse el botón ▼/▲ para seleccionar Photo en el menú principal, y luego pulse el botón ENTER para entrar. Pulse el botón EXIT para volver al menú anterior. 1. Pulse el botón ▼ / ▲ para seleccionar la opción que usted quiere ajustar en el menú de Media, y luego pulse el botón ENTER o el►para entrar. 2. Pulse el botón ▼/▲ para ajustar o pulse el botón ▼ / ▲ para seleccionar. 3. Al terminar sus ajustes, pulse el botón MENU para guardar y volver al menú anterior, y luego pulse el botón EXIT para salir del menú por completo. o ► p ara visualizarlas. Pulse el botón ▼/▲para seleccionar fotos, pulse el botón ENTER o Puede leer la información de la foto que está en la reproducción después de pulsar el botón INFO, y luego pulse el botón para reproducir o pausar y ver el estado de reproducción a la derecha. Luego pulse el botón ▼/▲ o ◄ / ► para seleccionar la imagen. Notas: Otros menús y descripciones(Por ejemplo MENÚ PELICULA) son similares a este y se opera de la misma manera. 20 Menú de Música Pulse el botón ◄ / ► para seleccionar Music en el menú principal, y luego pulse el botón ENTER para entrar. Pulse el botón EXIT para volver al menú anterior. Pulse el botón▼/▲ para seleccionar lo que quiere escuchar y luego pulse el botón ENTER o p ara reproducir. o► Pulse el botón ◄ p ara volver al menú anterior. Usted puede leer la información de la canción que está en la reproducción a la izquierda del menú. 21 Menú de Película Pulse el botón ◄ / ► para seleccionar Movie en el menú principal, y luego pulse el botón ENTER para entrar. Pulse el botón EXIT para volver al menú anterior. Pulse el botón ▼/▲ para seleccionar la carpeta que usted quiere contemplar. Pulse el botón ENTER para seleccionar la sub‐carpeta. Andrew Sixty Unknown Pulse el botón ENTER o para reproducir. Pulse el botón o el EXIT para detener la reproducción. Pulse el botón ◄ para volver a la página anterior. Usted puede leer la información de la película que está en reproducción a los primeros segundos o después de pulsar el botón INFO. 22 Ebook Pulse el botón ◄ / ► para seleccionar Music en el menú principal, y luego pulse el botón ENTER para entrar. Pulse el botón EXIT para volver al menú anterior. Pulse ▼/▲ para seleccionar Video, pulse el botón ENTER o o ► p ara reproducir. Menú de PVR Pulse el botón ◄ / ► para seleccionar PVR en el menú principal, y luego pulse el botón ENTER para entrar. Pulse el botón EXIT para volver al menú anterior. Pulse ▼/▲ para seleccionar Video, pulse el botón ENTER o o ► p ara reproducir. Usted puede leer la información del vídeo que está en reproducción a los primeros segundos o después de pulsar el botón INFO. Luego pulse el botón para reproducir, y usted puede ver el estado de reproducción a la derecha. 23 Grabación (PVR) Grabacion Temporizada Presione ▼/▲ para seleccionar grabación (Recorder), luego pulse ENTER o ►para entrar y presione ▼/▲ para seleccionar grabación (Recorder) o Recordatorio (Reminder). Presione MENU para salvar la configuración y presione EXIT para salir. Presione ▼/▲ para seleccionar el canal que desea editar Presione la tecla AZUL para editar el canal seleccionado. El menú de edición de temporizador aparecerá Tipo Presione ▼/▲ para seleccionar el tipo de canal, pulse ENTER o ►para entrar y presione ▼/▲ para seleccionar TDT o Radio Programa Presione ▼/▲ para seleccionar el canal, pulse ENTER o ►para entrar y presione ▼/▲ para seleccionar el canal que desea añadir a la lista del temporizador. Hora Inicio Presione ▼/▲ para seleccionar hora de Inicio, pulse ENTER o ►para entrar y presione los botones del 0‐9 para introducir valores de tiempo deseado. Duración Presione ▼/▲ para seleccionar duración, pulse ENTER o ►para entrar y presione los botones del 0‐9 para introducir la duración deseada. Fecha Presione ▼/▲ para seleccionar Fecha, pulse ENTER o ►para entrar y presione los botones del 0‐9 para introducir la fecha deseada Modo Presione ▼/▲ para seleccionar Modo, pulse ENTER o ►para entrar y presione los botones ▼/▲para seleccionar entre: Una vez, diariamente, semanalmente o mensualmente. Lista Grabación Presione ▼/▲para seleccionar Lista Grabación, pulse ENTER o►para entrar y aparecerá la siguiente pantalla 24 Grabación en tiempo real En modo TDT, presione en el mando a distancia. Si la velocidad del dispositivo USB introducido no es suficiente, aparecerá el siguiente mensaje de aviso Lo recomendable es cambiar el dispositivo USB a uno de alta velocidad. De lo contrario puede presionar OK para continuar. en el mando a distancia de nuevo para empezar la grabación y se mostrará el siguiente Presione dialogo: ¿Desea iniciar la grabación? Seleccione OK para iniciar la grabación y verá el siguiente dialogo: 25 Durante la grabación, habrá una pequeña ventana de dialogo a la izquierda: Presione Presione en el mando a distancia para establecer el tiempo de grabación en el mando a distancia para detener la grabación. MODO HOTEL Para entrar en el modo hotel: 1.‐ Entre en menú de Fuentes (Source) teclee la contraseña numérica 4588 • EXIT: pulse la tecla MENU para volver a la página anterior. Utilice la tecla EXIT para salir del menú. • Use las flechas de dirección para seleccionar los diferentes elementos. • Pulse la tecla ENTER o la flecha de dirección derecha para confirmar. 26 1.Descripción de funciones en Modo Hotel MODO HOTEL ELEMENTO MODO HOTEL VOLUMEN MAX. VALOR FUNCIÓN Activado (ON) / Desactivado (OFF) Al activarse el Modo Hotel (ON), todas las demás funciones de la lista se activarán y podrán ajustarse. Activado (ON) / Desactivado (OFF) 50/60/…/100 Si se activa (ON) y se elige un valor máximo de volumen, el volumen de la unidad estará limitado a ese valor. Si se mantiene desactivado (OFF) el volumen máximo se puede establecer 100. hasta Por defecto este elemento viene desactivado (OFF) y el valor configurado es 50 VOLUMEN POR DEFECTO Activado (ON) / Desactivado (OFF) 10/20/30/…/100 Si se activa (ON) y se elige entre un valor de 10/20/30…/100 la unidad quedará configurada con el valor seleccionado. Si se desactiva (OFF) la unidad quedará configurada con el nivel de volumen establecido la última vez que se apagó la unidad y no puede exceder el máximo volumen permitido (100). Por defecto este elemento viene desactivado (OFF) y el valor establecido es 20 FORMATO (Aspect Ratio) Activado (ON) / Desactivado (OFF) Si se activa (ON) el FORMATO no podrá ser ajustado y permanecerá bloqueado en 16: 9. Si se desactiva (OFF) los diferente formatos estarán disponibles. Por defecto este elemento viene desactivado (OFF) BLOQUEO BÚSQUEDA CANALES Activado (ON) / Desactivado (OFF) BLOQUEO MODO IMAGEN Activado (ON) / Desactivado (OFF) Si se activa (ON) el usuario no podrá escanear ni buscar canales. Si se desactiva (OFF) el escaneo o búsqueda de canales estará disponible. Por defecto este elemento viene desactivado (OFF) Si se activa (ON) el usuario no podrá ajustar el brillo, contraste, matiz...etc. Si se desactiva (OFF) todos los ajustes de imagen disponibles. estarán Por defecto este elemento viene desactivado (OFF) 27 BLOQUEO MENÚ PRINCIPAL Activado (ON) / Desactivado (OFF) BLOQUEO TECLADO Activado (ON) / Desactivado (OFF) ENCENDIDO /STANDBY Activado (ON) / Desactivado (OFF) Si se activa (ON), los elementos del menú principal se bloquean y el OSD del menú principal se inutiliza. Si se desactiva (OFF) todos los elementos del Menú Principal estarán disponibles. Por defecto este elemento viene desactivado (OFF) Si se activa (ON), el teclado se bloquea y no se puede utilizar ninguna tecla del mismo. Si se desactiva (OFF) todos los elementos del teclado estarán disponibles. Por defecto este elemento viene desactivado (OFF) Si se activa (ON), la unidad se mantendrá en STANDBY una vez conectada a la corriente, hasta que se presione el botón de POWER. Si se desactiva (OFF) la unidad funcionará directamente. Por defecto este elemento viene desactivado (OFF) Desactivado FUENTE DE (OFF)/ATV/TDT/AV/H Activa (ON) o desactiva (OFF) las fuente que desee mostrar. ENCENDIDO DMI/YPBPR/SCART DESHACER BLOQUEO HOTEL Presione la flecha de dirección derecha para ejecutar esta opción. Todas las configuraciones de bloqueo establecidas se eliminarán y se volverá a los valores de fábrica BLOQUEO FUENTES BLOQUEO FUENTES Activado (ON) / Desactivado (OFF) Para usar esta opción, se debe primero activar (ON) el modo hotel. De lo contrario este elemento no podrá ser ajustado. Por defecto este elemento viene desactivado (OFF) ATV Activado (ON) / Desactivado (OFF) Este elemento se usa para bloquear la fuente TV Analógica. Si se activa (ON), esta fuente quedara oculta en el Menú de fuentes, imposibilitando al usuario acceder a ella. Por defecto este elemento viene desactivado (OFF) TDT Activado (ON) / Desactivado (OFF) Este elemento se usa para bloquear la fuente TDT. Si se activa (ON), esta fuente quedara oculta en el Menú de fuentes, imposibilitando al usuario acceder a ella. Por defecto este elemento viene desactivado (OFF) Activado (ON) / Desactivado (OFF) Este elemento se usa para bloquear la fuente SCART. Si se activa (ON), esta fuente quedara oculta en el Menú de fuentes, imposibilitando al usuario acceder a ella. Por defecto este elemento viene desactivado (OFF). Si la unidad tiene más de una fuente SCART, al activar esta opción se ocultaran todas Activado (ON) / Desactivado (OFF) Este elemento se usa para bloquear la fuente AV. Si se activa (ON), esta fuente quedara oculta en el Menú de fuentes, imposibilitando al usuario acceder a ella. Por defecto este elemento viene desactivado (OFF) Si la unidad tiene más de una fuente AV, al activar esta opción se ocultaran todas EUROCONECTOR (SCART) AV. 28 Activado (ON) / Desactivado (OFF) Este elemento se usa para bloquear la fuente COMPONENTES. Si se activa (ON), esta fuente quedara oculta en el Menú de fuentes, imposibilitando al usuario acceder a ella. Por defecto este elemento viene desactivado (OFF) Si la unidad tiene más de una fuente COMPONENTES, al activar esta opción se ocultaran todas HDMI Activado (ON) / Desactivado (OFF) Este elemento se usa para bloquear la fuente HDMI. Si se activa (ON), esta fuente quedara oculta en el Menú de fuentes, al usuario acceder a ella. imposibilitando Por defecto este elemento viene desactivado (OFF) Si la unidad tiene más de una fuente HDMI, al activar esta opción se ocultaran todas PC Activado (ON) / Desactivado (OFF) Este elemento se usa para bloquear la fuente PC. Si se activa (ON), esta fuente quedara oculta en el Menú de fuentes, imposibilitando al usuario acceder a ella. Por defecto este elemento viene desactivado (OFF) MULTIMEDIA Activado (ON) / Desactivado (OFF) Este elemento se usa para bloquear la fuente MULTIMEDIA. Si se activa (ON), esta fuente quedara oculta en el Menú de fuentes, imposibilitando al usuario acceder a ella. Por defecto este elemento viene desactivado (OFF) COMPONENTES 29 8. SOLUCIONES DE PROBLEMAS Y CONSEJOS Por favor, compruebe si usted es capaz de solucionar problemas por sí solo. Problema Sin señal Sin tonalidad Mancha en la pantalla Control Pudede ser debido a un señal de iluminación, tales como procedente de un coche, motor, luz de neón y otros dispositivos eléctricos o accesorios. Imagen nublosa Puede ser producida por alguna onda eléctrica que viene de otro TV, computadora, consola de videojuego o equipo de radio. Los cables de la antena no han sido conectados correctamente. Por favor, compruebe el orden y la alineación de las pilas. Compruebe que el transmisor IR del mando a distancia no está oculto. El mando a distancia no funciona. Ruido (silbido) procedente de la unidad. Ajuste el contraste, el color y el brillo. Imagen doble o múltiple Compruebe que todos los cables están conectados correctamente. Incluso si la imagen que se está reproduciendo es buena, el ruido puede venir de alguna fijación inestable del panel. Sin sonido Compruebe que usted no ha pulsado el botón MUTE del panel o del mando a distancia. 30 9. ESPECIFICACIONES Este manual sólo le sirve de referencia y las aviso. y las especificaciones están som Tamaño 29”(73.66cm) Tipo de Reproducción TFT LE D Resolución(Pixel) 1366x768 Relación de Aspecto 16:9 Fuente de Alimentación AC110-240V~ Consumo de Energía 50 W Sistema de TV PAL Formato de Entrada de Video PAL/NTSC Potencia de Salida de Audio L / R 2X8W ANTENA Sí AV-ENTRADA Sí YPbPr - ENTRADA Sí APOYO HDMI - ENTRADA Sí VGA(PC) - ENTRADA Sí VGA(PC) AUDIO - ENTRADA Sí SCART - ENTRADA Sí EARPHONE - SALIDA S-VIDEO - ENTRADA Sí -- COAXIAL - SALIDA -- INTERFAZ COMÚN Sí USB DVD das a cambios sin previo Formato Físico de Disco Sí -- Formato de Salida de Video -- En base a la Norma europea 2002/96/CE de Residuos de aparatos Eléctricos y Electronicos (RAEE), los electrodo cos viejos no puenden ser arrojados en los contenedores municipales habituales; enen que ser recogidos vamente para op mizar la recuperacion y el reciclado de los componentes y materiales que los , y reducir el impacto en la salud humana y el medio ambiente. El símbolo del cubo de basura tachado que se marca sobre el producto le recuerda al consumidor la obligación de separarlo para recogida sel va. Puede dañar el oído del usuario la prolongada volumen. del disposi vo de audio port l a todo La pantalla de LED es un producto de tecnología punta con aproximadamente un millón de finos transistores de película, lo que le proporciona una excelente definición de imagen. En ocasiones vos, como puntos fijos de color azul, verde pueden aparecer en la pantalla unos pocos píxeles i o rojo. Tenga en cuenta que esto no afecta al funcionamiento del aparato. Para dar cumplimiento a la Norma UNE EN- 60065, indicamos que si el cable flexible se o por un taller de reparación reconocido por el daña, únicamente puede ser fabricante NEVIR, S.A., ya que se necesitan herramientas especiales 31 NVR-7402-29HD-N NVR-7402-29HD-B 29” (73.66CM) DLED TV WITH HD DVBT USER MANUAL PVR Menu Hotel Mode 22 25 28 29 1.PREFACE Thank you for buying this TV ! Please read this manual thoroughly before operating the TV. Make sure the TV was not damaged in transit. Should the TV is damaged, do no install it and contact your dealer. Check that you have all the accessories according to the model. 2.SAFETY PRECAUTIONS Put the TV on a stable surface. Do not place any material on the TV. Minimum distances 10cm 10cm 20cm 5cm Do not use the TV with fixtures other than those provided or suggested by the manufacturer. Do not block or cover the ventilation openings on the TV. If you have a wall mount, check that it is steady. Power cord and cables must be properly routed and protected to prevent people from stepping on them and causing the TV to fall. Keep the TV dry and away from humidity. 2 Keep the TV away from heat sources. Unplug the TV before cleaning it. Do not use solvent or liquid to clean the TV. Only clean the TV with a soft and dry cloth. In case of troubleshooting, do not use spare parts other than those suggested by the manufacturer. Using inadequate spare parts can lead to electric shocks, short-circuits fire or other incidents. Unplug the TV during lightening storms or when unused for long periods of time. -Different types of batteries, new and used batteries should not be mixed. -The battery must be installed according to the polarity. -If the battery is worn, it must be removed from the product. -The battery must be disposed of safely. Always use the collection bins provided (check with your dealer) to protect the environment. -If the cord is damaged, have it repaired by the manufacturer, its service or a similarly qualified person in order to avoid any hazard. 1. An apparatus with CLASS I construction shall be connected to a MAINS socket outlet with a protective earthing connection. 2. Batteries (battery pack or batteries installed) shall not be exposed to excessive heat such as sunshine, fire or the like. 3. Where the MAINS plug is used as the disconnect device, the disconnect device shall remain readily operable. 4. To reduce the risk of fire or electric shock,do not expose this apparatus to rain or moisture. The apparatus shall not be exposed to dripping or splashing and that objects filled with liquids, such as vases, shall not be placed on the apparatus. WARNING:To prevent the spread of fire, keep candles or other open flames away from this product all times. 3 POWER MUTE P.MODE S.MODE AUTO DISPLAY NICAM AUDIO 1 2 3 5 6 7 9 0 0 TV MENU 4 PROGRAM 8 +10 -/-- LIST ASPECT EXIT GUIDE SOURCE SOURCE ZOOM ENTER OK CH- TEXT TV/RADIO VOL+ CH+ VOL- HOLD INDEX SIZE SUBPAGE REVEAL SUBTITLE REVEAL SUBPAGE SLEEP ZOOM D.SETUP TV/RADIO FAV D.MENU FAV- TITLE D.DISPLAY FAV+ GUIDE SUBTITLE REPEAT MEDIA MEDIA REC REC 1. HDMI :Connecting for HDMI signal. 2.SCART:Connected to the SCART output jack of VCR or DVD. 3.PC Audio :Connected to the audio output jack on a Personal computer. 4. VGA:Connected to the VGA output jack on apersonal computer. 5.CAOXIAL:Connecting for headphone. 6.RF In:Connected to external antenna to receive. 7.CI Port:Connect to the CI card. 8. YPbPr:Connecting for the Y/Pb/Pr Input in Component mode. 9. AV :Connecting for AV signal input inComposite mode. 10. USB:Connecting for USB device. COAX 1 2 3 4 5 6 7 8 9 10 5. TV INSTALLATION DRAWINGS Power Cord Connection DC12V IN - Connect the power cord correctly as shown. - Press the POWER switch of your LED TV to switch on the LED TV. The power indicator on the front panel lights up in Green or Blue. Antennas Connection VHF ANTENNA UHF ANTENNA OUTDOOR ANTENNA AMPLIFIER RF IN INDOOR ANTENNA AMPLIFIER POWER PLUG ANTENNA AMPLIFIER 75 OHM ANTENNA PLUG OF To ensure good picture and sound, TV antenna system needs to be installed. The antenna system as Shown can be soured from TV equipment shops, which will provide service for correct installation and connection. After installation, insert the 75-ohm antenna plug into the antenna jack as shown. 6 HDMI Connection TV Back HDMI Cable DVD or VCR Back DVD or VCR The HDMI input connection enables the digital transfer of audio/video/control signals through one cable only. VGA Connection TV Back Audio Cable VGA Cable Audio PC OUTPUT Connect the RGB output of the PC to the VGA jack on the set. Connect the AUDIO output of the PC to the PC AUDIO jack on the set . Select the VGA input source with using INPUT button on the remote control. 7 USB Connection COAX TV Back USB Port Insert the USB flash drive to the USB port. Select USB channel source via the SOURCE button on the remote control. SCART Connection TV Back Scart Cable DVD or VCR Back DVD or VCR Connect the SCART connector to the external video item and the SCART connector on the tv. The SCART lead operates as an Input/Output connection. If the tv does not select the SCART input automatically, select SCART using the INPUT button on the remote control or tv. Earphone Connection Earphone COAX TV Back Connect to earphone. 8 AV Connection COAX TV Back AUDIO input connector Video cable (RCA) R L VIDEO Mini video transfer cable R L VIDEO DVD or VCR back DVD or VCR Connect the VIDEO and AUDIO output jack of the DVD or VCR to the VIDEO jacks on the TV set using the RCA cable. Match the jack colors: Video is yellow, Audio left is white, and Audio right is red. Select the AV input source via the SOURCE button on the remote control. YPbPr Connection COAX TV Back AUDIO input connector Video Cable (RCA) VIDEO L R AUDIO input Connector Y Pb Pr Mini video transfer cable Y Pb Pr L R DVD or VCR back DVD or VCR Connect the YPbPr output of the DVD or VCR to the YPbPr input on the TV set. Connect the Audio output of the DVD or VCR to the Audio input jacks on the TV set using the RCA cable. Match the jacks colors : Y is green, Pb is blue, Pr is red, Audio left is white and Audio right is red. Select Component input source via the SOURCE button on the remote control. 9 POWER MUTE P.MODE S.MODE AUTO DISPLAY NICAM AUDIO 1 2 3 4 5 6 7 8 9 0 -/-- TV MENU EXIT GUIDE SOURCE ENTER -/-- CH- TEXT VOL+ CH+ VOL- HOLD INDEX SIZE REVEAL SLEEP SUBPAGE ZOOM TV/RADIO FAV FAV- FAV+ SUBTITLE REPEAT MEDIA REC POWER MUTE P.MODE S.MODE AUTO DISPLAY NICAM AUDIO 1 2 3 4 5 6 7 8 9 0 -/-- TV MENU EXIT GUIDE SOURCE ENTER CH- TEXT VOL+ CH+ VOL- HOLD INDEX SIZE REVEAL SLEEP SUBPAGE ZOOM TV/RADIO FAV FAV- FAV+ SUBTITLE REPEAT MEDIA REC POWER MUTE P.MODE S.MODE AUTO DISPLAY NICAM AUDIO 1 2 3 4 5 6 7 8 9 0 -/-- TV MENU EXIT GUIDE SOURCE ENTER CH- TEXT VOL+ CH+ VOL- HOLD INDEX SIZE REVEAL SLEEP SUBPAGE ZOOM TV/RADIO FAV FAV- FAV+ SUBTITLE REPEAT MEDIA REC 7. Menu Operation Select Input Source HDMI1 HDMI2 HDMI3 Press INPUT button to display the input source list; Press ▼/▲ button to select the input source you want to watch; Press OK button or ► button to enter the input source; Picture Menu Press MENU button to display the main menu. Press ▼ / ▲ button to select Picture in the main menu, then press OK button or ► button to enter. ► Picture Picture Mode Standard Brightness 50 Contrast 50 Picture Sound Channel Feature Sharpness 5 Colour 50 Tint 50 Colour Temperature Standard Noise Reduction Middle ► ► ► ► ► ► ► ► Setup ► Move Enter ok Enter Exit Exit MENU Return 1. Press ▼/▲ button to select the option that you want to adjust in the Picture menu, then press OK button or ► button to enter. 2. Press ◄/► button to adjust or press ▼/▲ button to select. 3. After finishing your adjustment, Press MENU button to save and return back to the previous menu, and press EXIT button to exit the entire menu. Picture Mode Press ▼ / ▲ button to select Picture Mode, then press OK button or ► button to enter and press ▼/▲ button to select. Picture mode: Standard, Vivid, Soft, Optimal, User). You can change the value of brightness, contrast, sharpness, colour, when the picture is in Standard mode.(You can press PICTURE button on the remote control to change the Picture Mode directly.) Brightness Press ▼/▲ button to select Brightness, then press OK button or ► button to enter and press◄/► button to adjust. 14 Contrast Press ▼/▲ button to select Contrast, then press OK button or ►button to enter and press◄ / ► button to adjust. - Contrast + 50 Sharpness Press ▼/▲ button to select Sharpness, then press OK button or ► button to enter and press◄/► button to adjust. Colour P r e s s ▼ / ▲ b u t t o n t o s e l e c t C o l o u r, t h e n p r e s s O K b u t t o n o r ► b u t t o n t o e n t e r a n d p r e s s ◄ / ► b u t t o n to adjust. Ti n t ( N o t a v a i l a b l e i n D T V ) P r e s s ▼ / ▲ b u t t o n t o s e l e c t Ti n t , t h e n p r e s s ◄ / ► b u t t o n t o e n t e r a n d p r e s s ◄ / ► b u t t o n t o a d j u s t . C o l o u r Te m p e r a t u r e P r e s s ▼ / ▲ b u t t o n t o s e l e c t C o l o u r Te m p e r a t u r e , t h e n p r e s s ◄ / ► b u t t o n t o s e l e c t s t a n d a r d , w a r m , cool. Noise Reduction P r e s s ▼ / ▲ b u t t o n t o s e l e c t N o i s e R e d u c t i o n , t h e n p r e s s ◄ / ► b u t t o n t o s e l e c t O f f , L o w, M i d d l e , High. Reset Press ▼/▲ button to select Reset, then press OK button or ► button to enter to reset sub-menu. Sound Menu Press MENU button to display the main menu. Press ▼ / ▲ button to select Sound in the main menu, then press OK button or ► button to enter. Sound Sound Mode Standard Bass 50 Picture Sound Channel Treble 50 EQ ENTER Balance 0 Surround Off Feature AVL Off Reset ENTER ► ► ► ► ► ► ► ► Setup Move Enter ok Enter Exit Exit MENU Return 1. Press ▼/▲ button to select the option that you want to adjust in the Sound menu, then press OK button or ► button to enter. 2. Press ◄/► button to adjust or press ▼/▲ button to select. 3. After finishing your adjustment, Press MENU button to save and return back to the previous menu, and press EXIT button to exit the entire menu. Sound Mode Press ▼/▲ button to select Sound Mode, then press ◄/► button to select. (Available Sound mode: User, Speech, Music, Movie, Standard). You can change the value of bass and treble, Balance, when the sound is in Standard mode. TIPS: You can press SOUND button on the remote control to change the Sound Mode directly. Bass(Avaliable just in USER Mode) Press ▼/▲ button to select Bass, then press OK button or ► button to enter and press ◄/► button to adjust. 15 Tr e b l e ( A v a l i a b l e j u s t i n U S E R M o d e ) P r e s s ▼ / ▲ b u t t o n t o s e l e c t Tr e b l e , t h e n p r e s s O K b u t t o n o r ► b u t t o n t o e n t e r a n d p r e s s ◄ / ► b u t t o n to adjust. EQ/Balance/Surround P r e s s ▼ / ▲ b u t t o n t o s e l e c t E Q / Balance/Surround , t h e n p r e s s O K b u t t o n o r ► b u t t o n t o e n t e r a n d press ◄/► button to adjust. AV L P r e s s ▼ / ▲ b u t t o n t o s e l e c t A u t o Vo l u m e L e v e l , t h e n p r e s s ◄ / ► b u t t o n t o s e l e c t O n o r O f f . Reset Press ▼/▲ button to select Reset, then press OK button or ► button to enter to reset sub-menu. Channel Menu Press MENU button to display the main menu. Press ▼/▲ button to select Channel in the main menu, then press OK button or ► button to enter. Channel Picture Channel Management ENTER Favorite Management ENTER Country Hungary Sound Channel Auto Search ENTER Digital Manual Search ENTER Analogue Manual Search ENTER LCN On/Off On Feature ► ► ► ► ► ► ► Setup Move Enter ok Enter Exit Exit MENU Return 1. Press ▼/▲ button to select the option that you want to adjust in the Channel menu, then press OK button or ► button to enter. 2. Press ◄/► button to adjust or press ▼/▲ button to select. 3. After finishing your adjustment, press MENU button to save and return back to the previous menu, and press EXIT button to exit the entire menu. Channel Management P r e s s ▼/▲ b u t t o n t o s e l e c t C h a n n e l M a n a g e m e n t , t h e n p r e s s O K b u t t o n o r ► b u t t o n t o e n t e r. Favorite Manager P r e s s ▼ / ▲ b u t t o n t o s e l e c t F a v o r i t e M a n a g e r, t h e n p r e s s O K b u t t o n o r ► b u t t o n t o e n t e r. Country P r e s s ▼ / ▲ b u t t o n t o s e l e c t C o u n t r y, t h e n p r e s s O K b u t t o n o r ► b u t t o n t o e n t e r a n d p r e s s ▼/▲ button to adjust. Auto Search P r e s s ▼ / ▲ b u t t o n t o s e l e c t A u t o S e a r c h , t h e n p r e s s O K b u t t o n o r ► b u t t o n t o e n t e r. Digital Manual Search P r e s s ▼ / ▲ b u t t o n t o s e l e c t D i g i t a l M a n u a l S e a r c h , t h e n p r e s s O K b u t t o n o r ► b u t t o n t o e n t e r. Analogue Manual Search P r e s s ▼ / ▲ b u t t o n t o s e l e c t A n a l o g u e M a n u a l S e a r c h , t h e n p r e s s O K b u t t o n o r ► b u t t o n t o e n t e r. L C N O n / O ff P r e s s ▼/▲ b u t t o n t o s e l e c t L C N O n / O f f t h e n p r e s s O K b u t t o n o r ► b u t t o n t o e n t e r a n d p r e s s ▼/▲ button to adjust. 16 Feature Menu Press MENU button to display the main menu. Press ▼/▲ button to select Feature in the main menu, then press OK button or ► button to enter. Feature Picture Sound Channel Child Lock ENTER Language ENTER Clock ENTER Sleep Timer Off Auto Power Off Off Hearing Impaired Off CI Info ENTER PVR ENTER Feature ► ► ► ► ► ► ► ► Setup Move Enter ok Enter Exit Exit MENU Return 1. Press ▼/▲ button to select the option that you want to adjust in the Feature menu, then press OK button or ► button to enter. 2. Press ◄/► button to adjust or press ▼/▲ button to select. 3. After finishing your adjustment, Press MENU button to save and return back to the previous menu, and press EXIT button to exit the entire menu. Child Lock P r e s s ▼/▲ b u t t o n t o s e l e c t C h i l d L o c k , t h e n p r e s s ◄ / ► b u t t o n t o s e l e c t O n o r O f f ( w h e n t h e d e f a u l t child lock is on, please input the default password“0000”). S l e e p Ti m e r P r e s s ▼/▲ b u t t o n t o s e l e c t S l e e p T i m e r , t h e n p r e s s O K o r ► e n t e r a n d p r e s s ▼/▲ b u t t o n t o s e l e c t t h e 1 5 M i n s , 3 0 M i n s , 4 5 M i n s , O ff . . . e t c . . A u t o P o w e r O ff P r e s s ▼/▲ b u t t o n t o s e l e c t A u t o P o w e r O f f , t h e n p r e s s O K o r ► e n t e r a n d p r e s s ▼/▲ b u t t o n t o select the 1Hour, 2Hours,3Hours, 4Hours and Off. Hearing Impaired Select the On/Off. CI Info Display the Common Interface card information. Setup Menu Press MENU button to display the main menu. Press ▼/▲ button to select Setup in the main menu, then press OK button or ► button to enter. Setup 10 Seconds OSD Timer Picture Sound Channel Feature Auto SCART On PC Steup ENTER HDMI Mode Under Scan Blue Screen Off Aspect Ratio 16:9 Reset TV Setting ENTER Auto Installation ENTER Setup Move OK Enter MENU Return EXIT Exit 17 1. Press ▼/▲ button to select the option that you want to adjust in the Setup menu, then press OK button or ►button to enter. 2. Press ◄/► button to adjust or press ▼/▲ button to adjust. 3. After finishing your adjustment, Press MENU button to save and return back to the previous menu, and press EXIT button to exit the entire menu. O S D Ti m e r P r e s s ▼/▲ b u t t o n t o s e l e c t O S D Ti m e r, t h e n p r e s s O K o r ► e n t e r a n d p r e s s ▼/▲ b u t t o n t o a d j u s t . A u t o S C A RT Select the On/Off. PC Setup(Select the source in PC) Setup Auto Adjust Picture ENTER H Position 50 V Position 50 Phase 50 Clock 50 Sound Channel Feature Setup Move OK Enter MENU Return EXIT Exit Auto Adjust: Press ▼/▲ button to select Auto Adjust, then press ► button, the menu will appear a few second. H Position: Press ▼/▲ button to select H Position, then press ► button to enter and press ◄/► button to adjust. Adjusts the picture horizontally. V Position: Press ▼/▲ button to select V Position, then press ► button to enter and press ◄/► button to adjust. Adjusts the picture vertically. HDMI Mode P r e s s ▼ / ▲ b u t t o n t o s e l e c t H D M I M o d e , t h e n p r e s s O K o r ► e n t e r a n d p r e s s ▼/▲ b u t t o n t o a d j u s t . Blue Screen P r e s s ▼ / ▲ b u t t o n t o s e l e c t B l u e S c r e e n , t h e n p r e s s O K o r ► e n t e r a n d p r e s s ▼/▲ b u t t o n t o s e l e c t O n / O ff . Aspect Ratio P r e s s ▼ / ▲ b u t t o n t o s e l e c t A s p e c t R a t i o , t h e n p r e s s O K o r ► e n t e r a n d p r e s s ▼/▲ b u t t o n t o a d j u s t . Reset TV Setting Press ▼ / ▲ button to select Reset TV Setting, then press OK button or ► button enter the password menu will appear(when the child lock is on). Auto Installation Press ▼ / ▲ button to select Auto Installation, then press OK button or ► button to enter the auto installation menu. Software Upgrade Press ▼ / ▲ button to select Software Upgrade, then press OK button or ► button to enter the software upgrade menu. 18 Music Menu Press ◄/► button to select Music in the main menu, then press ENTER button to enter. Press EXIT button to return back to the previous menu. Press ▼/▲ button to select the sonny you want to listen, and then press ENTER or to play. Press ◄ button to return back to the previous menu. You can see the information of the current playing sonny at the left of the menu. 20 or ► button Ebook Press ◄/► button to select Music in the main menu, and then press ENTER button to enter. Press EXIT button to return back to the previous menu. Press ▼/▲ to select the Video, press ENTER or button or ► button to play. PVR Menu Press ◄/► button to select PVR in the main menu, then press ENTER button to enter. Press EXIT button to return back to the previous menu. Press ▼/▲ to select the Video, press ENTER or button or ► button to play. You can see the information of the current video playing at the first few seconds or after press INFO button. Then press button to play, you can see the playing state in the right. Notes: Other menu and description are the same as that for Movie menu. 22 [ ] button or / . MENU / ,p / . , , . / / / button / . / 0-9 Durat ion 0-9 / Dat e 0-9 / M ode / / , , , Then w ill appear as / Follow s: 23 24 Hotel Mode Enterenter the hotel mode menu 1. Press password "4588" under the source menu. Exit:Press the Key“MENU”to return to the previous pageand press the key "EXIT" to exit the menu Selectuse direction key to select the different items. confirmPress the key “ENTER”or right direction key to confirm. Hotel Mode 1 2 Hotel Mode Adj Hotel Mode Max Volume Off Off 50 On 20 Off Off Off Off Off Off Off Default Volume Aspect Ratio Lock Channel Scan Lock Picture User Lock Main Menu Lock Keypad Lock Power On Standby Power On Source Clear Hotel Lock Hotel Mode 1 2 Source Lock Source Lock TV DTV SCART AV Component HDMI PC Media Off Off On On On On On On On 25 2.Function description of hotel mode: REGLAGES MODE HOTEL Items Value Hotel Mode On/off On/off 50/60/.../100 Max Volume Default Volume On/off 10/20/30/.../100 Function On/off If set to “On”, the next functions in the list will be activate or adjustable. If set to “On” and choose a Max volume value, the volume value which the user want to adjusted is limited to this value. If set to “Off”, the volume value which the user want to adjusted is limited to 100. The default value is Off. This item’s default value is 50. If set it “On” and Select one of 10/20/30…./100 except Off, then TV will output the Selected value. If Off, then TV will output the value of the Default Volume last shutdown after boot-strap. And the volume value can not exceed the maximum volume setting. The default is Off. This item’sdefault value is 20. Aspect Ratio Lock On/off If set to “On”, the “ASPECT” can not be adjusted and which is locked on “16:9”. If set to “Off”, all aspect items is effective. The default value is Off. Channel Scan Lock On/off If set to “On”, then the user can’t scan or search the TV. If set to“Off”, Channel Scan item is effective. The default is Off. On/off If set to “On”, the user can’t adjust brightness,contrast, tone,definition etc. picture mode. If set to “Off”, all picture mode items is effective. The default is Off. On/off If set it to “On”, the button of main menu is locked, then the OSD of main menu is useless. If set to “Off”, main Menu item is effective. The default is Off. On/off If set to “On”, the keypad is locked, then the user can not using anyone button on the keypad. If set to “Off”, all keypad items is effective. The default is Off. On/off If set to “On” the TV will keep Standby after get Power until the “POWER” button be pressed. If set to “Off”, the TV will direct work on. The default is Off. Picture User Lock Main Menu Lock Keypad Lock Power On standby Power on source Clear Hotel Lock Off/ATV/DTV/ AV/SV/HMDI/ YPbPr/SCART If one of TV/AV/PC except Off is selected, and then TV will show the SOURCE item when boot-strap. If “Off” item is Selected, and then TV will show the SOURCE item last shutdown after boot-strap. The defaultvalue is Off . Press right direction key to execute. All user' lock setting will be clear and reset to default value after executing this. 26 Source Lock Source Lock On/off To use this setting, user must firstly set the hotel mode to "on", otherwise this item can not be adjustable. If this item is set to "on" the next sources lock will be actived.the default value is off. TV On/off This item is used to set TV source lock, if set toon , ATVsource will be hide in the source menu. And user can not enter ATV source. The default value is off. DTV On/off This item is used to set DTV source lock, if set to on, DTV source will be hide in the source menu. And user can not enter DTV source. The default value is off. On/off This item is used to set SCART source lock, if set to on, SCART source will be hide in the source menu. And user can not enter SCART source. The default value is off. If there is one more SCART source, then all SCART source will be locked after set this item on. On/off This item is used to set AV source lock, if set to on, AV source will be hide in the source menu. And user can not enter AV source. The default value is off. If there is one more AV source, then all AV source will be after set this item on. On/off This is used to set Component source lock, if set to on, Component source will be hide in the source menu. And user can not enter Component source. The default value is off. If there is one more Component source, then all Component source will be locked after set this itemon. On/off This item is used to set HDMI source lock, if set to on, HDMI source will be hide in the source menu. And user can not enter HDMI source. The default value is off. If there is one more HDMI source, then all HDMI source will be locked after set this item on. On/off This item is used to set PC source lock, if set to on, PC source will be hide in the source menu. And user can not enter PC source. The default value is off. On/off This item is used to set Media source lock, if set to on, Media source will be hide in the source menu. And user can not enter Media source. The default value is off. SCART AV Component HDMI PC Media 27 8. TROUBLESHOOTING AND ADVICE Please check if you can solve the troubleshooting by yourself. Troubleshooting Control No signal Please check that all cables are correctly plugged in. No color shades Adjust the contrast, the color and the brightness. Stain show on the screen Maybe result from a lighting signal from car, motor, neon light and other electrical devices or appliances. Double or multiple display image Maybe the result of an electrical wave disturb from other TV, Computer and Game machine or Radio Snow on the screen The cables of the antenna are not correctly plugged in. The remote control does not work Please check the batteries order and alignment.Check that the IR of the remote control is not hidden by something. "Zip" made noise on TV cover Even if the display image is correct, the noise may come from an unsteady fixation of the panel. No sound Make sure that you have not press the MUTE button of the panel or of the remote control. 28 9. SPECIFICATIONS This manual is only for your reference, any change to the design and specification will not be advised. Size 29”(73.66cm) Display Type TFT LE D Resolution(Pixel) 1366x768 Aspect Ratio 16:9 Power Supply AC110-240V Power Consumption 50W TV System PAL Video Input Format PAL/NTSC Audio Output Power L / R 2X8 W SUPPORT DVD ANTENNA YES AV-IN YES YPbPr - IN YES HDMI - IN YES VGA(PC) - IN YES VGA(PC) AUDIO - IN YES SCART - IN YES EARPHONE - OUT YES S-VIDEO - IN -- COAXIAL - OUT -- COMMON INTERFACE YES USB Disc Physical Format YES -- DVD Video Output Format -- The European directive 2002/96/EC on Waste Electrical and Electronic Equipment (WEEE), requires that old household electrical appliances must not be disposed of in the normal unsorted municipal waste stream. Old appliances must be collected separately in order to optimize the recovery and recycling of the materials they contain, and reduce the impact on human health and the environment. The crossed out “wheeled bin” symbol on the product reminds you of your obligation, that when you dispose of the appliance, it must be separately collected. At full volume, prolonged listening to the portable audio device may damage the user’s hearing. The LED panel is a very high technology product with a about a million thin film transistors, giving you fine picture details. Occasionally, a few non-active pixels may appear on the screen as fixed blue, green or red point. Please note that this does not affect the performance of your product. Warning! Do not leave your TV in standby or operating mode when you leave your house. 29 DECLARACIÓN DE CONFORMIDAD NEVIR, S.A. declara bajo su responsabilidad que el aparato indicado cumple los requisitos de las siguientes directivas: DIRECTIVA EMC LOW VOLTAGE DIRECTIVA EEC 2004/108/EC 2006/95/EC Descripción del aparato: Televisor LED 29” (73.66 centímetros) con TDT HD Modelo NEVIR: NVR-7402-29HD-N NVR-7402-29HD-B Importador: NEVIR, S.A. Dirección del importador: Nevir S.A. C/ Canteros, 14 Parque Empresarial Puerta de Madrid 28830 San Fernando de Henares - Madrid