1
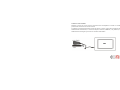
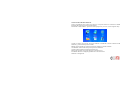
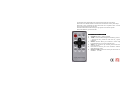
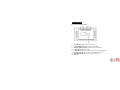
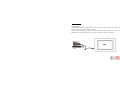
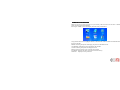
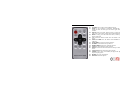
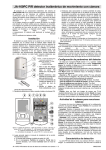
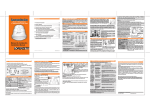
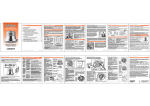
MARCO DIGITAL 7”
NVR-2303MD
MANUAL DE INSTRUCCIONES
OPERATING INSTRUCTIONS
Introducción
Enhorabuena por la compra de nuestro Marco Digital
Antes de empezar a manejar la unidad, por favor lea cuidadosamente este manual y consérvelo para
futuras referencias. Este manual le ayudará a usar todas y cada una de las excitantes funciones disponibles
para conseguir el máximo disfrute de Su Marco Digital
Este Marco Digital le da la posibilidad de ver fotos digitales directamente desde la tarjeta de memoria de
su cámara. Usted también podrá crear su propia fotogalería con efectos variados. No necesita conexión a
ordenador, cámara digital o Internet
El Marco Digital Multimedia es compatible con los siguientes formatos de tarjetas de memoria: SD,
MMC y también vía USB.
Precaución y mantenimiento
● Para uso exclusivo en espacios interiores
● Para evitar riesgos de fuego o descarga eléctrica no exponga la unidad a condiciones de humedad
● Para evitar sobrecalentamiento: no tape los orificios de ventilación situados en la parte posterior de la
unidad.
● Mantenga su Marco Digital alejado de la luz solar. La exposición directa a la luz solar puede dañar la
unidad
● Use siempre el botón “eject” situado en el espacio destinado a la tarjeta de memoria para sacar la
tarjeta.
● No desmantele la unidad. Puede existir riesgo de descarga eléctrica y no encontrará ninguna de las
funciones de la unidad en el interior de la misma. Desmantelar la unidad anulará la garantía.
● No use el Marco Digital en condiciones que puedan generar condensación, para evitar un posible daño
a la misma.+
Compatibilidad
Su Marco Digital es compatible con las siguientes tarjetas de memoria
Tarjeta de Seguridad Digital (SD)
Tarjeta Multimedia (MMC)
Puerto USB
Evite presionar con fuerza la tarjeta de memoria o el USB en su ranura. Si usted no puede insertar la
tarjeta de memoria o el USB fácilmente, quizás se deba a que ha intentado introducirla de la manera
incorrecta.
Vista lateral del Marco Digital
●DC (+5V): Entrada para el adaptador de corriente
●SD/MMC Card: Ranura para conectar la tarjeta de memoria SD/MMC
●Puerto USB: Para conectar un pendrive USB
Overview
Botones de control y
1.
2.
3.
4.
5.
6.
7.
8.
función:
ENTER : Confirmar / Pausa / Play
FLECHA DIRECCIÓN IZQUIERDA: Mover hacia la izquierda / Siguiente foto
FLECHA DIRECCIÓN DERECHA: Mover hacia la derecha/ Foto anterior.
MENU: Ir a Menu.
FLECHA HACIA ARRIBA: Mover hacia arriba / Ajustar transición, velocidad y Brillo.
FLECHA HACIA ABAJO: Mover hacia abajo / Girar foto en sentido de las agujas de reloj.
STANDBY: Standby / ON/OFF.
SOPORTE
Comenzar a usar la unidad
Ensamble el soporte en la parte trasera de la unidad. Inserte el adaptador de corriente a la unidad para
posteriormente conectarlo a la toma de corriente.
La pantalla se encenderá mostrando la imagen que aparece en la foto: (aparecerán las imágenes que estén
automáticamente almacenadas). Si inserta una tarjeta de memoria (SD/MMC) o un pendrive (USB) la
unidad mostrará las imágenes que en ellas se encuentren almacenadas.
DPF
COMO USAR SU MARCO DIGITAL
Tenga la seguridad de tener al menos una imagen en su tarjeta de memoria e insértela en la unidad. Una
fotogalería de imágenes aparecerá automáticamente
Presionando el botón “MENU” aparecerá el menú principal tal y como se ve en la imagen de abajo
Usando las flechas de dirección seleccione: PHOTO/ CALENDAR/ CLOCK/ FILES/ FAVORITE/
SETTING y posteriormente presione ENTER
PHOTO: Seleccionando esta opción aparecerán sus imágenes en formato reducido.
CALENDAR: Seleccionando esta opción aparecerá el calendario.
CLOCK: Seleccionando esta opción aparecerá el reloj.
FILES: Seleccionando esta opción aparecerá la lista de archivos.
FAVORITE: Muestra las imágenes guardadas en la memoria interna.
SETTING: Configuración
Copiar y Borrar fotos
El Marco Digital tiene una pequeña memoria interna para almacenar unas cuantas fotos.
Para copiar fotos:
Vaya al Menú principal.
Usando las flechas direccionales, Seleccione el icono de la foto y pulse ENTER.
Todas sus fotos aparecerán en formato reducido.
Usando de nuevo las flechas direccionales, seleccione la foto deseada y presione ENTER. La foto
aparecerá en la pantalla.
Para copiar la foto en el menú principal, presione una vez el BOTÓN MENU.
Aparecerá un texto pidiéndole que presione OK para confirmar o MENU para cancelar.
Presionando ENTER, la foto se copiará desde su tarjeta de memoria a la memoria interna de la unidad.
Hay dos maneras de borrar las fotos desde la memoria interna comenzando desde el menú principal:
Borrando todas las fotos:
Usando las flechas direccionales, seleccione el icono de favoritos (FAVORITE) y presione
ENTER.
Hay dos opciones: “Format” y “Photo”.
Asegúrese que la opción “Format” esté seleccionada y presione ENTER.
Presionando ENTER de nuevo todas las fotos de la memoria interna se borrarán.
Borrando fotos individuales_
Usando las flechas direccionales, seleccione el icono de archivos (FILES) y presione ENTER.
Seleccione bien “internal memory” o SD/MMC
Selecciones la carpeta llamada “DATA” y presione ENTER
Un listado de fotos almacenadas en la memoria interna aparecerá en la imagen
Seleccione la foto deseada usando los botones direccionales hacia arriba y hacia abajo
Seleccione la foto presionando la flecha direccional de la izquierda. Junto al nombre del
archivo aparecerá una marca de selección
Presione la flecha direccional derecha para que aparezca una lista de opciones
Seleccione DELETE y presione ENTER
Funciones del Mando a distancia
1.
2.
3.
4.
5.
6.
POWER: Encender y apagar la unidad.
TIME: Con la función de fotogalería automática, presione TIME
y aparecerá la hora, presione el botón otra vez y aparecerá el
calendario.
PHOTO: Presione PLAY para comenzar a mostrar imágenes.
Presionando de nuevo se active la función pausa.
MENU: Con la función stop activada, presione este botón para
entrar en el menú.
UP: Botón de función para mover elementos seleccionables
desde abajo hacia arriba.
SELECT CARD: Presione este botón para seleccionar la tarjeta
SD/MMC o el USB
7.
8.
9.
10.
11.
12.
13.
14.
15.
LEFT SHIFT: Cursor direccional hacia la izquierda.
ENTER: Confirmación de su elección.
RIGHT SHIFT: Cursor direccional hacia la derecha
PAGE UP: Presione este botón para seleccionar un archivo previo.
DOWN: Botón de función para mover elementos seleccionables desde arriba hacia abajo
PAGE DOWN: Presione este botón para ir al siguiente archivo.
SPEED: botón de ajuste de la velocidad de las imágenes.
MODE: Formato de pantalla
ROTATE: Girar imagen
“Para dar cumplimiento a la Norma UNE EN-60950, indicamos que si el cable flexible se daña,
únicamente puede ser sustituido por un taller de reparación reconocido por el fabricante NEVIR, S.A., ya
que se necesitan herramientas especiales”
Especification
Tipo
Marco Digital de 7 pulgadas
Resolución
480x234
Alimentación
5V 1000MA
Consumo
5Watts
Temperatura de funcionamiento
-20 to +65 grados
Luminosidad
200cd/m2 max.
Contraste
300:1
Modo
16 :9 / 4:3
Formato de Archivo
JPEG
Tamaño de Foto
10 Mega Pixels
Corriente
AC100—240V (50Hz—60Hz)
Tarjetas
SD/MMC/USB
Contenido
Marco Digital, AC/DC adaptador de corriente, Guía de
Usuario
Introduction
Congratulations on your purchase of our Digital Photo Frame.
Before operating the unit, please read this manual thoroughly and keep it for future reference. This
manual will help you use many of the exciting features to make your Digital Photo Frame more
enjoyable.
This Digital Photo Frame enables you to view digital pictures directly from your cameras memory card.
You can also create a slide show with multiple transition effects. No computer, digital camera, or internet
connection is required.
The Multimedia Digital Photo Frame is compatible with the following memory card formats: SD, MMC
card and USB Host.
Precautions and Maintenance
●For indoor use only
●To avoid risks of fire or electric shock; do not expose this appliance to moisture.
●To avoid overheating; do not block the ventilation holes on the back of the unit at any time.
●Keep your Multimedia Digital Photo Frame out of sunlight .Direct sunlight may cause damage.
●Always use the eject buttons on the memory storage card slots to remove the memory storage cards.
●Do not dismantle the unit. There is a risk of electric shock, and there are no user serviceable parts inside.
Dismantling your Digital Photo Frame will void your warranty.
●Do not use the Digital Photo Frame if conditions could allow condensation to occur, or damage may
result.
Compatibility
Your Digital Photo Frame is compatible with the following memory cards:
Secure Digital Card (SD)
Multimedia Card (MMC)
USB Stick
Does not force the memory card or USB stick in the slot. If you are not able to easily insert the memory
card or USB stick completely, you may have inserted it in a wrong way.
Digital Photo Frame (DPF) Side view
●DC (+5V): The input for the DC power adapter.
●SD/MMC card: The socket to connect the SD/MMC memory card.
●USB Host: The socket connects to with the USB stick.
Player Overview
Key control and Key function:
9.
10.
11.
12.
13.
14.
15.
16.
ENTER BUTTON: Confirm / Pause / Play
LEFT SHIFT BUTTON: Move Left / Next Photo
RIGHT SHIFT BUTTON: Move Right/ Previous Photo.
MENU BUTTON: Show Menu.
UP BUTTON: Move Up / Adjust Transition, Speed and Brightness.
DOWN BUTTON: Move Down / Rotate Photo Clockwise.
STANDBY BUTTON: Standby or power ON/OFF.
Bracket.
Getting started
Getting started
Assemble the Digital Photo Frame bracket to prop the unit up. Insert DC adapter plug into the unit first,
then plug the power cord to a standard wall outlet.
Then the screen will display as below: (Will play the pictures automatically stored). If you insert an
SD/MMC card or USB Stick, then the unit will play the pictures in the card / USB stick.
DPF
Using your Digital Picture Frame
Make sure you have at least one picture on your memory card and insert it into the unit. A slideshow of
photos will be displayed automatically.
Pressing the “MENU” button will display the main menu pictured below.
Using the directional arrows highlight PHOTO/ CALENDAR/ CLOCK/ FILES/ FAVORITE/ SETTING
then press ENTER
PHOTO: Selecting this option will display your photos in thumbnail format.
CALENDAR: Selecting this option will display the calendar.
CLOCK: Selecting this option will display the clock.
FILES: select this option to view your files in list format.
FAVORITE: Displays the photos saved on the internal memory.
SETTING: Displays a list of parameters
Copying and Deleting Photos
The digital photo frame has a small amount of internal memory to store a few photos. In order to copy
photos:
Enter the main menu
Using the directional arrows, highlight the Photo Icon and press ENTER
All your photos will be displayed in thumbnail format
Using the directional arrows highlight the desired photo and press ENTER. The photo will then be
displayed
In order to copy the photo to the main menu press the ENTER button once
Text will appear asking you to press OK to confirm and MENU to cancel
Pressing ENTER will copy the photo from your memory card to the internal memory.
There are two ways to delete photos from the internal memory starting at the main menu:
Deleting All Photos:
Using the directional arrows, highlight the Favorite Icon and press ENTER.
There are two options “Format” and “Photo”
Ensure “Format” is highlighted and press ENTER
Pressing ENTER again will delete all the photos in the internal memory.
Deleting individual photos:
Using the directional arrows, highlight the Files Icon and press ENTER.
Select either Nor flash (internal memory) or SD/ MMC
Highlight the folder entitled “DATA” and press ENTER
A list of photos saved on the internal memory will be displayed
Highlight the desired photo using the up and down directional arrows.
Select the photo by pressing the left directional arrow. A check mark will appear next to the
file name.
Press the right directional arrow to bring up a list of options.
Highlight “DELETE” and press ENTER
Remote Controller Function Introduction
16.
17.
18.
19.
20.
21.
22.
23.
24.
25.
26.
27.
28.
29.
30.
POWER: This is used to turn ON/OFF the player.
TIME: In the condition of slideshow automatically, press
TIME will show the Time, press the button again will show
calendar.
PHOTO: Press the PLAY button directly to begin playback
under stop or pause status, and the pause will pause playback.
MENU: At stop, press this button into menu, in menu you can
choose menu item.
UP: Functional selection button from the button to the top
cursor.
SELECT CARD: Press the button select SD/MMC card or
USB play .
LEFT SHIFT: Left cursor selecting function.
ENTERN: Confirm that what you choose.
RIGHT SHIFT: Right cursor selecting function.
PAGE UP: Press the button select prev file.
DOWN: Functional selection button from the top to the button
cursor.
PAGE DOWN: Press the button select next file.
SPEED: In play state, press SPEED, the player will adjust in
the picture play speed.
MODE: Set screen Aspect Ratio.
ROTATE: Rotate the picture.
Specification
Type
7 inch Digital Picture Frame
Resolution
480x234
Alimentation
5V 1000MA
Consumption
5Watts
Working Temperature
-20 to +65 degrees
Luminosity
200cd/m2 max.
Contrast
300:1
Display Mode
16 :9 / 4:3
File Format
JPEG
Photo Size
10 Mega Pixels
Current
AC100—240V (50Hz—60Hz)
Cards
SD/MMC/USB
Package Contents
Digital Picture Frame, AC/DC Adapter, User Guide
In order to fulfill ruling UNE EN-60950, we indicate that if the flexible wire is damaged, it can only be substituted by a technical service
recognized by NEVIR, S.A., as per special tooling is required.
DECLARACIÓN DE CONFORMIDAD
NEVIR, S.A.
declara bajo su responsabilidad que el aparato indicado cumple los requisitos de las
siguientes directivas:
LOW VOLTAGE DIRECTIVA EEC
DIRECTIVA EMC
EN 55022:2006
EN 60950-1:2006.
EN 61000-3-2:2006;
EN 61000-3-3:1995+A1:2001+A2:2005;
EN 55024:2002 + A1:2003+A2:2005.
Descripciones del aparato:
Modelo NEVIR: NVR-2303MD Marco Digital
Importador: NEVIR, S.A.
Dirección del importador: NEVIR, S.A. c/ ALFONSO GOMEZ, 40 MADRID 28037 ESPAÑA