1
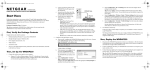
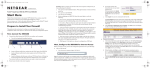
WN604 IG 26July11.fm Page 1 Tuesday, July 26, 2011 6:00 PM
Installation Guide
NETGEAR® Wireless N150 Access Point WN604
Follow these instructions to set up your WN604 access point. You can also click the
documentation links on the Resource CD or the NETGEAR knowledge base at
http://kbserver.netgear.com. Refer to the Resource CD or click the Documentation
link on the user interface to access the Installation Guide for instructions on
advanced configuration options.
7. Power socket.
c. Connect the Ethernet cable from the access point to the PC.
d. Securely insert the other end of the
cable into the access point Ethernet
port.
e. Connect the power adapter from the
access point to an AC power outlet.
8. Power On/Off.
9. Ethernet ports.
10. Reset factory defaults.
2.
Note: Connect your access point using only
the power adapter provided with the access
point.
A login window displays.
Estimated completion time: 20 minutes.
Tip: Before mounting the access point in a high location, first set up
and test the unit to verify wireless network connectivity.
Package Contents
The NETGEAR® Wireless N150 Access Point WN604 contains the following:
•
•
•
•
•
•
Wireless access point
Ethernet cable
Power adapter
Vertical stand feet (2)
Installation Guide
Resource CD
Set Up the Access Point
1.
Connect the access point to your computer:
a. Unpack the box and verify the contents.
b. Prepare a computer with Internet access and an Ethernet adapter. If this
computer is already part of your network, record its TCP/IP configuration
settings. Configure the computer with a static IP address of 192.168.0.210
and subnet mask of 255.255.255.0. See the Reference Manual for more
detailed instructions.
Configure LAN and wireless access.
a. Configure the access point Ethernet port for LAN access. Connect to the
access point by opening your browser and entering http://192.168.0.100 in
the address field.
123
4
56
7 8
9
10
1. Power (green/amber): The green power LED should be lit. If the Power LED
is not lit, check the connections and check to see if the power outlet is controlled
by a wall switch that is turned off. If the LED is blinking, a firmware upgrade is in
process. If the LED is amber, the access point is performing a self-test.
2. WPS (green): The WPS LED blinks green when there is WPS activity
3. WLAN (blue): The WLAN LED is on steady when the wireless access point is
running. The LED blinks when there is wireless activity. If the LED is off, the
wireless is turned off.
4. LAN (green/amber): A green LAN LED indicates 100 Mbps speed. An amber
LAN LED indicates 10 Mbps speed. Blinking indicates activity.
5. Wireless On/Off: Turns the wireless radio on or off.
6. WPS button: Push to automatically configure settings.
b. When prompted, enter admin for the
user name and password for the
password, both in lower case letters.
c. The NETGEAR® Wireless N150
Access Point WN604 user interface
displays.
d. Select Wireless Settings under the Setup menu on the left navigation pane
and configure your wireless interface for wireless access.
e. Under Security, select WEP/WPA Settings and configure the level of data
encryption security for your network.
See the online help or the online reference manual for full instructions.
f. In the left navigation pane under Setup, select Basic Settings,and
configure the IP settings for your network.
Note: If you change the default sub net of the LAN IP address, you will be
disconnected from the ProSafe Wireless N150 Access Point WN604 user
interface. To reconnect, reconfigure your computer with a static IP address within
the new LAN IP sub net.
Tip: Before you deploy your access point, reserve an IP address
(based on the WN604’s MAC address) on the DHCP server. That way,
you can configure the access point with a static IP address that you can
always use to log in to make future configuration changes.
WN604 IG 26July11.fm Page 2 Tuesday, July 26, 2011 6:00 PM
Deploy the WN604
The LAN LED is not lit.
Now that you have finished the setup steps, you are ready to deploy the access
point in your network. If necessary, you can now reconfigure the PC you used in
step 1 back to its original TCP/IP settings.
•
1.
Disconnect the access point from the computer and place it where you will
deploy it. The best location is elevated, such as a wall, ceiling, or the top of a
cubicle. The access point should be placed near the center of your wireless
coverage area and within line of sight of all the mobile devices.
2. Connect an Ethernet cable from your access point to a LAN port on your
router, switch, or hub.
3. Connect the power adapter to the access point and plug the power adapter into
an AC power outlet. The Power, WLAN, and LAN LEDs should light up.
Verify Wireless Connectivity
Before installing in a remote location, use a computer with an 802.11g, 802.11b, or
802.11n wireless adapter and verify connectivity. Use a browser such as
Netscape®, Internet Explorer, or Mozilla Firefox® to connect to the Internet, and
check for file and printer access on your network.
There is a hardware connection problem.
•
Make sure that the cable connectors are securely plugged in at the access point
and the network device (hub, switch, or router).
Make sure that the connected device is turned on.
The WLAN LED is not lit.
Technical Support
•
Thank you for selecting NETGEAR products.
If the WLAN activity LED stays off, disconnect the adapter from its power source
and then plug it in again.
Contact NETGEAR if the WLAN LED remains off.
Check these items:
After installing your device, locate the serial number on the label of your product and
use it to register your product at http://www.NETGEAR.com/register. Registration is
required before you can use the telephone support service. Registration through the
NETGEAR website is strongly recommended.
•
Go to http://support.netgear.com for product updates, documentation, and support.
•
I cannot configure the access point from a browser.
•
The access point is properly installed and it is powered on. Check that the LAN
port LED is green to verify that the LAN connection is OK.
If your PC uses a fixed (static) IP address, ensure that it is using an IP address
in the range of the WN604. The WN604 default IP address is 192.168.0.100
and the default subnet mask is 255.255.255.0. The access point default setting
is for a static IP address. If the network where you are connecting it is using
DHCP, configure it accordingly. See the reference manual on the Resource CD
for more details.
Note: The factory default reset button and the default settings for your access
point are located on the label at the rear of your access point.
I cannot access the Internet or the LAN with a wireless capable
computer.
Here are some tips for correcting simple problems you might have.
No LEDs are lit on the access point.
The access point has no power.
Confirm that the network is connected to the Internet. The problem could be with the
router and not with the access point.
•
There is a configuration problem. Check these items:
•
Make sure that the power supply is connected to the access point and plugged
in to a working power outlet or power strip.
Make sure that you are using the NETGEAR power supply provided with your
access point.
July 2011
•
The access point’s default values might not work with your network. Check the
access point default configuration against the configuration of other devices in
your network.
For full instructions on changing the access point’s default values, click the
documentation links on the Resource CD or on the menu of the WN604 access
point user interface.
The access point’s antennas are not working.
Note: If you cannot connect, see the Troubleshooting Tips in this guide or the link
to the reference manual on the Resource CD.
Troubleshooting Tips
•
•
•
You might not have restarted the computer with the access point to have TCP/IP
changes take effect. Restart the computer.
The computer with the wireless adapter might not have the correct TCP/IP
settings to communicate with the network. Restart the computer and check that
TCP/IP is set up correctly for that network. The usual setting for Windows in the
Network Properties is “Obtain an IP address automatically.”
For additional information about setting up, configuring, and using your ProSafe
Wireless N150 Access Point WN604, see the reference manual.
For complete DoC please visit the NETGEAR EU Declarations of Conformity
website at: http://support.netgear.com/app/answers/detail/a_id/11621/
For GNU General Public License (GPL) related information, please visit
http://support.netgear.com/app/answers/detail/a_id/2649
WARNING!!
DO NOT stack equipment, or place equipment in tight spaces, or in drawers. Be
sure your equipment is surrounded by at least 2 inches of air space.
This symbol was placed in accordance with the European Union Directive 2002/96 on the Waste
Electrical and Electronic Equipment (the WEEE Directive). If disposed of within the European Union,
this product should be treated and recycled in accordance with the laws of your jurisdiction
implementing the WEEE Directive.
NETGEAR, the NETGEAR logo, and Connect with Innovation are trademarks and/or registered trademarks of
NETGEAR, Inc. and/or its subsidiaries in the United States and/or other countries. Information is subject to
change without notice. Other brand and product names are registered trademarks or trademarks of their
respective holders. © 2011 NETGEAR, Inc. All rights reserved.