1
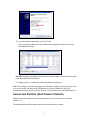
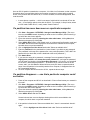
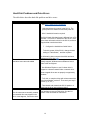
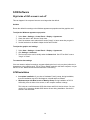
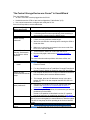
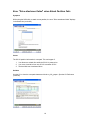
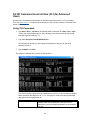
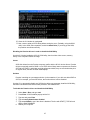
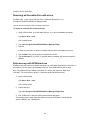
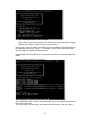
NETGEAR SC101 - Revised Troubleshooting Guide
Update the SC101 firmware and SCM utility to the latest version, found here.
Warning! Use the power adapter that came with the SC101. Other adapters, such as laptop
power adapters, may destroy the hard disks!
Viewing and Accessing Drives............................................................................................ 3
Troubleshooting Tips....................................................................................................... 3
Windows Disk Management Unallocated Partitions....................................................... 3
Cannot See Partition (Old Firmware Problem)....................................................................7
If a partition has never been seen on a particular computer............................................ 8
If a partition disappears — one that a particular computer could see before.................. 8
Cannot Create a Mirror........................................................................................................ 9
Prerequisites..................................................................................................................... 9
Check LED Lights (URL Link)................................................................................. 10
Check Cables............................................................................................................. 10
Check the Drive Partition...........................................................................................10
Hardware............................................................................................................................ 11
LED Indicators............................................................................................................... 11
D-Link or FritzBox Routers........................................................................................... 11
LAN Connection............................................................................................................ 12
Defragmenting............................................................................................................... 12
Hard Disk Problems and Drive Errors........................................................................... 13
SCM Software....................................................................................................................14
Right side of GUI screen is cut off................................................................................ 14
SCM Installation............................................................................................................ 14
Error Messages...................................................................................................................15
List of Error Messages............................................................................................... 15
“No Central Storage Device was Found” in SmartWizard............................................ 16
SmartSync Pro Activation Error.................................................................................... 18
Error "Drive attachment failed" when Attach Partition Fails........................................ 19
About the SC101................................................................................................................ 20
System Requirements.....................................................................................................20
What operating systems cannot be used?...................................................................20
Heat and the SC101....................................................................................................... 20
Does vertical disk mounting affect disk life?............................................................ 20
SC101 and Heat Generation.......................................................................................20
How does heat affect the Storage Central performance?........................................... 21
SC101 Performance....................................................................................................... 21
1
Self-certifying File System (SFS).................................................................................. 22
New Technology File System (NTFS).......................................................................... 22
SAN and Network Attached Storage (NAS)................................................................. 22
SC101 Command Line Interface (CLI) for Advanced Users............................................ 23
Using CLI Commands................................................................................................... 23
Command: ut_full getpart.............................................................................................. 25
Fixing Corrupted Characters.......................................................................................... 25
Removing an Unusable Drive with ut.exe..................................................................... 28
Data recovery with SFSExtract.exe............................................................................... 28
2
Viewing and Accessing Drives
Troubleshooting Tips
Problem
SC101 drives disappear from the
network
Solution
Detach and reattach the drives from the SC101,
or
A shared drive attached with one
computer does not show on other
computers.
SC101 occasionally drops off
wireless network
Restart the network as described in "When using the
SC101, restart your network in this order".
This doesn't happen automatically. Use the "Attach Drive"
feature on each computer to attach the drive to it.
To maintain a wireless connection, a small amount of data
throughput must be available. The SC101 may drop off
when operating at the extreme limits of wireless range.
NETGEAR may release firmware shortly which needs even
less throughput.
Windows Disk Management Unallocated Partitions
This section explains what to do if you have created partitions with the SC101, but they show the
unallocated partition attribute in Windows Disk Manager.
Use the Windows Disk Management Utility to work around an unallocated partition. Review the
following procedure and be sure to follow these steps exactly as they are listed below. This
procedure is not a fix.
To use Windows Disk Management Utility for the Unallocated Partition workaround
1. Click Start->Run. Type diskmgmt.msc and click OK.
2. This command launches the Windows Disk Management Utility which should look like the
screenshot below. If your disk is “Basic” then proceed to Step 4. If your disk is “Unknown”
then continue to Step 3.
3
The blue volume above represents a known working partition and the black volume
represents the non-working partition that the following steps will fix.
3. Right click the red circle, select Initialize Disk, and click Next to continue.
4. Right click the black unallocated portion of your volume. Select New Partition and click
Next.
4
5. Select Primary partition and click next.
6. Leave Partition size in MB at the maximum or default value.
5
7. Select the default “Assign the following drive letter” and click next.
8. VERY IMPORTANT – DO NOT FORMAT THIS PARTITION should be selected.
Formatting the partition from Disk Manager will result in loss of user data.
9. STOP! Do not click the Finish button until you read this screen’s selected setting’s output
and have confirmed that your File System reports None.
6
10. If your File System reports None, then click Finish.
Once you have selected Finish, your partition should change from black to blue in the
Disk Management Utility.
Example: Seagate1 and Seagate2 are both SC101 volumes and do not list a file system type
under the column titled “File System”.
11. Reboot your PC to complete the Unallocated Partition workaround.
Note: If a partition is attached and shows up in Windows Explorer with a drive letter, but
can’t be accessible, then the utility SFSExtract.exe which is bundled in the SCM
installation package can help to get the data out. See Data Recovery with SFSExtract.exe.
Cannot See Partition (Old Firmware Problem)
Upgrade to the latest version of the firmware and utility: Firmware version 4.19.0 and SCM
version 1.5.6.
The situation described in this article resolves a problem with earlier versions.
7
Once an SC101 partition is attached to a computer, it is visible in a file browser on that computer.
Sometimes there is a small delay before the computer recognizes it is there and the partition
shows. If the partition does not show at all, or if it once showed, but now has disappeared, then
read this article.
•
In some places a partition — which is one area of a disk which is sectioned off from the
rest — is confusingly called a drive with the SC101. For example, in Step 3 below, where
the GUI reads "Attach Drive", it really means "Attach Partition".
If a partition has never been seen on a particular computer
1. Click Start > Programs > NETGEAR > Storage Central Manager Utility. (The menu
item may read SCM, instead, depending on what version is installed.) Some time will go
by before the next screen appears.
2. Ignore the automatic update by selecting the other radio button, clicking Next, then
dismissing the popup by clicking No.
3. Select Attach Drive (either in the Wizard mode, or in Advanced Configuration mode) and
click Next. Wait till the window displays the drives which are available to the computer,
but which have not yet been attached.
4. Click to highlight one of the drives listed under "Select an available drive".
5. Enter the password for the partition/drive. Leave it blank if you didn't set any password
(The password in this step is the password for a one particular partition. This is NOT the
password for the whole disk, which is defaulted to the word "password".)
6. Click Attach Drive.
7. If you enter the wrong drive password, a message "Incorrect password" appears.
Highlight the partition, and reenter the correct password. If you forget the password,
you can reset it to blank by clicking Reset Drive Password. If you do this, you are asked
for the SC101 administrative password — be aware that you cannot cancel out of this
screen, and if you click Exit, the Wizard will close, and you'll have to repeat the above
steps. Once the partition is successfully attached to a computer, it disappears from the
list of attachable partitions.
8. On each computer that will access the SC101, repeat the above steps.
If a partition disappears — one that a particular computer could
see before
1. Power off the computer and SC101 as described in “Power off and restart your network in
this order”.
2. Click Start > Programs > NETGEAR > Storage Central Manager Utility. (The menu
item may read SCM, instead, depending on what version is installed.) Some time will go
by before the next screen appears.
3. Ignore the automatic update by selecting the other radio button, clicking Next, then
dismissing the popup by clicking No.
4. Select Attach drives and then click Next.
Several minutes later a screen displays showing drives which are available to the
computer, but which have not yet been attached.
5. If the partition is listed under "Select an available drive", then it is not attached. Attach it
again:
i. Click to highlight one of the drives listed under "Select an available drive".
8
ii.
Enter the password for the partition/drive.
Leave it blank if you did not set a password. The password in this step is the
password for a one particular partition. This is NOT the password for the whole
disk, which is defaulted to the word "password".
iii.
iv.
Click Attach Drive.
If you enter the wrong drive password, a message "Incorrect password" appears.
Highlight the partition, and reenter the correct password. If you forget the
password, you can reset it to blank by clicking Reset Drive Password. If you do
this, you are asked for the SC101 administrative password — be aware that you
cannot cancel out of this screen, and if you click Exit, the Wizard will close, and
you'll have to repeat the above steps. Once the partition is successfully attached
to a computer, it disappears from the list of attachable partitions.
6. If the partition appears on the Broken Drive screen then the partition is broken (for
example, a broken mirror if one disk is removed) and needs to be removed using the
"Delete Broken Drive" button on that screen.
7. If the partition still does not show in either the "Manage Drive", "Attach Drive" or "Broken
Drive" screens, then there are two methods to resolve it, the first method is easiest and
safest.
o
o
o
o
o
Method 1: Uninstall the SCM, then reinstall it. All partitions will need to be
reattached again.
Method 2: Alternatively, edit the Windows registry. Don't do this unless you
have experience registry editing. Mistakes can cause the operating system
to stop working.
Microsoft explains the purpose of the registry in this article.
It's advised to back up the registry before changing it manually. The process is
described in this Microsoft article.
NETGEAR IS NOT RESPONSIBLE FOR PROBLEMS CAUSED BY EDITING
THE REGISTRY !
a. Start the registry editor.
b. Select HKEY_LOCAL_MACHINE\Software\ZNS\Client. There
should be multiple sub-entries under Client.
c. Highlight the sub-entry in the left pane which shows in the right
pane the name of the missing partition as "UserDefinedString"
and click Delete.
d. Confirm to remove this key ( Make sure you do not delete the
Client key itself, only the sub-key with the missing partition
name)
e. Quit the registry editor.
f. Reboot the computer. The partition now shows in the "Attach
Drive" screen.
g. Attach the partition again.
Cannot Create a Mirror
Prerequisites
•
The SC101 has two disk drives installed.
9
•
•
•
•
•
Hard drives are on the Drive Compatibility List.
Hard Drives must be ATA6 or above (Parallel ATA) and configured as “Cable Select”
(CS).
The Power LED light must light up solid green.
The DHCP Server must be present.
Use a wired PC to configure/modify the SC101 (see diagram).
Also check the following:
•
Do not use a drive that was formatted on a PC. The data will not be usable on the
SC101, and may be corrupted, even if you do not explicitly overwrite the PC partitions.
You cannot mirror a drive that uses the format of another operating system. The drive
must be completely reformatted (destroying all previous data) with the SC101 file system
through the Storage Central Manager Utility (SCM).
•
Make sure no other network users are connected to the SC101 during the mirroring
process. This may slow or kill the mirroring process. If the drives are attached or shared
on a network, detach and unshare these drives before mirroring. It is normal for the
mirroring to take a long time to complete.
Check LED Lights (URL Link)
1. Confirm that there is an Ethernet link, if not, check your Ethernet cable.
2. Look for the blinking patterns on the green LED to see whether they are correct.
If the green LED flashes 3 times, something is wrong with the DHCP server and the SC101
cannot obtain an IP address.
Check Cables
1. Confirm that IDE and power cables on the drives are firmly connected.
2. Confirm that the Ethernet cable is firmly attached. When the SC101 detects a cable
disconnection and reconnection, it will reboot automatically.
Check the Drive Partition
1. Make sure that you partitioned the drive. Use the UT commands to see a list of all the
partitions that you have created. (See Using CLI Commands.)
2. If you only see the root partition, create a new partition.
3. Confirm that the mirrored drive has space to do the mirror. The mirrored drive must have
at lest as much partition space as the drive that is it mirroring.
4. Do the mirroring process through a wired connection, not a wireless one.
10
Hardware
LED Indicators
This table describes how the SC101 LEDs work.
Light
Light State
What It Means
All lights off
Off
SC101 has no power or
it is not plugged in
Red disk light
Green power
status light
What You Should Do
•
Check if plug has power
•
Plug in the SC101
Off
There is no disk activity Normal state, do nothing
On
There is disk activity
Normal state, do nothing
Off
Self-test is not finished
Normal state, do nothing
On
SC101 is working
normally
Normal state, do nothing
Fast constant
blinking
No working hard drives
are inserted
Power off the SC101, insert working
hard drive
•
1 blink at
Error on disk 1
intervals (rare)
•
•
If operation continues normally, do
nothing.
Back up the disk or replace it
because disk errors may lead to
some unreadable files.
If operation continues normally, do
nothing.
Back up the disk or replace it
because disk errors may lead to
some unreadable files.
2 blinks at
Error on disk 2
intervals (rare)
•
3 blinks at
intervals
DHCP network
addressing problem
See the User Manual on DHCP
4 blinks at
intervals
An older, incompatible
disk is inserted
Power off the SC101, replace disk with
ATA6 IDE disk or newer
Disconnected cable
Check Ethernet cable connection
Off
Yellow
Ethernet status
On
light
Blinking
No data is being
Normal state, do nothing
transferred over network
Data is being
Normal state, do nothing
transferred over network
D-Link or FritzBox Routers
•
•
D-Link router continuously reboots: To fix this, upgrade the SC101 firmware to level
4.14.0.
FritzBox: Upgrade the router to FRITZ!Box Fon WLAN 7050 new firmware 14.03.88
(Released on 10/28/05). Periodically check the FritzBox Web site to download new
firmware for their products.
11
LAN Connection
When the Ethernet cable is disconnected, the SC101 reboots. It takes 2 minutes for the SCM
to recognize it again, or longer if many partitions are defined.
Defragmenting
The SC101 uses a SAN File System (SFS), and includes its own defragmenter. For the SC101's
own defragmenter to work properly — and as with any hard disk, to avoid poor performance —
leave 10% free space on each disk or drive. (Remember, the SC101 uses the word drive to mean
what is usually called a disk partition.)
You do not need to defragment the drives, or to use other Windows utilities such as
chkdsk.
12
Hard Disk Problems and Drive Errors
The table below describes hard disk problems and drive errors.
Hard Disk Problem
Hard disk does not work
Action
1. See SC101 Hard Drive Compatibility.
Older disk drives do not work in the SC101. The
green power LED flashes 4 times after power on.
2. SC101 hard disk format is required.
The SC101 hard disk data format is different from a PC
hard disk. To move a PC hard disk to the SC101, back
up the data, reformat the drive for the SC101, and then
copy the data onto the hard drive.
1. Configure the hard disk as Cable Select.
To do this, power off the SC101, change the disk
setting to “Cable Select," and then repower.
Errors: “Unable to enumerate drive”,
and drive letter cannot be added
For information about computer hard disk Interfaces,
and types of ATA, click here.
This is a Windows issue. Even though the drive is
already mapped, Windows returns whatever letter it
thinks is the next highest.
1. Use Windows Explorer to see if a letter drive is
mapped to a shared network folder or network drive.
These mapped drives are not properly recognized by
Windows.
2. To fix this, re-map the drives with a letter toward the
end of the alphabet, such as Z. Then work your way in
reverse, (Y, X, W...).
Unusable drive
If a drive was not successfully created,
an unusable drive may appear in the
GUI. If this happens, remove the drive.
3. Then detach and re-attach the SC101 partition. It
should get the drive letter without problem.
You can use the DOS utility ut.exe from the Command
Line Interface to remove a disk drive. See the CLI
section of this document for instructions.
13
SCM Software
Right side of GUI screen is cut off
This can happen if the computer fonts are set to larger than the default.
Solution
Return the default font settings to the Windows appearance properties and the graphics card.
To adjust the Windows appearance properties
1.
2.
3.
4.
Select Start > Settings > Control Panel > Display > Appearance.
Check the value in the "Scheme" drop down.
See if the scheme name ends with the words "(large)" or has a name that you gave it.
Set the font back to the default. Adjust the font and click OK.
To adjust the graphic card settings
1. Select Start > Settings > Control Panel > Display > Appearance.
2. Click Settings > Advanced.
3. The font size for the card is usually under the General tab. See if "Font Size" is set to
"Large" or "Other".
To customize font settings
If the user wants to adjust font settings, suggest adjusting the font in only one place (either the in
Appearance or the graphics card). This is a more reliable method for the whole computer, not just
the SC101 GUI. Note that Web browsers also have a font setting.
SCM Installation
•
•
Incomplete installation. If you close a “Hardware Found” prompt, during installation,
then the installation may fail. If this happens, uninstall and then reinstall.
Windows stops with Blue Screen or Memory Dump. During installation of SC101
SCM utility, there is either a blue screen, or the computer crashes or hangs.
This is due to a conflict between SCSI disk drivers and SC101 device drivers. You can
use the CLI to temporary disable SCSI device drivers during installation. See the CLI
section in this document.
14
Error Messages
List of Error Messages
The table below lists error messages for the SC101.
Error Message
Meaning and Action
can’t resolve hostname to IP address
can’t resolve hostname to IP address
Mirroring error, see SmartSync Pro Activation
Error
Mirroring error, see SmartSync Pro Activation
Error
SmartWizard error, see “No Central Storage
Device was Found” in SmartWizard
SmartSync Pro Activation Error
Error occurred during activation
SmartSync Pro Activation Error
Drive attachment failed
Attach partition failed. See Error "Drive
attachment failed" when Attach Partition Fails.
See Hard Disk Problems and Drive Errors.
Error occurred during activation
No Central Storage Device was Found
Unable to enumerate drive
15
“No Central Storage Device was Found” in SmartWizard
First, check these items:
• At least 1 hard disk must be plugged into the SC101.
• Hard disks must be ATA6 or later, and configured as "Cable Select" (CS).
• Use a wired connection to configure and modify the SC101.
If there is still a problem, see the table below.
No Central Storage
Device was Found
Check the Power LED.
Action
•
•
Was the computer or
SC101 recently
rebooted?
•
•
•
•
Are the Microsoft
Security, Socketwatch,
or Socketlock utilities
installed?
Which firewall is
used?
•
•
Make sure to shut down and restart in the correct order. See
How To’s or the User Manual.
These freeware utilities can conflict with the SC101.
Run the utility again, and remove it (Source to uninstall
utilities).
For more information about problems with these utilities, see
reference.
• The SC101 automatically works with the Windows XP
Personal Firewall.
•
Check the LAN
connections and subnet
setup.
The Power LED light should be lit solid green.
If it flashes green three times periodically, then something is
wrong with the response from the DHCP server.
The SC101 takes more than 2 minutes to reboot.
If there are many partitions it takes longer.
Wait a few minutes after rebooting before running the SCM to
locate the disks.
•
For other firewalls such as Trend Micro Personal Firewall and
Norton Firewall, disable the firewall or open UDP port 20001.
The computer and the SC101 must be connected to the same
LAN and subnet (and not across different routers.
•
Have the hard disks
been partitioned?
Wireless network
IP address from DHCP
server.
For example, these two IP addresses are not in the same
subnet: 255.255.0.0 for the computer and 255.255.255.0 for
the SC101.
• Use the UT commands to see a list of partitions that were
created. See Using the UT Command and the SC101
Command Line Interface.
• If there is only the Root partition, this means that you have not
partitioned your hard disks.
Create a new partition as described in section "If a partition
has never been seen on a particular computer" in this article.
To keep a wireless connection between your computers and the
SC101, there must regularly be a small amount of data throughput.
The SC101 may drop off when operating at the limits of wireless
range.
See Using the UT Command and the SC101 Command Line
Interface to confirm that the SC101 got an IP address from the
16
No Central Storage
Device was Found
Action
DHCP server.
17
SmartSync Pro Activation Error
Symptoms
•
Message “can’t resolve hostname to IP address”
•
Message “Error occurred during activation"
Cause
The computer that you are using to install the SmartSync Pro is not connected to the Internet.
Solution
Connect to Internet, or use another computer that is already connected.
18
Error "Drive attachment failed" when Attach Partition Fails
Symptom
While using the SCM utility to attach a new partition, the error "Drive attachment failed" displays
in the Status line (as shown).
Cause
The SC101 partition information is corrupted. This can happen if:
1. You disconnect a hard drive while the SC101 is powered on.
2. You move a hard drive from one SC101 to another SC101.
3. The hard disk has a hardware failure.
Solution
Use the CLI to view the corrupted characters with the ut_full_getpart . (See the CLI Reference
(need link)
19
About the SC101
System Requirements
•
•
•
Operating systems
o Windows XP SP1 or higher, or
o Windows 2000 Service Pack 4 or higher, or
o Windows 2003 Server.
DCHP must be running on the network.
SC101 software must be installed on each network computer that accesses the unit.
What operating systems cannot be used?
•
•
•
Macintoshes
UNIX
64-bit operating systems
Heat and the SC101
Although it is hotter than most networking products, the SC101 is within normal safe operating
limits.
What disks are compatible with the SC101?
See SC101 Hard Drive Compatibility.
Does vertical disk mounting affect disk life?
Manufacturers usually specify horizontal or vertical mounting, but some even say any orientation
is ok. For an outstanding site that includes hard drive information, see The PC Guide, which
includes every aspect of hard drive operation, selection, and maintenance.
SC101 and Heat Generation
The SC101 is tested by NETGEAR to make sure that it operates in safe temperature limits.
Computer owners are used to touching the outside case of a computer which is near room
temperature, however it is not necessary for electronic devices to be at room temperature to
operate safely.
Always follow a product's safety instructions for use. As noted in the manuals the Storage Central
should be placed:
•
•
•
•
Standing upright on its feet
With ample ventilation
With nothing placed on top
Where it cannot be easily knocked over
The Storage Central is hotter when:
20
•
•
•
•
You are not using the latest firmware that includes hard disk standby, which spins the
disks down when not in use.
The disks are reading or writing
Copying data to mirrored drives, since the writing activity happens on both disks
Disk brands which naturally run hotter are used
How does heat affect the Storage Central performance?
Even when the Storage Central seems hot, the IDE disk-drives are working within their normal
specified temperature limits. In fact by placing back-up disk-drives outside a computer case you
lower the heat generated around critical, heat-sensitive components in your PC, such as your
CPU and memory. Also you reduce the heat produced by your computer's power supply. This
actually can help protect and improve your PC’s performance.
As far as is known, the Storage Central has not caused a significant reduction in disk life.
This non-NETGEAR article HDD Diet: Power Consumption and Heat Dissipation, explains in
detail hard disk heating, and also compares recent brands. Note that many of these disks,
however, are NOT compatible with the SC101.
SC101 Performance
The SC101 Storage device is designed for these critical requirements:
•
•
•
Security through mirrored disks
Flexible network storage expansion
Cost-effectiveness
Since performance is slightly less critical in the design, be aware of factors that affect it. The
SC101 performs best when:
•
•
•
•
•
Using the unmirrored configuration
Using high performance disks
Using a wired connection. Wireless 802.11b in particular will cause a considerable
performance degradation
Leaving disks with > 10% free space
Reading and writing to the SC101 from a high performance computer
In the best conditions, the fastest read time is 7 MB / second, and the fastest write time is 5 MB /
second. The San File System used by NETGEAR has the strongest advantages with read/write,
bandwidth-intensive applications.
For reasonable performance with multiple users, use a switch with I/O at least as fast at 100 MB.
21
Self-certifying File System (SFS)
To reduce request fragmentation for large requests, Self-certifying File System (SFS) bypasses
the Windows buffer cache and tries to make one request for the entire amount of data.
The SFS accesses hard disks by addressing entire extents, which are flexibly-sized groups of
blocks. With a good disk allocator such as ours, extent-based file systems minimize
fragmentation. For example, say Windows makes 64 KB requests for buffered I/O, which results
in eight I/O requests for 8 KB blocks. The SC101 SFS allocator, in comparison, searches chunks
of thirty-two 8KB blocks (before moving to sixteen 8KB blocks, before finally moving to eight 8KB
blocks). Often files are larger than the maximum Windows request size, so Windows’ files will
fragment. SFS avoids the fragmentation of Windows. The SFS allocator can use both first-fit and
best-fit algorithms, and typically outperforms Windows in terms of maximum blocks that can be
transferred at a time. All this makes it easy for the SC101 to stay “defragmented”, using its own
software.
Another non-Windows feature that reduces SC101 disk accesses is stuffed dinodes. In the
Windows NTFS disk management, the addresses for blocks are stored in a different place than
the blocks, themselves. This means that any request for NTFS disk data, no matter how small,
causes two I/O operations. Since hard disk I/O is far slower than your CPU or RAM, doubling the
amount of I/O can have a noticable impact on performance. Since SFS can store both the
address and the data in the same extent, the amount of I/O for very small files is cut in half.
New Technology File System (NTFS)
With conventional disk management such the NTFS used by Windows, disks are divided into
small, equally-size divisions called clusters; disk access is made for clusters, and a file may use
many clusters. This old practice is suited for programs with limited needs for disk performance, or
for low-level programs that handled their own disk access. Unfortunately, neither of these is true
of many modern software applications.
To reduce request fragmentation for large requests, Self-certifying File System (SFS) bypasses
the Windows buffer cache and tries to make one request for the entire amount of data. See Selfcertifying File Systems (SFS).
SAN and Network Attached Storage (NAS)
The SC101 is a SAN device. SAN disks run as an extension of a computer's operating system.
Computers that use the SC101 must have operating systems and software that are compatible
with the SAN.
A NAS is a more complicated device that has its own, small operating system. Sometimes
computers that have been converted just to be file servers are referred to as NAS devices.
Both technologies create disks that are accessed directly by many computers over a network.
The computers share the network resource. This reduces maintenance in large systems, and also
avoids having a single computer tied up answering requests for its data from all over a network.
22
SC101 Command Line Interface (CLI) for Advanced
Users
Some SC101 commands and information are available only through the CLI. (For more about
CLIs, see What is a CLI?.) Compared to the Wizard, the CLI is a very fast way to check the basic
status of the SC101.
Using CLI Commands
1. Type Start > Run > command. (In Windows 2000 or Windows XP, Start > Run > cmd).
A black and white window pops up, with a blinking cursor after the prompt (the prompt
ends with a greater than sign ">").
2. Type cd c:\Program Files\NETGEAR\SC101*
This changes the directory. It also changes the prompt, so that you can see what
directory you are in.
3. Type ut listall, then Enter.
The computer responds with a screen of data similar to:
This is an overview of all the disks and partitions in the SC101. The information is divided
above and below the double line of "====", one group for each of the two physical hard
disks placed in this example SC101.
# PARTITIONS
Number of partitions created on each hard drive. In this
example, there are four partitions, each with a line of
characters. If you just created one partition, there would be
one line
23
PARTITION
LABEL
IP ADDR
SIZE(M)
MicroSan
Unique network identifier for each partition. (This is the
same value that appears in the "ut getpart" command as
UNIQUE NAME.)
What each partition is named. In this example, the first
partition is "test20gb"
the IP address of each partition on your network.
size in MB of each partition. The first partition is
20,480 MB, that is, 20 GB.
MicroSan found within subnet is either
•
"1 MicroSan found within subnet" = 1 physical hard
disk, or 2 physical hard disks which are mirrored.
•
"2 MicroSan found within subnet" = 2 physical hard
disks, which are not mirrored
The same LABEL and PARTITION appear on the top and bottom half. This SC101 is
mirrored. If it was not mirrored, then the information on the top and bottom would not
match, but would correspond to how you partitioned each SC101 disk, separately.
4. Type ut. The list of CLI commands for the SC101 appears.
5. All commands start with "ut", e.g., "ut listall". Most commands must be followed by the
rootAddr and other information such as the partitionAddr, the roottoken, or a filename.
•
•
•
•
rootAddr = "ROOT IP ADDR" from the "ut listall" command.
partitionAddr = "IP ADDR" from the "ut listall" command, in the PARTITION section.
roottoken = The SC101 administration password. If you have not changed it from the
default, it's password.
filename = The filename of a file that you wish to put on the SC101.
24
If a CLI is inside of a Windows pop-up, you can close it by typing exit then RETURN. It doesn't do
any harm to leave it open, if you might want it later.
Command: ut_full getpart
You can use this command to see if there are corrupted characters.
In the following screen shot, see the last row. It is a response to an ut_full getpart command, and
shows the numbers that can become corrupted. Here, in the middle of the row, are the correct
numbers: 02 00 02 or 01 00 01.
If a mirrored drive is broken, in place of 02 00 02, the numbers are 02 00 01 (shown).
If a non-mirrored drive is broken, the numbers are 01 00 01 (shown).
Fixing Corrupted Characters
This involves using a special SC101 command called ut_full. NOTE: This is the only situation
NETGEAR recommends using this utility. Do not use it to change attributes of partitions that are
working correctly. This might destroy data!
You will need to use the ut_full getpart, ut_full listall, and ut_full newattri commands.
1. Download the file below to the SC101 directory (If you installed to the default location,
C:\Program Files\NETGEAR\SC101 Manager Utility\)
37.3 KB
2. Unzip the file. The ut_full.exe file appears in the directory.
25
3. Type Start > Run, and type cmd in the pop-up window. Click OK to open a CLI window.
4. Type cd program files\netgear\sc101* (The last character is a star.) This changes the
CLI to the directory where you placed the ut_full.exe file.
5. Type ut_full listall in the CLI window to view the value for ROOT IP ADDR and the
IP ADDR of the partition that failed. Your window will have different values, but in this
example the first value is 192.168.50.3 and the second follows the name of this user's
broken partition "mirror100", which is 192.168.50.9
6. Type ut_full getpart, followed by the two IP addresses you found above. If you have
protected the parition with a password, include it after the IP addresses (as shown). The
attributes of the drive are displayed.
7. Type ut_full newattr, then the same IP and password information you typed in the last
step.
8. Type these characters carefully:
o If you have a mirrored drive, type
00 00 00 00 00 00 00 00 02 00 02 00 00 00 0A 07
o
If you do not have a mirrored drive, type
00 00 00 00 00 00 00 00 01 00 01 00 00 00 0A 07
9. If you do not see a message "new field set successfully", then power off the SC101,
power it on again, and repeat the process from Step 1.
26
10. Close the CLI window by typing exit.
11. Now, return to what you were doing before seeing the error. (Probably, using the SCM
utility. In the SCM, select a partition, and click Attach Drive.) If you bring up the SCM,
the partition now shows normally.
Disabling the Promise drivers in order to install the SCM Utility
Use this fix if during installation of SC101 SCM utility, there is either a blue screen, memory
dump, or the computer crashes or hangs.
Cause
SCSI disk drivers from the Promise company conflict with the SC101 device drivers. Promise
drivers are typically used for RAID 1 or for SATA drives. Many newer computers use Promise
SATA drivers. RAID 1 and higher are high performance disks, they are over double the price
of regular drives, and are not used inside laptops.
Solution
Promise is working on a permanent solution. In the meantime, if you don't use either RAID or
SATA, for example, you have IDE drives, the Promise drivers can be disabled.
Use the CLI to temporarily disable any SCSI device drivers or processes, install the SCM Utility,
and then re-enable the SCSI devices and processes. See CROSS REF.
To disable the Promise drivers and install the SCM Utility
1.
2.
3.
4.
5.
Select Start > Run, and type cmd.
Press Enter. A DOS window pops up with a CLI.
Type sc, and press Enter
Type sc config ftsata2 start= disabled
Type sc qc ftsata2 to see if the driver is disabled. The line with START_TYPE will end
with the word DISABLED.
6. Reboot your computer.
27
Install the SC101 SCM Utility.
Removing an Unusable Drive with ut.exe
The DOS utility “ut.exe” comes with the SC101 installation. By default, it is in:
C:\Program Files\NETGEAR\SC101 Manager Utility.
You can use ut.exe from the CLI to remove a disk drive.
To remove an unusable drive from the SC101:
1. Open a DOS window, go to that folder and type “ut” to see the available commands.
Type Start > Run > cmd.
A CLI window opens.
2. Type cd C:\Program Files\NETGEAR\SC101 Manager Utility.
3. Type ut.
In case you need them on another occasion, this lists all the commands you can run.
4. Type ut listall. This lists all partitions created on the SC101.
5. Type ut remvpart IP_of_Disk IP_of_partition admin_password” will remove the specific
partition.
Data recovery with SFSExtract.exe
SFSExtract.exe only works for a partition that shows up in Windows Explorer with a drive letter. If
the partition in SC101 doesn’t get attached in Explorer, then SFSExtract.exe will not help.
Note: The SFSExtract.exe bundled in pre-SCM 1.5.7 version has options of “RAW” and
“VOLUME”. The new version in SCM 1.5.7 performs better and should be used.
1. Open a DOS window.
Type Start > Run > cmd.
A CLI window opens.
2. Change directory.
Type cd C:\Program Files\NETGEAR\SC101 Manager Utility\Client
3. Run “SFSExtract” to learn the utility option and brief description.
The following screen shoot shows the output of running “SFSExtract”, it shows the two
options “SINGLE” and “THOROUGH”.
28
4. Type: SFSExtract SINGLE <drive> <target>
Where <drive> is the non-accessible SC101 partition drive letter showing up in Windows
Explorer, and <target> is where you want to copy the data to.
Note that the <target> (or another drive) MUST have more available storage space than the
total data size on the SC101 “<drive>”. For example, if a 100G <drive> has only 2G data,
then the <target> must have >2G available space.
Options SINGLE and THOROUGH are case-sensitive and must be entered with upper-case
letters.
Example: SFSExtract SINGLE E: C:\wutemp
The “THOROUGH” option usually is not needed unless the run with “SINGLE” option doesn’t
help recover all the data.
The utility creates a new sub-folder “<drivename)-xxxxxxxxxxxxxxxx” under the <target>.
29