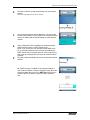
1
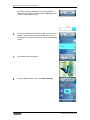
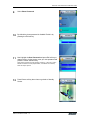
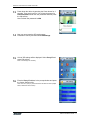
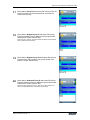
User Guide V24W Wi-Fi IP Phone NetComm VoIP WiFi Phone V24W User Guide Chapter 1: What’s in This User Guide ..........................................................................................3 Chapter 2: Getting to know your NetComm V24W WiFi VoIP Phone ........................................4 The V24W Buttons...................................................................................................................5 Chapter 3: Installing and Using the NetComm V24W WiFi VoIP Phone ...................................7 Inserting the Battery into the V24W Phone ..................................................................................7 Charging and Powering the V24W Phone ...................................................................................7 Setting up the V24W Phone.........................................................................................................7 Using the V24W Phone ............................................................................................................. 15 Line Option............................................................................................................................ 15 Chapter 4: Configuring the V24W WiFi VoIP Phone ................................................................ 17 Home Screen ............................................................................................................................ 17 Overview ................................................................................................................................... 18 How to Access the Web-based Utility................................................................................... 18 Main Menu................................................................................................................................. 19 Call Log ................................................................................................................................. 19 Phone Book............................................................................................................................... 20 Option.................................................................................................................................... 20 Network Settings ....................................................................................................................... 21 DHCP .................................................................................................................................... 21 Fixed IP ................................................................................................................................. 21 Wireless..................................................................................................................................... 22 Set Wi-Fi ............................................................................................................................... 22 Profiles .................................................................................................................................. 23 Hotspot.................................................................................................................................. 25 Phone Settings .......................................................................................................................... 26 Ring Option ........................................................................................................................... 26 Keypad Tone......................................................................................................................... 26 Wallpaper .............................................................................................................................. 26 Date & Time .......................................................................................................................... 26 Language .............................................................................................................................. 27 Phone Password................................................................................................................... 27 Auto KeyLock Settings.......................................................................................................... 28 SIP Settings............................................................................................................................... 29 Web Cam .................................................................................................................................. 30 Viewing a Web Camera ........................................................................................................ 30 Option.................................................................................................................................... 30 MSN........................................................................................................................................... 32 SKYPE....................................................................................................................................... 32 Web Site .................................................................................................................................... 33 Visiting a Web Site................................................................................................................ 33 Option.................................................................................................................................... 34 Information ................................................................................................................................ 35 Appendix A: Common Problem And Solutions........................................................................ 36 Appendix B: Glossary ................................................................................................................. 40 YML873 V24W User Guide - 1 NetComm VoIP WiFi Phone V24W User Guide How to Use This Guide This V24W WiFi IP Phone User Guide has been designed to make configuring and operating the V24W WiFi IP Phone easier than ever. Please look for the following items when reading this User Guide: This question mark provides you with a reminder about something you might need to do while using the IP Phone. This checkmark means there is a note of interest you should pay special attention to while using the IP Phone. This exclamation point means there is a caution or warning and is something that could damage your IP Phone. Copyright y y y y y This product includes Skype™ Version V1.1.0.20. This product uses the Skype API but is not endorsed or certified by Skype. Other products and brands mentioned herein maybe trademarks or registered trademarks of their respective owners. Unauthorized changes or modifications to this device may void your authority to operate the equipment. This product is protected by certain intellectual property rights of Microsoft Corporation. Use or distribution of such technology outside of this product is prohibited without a license from Microsoft or an authorized Microsoft subsidiary. Certain features, such as Skype, MSN, are branded services provided by third parties. We do not guarantee such services or warrant their continued availability. Caution y y y VoIP communication is not a replacement for your ordinary telephone, and not to be used for an emergency call. Screen shots in this manual may be different from the actual displays in the supplied software. The LCD of your device is designed with precision technology. However, in some cases, individual pixels may remain lit or may not light at all. Also, the brightness of the display may appear inconsistent, depending on the angle of view. Such anomalies are caused by the nature of the LCD and do not indicate a malfunction. Please note that we do not guarantee a replacement or refund for such cases. Do not expose the LCD to direct sunlight for prolonged periods of time. It may result in a malfunction. Do not store your device in areas subject to sunlight, such as near windows, and be careful when using outdoors. YML873 V24W User Guide - 2 NetComm VoIP WiFi Phone V24W User Guide Chapter 1: What’s in This User Guide Thank you for choosing the NetComm V24W WiFi VoIP Phone. It will allow you to make phone calls using your broadband connection, whether you are at home, in your office, or at a public hotspot. How does the V24W Phone do this? It connects to your wireless router or gateway, so telephone service is delivered through your cable or DSL Internet connection. You can also surf the Internet with its built-in web browser and full-color screen. But what does all of this mean? Networks are useful tools for sharing Internet access and computer resources. Your phone calls can also share your high-speed Internet connection. After setting up the V24W, you will be able to make phone calls using the account you set up with your Voice Service Provider, even while you’re surfing the Internet on your computer. So, networks not only are useful in homes and offices, but also can be fun. Use the instructions in this User Guide to help you configure and use the V24W VoIP Phone after you have registered an account with your Voice Service Provider. These instructions should be all you need to get the most out of your NetComm V24W WiFi VoIP Phone. NOTE: For information about your Internet phone service, refer to the materials provided by your Internet phone service provider YML873 V24W User Guide - 3 NetComm VoIP WiFi Phone V24W User Guide Chapter 2: Getting to know your NetComm V24W WiFi VoIP Phone The Bottom Panel The V24W Phone’s headset jack and USB port are located on the bottom panel. Headset Port USB Port Headset Port This port allows you to connect a headset to the V24W. USB Port The USB port allows you to attach the included power adapter. The Front and Side Panel 1. Power LED 2. Volume up/down 3. Soft Key 4. Navigation Pad 5. Center Selection Key 6. Call 7. Power/End Call 8. Different Key Choices/+ symbol 9. Enter Symbol/Space The Power LED is located at the top of the V24W VoIP Phone, while the buttons are located on the front and side panels. Power LED (Blue/Red/Purple) The LED is solid blue when the IP Phone is powered on and ready for calls. The LED flashes red when the IP Phone is not ready to make or receives calls. The LED alternates between blue and purple when the IP Phone is powered off and charging. YML873 V24W User Guide - 4 NetComm VoIP WiFi Phone V24W User Guide The V24W Buttons Button Name Function Soft Key Press the Soft Keys to use the menu items on the screen directly above the Soft Keys. Navigation Pad and Center Selection Key Navigation Pad lets you navigate menus and settings. Push the Center Selection Key to select the highlighted menu or setting. Controls the cursor when in web browser mode Call Press to make or receive calls. Power or End Call Ends the call or exits the current menu. Press and hold this button for two seconds to power the IP Phone on and off. Different Key Choices or + Sign Use the numeric keypad to enter the settings on the phone. It can represent uppercase letters (A, B, C … Z), lowercase letters (a, b, c … z), or numbers (0, 1, 2 … 0). Press the * (star) key to switch between the different modes or press the * (star) key twice to enter the + sign. Press the # (pound) key to open the Symbol Selection menu. Use the navigation pad to move through the menu. When you have the appropriate symbol highlighted, press the center selection key. Enter Symbol or Space Volume Press the # (pound) key twice to enter a space. Only available when the prompt window is up. Increases or decreases the volume. YML873 V24W User Guide - 5 NetComm VoIP WiFi Phone V24W User Guide The Back Panel The IP Phone’s battery compartment is located on the back panel of the IP Phone. For directions on how to insert the battery, refer to “Chapter 3: Installing and Using the NetComm V24W WiFi VoIP Phone.” YML873 V24W User Guide - 6 NetComm VoIP WiFi Phone V24W User Guide Chapter 3: Installing and Using the NetComm V24W WiFi VoIP Phone This chapter provides instructions for first-time installation and use of the NetComm V24W Phone. Firstly, you need to insert the battery into the V24W Phone and then configure it for your wireless network and VoIP service. After that, you will be able to make and receive Internet phone calls. Inserting the Battery into the V24W Phone To insert the battery, follow these instructions: 1. Remove the battery compartment cover by pressing the silver button and sliding the battery cover downward. 2. Insert the battery and ensure that the metal contact at the bottom of the battery align with the metal contact the top of the battery compartment. 3. Replace the battery cover by sliding it upward until it snaps into place. Charging and Powering the V24W Phone 1. Plug the USB mini-B connector of the included power adapter into the USB mini-B port of the IP Phone. Then connect the power adapter to a standard electrical outlet. 2. The Power LED will flash, alternating between blue and purple. For the initial charge, allow the battery to charge for at least 10 hours, so the battery will have a full charge, which is indicated by a solidly lit Power LED. This will maximizes battery performance and life. NOTE: When the battery is low on power, it will emit one warning sound or vibration, unless the Ring Type is set to Silent. (For more information about Ring Types, refer to Chapter 4: Configuring the V24W WiFi VoIP Phone.”) Setting up the V24W Phone 1 Press the Power button to turn on the V24W phone YML873 V24W User Guide - 7 NetComm VoIP WiFi Phone V24W User Guide 2 The phone will boot up and automatically scan the wireless network. Notes: This might take a few minutes to complete. 3 A list of wireless network will be displayed. You can see the wireless name (SSID), security status (a lock means wireless security is enable) and the signal strength for each wireless network. 4 Use the Navigation Pad to highlight your wireless network SSID and then press the Center Selection Key. Notes: If you do not see your wireless network SSID in the list, your wireless network may not be set to broadcast the SSID. Please refer to the User guide for more information on how to set up wireless profile to connect to wireless network manually. The phone will automatically connect to the selected wireless network. 5 5a. If WEP security is enabled on the selected network, a new screen will appear. Using the Navigation Pad, select the correct key index and move to the WEP Key field. Enter the network’s WEP key and then press the Center Selection Key. YML873 V24W User Guide - 8 NetComm VoIP WiFi Phone V24W User Guide 5b. If WPA security is enabled on the selected network, a new screen will appear. Enter the network’s WPA key. Then press the Center Selection Key. 6 You will be notified when the IP Phone has connected to the network, and a checkmark will appear next to the name of the network. Press the Exit soft key to go back to the standby screen. 7 The standby screen will appear. 8 Press the Menu soft key. Then select Phone Settings. YML873 V24W User Guide - 9 NetComm VoIP WiFi Phone V24W User Guide 9 Select Phone Password. 10 By default the phone password is disabled. Enable it by pressing the Edit soft key. 11 Now highlight the User Password and press Edit soft key to change the key. At the prompt, enter your new password and press the Center Selection Key. Note: please remember the new password. Press the * (star) key to switch between the different modes (Capital letters, small letters and numbers). Note: this step is optional. 12 Press Return soft key three times to go back to Standby Screen. YML873 V24W User Guide - 10 NetComm VoIP WiFi Phone V24W User Guide 13 Power down the device by pressing the Power button for 3 seconds. Then turn it back on. You will see the prompt for Phone Password. Enter the user password and then press the OK soft key. Note: Default user password is 0000 14 Now you can access the SIP settings page. Press Menu soft key and then select SIP Settings. 15 A list of SIP settings will be displayed. Select Proxy IP and press Edit soft key. Note: not all settings are necessary. 16 Enter the Proxy IP address in the prompt window and press the Center Selection Key. Note: Press the * (star) key to switch between the different modes (Capital letters, small letters and numbers). YML873 V24W User Guide - 11 NetComm VoIP WiFi Phone V24W User Guide 17 Move down to Proxy Port and press Edit soft key. Enter the Proxy Port number in the prompt window, and press the Center Selection Key. 18 Move down to Register Proxy IP and press Edit soft key. Enter the Register Proxy IP address in the prompt window and press the Center Selection Key. Note: Press the * (star) key to switch between the different modes (Capital letters, small letters and numbers). 19 Move down to Register Proxy Port and press Edit soft key. Enter the Proxy Port number in the prompt window, and press the Center Selection Key. 20 Move down to Outbound Proxy IP and press Edit soft key. Enter the Outbound Proxy IP address in the prompt window, and press the Center Selection Key. Notes: this step is optional. Press the * (star) key to switch between the different modes (Capital letters, small letters and numbers). YML873 V24W User Guide - 12 NetComm VoIP WiFi Phone V24W User Guide 21 Move down to Outbound Proxy Port and press Edit soft key. Enter the Outbound Proxy Port number in the prompt window, and press the Center Selection Key. Notes: this step is optional. 22 If your Voice Service Provider did not provide an Expire Time setting, then leave the default setting 60 seconds. If your Voice Service Provider provided an Expire Time setting, then Move down to Expire Time and press Edit soft key. Enter the Expire Time in the prompt window, and press the Center Selection Key. Notes: this step is optional. 23 Move down to Phone Number and press Edit soft key. Enter the Phone Number you’ll use for Internet phone calls, and press the Center Selection Key. 24 Move down to User Name and press Edit soft key. Enter the User Name in the prompt window and press the Center Selection Key. Note: Press the * (star) key to switch between the different modes (Capital letters, small letters and numbers). YML873 V24W User Guide - 13 NetComm VoIP WiFi Phone V24W User Guide 25 Move down to Password and press Edit soft key. Enter the Password in the prompt window and press the Center Selection Key. Note: Press the * (star) key to switch between the different modes (Capital letters, small letters and numbers). 26 On the SIP Settings screen, select “Return”. 27 On the main menu, select Return. 28 The standby screen will indicate that the IP Phone is ready for phone calls (Ready message at the top of the screen). Note: You can disable the phone password settings if you do not want to enter the password every time you turn on the device. Change the Enable setting in Phone Settings > Password Setting; change it from “Yes” to “No”. Please be aware that you can not access the SIP settings page when Password setting is disabled. YML873 V24W User Guide - 14 NetComm VoIP WiFi Phone V24W User Guide 29 The basic installation of the V24W Phone is now complete. Using the V24W Phone To make a call, enter the phone number you want to call. Then press the Call button. When you are on a phone call, select Option to see a list of menu choices. Press the HangUp soft key or press the End button to end the call. To change the volume, use the + and - buttons on the side panel of the Phone while on a call. For more information about the buttons on the IP Phone, refer to “Chapter 2: Getting to Know the V24W WiFi VoIP Phone.” Line Option When you are on a call, you have several options available. Press the Option softkey to make a selection, and press the right soft key to return to the previous menu. Use the navigation pad to scroll through menu choices and the Center Selection Key to choose an option. HangUp. To end the call, select HangUp. You can also press the End button to hang up. Mute. To mute the call, select Mute. Then select UnMute when you are ready to talk. Hold. To put a call on hold, select Hold. Then select UnHold when you are ready to return to this call. Line-2. When you want to switch back and forth between two separate conversations, use the Line-2 feature. When you are on your first call, select Line-2 to switch to a second line. A new prompt window will appear. Enter the phone number for the second call, and then press the Call button. The current call will be put on hold, and you will be switched to the second call. Select Switch to switch back to the first call. Transfer. There are two types of transfer features available. Use the Transfer feature when you want to introduce the caller you are transferring. Use the Blind TFR (Transfer) feature when you want to transfer the caller without introduction. When you are on your call, select Transfer. A new prompt window will appear. Enter the phone YML873 V24W User Guide - 15 NetComm VoIP WiFi Phone V24W User Guide number to which you want to transfer the call, and then press the Call button. When the second call is answered, speak to the answering party and select Transfer. Then hang up. Blind TFR. For a blind transfer, select Blind TFR. Dial the number to which you want to transfer the call. Select Blind TFR again. Then hang up. When you are on your call, select Blind TFR. A new prompt window will appear. Enter the phone number to which you want to transfer the call, and then press the Call button. Then hang up. Conference. When you are on your call, select Conference. A new prompt window will appear. Enter the phone number of the second call, and then press the Call button. When the second call is answered, select Conference. Second Incoming Call. When you have a second call coming in, you can select Option to see a list of menu choices. Select HangUp to end the call. Keylock. To lock the keys, press and hold down the # key. To unlock it, press the Unlock soft key and then press the * key. Voicemail For instructions on how to check your voicemail, contact your Internet phone service provider. NOTE: Some of the features describe above needs to be supported by your Voice Service Provider. To configure additional settings, proceed to “Chapter 4: Configuring the V24W WiFi IP Phone.” YML873 V24W User Guide - 16 NetComm VoIP WiFi Phone V24W User Guide Chapter 4: Configuring the V24W WiFi VoIP Phone Home Screen The Home screen displays a variety of information about the IP Phone. Wireless Signal Strength At the top of the screen, the icon on the left indicates wireless signal strength. Date and Time Display The current date and time are shown. To change the date, time and its format, analog or digital, use the main menu. Status of the IP Phone The IP Phone has three status messages. “Ready” indicates that the IP Phone is ready to make and receive calls. “Not Ready” indicates that the IP Phone has no wireless connection. “Not Registered” indicates that the IP Phone does not have a registered phone number. Battery Strength The icon on the right of the screen indicates battery strength of the IP Phone. Wireless Network Name The screen displays the name of the wireless network used by the IP Phone. Internet Phone Number The Internet phone number of the IP Phone is shown. Menu Press the left soft key button to view the main Menu. Its choices will be described in further detail below. Phonebook Press the right soft key to access the Phonebook. This can also be accessed through the main menu. Web Browsing Press the center selection key to launch the web browser. YML873 V24W User Guide - 17 NetComm VoIP WiFi Phone V24W User Guide Overview For your convenience, you can configure your V24W WiFi VoIP Phone either via the phone interface or you can use the build in Web-based utility. How to Access the Web-based Utility First, you need the VoIP Phone’s IP address. Use your V24W Phone to check the IP address. From the main Menu on the IP Phone, select Information and press the center selection key. The IP address is listed here. To access the Web-based utility of the Phone from your PC, launch your web browser. In the Address field, enter http:// and then the phone’s IP address (e.g. http://192.168.1.50) and press Enter. The login screen will appear. To login as a user, enter user in the User field and the password. The default password is 0000. Click the Login button. YML873 V24W User Guide - 18 NetComm VoIP WiFi Phone V24W User Guide Main Menu Press the Menu soft key to access the V24W main menu. Use the navigation pad to highlight each menu and the center selection key to select it. Call Log The V24W Phone keeps a list of all recent calls including the time and date of each call. Use the navigation pad to navigate through the list and the center selection key to select. Missed calls A list of missed calls will be displayed. Received A list of received calls will be displayed. Dialed A list of dialed calls will be displayed. Option For each entry, press the Option soft key to see the option. The options are explain below Option Dial Delete Delete All Add to (Modify) Phone Book Description Dial the selected number Delete the selected entry Delete all entries from the list Add the selected number to your phone book. Add to (or Modify) PhoneBook. If the number is not already in the Phone book, press the Option soft key and select Add to PhoneBook to create a new contact and add the phone number to the Phone Book. Select the type of phone number from the list and press the Select soft key or press the Return soft key to return to previous menu. The Add Person screen will appear. Then follow the instructions for the Phone Book settings. If the phone number is already in the Phone Book, select Modify PhoneBook to modify its entry in the Phone Book. The Phone Book screen will automatically appear. Follow the instructions for the Phone Book settings. YML873 V24W User Guide - 19 NetComm VoIP WiFi Phone V24W User Guide Phone Book The V24W Phone can store up to 250 contacts. Each contact can have the following information; Name, Home Number, Office Number, Mobile Number, Home-2 Number, Office-2 Number, Mobile-2 Number, Speed-Dial Number, Ring Tone and E-mail address. To view the contact information, highlight the contact name and press the center selection key. To search for a contact, enter the contact’s name in the field provided and the results will be automatically displayed. To call the selected contact, press the Call button. You need to select the correct phone number if the contact has more then one phone number. Select Option to see menu choices. Option Refer to the table below for the Phone book options. Option Edit Add Delete Mem Usage Description To edit the highlighted contact information To add a new contact To delete the highlighted contact To show the memory usage. Edit and Delete option will not be available if you do not have any contacts in the Phone Book. Edit Select Edit to edit a contact’s information: Name, Home Number, Office Number, Mobile Number, Home-2 Number, Office-2 Number, Mobile-2 Number, Speed-Dial Number, Ring Tone, and E-Mail. For each setting, press Edit soft key and enter the appropriate information in the new window. Then press the center selection key to save the new information, or press Exit soft key to return to the previous menu. After you finish, press Return soft key to return to the Phone Book screen. Add Select Add to add a new contact. Scroll through the different settings: Name, Home Number, Office Number, Mobile Number, Home-2 Number, Office-2 Number, Mobile-2 Number, Speed-Dial Number, Ring Tone, and E-Mail. For each setting, press Edit soft key and enter the appropriate information in the new window. Then press the center selection key to save the new information, or press Exit soft key to return to the previous menu. After you finish, press Return soft key to return to the Phone Book screen. YML873 V24W User Guide - 20 NetComm VoIP WiFi Phone V24W User Guide Network Settings The V24W Phone has two types of network modes, DHCP and Fixed IP. In most cases, you should keep the default setting, DHCP, if your network has a DHCP server enable to assign IP addresses to the IP Phone. To assign a static IP address to the IP Phone, press Edit soft key to change the IP Mode to Fixed IP. And the setting for fixed IP will be available. Edit the settings according to your network and press Return soft key to return to previous menu. DHCP Default setting is DHCP and there are no available settings to change. Fixed IP If Fixed IP is selected as the IP Mode, the screen will show these settings: IP Address, Subnet Mask, Default Gateway, Primary DNS, and Secondary DNS. Please change these values according to your network. Option IP Address Subnet Mask Default Gateway Primary DNS Secondary DNS Description IP address of the Phone Subnet mask for the network. IP address of the default gateway on the network. IP address of the primary DNS server. IP address of the secondary DNS Server. YML873 V24W User Guide - 21 NetComm VoIP WiFi Phone V24W User Guide Wireless The Wireless menu allows you to configure the wireless settings on the V24W Phone. The options are as follow: Options Set Wi-Fi Profiles Hotspot Description To scan for wireless networks in your area To configure profiles for different networks To view the list of the V24W Phone’s default hotspots. To save your username and password for these default hotspots, select Hotspot, Settings and enter your username and password. Set Wi-Fi After you have selected Set Wi-Fi, the V24W Phone will scan for wireless access points or wireless routers. A list of wireless networks, including hotspots, will be displayed and show their wireless network names, security status (a lock indicates wireless security), and signal strength, which is indicated by a bar graph. To connect to a wireless network, please follow the steps below. To connect to a default hotspots, which are shown on the Hotspot screen, please follow the steps outline in Connection to a Default Hotspot section. Otherwise, to connect to a new hotspot, please follow the steps outline in Connection to a New Hotspot. Connection to a Wireless Network 1. Select Set Wi-Fi in Wireless menu. Highlight your network name and press the center selection key to select it. If the network that you want is not shown, select Rescan soft key to scan again. Note: If your wireless network is still not shown, your network might be set not to broadcast the SSID. Please follow the steps for adding a profile in the Profile section. 2. The IP Phone will automatically connect to the network you have selected. WEP Security If WEP security is enabled on the selected network, a new screen will appear. Using the Navigation Pad, select the correct key index and move to the WEP Key field. Enter the network’s WEP key and then press the Center Selection Key. WPA Security If WPA security is enabled on the selected network, a new screen will appear. Enter the network’s WPA key. Then press the Center Selection Key. 3. You will be notified when the V24W Phone has connected to the network, and a checkmark will appear next to the name of the network. 4. Select Exit to return to the Wireless screen. YML873 V24W User Guide - 22 NetComm VoIP WiFi Phone V24W User Guide Connection to a Default Hotspot Before you begin, please make sure that you have saved your User Name and Password for the default hotspot you want to use. These login settings can be configured through the Hotspot screen. 1. Select Set Wi-Fi in Wireless menu. Highlight the wireless hotspot that you want to use and press the center selection key to select it. If the hotspot that you want is not shown, select Rescan soft key to scan again. 2. You will be notified when the V24W Phone has connected to the hotspot, and a checkmark will appear next to the name of the hotspot. 3. A new window will appear. On the Select Hotspot screen, scroll through the choices, and press the center selection key to select the appropriate hotspot. (If the hotspot you want is not listed on the Select Hotspot screen, proceed to step 3 of the following section, Connection to a New Hotspot) 4. The IP Phone will automatically use your User Name and Password to log in. 5. After you have logged in, select Exit to return to the Wireless screen. Connection to a New Hotspot 1. Select Set Wi-Fi in Wireless menu. Highlight the wireless hotspot that you want to use and press the center selection key to select it. If the hotspot that you want is not shown, select Rescan soft key to scan again. 2. You will be notified when the V24W Phone has connected to the hotspot, and a checkmark will appear next to the name of the hotspot. 3. A new window will appear. On the Select Hotspot screen, select IE Browser. 4. The web browser will automatically open. Follow the on-screen instructions to access the hotspot. 5. After you have gained access, you can browse the Internet and do VoIP call. To save the new hotspot settings, please follow the steps below: 1. When you are connected to the new hotspot, view the main menu. 2. Select Wireless. 3. Select Profiles. 4. Select Option. 5. Select Save <network name>. Then you will be automatically returned to the Wi-Fi Profiles screen. Profiles The profile menu allows you to configure and save different profile for different wireless access point. When accessing this menu, you will see a list of profiles (when you have profiles already configured). Press the Option soft key to see the option or the Exit soft key to return to the previous menu. You can also designate the order of the profiles saved by the V24W Phone. The next time it is powered on, the phone will try to use the first profile automatically. If that network is not available, the phone will try the next profile. This will continue until it has connected to a wireless network. YML873 V24W User Guide - 23 NetComm VoIP WiFi Phone V24W User Guide Option Refer to the table below for each option. Option Edit Add Delete Connect Go Down / UP Save <Network Name> Description To edit the highlighted profile To add a profile To delete the highlighted profile To connect to the highlighted profile To move the profile priority up / down To save the working wireless connection to a new profile The Edit and Delete options are available when you have at least one existing profile, and the Go Down/UP is available when you have more than one existing profile. Both the Edit and Add options have the same configuration settings. The Edit option will edit an existing profile and the Add option will add a new profile. Edit and Add options. Select Edit to edit a profile’s information or Add to add a new profile. The following settings need to be set up for each profile. • SSID. To change the SSID, press the Edit soft key and enter the new SSID in the prompt window. Press the center selection key to save the new information, or press the Exit soft key to return to the previous menu. • Wireless Mode. There are two choices, Infrastructure and Ad hoc modes. To change the Wireless Mode, press the Edit soft key. • Authentication Mode. The choices are: Share Key, Open System, and WPAPSK. To change the Authentication Mode, press the Edit soft key and a new window will open. Scroll through the modes, and select the correct mode for the wireless access point. Press the Save soft key to save the new Authentication Mode, or press Exit soft key to return to the Edit Profile menu without changing the Authentication Mode. - For Share Key, or Open System options, you need to configure the following: • Encryption. There are two choices, Disabled and WEP encryption. To change the Encryption method, press the Edit soft key. If you select Disabled then there are no other settings to change. For WEP, there are two more settings available, Key Index and WEP Key. • Key Index. This is the option for the Key Index Transmit. Choose the correct one for your wireless network. Press the Edit soft key to change it. A new window will open, scroll through the numbers, and select the correct transmit key number. Press the Save soft key to save the new transmit key number, or press the Exit soft key to return to the Edit Profile menu without changing the number. • WEP Key. To enter the WEP Key, press the Edit soft key. Enter the new WEP Key in the new prompt window and press the center selection key to save the new WEP Key. Press the Exit soft key to return to the Edit Profile menu without changing the key. - For WPA-PSK, you need to configure the following: • WPA Key. To enter the WPA Key, press the Edit soft key. Enter the new WPA Key in the new prompt window and press the center YML873 V24W User Guide - 24 NetComm VoIP WiFi Phone V24W User Guide • • selection key to save the new WPA Key. Press the Exit to return to the previous menu. EAP Type. To change the EAP Type setting, press the Edit soft key. You have a choice of TLS, MD5, and PEAP. Press the Save soft key to save the new EAP Type, or press the Exit soft key to return to the Edit Profile menu without changing the EAP Type. Hotspot. If you have default hotspots configured, then this setting will be available. To change the selected hotspot, press the Edit soft key. Delete. To delete a profile, highlight the profile that you want to delete, press the Option soft key and select Delete. Then you will be automatically returned to the Wi-Fi Profiles screen. Connect. To connect using a profile, highlight the profile that you want to use, press the Option soft key and then select Connect. The IP Phone will automatically try to connect to the selected network. Then you will be automatically returned to the Wi-Fi Profiles screen. Go Down/Up. To rearrange the order of the profile on your list, highlight the profile, press the Option soft key and select Go Down to move it down the list or Go Up to move it up the list. Then you will be automatically returned to the Wi-Fi Profiles screen. Save <network name>. When the IP Phone is connected to a network without a profile, this option will be available. To save the network’s settings as a new profile, press the Option soft key and then select Save <network name>. Then you will be automatically returned to the Wi-Fi Profiles screen. Hotspot The Hotspot menu will give you a list of the V24W Phone default hotspots. Scroll through these choices and press the left soft key to make a selection. Select Return to return to the Wireless screen. The options for each hotspot are as follow: • User Name. To change the User Name. • Password. To change the Password If you want to save a new hotspot’s settings, do not use this menu. When you are connected to the new hotspot, select Profiles on the Wireless screen. Press the Option soft key, and then select Save <network name>. Then you will be automatically returned to the Wi-Fi Phone Profiles screen. YML873 V24W User Guide - 25 NetComm VoIP WiFi Phone V24W User Guide Phone Settings This menu gives you option to customize the various settings of the V24W such as Ring Option, Wallpaper, Date & Time and Language. Ring Option Scroll through the list and press the left soft key to make a selection. Press the Return soft key to return to the Phone Settings screen. Ring Types There are five different ring types. The selected ring type is indicated by the <*> symbol. Scroll through these choices to hear the actual ring type. Highlight the ring type you want to select, and then press the center selection key to save your change. Press the Exit soft key to return to the Ring Option menu without changing the ring type. Ring Tones. There are three ring tones. The selected ring tone is indicated by the <*> symbol. Scroll through these choices to hear the actual ring tone. Highlight the ring tone you want to select, and then press the center selection key to save your change. Press the Exit soft key to return to the Ring Option menu without changing the ring tone. Ring Volume. There are five ring volume levels. The selected ring volume level is indicated by the <*> symbol. Scroll through these choices to hear the actual ring volume level. Highlight the ring volume level you want to select, and then press the center selection key to save your change. Press the Exit soft key to return to the Ring Option menu without changing the ring volume level. Keypad Tone There are three options for the Keypad Tone; Off, Soft, and Loud. The selected keypad tone is indicated by the <*> symbol. Highlight the keypad tone you want to select, and then press the center selection key to save your change. Press the Exit soft key to return to the Ring Option menu without changing the keypad tone. Wallpaper Scroll through the list to see the different wallpapers option and press the Preview soft key to see it. Press the Exit soft key to return to the Wallpaper menu. The selected wallpaper is indicated by the <*> symbol. Highlight the wallpaper you want to use, and then press the center selection key to save the changes. Press the Exit soft key to return to the Ring Option menu without changing the wallpaper. Date & Time There are six options that you can change in this menu, Time Format, Clock Type, Time Zones, Daylight Time, Enable NTP, Date, and Clock. Time Format. There are two formats available, 12-Hour and 24-Hour. To change the format, highlight Time Format, and press the left soft key. YML873 V24W User Guide - 26 NetComm VoIP WiFi Phone V24W User Guide Clock Type. There are two types available, Analog and Digital. To change the format, highlight Clock Type, and press the left soft key. Time Zones. Press the left soft key to select the Time Zone setting. A list of multiple time zones will be displayed. The selected time zone is indicated by the <*> symbol. Scroll through the choices, and highlight the time zone. Then press Settings soft key to save your change. Press the Exit soft key to return to the Date & Time menu without changing the time zone. Enable NTP. When Yes is displayed, the Network Timing Protocol (NTP) automatically sets the time and date for your phone. To disable NTP, press the left soft key until it displays No. Daylight Time. Press the left soft key to turn it on and off. Date. Press the left soft key to select the Date setting. A new prompt window will be displayed. Make your changes, and then press the center selection key to save your change. Press the Exit soft key to return to the Date & Time menu without changing the date. Option not available when Enable NTP is Yes. Clock. Press the left soft key to select the Clock setting. A new prompt window will be displayed. Make your changes, and press the center selection key to save your changes. Press the Exit soft key to return to the Date & Time menu without changing the time. Option not available when Enable NTP is Yes. Language The selected language is indicated by the <*> symbol. Highlight the language you want to use, and then press the left soft key to save your change. Press the Exit soft key to return to the Phone Settings menu without changing the language. Phone Password By default, user does not need to enter a password. To protect your phone so only users who know the password can use the V24W Phone, you can set a user password. To enable the user password for the WiFi IP Phone To enable the user password for the V24W Phone, press the left soft key to select the Phone Password setting and then press the Edit soft key. To set a new password, scroll down to Password and press the Edit soft key. Enter your new password and press the center selection key to save the new password. Press the Exit soft key if you do not want to change the password. The next time the IP Phone is powered on, it will ask for the Phone Password. Enter your user password in the field provided, and then press the OK soft key. NOTE: The default user password is 0000. YML873 V24W User Guide - 27 NetComm VoIP WiFi Phone V24W User Guide Auto KeyLock Settings If you want to automatically lock your keys after 10 seconds of inactivity, select Auto KeyLock Settings. Press the Edit soft key until Enable is displayed. To unlock your phone, press the left soft key (Unlock) and the asterisk (*) key. TIP: To key lock your phone, press and hold the (#) key at the stand by screen. Factory Default Factory default will removes all configurations on the V24W phone. And it will bring the V24W phone back to the factory default settings. Before selecting yes, make sure that you want to delete all data. Upgrade The Upgrade feature allows you to upgrade the firmware of the V24W Phone. The IP Phone is pre-configured with the correct Download URL (web address of the download site) and OS Image File (firmware upgrade file) entries. NOTE: Do not change these settings unless your VoIP Service Provider has given you new settings. Plug the USB mini-B connector of the included power adapter into the USB mini-B port of the IP Phone. Then connect the power adapter to a standard electrical outlet. NOTE: If the upgrade is interrupted, the V24W Phone will revert to its old firmware, and you can attempt the upgrade again. Press the Upgrade soft key to start upgrading the V24W Phone’s firmware, or press the Return soft key to cancel the upgrade and return to the previous menu. When the upgrade is complete, the V24W Phone will automatically power itself off. Wait five seconds and then power it back on. NOTE: Please do not upgrade the firmware unless instructed by your provider or NetComm Technical Support. YML873 V24W User Guide - 28 NetComm VoIP WiFi Phone V24W User Guide SIP Settings The necessary setup information is supplied by your VoIP Service Provider. If you do not have this information, contact your VoIP Service Provider before making any changes. Press the Return soft key to return to the previous menu. Refer to the table below for all SIP options. Options Proxy IP Proxy Port Register Proxy IP Register Proxy Port Outbound Proxy IP Outbound Proxy Port Expire Time Display Name Phone Number User Name Password Payload Type Packet Time DTMF Relay. UDP Port. RTP Port. Session Timer. SIP Format Description To add or change the Proxy IP address To add or change the Proxy Port number To add or change the Register Proxy IP address To add or change the Register Proxy Port number To add or change the Outbound Proxy IP address To add or change the Outbound Proxy Port number To change the Expire Time (default is 3600) This is the message displayed on the receiver’s caller ID To add or change the Phone Number you will use for VoIP phone calls To add or change the User Name used for authentication with the Registration Server To add or change the password used in conjunction with the User Name for authentication with the Registration Server G.711a, G.729, and G.711u are the three Payload Types available. They are listed in order of preference. There are two Packet Length Time available; small and large. To disable and enable the DTMF relay feature. To add or change the UDP Port number. To add or change the RTP Port number. To add or change the Session Timer. Session Timer is the periodic refresh of SIP sessions through a re-INVITE or UPDATE request. To change the SIP format (Default is Normal). The other 2 choices may be used with certain SIP Proxy Servers. To add or change any settings, press the Edit soft key and enter the value in the prompt window. Press the Center Selection key to save it or press the Exit soft key to return to the previous screen. For options with only choices, press the Edit soft key to scroll through the options list. Press the Exit soft key to return to the SIP Setting screen. YML873 V24W User Guide - 29 NetComm VoIP WiFi Phone V24W User Guide Web Cam This feature will let you use the V24W Phone to view video from a web camera. On the Web Cam screen, a list of web cameras (when you have web cam already configured) will be shown. Scroll through these choices and press the center selection key to view the video. To save the settings for your web camera(s), press Option soft key to see the menu choices, which will be described in further detail below. Press Return soft key to return to the previous menu. Viewing a Web Camera The IP Phone will display video from the web camera. Press the right soft key to return to the Web Cam screen. Option Refer to the table below for each option. Option Edit Description To edit a web cam entry (available when you have at least one web camera saved). To add a web cam entry. To delete the highlighted entry Add Delete The Edit and Add options configure the same settings. The Edit option is used for changing existing entries, while the Add option is used for adding new entries. Press Return soft key to return to the previous menu. Edit. Select Edit to edit a web camera’s information: Name, URL (web address), and Port Number. Scroll through these choices, and press the Edit soft key to change a setting. Name. To change the Name, select Edit. Enter the new Name in the new window. Press the center selection key to save the new information, or select Exit to return to the previous menu. URL. To change the URL, select Edit. Enter the new URL in the new window. Press the center selection key to save the new information, or select Exit to return to the previous menu. Port Number. To change the Port Number, select Edit. Enter the new Port Number in the new window. Press the center selection key to save the new information, or select Exit to return to the previous menu. (If you are not sure how to change this setting, keep the default, 80.) Press the Return soft key to return to the Web Cam screen. Add. Select Add to create a new entry with the following information: Name, URL (web address), and Port Number. Scroll through these choices, and press the Edit soft key to configure a setting. YML873 V24W User Guide - 30 NetComm VoIP WiFi Phone V24W User Guide Name. To enter the Name, select Edit. Enter the new Name in the new window. Press the center selection key to save the new information, or select Exit to return to the previous menu. URL. To enter the URL, select Edit. Enter the new URL in the new window. Press the center selection key to save the new information, or select Exit to return to the previous menu. Port Number. To enter the Port Number, select Edit. Enter the new Port Number in the new window. Press the center selection key to save the new information, or select Exit to return to the previous menu. (If you are not sure how to change this setting, keep the default, 80.) Press the Return soft key to return to the Web Cam screen. Delete. To delete an entry, scroll down until it is highlighted. Press the Option soft key and then select Delete. Then you will be automatically returned to the Web Cam screen. YML873 V24W User Guide - 31 NetComm VoIP WiFi Phone V24W User Guide MSN You can use MSN Messenger to send and receive instant messages, see who is online, and edit your MSN contact information. To get started, select MSN from the Main Menu, and select MSN. The wizard will guide you through the setup process. If the wizard is not successful or does not connect you can use the Settings window to input your information manually. If you need to change your MSN contact information, such as email and password, select Settings from the MSN menu. SKYPE Skype uses the Internet to make free Skype to Skype international calls. Select Skype from the Main Menu and select Skype to get started. The wizard will guide you through the setup process for a new or existing Skype account. If you need to change your Skype contact information, such as email and password and country code, select Settings from the Skype menu. NOTE: SIP client will stop when the phone is in MSN or Skype mode and therefore it will not be able to receive any incoming call. NOTE: User can also configure their MSN or Skype username without using the wizard. Once configured, the user can click on MSN or Skype and the phone will connect using the saved settings. YML873 V24W User Guide - 32 NetComm VoIP WiFi Phone V24W User Guide Web Site A list of web sites (if saved) will be shown. Scroll through these choices and press the center selection key to visit the web site you want. To save frequently visited web sites, select Option to see menu choices, which will be described in further detail below. Select Return to return to the previous menu. Visiting a Web Site When the web site is displayed, use the navigation bar below the Address field to control the web browser, and use the navigation pad to control the cursor. Refer to the table below for navigating the web browser. Button Description <= & => buttons Forward and back buttons to move between web pages. Red X button To stop loading the current website Green refresh button Reload the current website Home button To load your homepage Search button To run a search Small A To zoom out Large A To zoom in Minimize button To minimize the Address bar To auto-scroll, press the Mouse Mode soft key until you see an orange navigation cursor. Then use the navigation pad to scroll up and down the webpage. To use the cursor as a page up and down button, press the Mouse Mode soft key again until the cursor turns blue with a “o” in the center. Then use the navigation pad to move up and down the webpage. To visit a different website, select the current web address in the Address field. Enter the new web address, and a new window will automatically appear. When you have finished entering the new web address, press the center selection key. You can also use the Address drop-down menu. Select the website you want. Then press the center selection key, or select Option and then Enter. Press the Option soft key and select Exit to return to the stand by screen. YML873 V24W User Guide - 33 NetComm VoIP WiFi Phone V24W User Guide Option Refer to the table below for each option. Option Edit Description To edit a web site entry (available when you have at least one web camera saved). To add a web site entry. To delete the highlighted entry Add Delete The Edit and Add options configure the same settings. The Edit option is used for changing existing web site entries, while the Add option is used for saving new web site entries. Select Return soft key to return to the previous menu. Edit. Select Edit to edit a web site’s information: Name, URL (web address), and Port Number. Scroll through these choices, and select Edit soft key to change a setting. Name. To change the Name, select Edit. Enter the new Name in the new window. Press the center selection key to save the new information, or select Exit to return to the previous menu. URL. To change the URL, select Edit. Enter the new URL in the new window. Press the center selection key to save the new information, or select Exit to return to the previous menu. Port Number. To change the Port Number, select Edit. Enter the new Port Number in the new window. Press the center selection key to save the new information, or select Exit to return to the previous menu. (If you are not sure how to change this setting, keep the default, 80.) Press Return soft key to return to the Web Site screen. Add. Select Add to create a new web site entry with the following information: Name, URL (web address), and Port Number. Scroll through these choices, and select Edit soft key to configure a setting. Name. To enter the Name, select Edit. Enter the new Name in the new window. Press the center selection key to save the new information, or select Exit to return to the previous menu. URL. To enter the URL, select Edit. Enter the new URL in the new window. Press the center selection key to save the new information, or select Exit to return to the previous menu. Port Number. To enter the Port Number, select Edit. Enter the new Port Number in the new window. Press the center selection key to save the new information, or select Exit to return to the previous menu. (If you are not sure how to change this setting, keep the default, 80.) Press Return soft key to return to the Web Site screen. Delete. To delete a web site, scroll down the entries until the web site is highlighted. Press Option soft key and then select Delete. Then you will be automatically returned to the Web Site screen. YML873 V24W User Guide - 34 NetComm VoIP WiFi Phone V24W User Guide Information This menu provides the status information and software of the V24W Phone. It is a read only screen. Scroll through the settings to view them. Select Return to return to the previous menu. Refer to the table below for information on each option. Option Phone Number IP Address Wireless AP MAC Address Firmware Version Description Phone number of the V24W Phone IP address of the V24W Phone The name (SSID) of the access point associated with the V24W Phone MAC address of the V24W Phone Firmware version number YML873 V24W User Guide - 35 NetComm VoIP WiFi Phone V24W User Guide Appendix A: Common Problem And Solutions This appendix provides solutions to problems that may occur during the installation and operation of the V24W IP Phone. Read the description below to solve your problems. 1. When I make a telephone call, the call doesn’t go through; instead, I hear a fast busy signal. Go through this checklist until your problem is solved: • Follow these instructions to reboot your cable or DSL modem, IP Phone, and router: 1. Power off your cable or DSL modem by unplugging its power adapter. 2. Power off the router by unplugging its power adapter. 3. Power off the IP Phone by pressing and holding down the Power button for two seconds. 4. Wait 30 seconds, and then power on your cable or DSL modem by plugging its power adapter into an electrical outlet. 5. Wait 30 seconds. Power on the router by plugging its power adapter into an electrical outlet. 6. Wait 10 seconds. Power on the IP Phone by pressing and holding down the Power button for two seconds. 7. Reboot one of your networked computers, and check for an active Internet connection. 8. Pick up the IP Phone and try your call again. • Set up port forwarding on your router. You must specify that four port ranges be forwarded to the IP address of the IP Phone. These four port ranges are as follows: 5060-5061 (UDP), 53-53 (UDP), 69-69 (UDP), and 10000-20000 (UDP). If you have a non- router, refer to its documentation for instructions. If you have a router, then follow these instructions: 1. On one of your networked computers, open your web browser. 2. Access the Router’s Web-based Utility by going to http://192.168.1.1 or the IP address of the Router. 3. A login screen will appear. Leave the User Name field blank. Enter the Router’s password (the default is admin) in the Password field. Then click the OK button. 4. Click the Applications & Gaming tab, and then click the Port Range Forwarding tab. 5. For each port range you must specify, enter a different name in the Application field. Then enter the number or range of external port(s) used by the IP Phone. 6. Select the protocol you will be using, UDP. 7. Enter the IP address of the IP Phone. For example, if the IP Phone’s IP address is 192.168.1.100, you would enter 100 in the field provided. 8. Repeat steps 5-7 until you have entered all four port ranges for the IP Phone. Application Enable Internet Phone 1 X Internet Phone 2 X Internet Phone 3 X Internet Phone 4 YML873 V24W User Guide - 36 Start and End 5060 to 5061 53 to 53 69 to 69 10000 to 20000 Protocol UDP UDP UDP UDP IP Address IP address of IP Phone IP address of IP Phone IP address of IP Phone IP address of IP Phone NetComm VoIP WiFi Phone V24W User Guide 9. Check the Enable option for the port services you want to use. 10. When you have completed the configuration, click the Save Settings button. 2. When I’m on a telephone call, words are dropped intermittently. Go through this checklist until your problem is solved: • Are you using a wireless router and cordless phone? If so, the router and cordless phone may be using the same frequency and interfere with each other. Move the cordless phone farther away from the router. • There may be heavy network activity, particularly if you are running a server or using a file sharing program. Try to limit network or Internet activity during any Internet telephone call. For example, if you are running a file sharing program, files may be uploading in the background even though you are not downloading any files, so make sure you exit the program before you make an Internet phone call. • There may not be enough bandwidth available for your Internet phone call. You may want to test your bandwidth using one of the bandwidth tests available online. If necessary, access your service account at your Internet phone service provider’s website, and reduce the bandwidth requirements for your service. For more information, refer to your Internet phone service provider’s website. • There may be too many wireless routers or access points in your location using the same broadcast channel. Try changing the channel that your wireless router or access point uses; refer to the documentation of your router or access point for instructions. 3. The IP Phone does not ring, and my calls automatically go to voicemail. Go through this checklist until your problem is solved: • Check the ringer volume on the IP Phone, and make sure it is set to an audible level. • Follow these instructions to reboot your cable or DSL modem, IP Phone, and router: 1. Power off your cable or DSL modem by unplugging its power adapter. 2. Power off the router by unplugging its power adapter. 3. Power off the IP Phone by pressing and holding down the Power button for two seconds. 4. Wait 30 seconds, and then power on your cable or DSL modem by plugging its power adapter into an electrical outlet. 5. Wait 30 seconds. Power on the router by plugging its power adapter into an electrical outlet. 6. Wait 10 seconds. Power on the IP Phone by pressing and holding down the Power button for two seconds. 7. Reboot one of your networked computers, and check for an active Internet connection. • Set up port forwarding on your router. You must specify that four port ranges be forwarded to the IP address of the IP Phone. These four port ranges are as follows: 5060-5061 (UDP), 53-53 (UDP), 69-69 (UDP), and 10000-20000 (UDP). Note: By default, the IP Phone uses a dynamic IP address assigned by your router. For port forwarding, you may need to assign a static IP address to the IP Phone. Contact your Internet phone service provider for assistance. If you have a non- router, refer to its documentation for instructions. If you have a router, then follow these instructions: 1. On one of your networked computers, open your web browser. YML873 V24W User Guide - 37 NetComm VoIP WiFi Phone V24W User Guide 2. Access the Router’s Web-based Utility by going to http://192.168.1.1 or the IP address of the Router. 3. A login screen will appear. Leave the User Name field blank. Enter the Router’s password (the default is admin) in the Password field. Then click the OK button. 4. Click the Applications & Gaming tab, and then click the Port Range Forwarding tab. 5. For each port range you must specify, enter a different name in the Application field. Then enter the number or range of external port(s) used by the IP Phone. 6. Select the protocol you will be using, UDP. 7. Enter the IP address of the IP Phone. For example, if the IP Phone’s IP address is 192.168.1.100, you would enter 100 in the field provided. 8. Repeat steps 5-7 until you have entered all four port ranges for the IP Phone. Application Enable Internet Phone 1 X Internet Phone 2 X Internet Phone 3 X Internet Phone 4 Start and End 5060 to 5061 53 to 53 69 to 69 10000 to 20000 Protocol UDP UDP UDP UDP IP Address IP address of IP Phone IP address of IP Phone IP address of IP Phone IP address of IP Phone 9. Check the Enable option for the port services you want to use. 10. When you have completed the configuration, click the Save Settings button. 4. The power LED does not light up. Go through this checklist until your problem is solved: • Remove the IP Phone’s battery from its compartment. Wait five seconds while the IP Phone resets itself. Insert the battery and power on the IP Phone. • You may be using the wrong power adapter. Make sure the power adapter you are using is the one included with the IP Phone. YML873 V24W User Guide - 38 NetComm VoIP WiFi Phone V24W User Guide Frequently Asked Questions Can I make calls if my Internet connection is down? No. Your high-speed Internet connection must be active when you make Internet phone calls. Can I use the IP Phone to make a call and browse the Internet at the same time? No. The V24W Phone supports either calling or web browsing, not both at the same time. However, you can receive a call while web browsing with the IP Phone. Also, you can make calls with the V24W Phone while browsing the Internet on your computer. Please note that your web browsing may affect the quality of your telephone call, depending on the amount of upstream data traffic passing through your Internet connection. Can I receive calls while my network is down? You cannot directly receive calls while your network is down. However, your VoIP Service Provider account may allow you to forward calls to a different telephone number, such as a cellular phone number. For more information, please contact your VoIP Service Provider. YML873 V24W User Guide - 39 NetComm VoIP WiFi Phone V24W User Guide Appendix B: Glossary This glossary contains some basic networking terms you may come across when using this product. Access Point - A device that allows wireless-equipped computers and other devices to communicate with a wired network. Also used to expand the range of a wireless network. Ad-hoc - A group of wireless devices communicating directly with each other (peer-to-peer) without the use of an access point. Bandwidth - The transmission capacity of a given device or network. Bit - A binary digit. Boot - To start a device and cause it to start executing instructions. Broadband - An always-on, fast Internet connection. Browser - An application program that provides a way to look at and interact with all the information on the World Wide Web. Byte - A unit of data that is usually eight bits long. Cable Modem - A device that connects a computer to the cable television network, which in turn connects to the Internet. Default Gateway - A device that forwards Internet traffic from your local area network. DHCP (Dynamic Host Configuration Protocol) - A networking protocol that allows administrators to assign temporary IP addresses to network computers by “leasing” an IP address to a user for a limited amount of time, instead of assigning permanent IP addresses. DMZ (Demilitarized Zone) - Removes the Router's firewall protection from one PC, allowing it to be “seen” from the Internet. DNS (Domain Name Server) - The IP address of your ISP's server, which translates the names of websites into IP addresses. Domain - A specific name for a network of computers. Download - To receive a file transmitted over a network. DSL (Digital Subscriber Line) - An always-on broadband connection over traditional phone lines. Dynamic IP Address - A temporary IP address assigned by a DHCP server. Encryption - Encoding data transmitted in a network. Ethernet - IEEE standard network protocol that specifies how data is placed on and retrieved from a common transmission medium. Firmware - The programming code that runs a networking device. FTP (File Transfer Protocol) - A protocol used to transfer files over a TCP/IP network. YML873 V24W User Guide - 40 NetComm VoIP WiFi Phone V24W User Guide Full Duplex - The ability of a networking device to receive and transmit data simultaneously. Gateway - A device that interconnects networks with different, incompatible communications protocols. Half Duplex - Data transmission that can occur in two directions over a single line, but only one direction at a time. HTTP (HyperText Transport Protocol) - The communications protocol used to connect to servers on the World Wide Web. Infrastructure - A wireless network that is bridged to a wired network via an access point. IP (Internet Protocol) - A protocol used to send data over a network. IP Address - The address used to identify a computer or device on a network. ISP (Internet Service Provider) - A company that provides access to the Internet. ITSP (Internet Telepony Service Provider) - A company that provides voice over Internet protocol services. LAN - The computers and networking products that make up your local network. MAC (Media Access Control) Address - The unique address that a manufacturer assigns to each networking device. Mbps (MegaBits Per Second) - One million bits per second; a unit of measurement for data transmission. Network - A series of computers or devices connected for the purpose of data sharing, storage, and/or transmission between users. Packet - A unit of data sent over a network. Passphrase - Used much like a password, a passphrase simplifies the WEP encryption process by automatically generating the WEP encryption keys for products. Port - The connection point on a computer or networking device used for plugging in cables or adapters. RJ-45 (Registered Jack-45) - An Ethernet connector that holds up to eight wires. Roaming - The ability to take a wireless device from one access point's range to another without losing the connection. Router - A networking device that connects multiple networks together. Server - Any computer whose function in a network is to provide user access to files, printing, communications, and other services. SSID (Service Set Identifier) - Your wireless network's name. Static IP Address - A fixed address assigned to a computer or device that is connected to a network. Static Routing - Forwarding data in a network via a fixed path. YML873 V24W User Guide - 41 NetComm VoIP WiFi Phone V24W User Guide Subnet Mask - An address code that determines the size of the network. Switch - 1. A data switch that connects computing devices to host computers, allowing a large number of devices to share a limited number of ports. 2. A device for making, breaking, or changing the connections in an electrical circuit. TCP (Transmission Control Protocol) - A network protocol for transmitting data that requires acknowledgement from the recipient of data sent. TCP/IP (Transmission Control Protocol/Internet Protocol) - A set of instructions PCs use to communicate over a network. Telnet - A user command and TCP/IP protocol used for accessing remote PCs. TFTP (Trivial File Transfer Protocol) - A version of the TCP/IP FTP protocol that has no directory or password capability. Throughput - The amount of data moved successfully from one node to another in a given time period. Topology - The physical layout of a network. TX Rate - Transmission Rate. Upgrade - To replace existing software or firmware with a newer version. Upload - To transmit a file over a network. URL (Uniform Resource Locator) - The address of a file located on the Internet. WAN (Wide Area Network) - The Internet. WEP (Wired Equivalent Privacy) - A method of encrypting network data transmitted on a wireless network for greater security. WLAN (Wireless Local Area Network) - A group of computers and associated devices that communicate with each other wirelessly.. YML873 V24W User Guide - 42 Legal & Regulatory Information This manual is copyright. Apart from any fair dealing for the purposes of private study, research, criticism or review, as permitted under the Copyright Act, no part may be reproduced, stored in a retrieval system or transmitted in any form, by any means, be it electronic, mechanical, recording or otherwise, without the prior written permission of NetComm Limited. NetComm Limited accepts no liability or responsibility, for consequences arising from the use of this product. NetComm Limited reserves the right to change the specifications and operating details of this product without notice. NetComm is a registered trademark of NetComm Limited. All other trademarks are acknowledged the property of their respective owners. Customer Information ACA (Australian Communications Authority) requires you to be aware of the following information and warnings: (1) This unit shall be connected to the Telecommunication Network through a line cord which meets the requirements of the ACA TS008 Standard. (2) This equipment has been tested and found to comply with the Standards for C-Tick and or A-Tick as set by the ACA . These standards are designed to provide reasonable protection against harmful interference in a residential installation. This equipment generates, uses, and can radiate radio noise and, if not installed and used in accordance with the instructions detailed within this manual, may cause interference to radio communications. However, there is no guarantee that interference will not occur with the installation of this product in your home or office. If this equipment does cause some degree of interference to radio or television reception, which can be determined by turning the equipment off and on, we encourage the user to try to correct the interference by one or more of the following measures: • • • • Change the direction or relocate the receiving antenna. Increase the separation between this equipment and the receiver. Connect the equipment to an alternate power outlet on a different power circuit from that to which the receiver/TV is connected. Consult an experienced radio/TV technician for help. (3) The power supply that is provided with this unit is only intended for use with this product. Do not use this power supply with any other product or do not use any other power supply that is not approved for use with this product by NetComm. Failure to do so may cause damage to this product, fire or result in personal injury. V24W User Guide 43 YML8�� 73 www.netcomm.com.au Product Warranty The warranty is granted on the following conditions: 1. This warranty extends to the original purchaser (you) and is not transferable; 2. This warranty shall not apply to software programs, batteries, power supplies, cables or other accessories supplied in or with the product; 3. The customer complies with all of the terms of any relevant agreement with NetComm and any other reasonable requirements of NetComm including producing such evidence of purchase as NetComm may require; 4. The cost of transporting product to and from NetComm’s nominated premises is your responsibility; and, 5. NetComm does not have any liability or responsibility under this warranty where any cost, loss, injury or damage of any kind, whether direct, indirect, consequential, incidental or otherwise arises out of events beyond NetComm’s reasonable control. This includes but is not limited to: acts of God, war, riot, embargoes, acts of civil or military authorities, fire, floods, electricity outages, lightning, power surges, or shortages of materials or labour. 6. The customer is responsible for the security of their computer and network at all times. Security features may be disabled within the factory default settings. NetComm recommends that you enable these features to enhance your security. The warranty is automatically voided if: 1. You, or someone else, use the product, or attempts to use it, other than as specified by NetComm; 2. The fault or defect in your product is the result of a voltage surge subjected to the product either by the way of power supply or communication line, whether caused by thunderstorm activity or any other cause(s); 3. The fault is the result of accidental damage or damage in transit, including but not limited to liquid spillage; 4. Your product has been used for any purposes other than that for which it is sold, or in any way other than in strict accordance with the user manual supplied; 5. Your product has been repaired or modified or attempted to be repaired or modified, other than by a qualified person at a service centre authorised by NetComm; and, 6. The serial number has been defaced or altered in any way or if the serial number plate has been removed. Limitations of Warranty The Trade Practices Act 1974 and corresponding State and Territory Fair Trading Acts or legalisation of another Government (“the relevant acts”) in certain circumstances imply mandatory conditions and warranties which cannot be excluded. This warranty is in addition to and not in replacement for such conditions and warranties. To the extent permitted by the Relevant Acts, in relation to your product and any other materials provided with the product (“the Goods”) the liability of NetComm under the Relevant Acts is limited at the option of NetComm to: • • • • Replacement of the Goods; or Repair of the Goods; or Payment of the cost of replacing the Goods; or Payment of the cost of having the Goods repaired. All NetComm ACN 002 490 486 products have a standard 12 months warranty from date of purchase. However some products have an extended warranty option (refer to packaging). To be eligible for the extended warranty you must supply the requested warranty information to NetComm within 30 days of the original purchase by registering on-line via the NetComm web site at www.netcomm.com.au YML873��������������� V24W User Guide www.netcomm.com.au 44 NetComm Limited ABN 85 002 490 486 PO Box 1200, Lane Cove NSW 2066 Australia E – [email protected] W – www.netcomm.com.au