1
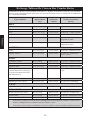
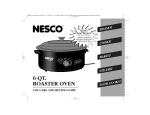
6 Qt. Electric Roaster Oven
Care/Use and Recipe Guide
5.7 Ltr. Le Four électrique de Poulet A Rôtir
Guide de soin/usage et Recette
17 Ltr. Horno eléctrico del Asador
Cuidado/Uso y Guía de la Receta
English
English
“NESCO®” and “Circle of Heat®”
are registered trademarks of The Metal Ware Corporation.
The Metal Ware Corporation
1700 Monroe St., P.O. Box 237
Two Rivers, WI 54241
Ph: (800) 288-4545
Visit our Website at http://www.nesco.com
©2008 The Metal Ware Corp. rev. 08/08.
One Year Limited Warranty
This appliance is warranted for one year from date of original purchase against defects in
material and workmanship. This warranty does not cover transportation damage, misuse,
accident or similar incident. This warranty gives you special legal rights and you may
have other rights which vary from state to state. Defective products may be returned,
postage prepaid, with a description of the defect to:
The Metal Ware Corporation
1700 Monroe Street
Two Rivers, Wisconsin 54241
Service and genuine NESCO® replacement parts may be obtained from the NESCO®
Factory Service Department.
For service in warranty, follow instructions set forth in warranty. When ordering new
parts, make sure you always mention the model number of the product, which is found on
the bottom of the Roaster Oven.
- This product is designed for household use only When using electrical appliances, basic safety precautions should always be
followed, including the following:
1. READ ALL INSTRUCTIONS.
. Do not touch hot surfaces. Use handles or knobs.
3. Always plug appliance cord into wall outlet, then adjust temperature control
to the desired temperature. To disconnect, turn control to off, then remove
plug from wall outlet.
4. To protect against electrical shock and personal injury, do not immerse this
appliance, including cord and plug, in water or other liquid.
5. Close supervision is necessary when any appliance is used by or near
children.
6. Unplug from outlet when not in use and before cleaning. Allow to cool
completely before putting on or taking off parts, and before cleaning.
7. Do not operate any appliance with a damaged cord or plug or after the
appliance malfunctions or has been damaged in any manner. To avoid
hazard, return appliance to NESCO® Factory Service Department for
examination, repair or adjustment.
8. The use of accessory attachments not recommended by the manufacturer
may cause injuries.
9. Do not use outdoors.
10. Do not let cord hang over edge of table or counter, or touch hot surfaces.
Never pull on cord.
11. Do not place on or near a hot gas or electrical burner or in a heated oven.
1. Extreme caution must be used when moving an appliance containing hot oil
or hot liquids.
13. Do not use appliance for other than its intended use, as described in this
manual.
14. Do not use metal scouring pads on the exterior surface of the Roaster Oven.
Pieces can break off the pads and touch electrical parts creating a shock
hazard.
15. Always place the Roaster Oven on a non-flammable, non-burnable, heat
resistant surface when cooking. Never place it on carpet, furniture, or other
combustible materials. Operate oven in a well-ventilated area away from
walls and other combustible materials.
SAVE THESE INSTRUCTIONS
Polarized Plug: This appliance has a polarized plug (one blade is wider than
the other). To reduce risk of electric shock, plug is intended to fit into polarized
outlet only one way. If the plug does not fit fully into the outlet, reverse the
plug. If it still does not fit, contact a qualified electrician. Do not try to modify
the plug in any way.
Short Cord Instructions: A short power supply cord is provided to reduce
the risk resulting from becoming entangled in or tripping over a longer cord.
Extension cords may be used if care is exercised in their use. If an extension
cord is used, the marked electrical rating of the cord should be at least as great
as the electrical rating of the appliance. The longer cord should be arranged so
that it will not drape over the tabletop where it can be pulled on by children or
tripped over unintentionally.
English
IMPORTANT SAFEGUARDS
Roaster Guide
Introducing the NESCO® Roaster Oven.
Now you are ready to discover more ways to make meals that are both healthful and
delicious . . . and you are ready to experience first-hand the convenience and versatility of
this compact portable electric cooking appliance.
English
NESCO® Roaster Ovens have a long tradition in family home cooking, starting in the 1930’s.
Yet, very few cooking appliances can demonstrate that they are as up-to-date and useful today
as they were in the past. NESCO® Roaster Ovens have truly kept pace with cooking styles,
preferences, occasions and family sizes.
In a short time, you will see the many ways to use your Roaster Oven. Its portability
makes it a moveable main cooking appliance at some times, and a valued supplementary
appliance at other times. Use it at home on your countertop in your kitchen (no more
kitchen heat!) or in a covered patio, basement or garage or away from home in a cabin,
RV or boat. Wherever you use your Roaster Oven, you can prepare a wide range of
favorite foods in different ways - baked, slow-cooked, roasted, steamed or poached. Serve
your foods buffet style or at table-side, right in the Roaster Oven. Moist, good-tasting
foods are yours because of NESCO’s exclusive “CIRCLE OF HEAT” construction.
You’ll taste the difference the first time you use your Roaster Oven. So, start cooking
with NESCO®. Explore all the ways to get the most out of this special home cooking
appliance.
Get To Know Your Roaster Oven
COVER: Heavy gauge high-profile aluminum Cover is designed to control heat and
moisture efficiently. Two vent-holes are provided for air circulation. Note: When lifting
the Cover, tilt it away to divert escaping steam.
RACK: The removable chrome-plated steel or non-stick coated Rack is designed for
better baking and fat-free roasting.
COOKWELL: The porcelain enamel or non-stick Cookwell has a full
6 quart capacity. It is removable for easy clean up in the dishwasher or sink, or food
storage in the refrigerator.
HEATWELL and BODY: The side of the Roaster Oven contains the exclusive
“CIRCLE OF HEAT” element for even, moist cooking, plus the added advantage of thick
insulation and a full range automatic oven temperature control. DO NOT PLACE FOOD
DIRECTLY IN THE HEATWELL, ONLY USE THE COOKWELL.
AUTOMATIC TEMPERATURE CONTROL: Regulates cooking temperature to
maintain the dial setting in the Roaster Oven interior.
TEMPERATURE GUIDE: The conveniently-placed guide gives recommended
temperatures for slow cooking, roasting, baking, steaming and serving.
1.
Unpack your NESCO® Roaster Oven completely and REMOVE ALL PACKAGING
MATERIAL AND INFORMATION LABELS. Place the Roaster Oven in a WELL
VENTILATED AREA ON A HEAT RESISTANT SURFACE. Set the control dial to its
minimum setting. Plug the cord into a 120 volt AC outlet. Return control to maximum
setting (425ºF). Operate the Roaster Oven empty (without the Cookwell or Cover) for
approximately 60 minutes, or until any odor or smoking disappear. Some smoke and
odor are a normal part of “curing” the element and will not reoccur in cooking use. When
curing is completed, turn the temperature control to its lowest setting, unplug the unit
from the electrical outlet and allow to cool.
.
Wash the Cover, Cookwell and Rack in warm sudsy water, then rinse and dry. Refer to
complete cleaning instructions on next page.
3.
NON-STICK COOKWELL: When ‘curing” your Roaster Oven with a non-stick
Cookwell, we recommend that it be operated WITHOUT COVER AND COOKWELL.
Do this in a covered outside area or other well-ventilated area. After curing and cleaning,
and before cooking in your non-stick Cookwell for the first time, lightly coat the interior
of the Cookwell with vegetable oil.
To Operate Your Roaster Oven
1.
Place the Cookwell into the Heatwell. Always use the Cookwell for food. NEVER
PLACE FOOD DIRECTLY IN THE HEATWELL.
.
Preheating is recommended. To preheat, place the Cookwell into the Heatwell and
cover. Set the control dial to its minimum setting. Plug into a 120 volt AC outlet.
Reset the temperature control to desired temperature. Preheat 20 minutes. Carefully,
using hot pads, add food to the Cookwell.
3.
The Rack may be used for baking or fat-free roasting. Other foods, such as soups
and stews, are prepared without the Rack.
4.
Replace the Cover. Always cook with the Cover in place.
5.
If the Roaster Oven has not been preheated, turn the temperature control to its lowest
setting. Plug the cord into a 120 volt AC outlet. Set the temperature control to the
desired temperature. Fill the Cookwell with food as desired.
6.
Cook the food for the desired amount of time. When finished, turn the temperature
control to its lowest setting, unplug the cord from the 120 volt outlet. Allow the
Roaster Oven to cool and clean as recommended below.
COOKWELL, COVER AND ACCUMULATED STEAM WILL BE HOT. USE
CAUTION AND HOT PADS TO LIFT COVER OR REMOVE COOKWELL
FROM HEATWELL.
English
How to Use and Care for your Roaster Oven
before using for the first time
Care and Cleaning
1.
.
English
3.
4.
5.
After the NESCO Roaster Oven has cooled, remove Cover, Rack (if used)
and Cookwell. Wash in warm sudsy water or place Rack and Cookwell in the
dishwasher. CAUTION–DO NOT PUT COVER IN THE DISHWASHER.
Cooked-on food may be removed by using a non-abrasive cleaning pad and nonabrasive cleansers. Do not use abrasive cleaners or steel wool as porcelain enamel
or non-stick finish may scratch. Use a plastic scrubbing pad to remove stains or
cooked-on foods, and also to clean the Rack. HINT: To easily remove baked-on food
residue, place Cookwell in Heatwell; then fill Cookwell with hot water. Cover and
heat at 350ºF for 30 minutes. Turn off and allow to cool completely. Wash cookwell
as directed above.
NEVER IMMERSE THE ROASTER OVEN IN WATER. To clean, wipe outside of
Roaster Oven with a damp cloth and dry. Do not use abrasive cleansers on exterior
surface.
PORCELAIN ENAMEL COOKWELL has a strong finish and provides easy
cleaning and years of use. It will stay attractive, even when used often. However, it
will chip if subjected to sharp blows or is mistreated. Water spots or mineral deposits
(characterized by a white film on surface) may be removed with household vinegar
or non-abrasive cleansers.
NON-STICK COOKWELL is made of durable carbon steel. In order to maintain
the non-stick surface, the use of rubber, plastic or wooden utensils is recommended.
Avoid cutting food in the cookwell. Use of a non-stick spray on the interior
surface is optional. Avoid storing items in the Cookwell which may scratch the
surface. When roasting or baking at high temperatures, you may notice an irregular
band of discoloration around the sidewalls of the Cookwell. This discoloration
is characteristic of the super tough, non-stick coating used on the interior of the
Cookwell and in no way affects the performance or durability of the finish. With
continued use, the discoloration will become less noticeable.
®
Helpful Hints
•
PREHEAT ROASTER OVEN FOR 20 MINUTES.
ROAST:
•
•
•
•
Roasting meat in your NESCO® Roaster Oven keeps it moist and tender.
For additional browning, you can add 1 tsp. browning sauce to 1/4 Cup melted
butter or margarine and brush over skin before roasting.
A 3 lb. to 4 lb. roast with bone is the maximum size suggested for the Roaster Oven.
Larger roasts, especially with a bone, may be difficult to fit into the Cookwell. If
meat and poultry are refrigerator cold, increase cooking time about 30 minutes. If
frozen, allow an additional 15 to 20 minutes per 1 lb. cooking time.
To sear meat: Preheat Roaster Oven at 425ºF. Add margarine. Cover, then sear meat
for 5 to 10 minutes per side until lightly browned. Stir ground meat once. Time will
vary depending on the quantity of meat.
COOK:
•
•
•
Food may be placed in a cold or preheated Roaster Oven. Follow recipe directions
for temperature settings.
Cut-up meats and vegetables should be of uniform sizes.
Remember, little moisture escapes during slow cooking, so add additional liquid
sparingly.
•
•
•
•
•
•
Use the Rack for baking.
A 7 inch pie plate just fits into the Cookwell. For the first half of the recommended
baking time, wrap a foil band (2 in. x 27 in.) around the edge of the crust to prevent
over-browning.
An 8.5 in. x 4.5 in. loaf pan will fit into the Cookwell. It’s an excellent size for
meatloaf and quick breads. Use caution when baking yeast bread loaves, during
baking it is likely they’ll rise close to the Cover and never brown.
The Rack can be covered with foil and used as a “mini” baking sheet for packaged
biscuits or rolls.
A 1.5 quart casserole dish will fit into the Cookwell. Place it on the Rack for better
heat circulation while it bakes. Cover only with the Roaster Oven Cover.
Many frozen foods, such as individual entrees (5 in. x 4 in. or slightly larger) can be
baked in the Roaster Oven simply by following package directions. Place item on
wire rack for best heat circulation while baking.
STEAM:
•
No fat is used when steaming, so it’s an easy way to cook tasty and nutritious lowcalorie foods.
SLOW COOKING:
•
•
•
•
When slow cooking, heat is very gradual. This allows a very slow simmer, which is
aided by keeping the Cover on and no stirring is necessary.
To convert a standard recipe to slow cooking: for each 30 minutes required in a
standard recipe, slow cook about 1-1/2 hours at 200ºF to 250ºF.
When slow cooking meats and poultry, it is not necessary to use the Rack. The low
temperature prevents the meat from sticking to the bottom of the Cookwell.
Remember, little moisture escapes during slow cooking so add additional liquid sparingly.
English
BAKE:
Roasting Chart
Preheat Roaster Oven for 20 minutes. Suggested times are only a guide. Use a meat
therrmometer for more accurate roasting.Set meat on Rack in preheated Cookwell
Avg. Weight
in pounds
Temp. Setting
Preheat/Roast
Ground Beef
2.5 to 3 lb.
425°F/425°F
10 to 12 well
Pot Roast, boneless
2.5 to 3 lb.
350°F/325°F
15 to 18 medium
Round Steak
2.5 to 3 lb.
375°F/325°F
20 to 25 medium
Sirloin Tip
3 to 4 lb.
350°F/325°F
20 to 25 medium
Standing Rump
3 to 4 lb.
350°F/325°F
20 to 25 rare-med
Standing Rump
2.25 to 3 lb.
425°F/400°F
12 to 15 rare-med
Leg, Sirloin, half
3 to 4 lb.
375°F/350°F
25 to 30 well
Shoulder, boneless
3 to 4 lb.
350°F/325°F
25 to 30 med-well
Chops, center cut
2.25 to 3 lb.
400°F/325°F
15 to 20 well
Loin Roast, center
3 to 4 lb.
350°F/325°F
25 to 30 well
Shoulder rolled
3 to 4 lb.
375°F/350°F
25 to 30 well
Ribs, lean country
(Precook ribs to tender;
finish in 425°F Roaster
Oven or on outdoor grill.)
4 to 5 lb.
250°F/250°F
20 to 25 well
Ham slice
1 to 1.5 lb.
350°F/350°F
20 to 25 well
Ham, precooked
3 to 5 lb.
350°F/325°F
15 to 20 heated
2.25 to 3 lb.
350°F/325°F
20 to 25 well
Chicken Pieces
3.5 to 4.5 lb.
400°F/375°F
15 to 20 well
Chicken Whole
3.5 to 4.5 lb.
400°F/400°F
15 to 20 well
Turkey, breast
2.5 to 3 lb.
375°F/325°F
25 to 30 well
Type of Food
Roast Time
in Minutes
BEEF
English
LAMB
PORK
VEAL
Veal Shoulder, roast
POULTRY
*To obtain additional browning on poultry, mix 4 tbsp. melted margarine with 1 tsp.
browning sauce; brush evenly over skin before roasting.
*For crisper skin, baste, then remove liquid during roasting.
Steam/Poach Chart
Place Rack in Roaster Oven, add hot water to the amount given in chart, cover, preheat
to 400°F. Steam all vegetables at 400°F.
To Poach: Place Rack in Roaster Oven. Add hot water to the amount given in the
chart. Cover; preheat to 350°F for 20 minutes. Poaching is a way of gently simmering
foods. There is no fat added during cooking.
Type of Food
Steam Time
Water Amount
Artichoke, trimmed
20 to 25 minutes
1.5 cups
Asparagus, trimmed
8 to 12 minutes
1.5 cups
Green Beans, Whole
10 to 15 minutes
1.5 cups
Beets Whole 2 in. to 3 in.
20 to 25 minutes
2 cups
Broccoli, Flowerettes
10 to 12 minutes
1.5 cups
Cabbage
(quartered or wedges)
12 to 15 minutes
1.5 cups
Carrots Chunks, cleaned
12 to 15 minutes
1.5 cups
Cauliflower, Flowerettes
10 to 12 minutes
1.5 cups
Corn on the Cob, husked
10 to 15 minutes
1.5 cups
Leeks, trimmed
5 to 10 minutes
2 cups
Potatoes Whole, red
20 to 25 minutes
2 cups
Sweet Potatoes 6 oz. ea.
25 to 30 minutes
2 cups
Summer Squash:
Pattypan, Whole small
Zucchini
10 to 15 minutes
1.5 cups
Winter Squash:
Acorn or Butternut
(halved or quartered)
20 to 25 minutes
2 cups
Fish Fillets or Steaks
10 to 15 minutes
1.5 cups
Whole Fish
20 to 25 minutes
2 cups
Clams in Shell
10 to 15 minutes
1.5 cups
Crabs, Claws and Legs
20 to 25 minutes
1.5 cups
Lobster Tails
15 to 20 minutes
2 cups
Shrimp, Large in Shell
10 to 12 minutes
1.5 cups
Fresh Sausages, 2 to 3 oz.
15 to 20 minutes
1.5 cups
Fresh Hot Dogs
10 to 15 minutes
1.5 cups
Fresh Pasta, 9 oz. to 12 oz
15 to 18 minutes
Water to cover, plus 1C
English
To Steam: Place Rack in Roaster Oven. Add hot water to the amount given in the
chart. Cover; preheat to 350°F for 20 minutes. Steaming will retain the delicate texture
and flavor of fish and seafood. Serve hot directly from Roaster Oven. To serve cold:
plunge in cold water to stop cooking, chill before serving.
Baking Chart
Preheat Roaster Oven for 20 minutes. Set Rack in preheated Cookwell
English
Type of Food
Temperature
Setting
Bake Time
in Minutes
Baking Potatoes
400°F
45 to 55
Sweet Potatoes
400°F
40 to 45
Winter Squash:
Butternut, Buttercup, Acorn (halved
or quartered)
400°F
30 to 40
Baked Apples in custard cup
350°F
30 to 35
Here are some popular recipes that will make cooking in
your Nesco Roaster Oven a real joy.
BAKE
Deep Dish Pizza:
1 Loaf Frozen bread dough, thawed
1/4 Cup Sliced Black olives
1 Can (4 Oz.) Pizza sauce
1/2 Cup (2 Oz.) Shredded Mozzarella or
16 Slices Pepperoni
Provolone cheese
1 Can (4 Oz.) Sliced mushrooms
Remove Cookwell. Preheat covered Heatwell to 400˚F.
Lightly wipe Cookwell with cooking oil. Pat bread dough into bottom and 1-inch up sides of
Cookwell. Spread on pizza sauce; top with pepperoni, mushrooms and olives. Sprinkle on cheese.
Place Cookwell in preheated Heatwell. Cover; bake 15 to 20 minutes or until done. Lift edges with
spatula and slide onto serving plate. Cut with pizza cutter.
Serves 2.
For thinner crust divide bread dough in half to make 2 pizzas.
Baked Fish Steaks:
2 Fish steaks (approximately 8 Oz. each)*
1/2 Tsp. Tarragon
1 Tsp. Chopped parsley
1 Tsp. Chopped chives
2 Tbsp. Margarine
*Halibut, tuna, salmon, swordfish.
Set Rack in Cookwell. Preheat Roaster Oven to 350˚F.
Lightly wipe Cookwell with cooking oil. Place steaks on Rack in preheated Cookwell. Arrange half
the margarine, parsley, chives and tarragon on each steak.
Cover; bake 15 to 20 minutes or until fish becomes white and flakes. Serve hot with salsa sauce.
Serves 2 to 4.
10
Layered Enchilada:
1/2 Lb. Ground turkey or beef, crumbled
4 Corn Tortillas
3/4 Cup Tomato juice, divided
1 Can (16 Oz.) Red kidney or pinto beans
1 Can (8 Oz.) Tomato sauce
1 Medium Onion, chopped
1 Tbsp. Diced green chilies
1 Tbsp. Chili powder
1 Cup Cooked brown rice, divided
1/2 Cup (2 Oz.) Cheddar cheese, shredded
Lightly wipe Cookwell with cooking oil. Add meat, onions, chilies, chili powder, salt and pepper.
Cover; cook 5 to 10 minutes or until browned. Remove from Cookwell into small bowl; set aside.
Remove Cookwell onto heatproof surface; cool. Combine 1/3 Cup rice and 1/4 Cup tomato juice in
Cookwell. Layer by placing 2 tortillas, 1/3 Cup rice, half the meat mixture, then half the remaining
ingredients; repeat for second layer topping with cheese
Place Cookwell in preheated Heatwell. Cover; bake 20-30 minutes.
Serves 4.
Spaghetti Pie:
1 Lb. Lean ground beef, crumbled
1 Small Onion, chopped
1 tsp. Chili powder
1 tsp. Italian herb seasoning
1 Pkg. (7 Oz.) Spaghetti noodles, cooked
2 Eggs
1/3 Cup Grated Parmesan cheese
2 Tbsp. Margarine
2 Cups (8 Oz.) Shredded Mozzarella cheese, divided
1 Jar (24 Oz.) Spaghetti sauce
Preheat Roaster Oven to 425˚F.
Lightly spray Cookwell with spray cooking oil. Add meat, onion, chili powder and seasoning. Cover;
cook 10 to 12 minutes or until browned. Remove from Cookwell into bowl; set aside.
Combine spaghetti, eggs and Parmesan cheese. Place margarine in Cookwell. Cover; cook until
melted. Spread evenly over bottom of Cookwell. Spoon spaghetti mixture into Cookwell and pat
with back of spoon over bottom and up 1-inch on sides of Cookwell. Sprinkle half the Mozzarella
cheese over spaghetti crust. Combine meat and spaghetti sauce; pour over spaghetti crust. Sprinkle
on remaining cheese.
Cover; bake 25 to 30 minutes or until center is set.
Serves 4.
Turkey Mornay:
2 Pkgs. (10 Oz. ea.) Frozen broccoli spears, thawed
1 Cup Chicken broth
6 Slices Turkey breast meat (approximately 1 Lb.) 1/4 Lb. Sliced Prosciutto ham
1/4 Cup Grated Parmesan cheese
1 tsp. Chopped parsley
1/2 to 3/4 Cup Milk
1 tsp. Grated Lemon peel
1/4 Cup Margarine
1/4 Cup All purpose flour
Salt and white pepper, to taste
Set Rack in Roaster Oven. Add 1 Cup water. Cover; preheat to 350˚F. for 20 minutes.
Place broccoli spears on Rack. Cover; steam 8 to 10 minutes or until tender. Remove broccoli and
Rack. Discard water from Cookwell, wipe clean.
Meanwhile, melt margarine in medium saucepan over medium heat. Stir in flour to form a roux.
Gradually stir in broth and milk to desired thickness. Add lemon peel, salt and pepper; stir. Remove
from heat.
Lightly wipe Cookwell with cooking oil. Arrange broccoli in Cookwell; layer turkey, then ham.
Pour sauce over meat. Sprinkle Parmesan cheese and parsley over the top. Set Cookwell in hot
Heatwell. Cover; bake 25 to 30 minutes or until bubbly hot.
Serves 4 to 6.
11
English
English
Preheat Roaster Oven to 350˚F.
Baked Stuffed Fillets:
2 Slices Dry bread, finely chopped
1 Tbsp. Lemon juice
1/4 to 1/2 Cup Water
4 (8 Oz.) Orange Roughy or Sole fillets
1/2 tsp. Thyme Paprika, to garnish
1/2 Cup Chopped mushrooms
1/2 Cup Shredded carrots
1/2 Cup Chopped celery
1 Small Onion, chopped
Salt and ground black pepper, to taste
Set Rack in Roaster Oven. Cover; preheat to 350˚F.
English
Combine bread crumbs, vegetables, thyme, salt and pepper in medium mixing bowl. Add lemon
juice and water to desired moistness. Divide and spread evenly over fillets. Roll-up and secure end
with wooden pick.
Lightly wipe Cookwell and Rack with cooking oil. Place rolled fillets on Rack in preheated
Cookwell. Cover; bake 20 to 30 minutes or until fish flakes.
Serves 4.
Twice Baked Sweet Potatoes:
4 Sweet potatoes
2 Tbsp. Margarine
1/4 Cup Milk
2 Tbsp. Brown sugar
1/4 tsp. Almond extract
4 tsp. Margarine
Place Rack in Cookwell. Preheat Roaster Oven to 400˚F.
Clean potatoes; pierce each potato in three places with a fork. Set potatoes on wire rack in preheated
Cookwell.
Cover; bake 40 to 45 minutes or until set.
With paring knife, cut an oval opening in top of each potato; discard oval pieces. Remove pulp and
place in mixing bowl. Add remaining ingredients except for 4 Tsp. margarine; beat until smooth.
Fill potato shells with mixture. Place 1 Tsp. of remaining margarine on top of each potato. Return
potatoes to wire racks.
Cover; bake 40 to 45 minutes or until margarine melts and potatoes are hot.
Serves 4.
COOK
Summer Vegetable Soup:
2 Tbsp. Vegetable oil
2 Lb. Red potatoes, peeled, chopped and cubed
2 Large Carrots, thinly sliced
1/2 tsp. Sweet basil
1/2 tsp. Italian herb seasoning
4 to 5 Cups Chicken broth Grated Parmesan, to serve
1 Lb. Tomatoes, peeled, seeded,
12 Oz. Shelled Peas, fresh or frozen
1 Medium Leek, thinly sliced
1/2 Lb. Asparagus, top stalks
1/2 Lb. Mushrooms, thinly sliced
Salt and ground black pepper, to taste
Preheat Roaster Oven to 400˚F.
Lightly wipe Cookwell with cooking oil. Add oil. Cover; heat 5 minutes. Add vegetables, herbs, salt
and pepper. Cover; cook 15 to 20 minutes.
Add broth to desired thickness. Cover; cook 30 to 40 minutes or until vegetables are tender. Ladle
into bowls, top with Parmesan cheese.
Serves 4.
12
Tomato Bisque:
Preheat Roaster Oven to 350˚F.
Lightly spray Cookwell with spray cooking oil. Add margarine, onions and celery. Cover; cook
10 minutes or until onions are tender. Add salt, pepper, paprika and marjoram. Add flour; stir until
smooth. Gradually add milk; stirring until blended. Cook until slightly thickened.
Add tomatoes and baking soda. Stir in crabmeat and shrimp. Reduce temperature to
250˚F. Cover; cook 15 to 20 minutes or until heated through.
Serves 4 to 6.
New England Clam Chowder:
2 Tbsp. Margarine
1 Large Onion, diced
3 Cups Milk (1%, 2% or whole)
4 Medium Red potatoes, cooked, peeled and diced 1 Can (7 Oz.) Minced clams
2 Tbsp. All purpose flour
Paprika, to garnish
Salt and ground black pepper, to taste
Preheat Roaster Oven to 400˚F.
Lightly wipe Cookwell with cooking oil. Add margarine and onion to Cookwell. Cover; cook 5
minutes or until onions are tender. Add flour; stir to blend. Gradually stir in milk. Add potatoes,
clams, salt and pepper. Cover; cook 10 minutes.
Reduce temperature to 300˚F. Stir. Cover; cook 20 to 30 minutes or until heated through, stirring
once. Do not allow soup to boil or the milk may curdle.
Ladle into bowls and garnish with a dash of paprika.
Serves 4.
Chicken Vegetable Stew:
1 Tbsp. Vegetable oil
1 (3 to 4 Lb.) Chicken, cut into bite-size pieces
1 Medium Leek, thinly sliced
1 Medium Carrot, thinly sliced
1 Cup Chicken stock
Corn starch, to thicken
1 Med. Tomato, seeded, and chopped
1/2 tsp. Poultry seasoning
1/4 tsp. Thyme
1 Medium Parsnip, diced
2 Stalks Celery, thinly sliced
Salt and ground black pepper, to taste
Preheat Roaster Oven to 325˚F.
Lightly wipe Cookwell with cooking oil. Add oil to preheated Cookwell.
Cover; cook 3 to 4 minutes or until hot. Carefully add chicken pieces. Cover; cook 10 minutes,
stirring once.
Add vegetables, seasonings and stock. Cover; cook 30 to 40 minutes or until hot. Thicken stock with
corn starch, if desired.
Serves 4.
13
English
1/4 Cup Margarine
3 to 4 Cups (2% whole, evaporated milk or half and-half)
2 Green onions, finely chopped
1 Lb.Tomatoes, seeded and chopped
1 Stalk Celery, finely chopped
1 tsp. Baking soda
1 tsp. Paprika
1/2 Lb. Lump crabmeat
1/2 tsp. Ground marjoram
1/2 Lb. Chopped shrimp
1/4 Cup All purpose flour
6 Fresh parsley sprigs, to garnish
Salt and ground black pepper, to taste
3 Bean Pot:
English
2 Tbsp. Margarine
1 Large Onion, chopped
1 Clove Garlic, minced
3/4 Cup B-B-Q sauce
1 tsp. Worcestershire sauce
1 Tbsp. Salad mustard
1/2 tsp. Ground black pepper
Preheat Roaster Oven to 300˚F.
Dash seasoned salt
1 Can (16 Oz.) Pinto beans
1 Can (16 Oz.) Red kidney beans
1 Can (16 Oz.) Lima beans
3 Strips Bacon, cooked, crumbled
1/2 Cup (2 Oz.) Shredded Cheddar cheese
Wipe Cookwell with cooking oil. Place margarine in preheated Cookwell. Cover; cook until
margarine melts. Add onion and garlic. Cover; cook 5 to 10 minutes or until onions soften. Add
remaining ingredients except for cheese. Stir to mix. Sprinkle cheese over top.
Cover; cook 50 to 60 minutes or until bubbly hot.
Serves 6.
Lasagna Rollups:
12 Lasagna noodles, cooked
1-1/2 Cups (12 Oz.) Small curd cottage cheese
1 Lb. Ground beef, browned
1 Medium Onion, chopped
1 Jar (24 Oz.) Prepared spaghetti sauce
1 tsp. Italian herb seasoning
1-1/2 Cups (6 Oz.) Shredded Mozzarella cheese
1 tsp. Ground black pepper
Remove 6-Qt. Cookwell; set aside. Preheat covered Heatwell to 350˚F.
Place noodles on clean surface. In mixing bowl, combine beef, onion, herbs, pepper and cottage
cheese. Stir until well blended. Divide meat and cheese mixture into 12 parts; with large spoon,
spread mixture entire length of each noodle. Divide spaghetti sauce in half; spoon evenly over meat
mixture on each noodle. Divide Mozzarella cheese in half; spread evenly over sauce on each noodle.
Roll noodles up.
Wipe Cookwell with cooking oil. Stand rolled up noodles in Cookwell. Pour remaining spaghetti
sauce over noodles, then sprinkle on remaining cheese.
Set Cookwell in Heatwell. Cover; cook 45 to 60 minutes. If noodles start to dry during cooking, add
1/4 Cup hot water.
Serves 4.
Cheesy Spinach Dip:
2 Cups (8 Oz.) Monterey Jack cheese, cut into pieces
2 Lg. Tomatoes, seeded and chopped
1 Pkg. (8 Oz.) Cream Cheese softened
1 Medium Onion, finely chopped
1/3 Cup Half-and-half
1 Pkg. (10 Oz.) Frozen spinach chopped
2 Whole Jalapeno peppers
Crackers, cocktail rye bread or fresh cut vegetables, to serve
Preheat Roaster Oven to 300˚F.
Lightly wipe Cookwell with cooking oil.
In medium mixing bowl, combine all ingredients; stir until well blended. Spoon into preheated
Cookwell. Cover; bake 30 to 40 minutes or until center is set and edges are puffed.
Serve warm with crackers, cocktail rye bread or your choice of cut fresh vegetables.
Serves 8 to 10.
14
Chili:
2 Cans (8 oz.) Tomato sauce
1 Can (16 Oz.) Red kidney beans, drained
1 Clove Garlic, minced
1 Can (16 Oz.) Stewed tomatoes
1 Can (10-3/4 Oz.) Tomato soup
Preheat Roaster Oven to 425˚F.
Lightly wipe Cookwell with cooking oil. Add margarine. Cover; cook until melted. Add meat,
onions and celery. Cover; cook 15 to 20 minutes or until browned.
Reduce temperature to 325˚F. Add remaining ingredients; stir to mix. Cover; cook 30 to 40 minutes
or until bubbly hot.
Serves 8 to 10.
Minestrone Soup:
4 Cups Beef broth
4 Small Red potatoes, peeled, coarsely diced
1/4 Cup Elbow macaroni, uncooked
1 Pkg. (10 Oz.) Mixed frozen vegetables
1 Can (15 Oz.) Great Northern beans
2 Slices Fried bacon, crumbled
Salt and ground black pepper, to taste
1 Can (15 Oz.) Stewed tomatoes
1 Can (2 Oz.) Tomato paste
2 Medium Carrots, peeled, thinly sliced
1 Small Onion, chopped
1 Stalk Celery, thinly sliced
2 Lg. Tomatoes, peeled, chopped
Preheat Roaster Oven to 375˚F.
Add broth and fresh vegetables into preheated Cookwell. Cover; cook 10 minutes. Add stewed
tomatoes, tomato paste and macaroni. Cover; cook 10 minutes.
Add remaining ingredients. Reduce temperature to 300˚F. Cover; cook 30 to 45 minutes or until
macaroni is tender and soup is heated through.
Serves 4 to 6.
Corned Beef and Cabbage:
1 (2 to 2-1/2 Lb.) Corned beef brisket
1/4 tsp. Ground black pepper
1/4 tsp. Rosemary
1 Bay leaf
1 Whole Clove
4 Medium Red potatoes peeled, halved
2 Small Onions, peeled
2 Small Parsnips, peeled, quartered
2 Large Carrots, peeled, quartered
1 Small Cabbage, cut into wedges
Preheat 6-Qt. Roaster Oven to 325˚F.
Lightly wipe Cookwell with cooking oil. Rub seasonings onto outside of brisket. Place meat in
preheated Cookwell. Add enough hot water to reach halfway up meat; add Bay leaf and Clove.
Cover; cook 10 minutes.
Reduce temperature to 250˚F. Add vegetables. Cover; cook 3 to 4 hours or until meat and vegetables
are tender.
Serves 4.
15
English
2 Tbsp. Margarine
2 Lb. Ground beef
1 Medium Onion, chopped
1 Tbsp. Chili powder
1 Tbsp. Italian herb seasoning
2 Tbsp. Brown sugar
ROAST
Chicken Paprikash:
1 (2 to 3 Lb.) Frying chicken, skin removed
3/4 Cup Sour cream or lowfat plain yogurt
1 Pkg. (1-1/4 Oz.) Dry golden onion soup mix
Salt and ground black pepper, to taste
1 tsp. All purpose flour
1 Tbsp. Hungarian paprika
1/4 Cup Chicken broth
Hot egg noodles, to serve
English
Preheat Roaster Oven to 400˚F.
Lightly wipe Cookwell with cooking oil. Arrange chicken in preheated Cookwell. Sprinkle soup mix and
paprika evenly over chicken pieces. Reduce temperature to 375˚F.; cover; roast 25 to 45 minutes (180˚F. on
meat thermometer).
Combine broth, sour cream, flour, salt and pepper in a small mixing bowl. Spoon over and around chicken.
Reduce temperature to 300˚F.; cover; roast 5 to 10 minutes.Serve immediately over hot noodles.
Serves 4 to 6.
Chicken Wings:
1 Lb. Chicken wings
1/4 Cup Seasoned bread crumbs
1/4 Cup Crushed flake cereal
2 Tbsp. Grated Parmesan cheese
1 Tbsp. Chopped Parsley
1 Tbsp. Paprika
Dash Seasoned salt
1/4 Tsp. Ground black pepper
1/2 Clove Garlic, minced
1/4 to 1/3 Cup melted margarine
Set Rack in Roaster Oven. Cover; preheat to 425˚F.
Disjoint wings and discard wing tip ends. Combine remaining ingredients except margarine; stir
until well mixed. Dip wings in melted margarine, then roll in bread crumb mixture. Place on Rack.
Cover; roast 10 minutes. Rearrange center wings to outside edge. Cover; roast 10 to 15 minutes or
until crispy and browned.
Makes 16 pieces.
Pot Roast:
1 (2-1/2 to 3 Lb.) Pot roast
8 Whole Small red potatoes, peeled
1/2 tsp. Browning sauce
4 Large Onions, cut in half
2 Tbsp. Margarine, melted
4 Medium Carrots, cut into chunks
Set Rack in Cookwell. Preheat Roaster Oven to 350˚F.
Lightly wipe Cookwell and Rack with cooking oil. Arrange meat and vegetables on Rack. Stir
together margarine and browning sauce; brush over meat. Cover; roast 10 minutes. Reduce
temperature to 300˚F. Cover; roast 30 to 40 minutes for medium (145˚F. on meat thermometer); 45 to
60 minutes for well done (160˚F. on meat thermometer).
For slow cooking: Brown meat then reduce temperature to 250˚F. and roast 2 to 3 hours or until tender.
Serves 4.
16
Mini-Meat Loaves:
2 Lb. Lean ground beef
1/4 Cup Dry bread crumbs
1/4 Cup Grated Parmesan cheese, divided
1 Green onion, thinly sliced
1/4 Cup Barbecue sauce
1/4 Cup Water
1 tsp. Worcestershire sauce
1 tsp. Italian herb seasoning
2 Tbsp. Dry milk granules
1 Egg
Combine beef, bread crumbs, 2 Tbsp. cheese and milk granules in medium mixing bowl. Add
remaining ingredients except for barbecue sauce; stir until well mixed.
Form into 4 loaves. Place loaves on Rack. Brush barbecue sauce evenly over meat; sprinkle on
remaining Parmesan cheese. Cover; bake 25 to 30 minutes (150˚F. to 160˚F. on meat thermometer).
Serves 4 to 6
Stuffed Pork Chops:
4 Pork chops, center cut, 1-inch thick
1 Green onion, thinly sliced
1 Tbsp. Parsley flakes
1 Cup Seasoned croutons
1 tsp. Italian herb seasoning (or dry bread, cubed) 1/4 Cup Apple juice
1/4 Cup & 2 Tbsp. Margarine, melted, divided
Preheat Roaster Oven to 425˚F.
With tip of knife along the bone, cut pork chops halfway down, then cut toward outside to make
pocket.
In medium mixing bowl, combine croutons, 1/4 Cup margarine, onion, parsley and herbs until well
mixed. Divide stuffing into 4 portions; stuff one portion into each pork chop.
Lightly wipe Cookwell with cooking oil. Pour remaining 2 Tbsp. melted butter into preheated Cookwell.
Arrange pork chops in Cookwell. Cover; bake 5 to 8 minutes or until bottom side is browned. Turn pork
chops over; bake 5 minutes or until other side is browned. Reduce temperature to 300˚F. Add apple
juice. Cover; roast 30 to 40 minutes for well done (170˚F. on a meat thermometer) or until tender.
Serves 2 to 4.
Whole Chicken:
1(3-1/2 to 4-1/2) Lb. Whole Chicken
1 Tbsp. Minced parsley
1 Tbsp. Vegetable oil
1 tsp. Italian herb seasoning
2 Tbsp. Paprika
Set Rack in Cookwell. Preheat Roaster Oven to 400˚F.
Rub skin with oil; rub on seasonings. Lightly wipe Cookwell and Rack with cooking oil. Place bird
on Rack in preheated Cookwell. Reduce temperature to 375˚F.; cover; roast 1 to 1-1/2 hours (180˚F.
on meat thermometer in thickest part of thigh.
17
English
Set Rack in Cookwell. Preheat Roaster Oven to 350˚F.
STEAM / POACH
Poaching Liquid:
English
1 Cup Apple Cider
1/2 tsp Ground Allspice
2 Whole Black Peppercorns
Combine all ingredients in Cookwell.
Preheat Roaster Oven to 350°F. for 20 minutes.
Makes 2 Cups.
1 Cup Hot water
1/4 tsp. Nutmeg
Chicken and Spinach Salad:
Salad:
2 Whole Chicken breasts, boned, skinless
1/4 Cup Italian salad dressing
4 Oz. Spinach leaves, rinsed, stems removed
1 Large Apple, coarsely chopped
1 Stalk Celery, thinly sliced
2 Green onions, thinly sliced
1/2 Cup chopped walnuts
Dressing:
1/2 Cup Italian salad dressing
Ground black pepper, to taste
1/4 Cup Mayonnaise or salad dressing
Cut each chicken breast in half. Place chicken and 1/4 Cup Italian salad dressing in a shallow dish,
cover, marinade 3 to 4 hours.
Set Rack in Roaster Oven. Add 1-1/2 Cups water. Cover; preheat to 350˚F. for 20 minutes.
Remove chicken from marinade and place on Rack with wide spatula. Cover; steam 20 to 25 minutes
or until meat is white and firm.
Meanwhile, place spinach leaves in a large salad bowl. Arrange apples, celery, onions and walnuts
over spinach. Cover; chill while chicken is being steamed.
Stir together dressing ingredients.
To serve, remove hot chicken from Rack. Slice thin retaining shape of meat, set on chilled salad.
Pour dressing over salad. Serve immediately.
Serves 4.
Tangy Beans:
1 Lb. Green string beans, stems removed
2 Tbsp. Granulated sugar
1 Tbsp. Teriyaki sauce
1 Tbsp. Sesame seeds
1 to 2 tsp. Cornstarch
1 Tbsp. Cider vinegar
1/4 Cup Sliced Water chestnuts
1 Green onion, thinly sliced
1/2 Cup Chicken broth, divided
1 Tbsp. Olive oil
Set Rack in Roaster Oven. Add 1-1/2 Cups water. Cover; preheat to 350˚F. for 20 minutes.
Place beans crosswise on Rack. Cover; steam 10 to 12 minutes or until tender. Remove beans and
Rack. Discard water from Cookwell.
Lightly wipe Cookwell with cooking oil. Place steamed beans along with remaining ingredients
except for 2 Tbsp. chicken broth and cornstarch in Cookwell. Stir until well mixed. Place Cookwell
into Heatwell. Cover; bake 20 to 25 minutes.
Blend cornstarch and remaining chicken broth. Stir into bean mixture. Cover; bake 10 to 15 minutes
or until sauce has thickened.
Serves 4.
18
English
NOTES:
19
Garantie Limitee D’Un An
Cet appareil est garanti pour un an à compter de la date originale d’achat, contre
les défauts de matière et de fabrication. La garantie ne couvre pas : transport,
endommagement, utilisation inappropriée, accident ou incident similaire. La présente
garantie vous accorde des droits juridiques spéciaux; il peut en exister d’autres qui varient
d’un état à l’autre.
Les produits défectueux peuvent être retournés en port payé, accompagnés d’une
description du défaut, à :
The Metal Ware Corporation
1700 Monroe Street
Two Rivers, Wisconsin 54241, E.-U.
Français
pour réparation ou remplacement gratuit, à notre choix.
SERVICE : vous pouvez obtenir service et pièces de rechange NESCO® d’origine en
vous adressant à : NESCO® Factory Service Department.
Pour le service aux termes de la garantie, suivez les instructions présentées dans la
garantie. Quand vous commandez des pièces neuves, ne manquez pas de mentionner le
numéro de modèle du produit, qui se trouve au fond du Roaster Oven.
20
- Ce produit est conçu pour usage domestique seulement Lorsque vous employez des appareils électriques, certaines précautions de sécurité
doivent toujours être suivies :
1. LIRE TOUTES LES INSTRUCTIONS.
. Ne pas toucher les surfaces chaudes. Utiliser les poignées et les boutons.
3. Attacher toujours le fil électrique à l’appareil d’abord, puis brancher le fil
dans une prise de courant. Pour déconnecter, remettre tous les contrôles à
zéro (Off) avant de débrancher l’appareil.
4. Pour éviter les décharges électriques, ne jamais plonger l’appareil ou le fil
électrique et la fiche dans l’eau ou autre liquide.
5. En présence d’enfants, tout appareil électrique doit être surveillé
attentivement.
6. Débrancher l’appareil lorsqu’il n’est pas utilisé et avant de le nettoyer.
Attendre qu’il soit froid avant de mettre ou d’enlever des pièces et avant de
le nettoyer.
7. Ne pas utiliser l’appareil si le fil ou la fiche sont abîmés, s’il ne fonctionne
pas bien ou s’il est endommagé d’une manière ou d’une autre. Renvoyer
l’appareil au “Service Department” de l’usine Nesco pour qu’il soit
examiné, réparé ou réglé.
8. L’emploi d’accessoires non recommandés par le fabricant peut causer des
blessures.
9. Ne pas utiliser à l’extérieur.
10. Ne pas laisser le fil électrique pendre au bord des tables ou comptoirs, ou
être en contact avec des surfaces chaudes.
11. Ne pas poser l’appareil sur ou à côté de plaques de cuuisinière chaudes ou à
l’intérieur d’un four chaud.
1. Etre extrêmement prudent lorsque l’appareil est déplacé s’il contient de
l’huile ou des liquides chauds.
13. N’utiliser l’appareil que pour l’emploi pour lequel il est conçu, comme
décrit dans ce manuel.
14. Ne pas utiliser d’éponge métallique pour nettoyer l’extérieur du Roaster
Oven. Des petites particules de métal pourraient toucher des éléments
électriques et causer des chocs électriques.
CONSERVER CES DIRECTIVES
Fiche polarisée : Cet appareil possède une fiche polarisée (une branche est
plus large que l’autre). Pour réduire le risque de choc électrique, la fiche est
conçue pour entrer dans la prise polarisée d’une seule façon. Si la fiche n’entre
pas correctement dans la prise, retourner la fiche. Si elle n’entre toujours pas
correctement, communiquer avec un électricien qualifié. Ne pas tenter de
modifier la fiche.
Directives relatives au cordon court: Un cordon d’alimentation court est fourni
dans le but de réduire le risque de s’y empêtrer ou de trébucher. Des rallonges
peuvent convenir si elles sont utilisées avec prudence. En cas d’utilisation d’une
rallonge, les caractéristiques électriques indiquées sur le cordon doivent être au
moins celles inscrites sur l’appareil. Le cordon long ne doit pas s’étendre d’un
côté à l’autre du dessus de la table où les enfants pourraient le tirer ou quelqu’un
pourrait trébucher involontairement.
21
Français
PRECAUTIONS IMPORTANTES
Guide D’utilisation Du Roaster Oven
Introduction du Roaster Oven NESCO®
Vous allez maintenant découvrir de nouvelles manières de préparer des repas sains et
délicieux. Vous allez pouvoir apprécier la commodité et les diverses manières d’utiliser
cet appareil de cuisine électrique compact et portatif. Depuis le début des années 30, la
compagnie NESCO® produit des Roaster Ovens d’utilisation ménagère. Toutefois, peu
d’appareils ménagers peuvent se venter d’être tout aussi modernes et utiles à l’heure
actuelle qu’ils l’étaient autrefois. Les Roaster Ovens NESCO® ont évolué avec les
nouveaux genres de cuisine et les nouveaux styles de vie familiale.
Français
Vous allez très vite apprécier les divers emplois de votre Roaster Oven. Etant portatif,
il peut parfois servir d’appareil de cuisine principal et d’autres fois servir d’appareil
supplémentaire. Il peut être employé sur le comptoir de votre cuisine (évitant de chauffer
toute la cuisine) … ou sur un patio couvert, au sous-sol, dans le garage … ou dans votre
maison de campagne, votre caravane ou sur votre bateau. Avec votre Roaster Oven, vous
pourrez préparer une variété de nourriture de toutes sortes de manières : cuisson au four,
cuisson lente, rôtissage, cuisson à la vapeur ou pochage. Vous pourrez servir la nourriture
directement dans le Roaster Oven. Grâce à l’unique construction “CIRCLE OF HEAT”
de NESCO®, les aliments restent moëlleux et délicieux. Vous remarquerez la différence la
première fois que vous utiliserez votre Roaster Oven.
Alors, cuisinez avec NESCO®. Découvrez toutes les manières d’utiliser cet extraordinaire
appareil ménager.
Description De Votre Roaster Oven NESCO®
COUVERCLE: Le Couvercle profond est fabriqué en aluminium épais ; il conserve la
chaleur et l’humidité efficacement. Il est muni de deux évents qui laissent l’air circuler.
Note : Lorsque vous soulevez le Couvercle, penchez-le pour que la vapeur se dirige loin
de vous.
GRILLE: La grille amovible antiadhésive en acier chromé offre une meilleure cuisson et
un rôtissage sans matières grasses.
COOKWELL: Le Cookwell émaillé et non-adhésif a une capacité de 5,7 litres. On peut le
retirer pour le nettoyer dans un évier ou au lave-vaisselle, ou pour conserver la nourriture
au réfrigérateur.
HEATWELL et EXTERIEUR: Les parois du Roaster Oven comportent l’élément
exclusif “CIRCLE OF HEAT” qui procure une cuisson uniforme et moëlleuse. Elles
ont une isolation épaisse et un contrôle d’amplitude thermique complet. NE DEPOSEZ
PAS LES ALIMENTS DIRECTEMENT DANS LE HEATWELL - METTEZ-LES
EXCLUSIVEMENT DANS LE COOKWELL.
CONTROLE DE TEMPERATURE AUTOMATIQUE: Il maintient la température à
l’intérieur du Roaster pour qu’elle corresponde à la position du cadran.
GUIDE DE TEMPERATURE: Le guide, commodément placé, indique les températures
recommandées pour la cuisson lente, le rôtissage, la cuisson au four et à la vapeur, et la
consommation.
22
Mode D’Emploi Et Entertien De Votre
Roaster Oven NESCO®
1.
Déballez complètement votre Roaster Oven NESCO. ENLEVEZ TOUT LE MATERIEL
D’EMBALLAGE ET TOUTES LES ETIQUETTES. Placez le Roaster Oven dans un
endroit. Mettez le bouton de contrôle à la position la plus basse. Et branchez dans une
prise de courant alternatif de 120 volts. Réglez le contrôle de température à la température
maximale (425°F). Laissez chauffer le Roaster Oven, vide, pendant 60 minutes environ,
ou jusqu’à ce que l’odeur et la fumée disparaissent. Cette odeur ainsi qu’un peu de fumée
sont normales la première fois que l’élément est chauffé et ne se reproduira plus par la
suite. Réglez ensuite le contrôle de température à la position la plus basse, débranchez
l’appareil et laissez-le refroidir.
.
Lavez le Couvercle, le Cookwell et la Grille à l’eau tiède savonneuse, rincez et séchez.
Vous trouverez les instructions complètes de nettoyage à la page suivante.
Cookwell aux parois non-adhésives : Si le Cookwell de votre Roaster Oven a des parois
non-adhésives, nous recommandons que vous le traitiez pour la première fois SANS LE
COOKWELL ET LE COUVERCLE. Faites cette opération à l’extérieur dans un endroit
protégé ou dans un endroit bien aéré. Après avoir traité, nettoyé et avant de cuire pour la
première fois dans votre Cookwell aux parois non-adhésives , imprégnez légèrement l’intérieur
du Cookwell avec de l’huile de cuisine.
Fonctionnnement De Votre Roaster Oven
1.
.
3.
4.
5.
6.
Placez le Cookwell dans le Heatwell. Employez toujours le Cookwell. NE METTEZ
JAMAIS D’ALIMENTS OU D’EAU DANS LE HEATWELL.
Il est préférable de préchauffer. Pour préchauffer, placez le Cookwell dans le
Heatwell et couvrez. Réglez le contrôle de température au point le plus bas. Et
branchez-le dans une prise de courant alternatif de 120 volts. Réglez le contrôle
de température à la température désirée. Préchauffez pendant 20 minutes. En vous
servant de manettes placez soigneusement les aliments dans le Cookwell.
La grille est utilisée pour cuire au four ou faire rôtir sans graisse. Les autres aliments
tels que les soupes et les ragoûts sont préparés sans utiliser la grille.
Remettez le couvercle; employez toujours le couvercle.
Si le Roaster Oven n’a pas été préchauffé, placez le contrôle de température au point
le plus bas. Branchez le fil dans une prise de courant alternatif de 120 volts. Réglez
le contrôle de température à la température désirée. Placez la nourriture dans le
Cookwell.
Laissez la nourriture cuire le temps désiré. Remettez ensuite le contrôle de
température à la position la plus basse et débranchez le fil électrique. Laissez le
Roaster Oven refroidir et nettoyez-le suivant les indications ci-dessous.
LE COOKWELL, LE COUVERCLE ET LA VAPEUR ACCUMULEE SERONT
TRES CHAUDS. SOYEZ TRES PRUDENT ET PORTEZ DES GANTS DE
PROTECTION POUR RETIRER LE COUVERCLE OU LE COOKWELL DU
HEATWELL
23
Français
AVANT DE L’EMPLOYER POUR LA PREMIERE FOIS.
Entretien Et Nettoyage
1.
.
Français
3.
4.
5.
Après avoir laissé refroidir le Roaster Oven NESCO, enlevez le couvercle, la grille
(le cas échéant), et le Cookwell. Lavez-les à l’eau tiède savonneuse ou mettez-les
dans le lavevaisselle. ATTENTION - NE METTEZ PAS LE COUVERCLE DANS
LE LAVE-VAISSELLE.
Si nécessaire, utilisez un tampon et des détergents non abrasifs pour nettoyer.
N’utilisez pas de détergents abrasifs ou d’éponges métalliques qui pourraient érafler
le fini. Utilisez un tampon en plastique pour nettoyer les taches et la nourriture
attachée ainsi que pour nettoyer la grille.
CONSEIL : Pour nettoyer facilement les aliments collés, placez-le Cookwell dans
le Heatwell. Remplissez le Cookwell d’eau chaude et chauffez à 350°F pendant 30
minutes. Arrêtez l’appareil et laissez-le refroidir complètement. Lavez ensuite le
Cookwell comme indiqué.
NE PLONGEZ JAMAIS LE ROASTER OVEN DANS L’EAU. Pour nettoyer
l’extérieur du Roaster Oven, essuyez-le avec un linge humide. N’utilisez pas de
détergents abrasifs sur la surface extérieure.
Le FINI ÉMAILLÉ DU COOKWELL est très résistant et se nettoie facilement. Il
ne se salit pas et reste en bon état même s’il est souvent employé. Il risque pourtant
de s’ébrécher s’il reçoit des coups violents ou s’il est cogné. Les taches de calcaire
(caractérisées par une pellicule blanche à la surface) se nettoient avec du vinaigre ou
un détergent doux.
Le RÉCIPIENT AMOVIBLE NON-ANTIADHÉSIF est fait d’acier au carbone
durable. Afin de ne pas endommager la surface antiadhésive, on recommande
l’usage d’ustensiles en caoutchouc, en plastique ou en bois. Éviter de couper les
aliments directement dans le récipient amovible. Il n’est pas nécessaire d’utiliser
un vaporisateur antiadhésif sur la surface interne du récipient. Évitar de ranger des
objets dans le récipient pour ne pas l’endommager ou l’égratigner. Au cours de la
cuisson et du rôtissage à haute température, il est possible que la paroi interne du
récipient présente une bande décolorée. Cette décoloration est normale et typique
de la couche antiadhésive ultra-épaisse utilisée sur la surface interne du récipient
amovible, et elle ne compromet en rien l’efficacité et la durabilité du récipient. Après
un usage prolongé, la décoloration devient de moins en moins apparente.
Conseils Pratiques
•
PRECHAUFFEZ TOUJOURS LE ROASTER OVEN PENDANT 20
MINUTES ROTISSAGE.
ROTISSAGE:
•
La viande que vous ferez rôtir dans votre Roaster Oven NESCO® restera tendre
et juteuse. Pour qu’elle soit mieux dorée, ajoutez 12,5 ml de sauce brune à l’huile
utilisée pour l’arroser.
•
Nous recommandons de ne pas cuire de rôtis avec os de plus de 1,4 à 1,8 kg dans
le Roaster Oven . Des morceaux de viande plus gros, surtout avec os, n’entrent pas
facilement dans le Cookwell. Si la viande sort du réfrigérateur, ajoutez 1/2 heure au
temps de cuisson. Si la viande est surgelée, ajoutez de 15 à 20 minutes de plus par
kilogramme au temps de cuisson normal.
•
Pour faire revenir la viande : préchauffez le Roaster Oven à 425°F. Ajoutez la
margarine, Couvrez et laissez dorer la viande de 5 à 10 minutes par côté ou jusqu’à
ce qu’elle ait pris une belle couleur. Décollez une fois la viande hachée. Le temps
variera selon la quantité de viande.
24
Tableau De Cuisson Au Four
Préchauffez le Roaster Oven pendant 20 minutes. Mettez la grille dans le Cookwell.
Type d’aliment
Temperature
Setting (°F)
Temps de Cuisson
(minutes)
Pommes de terre
400°F
de 45 à 55
Patates douces
400°F
de 40 à 45
Courge
(coupée en deux ou en quatre)
400°F
de 30 à 40
Pommes fruits (en petits pots)
350°F
de 30 à 35
25
Français
CUISSON AU JUS:
•
La nourriture peut être placée dans le Roaster Oven s’il est froid ou s’il est
préchauffé. Suivez les recettes pour le réglage de température recommandé.
•
Les morceaux de viande et de légumes doivent être de taille uniforme.
•
Rappelez-vous que peu de liquide s’évapore au cours de la cuisson à feu doux ;
n’ajoutez donc pas beaucoup de liquide.
CUISSON AU FOUR:
•
Employez la Grille pour cuire au four.
•
Un moule à tarte de 18 cm entre parfaitement dans le Cookwell. Nous
recommandons de couvrir le rebord de la tarte avec une bande de papier
d’aluminium (5 x 68 cm) pendant la première moitié du temps de cuisson pour éviter
que la croûte brunisse trop vite.
•
Un moule à pain de 21,5 cm x 11,5 cm peut entrer dans le Cookwell. C’est une très bonne
taille pour cuire des pains de veau ou autres. Méfiez-vous lorsque vous faite cuire du pain à la
levure. Il peut lever très haut, presque toucher le couvercle, et ne pas dorer.
•
Recouvrez la grille d’une feuille de papier d’aluminium avant d’y poser des petits pains
ou biscuits.
•
Un plat à gratin de 1,4 L peut entrer dans le Cookwell. Placez-le sur la Grille
pour que la chaleur circule mieux pendant la cuisson. Couvrez seulement avec le
Couvercle du Cookwell.
•
Beaucoup de plats préparés ou surgelés (12,5 x 10 cm, ou un peu plus grands)
peuvent être cuits dans le Roaster Oven. Suivez les instructions indiquées sur
l’emballage. Posez les plats sur la grille pour qu’ils cuisent de façon plus uniforme.
CUISSON A LA VAPEUR:
•
Aucune matière grasse n’est nécessaire pour cuire à la vapeur. C’est une manière
simple de préparer de la bonne nourriture saine et légère.
CUISSON A FEU DOUX:
•
Lorsque vous faites cuire à feu doux, la nourriture chauffe très lentement. Laissez
mijoter en gardant l’appareil couvert. Il n’est pas nécessaire de remuer.
•
Une recette normale peut être adaptée à une cuisson à feu doux de la manière suivante :
pour chaque 30 minutes de cuisson normale, accordez 1 1/2 heure de cuisson à feu doux
de 200°F à 250°F.
•
Lorsque vous faites cuire de la viande ou de la volaille à feu doux, il n’est pas
nécessaire d’employer la grille. La viande cuite à feu doux ne colle pas au fond du
Cookwell.
•
Rappelez-vous que peu de liquide s’évapore au cours de la cuisson à feu doux ;
ajoutez donc peu de liquide.
Rotissage Tableau De Cuisson Des Viandes Roties
Préchauffez le Roaster Oven pendant 20 minutes. Le nombre de minutes N’EST QU’UN GUIDE.
Servez-vous d’un thermomètre pour rôtir avec plus de précision. Posez la viande sur la Grille dans
le Cookwell préchauffé.
Poids
approximatif
(kg)
Température
préchauff./
cuisson
Nombre de minutes
par kg
Bifteck haché
de 1,1 à 1,4 kg
425°F/425°F
de 20 à 25 - viande bien cuite
Rôti sans os
de 1,1 à 1,4 kg
350°F/325°F
de 20 à 25 - viande bien cuite
Gîte
de 1,1 à 1,4 kg
375°F/325°F
de 40 à 50 - viande à point
Aloyau
de 1,4 à 1.8 kg
350°F/325°F
de 40 à 50 - viande à point
Culotte
de 1,4 à 1,8 kg
350°F/325°F
de 40 à 50 - viande
saignante-à point
Culotte
de 1 à 1,4 kg
425°F/400°F
de 25 à 30 - viande
saignante-à point
Gigot
de 1,4 à 1.8 kg
375°F/350°F
de 50 à 60 - viande bien cuite
Epaule. sans os
de 1,4 à 1,8 kg
350°F/325°F
de 50 à 60 - viande bien
cuite- à point
Côtelettes, centre
de 1 à 1,4 kg
400°F/325°F
de 30 à 40 - viande bien cuite
Rôti de filet, centre
de 1,4 à 1,8 kg
350°F/325°F
de 50 à 60 - viande bien cuite
Epaule roulée
de 1,4 à 1,8 kg
375°F/350°F
de 50 à 60 - viande bien cuite
Côtes maigres, style “country”
Commencer par cuire les côtes jusqu’à
ce qu’elles soient tendres finir à 425°F
dans le Roaster Oven
de 1,8 à 2,3 kg
250°F/250°F
de 40 à 50 - viande bien
cuite
Jambon en tranches
de 454g à 681g
350°F/350°F
de 40 à 50 - viande bien cuite
Jambon pré-cuit, sans os
de 1,8 à 2,3 kg
350°F/325°F
de 30 à 40 - réchauffage
de 1 à 1,4 kg
350°F/325°F
de 40 à 50 - viande bien cuite
Poulet en morceaux cuite
de 1,6 à 2 kg
400°F/375°F
de 30 à 40 - volaille bien
Poulet entier
de 1,6 à 2 kg
400°F/400°F
de 30 à 40 - volaille bien cuite
Poitrine de dinde désossée
de 1,1 à 1,4 kg
375°F/325°F
de 50 à 60 - volaille bien cuite
Type d’aliment
BŒF
Français
AGNEAU
PORC
VEAU
Epaule
VOLAILLE
•
Pour que la volaille soit mieux dorée, mélangez 60 ml de margarine fondue à 5 ml de sauce
brune, et badigeonnez la volaille avant de la mettre à rôtir.
•
Pour que la peau soit plus croustillante, arrosez la viande et retirez le liquide pendant la cuisson.
26
Cuisson A La Vapeur/Pochage
Tableau De Cuisson Des Legumes A La Vapeur
Posez la Grille dans le Roaster Oven, ajoutez la quantité d’eau chaude indiquée ci-dessous,
couvrez et préchauffez à 400°F. Cuisez tous les légumes à 400°F.
Cussion à la Vapeur: Posez la Grille dans le Roaster Oven. Ajoutez la quantité d’eau chaude
appropriée indiquée sur le tableau. Couvrez. Préchauffez à 350°F pendant 20 minutes. Le cuisson
à la vapeur conserve la texture et la saveur délicates du poisson et des fruits de mer. Servez chaud
directement du Roaster Oven. Pour servir froid : plongez dans l’eau froide pour arrêter la cuisson,
mettez au réfrigérateur avant de servir.
Pour pocher les aliments: Posez la Grille dans le Roaster Oven. Ajoutez la quantité d’eau
indiquée au tableau. Couvriez ; préchauffez à 350°F pendant 20 minutes.
Le pochage est une méthode de cuisson sans ébullition. La cuisson ne demande pas de graisse.
Temps de vapeur
Quantité d’eau
de 20 à 25
356 ml
Asperges parées
de 8 à 12
356 ml
Haricots verts entiers
de 10 à 15
356 ml
Betteraves entières, de 5 à 8 cm
de 20 à 25
474 ml
Fleurs de broccoli, parées
de 10 à 12
356 ml
Chou, quartiers ou sections
de 12 à 15
356 ml
Carottes en morceaux, nettoyées
de 12 à 15
356 ml
Fleurs de chou-fleur, parées
de 10 à 12
356 ml
Epi de maïs, épluché
de 10 à 15
356 ml
Poireaux, parés
de 5 à 10
474 ml
Pommes de terre entières,
petites, rouges
de 20 à 25
474 ml
Patates douces, de 175 g. chacune
de 20 à 25
474 ml
Courge, qualité Pattypan
Petites courgettes entières
de 10 à 15
356 ml
Potiron, qualité Acorn
ou Butternutt, moitiés ou quartiers
de 20 à 25
474 ml
Tranches, Filets de poisson
de 10 à 15
356 ml
Poisson entier
de 20 à 25
474 ml
Palourdes dans la coquille
de 10 à 15
356 ml
Crabe, pinces et pattes de
de 20 à 25
356 ml
Homard, queues
de 15 à 20
474 ml
Moules dans la coquille
de 10 à 15
356 ml
Crevettes, grosses, non décortiquées
de 10 à 15
356 ml
Blancs de poulet sans peau
de 25 à 30
712 ml
Saucisses fraîches
de 15 à 20
712 ml
Pâtes fraîches, de 255 g à 340 g
de 15 à 18
Recouvrir
d’eau plus 1 tasse
27
Français
Type d’aliment
Artichaut paré
Un Año De Garantia Limitada
Este artefacto está garantizado por un año desde la fecha original de compra contra
defectos en material y mano de obra. Esta garantía no cubre daños de transporte, mal uso,
accidente o incidente similar. Esta garantía le da a Ud. derechos especiales legales y Ud.
puede tener otros derechos que varían de un estado a otro.
Productos defectuosos pueden ser devueltos, porte prepagado, con una descripción del
defecto a:
The Metal Ware Corporation
1700 Monroe Street
Two Rivers, Wisconsin 54241
para reparación sin recargo o reemplazo a nuestra opción.
SERVICIO. Servicio y piezas genuinas NESCO® pueden ser obtenidas del
DEPARTAMENTO DE SERVICIO DE LA FABRICA NESCO®.
Español
Para servicio bajo la garantía, siga las instrucciones indicadas en la garantía. Cuando
ordene partes nuevas, asegúrese que Ud. siempre mencione el número del modelo del
producto el cual está en el fondo del Horno Asador.
28
- Este Artefacto es para Uso Doméstico Cuando se usen artefactos eléctricos, se deben tomar precauciones básicas
incluyendo lo siguiente:
1. LEA TODAS LAS INSTRUCCIONES.
. No toque superficies calientes. Use las asas o mangos.
3. Siempre conecte el enchufe en el artefacto primero, luego enchufe el cable
en el tomacorriente de la pared. Para desconectar, apague cualquier control,
luego desconecte el cable del tomacorriente de la pared.
4. Para protegerse de choque eléctrico, no sumerja este artefacto, incluyendo
cable y enchufe, en agua o en otro líquido.
5. Supervision cercana es necesaria cuando cualquier artefacto es usado por o
cerca de niños.
6. Desconéctelo del tomacorriente cuando no esté en uso y antes de limpiarlo.
Dejelo enfriar completamente antes de ponerle o quitarle partes y antes de
limpiarlo.
7. No opere artefacto alguno con el cable o el enchufe dañados o después
de que el artefacto falló o ha sido dañado en alguna forma. Devuelva el
artefacto al Departamento de Servicio de la Fábrica NESCO® para examen,
reparación o ajuste.
8. El uso de accesorios que no hayan sido recomendados por el manufacturero
pueden causar lesiones.
9. No lo use a la intemperie.
10. No deje que el cable cuelgue fuera del borde de la mesa o meseta, o que
toque superficies calientes.
11. No lo coloque sobre o cerca de quemadores eléctricos o de gas o en un
horno caliente.
1. Se debe tomar extrema precaución cuando se muevan artefactos que
contienen aceite caliente o líquidos calientes.
13. No use el artefacto para otro uso que no sea el indicado, como indica este
manual.
14. No use almohadillas metálicas para fregar la superficie exterior del Horno
Asador. Pedazos de la almohadilla se pueden safar y tocar partes eléctricas
creando peligro de choque eléctrico.
GUARDE ESTAS INSTRUCCIONES
Se provee un cable corto para reducir el peligro de enredarse o tropezarse
sobre un cable más largo. Cables más largos y cables de extensión estan
disponibles y pueden ser usados si la capacidad eléctrica del cable es por
lo menos tan grande como la capacidad eléctrica del artefacto y si se tiene
cuidado de colocar el cable más largo de tal forma que no cuelgue fuera de
la mesa o meseta de donde puede ser halado por niños o tropezarse con éste
accidentalmente.
Enchufe polarizado: Esta aplicación tiene un enchufe polarizado (una lámina
es más ancha que la otra). Para reducir riesgo de la descarga eléctrica, el enchufe
se piensa para caber en una forma polarizada del enchufe solamente. Si el
enchufe no cabe completamente en el enchufe, invierta el enchufe. Si todavía
no cabe, entre en contacto con a electricista cualificado. No intente modificar el
enchufe de ninguna manera.
29
Español
PRECAUCIONES IMPORTANTES
Guía del asador
Presentando el Horno Asador NESCO®
Ahora usted está listo para descubrir más maneras de preparar comidas que son
saludables y deliciosas. Y, ahora usted está listo para experimentar usted mismo la
conveniencia y versatilidad de este artefacto eléctrico compacto y portatil para cocinar.
Los Hornos Asadores NESCO® tiene una larga tradición en la cocina casera, principiando
en los años de 1930. Aunque, muy pocos artefactos para cocinar pueden demostrar
que estos están tan al día y útiles hoy como fueron en el pasado. Los Hornos Asadores
NESCO® han mantenido el paso con los estilos de cocinar, preferencias, ocasiones y
tamaños de familia.
Español
En poco tiempo, usted verá las muchas maneras de usar su Horno Asador. Su portabilidad
lo hace un artefacto primordial, movible algunas veces, y un artefacto suplementario
valioso otras veces. Uselo en su casa sobre su meseta en su cocina (no más calor de
cocina!)…o en un patio cubierto, sótano o garaje…o lejos de su casa en una cabaña, en
un RV (auto de recreo) o bote. Donde quiera que usted use su Horno Asador, usted podrá
preparar una gran variedad de comidas favoritas en diferentes formas-horneadas, cocción
lenta, asados, al vapor, o escalfados. Y sirva sus comidas al estilo buffet o al lado de la
mesa y ahí mismo dentro del Horno Asador. Comidas jugosas y de buen sabor son suyas
debido a la construcción exclusiva de NESCO® “CIRCLE OF HEAT” (Circulo de Calor).
Usted se dará cuenta de la diferencia la primera vez que usted use su Horno Asador.
Así que principie a cocinar con NESCO®. Explore todas las maneras para sacarle el
máximo uso a este artefacto especial para cocinar en la casa.
Conozca Su Horno Asador Nesco®
TAPA: La Tapa es de aluminio grueso de alta calidad, esta diseñada para controlar el
calor y la humedad eficientemente. Se proveen 2 aberturas de ventilación. Nota: Cuando
levante la Tapa, muévala lejos de usted para desviar el vapor que se escapa.
REJILLA: La rejilla separable de acero/que-no-se-pega cromada, ha sido diseñada para
para hornear y asar sin grasa.
COOKWELL: El recipiente Cookwell de esmalte de porcelana tiene capacidad para 5.7
litros completos. Es removible para limpieza fácil en el lavaplatos o fregadero, o para
guardar comidas en la nevera.
HEATWELL y BASE: E lado del Horno Asador contiene el elemento exclusivo de
calor “CIRCLE OF HEAT” (circulo de calor) para cocinar parejamente y con humedad,
más la ventaja adicional de aislamiento espeso y un control automático de temperatura
de alcance completo. NO PONGA COMIDA DIRECTAMENTE EN EL “HEAT
WELL”- SOLAMENTE EN EL COOKWELL.
CONTROL AUTOMATICO DE TEMPERATURA: Regula la temperatura de cocinar
para mantener la posición del dial en el interior del Horno Asador.
GUIA DE TEMPERATURA: El guía convenientemente colocado le da temperaturas
recomendadas para cocción lenta, asar, hornear, cocinar al vapor y servir.
30
Como Usar Y Cuidar Su Horno Asador Nesco®
Antes De Usarlo Por Primera Vez
1.
Desempaque su Horno Asador NESCO® y REMUEVA TODO EL MATERIAL DE
EMPAQUE Y AVISOS DE INFORMACION. Coloque el Horno Asador en una Área
bien ventilada y sobre una superficie resistente al calor. Ponga el dial de control en su
posición mínima. Conecte el cable en un tomacorriente de 120 voltios AC. Vuelva a
poner el control en la posición máxima 425°F. Haga funcionar el Horno Asador vacío
por aproximadamente 60 minutos, o hasta que cualquier olor o humo desaparezca. Un
poco de humo y olor son normales para (curar) el elemento y no reocurrirá cuando se esté
cocinando. Cuando la “curación” esta terminada, ponga el control de temperatura en su
posición más baja, desconecte la unidad del tomacorriente de la pared y déjela enfriar.
.
Lave la Tapa, Cookwell y Parrilla en agua medio-caliente y jabonosa, luego enjuáguela y
séquela. Refiérase a la página siguiente para instrucciones completas de limpieza.
Para Operar Su Horno Asador
1.
.
3.
4.
5.
6.
Coloque el “Cookwell” dentro del “Heatwell”. Siempre use el Cookwell para
comida. Nunca ponga comida directamente en el “Heatwell”.
Se recomienda calentar de antemano. Para calentar de antemano, coloque el
“Cookwell” dentro del “Heatwell” y tápelo. Mueva el dial de control a su posición
más baja. Conecte el cable al horno asador y enchúfelo dentro de un tomacorriente
AC de 120 voltios. Vuelva a poner el control de temperatura a la temperatura
deseada. Caliéntelo de antemano por 20 minutos. Cuidadosamente, usando
almohadillas para calor, agregue comida al “Cookwell”.
La Parrilla puede ser usada para hornear o para asar sin grasa. Otras comidas, tales
como sopas y estofados, son preparadas sin la Parrilla.
Vuelva a poner la Tapa. Siempre cocine con la Tapa puesta.
Si el Horno Asador no ha sido precalentado, ponga el control de temperatura en su
posición más baja. Conecte el cable en un tomacorriente AC de 120 voltios. Coloque
el control de temperatura a la temperatura deseada. Llene el “Cookwell” con comida
como se desee.
Cocine la comida por el tiempo deseado. Cuando termine, ponga el control de
temperatura en su posición más baja, desconecte el cable del tomacorriente de 120
voltios. Deje que el Horno Asador se enfríe y límpielo como se recomienda abajo.
EL COOKWELL, LA TAPA Y EL VAPOR ACUMULADO ESTARAN
CALIENTES. TENGA CUIDADO Y USE ALMOHADILLAS PARA CALOR
PARA LEVANTAR LA TAPA O REMOVER EL COOKWELL DEL HEATWELL.
31
Español
COOKWELL ANTIPEGANTE: Cuando “cure” su Horno Asador NESCO® con el
“Cookwell” antipegante nosotros recomendamos que sea operado SIN LA TAPA Y EL
COOKWELL. Haga esto en una area cubierta afuera o cualquier area bien ventilada. Después
de curar y limpiar, y después antes de cocinar en su Cookwell antipegante por primera vez,
cubra ligeramente el interior del Cookwell con aceite vegetal.
Cuidado Y Limpieza
1.
.
3.
4.
Español
5.
Después que el Horno Asador NESCO se ha enfriado, remueva la Tapa, la Parrilla
(si fué usada) y el “Cookwell”. Lávelo en agua medio caliente y jabonosa o póngalo
en el lavaplatos. PRECAUCION: no ponga la Tapa en el lavaplatos.
Comida pegada puede ser removida usando una almohadilla para fregar que no sea
abrasiva y limpiadores que no sean abrasivos. No use limpiadores abrasivos o lana
de acero porque el esmalte de porcelana del acabado se puede rayar. CONSEJO:
Para remover comida pegada facilmente, ponga el “Cookwell” en el “Heatwell”;
luego llene el “Cookwell” con agua caliente. Tápelo y caliéntelo a 350°F por 30
minutos. Apáguelo y déjelo enfriar completamente. Lave el “Cookwell” como se
indica arriba.
NUNCA SUMERJA EL HORNO ASADOR EN AGUA. Para limpiar, limpie el
exterior del Horno Asador con un trapo mojado y séquelo. No use limpiadores
abrasivos sobre la superficie exterior.
EL ESMALTE DE PORCELANA DEL COOKWELL tiene un acabado fuerte y
provee limpieza fácil y años de uso. Este no se manchará y se mantiene atractivo
aun cuando se use con frecuencia. Sin embargo, se desportillará si se golpea
fuertemente o es mal tratado. Gotas de agua o depósitos minerales (caracterizado por
una película blanca sobre la superficie) pueden ser removidos con vinagre casero o
limpiadores que no sean abrasivos.
El Inserto COOKWELL Que-no-se-pega está hecho de acero al carbono duradero.
Para dar mantenimiento a la superficie que-no-se-pega, se recomienda el uso
de utensilios de caucho, plástico o madera. Evite cortar la comida en el inserto
Cookwell. El uso de rocío que-no-se-pega es optativo. Evite almacenar artículos
en el “Cookwell,” ya que pueden rasguñar su superficie. Cuando hornee o ase
en temperturas altas, es posible que note una banda descoloreada a lo largo de
las paredes internas del “Cookwell.” Esta descoloración escaracteristica del
recubrimiento que-no-se-pega extra-duro, que se usa en el interior del “Cookwell,”
y no afecta el rendimiento o durabilidad del acabado. Con uso continuo, esta
descoloración se hará menos notable.
Consejos Utiles
•
CALIENTE DE ANTEMANO EL HORNO ASADOR POR 20 MINUTOS.
ASAR:
•
El asar carne en su Horno Asador NESCO® la mantiene húmeda y blanda. Para
dorado adicional, usted puede agregar 12.5 ml de salsa para dorar al aceite y untarla
con una brocha antes de asarla.
•
Un carne de 1.4 a 1.8 kg para asar, con hueso, es el tamaño máximo sugerido para
el Horno Asador. Carnes para asar de mayor tamaño especialmente con hueso,
sería difícil de meter dentro del “Cookwell”. Si la carne de res o carne de ave
estan demasiado frías, incremente el tiempo de cocinar cerca de 1/2 hora. Si está
congelada, agregue 15 a 20 minutos más para cocinar por .5 kg.
•
Para asar en forma rápida: caliente de antemano el Hornoa Asador a 425°F. Agregue
margarina, tápelo, luego cocine la carne en forma rápida de 5 a 10 minutos cada
lado hasta que esté ligeramente dorada. Revuelva la carne molida una vez. El tiempo
varía dependiendo de la cántidad de carne.
32
Grafica De Hornear
Caliente de antemano el Horno Asador por 20 minutos. Ponga la parrilla en el
“Cookwell”.
Tipo de Comida
Posición de
Temperatura
Tiempo de Horneo
en minutos
Papas de hornear
400°F
45 a 55
Papas dulces
400°F
40 a 45
Calabazas
400°F
30 a 40
Manzanas horneadas en recipientes
350°F
30 a 35
33
Español
COCINAR:
•
La comida se puede poner en el Horno Asador frío o precalentado. Siga las
instrucciones de la receta para la posición de la temperatura.
•
Los pedazos cortados de carne y vegetales deben ser de tamaños uniformes.
•
Recuerde, que poca humedad se escapa durante la cocción lenta así que agregue
poca de agua
HORNEAR:
•
Use la Parrilla para hornear.
•
Un plato para torta de 18 cm encaja perfectamente en el “Cookwell” . Por la
primera mitad del tiempo recomendado para hornear, póngale una hoja de papel de
aluminio (5 cm x 68 cm) alrededor del borde de la costra para prevenir que se dore
demasiado.
•
Un molde para pan de 21.5 cm x 11.5 cm cabrá dentro del “Cookwell”. Es un
tamaño excelente para torta de carne y panecillos. Tenga cuidado cuando cocine pan
con levadura, durante el horneo es posible que el pan crezca hasta cerca de la Tapa y
no se dore.
•
La Parrilla puede cubrirse con papel de aluminio y usarla como una bandeja para
hornear bizcochos o panecillos.
•
Un plato de cacerola de 1.5 L cabrá dentro del “Cookwell”. Colóquelo sobre la
Parrilla para mejor circulación del calor mientras se hornea. Tápelo solamente con la
tapa del Horno Asador.
•
Muchas comidas congeladas, tales como platos principales individuales (12.5
cm x 10 cm o un poco más grande) pueden ser horneadas en el Horno Asador
simplemente siguiendo las instrucciones del paquete. Coloque el artículo sobre la
parrilla de alambre para mejor circulación del calor mientras hornea.
AL VAPOR:
•
No se usa manteca cuando se cocina al vapor, así es que es una manera fácil de
cocinar comidas nutritivas sabrosas y de bajas calorías.
COCCION LENTA:
•
Cuando se cocine lentamente, el calor es muy gradual. Esto permite un
calentamiento lento, y ayuda no poner la tapa y rebullir no es necesasrio.
•
Para convertir una receta común a cocción lenta: por cada 30 minutos requeridos en
una receta común, cocine lentamente cerca de 1-1/2 horas a 200°F-250°F.
•
Cuando se cocinen lentamente carnes y aves, no es necesario usar la Parrilla. La
temperatura baja previene que la carne se pegue en el fondo del “Cookwell”.
•
Recuerde que poca humedad se escapa durante la cocción lenta así que agregue poco
líquido.
Grafica Para Asar
Precaliente el Horno Asador por 20 minutos. Los tiempos sugeridos son solamente una
guía. Use un termómetro de carnes para und asado más exacto. Ponga la carne sobre la
Parrilla en el Cookwell calentado de antemano.
Promedio de Peso
en Kg
Posicion de
Precalentar/Asar
Minutos aprox.
por Kg
Carne Molida
1,1 kg a 1,4 kg
425°F/425°F
40 a 50 bien cocido
Carne de Res para Asar,
sin hueso
1,1 kg a 1,4 kg
350°F/325°F
60 a 70 med cocido
Biftec
1,1 kg a 1,4 kg
375°F/325°F
80 a 95 med cocido
Solomillo, punta
1,4 kg a 1,8 kg
350°F/325°F
80 a 95 med cocido
Cuarto Trasero
1,4 kg a 1,8 kg
350°F/325°F
80 a 95 med crudo
Filete, mitad
1 kg a 1,4 kg
425°F/400°F
50 a 60 med crudo
Media Pierna
1,4 kg a 1,8 kg
375°F/350°F
85 a 95 bien cocido
Paletilla, enrollada
1,4 kg a 1,8 kg
350°F/325°F
85 a 95 med cocido
Chuletas, del centro 1
pulgada
1 kg a 1,4 kg
400°F/325°F
70 a 120 bien cocido
Lomo para asar, centro
1,4 kg a 1,8 kg
350°F/325°F
90 a 120 bien cocido
Paletilla, enrollada
1,4 kg a 1,8 kg
375°F/350°F
90 a 120 bien cocido
Costillas, sin grasa
(Cocine de antemano las
costillas hasta que esten
blandas; terminelas en
temperatura de 425°F en
el Horno Asador o en una
Parrilla afuera).
1,8 kg a 2,3 kg
250°F/250°F
90 a 120 bien
cocido
Tajada de Jamón
454 g a 681 g
350°F/350°F
90 a 120 bien cocido
Jamón, precocinado,
sin hueso
1,8 kg a 2,3 kg
350°F/325°F
70 a 80 para calentar
1 kg a 1,4 kg
350°F/325°F
90 a 120 bien cocido
Pedazos de pollo
1,6 kg a 2 kg
400°F/375°F
60 a 80 bien cocido
Pollo Entero
1,6 kg a 2 kg
400°F/400°F
60 a 80 bien cocido
Pechuga de Pavo sin hueso
1,1 kg a 1,4 kg
375°F/325°F
90 a 120 bien cocido
Tipo de Comida
CARNE DE VACA
CORDERO
Español
CERDO
TERNERA
Paletilla para asar
AVES DE CORRAL
•Para obtener un dorado mejor en carne de aves, mezcle 60 ml de margarina derretida 5 ml de
salsa para dorar; úntela con una brocha de cocina en forma pareja sobre el cuero antes de asarla.
•Para cuero más tostado úntelo con la brocha, luego remueva el líquido durante el período de asar.
34
Grafica Para Cocinar Al Vapor O Escaidar
Coloque la Parrilla en el Horno Asador, agregue agua caliente hasta la cantidad que
indica la gráfica, tápelo, precaliente a 400°F. Cocine al vapor todos los vegetales a 400°F.
Para Cocinar al Vapor: Coloque la Parrilla en el Horno Asador. Agregue agua
caliente hasta la cantidad indicada en la grafíca. Tápelo; precaliente a 350°F por 20
minutos. El cocinar al vapor retiene la textura delicada y sabor a pescado y comida
marina. Sírvala caliente directamente del Horno Asador. Para Servirla Fría: sumérjala
en agua fría para que pare de cocinarse, y refrigérela antes de servirla.
Para Escaldar: Coloque la Parrilla en el Horno Asador. Agregue agua caliente hasta la
cantidad indicada en la grafíca. Tápelo; precaliéntelo a 350°F por 20 minutos.
Tiempo al Vapor
Cantidad de Agua
20 to 25 minutes
356 ml
Espárragos recortados
8 to 12 minutes
356 ml
Judías Verdes, enteras
10 to 15 minutes
356 ml
Remolachas, enteras
20 to 25 minutes
474 ml
Tallos y florecitas, recortadas
10 to 12 minutes
356 ml
Repollo en cuartos o tajadas
12 to 15 minutes
356 ml
Zanahorias, en pedazos,
limpias
12 to 15 minutes
356 ml
Coliflor , florecitas, recortadas
10 to 12 minutes
356 ml
Mazorca de maíz, peladas
10 to 15 minutes
356 ml
Puerros, recortados
5 to 10 minutes
474 ml
Papas, enteras, pequeñas rojas
20 to 25 minutes
474 ml
Papas dulces .75 ml.
25 to 30 minutes
474 ml
Calabaza de verano, entera
Zucchini pequeña
10 to 15 minutes
356 ml
Calabazas de invierno mitades
o cuartos
20 to 25 minutes
474 ml
Filetes de Pescado, Biftec
10 to 15 minutes
356 ml
Pescado Entero sin aletas
20 to 25 minutes
474 ml
Almejas en la concha
10 to 15 minutes
356 ml
Cangrejo tenazas y piernas
20 to 25 minutes
356 ml
Langostas, colas
15 to 20 minutes
474 ml
Mejillones, en la concha
10 to 15 minutes
356 ml
Ostras, en la concha
Pasta Fresca 255 g a 340 g
10 a 15 minutes
356 ml
15 a 18 minutes
226 ml
35
Español
Tipo de Comida
Alcachofas recortadas
The Metal Ware Corporation, Two Rivers, WI 54241 USA
66830