1
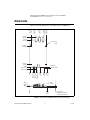
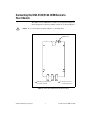
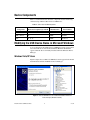
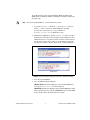
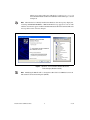
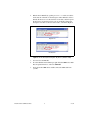
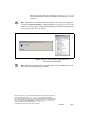
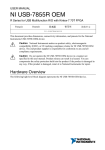
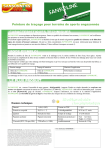
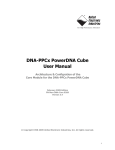
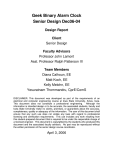
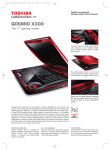
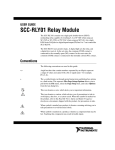
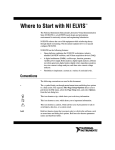
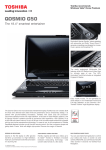
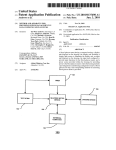
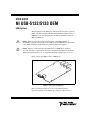
USER GUIDE
NI USB-5132/5133 OEM
USB Digitizers
This document provides dimensions and information about the connectors,
LEDs, and chassis ground of the National Instruments USB-5132/5133
OEM devices. It also explains how to modify the USB device name in
Microsoft Windows.
There are no product safety, electromagnetic compatibility (EMC), or
CE marking compliance claims made for the USB-5132/5133 OEM devices. Conformity
to any and all compliance requirements rests with the end product supplier.
Caution
Caution Exercise caution when placing USB-5132/5133 OEM devices inside an
enclosure. Auxiliary cooling may be necessary to keep the device under the maximum
ambient temperature rating of 55 °C, as specified in the NI 5132/5133 Specifications.
Figure 1 shows the USB-5132/5133 OEM device.
Figure 1. USB-5132/5133 OEM Device
Refer to the NI 5132/5133 Specifications document for device
specifications. Refer to the NI High-Speed Digitizers Help for more
information about USB-5132/5133 devices. You can find all
documentation at ni.com/manuals.
Dimensions
2.943
(74.75)
2X 3.604
(91.54)
2.178
(55.32)
1.413
(35.89)
2X .182
(4.62)
Figure 2 shows the dimensions of the USB-5132/5133 OEM device.
6.602
(167.69)
5.959
(151.35)
4X Ø .149
(3.78)
2X 4.726
(120.04)
2X .694
(17.63)
.142 (3.61)
2X .075 (1.91)
3.786
(96.16)
3.086
(78.34)
2.257
(57.33)
1.530 (38.86)
.700 (17.78)
.957 (24.31)
1.399 (35.53)
.000
.000
.225 (5.72)
.310 (7.87)
.526
(13.36)
.000
3.786
(96.16)
.062
(1.58)
.000
.138 (3.51)
Minimum clearance
needed below board
Figure 2. USB-5132/5133 OEM Dimensions in Inches (millimeters)
NI USB-5132/5133 OEM User Guide
2
ni.com
Connecting the USB-5132/5133 OEM Device to
Your Chassis
The USB-5132/5133 OEM device includes several plated mounting holes
that are designed for customer grounded connections, as shown in Figure 3.
Caution
Do not use the holes labeled A in Figure 3 as mounting holes.
Ground
A
A
Mounting Hole Connected
to Chassis Ground
A Do Not Use These
as Mounting Holes
Figure 3. USB-5132/5133 OEM Customer Mounting Holes
© National Instruments Corporation
3
NI USB-5132/5133 OEM User Guide
Device Components
Table 1 contains information about the components used for interfacing
and interacting with the USB-5132/5133 OEM device.
Table 1. USB-5132/5133 OEM Components
Component
Reference Designator(s) on PCB
Manufacturer
Manufacturer
Part Number
LEDs
DS1
Sunled
XVQ1LUG41D
USB connector
J4
AMP
292304-1
BNC
J1, J3, J5
AMP
5413631-1
Modifying the USB Device Name in Microsoft Windows
You can change how the USB-5132/5133 OEM device name appears when
users install the device in both the Found New Hardware Wizard that
appears when the device is initially installed and in the Windows Device
Manager.
Windows Vista/XP Users
Figure 4 depicts how a USB-5133 OEM device name appears in the Found
New Hardware Wizard and Windows Device Manager.
Figure 4. USB-5133 OEM Device in the Found New Hardware Wizard and
Device Manager (Windows Vista/XP)
NI USB-5132/5133 OEM User Guide
4
ni.com
To modify the device name in the Found New Hardware Wizard and
Windows Device Manager in Microsoft Windows Vista/XP, complete the
following steps.
Note
You must have NI-SCOPE 3.4 or later installed on your PC.
1.
Locate the NIHSD2k.inf file in the y:\WINDOWS\inf\ directory,
where y:\ is the root directory where Windows is installed.
If you want to revert back, save a copy of this file as
NIHSD2k_original.inf in a different location.
2.
Edit the device INF file by opening NIHSD2k.inf with a text editor.
At the bottom of this file are the descriptors where Windows looks to
identify the device. Locate the four lines of text that contain in quotes
the descriptors for the device name you are modifying. Change the
descriptor on all lines to the new device name, as shown in Figure 5.
Original File
Modified File
Figure 5. INF File Descriptors Changed to “My Device” (Windows Vista/XP)
3.
Save and close the INF file.
4.
Go to the Windows Device Manager.
(Windows Vista) In the Device Manager, notice that the OEM device
now appears as My Device, as shown in Figure 6.
(Windows XP) In the Device Manager, right-click the OEM device under
Data Acquisition Devices, and select Uninstall. Power down the OEM
device and disconnect the USB cable from your PC.
© National Instruments Corporation
5
NI USB-5132/5133 OEM User Guide
When you reconnect and power on the device, it appears as My Device in
the Found New Hardware Wizard and Windows Device Manager, as shown
in Figure 6.
When the device is initially installed, the Windows alert message may display the
following: Found New Hardware: USB 513x. This message appears for a few seconds
until the custom name appears and the Found New Hardware Wizard is launched. This alert
message device name cannot be changed.
Note
Figure 6. “My Device” in the Found New Hardware Wizard and
Device Manager (Windows Vista/XP)
Modifying the INF file will not change the USB-5132/5133 OEM device name in
Measurement & Automation Explorer (MAX).
Note
NI USB-5132/5133 OEM User Guide
6
ni.com
Windows 2000 Users
Figure 7 depicts how a USB-5133 OEM device name appears in the Found
New Hardware Wizard and Windows Device Manager.
Figure 7. USB-5133 OEM Device in the Found New Hardware Wizard and
Device Manager (Windows 2000)
To modify the device name in the Found New Hardware Wizard and
Windows Device Manager in Windows 2000, complete the following steps.
Note
You must have NI-SCOPE 3.4 or later installed on your PC.
1.
Locate the NIHSD2k.inf file in the x:\WINNT\inf\ directory,
where x:\ is the root directory where Windows is installed.
If you want to revert back, save a copy of this file as
NIHSD2k_original.inf in a different location.
© National Instruments Corporation
7
NI USB-5132/5133 OEM User Guide
2.
Edit the device INF file by opening NIHSD2k.inf with a text editor.
At the bottom of this file are the descriptors where Windows looks to
identify the device. Locate the four lines of text that contain in quotes
the descriptors for the device name you are modifying. Change the
descriptor on all lines to the new device name, as shown in Figure 8.
Original File
Modified File
Figure 8. INF File Descriptors Changed to “My Device” (Windows 2000)
3.
Save and close the INF file.
4.
Go to the Windows Device Manager, right-click the OEM device under
Data Acquisition Devices, and select Uninstall.
5.
Power down the OEM device and disconnect the USB cable from
your PC.
NI USB-5132/5133 OEM User Guide
8
ni.com
When you reconnect and power on the device, it appears as My Device in
the Found New Hardware Wizard and Windows Device Manager, as shown
in Figure 9.
When the device is initially installed, the Windows alert message may display the
following: Found New Hardware: USB 513x. This message appears for a few seconds
until the custom name appears and the Found New Hardware Wizard is launched. This alert
message device name cannot be changed.
Note
Figure 9. “My Device” in the Found New Hardware Wizard and
Device Manager (Windows 2000)
Modifying the INF file will not change the USB-5132/5133 OEM device name in
Measurement & Automation Explorer (MAX).
Note
National Instruments, NI, ni.com, and LabVIEW are trademarks of National Instruments Corporation.
Refer to the Terms of Use section on ni.com/legal for more information about National
Instruments trademarks. Other product and company names mentioned herein are trademarks or trade
names of their respective companies. For patents covering National Instruments products/technology,
refer to the appropriate location: Help»Patents in your software, the patents.txt file on your
media, or the National Instruments Patent Notice at ni.com/patents.
© 2008 National Instruments Corporation. All rights reserved.
372530A-01
Aug08