1
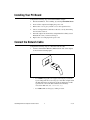
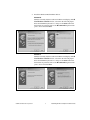
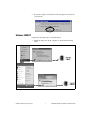
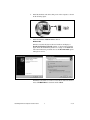
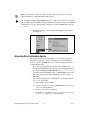
INSTALLATION GUIDE
PCI/PXI Gigabit Ethernet Adapters
National Instruments gigabit Ethernet adapters are based on the
Intel 82540-compatible Ethernet controller.
This document explains how to install and troubleshoot the Ethernet drivers
for your PCI/PXI board. Some boards also contain additional functionality
(for example, GPIB). Refer to the documentation that came with your kit to
install the software for the other functionality.
Installing Your PXI Board
Complete the following steps to install the Ethernet adapter:
1.
Shut down Windows, if it is running, by selecting Start»Shut Down.
2.
Power off your PXI or CompactPCI chassis. Keep the chassis plugged
in so that it remains grounded as you install the adapter.
3.
Remove the filler panel from a PXI peripheral bus master slot. The
adapter requires a bus master slot to take advantage of the onboard
DMA and Ethernet controllers. All PXI chassis and most CompactPCI
chassis contain only bus master slots. Refer to your chassis
documentation to verify you are using a bus master slot.
4.
Touch a metal part on your chassis to discharge any static electricity
that might be on your clothes or body.
5.
Insert the adapter into the selected bus master slot. Use the
injector/ejector handle to fully inject the device into place.
6.
Screw the front panel of the adapter to the front panel mounting rail
of the PXI or CompactPCI chassis.
Installing Your PCI Board
Complete the following steps to install the Ethernet adapter:
1.
Shut down Windows, if it is running, by selecting Start»Shut Down.
2.
Power off the computer and unplug the power cord.
3.
Remove the cover to give yourself access to the expansion slots.
4.
Choose an empty PCI slot and remove the slot cover by unscrewing
the screw that secures it.
5.
Insert the adapter into the PCI slot and push until it is firmly seated.
Reinstall the screw you removed in step 4.
6.
Replace the cover and plug in the power cord.
Connect the Network Cable
Complete the following steps to connect the network cable:
1.
Connect a Twisted Pair Ethernet (TPE) network cable to the adapter,
as shown in the following figure.
•
For 1000BaseT (gigabit over copper), use Category 5 (must be
4-pair wiring). Be sure to use Category 5 cable that complies with
the TIA-568 wiring specification. For more information on this
specification, refer to the Telecommunications Industry
Association Web site, www.tiaonline.org.
•
For 100BaseTX, use Category 5 wiring or better.
PCI/PXI Gigabit Ethernet Adapters Installation Guide
2
ni.com
If using less than 4-pair cabling, you must manually configure the speed and
duplex setting of the adapter and the link partner. In addition, with 2- and 3-pair cabling,
the adapter can achieve speeds of up to only 100 MB/s.
Caution
2.
•
For 10BaseT, use Category 3 wiring or better.
•
To use this adapter in a residential environment (at any speed), use
Category 5 wiring. If the cable runs between rooms or through
walls and/or ceilings, it should be plenum rated for fire safety.
•
The cable length is limited to 100 m.
•
The adapter must be connected to a compatible link partner,
preferably set to auto-negotiate speed and duplex.
•
The PCI-8232 and PXI-8231/8232 automatically accommodate
either MDI or MDI-X connections. The auto-MDI-X feature
allows you to directly connect two adapters without using a
crossover cable.
To configure Ethernet for your adapter, continue with the procedure
specific to your operating system outlined later in this guide.
Install the Drivers
Follow the installation instructions for your operating system. The adapter
works with the following operating systems:
•
Windows Me/98
•
Windows 2000/XP
•
Windows NT 4.02
© National Instruments Corporation
3
PCI/PXI Gigabit Ethernet Adapters Installation Guide
Windows Me/98
Complete the following steps to install the drivers:
1.
Shut down, then power off the computer, as shown in the following
figure.
2.
Install the hardware and cables, then power on the computer, as shown
in the following figure.
3.
Install the PCI-PCI bridge driver.
Windows automatically detects the new hardware.
Follow the prompts in the Wizard. Select the recommended options
when given a choice. If Windows asks where to search for a new driver,
clear all checkboxes and click Next.
PCI/PXI Gigabit Ethernet Adapters Installation Guide
4
ni.com
4.
Install the Windows Me/98 Ethernet drivers.
Windows Me
Windows automatically detects the new hardware and displays an Add
New Hardware Wizard window, as shown in the following figure.
Insert the PCI/PXI Gigabit Ethernet Adapters CD-ROM and follow
the instructions presented. Choose the Recommended options when
given a choice and click Next.
Windows 98
Windows automatically detects the new hardware and displays an Add
New Hardware Wizard window, as shown in the following figure.
Insert the PCI/PXI Gigabit Ethernet Adapters CD-ROM and follow
the instructions presented. Choose the Recommended options when
given a choice and click Next.
© National Instruments Corporation
5
PCI/PXI Gigabit Ethernet Adapters Installation Guide
If Windows asks where to search for a new driver, make sure the box
next to CD-ROM Drive is checked and click Next, as shown in the
following figure.
Tip If Windows displays a dialog box saying it cannot locate the file on the Intel PRO
Adapter CD-ROM, insert the PCI/PXI Gigabit Ethernet Adapters CD-ROM and tell
Windows to copy files from the Win98Me directory of the CD-ROM drive (typically
d:\Win98Me\).
If Windows displays a dialog box indicating it cannot locate a file on the Windows 98
CD-ROM, try inserting the Windows 98 Installation CD-ROM and tell Windows to copy
files from either the top directory or the win98 directory of the CD-ROM drive (typically
d:\ or d:\win98\).
Tip
PCI/PXI Gigabit Ethernet Adapters Installation Guide
6
ni.com
5.
Restart the computer as shown in the following figure, then connect to
your network.
Windows 2000/XP
Complete the following steps to install the drivers:
1.
© National Instruments Corporation
Shut down and power off the computer, as shown in the following
figure.
7
PCI/PXI Gigabit Ethernet Adapters Installation Guide
2.
Install the hardware and cables, then power on the computer, as shown
in the following figure.
3.
Install the Windows 2000/XP Ethernet drivers.
Windows 2000
Windows automatically detects the new hardware and displays a
Found New Hardware Wizard window, as shown in the following
figure. Insert the PCI/PXI Gigabit Ethernet Adapters CD-ROM and
follow the instructions presented. Choose the Recommended options
when given a choice.
If Windows asks where to search for a new driver, make sure the box
next to CD-ROM Drive is checked and click Next.
PCI/PXI Gigabit Ethernet Adapters Installation Guide
8
ni.com
Windows XP
Windows automatically detects the new hardware and displays a
Found New Hardware Wizard window, as shown in the following
figure. Insert the PCI/PXI Gigabit Ethernet Adapters CD-ROM and
follow the instructions presented. Choose the Recommended options
when given a choice and click Next.
© National Instruments Corporation
9
PCI/PXI Gigabit Ethernet Adapters Installation Guide
Tip If Windows displays an Insert Disk dialog box or indicates it cannot locate a file on
the Intel PRO Adapter CD-ROM, insert the PCI/PXI Gigabit Ethernet Adapters CD-ROM
and tell Windows to copy files from the Win2kXP directory of the CD-ROM drive
(typically d:\Win2kXP\).
4.
Restart the computer, as shown in the following figure, then connect to
your network (Windows 2000 only).
Windows NT 4.02
Complete the following steps to install the drivers:
1.
Shut down, then power off the computer, as shown in the following
figure.
2.
Install the hardware and cables, then power on the computer, as shown
in the following figure.
PCI/PXI Gigabit Ethernet Adapters Installation Guide
10
ni.com
3.
Install the Windows NT 4.0 Ethernet drivers.
Select Start»Settings»Control Panel»Network»Adapters and click
Add, as shown in the following figure. Click Have Disk and insert the
PCI/PXI Gigabit Ethernet Adapters CD-ROM. You may also be
prompted for the original Windows NT CD-ROM.
Note Service Pack 5 or later is required for Ethernet driver installation. Advanced features
require Service Pack 6a or later.
© National Instruments Corporation
11
PCI/PXI Gigabit Ethernet Adapters Installation Guide
Note When installing adapters on a Windows NT system that does not have any other
adapters installed, you must install Networking support.
Tip If Windows displays an Insert Disk dialog box or indicates it cannot locate a file on
the Intel PRO Adapter CD-ROM, insert the PCI/PXI Gigabit Ethernet Adapters CD-ROM
and tell Windows to copy files from the WinNT directory of the CD-ROM drive (typically
d:\WinNT\).
4.
Restart the computer, as shown in the following figure, then connect to
your network.
Alternative Driver Installation Options
The installation instructions illustrated for each operating system in this
document are appropriate for most users. However, if your PXI chassis
does not contain a CD-ROM drive, try one of the following alternatives to
load the Ethernet driver.
•
If you have an existing Ethernet connection in your PXI chassis,
download the Intel Ethernet driver from the National Instruments Web
site. Access the Drivers and Downloads page at ni.com/download.
•
Connect an external CD-ROM, such as a USB CD-ROM, and load the
Ethernet driver directly from the PCI/PXI Gigabit Ethernet Drivers
CD-ROM.
•
Use another computer that has a CD-ROM to copy the Ethernet driver
onto a 3.5 in. floppy disk:
1.
Open a DOS command window.
2.
Change to the directory on the CD-ROM that matches the OS you
want to use with the diskette.
3.
Change to the \MAKEDISK directory.
4.
Depending on your OS, enter: MAKE2KXP, MAKENT, or MAKE98ME
[destination (optional; A: if not specified)].
PCI/PXI Gigabit Ethernet Adapters Installation Guide
12
ni.com
Troubleshooting
Windows NT Troubleshooting
If Windows NT reports an error or you cannot connect to the network, try
the following suggestions first. If you are still having trouble, refer to the
additional topics in this section.
•
Service Pack 5 or later is required for driver installation. Advanced
features require Service Pack 6a or later.
•
When installing adapters on a Windows NT system with no other
adapters installed, you must install Networking support. To
successfully install Networking and the adapter drivers, you can either:
–
Copy the required Windows NT 4.0 Networking files to the hard
drive and use the Intel PRO Adapter CD-ROM to install the
adapter driver, or
–
Use the Windows NT 4.0 CD-ROM to install Networking and
create setup disks to complete driver installation. To create setup
disks, click Create Install Disk in the Autorun screen.
•
Make sure you are using the drivers provided on the PCI/PXI Gigabit
Ethernet Adapters CD-ROM.
•
Make sure the drivers are loaded and the protocols are bound. Check
the settings in the Network/Bindings dialog box in the Control Panel.
•
Check the Windows NT Event Viewer for error messages.
•
Make sure Plug and Play OS is set to NO in your computer’s BIOS.
•
Test the adapter with the PROSet advanced configuration utility that
was installed on your system when you installed the drivers. To start
PROSet, double-click the PROSet icon in the Windows Control Panel.
To run diagnostics, select the adapter and click the Diagnostics tab,
then click Run Tests.
•
If you do not see the ProSet icon, refer to the Additional
Troubleshooting Tools section.
Testing the Adapter
Test the adapter by running diagnostics. To test the Ethernet functionality,
run PROSet by double-clicking the PROSet icon in the Control Panel.
Select the adapter and click the Diagnostics tab, then click Run Tests.
If your board has GPIB functionality, run the NI-488.2 Getting Started
Wizard to verify your hardware and software installation.
© National Instruments Corporation
13
PCI/PXI Gigabit Ethernet Adapters Installation Guide
WOL558.VXD Missing or Not Found (Windows 98 Only)
This error can occur in Windows 98 if an .inf file already installed on the
system interferes with the driver installation. Complete the following steps
to manually install the Ethernet adapter:
1.
Open Windows Explorer.
2.
Select Views»Folder Options.
3.
Select the View tab.
4.
Select Show all files and click OK.
5.
Delete net557.inf and net557.pnf in the Windows/inf folder.
6.
Double-click the System icon from the Control Panel.
7.
Select the Device Manager tab and double-click Network Adapters.
8.
Select the Intel PRO/1000 MT Desktop Adapter and click Remove.
9.
Restart your computer.
10. Follow the instructions given previously in the Windows Me/98 section
to install the Windows 98 drivers.
Adapter Cannot Connect to the Network
1.
Make sure the cable is installed properly.
The network cable must be installed properly at both the adapter and
the hub. The maximum distance for the cable is 100 m. If the cable is
connected properly and within the allowed distance, try another cable.
2.
Check the LEDs on the adapter.
The adapter has two LEDs located on the RJ-45 connector.
The following table lists the function of each LED.
LED Color
Green
Function
Indication
Action/Link
On
The adapter is receiving power. The cable
connection is good.
Off
The adapter is not sending or receiving
network data. The adapter is not receiving
power. The cable connection is bad or you
have a driver problem.
Flashing
Yellow/Green
Speed
PCI/PXI Gigabit Ethernet Adapters Installation Guide
Meaning
The adapter is sending and receiving
network data.
Yellow
The adapter is operating at 1,000 Mb/s.
Green
The adapter is operating at 100 Mb/s.
Off
The adapter is operating at 10 Mb/s.
14
ni.com
3.
Make sure you are using the correct drivers.
Verify that you are using the drivers that came with the adapter.
Computer Hangs When Drivers Are Loaded
Change the PCI BIOS interrupt settings. Refer to the PCI/PXI Installation
Tips section for more information.
Diagnostics Pass, But Connection Fails or Errors Occur
•
Check the responding link partner.
•
Make sure the cable is securely attached, is the proper type, and does
not exceed the recommended lengths.
•
Try another cable.
•
Make sure the duplex mode and speed setting on the adapter matches
the setting on the switch.
Link LED Does Not Light
•
Make sure the network drivers are loaded.
•
Check the cable connection.
ACT LED Does Not Light
•
Make sure the correct network drivers are loaded.
•
The network may be idle.
Adapter Has Stopped Working
•
Run the diagnostics. Refer to the Additional Troubleshooting Tools
section.
•
Try reseating the adapter in the PCI/PXI slot or try a different slot.
•
The network drivers may be corrupt or missing. Try removing and
reinstalling the drivers.
•
Try rebooting the computer.
•
Try another cable.
•
Try a different adapter.
Link LED Is Not Lit When Computer Is Shut Down and Power Is
Connected
Make sure the network cable is attached.
© National Instruments Corporation
15
PCI/PXI Gigabit Ethernet Adapters Installation Guide
PCI/PXI Installation Tips
PCI/PXI computers are designed to automatically configure add-in boards
each time the computer starts. The PCI/PXI computer sets the I/O address
and IRQ level for the peripheral boards when the computer starts. The
network drivers cannot change these values. If you experience problems
when the computer starts, you may have to follow additional steps.
On some computers, manual configuration is possible through the
computer’s BIOS setup utility. Refer to the documentation that came with
your computer. You may need to verify or change some BIOS settings.
The following common solutions may correct your problem:
•
Make sure you have installed the adapter in a bus master-enabled slot.
On some computers, not all slots are bus master enabled by default.
Check your BIOS settings. Enable PCI/PXI bus mastering, if your
BIOS has such an option.
•
Reserve interrupts (IRQ) and/or memory addresses for ISA adapters.
This prevents PCI/PXI boards from using the same settings ISA boards
are using. Try changing some of the interrupts that are reserved for
ISA, but not being used, to reserved for PCI/PXI.
•
Update your BIOS. Sometimes updating the BIOS will correct some
configuration problems.
•
Configure the PCI/PXI slot for level-triggered interrupts instead of
edge-triggered interrupts in BIOS.
Additional Troubleshooting Tools
The PCI/PXI Gigabit Ethernet Adapters CD-ROM contains an Intel utility
for troubleshooting the gigabit Ethernet adapter.
Complete the following steps to install the tool:
1.
Navigate to the appropriate directory for your operating system on the
PCI/PXI Gigabit Ethernet Adapters CD-ROM.
2.
Run the setup.exe program.
3.
Start the tool by double-clicking the Ethernet Adapter icon in the
system tray.
PCI/PXI Gigabit Ethernet Adapters Installation Guide
16
ni.com
Ethernet Adapter Specifications
LEDs
Green ...............................................Activity/Link
Yellow/Green ..................................Speed
Refer to the online catalog at ni.com/products or the print catalog for
complete specifications.
National Instruments™, NI™, NI-488.2™, and ni.com™ are trademarks of National Instruments
Corporation. Product and company names mentioned herein are trademarks or trade names of their
respective companies. For patents covering National Instruments products, refer to the appropriate
location: Help»Patents in your software, the patents.txt file on your CD, or ni.com/patents.
© 2002–2003 National Instruments Corp. All rights reserved.
*370620C-01*
370620C-01
Aug03