1
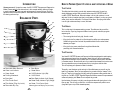
©2003 Sunbeam Products, Inc. All rights reserved.
MR. COFFEE ® is a registered trademark of Sunbeam Products, Inc.
Distributed by Sunbeam Products, Inc., Boca Raton, Florida 33431.
MODEL
ECMP30/33
Instruction Manual with Recipes
MR. COFFEE ESPRESSO/ CAPPUCCINO MAKER
®
READ ALL INSTRUCTIONS BEFORE USING THIS APPLIANCE
Printed in China
P. N. 7586
IMPORTANT SAFEGUARDS
When using electrical appliances, basic safety precautions should always be
followed to reduce the risk of fire, electric shock and/or injury to persons,
including the following:
1. READ ALL INSTRUCTIONS BEFORE USING THE MACHINE.
2. Do not touch hot surfaces. Use handles or knobs.
3. To protect against electric shock, do not put cord, plugs or machine in water
or any other liquids.
4. Close supervision is necessary when any appliance is used by or around children.
5. Unplug from outlet when Espresso Machine is not in use and before cleaning.
Allow to cool before putting on or taking off parts and before cleaning
the appliance.
6. The use of accessory attachments not recommended by MR. COFFEE®
may cause hazards or injuries.
SPECIAL CORD SET INSTRUCTIONS
1. A short power supply cord is provided to reduce the hazards resulting from becoming
entangled in or tripping over a longer cord.
2. An extension cord may be purchased and used if care is exercised in its use.
3. If an extension cord is used, the marked electrical rating of the extension cord must be
at least 15 amps and 120 volts. The resulting extended cord must be arranged so that
it will not drape over the countertop or tabletop where it can be pulled on by children
or tripped over accidentally.
*This appliance has a polarized plug (one blade is wider than the other).
To reduce the risk of electric shock, this plug will fit in a polarized outlet only
one way. If the plug does not fit fully in the outlet, reverse the plug. If it still
does not fit, contact a qualified electrician. Do not modify the plug in any way.
I F S ERVICE I S R EQUIRED , D O N OT R ETURN A PPLIANCE
TO
S TORE
For Service, call 1-800 MR COFFEE (1-800-672-6333)
7. Do not use outdoors.
8. Do not let cord hang over edge of table or countertop or to touch hot surfaces.
9. Do not place this appliance on or near a hot gas or electric burner or in a heated
oven.
10. To disconnect, turn unit off, then remove plug from wall outlet.
11. Do not use appliance for other than its intended use.
12. Use on a hard, flat level surface only, to avoid interruption of air flow
underneath the appliance.
13. Do not operate any appliance with a damaged cord or plug or after the
appliance malfunctions or has been damaged in any manner. Return this
appliance only to the nearest Authorized Service Center for examination,
repair or adjustment.
14. WARNING: To reduce the risk of fire or electric shock,
do not remove any service covers. No user serviceable parts inside.
Repair should be done by authorized personnel only. Opening the
bottom service cover will void the warranty.
THIS UNIT IS
FOR
HOUSEHOLD USE ONLY
2
TO ASSIST US IN SERVING YOU, PLEASE HAVE THE MODEL NUMBER
(ECMP30/33) AND DATE OF PURCHASE AVAILABLE.
All repairs must be made by Sunbeam or by an Authorized MR. COFFEE® Service Center.
Please call us for assistance or for the location of the nearest Authorized MR. COFFEE® Service Center.
PLEASE DO NOT RETURN APPLIANCE TO STORE.
We welcome your questions, comments or suggestions.
Please contact us at
1-800 MR COFFEE (1-800-672-6333)
or
www.mrcoffee.com
S AVE T HESE I NSTRUCTIONS
3
H OW TO P REPARE Q UALITY E SPRESSO AND C APPUCCINO AT H OME
I NTRODUCTION
®
CONGRATULATIONS! You are the owner of a MR. COFFEE Espresso and Cappuccino
Maker. Please read all of the instructions in this manual carefully before you begin
to use this appliance. Proper care and maintenance will ensure the long life of this
appliance and its trouble-free operation. Save these instructions and refer to them often
for cleaning and care tips.
D IAGRAM OF PARTS
L
K
O
I
J
The coffee should be a freshly ground, dark, espresso roast variety. You may buy
whole coffee beans and grind them yourself at home using a MR. COFFEE Burr Mill
or a MR. COFFEE Bean Grinder. Store whole beans in an air-tight container, in a cool,
dark area. You do not need to store them in a refrigerator or freezer. If you buy pre-ground
coffee, plan to use the coffee within 7 to 8 days for best flavor. Store pre-ground coffee
in an air-tight container and keep in a cool, dark area.
®
®
THE GRIND
This is a vital step in the espresso making process. The coffee must be ground fine,
but not too fine. If you buy pre-ground coffee or have it ground, make sure you get an
espresso grind.
A
B
M
THE COFFEE
• The correct grind should look gritty, like salt or sand.
N
C
E
D
• If the grind is too fine, water will not flow through the coffee, even under pressure.
Coffee that is ground too fine looks like powder and feels like flour when rubbed
between your fingers.
• If the grind is too coarse, water flows through the coffee too fast,
preventing a full-flavored extraction.
G
F
THE PROCESS
H
A.
B.
C.
D.
E.
F.
G.
H.
Removable Water Reservoir
Water Level Indicator
Steam Nozzle
Frothing Attachment
Brew Head
Filter Thumb Guard
Filter Holder (Filter Cup Inside)
Removable Drip Tray
I. Brew Button
J. Steam Button
K. On/Off Indicator Light (Red)
L. On/Off Switch
M. Brew Ready Indicator Light (Orange)
N. Steam Ready Indicator Light (Orange)
O. Steam / Froth Control Knob
Measuring Spoon and Tamping Tool (not shown)
4
Your New MR. COFFEE Espresso and Cappuccino Maker was designed to make brewing
fresh espresso and cappuccino at home easy. Several hints will help you make quality
espresso and frothed milk drinks time after time. First, always start with fresh, cold water
in the water reservoir. Be sure that all parts of your machine are cleaned from previous uses.
You can preheat the cups you brew espresso into by rinsing them with hot water.
This will help keep your espresso hot after it is brewed.
®
The quality, roast, freshness, grind and origin of the coffee beans you use will vary the
taste of your espresso. When you brew espresso, the grounds should be “tamped” in the
filter cup. Tamping is the process of slightly packing the espresso coffee grounds down in
the filter cup. Your MR. COFFEE Espresso/Cappuccino Machine comes with a pre-measured
coffee scoop tamping tool. NOTE: Do not overpack the grounds.
®
Use the bottom of the scoop to slightly press the grounds down after placing them in the
filter cup (G). This will help you brew hot, rich, delicious espresso with perfect crema
(the golden layer on top of fresh-brewed espresso).
5
BEFORE USING FOR THE FIRST TIME
Refer to Page 4 for the Diagram of Parts.
1. Wash all removable parts with hot water and a mild detergent and rinse thoroughly.
2. Remove the pink cap from the end of the hose inside the reservoir.
3. Fill the Water Reservoir with water. Do not exceed MAX fill line.
4. Follow the steps on Page 6 for brewing espresso to rinse the inside of the machine.
Use water only. Do not use coffee for the cleaning cycle.
5. Follow the Steps on Page 7 for steaming milk to clean the Frothing Arm.
You should use water instead of milk for this cleaning process.
6. After you have brewed one cycle and steamed for approximately 45 seconds,
empty the water reservoir, remove, rinse and dry all parts.
C AUTION : Allow unit to cool before removing parts.
YOUR ESPRESSO MAKER IS NOW READY TO BREW GREAT ESPRESSO AND CAPPUCCINO!
11. When the Brew Ready Indicator Light comes on, you may begin brewing espresso.
(Your machine will only take a few minutes to heat up enough water for brewing).
Press brew button on
(brew position). Brew for approximately 30 seconds. You
may adjust brewing time to taste. A shorter brew time will yield a stronger cup of
espresso. The brew ready indicator light may go out while you are still brewing. This
just means that the machine is heating more water.
12. Press brew button to turn off pump.
13. Remove cup from drip tray. Use caution when removing the filter holder as there can
still be hot water in the filter. Flip the thumb guard over the filter and knock out the
used grounds. Use caution as the filter and filter holder are very hot. Rinse out the
filter and filter holder and dry all parts.
14. You can brew multiple cups of espresso one right after the other! Just make sure the
water reservoir stays filled above the “min” level marking. Repeat Steps 5 – 13 above
to brew multiple cups of espresso.
BREWING ESPRESSO
HOW TO MAKE CAPPUCCINO
1. Make sure the On/Off switch (see Diagram on Page 4) is in the OFF position
and the brew and steam switches are off.
2. Plug in your new MR. COFFEE Espresso and Cappuccino Maker.
3. Remove the water reservoir and fill with fresh, cold water. Be sure to keep the water
reservoir filled above the “min” water level marking printed on the reservoir.
4. Replace the water reservoir into the machine, making sure that it slides completely into
place. When inserted properly, the end of the water reservoir will be even with the base.
Make sure the end of the hose is down in the water.
5. Turn the On/Off Switch to the “On” position so that the On Light is illuminated.
6. While the water is heating, insert filter in filter holder.
7. Put grounds into filter cup using 1 scoop for one 20-ounce serving and 2 scoops
for two 20-ounce servings.
8. Use the bottom of the scoop to press the coffee grounds so that they are flattened down
and smoothed over. Gently remove any excess grounds from the rim of the filter holder.
9. Insert the filter holder into the machine. Make sure the thumb guard is flipped back and
not resting on top of the filter. Insert filter holder approximately 45 degrees to the left,
using the line on the Brew Head as a guide. When properly aligned, slide the filter
handle to the right until the handle is in the locked position. The handle will be
in the “Lock” area and should feel snug. YOU DO NOT NEED TO OVERTIGHTEN.
10. Place a cup underneath the filter holder spouts. Espresso will brew out of both filter
spouts, so use a cup that is wide enough to catch liquid from both spouts or brew
into two cups placed right next to each other.
Cappuccino is espresso topped with steamed and frothed milk. Frothing milk for cappuccino
takes practice. Do not be discouraged if it is not perfect the first time. The milk should be
half steamed (bottom of pitcher) and half frothed (top of the pitcher). It may take a few
times before you perfect this process.
6
7
®
For the best results, we recommend frothing milk in a separate pitcher and pouring the
milk into your coffee. The milk and pitcher should be cold. Do not use a pitcher which
has just been washed in warm water. Use skim or 2% milk.
We also recommend a stainless steel frothing pitcher and a specialty beverage thermometer,
if you own one, for preparing the best froth and steamed milk.
1. The first step in making cappuccino is to make espresso.Therefore, fill the water reservoir
with cold water. Never use warm or hot water to fill the water reservoir.
2. Follow steps in “Brewing Espresso”.
3. Fill a small stainless steel pitcher 1/3 to 1/2 way with cold milk. We recommend using a
MR. COFFEE® frothing pitcher (EFP1) or any other pitcher that holds about 10 - 12 ounces
and is around 5 inches tall. The pitcher should be cold. Do not use a pitcher that has just
been washed with warm water.
4. Make sure the Espresso Machine is turned on and that there is water in the water reservoir.
The brew ready indicator light will go off when the machine is ready to steam milk.
5. Press the Steam
Start/Stop Button. The steam ready light will come on when
the unit is ready to froth milk. The brew ready light will stay on.
6. Place the steaming tube in the pitcher with milk. Hold the pitcher so that the
steaming tube is submerged in milk and close to the bottom of the pitcher.
7. Turn the Steam/Froth Control Knob counterclockwise
to begin steaming.
The steam ready light will go off while you are steaming milk. This is normal
and you may continue steaming until you have completely steamed your milk.
USE CAUTION: Steam emitted from the frothing arm is very HOT. As the milk
heats up, the frothing pitcher will become very HOT!
8. The specially designed frothing attachment requires very little effort to produce thick
and frothy steamed milk. Steam the milk until the desired consistency is achieved
or until the frothed milk reaches the top of the pitcher. Slightly moving the pitcher
up and down while steaming (and keeping the frothing tube immersed in milk)
will help produce extra froth. When you are finished steaming, turn the Steam Control
Knob clockwise until it stops. Do not over tighten. Press the steam start / stop button
to complete the frothing process.
9. When the Steam Control Knob is closed, you will notice the machine releases
some steam. This is the machine releasing the pressure it has generated during
the steaming process and is normal.
IMPORTANT
Clean the steam nozzle and frothing attachment immediately after each use. Fill a
pitcher halfway with water and run the steaming feature again for about 20 seconds.
This will clean out the inside of the steaming tube. Use a damp cloth to wipe off the
exterior of the steaming tube and frother attachment. You may want to rinse the frother
attachment with warm, soapy water. If the end of the steam tube becomes blocked with
dry milk, use a sewing needle or safety pin to clean out the small hole.
ATTENTION
After using the steaming feature of your machine, the heating system is at its highest
temperature. If you wish to prepare more espresso immediately after steaming milk,
the heating system should be cooled down to keep from “burning” your espresso.
When the steam ready indicator light goes off, your machine is now ready to brew
espresso at the perfect temperature.
The filter handle and filters should be cleaned each time you brew espresso. To clean,
remove filter handle by turning the handle approximately 45 degrees left of center.
The filter handle will release down from its locked position. Use caution as the filter
may still contain hot water floating on top of the coffee grounds. Knock the used espresso
grounds out while holding the filter in place by holding the thumb guard lock firmly
against the filter cup. Use caution as the filter cup and holder will be very hot. Rinse the
filter cup and holder out thoroughly with water. It is not recommended to put the filter
or filter holder in the dishwasher. If you are not going to use the machine again for
some time, do not reinsert the filter holder on the brew head; this will lengthen the
service life of the filter seal.
Remove the Water Reservoir and empty out any remaining water. Do not wash the
Water Reservoir in the dishwasher.
Remove the Drip Tray and Overflow Grid from the machine and rinse with warm,
soapy water. Do not wash these parts in the dishwasher.
CLEANING THE BREW HEAD
The Brew Head may need cleaning after prolonged use. You may wipe off the brew head
with a damp cloth to remove any old espresso grounds. If the brewing sieve (the underside
of the brew head) is particularly dirty, run a few cycles of plain water through the machine.
Operate the machine as if you were going to brew espresso, but do not put coffee grounds
in the filter cup. Secure the filter handle in place and operate for 30 seconds several times.
This will run hot water through the brew head and clean out any old grounds.
CLEANING THE FROTHING TUBE
The Frothing Tube should be cleaned immediately after every use to prevent steamed milk
from drying on the tube. Fill a pitcher half way with water and run the steaming feature
again for about 20 seconds. This will clean out the inside of the steaming tube.
Use a damp cloth to wipe off the exterior of the steaming tube and frother attachment.
You may wish to rinse the frother attachment with warm, soapy water. If the end of
the steam tube becomes blocked with dry milk, use a sewing needle or safety pin
to clean out the small hole.
DE-LIMING
CLEANING
When you are finished brewing espresso and steaming milk, begin cleaning by turning
the unit off and unplugging the power cord.
8
The service life of your Espresso Maker will be lengthened if you de-lime it regularly.
Your Espresso Maker may be de-limed using white household vinegar. The frequency
of de-liming depends upon the hardness of the water used. The following table gives
the suggested cleaning intervals.
9
TROUBLESHOOTING
SUGGESTED CLEANING INTERVAL
Type of Water
Cleaning Frequency
Soft Water
Every 80 Brew Cycles
Hard Water
Every 40 Brew Cycles
Fill about 18 ounces of vinegar into the Water Reservoir. Place a sufficiently large container
in the middle of the drip tray. Allow about one-third of the vinegar to run through the
system by operating the machine as if you were making espresso, but without putting
coffee grounds in the filter cups. Switch the machine off again and leave the vinegar to
work in for 10 to 15 minutes. Then run the rest of it through the system in one cycle.
It may be necessary to repeat the de-liming if the lime deposits are heavy. After the
last cycle, run two reservoirs of clear, fresh water through the system to clean all vinegar
from the machine. Once the cleaning cycle is complete, clean all removable parts in warm,
soapy water.
The espresso temperature is too low . . .
• Tamp (pack) the espresso ground coffee down a little more firmly.
• Pre-warm the cup by rinsing with hot water.
• De-lime the appliance.
The espresso brews too slowly . . .
• Do not tamp (pack) grounds so firmly.
• Use coarser espresso grounds.
• De-lime the appliance.
The espresso runs out of the side or top of the filter holder . . .
• Make sure that the filter holder is fitted into the holding ring properly.
• Tighten the filter handle down a little more firmly.
• Clean the espresso grounds off the edge of the filter cups before inserting into brew head.
• Clean the brew head.
Espresso will not come out . . .
• Be sure that the Water Reservoir is full.
• Be sure that the Water Reservoir is properly fitted into position.
• Make sure the hose is down in the water and pink cap is removed.
• Be sure the grounds are not overpacked in the filter.
• Be sure that the filter holder is properly fitted into the holding ring.
• Clean the Filter Basket and Brew Head.
• De-lime the appliance.
The Machine is very noisy when operating . . .
• Be sure that the Water Reservoir is full.
• Be sure that the Water Reservoir is properly fitted into position.
It is difficult to brew espresso with crema . . .
• Always use fresh espresso ground coffee.
• Be sure there is sufficient espresso ground coffee in the filter basket.
• Tamp (pack) the espresso ground coffee down slightly more.
Difficulty foaming milk . . .
• Always use fresh, cold milk.
• Use a stainless steel frothing pitcher. Insure the pitcher is cool before use.
• Clean the frothing tube by following the directions.
• Move the frothing pitcher slightly up and down while frothing.
• Make sure the frothing attachment is pushed up on the frothing arm as
far as it will go.
10
11
R ECIPES
ESPRESSO – . . . . . . . . Brew one or two cups at a time following the
directions. Optional: Add sugar to taste.
CAPPUCCINO – . . . . . . . Mix 1/3 espresso, 1/3 steamed milk and 1/3 frothed
milk. Top with ground nutmeg, cinnamon,
powdered chocolate or vanilla to taste.
LATTE – . . . . . . . . . . . Mix 1/3 espresso with 2/3 steamed milk.
Top with ground nutmeg, cinnamon,
powdered chocolate or vanilla to taste.
ICED ESPRESSO,
Mix beverages as described above,
CAPPUCCINO OR LATTE – then pour over ice.
1-YEAR LIMITED WARRANTY
Sunbeam Products, Inc, or if in Canada, Sunbeam Corporation (Canada) Limited (collectively “Sunbeam”)
warrants that for a period of one year from the date of purchase, this product will be free from defects in
material and workmanship. Sunbeam, at its option, will repair or replace this product or any component of
the product found to be defective during the warranty period. Replacement will be made with a new or
remanufactured product or component. If the product is no longer available, replacement may be made
with a similar product of equal or greater value. This is your exclusive warranty.
This warranty is valid for the original retail purchaser from the date of initial retail purchase and is not
transferable. Keep the original sales receipt. Proof of purchase is required to obtain warranty performance.
Sunbeam dealers, service centers, or retail stores selling Sunbeam products do not have the right to alter,
modify or any way change the terms and conditions of this warranty.
This warranty does not cover normal wear of parts or damage resulting from any of the following: negligent
use or misuse of the product, use on improper voltage or current, use contrary to the operating instructions,
disassembly, repair or alteration by anyone other than Sunbeam or an authorized Sunbeam service center.
Further, the warranty does not cover: Acts of God, such as fire, flood, hurricanes and tornadoes.
What are the limits on Sunbeam’s Liability?
R ECIPE I DEAS THAT YOU W ILL LOVE TO T RY !
Sunbeam shall not be liable for any incidental or consequential damages caused by the breach of any
express, implied or statutory warranty or condition.
CHOCOLATE
1/3 espresso, 1/3 steamed chocolate milk and
CAPPUCCINO –. . . . . . 1/3 froth from the chocolate milk.
Except to the extent prohibited by applicable law, any implied warranty or condition of merchantability or
fitness for a particular purpose is limited in duration to the duration of the above warranty.
FRENCH VANILLA
Pour 1/2 oz. vanilla syrup, 1/4 oz. hazelnut syrup
LATTE – . . . . . . . . . . into cup. Add espresso. Top with frothed milk.
Sunbeam shall not be liable for any damages of any kind resulting from the purchase, use or misuse of,
or inability to use the product including incidental, special, consequential or similar damages or loss of
profits, or for any breach of contract, fundamental or otherwise, or for any claim brought against purchaser
by any other party.
Dust with vanilla powder.
VIENNA MOCHA – . . . . Pour 2/3 oz. chocolate syrup, 1/2 oz. almond syrup
into a glass. Add a shot of espresso. Fill with
steamed milk and top with frothed milk.
Dust with cinnamon.
BLACK FOREST
Pour 1 oz. chocolate syrup, 1 oz. bing cherry syrup,
CAPPUCCINO – . . . . . . 1/2 oz. orange syrup into a glass. Add 2 shots of
espresso. Fill with steamed milk and top with
frothed milk and cinnamon.
Sunbeam disclaims all other warranties, conditions or representations, express, implied, statutory or otherwise.
Some provinces, states or jurisdictions do not allow the exclusion or limitation of incidental or
consequential damages or limitations on how long an implied warranty lasts, so the above limitations
or exclusion may not apply to you.
This warranty gives you specific legal rights, and you may also have other rights that vary from province
to province, state to state or jurisdiction to jurisdiction.
How to Obtain Warranty Service
In the U.S.A.
If you have any question regarding this warranty or would like to obtain warranty service,
please call 1 800 672-6333 and a convenient service center address will be provided to you.
In Canada
IRISH NUT
Pour 1 oz. Irish Cream syrup, 1 oz. hazelnut syrup,
LATTE – . . . . . . . . . . 1 shot espresso. Top with steamed and frothed milk.
If you have any question regarding this warranty or would like to obtain warranty service,
please call 1 800 672-6333 and a convenient service center address will be provided to you.
CAPPUCCINO
Mix 1 shot espresso with 1 oz. Amaretto,
SUPREMO – . . . . . . . . 1 oz. brandy and steamed and frothed milk.
In the U.S.A., this warranty is offered by Sunbeam Products, Inc located in Boca Raton, Florida 33431.
In Canada, this warranty is offered by Sunbeam Corporation (Canada) Limited, located at 5975 Falbourne
Street, Mississagua, Ontario L5R 3V8.
PLEASE DO NOT RETURN THIS PRODUCT TO ANY OF
THESE ADDRESSES OR TO THE PLACE OF PURCHASE.
13
NOTES
NOTES
14
15