1
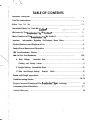
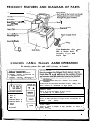
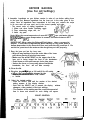
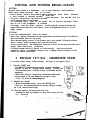
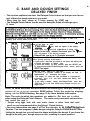
INSTRUCTION MANUAL
Automatic Breadmaker
BMR 200
IMPORTANT
SAFEGUARDS
When using electrical appliances, basic safety precautions should always
be followed to reduce the risk of fire, electrical shock, and/or injury to
persons including the following:
1. Read all instructions before using the machine.
2. Do not touch hot surfaces. Use-handles or knobs.
3. To protect against electrical shock do not immerse cor d, plugs or breadmaker
in water or other liquid.
4. Close supervision is necessary when any appliance is, used by or near children.
5. Unplug from outlet when not in use and before cleaning. Allow to cool before
putting on or taking off parts.
6. Do not operate any appliance wilh a damaged cord or plug or after the
appliance malfunctions, or has been damaged in any manner. Return appliance
to the nearest authorized, service center
for repair.
7. The use of accessory attachments not recommended by Mr. Coffee, inc. may
cause hazards or injuries.
8. Do not use outdoors.
9. Do not let cord hang over edge of table or counter or touch hot surfaces.
10. Do not place on or near a hot gas or electric burner or in a heated oven.
Il. To disconnect, turn any control to “OFF: then remove plug from wall outlet.
12. Do not use breadmaker for storage purposes nor insert any utensils in the
automatic b r e a d m a k e r a s t h e y may create a fire or electric shock.
13. Avoid contacting moving parts.
14. Do not use appliance for other than intended use.
SAVE THESE INSTRUCTIONS
SPECIAL CORD SET INSTRUCTIONS
I . A short
power supply cord is provided to reduce the risk resulting from
becoming entangled in or tripping over a longer cord.
2. Extension cords are available and may be used if care is exercised in their use.
3. When an extension cord is used, (1) the marked electrical rating of the cord set
or extension cord should be at least as great as the electrical rating of the
appliance and (2) the longer cord should be arranged so that it will not drape
over the countertop or tabletop where it can be pulled on by children or
tripped over unintentionally.
4. This product is designed for household use only.
,
5. This appliance has a polarized plug (one blade is wider than the other). As a safely
feature, this plug will fit in a polarized outlet only one way. If the plug does not fit
fully in the outlet, reverse the plug. If it still does not fit, contact a qualified
electrician. Do not attempt to defeat this safety feature.
feature.
2
BEFORE Y O U R
FIRST USE
Carefully unpack the breadmaker and remove all packaging materials. To remove
any dust that may have accumulated during packaging, wipe the inner pot, kneader
blade and the outside of the breadmaker with a clean, damp cloth. Do not use
harsh or abrasive cleaners on any part of the breadmaker.
Warning: Do not immerse the cord, plug, inner pot or base in water or other
liquid.
Place the breadmaker on a dry, stable surface away from burners and away ‘from
areas where cooking grease or water may splatter onto it.
Plug the breadmaker info a 120 volt 60 Hz AC only outlet.
IMPORTANT SAFETY TIPS FROM MR. COFFEE”’
l
l
Keep the breadmaker out o f the reach of infants and children, especially while it
is hot if any pads are accidentally touched, t h e operation may stop.
Be careful to keep your lace and hands away from the breadmaker.
Place the breadmaker at least 2 inches away from any wall for proper cooling.
Do not cover the breadmaker with towels or any other material because steam
would not be able to escape. This could cause the lid to warp or change color.
l Do not remove the inner pot or insert your hand into the inner pot during
operation. If you need to remove the inner pot before operation is complete, first
press The STOP pad to stop operation of the breadmaker.
l Remove any flour, bread crumbs or other materials from the inside of the inner
case using a damp sponge or cloth.
; Do not put a larger quantity of ingredients into the inner pot than recommended.
If you do so, the bread may not mix or bake correctly and the breadmaker may
be damaged. The maximum amount of flour to be used for the BAKE settings is
4-2/3cups. The maximum amount of prepackaged breadmaker mix is 4 cups t he
maximum amount for the DOUGH setting is 4 1/2 cups flour.
l Handle the inner pot whith care. Remove the inner pot by pulling straight up on
the handle. Do-not turn or shake the inner pot while taking it out. If the inner
p o t is damaged or bent, the temperature sensor won't work properly. Handle hot
inner pot using pot holders or oven mitts.
l
l
l
Do not use metal scouring pads on any part or parts of the breadmaker as this
this will
damage the finishes.
TABLE OF CONTENTS
Important Safeguards
.........................................................
2
Card Set Instructions . . . . . . . . . . . . . . . . . . . . . . . . . . . . . . . . . . . . . . . . . . . . . . . . . . . . . . . . 2
Before Your First Use . . . . . . . . . . . . . . . . . . . . . . . . . . . . . . . . . . . . . . . . . . . . . . . . . . . . . . ...3
Important Safety Tips from Mr. Coffee* . . . . . . . . . . . . . . . .
Welcome to The Dreadmaker’“by
. .. .....................
I
Mr. Coffee@ . . . . . . . . . . . . . . . . . . . . . . . . . . . . . . . . . . .
Ma/or Features of The Rreadmaker”‘by
Important
3
5.
Mr. Coffee’? . . . . . . . . . .... . . . . . . . . . . . . . . . . 5.
Information Regarding Pre-Packaged Bread Mixes . . . . . . . . . . . . . . . . . . . . 5.
Product Features and Diagram of Parts . . . . . . . . . . . . . . . . . . . . . . . . . . . . . . . . . . . . . . . . 6.
Control Panel Names and Operation . . . . . . . . . . . . . . . . . . . . . . . . . . . . . . . . . . . . . . . . . 6.
HOW Your Breadmaker Works . . . . . . . . . . . . . . . . . . . . . . . . . . . . . . . . . . . . . . . . . . . . . . . . . 7
How to Use Your Breadmaker
A. Bake Settings
...............................................
D-9
Immediate Start . . . . . . . . . . . . . . . . . . . . . . . . . . . . . . . . . . . . . . . 10.
Cutting and Storing Loaves . . . . . . . . . . . . . . . . . . . . . . . . . . . . . . . . . . . . . . . . . . . 1 1
B. Dough Setting - Immediate Start . . . . . . . . . . . . . . . . . . . . . . . . . . . . . . . . . . . . . ..11
C. Bake and Dough Settings . Delayed
Finish . . . . . . . . . . . . . . . . . . . . . . . . . . . . . .12
Bread and Dough Ingredients . . . . . . . . . . . . . . . . . . . . . . . . . . . . . . . . . . . . . . . . . . . . . . .13
Troubleshooting Guides . . . . . . . . . . . . . . . . . . . . . . . . . . . . . . . . . . . . . . . . . . . . . . . . . 14-15
,
Proper Care and Cleaning of The 0readmaker’“by
Mr. Coffee@. . . . . . . . . . . . . . . . .
.16
Commonly Asked Questions . . . . . . . . . . . . . . . . . . . . . . . . . . . . . . . . . . . . . . . . . . . . . . .17
Limited Warranty . . . . . . . . . . . . . . . . . . . . . . . . . . . . . . . . . . . . . . . . . . . . . . . . . . . . . . . . . . . I8
If If Service Is Required ............................................1
,
WELCOME T O
THE BREADMAKER’” BY MR. COFFEE”
Thank you for purchasing The Breadmaker’“by MrCoffee? Your new breadmaker is
an exciting appliance because it mixes, kneads and bakes the bread by itself after
you measure and add the ingredients-in the correct order.
Please try several loaves of bread from the accompanying Recipe Book to
familiarize yourself with the breadmaker, specific breadmaker recipes, and the
shape and quality of loaves your b r e a d m a k e r w i l l give. We recommend White
Bread, 100% Whole Wheat Bread, Salty Lunn and Sticky Breakfast Rolls, to give you
some experience with the different settings.
A few things you should know:
l The method of using yeast and the order of
adding ingredients lo the
breadmaker are different from yeast-bread
recipes made from scratch.
l
The shape of the loaves is different than traditional bread loaves. See directions
for Cutting and Storing Bread Loaves on page 11.
l Accurate measuring of ingredients
is very important for best results.
l After your try several loaves of bread from the recipes provided; only then should
you begin to make any adjustments in the recipe ingredients or try IO adapt a
favorite family recipe. The more experience you have with the exact fngreclienl
proportions, the more successful you will be when you make any changes.
Please take time to read the use and care information that follows as well as the
information in the Recipe Book that accompanies your breadmaker. By following
this’ information, we feel that you will be thoroughly satisfied, and will enjoy highquality, delicious fresh bread for years to come!
MAJOR FEATURES-OF--~
THE BREADMAKER’” BY MR. CQFFEE”
l
l
l
l
l
,
l
l
.
Three loaf sizes: 1. pound (Regular), 1 1/2 pound (Large), and 2. pound (Extra Large).
Seven bread setting for versatility.
Simple operation
for ease of use.
Delayed finish function.
Additionaf ingredients buzzer.
Automatic keep warm function.
,
Class window for viewing each stage of the selected setting.
IMPORTANT INFORMATION REGARDING
PRE -PACKAGED BREAD MIXES
Follow the directions-5 n the back of your bread mix. For a 1 pound loaf light crust,
set to Setting 3. For a 1-1/2 pound loaf medium crust, set lo Selling 1. For a 1-1/2
pound loaf dark crust, set to Setting 2.
..
PRODUCT FEATURES AND DIAGRAM OF PARTS
.
Glass Window
Inner Pot
Pot
Iwcrl Ihc. innrf pul
-1
until ynnc hear it “click”
inln place.
I
VeIlI I
Conlrol
Kl
i%=a
Panel
Knraclcr Rlatlc
h\ounlinR Shall
Kllcwicr
Rlaclr
7
/
Your Breadmaker Also omes
With A Recipe Book.
Includes recipes and
helpful lips.
CONTRO L P AN EL
N AME S AAND OPERATION
Be sure-to press the pad until a beep is heard.
l
l
l
Indicates number of course.
indicates amount of time left 10
t c mpletion of course.
Indicates warnings (See page 14)
A: Displayed lime will move forward in 10 minute
increments.
If the pads are pressed and h&l. the time setting will
move forward or backward af high speed.
SELECT PAD
COURSE SELECT
1 . Basic (1)
2. Dark (2)
3 . Basic (3)
4. Whole Wheat (4)
5. Whole Wheat (5)
6. French
7. Sweet
cl
Press to select the setting pf your choice.
“1” for Basic (I). “2’: Basic (2).,elc.
SELECT
START PAD
Press to start operation or begin timer countdown for
Delayed
Finish
feature
I
STOP PAD
I
‘Press lo cancel a mistake, lo stop operation or cancel a
I timer Setting.
I
6
HOW YOUR BREADMAKER WORKS
1. BASIC, FRENCH, SWEET, AND DOUGH SETTINGS
BASIC
Settings 1 - 3
FRENCH
Setting 6
SWEET
Setting 7
1
1
I
I
2. WHOLE WHEAT SETTINGS
Setting 4 and 5
Rest
First Second
Knead Knead
\
U KNEAD
During the first knead, the dough ingredienls are mixed together for a few
minutes with the kneader blade pulsing on/off. During all knead stages. the
dough is manipulated continuously. Kneading develops The gluten (elastic
substance developed from protein when wheat flour is combined with liquid)
that gives yeast bread its characteristic cellular structure.
h REST
For WHOLE WHEAT settings, rest period occurs at the beginning of the setting
to allow time (or the liquid to moisten the whole wheat flour and the
breadmaker’s inner case to warm.
Cl RISE
The dough is left alone to rise.
Cl PUNCH
Releases gas (carbon dioxide) that has built up in the dough.
D SHAPE
The dough is shaped into a smooth, round ball.
.
0 FINAL RISE
The dough is left to rise and the bread is formed for baking.
0 BAKE
Two bake stages are sed for good results.
The buzzer sounds three times when baking is completed.
0 KEEP WARM
The inner case is automatically
getting soggy,
soggy.
kept warm to prevent the bread from
‘HOW TO USE YOUR BREADMAKER
The breadmaker can be programmed to perform various functions within the
different settings. The BAKE settings make bread from start IO finish. The DOUGH
setting makes dough for a variety of recipes, but you must shape it yourself, then
bake it in a regular oven. For the Delayed Finish feature, the breadmaker can be
programmed to make bread or dough while you are at work or asleep.
The step-by-step directions that follow are d i v i d e d four sections to help you
learn how tO use your breadmaker: Before Baking (Use For All settings); BAKE
Settings - Immediate Start; DOUGH Setting; and BAKE and DOUGH Settings .
Delayed Finish.
BEFORE BAKING
(Use For All Settings)
All of the settings are programmed by first following step 1 through 10 on pages 8
and 9. Then, depending on the selling desired, refer, to BAKE Sellings - Immediate
5~ I (page IO); DOUGH Setting immediate Start (page 11); or BAKE and DOUGH
Settings - Delayed Finish (page 12T to complete the process.
1. Choose a recipe from the Recipe Book. Read it thoroughly before your begin lo bake.
Be sure the recipe uses no more than a total amount of 4-2/3 cups of flour for
BAKE settings and 4-1/2 cups for DOUGH settings.
2. Before adding ingredients, remove the inner pot by pulling the handle straight up.
(Adding ingredients to the inner pot outside the breadmaker eliminates the
possibility of accidentally spilling ingredients directly into the inner case.) Attach
the kneader blade onto the mounting shaft inside the inner pot by lining up the flat
sides of the kneader blade with mounting shaft then firmly pushing the kneader
blade down onto the mounting shaft.
l Be sure all parts are clean and free of crumbs or oiher food.
l If the kneader blade is not placed correctly,kneading
may be affected.
.
.
3. Select fresh, high-quality ingredients, and use them in proper p roportion. Even small
adjustments in the type or amount of ingredients can affect the quality of the bread.
l for BAKE settings,
the maximum amount of flour is 4-2/3 cups.
l for DOUGH
setting, the maximum amount of flour is 4-1/2 cups.
l For prepackaged breadmaker bread mixes, be sure that the amount of mix is
nol more lhan 4 cups. If the amount of mix is more, measure out:4 cups.
4. Important information regarding pre-packaged bread mixes:
l Follow the directions on the back of your bread
mix. For a 1 pound loaf light
crust set to Setting 3. For a 1-1/2 pound loaf medium crust, set to Setting 1.
For a 1-1/2 pound loaf dark, crust, set to setting 2.
5. Measure accurately for successful breadmaker bread loaves. Mismeasuring
even
slightly, can make a big difference in your results. Measure each ingredient precisely
before placing it into the inner pot.
l To
measure liquids, pour into a seethrough glass or plastic liquid measuring
cup. Read the measurement al eye level.
l To measure flour, spoon into a standard
dry-ingredient measuring cup and level
with a-straight-edge knife or metal spatula.
l
Use standard measuring spoons and level
with a straight-edge knife or metal spatula.
5
BEFORE BAKING
(Use For All Settings)
CONT.
6. Assemble ingredients on your kitchen counter in order of use before adding them
to the inner pot. Measure ingredients into the inner pot in the order given in the
recipe. Once all ingredients have been-added lo the inner pot, recheck the recipe
lo be sure each one was used, and in the correct quantity and order.
l
The correct order of adding ingredients is:
1. Water and other liquids (including eggs)
2. Flour, shortening, sugar, salt, elc.
I
3. Active dry yeast
Note: When the room temperature is over 02°F (28’C), use cold water (about
SO”F [IOYI)). When room temperature is normal, use waler between 65°F
(10°C) and 70°F (26°C).
IMPORTANT: When using the Delayed Finish feature, please pay special
attention to the order of ingredients. When adding the dry yeast, make a
hollow depression in the mound of flour ancl pour the dry yeast into il. Do
not let the yeast touch the water or the dough may not rise properly.
7. Place the inner pot into the inner case.
l Wipe off any moisture from the outer side of the inner
pot before placing it into the inner case.
l Make sure the word FRONT on the upper rim of the
inner pot is facing toward the front of the breadmaker.
l Push down on rim until inner pot locks into place.
l Unless the inner pot is securely placed inside the
breadmaker, the bread will not bake correctly.
8, Close the lid.
r into a 120 volt 60 Hz AC outlet.
is plugged in, the
display window will flash “0 00," within
a minute.
9. Plug the breadm
,
10. Select the desired setting.
l
Press the SELECT pad until the number of the desired
setting appears in the display window.
l
Each time the SELECT pad is pressed, the display window
changes IO the number of the next setting.
l The number of the setting and the required amount of
time in hours and minutes for each setting will appear.
CRUST CONTROL
A. BAKE SETTINGS - IMMEDIATE START
This section explains how to set the breadmaker using one of the various BAKE
settings. Make sure that the setting you select is the correct setting for the recipe
you are making. Follow steps 1 through 10 on pages 8 and 9.
11. Press the START pad.
l The-display window will show the time remaining
until the completion of the
selected setting. The time will “count down” in one-minute increments.
For example: When you have selected the Basic (1) setting "2:50" appears in
the display window.
BASIC and SWEET Settings:
These settings have an additional ingredient buzzer that.
sounds eight times IO allow you tO add ingredients such as
nuts, raisins, etc. during the last part of the kneading. When
using delayed start, these ingredients are added the same time’
as the flour, water, etc.
WHOLE WHEAT Settings:
For the first 32 minutes of course setting number 4 and 5 the breadmaker is
heating and allowing the liquid t o moisten the flour, The kneader blade does
not mix or knead during this time.
l Steam may rise from the vent on the back of the lid during operation.
l When baking is finished the buzzer will sound three times and
the display
will read “0 00."
l "0 00" will be flashing, indicating the “Keep Warm” feature is on.
12. Remove the inner pot.
l Open the lid.
l Using’ pot holders or oven mitts, remove the inner pot by
pulling straight up on the handle
Caution: Be sure
to use pot holders or oven mitts IO
remove the inner pot as it will be extremely h o t
l When a BAKE setting is completed,
the machine automatically goes into a
“KEEP WARM” stage.
l You may remove your bread anytime
during this period, or you ‘may wait until
the keep warm period is over.
Warm " feature will re
Note: Unless turned OFF, the "KEEP
after baking is complete. To turn off the “KEEP WARM” feature, press the
STOP pad. "0 00” will stop flashing, but remain in the display windown.
13. Remove the bread.
l Be sure to use-pot holders when removing the bread
from the inner pot.
l Turn the inner pot upside down and shake it several
‘times to remove the bread.
l Place the bread on a wire rack and allow it to cool.
l The kneader blade may remain in the bottom of the loaf. I
the loaf to cool, then remove the kneader blade using the
plastic spoon or other plastic or wooden utensil so the kneader blade is not
scratched. If removing the blade when the bread is hot, use oven mitts or
wrap the loaf in a towel.
l If you are not satisfied with the bread results,
refer to the Troubleshooting
Guide (pages 14 and 15).
14. Unplug the breadmaker.
l When removing the plug, always hold the plug - not the cord.
IO
CUTTING AND STORING BREAD LOAVES
CUTTING
.
. . ,
. ,
Because loaves baked in a breadmaker
are s h rped differently from traditional
bread loaves, below are several ways to’ cut them:‘
l Use an electric
knife for best results when cutting . .hot bread loaves. Otherwise,
a sharo serrated or sawtooth breadkni ife works well
. and slice across the loaf. We find this
l For square
slices place the loaf on its side
is the easiest way to cut loaves.
.
l For rectangular slices - place the loaf upright
and cut from the top down. Slices
may be cut in half; lengthwise or crosswise.
l For wedges - place the
loaf u right-and cut through the center-from the top
down; Place each half cut side down and cut lengthwise into four, six or,
eight wedges.
STORING
If you have leftover bread, store it as follows:
l Store bread
tightly covered at room temperature up to ihree days. If weather is
hot and humid, store in the freezer.
. Store bread tightly covered in the freezer up to one month. Slicing the loaves
before freezing makes it easy to use one slice at a time.
l Do not store bread in
the refrigerator because it tends to dry out and stale more
quickly than commercially, made bread.
l Leftover bread can be cut into 1/2 or 1-Inch cubes for
use in your favorite
pudding, crouton and stuffing recipes. Keep a tightly closed container in the
freezer to add to as needed,
B . DOUGH S E T T I N G - IMMEDIATE START
TO
1
set the
DOUGH
setting: follow steps 1 through 10 on pages 8 and 9
Press the START pad.
l The SELECT pad has been pressed, and the machine
changed to the "8" - Dough mode. Press the START pad.
l The remaining time until the dough is finished will be
displayed.
l When the rising is completed, the buzzer will sound
three times to let you know the dough is ready.
l "0 00" will then be displayed
.
--
12. Remove the dough.
When the buzzer sounds, press the STOP pad.
. Open t h e lid, remove the inner pot by lifting it straight
u p a n d remove the dough.
l
13. Turn the machine off and unplug the cord.
l Unplug the unit by holding t h e plug and, not by pulling
,
on
the-cord.
:
. .
::
‘..
C. BAKE AND DOUGH SETTINGS DELAYED FINISH
l
l
l
This section explains how to set the Delayed Finish feature so that you can have a
loaf of bread or dough whenever you want.
When using the timer, always set it before pressing the START pad.
The Delayed Finish feature can be used to delay the finish of settings up to
12 hours.
To program the machine for Delayed Finisb: follow steps 1 through 10 on pages
selecting and selling BAKE or DOUGH.
‘*
Lq
To enter 9:30 In the display window. press either the A or v
(;):l-ro) pads of the timer set pad.
l i$uu&vess the A pad, 2:40 wilt appear In the display
l
II you press the v pad, 2:40 of the Dark (3) setting wilt
appear In the display window. Once more press the V pad,
Q
PUSS
8 and 9 for
12:00 will appear in the display window.
‘Pm5mca
Delayed Finish can be set in 10-minute increments.
If you press and “hold” one of the timer set pads, the time wilt
l
move quickly forward or backward.
l If you go past the time you want to set. press the other pad
tO reverse the setting to desired
time
l To check the setting
you have selected, press the SELECT pad.
To return to the time of the Delayed finis h feature, press the
SELECT pad again.
Press the START pad
l
l
l
tO start the timer.
The colon (:) of t h e time readout in the display will flash tO
indicate that the countdown has begun.
The display will show the time countdown in one-minute
increments until " 0 : 0 0 " has been reached and baking has
been completed.
It you make a mistake setting the Delayed Finish, press the
STOP pad. This will clear the display window and you can
begin again.
Follow the same directions and precautions for removing the inner pot, turning the
machine off, etc. as for any immediate BAKE setting. Follow the recipe for shaping,
baking, etc. for DOUGH setting. See page 10 for more detailed information.
Note: The order in which the ingredients are added to the Inner pot is critical
when using the Delayed Finish feature. The water and yeast must not touch for,
best results. See page 9.
l
Recipes using eggs, fresh milk, sour cream, cheese or other foods that could
spoil are not recommended for the Delayed Finish feature.
l For more information see page 3 of The B r e a d m a k e r b y Mr. Cofhe@Recipe
Book.
Caution: You can program tO make dough using the Delayed Finish feature. After
letting the dough rise, you will need to shape and bake the dough. If you leave the,
dough in the unit, your dough may over rise, resulting in a poor product.
BREAD A N D DOUGH INGREDIENTS
FLOURS
l Dread flour is the highest in gluten of the readily available flours. It gives the
tallest results and is the most tolerant of adverse conditions, high temperatures,
high humidity, etc.
l Whole wheat flour still contains the bran
and germ from the wheat kernel. It is
lower in gluten and needs to be used only with the WHOLE WHEAT BAKE settings.
l All- purpose flour is used only In some of the DOUGH recipes.
I t is not a
substitute for bread flour in a recipe.
Y E A S T
. It is a living organism that causes the dough to rise.
,
l All of the recipes call for active dry yeast.
l
Rapid rise andcompressed- yeast are not direct substitutes for active dry yeast.
SALT
l
Controls the actlon of the yeast.
l
Adds to and enhances the flavor of the bread.
l
At altitudes over 7,000 feet additional
salt may be used to improve bread ‘results.
SWEETENERS (Sugar Brown or White; Honey;Molasses
I
l Provides "food"
for the yeast to help it grow.
l
Enhances the flavor and the browning process of the bread.
FAT (Shortening, Butter, Margarine, Vegetable Oil)
l
Adds flavor and enhances the tenderness.
l
Increases the “keeping” capabilities of the product.
MILK (Liquid or Dry)
l
Increases the nutritional value.
l Produces a soft c r u s t
and a velvety
l
Enhances the flavor.
texture.
GLUTEN
l An elastic substance that i s developed
from protein when wheat flour is
combined with liquid and then mixed or kneaded.
l Helps give bread its cellular structure .
l
Several types
of commercial powdered gluten products are available in health
food stores. ‘it is sometimes recommended for use in breadmaker
recipes,
especially for recipes that use whole grain flours or when bread flour is not
used. Our recipes do not require the addition of powdered gluten.
EGGS
Added for flavor, richness and color.
l
Do not use recipes containing eggs when using the Delayed Finish feature.
l
I’
13
TROUBLESHOOTING GUIDE:
BREADMAKER
Problem
Solution
Flour spilled out
of inner pot into
inner case
Wipe out inner case with a clean cloth. Use care when
cleaning around heating element.
For BAKE selling, use a maximum of 4-2/ 3 cups flour at a time.
For DOUGH setting, use a maximum of 4-1/2 cups flour.
Bread not baking
properly
Check kneader blade mounting shaft for free rotation. If
the rolation of the shaft Is binding or tight, please contact
Mr. Coffee at 1-800-MRCOFFEE
(I-8OO-672-6333) for service
information.
"E:01" appears in
display window
Open’the lid and remove the inner pot to cool the inside of
the unit. After the panel message disappears, replace the
inner pot and press the START pad again.
"E:02, E:03, E:O4,
E:05, E:08"
appears in the ,
display window
Unplug the unit and please contact Mr. Coflee at
1-800-MRCOFFEE
(I-800-672-6333) for service information.
TROUBLESHOOTING GUIDE:
BREAD LOAVES
Problem
Not baked in
center
Collapse
Causes
. Can happen with recipes calling for moist ingredients
such as applesauce and yogurt or with heavier flours such
as whole wheat or bran.
. Reduce the liquids by 1 tablespoon the next time you
make the recipe.
. Humidity may be high. Add 1 to 2 tablespoons of flour the
next time you make the recipe.
Ingredient amounts were out of proportion. Salt omitted.
Too much dough was made. Exceeding the capacity of the
inner pot may cause an underbaked, gummy center and a
collapsed top. When dough rises to the top of the
machine, it interferes with circulation needed for proper
baking and cooling.
l Warm weather, high humidity or overheated liquids all
speed up yeast action, which may cause the dough to rise
too fast and the bread to collapse before baking begins.
l
l
TROUBLESHOOTING
GUIDE:
BREAD LOAVES
CONT.
Problem
Causes
Overrising
Usually indicates that ingredient quantities are out of
proportion. Too much yeast, sugar, flour, liquid or a
combination may result in exceeding the capacity of the
inner pot.
l
Open, coarse or
holey texture
Excess water or yeast was used, or yeast action was
accelerated by hot, humid weather or overheated
ingredients.
Salt omitted.
l
l
Not enough water or too much flour was used.
.. Not enough sugar or yeast was used.
l Recipe was imbalanced by an excess of whole grain
flours,
whole grains, dried fruits or other added ingredients.
Heavy,
dense texture
l
Short loaf,
unsatisfactory
rising
Not enough sugar was used.
Delayed Finish feature was used and ingredients were
placed in inner pot in a way that salt or water were in
contact with the yeast for a prolonged period.
l
Short, heavier loaves are to be expected when whole
grains or whole grain flours are used or when all-purpose
four is substituted for bread flour. Try using bread flour
and reducing the amount of other flours and grains.
l
Incorrect amount of yeast was used, or yeast was not fresh
l
l
No rise’
l
l
l
Mushroomshaped top
Old or improperly stored yeast was used. Yeast was
omitted or mismeasured,
Other key ingredients were omitted or mismeasured.
Delayed Finish feature was used and ingredients were
placed in the pan incorrectly.
* Too much yeast may have been used. Be sure yeast was
measured with a teaspoon, not a tablespoon.
l
Added ingredients that contain sugar, such as sweetened
applesauce or raisins.
Sunken
l
I
l
Loaf with top or sides that have caved in could be caused
by too much moisture. Reduce the liquids by
2 tablespoons the next time you make the recipe.
If recipes call for fruit or vegetables, drain well and
pat them dry.
PROPER CARE AND CLEANING OF
THE BREADMAKER BY MR. COFFEE
l
Unplug the power cord and allow the breadmaker TO cool completely,
Caution: Do not pour water into the inner case or submerge the breadmaker
in water.
l
Use only a mild detergent tO clean the breadmaker. To avoid damaging the
smooth surfaces of the breadmaker and inner pot, do not use chemical liquid
cleaners (such as benzene or thinners), nonabrasive or abrasive cleansers, or
scrubbing brushes or pads to clean the breadmaker or inner pot surfaces.
The Unit Body, Lid and Inner Case
l Wipe the outside of the
unit body and the lid with a damp cloth.
l Remove any flour, bread crumbs or other
materials from the inside of the inner
case using a damp sponge or cloth or a small portable vacuum cleaner.
The inner Pot and Kneader Blade
Both the inner pot and the kneader blade are coated with a nonstick surface.
Do not use any cleaners or utensils that could scratch this surface.
. The nonstick surface may change in appearance after continued used. This is
.
caused by moisture and steam and has no effect on its use or quality.
l Remove the inner pot with kneader blade from the inner case and wash
with a
damp sponge or dishcloth, making sure the kneader blade mounting shaft is also
very clean. The inner pot interior can be washed with soapy waler, but do not
submerge inner pot in water. Wash after each use and dry thoroughly.
,
l Do not soak either part in water or wash in a dishwasher.
l If it is difficult
to remove the kneader blade from the inner pot, fill the inner pot
with warm water and let it stand a few minutes IO allow any baked-on bread
dough to soften.
l If the hole
in the kneader blade becomes clogged, clean It out with a soft bristle
brush or wooden or plastic toothpicks.
l
Before Storing the tlreadmaker
l Make sure the breadmaker base has cooled completely and all
parts have been
thoroughly cleaned and dried.
l Leave th e lid open until the breadmaker is completely cool. This will avoid the
furmation of any moisture in the inner case.
COMMONLY ASKED QUESTIONS
What has happened to the kneader bl ade?
I t may have been baked into the bottom of the loaf of bread. See step 12 on
page 10 for how to remove the kneader blade from the loaf.
Why is bread flour used in most of the recipes?
Bread flour is high in protein. When kneaded the protein produces gluten that
gives bread a strong structure more tolerant of variations in the recipe, weather
conditions etc., than all-purpose flour.
Can I use all- purpose flour in my breadmaker?
You may use all - purpose flour, however, the bread will be lower in volume and the
texture will be slightly different than bread made with bread flour. Because the
bread structure is less strong’ than when bread flour is used, breads made with
all-purpose flour aren’t as tolerant tO additional ingredients such as fruit, grains
or vegetables.’
Can I use self-rising flour in my breadmaker?
No, the leavening in self-rising flour interferes with the yeast, and the result
will not be satisfactory.
what is g l u t e n ?
Gluten is the insoluble protein found in wheat flours. Hard wheat has a higher
g l u t e n content that soft wheat. Gluten is formed when liquid is added to flour and
kneaded. Gluten is the foundation of a good loaf of bread.
Can Iuse my favorite bread recipes in my breadmaker?
You can if you are wilting to experiment. Unfortunately, there is no tried-and-true
formula for doing this because bread recipes vary. The recipe needs to be scaled
down to fit the flour restrictions of your breadmaker (4 2 / 3 cups for BAKE settings,
4 1/2 cups for ROUGH setting). You will have to figure amounts mathematically.
(For example, if a favorite recipe uses 7 1/2 to 8 cups of flour, because your
breadnaker has a maximum amount of 4 2/3 cups of flour for baked recipes you
could begin by using 4 cups of flour and one-half of the amount of remaining
Ingredients.) Use the same order of adding ingredients to the inner pot as
recommended in our recipes.
,
31
31
MR.C@FFEE"