1
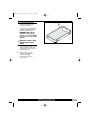
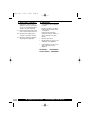
75263 rev1
9/3/07
09:04
Page 1
The After Sales Division
Morphy Richards Ltd
Morphy Richards products are intended for household use only.
Morphy Richards has a policy of continuous improvement in product quality and
design. The company, therefore reserves the right to change the specification of its
models at any time.
Mexborough, South Yorkshire,
England, S64 8AJ
Registration: no: 644702
Helpline (office hours)
UK 0870 060 2614
Republic of Ireland 1800 409089
EB75263 M UK Rev 1 02/07
For details of other products in the Morphy Richards range please see our website . . .
75263 rev1
9/3/07
09:04
Page 2
Polar Fleece Heated bedding
Please read and keep these instructions
Getting the best from your new blanket...
Safety first
For your safety, the in-built system in this product will
automatically shut off the power if it reaches a temperature
that is higher than considered comfortable. It will also shut
off automatically if any unsafe situation should arise.
Washing Instructions
Before washing, detach the switch control and lead
from the blanket.
For replacement parts, help with using your Morphy Richards product,
problems and lots more, contact us by phone or through our website.
UK Helpline: 0870 060 2614
Ireland 1800 409119
www.morphyrichards.com
EB75263 MUK Rev 1
75263 rev1
9/3/07
09:04
Page 3
IMPORTANT
INSTRUCTIONS PLEASE
READ CAREFULLY AND
RETAIN FOR FUTURE USE
IMPORTANT SAFETY
INSTRUCTIONS
•
Do not crease the appliance by
placing items on top of it during
storage.
All Morphy Richards heated
blankets have been
manufactured to the highest
European standards. This
product has been
comprehensively tested for all
known safety situations, so you
can relax in the knowledge that
it will provide warmth, comfort
and peace of mind.
•
Do not dry clean the blanket,
follow washing instructions on
the label attached to the blanket
and the details that relate to
your blanket.
Personal safety
•
The use of any electrical
appliance requires the following
common sense safety rules.
Primarily there is danger of
injury or death and secondly the
danger of damage to the
appliance. These are indicated
in the text by the following two
conventions:
WARNING: Danger to the
person!
•
IMPORTANT: Damage to the
appliance! In addition we offer
the following safety advice.
•
Young children should be
instructed on how to operate
the controls safely and heat
settings should be controlled
by a parent or guardian.
•
Children should be supervised
to ensure that they do not play
with the appliance.
•
Do not use a hot water bottle at
the same time as using the
blanket.
Care instructions
•
3
WARNING: This appliance is
not attended for use of
persons (including children)
with reduced physical,
sensory or mental
capabilities, or lack of
experience and knowledge,
unless they have been
given supervision or
instruction concerning use
of the application by a
person responsible for their
safety.
Do not use with a helpless
person, an infant or a person
insensitive to heat.
Examine frequently for any signs
of wear or damage to the
blanket, switch or cord. In case
of damage or misuse, please
cease using and contact The
After Sales Helpline. (See page
11).
•
During the summer, the blanket
can be used to air the mattress.
•
To store fold carefully and place
back into original packaging.
UK Helpline 0870 060 2614
Ireland Helpline 1800 409119
75263 rev1
9/3/07
09:04
Page 4
Product safety
•
•
Ensure the blanket is used in
the manner in which it is
intended, either as an
overblanket or underblanket as
appropriate.
If used on an adjustable bed,
check the blanket or cord
cannot become trapped or
rucked.
•
Ensure the product is correctly
fitted to the bed, following the
instructions in this booklet.
•
Do not insert pins or any sharp
objects into the blanket.
•
Do not tuck the heated part of
material under the mattress.
•
Do not use if the blanket is wet.
•
Avoid pressing creases or folds
into the blanket. Do not switch
on if the blanket is folded,
creased or rucked.
•
Do not use any lead, switch or
cord other than the one
supplied with this blanket.
•
Do not coil or lay the lead on
the blanket.
•
Not intended for medical use in
hospitals.
•
WARNING: When storing
the appliance allow it to
cool down before
folding.
ELECTRICAL
REQUIREMENTS
Check that the voltage on the
rating label of your appliance
corresponds with your house
electricity supply which must be
A.C. (Alternating Current).
If the socket outlets in your
home are not suitable for the
plug supplied with this
appliance, the plug should be
removed and the appropriate
one fitted.
Warning: The plug removed
from the mains lead, if
severed, must be destroyed
as a plug with bared
flexible cord is hazardous if
engaged into a live socket
outlet.
Should the fuse in the 13 amp
plug require changing, a 3 amp
BS1362 fuse must be fitted.
This appliance does not need to
be earthed. It is a double
insulated product.
3
75263 rev1
9/3/07
09:04
Page 5
BEFORE USE
Before using this appliance
ensure that the voltage indicated
on the product corresponds
with the mains voltage in your
home. If you are in any doubt
about your supply, ask your
electrical dealer or local
electricity company.
WARNING: Do not
attempt to use the
blanket with controls
other than those
supplied with the unit as
referred to on the rating
label attached to the
blanket.
Dual control models
On double dual models users
are able to control their own
side of the bed with individual
controls, tailoring independent
temperatures to independent
needs.
Each side of the blanket has a
completely separate element
and each is supplied with its
own independent mains lead. A
13amp plug on each lead is
essential.
Do not connect both flexible
cords to one 13amp plug.
The two leads should preferably
be plugged into individual
sockets. However, if only one
socket is accessible, then a
multi adaptor should be used.
SAFEGUARD
OVERHEAT
PROTECTION
SYSTEM
Activation
The system will remain dormant
indefinitely as long as the
blanket is operating in the
normal temperature range. If for
any reason the blanket is
operated in an abnormal
situation or condition which
would otherwise have induced a
rapid temperature rise high
enough to constitute a hazard
the OVERHEAT SYSTEM should
intervene by cutting off the
supply current before the
temperature reaches the point at
which damage may occur.
It is normal for the lead from the
blanket to the switch to become
warm as this is part of the
heater protection circuit
extended to the switch.
In the event of the OVERHEAT
SYSTEM operating, the blanket
will cease to function.
WARNING: No attempt
should be made to repair
the blanket or have it
repaired locally and the
switch supplied must
never be replaced since
the specialised
components are not
generally available.
The fact that this blanket
incorporates the overheat
system does not absolve the
user from observing these
instructions.
WARNING: If you are unsure
about electrical
connections please contact
a qualified engineer.
It is quite normal for the switch
to become warm as the
components encased are part
of the protection circuit.
4
UK Helpline 0870 060 2614
Ireland Helpline 1800 409119
75263 rev1
9/3/07
09:04
Page 6
Fitting instructions
•
Use only as an underblanket
and do not use above the
occupant of the bed.
•
This product can be used with
any type of bedding including
waterproof bed protectors.
•
WARNING: Ensure the
blanket is not folded,
rucked or creased. When
in use do not cover with
pillows.
A
Mattress covers with
elasticated corner
tapes
1 Place the mattress cover directly
on the mattress with the control
switch end at the head of the
bed making sure the connector
is facing upwards.
2 Turn the elastic corners
underneath the mattress to
secure in place A.
•
Ensuring all creases are
smoothed out.
5
75263 rev1
9/3/07
09:04
Page 7
⁄
¤
‡
fl
‹B
‹A
›
fi
FEATURES
⁄ LCD screen with back light.
¤ Standby/ON LED.
‹ A Down Arrow
B Up Arrow
› Slider switch OFF, ON, SLEEP
TIMER
fi Boost button.
fl Mode button
‡ Blanket active LED
6
UK Helpline 0870 060 2614
Ireland Helpline 1800 409119
75263 rev1
9/3/07
09:04
Page 8
HOW TO USE
All night use (manual)
1 Ensure the blanket is fitted to
NOTE: Blankets are perfectly
safe to be used all night.
However we recommend using
the heat setting below.
the bed correctly. Move the
slider switch to the ‘OFF’
position.
2 Plug the power lead into the
closest socket, using an
extension lead if needed to
ensure that the lead is not
stretched.
Start up
1 Select the ‘ON’ position
2 Using the up and down buttons,
select your desired heat level (14).
•
This setting will provide safe
and comfortable heat to sleep
on all night.
•
This setting can be used to air
the bed.
1 When plugged in, the red power
LED will illuminate. The switch is
already in time set mode.
2 Select the appropriate hour
AM/PM by using the down
arrow ‹A or the up arrow ‹B.
Press the mode button fl. The
minute symbol will then flash,
select the appropriate time.
Press mode again and the clock
will be set A.
Heating the bed
1 Move the slider switch to the
‘ON’ position the green LED ‡
will illiuminate and heat level 1 is
automatically selected.
2 Select the heat required using
A
B
WARNING: Always
ensure that the heat
setting is moved to the
OFF position when you
get up the next day, or
after airing the bed.
Boost button
At any time during use, if the
boost button is pressed fi the
switch will increase by two heat
levels, for 30 minutes C.
C
Then it will revert back to the
previous heat level.
the up and down arrow buttons
level 1-9 B.
If within this 30 minutes the
boost button is pressed again, it
will revert to the original setting.
NOTE: Make sure when you get
into bed that the blanket is
switched off, or reduced to level
suitable for all night use (1-4).
This feature can be used any
number of times during use.
Sleep button
1 Move the slider switch to sleep
D
position. The sleep symbol will
be lit up D.
2 There is no heat output from the
blanket until the boost button is
pressed.The default level is 4, it
can be altered by using the up
and down buttons to your
desired level. This will maintain
for 30 minutes then switch off
E.
E
If at any time during this period
the boost is pressed again, the
heat will be switched off.
7
75263 rev1
9/3/07
09:04
Page 9
Setting the timer
1 Move the slider to timer position.
F
G
2 The start and timer symbols will
appear plus the hour will flash.
Use the up and down buttons to
select the required start time
ensuring its on the correct AM
or PM. When desired hour is
selected press mode button F.
3 Then the minutes will start to
flash, select the desired start
time (this setting adjusts in 15
minute steps) When selected
press mode button.
4 Timer and finish will appear. plus
H
the hour will flash. Use the up
button to select required finish
time ensuring its on correct AM
or PM. When correct hour is
selected press mode.Then the
minutes will start to flash, select
required time. Then press mode
button (this setting adjusts in 15
minute steps) G.
7 The programmed time is stored
even when switch is moved to
the OFF position.
To use stored programme simply
move slide switch to timer
position.
8 To change the programme move
slide to timer position and press
mode button and repeat steps
1-5.
Safety features
Button lock feature
Press mode then boost to lock
the buttons. To unlock press
mode then boost. This will
prevent accidental operation
while asleep. When the lock is
activated. The LOCK symbol will
appear on the LCD screen I.
5 The heat level will start to flash
I
use the up and down arrows to
select required heat level. Press
mode button. The pre-heat
symbol will flash. If this is
required, then press mode
button (if not required then press
down arrow button before the
mode button)
NOTE: The pre-heat feature will
pre-heat the bed at high level (H)
for the first 30 minutes of
programed time before reverting
to the selected heat level H.
The clock symbol will then
appear indicating that the timer
function is set.
6 Once the timer function is set.
The programme details are
stored in memory.
If left in timer mode the blanket
will automatically switch On and
OFF at the set time each day.
8
UK Helpline 0870 060 2614
Ireland Helpline 1800 409119
75263 rev1
9/3/07
09:04
Page 10
WASHING
INSTRUCTIONS
Hand washing
1 Unplug the blanket from the
power socket.
WARNING:
2 Disconnect the control switch
•
Do NOT dry clean -
•
Do NOT iron -
and cord from the blanket by
lifting the locking lever over the
raised button and pull apart.
WARNING: Before
washing ensure that you
detach all the controls
from the blanket.
1 Measure the blanket so it can be
stretched back to its original
size whilst wet.
3 Use a mild washing liquid or
detergent and lukewarm water.
4 Immerse the blanket in the water
and allow to soak for 5-10
minutes.
5 Squeeze the soapy water
2 Only use in a washing machine
through the fabric.
with a drum large enough to
take the blanket without forcing
it in.
6 Rinse the blanket thoroughly in
NOTE: Please ensure washable
models are fully dry before use.
WARNING: Do not wring
dry.
Machine washing
J
cool water, gently squeezing the
fabric.
40º
1 Unplug the blanket from the
power socket.
2 Disconnect the control switch
and cord from the blanket by
lifting the locking lever over the
raised button and pull apart J.
3 Wash on the wool setting at
40°C.
4 Gentely stretch the blanket back
to its original shape and size
before drying without applying
clothes pegs to wired areas of
the blanket. (See instructions for
tumble drying).
Tumble drying
1 Unplug the blanket from the
power socket.
2 Disconnect the control switch
and cord from the blanket by
lifting the locking lever over the
raised button and pull apart J.
3 Tumble dry on the LOW heat
setting, following the drying
under ‘machine washing’
section, point 4.
9
75263 rev1
9/3/07
09:04
Page 11
After sales servicing
HELPLINE
Examine the blanket and cord
frequently for signs of wear or
damage. In the case of damage
do not use. If the blanket fails to
operate, check the following:
If you have any difficulty with
your appliance, do not hesitate
to call us.
We are more likely to be able to
help than the store from where
you bought it.
1 Ensure that the plug and socket
have not become disconnected.
Please have the following
information ready to enable our
staff to deal with your query
quickly.
2 Check that the supply plug is
correctly connected to the flex.
3 Check the supply fuse and the 3
amp plug fuse if applicable.
•
Name of the product
•
Model number as shown on the
satin label of the appliance.
•
Serial number as shown on the
back of the switch. of the
appliance.
UK Helpline
0870 0602614
Ireland Helpline 1800409089
10
UK Helpline 0870 060 2614
Ireland Helpline 1800 409119
75263 rev1
9/3/07
09:04
Page 12
YOUR THREE
YEAR
GUARANTEE
It is important to retain the
retailers receipt as proof of
purchase. Staple your receipt to
this back cover for future
reference.
Please quote the following
information if the product
develops a fault. These numbers
can be found on the rating label
attached to the blanket and
back of the switch.
EXCLUSIONS
Morphy Richards shall not be
liable to replace the goods under
the terms of the guarantee
where:
1
The fault has been caused or is
attributable to accidental use,
misuse, negligent use or used
contrary to the manufacturers
recommendations or where the
fault has been caused by power
surges or damage caused in
transit.
2
The appliance has been used on
a voltage supply other than that
stamped on the products.
3
Where the appliance has been
used for hire purposes or non
domestic use.
Model no.
Serial no.
All Morphy Richards products
are individually tested before
leaving the factory. In the unlikely
event of any appliance proving
to be faulty within 28 days of
purchase it should be returned
to the place of purchase for it to
be replaced.
If the fault develops after 28
days and within 36 months of
original purchase, you should
contact the Helpline number
quoting Model number and
Serial number on the product, or
write to Morphy Richards at the
address shown.
4 Morphy Richards are not liable
to carry out any type of servicing
work, under the guarantee.
This guarantee does not confer
any rights other than those
expressly set out above and
does not cover any claims for
consequential loss or damage.
This guarantee is offered as an
additional benefit and does not
affect your statutory rights as a
consumer.
•
This guarantee is valid in the UK
and Ireland only.
You may be asked to return a
copy of proof of purchase.
Subject to the exclusions set out
below (see Exclusions) the faulty
appliance will then be replaced
and dispatched usually within 28
working days of receipt.
For electrical products sold
within the European
Community. At the end of the
electrical products useful life it
should not be disposed of
with household waste.
Please recycle where facilities
exist. Check with your Local
Authority or retailer for
recycling advice in your
country.
If for any reason this item is
replaced during the 3 year
guarantee period, the guarantee
on the new item will be
calculated from original
purchase date. Therefore it is
vital to retain your original till
receipt or invoice to indicate the
date of initial purchase.
To qualify for the 3 year
guarantee the appliance must
have been used according to the
manufacturers instructions.
11