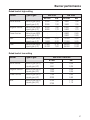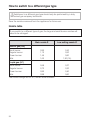
1
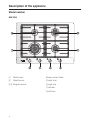
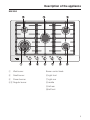
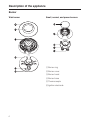
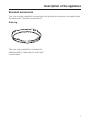
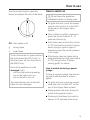
Instructions for installation and use
Gas stovetop
KM 2030 / KM 2050
®
To prevent accidents and
machine damage,
read the Operating Manual
before
installation or use.
®
en - CA
M.-Nr. 07 520 080
WARNING:
If the information in this manual is not followed
exactly, a fire or explosion may result causing
property damage, personal injury or death.
– Do not store or use gasoline or other flammable
vapors and liquids in the vicinity of this or any
other appliance.
– WHAT TO DO IF YOU SMELL GAS
ß Do not try to light any appliance.
ß Do not touch any electrical switch.
ß Do not use any phone in your building.
ß Immediately call your gas supplier from a
neighbor’s phone. Follow the gas supplier’s
instructions.
ß If you cannot reach your gas supplier, call the
fire department.
– Installation and service must be performed by a
qualified installer, service agency or the gas
supplier.
– Note to the installer:
Please leave this instruction book with the
consumer for the local electrical / gas inspector’s
use.
2
Contents
Description of the appliance . . . . . . . . . . . . . . . . . . . . . . . . . . . . . . . . . . . . . . . . . 4
Model number . . . . . . . . . . . . . . . . . . . . . . . . . . . . . . . . . . . . . . . . . . . . . . . . . . . . . 4
Burner . . . . . . . . . . . . . . . . . . . . . . . . . . . . . . . . . . . . . . . . . . . . . . . . . . . . . . . . . . . 6
Standard accessories . . . . . . . . . . . . . . . . . . . . . . . . . . . . . . . . . . . . . . . . . . . . . . . 7
SAFETY NOTICES AND WARNINGS . . . . . . . . . . . . . . . . . . . . . . . . . . . . . . . . . . 8
Before the first use . . . . . . . . . . . . . . . . . . . . . . . . . . . . . . . . . . . . . . . . . . . . . . . 14
First cleaning . . . . . . . . . . . . . . . . . . . . . . . . . . . . . . . . . . . . . . . . . . . . . . . . . . . . . 14
How to use . . . . . . . . . . . . . . . . . . . . . . . . . . . . . . . . . . . . . . . . . . . . . . . . . . . . . . 15
How to switch on . . . . . . . . . . . . . . . . . . . . . . . . . . . . . . . . . . . . . . . . . . . . . . . . . . 15
How to adjust the flame . . . . . . . . . . . . . . . . . . . . . . . . . . . . . . . . . . . . . . . . . . . . . 16
How to switch off . . . . . . . . . . . . . . . . . . . . . . . . . . . . . . . . . . . . . . . . . . . . . . . . . . 16
Wok ring . . . . . . . . . . . . . . . . . . . . . . . . . . . . . . . . . . . . . . . . . . . . . . . . . . . . . . . . . 16
Cookware . . . . . . . . . . . . . . . . . . . . . . . . . . . . . . . . . . . . . . . . . . . . . . . . . . . . . . . 17
Safety cut-off . . . . . . . . . . . . . . . . . . . . . . . . . . . . . . . . . . . . . . . . . . . . . . . . . . . . 18
Cleaning and care . . . . . . . . . . . . . . . . . . . . . . . . . . . . . . . . . . . . . . . . . . . . . . . . 19
General . . . . . . . . . . . . . . . . . . . . . . . . . . . . . . . . . . . . . . . . . . . . . . . . . . . . . . . . . 19
Stainless steel recess . . . . . . . . . . . . . . . . . . . . . . . . . . . . . . . . . . . . . . . . . . . . . . 20
Burner grate, control knob . . . . . . . . . . . . . . . . . . . . . . . . . . . . . . . . . . . . . . . . . . . 20
Burners . . . . . . . . . . . . . . . . . . . . . . . . . . . . . . . . . . . . . . . . . . . . . . . . . . . . . . . . . 21
Troubleshooting. . . . . . . . . . . . . . . . . . . . . . . . . . . . . . . . . . . . . . . . . . . . . . . . . . 23
Technical Service. . . . . . . . . . . . . . . . . . . . . . . . . . . . . . . . . . . . . . . . . . . . . . . . . 24
SAFETY NOTICES FOR INSTALLATION . . . . . . . . . . . . . . . . . . . . . . . . . . . . . . 26
Appliance and installation dimensions . . . . . . . . . . . . . . . . . . . . . . . . . . . . . . . 29
Installation . . . . . . . . . . . . . . . . . . . . . . . . . . . . . . . . . . . . . . . . . . . . . . . . . . . . . . 31
General installation information . . . . . . . . . . . . . . . . . . . . . . . . . . . . . . . . . . . . . 32
Electrical connection . . . . . . . . . . . . . . . . . . . . . . . . . . . . . . . . . . . . . . . . . . . . . . 33
Gas connection . . . . . . . . . . . . . . . . . . . . . . . . . . . . . . . . . . . . . . . . . . . . . . . . . . 34
Gas pressure regulator . . . . . . . . . . . . . . . . . . . . . . . . . . . . . . . . . . . . . . . . . . . . . 35
Burner performance . . . . . . . . . . . . . . . . . . . . . . . . . . . . . . . . . . . . . . . . . . . . . . 37
How to switch to a different gas type . . . . . . . . . . . . . . . . . . . . . . . . . . . . . . . . 38
Nozzle table . . . . . . . . . . . . . . . . . . . . . . . . . . . . . . . . . . . . . . . . . . . . . . . . . . . . . . 38
How to change a nozzle . . . . . . . . . . . . . . . . . . . . . . . . . . . . . . . . . . . . . . . . . . . . 39
How to change the main nozzle . . . . . . . . . . . . . . . . . . . . . . . . . . . . . . . . . . . . 39
How to change the small nozzles . . . . . . . . . . . . . . . . . . . . . . . . . . . . . . . . . . . 40
After switching over . . . . . . . . . . . . . . . . . . . . . . . . . . . . . . . . . . . . . . . . . . . . . . . . 41
Help protect our environment. . . . . . . . . . . . . . . . . . . . . . . . . . . . . . . . . . . . . . . 42
3
Description of the appliance
Model number
KM 2030
a
Wok burner
Burner control knob:
b
Small burner
e right front
cd Regular burner
f right rear
g left rear
h left front
4
Description of the appliance
KM 2050
a
Wok burner
Burner control knob:
b
Small burner
f right front
c
Power burrner
g right rear
de Regular burner
h middle
i left rear
j left front
5
Description of the appliance
Burner
Wok burner
Small, normal, and power burners
a Burner ring
b Burner cover
c Burner head
d Burner base
e Thermocouple
f Ignition electrode
6
Description of the appliance
Standard accessories
You can re-order standard accessories and optional accessories as needed (see
the section on "Optional accessories").
Wok ring
The wok ring (supplied) is included for
added stability, especially for woks with
round bases.
7
SAFETY NOTICES AND WARNINGS
Correct use
This gas stovetop complies with all
applicable safety laws and
regulations. However, improper use
can result in personal injury and
material damage.
Before using the cooktop for the first
time, carefully read the Instructions
for installation and use. These
operating instructions contain
important information on the safe
installation, operation, and care of
your appliance. To reduce the risk
of personal injury or damage to the
appliance, it is important that you
carefully read the instructions.
Keep them in a safe place and pass
them on to any future user.
8
~ The gas stovetop is intended for
household use only, and for the
purposes described in this manual.
Other uses are not permitted and can
be dangerous. The manufacturer will
not be held liable for damage caused
by unauthorized use or improper
operation of any kind.
~ Individuals who are incapable of
using the gas cooktop safely because
of their physical, sensory or mental
capabilities, or their lack of experience
or knowledge, must not use the
appliance without supervision or
instruction by a responsible person.
SAFETY NOTICES AND WARNINGS
Children in the house
~ Always supervise any children in the
vicinity of the cooktop. Never allow
children to play with the appliance.
~ Children should use the cooktop
~ Packing materials (e.g., foil,
styrofoam) can be dangerous for
children, because of the danger of
suffocation. Keep packaging materials
out of the reach of children and dispose
of them as promptly as possible.
only if they have received sufficient
instruction to operate it safely. They
must be able to recognize potential
hazards of improper operation.
~ The cooktop is hot during use and
remains so for some time after being
switched off. Keep children away from
the appliance until it has cooled down
enough that there is no longer any
danger of burns.
~ Keep the spaces above and behind
the appliance clear of any items that
could draw the interest of a child.
Otherwise, a child might be tempted to
climb on it, and risk being burnt.
~ Make sure that children will not be
able to grab and topple any cookware
on the cooktop. Danger of scalding and
burns! A special childproofing screen is
available through your dealer, to help
reduce these risks.
9
SAFETY NOTICES AND WARNINGS
Technical safety
~ Only professionals who are duly
authorized by the manufacturer should
perform installation work, maintenance,
and repairs on this appliance.
Work performed by unqualified persons
carries the risk of serious harm to the
user. The manufacturer will not be held
liable for such harm.
~ Before installing the cooktop, check
for externally visible damage. NEVER
operate a damaged appliance, under
any circumstances. A damaged
cooktop may endanger your safety.
~ Before plugging in the appliance,
you must make sure that the electrical
rating (voltage and frequency,
indicated on the rating plate)
corresponds to the household electrical
supply.
These ratings must match, in order to
avoid damaging the applicance. If in
doubt, please contact a qualified
electrician.
~ The electrical safety of this cooktop
can only be guaranteed if proper
grounding has been installed in
compliance with applicable safety
regulations. Is is very important to make
sure that this essential safety
requirement is met. In case of doubt,
have a qualified electrician check the
wiring.
The manufacturer will not be held liable
for damage or injury caused by a
missing or broken grounding conductor
(e. g., electric shock).
10
~ The gas line must be connected by
a qualified technician. Also, if the plug
is removed, the appliance will need to
be installed and connected by a
qualified electrician. Hire a qualified
technician who is thoroughly familiar
with all national and local regulations
and requirements for electrical supply,
and who will carefully comply with
these specifications. The manufacturer
will not be held liable for damage
caused by incorrect installation or
connection.
~ To ensure safe operation, use the
appliance only after it has been
installed into place.
~ Do not under any circumstances
open the cooktop housing.
Any contact with connections carrying
voltage, or changes in the electrical or
mechanical set-up, will endanger you
and may impair the functioning of the
appliance.
~ If the power cord is damaged, it
must be replaced with a special power
cord (type H 05 VV-F, PVC insulated),
which is available from the
manufacturer or from Customer Service.
~ Defective components should be
replaced using Miele original parts
only. Only these parts are guaranteed
by the manufacturer to comply with
safety requirements.
SAFETY NOTICES AND WARNINGS
~ Whenever performing installation or
maintenance work or repairs, the
appliance must be disconnected from
the power supply. The appliance is
considered to be electrically
disconnected when one of the following
conditions is met:
– the fusebox or circuit breakers are
switched off.
– the screw-in type fuses are fully
unscrewed,
– the power cable is disconnected
from the electrical system.
To disconnect units with plugs, do
not pull on the cord but rather on the
plug itself.
~ Do not connect the gas cooktop to
the power supply by a power strip or
extension cord. They do not guarantee
the required safety of the appliance
(danger of overheating, for example).
Correct use
,WARNING
NEVER use this appliance as a
space heater to heat or warm the
room. Doing so may result in carbon
monoxide poisoning.
~ The cooktop is hot during use and
remains so for some time after being
switched off. Be careful not to touch the
appliance if it may still be hot.
~ Protect your hands when working
with a hot appliance - wear oven mitts,
and use potholders, etc. Make sure
these materials do not come into
contact with flames. Specifically, do not
use large dishcloths, towels, or the like.
Also make sure that the materials do
not become damp or wet. This would
increase the transfer of heat to your
skin, and could cause burns.
~ NEVER use the appliance to heat up
closed containers, e.g., canned foods.
The increased pressure can cause the
containers/cans to explode, and this
carries the danger of injury and burns.
~ Do not place or use the appliance in
the open.
~ Do not obstruct the flow of
combustion and ventilation air.
~ Do not light the gas cooktop until all
burner parts have been properly
assembled.
11
SAFETY NOTICES AND WARNINGS
~ Only uses cookware that is within
the range of listed diameters (see the
section on "Cookware"). If the diameter
is too small, the cookware will be
unstable. If the diamtere is too large,
heated fumes can extend out from
underneath the cookware, potentially
causing damage to the countertop,
walls, and appliance panels. The
manufacturer will not be held liable for
such damages.
~ Do not use any roasting trays, pans,
or barbecue stones that are large
enough to span several burners. They
can trap heat, which can damage the
appliance.
~ Do NOT let the burner flame rise up
beyond the bottom of the cookware and
up the sides.
~ NEVER leave the gas cooktop on
without cookware on the burner(s). The
intense heat from the flames can
damage the burner grate or even cause
it to catch fire.
~ Do not use plastic or aluminum
cutlery or dishware. It can melt at high
temperatures. There is also the danger
of fire.
~ The burner grates supplied with the
appliance must always be used. Never
place a pan on the burner by itself.
~ Keep the appliance area clear and
free from combustible materials.
gasoline and other flammable vapors
and liquids.
12
~ Do not use the appliance as a
storage surface. If the appliance is
accidentally switched on or there is
residual heat, there is the danger that
the items on top of it will heat up and
melt or catch fire - danger of fire and
burns!
~ NEVER cover the grill with a cloth or
foil stovetop protector. There is a fire
hazard if the appliance is accidentally
switched on.
~ Promptly remove fat splatters and
other food residue from the surface of
the appliance. If they are not removed,
there is the danger of fire.
~ Do NOT leave the appliance
unattended when working with hot oil or
fats. Superheated fat or oil can ignite,
even causing the exhaust hood to
catch fire. Fire hazard!
~ If hot fat or oil catches fire, NEVER
use water to douse the flames. Instead,
use a lid, or wet dishtowel, for example,
to put out the fire.
~ Never flambé food under an exhaust
hood. The flames can set fire to the
exhaust hood.
~ Do not use cookware with an overly
thin bottom, and never heat dishware
when it is empty, unless expressly
permitted by the manufacturer.
Otherwise, the cooktop may be
damaged.
SAFETY NOTICES AND WARNINGS
~ Keep salty foods and liquids away
from the cooktop. Salt must be
promptly and thoroughly wiped away,
or it will corrode the appliance.
~ Place the burner grate gently on the
stovetop from above, to avoid
scratching.
~ The use of a gas cooktop will
generate heat and moisture in the
room. Make sure the room is
well-ventilated, whether by natural exits
or the installation of a mechanical
device, e.g., an exhaust hood.
~ Prolonged intensive use of the
appliance may require additional
ventilation of the room, e.g., by opening
a window, or by setting the exhaust
hood to a higher setting.
~ If the appliance is plugged into a
socket near the appliance, check to be
sure that the power cord does not
come into contact with the hot
appliance. This can damage the
insulation on the cord. Danger of
electric shock!
~ If there is a drawer below the
appliance, do NOT store any spray
cans, flammable liquids, or flammable
materials in the drawer. Cutlery trays
must be made of heat-resistant
material.
~ NEVER use a steam cleaner to clean
this appliance.
The steam can reach the electrical
components and cause the appliance
to short circuit.
~ If the appliance has been out of use
for a long period of time, be sure to
thoroughly clean it and have it
inspected by a qualified technician
before using it again.
~ Repair of the gas cooktop during the
warranty period should be performed
only by a service technician who is
authorized by the manufacturer;
otherwise, should damage result, it will
not be covered by the warranty.
~ Always cook food throughly.
Temperatures must be high enough,
and the cooking times long enough, to
kill any germs in the food.
The manufacturer will not be held
liable for damage caused by failure
to comply with the Safety information
and warnings.
13
Before the first use
Refer to the section on the "Data plate"
and attach the plate, which is included
with the appliance documents, in the
location specified in that section.
First cleaning
^ Remove any protective foil.
^ Clean the removeable parts of the
burner with a soft sponge dipped in
warm water and some dish liquid.
Then dry the parts and put the burner
back together (see the section on
"Cleaning and care").
^ Wipe down the stainless steel
cooktop with a damp cloth and dry it.
The metal parts have a protective
coating. This may cause a slight
odor when the appliance is used for
the first time.
This odor and any accompanying
vapor will disappear after a short
while, and are not an indication of a
faulty connection or appliance
defect.
14
How to use
Use the control knob to ignite the
burner and adjust the size of the flame.
How to switch on
,Do not leave the appliance
unattended whilst it is being used.
^ To ignite a burner, press the proper
control knob and turn it to the LEFT,
all the way to the largest flame
symbol.
^ Once a flame is visible, continue to
press the control knob for 8 - 10
seconds, then let go.
Off Gas supply is off
&
strong flame
/
weak flame
^ If the flame goes out turn the control
to "Off" and wait for at least 1 minute
before trying to ignite it again. If
necessary keep the control pressed
in for longer.
To turn the burner on, press and turn
the knob toward the LEFT only. To
turn the burner off, turn the knob to
the RIGHT only.
^ If the burner does not ignite after a
second attempt turn the control back
to "Off" and go to the "Problem
solving guide" for advice.
Parts of the appliance can be
damaged if you:
- turn the knob without pressing,
- turn to the right to turn on,
- turn to the left to turn off.
How to switch on during a power
outage
The manufacturer will not be held
liable for such damages.
^ To ignite a burner, press the control
knob and turn it to the LEFT, all the
way to the largest flame symbol.
If there is a power outage, the burners
can be lit with matches or a stove
lighter.
^ Pressing down the knob, bring a lit
match to the gas/air mixture.
^ Continue to hold down the knob for
approx. 8-10 seconds, then let go.
15
How to use
How to adjust the flame
Wok ring
The burners can be variably adjusted
between the lowest and highest flame.
For added stability, especially for woks
with round bases, use the wok ring
(supplied).
Be sure to adjust the flame to a level
that does not jut out from under the
cookware. Because the edges of a gas
flame are much hotter than the center
of the flame, the tips must remain under
the bottom of the cookware. If the flame
is too large, excess heat will be
produced, which can damage the
handles on the cookware and cause
the risk of burns.
How to switch off
^ Turn the control knob to the RIGHT,
to "Off".
The gas supply is interrupted and the
flame goes out.
16
Make sure the wok ring is properly in
place, so that it won't move around.
(See illustration.)
Cookware
Burner
Min. bottom
diameter pots/pans,
in cm
Small burner
10
Regular burner
12
Power burrner
14
Wok burner
14
Max. upper diameter
pots/pans, in cm
Small burner
22
Regular burner
22
Power burrner
24
Wok burner
24
– Choose cookware to suit the size of
the burner. In general, note that: a
larger diameter = a larger burner, a
smaller diameter = a smaller burner.
– It is better to use broad shallow pots
than tall narrow pots, because broad
pots will heat up more quickly.
– You can use any heat-resistant
cookware on a gas cooktop.
– When buying cookware, note that the
diameter given is typically the upper
diameter, rather than the bottom
diameter.
– Follow the recommended diameters
as listed in the Table. If the bottom
diameter is too small, the cookware
will be unstable. If the upper
diameter is too large, heated vapours
can extend out from underneath the
cookware, potentially causing
damage to the countertop, walls, and
appliance panels. The manufacturer
will not be held liable for such
damages.
– Whenever possible, keep pots and
pans covered while cooking. This
helps keep in the most possible heat.
– The burner grates supplied with the
appliance must always be used.
Never place a pan on the burner by
itself.
– When using a wok make sure that
the base does not touch the burner.
A distance of 1 cm should be
maintained between the burner and
the base of the wok pan above it.
– If you choose cookware with a thick
bottom, it will conduct heat more
evenly. Cookware with a thin bottom
may unevenly heat food and lead to
overheating in spots. It is important
to stir the food so it will heat evenly.
17
Safety cut-off
The gas cooktop is equipped with a
thermoelectric safety ignition. In other
words, if the gas flame goes out ( e. g.,
because of overflowing food or a draft),
the gas supply is interrupted.
^ To switch the flame back on again,
turn the control knob right to "Off"
then switch the burner on as usual.
The safety cut-off is independent of the
power supply. In other words, it
remains in effect even if there is a
power failure.
18
Cleaning and care
General
,NEVER use a steam cleaner to
clean this appliance. The steam can
reach the electrical components and
cause the appliance to short circuit.
To avoid damaging the surfaces, do
not use any
– cleaning products that contain
washing soda, acids/alkali, ammonia,
or chlorine bleach,
– lime removers,
Clean the entire appliance after each
use. Let the appliance cool down
before cleaning.
Dry the appliance any time water is
used to clean it - this helps prevent lime
spots.
To prevent changes to the stovetop
surface, promptly wipe away any salty
foods or liquids.
– stain and rust removers,
– scouring cleansers, e. g., scouring
powder, scouring liquid, pumice
stones,
– solvent-based cleansers,
– dishwasher cleaner,
– grill andoven sprays,
– glass cleaner,
– scouring sponges or brushes, e. g.
pot scrubbers,
– sharp objects
(they could damage the seals
between the frame and the
countertop).
19
Cleaning and care
Stainless steel recess
Burner grate, control knob
To clean this area, use only a soft
sponge with some dish liquid and warm
water. Pre-soak any stubborn residue
before cleaning.
After cleaning, dry the recess
thoroughly with a soft cloth.
Remove the burner grate. To clean the
grate and knob, use a soft sponge with
some dish liquid and warm water.
Pre-soak any stubborn residue before
cleaning.
If needed, you can use the glass
ceramic and stainless steel cleaner
(see the section on "Optional
accessories"). Make sure to only use
the product in the direction of the grain
(ridges).
Do not use any stainless steel
cleanser on or around the printing.
This would rub off the printing. Use
only a soft sponge with some dish
liquid and warm water to clean this
area.
To keep the surfaces from quickly
becoming soiled again, we recommend
treatment with a stainless steel care
product (see the section on "Optional
accessories").
Using a soft cloth, apply the product in
a thin, even layer.
20
Dry all surfaces with a clean, soft cloth
after cleaning.
Do NOT clean the burner grate in
the dishwasher.
Cleaning and care
Burners
How to assemble the small, normal,
and power burners
NEVER clean the burner parts in the
dishwasher.
Instead, take off all the removeable
parts of the burner, and clean them with
a soft sponge dipped in warm water
and some dish liquid.
Wipe the immoveable part of the burner
with a damp cloth.
Gently wipe the ignition electrode and
the thermocouple with a well wrung-out
cloth.
The ignition electrode must not get
wet, or the spark will be extinguished.
After cleaning, dry all surfaces with a
clean, soft cloth.
Be sure to dry off all the flame openings
as well.
Over time, the surface of the burner
covers will become somewhat more
matte. This is normal and does not
represent any material defect.
^ Arrange the burner head b on the
lower part (base) of the burner d in
such a way that the thermocouple e
the ignition electrode f and the
retaining pins g align through the
holes in the burner head.
^ Place the burner cover b evenly onto
the burner head c, so that the
notches fit over the retaining pins. To
adjust the burner cover into place,
turn slightly left or right.
Once the burner cover is in the right
position, it will not move.
Be sure to assemble the burner parts in
the proper order.
21
Cleaning and care
How to assemble the wok burner
^ Arrange the burner head c on the
burner base d in such a way that the
thermocouple e and the ignition
electrode f align through the hole in
the burner head.
^ Next put the burner ring a in place.
^ Finish by putting the burner cover b
in place.
Be sure to assemble the burner parts in
the proper order.
22
Troubleshooting
,Repairs to electrical and gas
appliances should only be carried
out by qualified professionals. Work
performed by unqualified persons
can place the user at considerable
risk of harm.
What should I do if ...
... the burner does not ignite even
after several attempts?
Check whether:
– the burner is properly assembled.
– the gas valve is open.
... the gas flame goes out AFTER
ignition?
Check that the burner cover is properly
in place.
... the electrical ignition is not
working?
Check whether there are food particles
between the ignition electrode and the
burner cover. Carefully remove the
debris. Make sure the ignition electrode
does not get wet.
... the flame suddenly looks
different?
Check that the burner is properly
assembled.
– the burner is clean and dry.
– the flame openings are clear and
dry.
– the fuse or breaker was tripped.
Contact a qualified electrician or
Customer Service for assistance. You
can light a gas burner with matches
instead (see the section on "Power
outages").
23
Technical Service
For replacement parts or a fault which
you cannot easily fix yourself, please
contact the Miele Technical Service
Department at the address on the back
of this booklet.
When contacting Technical Service
please quote the serial number and
model of the appliance. This
information is visible on the silver data
plate supplied with the appliance.
Adhere data plate sticker here:
24
Installation Instructions
IMPORTANT: SAVE FOR THE LOCAL ELECTRICAL INSPECTOR'S USE
To prevent accidents
and machine damage
read these instructions
before
installation or use.
SAFETY NOTICES FOR INSTALLATION
To avoid damage to the appliance, it
should not be installed until the
upper cabinet and exhaust hood
have already been mounted.
~ This appliance is not connected to
an exhaust vent. It must be installed
and connected to the power supply in
compliance with the applicable
installation requirements.
~3 The room will need to be at least 20
m in volume, with at least one door or
window opening to the outside.
~ The countertop veneers must be
affixed with heat-resistant glue
(100 °C), so that they do not become
deformed or detached.
The wall strips must be heat-resistant
as well.
~ Installation and assembly of this
appliance in non-stationary locations
(for example, aboard ships) should be
performed only by specialized
companies/technicians, to ensure that
the requirements for safe use are met.
~ Because there is the risk of
flameover, a gas cooktop should
NEVER be installed next to a
deep-fryer. A minimum distance of 12"
(300 mm) must be maintained between
these appliances. Other appliances
may be build in directly next to the gas
cooktop.
26
~ Storage cabinets above the cooktop
present a fire hazard.
~ This gas cooktop is not authorized
for installation atop
refigerators/freezers, dishwashers, or
washers/dryers.
~ Check to be sure that the gas line
and power cord will not come into
contact with any hot spots after
installation. Hot spots can cause heat
damage to the gas line and power
cord.
~ The power cord and a flexible gas
line must be arranged in such a way
that they will not come into contact with
moveable parts in the cabinetry (e.g., a
drawer) or be subject to any
mechanical strain.
~ Be sure to carefully observe the
clearance distances listed on the
following pages.
~ Never use caulking unless it is
explicitly called for in the instructions.
The sealing tape for the appliance
provides an adequate seal with the
countertop (see the section on "General
installation notices").
SAFETY NOTICES FOR INSTALLATION
Upper clearance
If there are various appliances with
different recommended clearance
distances beneath the exhaust
hood, e. g., a gas stovetop and an
electric cooktop, always choose the
greatest distance.
For an exhaust hood above the
appliance, the safe clearance distance
indicated by the hood manufacturer
must be maintained.
If there are no specifications from the
hood manufacturer or if flammable
materials (e. g., a hanging cabinet) are
installed above the appliance, the
clearance distance must be at least 30"
(760 mm).
The maximum depth of cabinets
installed above the cooktop must be
13" (330 mm).
27
SAFETY NOTICES FOR INSTALLATION
When installing a gas stovetop, the
cabinetry or walls to ONE side and to
the rear of the appliance can be as tall
as you wish. However, on the other side
there must not be any appliance or
furniture that is taller than the installed
gas stovetop (see illustrations).
You must ensure that the following
minimum safety clearances are kept:
– 4" (100 mm) to the right or left of the
countertop cut-out to the next closest
piece of furniture (e.g., tall
cupboard).
2”
Highly recommended
– 2" (50 mm) from the countertop
cut-out to the rear wall.
Not recommended
Not permitted
28
Appliance and installation dimensions
KM 2030
a front
b Installation height
c Gas connection R 1/2" ISO 7-1
d Junction box with power cable, L = 78 3/4" (2000 mm)
29
Appliance and installation dimensions
KM 2050
a front
b Installation height
c Gas connection R 1/2" ISO 7-1
d Junction box with power cable, L = 78 3/4" (2000 mm)
30
Installation
How to make the countertop
cut-out
How to install the gas stovetop
^ Use the template to make a
countertop cut-out.
Be sure to observe the minimum
distance from the rear wall and from
the left or right to a side wall.
See the section on "SAFETY
NOTICES FOR INSTALLATION".
^ Seal any wooden countertop
surfaces with a special varnish,
silicone rubber, or resin, to help
prevent swelling from moisture.
The materials used must be
temepature-stable.
If, during installation, you find that
the frame is not tightly sealed to the
countertop at the corners, then the
corner edges, ß R4, can be carefully
trimmed with a jigsaw.
^ Feed the appliance power cord
downward through the countertop
cut-out.
^ Set the appliance loosely into place
in the cut-out.
^ Connect the appliance to the power
supply (see the section on "Electrical
connection").
^ Establish the gas connection (see the
section on "Gas connection").
^ Use the supplied brackets to hold the
appliance in place.
31
General installation information
Sealing
Tiled surfaces
NEVER use sealing unless it is explicitly
called for in the instructions. The
sealing strip under the edge of the
upper part of the appliance provides a
sufficient seal against the countertop.
The grouting a and shaded area under
the cooktop frame must be flat and
even, so that the frame will lie evenly
and the sealing strip under the edge of
the upper part of the appliance can
provide an adequate seal against the
countertop.
NEVER use sealing between the
upper appliance frame and the
countertop!
It will hinder access to the appliance
during servicing, and the frame and
countertop can be damaged as a
result.
32
Electrical connection
This appliance must be grounded
according to local or national codes.
All electrical work should be
performed by a qualified electrician
in accordance with local codes and
with the:
-
National Electrical Code
ANSI / NFPA 70
for the USA
or
- Canadian Electrical Code Part I
for Canada
(CSA Standard C 22.1)
,WARNING
Disconnect the appliance from the
main power supply before
installation or service. To reduce the
risk of electric shock, make sure that
the appliance is properly grounded
after installation.
This appliance is equipped with a
three-prong grounding plug to
prevent shock hazards. It should be
plugged directly into a properly
grounded outlet. Do not cut or
remove the grounding prong from
the plug. If the plug does not fit the
outlet, have the proper outlet
installed by a licensed electrician.
To guarantee the electrical safety of
this appliance, continuity must exist
between the appliance and an
effective grounding system. It is
imperative that this basic safety
requirement be met. If there is any
doubt, have the electrical system of
the house checked by a qualified
electrician.
The manufacturer cannot be held
responsible for damages caused by
the lack, or inadequacy, of an
effective grounding system.
Power supply
The automatic ignition requires that the
appliance be connected to a 120 VAC,
60 Hz power supply. The supply line
should be protected by a 15 A fuse.
Note to the installer
Please leave these instructions with the
consumer or the appliance.
Actual power consumption (during
ignition only) is 25 W.
This appliance is equipped with a
78 3/4" (2000 mm) long power cord that
is ready for connection to the
appropriate outlet.
Place the power outlet so that it is
accessible after the appliance has
been installed in the countertop.
33
Gas connection
Installation and service must be
performed by a qualified installer,
service agency or the gas supplier.
The gas connection must be made
in accordance with local codes or, in
the absence of local codes, with
This appliance must be installed
with its own shut off valve and the
included gas pressure regulator.
Both the valve and the regulator
must be easily accessible to the
consumer to turn on or shut off the
gas supply after the appliance is
installed.
-
This appliance and its individual
shut off valve must be disconnected
from the gas supply during any
pressure testing performed in
excess of ½ psi (3.5 kPa), or
isolated from the gas line by closing
its individual manual shut off valve at
test pressures equal to or less than
½ psi (3.5 kPa).
Any pipe connections must be made
using a thread sealant approved for
gas connections. Failure to correctly
install these items could lead to a
gas leak and subsequent explosion.
Leak testing of the appliance shall
be conducted according to the
manufacturer's instructions.
34
the National Fuel Gas Code,
ANSI Z 223.1/NFPA 54
for the USA
or
- the current Can/CGA B 149.1
and .2 Installation Codes for gas
burning appliances for Canada.
Make sure that the maximum gas
supply pressure before the gas
pressure regulator is never more than
½ psi for both natural gas or LP gas.
The minimum supply pressure to get
the required gas input is
4" w.c. for natural gas:
10" w.c. for LP gas.
Gas connection
Gas pressure regulator
A pressure regulator that is convertible
from natural to LP gas (Propane) or vice
versa is included with the appliance.
The included regulator corresponds
with the gas type of the appliance.
Verify before installing.
The adjusted pressure is:
natural gas - 4" w.c.
LP gas - 10" w.c.
For convenience, an AGA or CGA
approved flexible stainless steel gas
hose (accordion type) may be used
between the gas connection and the
regulator. This will allow the appliance
to be lifted out of the countertop for
cleaning or servicing. Make sure that
any drawers, cabinet doors, etc., do not
rub on this gas hose.
Do not use any regulator unless it
has been supplied by Miele. Doing
so may cause a gas leak.
If there is any doubt concerning
installation contact the Miele Technical
Service Department.
After connecting the appliance check
all fittings for gas leaks e.g. with
soapy water.
a Appliance
b ½" NPT
When installed properly, the flame will
be steady and quiet. It will also have a
sharp, blue inner core that will vary in
length proportional to the burner size.
Flame adjustment will not be
necessary.
c Regulator
As shown in the above diagram, the
included regulator must be used when
connecting the Miele appliance to your
gas supply. This item has been
customized by Miele to meet all
applicable safety requirements. Make
sure the regulator is easily accessible
for adjustment after the appliance has
been installed.
35
Gas connection
The appliance should have been
ordered for connection to either natural
gas or LP gas (propane).
If the appliance is not configured for the
proper type of gas connection please
contact your Miele Dealer.
If the appliance is to be connected to a
type of gas other than it was originally
configured for, both the regulator and
burners must be converted. A
conversion kit is available as an
optional accessory from the Miele
Technical Service Department.
36
Burner performance
Rated load at high setting
Burner
Type of gas
KM 2030
KM 2050
BTU/hr
kW
BTU/hr
kW
Small burner
Natural gas (NG)
Liquid gas (LP)
3500
3500
1,00
1,00
3500
3500
1,00
1,00
Regular burner
Natural gas (NG)
Liquid gas (LP)
6200
5800
1,80
1,70
6200
5800
1,80
1,70
Power burner
Natural gas (NG)
Liquid gas (LP)
-
-
8900
8900
2,60
2,60
Wok
Natural gas (NG)
Liquid gas (LP)
12000
11000
3,50
3,20
12000
11000
3,50
3,20
Total
Natural gas (NG)
Liquid gas (LP)
27900
26100
8,10
7,60
36800
35000
10,70
10,20
Rated load at low setting
Burner
Type of gas
KM 2030 / KM 2050
BTU/h
kW
Small burner
Natural gas (NG)
Liquid gas (LP)
850
850
0,25
0,25
Regular burner
Natural gas (NG)
Liquid gas (LP)
1200
1200
0,35
0,35
Power burner
Natural gas (NG)
Liquid gas (LP)
1700
2000
0,50
0,60
Wok
Natural gas (NG)
Liquid gas (LP)
3700
3700
1,10
1,10
37
How to switch to a different gas type
,Switchover to a different gas type should only be performed by a duly
authorized gas company technician.
Save the nozzles removed from the appliance for future use.
Nozzle table
If you switch to a different type of gas, the large and small burner nozzles will
need to be changed.
Main nozzle Ø
Low setting nozzle Ø
0,90
1,13
1,45
1,63
0,42
0,52
0,60
1,30 (1A)
0,58
0,72
0,90
0,98
0,27
0,32
0,40
0,60
Natural gas (NG)
Small burner
Regular burner
Power burrner
Wok
Liquid gas (LP)
Small burner
Regular burner
Power burrner
Wok
The nozzle listings are for a 1/100mm bore diameter.
38
How to switch to a different gas type
How to change a nozzle
Small, normal, and power burners
Unplug the appliance from the
electrical supply.
How to change the main nozzle
^ Remove the burner cover b, the
burner ring a (wok) and the burner
head c.
^ Use a socket wrench (M7) to
unscrew the main nozzle h.
^ Insert the proper nozzles (see Nozzle
table) and tighten them down.
Wok burner
39
How to switch to a different gas type
How to change the small nozzles
(all burners)
To change the small nozzles, you will
first need to remove the upper part of
the appliance.
a
^ Unscrew the mounting screws on the
burner.
^ Pull the control knob up and off.
^ Take off the upper part of the
appliance.
^ Remove the ignition switch a.
^ Use a small screwdriver to unscrew
the small nozzle b from the gas tap.
^ Use needle-nosed pliers to pull the
nozzle out.
^ Insert the proper nozzles (see Nozzle
table) and tighten them down.
40
b
How to switch to a different gas type
After switching over
^ Use the reverse order to re-assemble
the burner parts.
^ Before putting the upper part of the
appliance back in place, light each
burner with matches to test the seal
on all the gas flow parts.
^ After testing, set aside the loose
burner parts.
^ Put the upper part of the appliance
back in place.
^ Screw down the lower part of the
burner, then put the loose burner
parts back into place, making sure to
follow the right order.
^ Put the control knob back on.
^ Finally, check the flame behaviour of
each burner.
The flame must not go out in the low
setting, even if the control knob is
quickly turned from "high" to "low".
At the high setting, the flame needs to
burn with a clearly visible core.
^ In the nozzle pack, find the
appropriate sticker for the new gas
type and stick it over top of the
previous sticker.
41
Help protect our environment
Disposal of packing materials
Disposal of an old appliance
The cardboard box and packing
materials are biodegradable and
recyclable. Please recycle.
Old appliances contain materials that
can be recycled. Please contact your
local recycling authority about the
possibility of recycling these materials.
Ensure that any plastic wrappings,
bags, etc. are disposed of safely and
kept out of the reach of children.
Danger of suffocation!
42
Before discarding an old appliance
disconnect it from the electrical supply
and cut off the power cord to prevent it
from becoming a hazard.
43
Alteration rights reserved / 4908
For the most updated manual see the Miele web site.
M.-Nr. 07 520 080 / 00