1
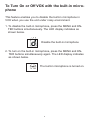
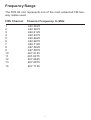
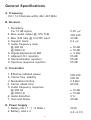
MK 1700A
14 CHANNEL FAMILY RADIO SYSTEM
CALL
ENTER
MENU
MIC
PW
R
BEFORE OPERATING THIS PRODUCT
PLEASE READ THESE INSTRUCTIONS
COMPLETELY
CONTENTS
FCC Warmings.............................................................................1
Features........................................................................................1
Precaution.....................................................................................1
Unpacking.....................................................................................1
Controls and Indicators.................................................................2
Install Batteries.............................................................................3
To Turn On or Turn Off The Unit...................................................4
To Transmit...................................................................................4
To Adjust Volume Control..............................................................4
To Select Channel........................................................................4
To Send Call Tone.........................................................................5
To Lock Control Keys....................................................................5
To Turn On or OFF Beep..............................................................5
To Turm On or OFF VOX..............................................................6
Frequency Range.........................................................................7
General Specifications..................................................................8
FCC WARNINGS
This device complies with part 15 of the FCC rules, operation is
subject to the condition that this device does not cause harmful
interference.
Features
No Air Time Fees and No License Required
Up to 2 miles range
14 Channel
Build-in VOX Function(Optional)
Muti-function LED Display
Talk Confirmation Tone and Call / Ring Button
Auto Battery Saver and Auto Squelch
Monitor and Key Lock Button
External Power (DC 6V) and External Microphone Speaker Jacks
Detachable Belt Clip
PRECAUTIONS
• Do not modify or attempt to adjust the transceiver for any reason.
• Avoid extremes in exposure to water, heat, and cold. This
transceiver is weather resistant but not waterproof.
• Do not expose the transceiver to long period of direct sunlight,
nor place the transceiver close to heating appliances.
• Do not place the transceiver in excessively dusty areas, humid
areas, wet areas, nor on unstable surfaces.
• If an abnormal or smoke is detected coming from the transceiver, immediately switch OFF the power and remove the batteries from the transceiver. Contact your dealer.
UNPACKING
Carefully unpack the transceiver. We recommend that you identify the items listed below before discarding the packing material.
• Transceiver ..........................1
• Belt Clip ..............................1
• Instruction Manual ...............1
1
Controls and Indicators
1. Earphone/Microphone jack
2. Transmission/Reception indicator
3. PTT button
4. MONITOR button
5. ENTER/LOCK button
6. UP/DOWN buttons
7. Microphone
8. POWER button
9. MENU button
10. CALL button
11. Power Saver mode 2
3
indicator
12. LED display
4
13. Ext. Power IN
5
6
7
1
CALL
ENTER
MENU
MIC
PW
R
13
12
11
10
9
8
Display and Indicators
LED display - indicates Channel numbers, Volume level, Lock,
Beep, Low Battery Level, etc.
Transmission and Receiption indicator - When transmitting,
the indicator stays on. The indicator flashes when receiving a
singal.
Power Saver Mode indicator - flashes in Power Saver Mode.
2
Operation
Install Batteries
1.
2.
Pull lock tab down and lift door up (towards you) to remove
battery cover.
batteries. Position batteries according to
Insert four
polarity markings.
Note : When batteries are low or need charging the BATTERY
LOW “L” will blink. Replace all batteries with new alkaline batteries.
3
To Turn On The Unit or To Turn Off The Unit
Press the POWER switch for more than 1 second.
Auto Battery Power Saver
The unit has a special circuit designed to extend battery life. If
there are no transmissions within 5 seconds, the unit will automatically switch to battery save mode. The Power Saver Mode
LED(Green) will flash.
Low Battery Indicator
When battery level becomes low, “L” appears on the LED display and flashes. Replace all four batteries with new ones.
To Transmit
Simply talk to the built-in microphone as VOX (Voice Activated
Transmission) turns into transmission mode automatically, or
press the PTT(Push-To-Talk) button.
To Adjust VOLUME control
Press momentarily UP button to increase or DOWN button to
decrease volume.
The higher number, the higher volume level.
To Select Channel
1. Press the MENU button. The LED display indicates a flashing
number.
2. Press the UP or DOWN button to set a desired channel from 1
to 14.
3. Press the MENU button to continue other settings.(Beep On or Off).
To complete setting, press the ENTER button.
4
Automatic Channel Scan
Press and hold the UP or DOWN button to search signals.
When the unit catches a strong signal , scan will stop for 5 seconds.
If you want to stop at that channel, press the PTT or ENTER button.
To Send Call Tone
Call tone sounds like a telephone ring, and is convenient for
quickly identify yourself to another party. Persons whom you call
will instantly recognize you because of your call tone.
Press the CALL button to send Call Tone. “C” appears on the
LED display and flashes.
To Lock Control Keys (UP/DOWN, MENU keys)
Press and hold the ENTER button for 2 seconds. “L” will appear
on the display.
To Turn On or Off Beep
To turn on Beep
1. Press the MENU button twice. The LED display indicates as
shown at right.
or
2. Press the UP or DOWN button to select below.
Beep On
Beep Off
3. Press the ENTER button.
5
To Turn On or Off VOX with the built-in microphone
This feature enables you to disable the built-in microphone in
VOX when you use the unit under noisy environment.
1. To disable the built-in microphone, press the MENU and ENTER buttons simultaneously. The LED display indicates as
shown below.
Disable the built-in microphone
2. To turn on the built-in microphone, press the MENU and ENTER buttons simultaneously again. The LED display indicates
as shown below.
The built-in microphone is turned on.
6
Frequency Range
The FRS 80 unit represents one of the most advanced FM twoway radios used.
FRS Channel
Channel Frequency In MHz
1
2
3
4
5
6
7
8
9
10
11
12
13
14
462.5625
462.5875
462.6125
462.6375
462.6625
462.6875
462.7125
467.5625
467.5875
467.6125
467.6375
467.6625
467.6875
467.7125
7
General Specifications
A. Frequency
CH = 14 Channels within 462 -467 MHz.
B. Receiver
1. Sensitivity
For 12 dB signal
2. Max. audio output @ 10% THD
3. Max. S/N ratio @ 1mV RF input
4. Squelch Sens
5. Audio frequency resp.
@ 300 Hz
@ 3000 Hz
6. Signal displacement BW
7. Adjacent CH. rejection
8. Intermodulation rejection
9. Spurious response rejection
0.25 µV
300 mW
40 dB
0.2 µV
± 10 dB
± 10 dB
± 5 kHz
55 dB
55 dB
55 dB
C. Transmitter
1. Effective radiated power
2. Carrier freq. stability
3. Modulation limiting
4. Carrier attack time
5. Audio frequency response
@ 300 Hz
@ 3000 Hz
6. Audio distortion
7. Hum and Noise
500 mW
500 Hz
2.5 kHz
80 mS
± 10 dB
± 10 dB
3%
40 dB
D. Power Supply
1. Battery life ( 1 : 1 : 8 Ratio )
2. Battery, AAA x 4
8
30 Hr
4.8 - 6.0 V