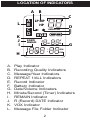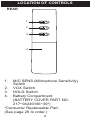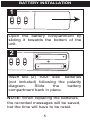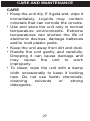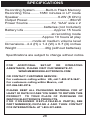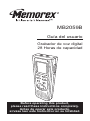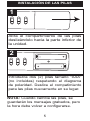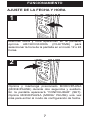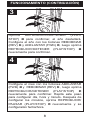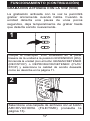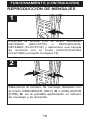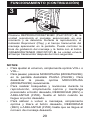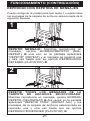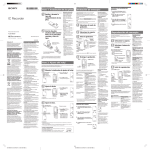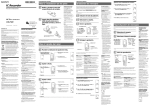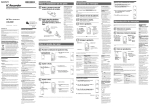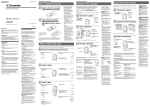
1
MB2059B
User’s Guide
28 Hours Digital
Voice Recorder
Before operating this product,
please read these instructions completely.
Thank you for purchasing this Memorex audio system.
The serial number of your unit can be found on a label on
the rear of the cabinet. We suggest that you record the serial
number in the space provided below in case this information
is ever needed at a future date.
PLEASE KEEP ALL PACKAGING MATERIAL FOR AT
LEAST 90 DAYS IN CASE YOU NEED TO RETURN THIS
PRODUCT TO YOUR PLACE OF PURCHASE OR
IMATION ELECTRONICS PRODUCTS.
Model Number: MB2059B
Serial Number: _________________________________
SAFETY
PRECAUTIONS
INFORMATION
This equipment has been tested and found to comply with
the limits for a Class B digital device, pursuant to Part 15 of
the FCC Rules. These limits are designed to provide
reasonable protection against harmful interference in a
residential installation. This equipment generates, uses and
can radiate radio frequency energy and, if not installed and
used in accordance with instructions, may cause harmful
interference to radio communications. However, there is no
guarantee that interference will not occur in a particular
installation. If this equipment does cause harmful
interference to radio or television reception, which can be
determined by turning the equipment off and on, the user is
encouraged to try to correct the interference by one or
more of the following measures:
• Reorient or relocate the receiving antenna.
• Increase the separation between the equipment and
receiver.
• Consult the dealer or an experienced radio/TV
technician for help.
1
LOCATION OF INDICATORS
A B
L
K
J
I
A
B
C
D
C
LP MP
HP
REPEAT ALL
R DATE
REMAIN
Y
M
D
G
AM
PM
H
A.
B.
C.
D.
E.
F.
G.
H.
I.
J.
K.
L.
D
E
F
Play Indicator
Recording Quality Indicators
Message/Year Indicators
REPEAT 1/ALL Indicators
Record Indicator
Battery Indicator
Date/Volume Indicators
Minute/Second (Timer) Indicators
REMAIN Indicator
R (Record) DATE Indicator
VOX Indicator
Message File Folder Indicator
2
LOCATION OF CONTROLS
FRONT
1
9
2
10
3
11
12
4
5
6
13
14
15
7
8
1.
2.
3.
4.
5.
6.
7.
8.
MIC (Microphone)
Jack
Built-in Microphone
Display
REV Button
MODE/PAUSE Button
PLAY/STOP Button
REC/STOP Button
Speaker
9.
10.
11.
12.
EAR (Earphone) Jack
REC Indicator
VOLUME Up Button
VOLUME Down
Button
13. FWD Button
14. DEL/REPEAT Button
15. FILE/TIME Button
3
LOCATION OF CONTROLS
REAR
1
2
3
4
1.
MIC SENS (Microphone Sensitivity)
Switch
2. VOX Switch
3. HOLD Switch
4. Battery Compartment
(BATTERY COVER PART NO.
217−04240106−30*)
*Consumer Replaceable Part.
(See page 28 to order.)
4
1
BATTERY INSTALLATION
Open the battery compartment by
sliding it towards the bottom of the
unit.
2
Insert two (2) "AAA" size batteries
(not included) following the polarity
diagram.
Slide
the
battery
compartment back in place.
NOTE: When replacing the batteries,
the recorded messages will be saved,
but the time will have to be reset.
5
BATTERY INSTALLATION
BATTERY INDICATORS:
: The batteries are fresh.
: The batteries are weak or
dead; replace.
BATTERY PRECAUTIONS
Follow these precautions when using batteries in this
device:
1. Use only the size and type of batteries
specified.
2. Be sure to follow the correct polarity when
installing the batteries as indicated in the
battery compartment. Reversed batteries may
cause damage to the device.
3. Do not mix different types of batteries together
(e.g. Alkaline, Rechargeable and Carbon-zinc)
or old batteries with fresh ones.
4. If the device is not to be used for a long period of
time, remove the batteries to prevent damage or
injury from possible battery leakage.
5. Do not try to recharge batteries not intended to
be recharged; they can overheat and rupture.
(Follow battery manufacturer’s directions.)
6
OPERATION
SETTING THE TIME AND DATE
1
While the date/time appears in the display,
press the FILE/TIME button to select 12 or
24 hour time display.
2
Press and hold the MODE/PAUSE button
for two seconds, then release; “SET” will
appear in the display. Press the MODE/
PAUSE button once again to enter the Set
Date mode.
7
3
OPERATION
2
3
1
Press the PLAY/STOP button 1 to confirm
and the year will blink. Set the year using
the REV 2 and FWD 3 buttons, then press
the
PLAY/STOP button 1 again to
confirm.
4
2
1
3
Set the Month using the FWD 1 and REV 2
buttons, then press the PLAY/STOP button
3 again to confirm. Repeat this step to set
the Day, Hour and Minute. After setting the
minute, press the PLAY/STOP button 3
again and the date/time will be set.
8
OPERATION
TO TURN THE UNIT ON & OFF
1
2
1
To turn the unit on, press the REC/STOP 1 or
PLAY/STOP 2 button. To turn the unit off, simply
do not touch any button for 30 seconds, and the
unit will automatically turn off and show the time.
TO SWITCH BETWEEN MODES
1
3
2
1
To enter the Standby mode, press the
REC/STOP button 1 or PLAY/ STOP button 2
while in the Time mode. The unit will change to
the Time mode if no button is pressed in 30
seconds. To enter the Time mode, press the
MODE/PAUSE button 3 once while in the
Standby mode.
9
OPERATION
ADJUSTING THE VOLUME
1
1
2
To adjust the volume, while in the Standby
mode or during playback of a file, press the
VOL+ 1 or VOL– button 2; the volume
number will increase or decrease to
indicate the volume level (i.e. “0” is
minimum and “15” is maximum).
EARPHONE JACK
For private listening, connect an earphone
(not included) to this jack. The speaker is
automatically disconnected when the
earphone plug is inserted in the jack.
10
OPERATION
RECORDING QUALITY
You can choose between four voice recording
quality modes. For best sound quality, select HP
(High Play) and for good quality, select MP
(Medium Play). For longer recording time
(reasonable sound quality), select LP (Long
Play).
1
2
1
3
Press and hold the MODE/PAUSE button
1 for two seconds; “SET” will appear and
the recording quality will blink. Press the
REV 2 or FWD 3 button to select the
desired recording quality.
11
2
OPERATION
When the desired recording quality
appears, press the MODE/PAUSE button
twice to confirm and return to the Time
mode or it will change to the Time mode if
no button is pressed in 30 seconds.
High Play: .................................427 min.
Medium Play: ............................853 min.
Long Play:...............................1680 min.
12
OPERATION
SELECTING A FILE FOLDER
This unit has four memory storage areas (file
folders) to choose from, labeled A, B, C and D. You
can store a total of 99 messages in each dividual
file folder, for four file folder you can save a total of
396 messages or 1680 minutes in LP mode (853
min. in MP, 427 min. in HP) in all the folders. To
select the folder:
1
2
3
1
Press the REC/STOP 1 or PLAY/STOP 2 button
to enter the Standby mode. Press the FILE/TIME
button 3 to select the desired file folder
(A,B,C,D). The number at the top right of the
display indicates the total messages recorded.
The number at the bottom of the display will
indicate the total time recorded for the selected
message.
NOTE:
Each time you record a message, the unit will assign
a number, counting up 1 from the last message
number, which will be shown on the display.
If the unit is full, FULL will appear in the display.
Delete messages in this case.
13
OPERATION
RECORDING SENSITIVITY
1
Slide the MIC SENS switch to the LOW
position if recording sounds that are close.
Select the HIGH position if recording
sounds that are further away.
HOLD SWITCH
1
Slide the HOLD switch to the LOCK position to
disable the buttons; HOLD will appear in the
display if the unit is in the Standby mode. Slide
the HOLD switch to the OFF position to enable
the buttons again.
14
OPERATION
NORMAL RECORDING
This unit is capable of recording only when
sound is heard. To use this feature, see page
17. For normal recording, follow steps below.
1
Make sure the VOX switch on the rear of unit is
set to OFF. Turn the unit on (by pressing the
REC/STOP or PLAY/STOP button) and select the
desired sound quality as previously described.
2
1
2
Select a File Folder as described on page
13 by pressing the FILE/TIME button 1.
While in the Standby mode, press the
REC/STOP button 2 and the REC indicator
will light and the elapsed time will appear.
15
3
OPERATION
Speak into the built-in microphone or insert a
microphone into the MIC jack and speak into it in
a normal tone of voice. Press the REC/STOP
button again to stop recording.
4
2
1
Press and hold the PLAY/STOP button 1 to see
the remaining recording time during recording. To
pause recording, press the MODE/PAUSE button
2; PAUSE will blink in the display. To release
pause, press the MODE/PAUSE button 2 again.
NOTES:
• The built-in audio level automatically sets the
recording level.
• For normal voice levels, a distance of 5-9
inches is appropriate.
16
OPERATION
VOICE ACTIVATED (VOX) RECORDING
Voice activated recording will allow dictation
only when you speak. When the unit detects
a pause of a few seconds, it will temporarily
stop recording until it detects sound again.
1
Slide the VOX switch on the rear of the unit to
the ON position. Turn the unit on (by pressing
the REC/STOP or PLAY/STOP button), and
select the desired sound quality as described
on page 11.
2
Select a File Folder by pressing the
FILE/TIME button (see page 13).
17
3
OPERATION
Press the REC/STOP button and the REC
indicator will light and the elapsed time will
appear. Speak into the built-in microphone
or insert a microphone into the MIC jack and
when the unit picks up sound, it will record.
When not recording, the REC indicator will
blink and PAUSE will blink in the display
until sound is detected. Press the
REC/STOP button again to stop recording.
NOTES:
• The first few sounds activate the recorder and
may not be recorded.
• A variation in voice level during recording will not
stop the unit, two seconds of silence is required
to stop the recording.
• For constant recording, see page 15.
• To pause, press the MODE/PAUSE button.
• The built-in audio level automatically sets the
recording level.
• For normal voice levels, a distance of 5-9
inches is appropriate.
18
OPERATION
TO PLAY BACK MESSAGES
1
Turn the unit on (by pressing the
REC/STOP or PLAY/STOP button) and
select a File Folder by pressing the
FILE/TIME button (see page 13).
2
1
2
Select the desired message number by
pressing the REV 1 or FWD 2 button; the
message number and the message length
will appear in the display.
19
3
OPERATION
1
2
Press the PLAY/STOP button 1; the unit will play
the currently selected message, then stop. During
playback, the Play indicator and the elapsed time
of the message will appear in the display. You can
check the message recording time and date by
pressing the REC/STOP button 2. The unit will
return to the elapsed time after five seconds.
NOTES:
• To adjust the volume, simply press the VOL+
or VOL– button.
• To pause, press the MODE/PAUSE button;
PAUSE will blink in the display. To release pause,
press the MODE/PAUSE button again.
• For Cue and Review during playback, simply
press and hold the desired REV or FWD
button. Release the button when the desired
point is reached.
• To skip or go back to messages, simply press
and release the desired REV or FWD button
until the desired message number is reached.
20
OPERATION
TO REPEATEDLY PLAY BACK MESSAGES
You can set the unit to repeat 1 or repeat all
messages in the selected file folder as follows:
1
1
2
REPEAT MESSAGE: While playing back a
message, press the DEL/REPEAT button 1
once; “REPEAT” will appear in the display and
the message playing will repeat over and over
until the PLAY/STOP button 2 is pressed.
2
1
2
REPEAT ALL MESSAGES IN THE SELECTED
FILE FOLDER: While playing back a message,
press the DEL/REPEAT button 1 twice; “REPEAT
ALL” will appear in the display and all messages in
the selected file folder will repeat over and over
until the PLAY/STOP button 2 is pressed.
21
OPERATION
TO CANCEL REPEAT PLAYBACK:
To cancel repeat playback, press the
DEL/REPEAT button once or twice until the
REPEAT indicator disappears from the
display.
TO PAUSE A MESSAGE
1
To pause Recording or Playback, press the
MODE/PAUSE button; PAUSE will blink in
the display.
2
Press the MODE/PAUSE button again to
resume recording or playback.
22
OPERATION
SCAN PLAYBACK
This unit can play back the first five seconds of
each recorded message as follows:
1
2
1
While in the Standby mode, select the file folder
(A,B,C,D) using the FILE/TIME button 1. Press
and hold the PLAY/STOP button 2 for 2 seconds;
SCAN will appear in the display. The unit will
automatically scan and play the first five seconds
of each message in the selected file folder,
starting at message one.
2
The unit will automatically stop after all messages
have been played. To play back the message
during scanning, press the PLAY/STOP button
once to change to Playback mode. To stop Scan
Playback, press the PLAY/STOP button twice.
23
OPERATION
ERASING A SINGLE MESSAGE
1
2
3
1
While in the Standby mode, select the desired
file folder using the FILE/TIME button 1, and
the desired message to delete using the REV
2 or FWD 3 button; the message number and
the message length will appear in the display.
2
Press the DEL/REPEAT button; ERASE will
appear in the display and the first five seconds of
the message will play. To erase, press the
DEL/REPEAT button within the five seconds while
it is playing and the rest of the messages will be
renumbered. If you do not want to erase, do not
press the DEL/REPEAT button while it is playing.
(You can also press the PLAY/STOP button to
cancel and stop playback.)
24
OPERATION
ERASING ALL MESSAGES
1
1
2
While in the Standby mode, press and hold the
DEL/REPEAT button 1 first, then press and hold
the REC/STOP button 2 for two seconds; ALL
and ERASE will blink in the display.
2
To erase all the messages, press the DEL/REPEAT
button again within five seconds. If the
DEL/REPEAT button is not pressed again within
the five seconds, the messages will not erase.
IMPORTANT NOTES:
• Once message(s) are deleted, they cannot be
recovered.
• If the memory is full, FULL will appear in the
display when you press the REC/STOP button to
start recording. The recording will be disabled.
25
CARE AND MAINTENANCE
RESETTING THE UNIT
If the unit is exposed to a strong static
electrical charge, the unit may lock up,
or the display may dim. This is very
rare, but if it does happen, remove the
batteries and then reinstall. All settings
will return to their preset values, but the
previous messages are saved.
TRAFFIC SAFETY
• Do not use while operating a
motorized vehicle. It may create a
traffic hazard and is illegal in many
areas.
• Even if your earphone is an open air
type designed to let you hear outside
sounds, do not turn the volume up so
high that you cannot hear what is
around you.
• Use extreme caution or temporarily
discontinue use in potentially
hazardous situations.
26
CARE AND MAINTENANCE
CARE
• Keep the unit dry. If it gets wet, wipe it
immediately. Liquids may contain
minerals that can corrode the circuits.
• Use and store the unit only in normal
temperature environments. Extreme
temperatures can shorten the life of
electronic devices, damage batteries
and/or melt plastic parts.
• Keep the unit away from dirt and dust.
• Handle the unit gently and carefully.
Dropping it can cause damage and
may cause the unit to work
improperly.
• To clean, wipe the unit with a damp
cloth occasionally to keep it looking
new. Do not use harsh chemicals,
cleaning
solvents
or
strong
detergents.
27
SPECIFICATIONS
Recording System...........Built-in Flash Memory
Recording Time.........1680 minutes in LP mode
Speaker .......................................0.2W (8 Ohm)
Output Power...........................................80mW
Power Source .......................3V, “AAA” size x 2
......................................batteries (not Included)
Battery Life ..............................Approx 15 hours
..............................................at recording mode
.....................................Approx 10 hours at play
...........................mode at medium volume level
Dimensions...4.4 (H) x 1.4 (W) x 0.7 (D) inches
Weight ............................46g (without batteries)
Specifications are subject to change without notice.
FOR
ADDITIONAL
SET-UP
OR
OPERATING
ASSISTANCE, PLEASE VISIT OUR WEBSITE AT:
WWW.MEMOREXELECTRONICS.COM
OR CONTACT CUSTOMER SERVICE:
For customers calling within US, call 1-800-919-3647.
For customers calling within Mexico, call
001-866-580-8316.
PLEASE KEEP ALL PACKAGING MATERIAL FOR AT
LEAST 90 DAYS IN CASE YOU NEED TO RETURN THIS
PRODUCT TO YOUR PLACE OF PURCHASE OR
IMATION ELECTRONICS PRODUCTS.
F O R C O N S U M E R R E P L A C E A B L E PART(S), SEE
PART NUMBER(S) ON PA G E 4 A N D T H E N CONTACT
FOX INTERNATIONAL AT 1-800-321-6993.
28
Imation Electronics Products,
A Division of Imation Enterprises Corp.
Weston, FL
Printed in China
www.memorexelectronics.com
ICR411-P04
MB2059B
Guía del usuario
Grabador de voz digital
28 Horas de capacidad
Before operating this product,
please read these instructions completely.
Antes de operar este producto,
sírvase leer este instructivo en su totalidad.
Gracias por comprar este sistema de audio Memorex.
El número de serie de su unidad se encuentra en una etiqueta
en la parte posterior del gabinete. Le sugerimos que registre
el número de serie en el espacio provisto a continuación por
si en algún momento futuro necesita esta información.
CONSERVE EL EMBALAJE AL MENOS 90 DÍAS EN CASO
QUE NECESITE DEVOLVER EL PRODUCTO AL LUGAR DE
COMPRA O A IMATION ELECTRONICS PRODUCTS.
Número de modelo: MB2059B
Número de serie: _________________________________
MEDIDAS DE
SEGURIDAD
INFORMACIÓN:
Este equipo cumple con los reglamentos de un
aparato digital de Clase B. Este equipo genera, usa y
puede irradiar energía de radiofrecuencia y, si no se
instala y usa conforme a las instrucciones, puede
generar
interferencia
dañina
con
las
radiocomunicaciones. Sin embargo, no hay garantía
de que no habrá interferencia en una instalación
particular. Si este equipo llegara a causar interferencia
dañina con la recepción de radio o televisión, lo cual
se puede determinar encendiendo y apagando el
equipo, le pedimos que intente corregir la interferencia
con las siguientes medidas:
• Cambie la orientación o ubicación de la antena
receptora.
• Incremente la distancia entre el equipo y el receptor.
• Consulte al vendedor o a un técnico de radio y
televisióncon experiencia.
1
UBICACIÓN DE LOS INDICADORES
A B
L
K
J
I
A
B
C
D
C
LP MP
HP
REPEAT ALL
R DATE
REMAIN
Y
M
E.
F.
G.
H.
I.
J.
K.
L.
D
G
AM
PM
H
A.
B.
C.
D.
D
E
F
Indicador de Reproducir (Play)
Indicadores de calidad de grabación
Indicadores de mensaje/año
Indicadores de REPETIR 1/TODO (REPEAT
1/ALL)
Indicador de grabación
Indicador de las pilas
Indicadores de fecha/volumen
Indicadores de minuto/segundo
(temporizador)
Indicador de PERMANECER (REMAIN)
Indicador R (Grabar, Record) FECHA
Indicador de VOX (Transmisor activado por
la voz)
Indicador de carpeta de archivos de
mensajes
2
UBICACIÓN DE LOS CONTROLES
FRENTE
1
9
2
10
3
11
12
4
5
6
13
14
15
7
8
1. Conector para MIC
(Micrófono)
2. Micrófono integrado
3. Pantalla
4. Botón REBOBINAR
(REV)
5. Botón MODO/PAUSA
(MODE/PAUSE)
6. Botón
REPRODUCIR/DETENE
R (PLAY/STOP)
7. Botón
GRABAR/DETENER
(REC/STOP)
8. Altavoz
3
9. Entrada para auriculares
(EAR)
10. Indicador de GRABAR
(REC)
11. Botón de aumento del
volumen (VOLUME UP)
12. Botón de disminución
del volumen (VOLUME
DOWN)
13. Botón ADELANTAR
(FWD)
14. Botón
BORRAR/REPETIR
(DEL/REPEAT)
15. Botón ARCHIVO/HORA
(FILE/TIME)
UBICACIÓN DE LOS CONTROLES (CONTINÚA)
POSTERIOR
1
2
3
4
1.
2.
3.
4.
Interruptor de SENSIBILIDAD DEL
MICRÓFONO (MIC SENS)
Interruptor VOX (Transmisor activado por voz)
Interruptor para BLOQUEO DE TECLAS
(HOLD)
Compartimiento de las pilas
(TAPA DE LAS PILAS. PIEZA N.º 21704240106-30*)
*Pieza remplazable por el consumidor
(Ver página 28 para ordenar)
4
1
INSTALACIÓN DE LAS PILAS
Abra el compartimiento de las pilas
deslizándolo hacia la parte inferior de
la unidad.
2
Introduzca dos (2) pilas tamaño “AAA”
(no incluidas) respetando el diagrama
de polaridad. Deslice el compatimiento
para las pilas nuevamente en su lugar.
NOTA: Cuando cambie las pilas, se
guardarán los mensajes grabados, pero
la hora debe volver a configurarse.
5
INSTALACIÓN DE LAS PILAS (CONTINUACIÓN)
INDICADORES DE LAS PILAS:
: Las pilas son nuevas.
: Las pilas tienen poca carga o
estás descargadas; reemplácelas.
CUIDADO DE LAS PILAS
Cuando use pilas, tome las siguientes
precauciones:
1. Use únicamente el tamaño de pila que indica
el fabricante.
2. Asegúrese de seguir la polaridad indicada en
el compartimiento cuando coloque la misma.
De no hacerlo, la unidad podría dañarse.
3. No mezcle tipos de pilas diferentes, por
ejemplo alcalinas con Carbono de Cinc, ni
tampoco mezcle pilas usadas con nuevas.
4. Si no va a utilizar su unidad por un período de
tiempo prolongado, saque la pila para evitar
que se oxide y se dañen las terminales.
5. Nunca intente recargar pilas que no han sido
fabricadas para este fin, ya que pueden
recalentarse y reventar.
(Siga las
indicaciones del fabricante de las pilas).
6
FUNCIONAMIENTO
AJUSTE DE LA FECHA Y HORA
1
Mientras fecha y hora aparezcan en la pantalla,
oprima ARCHIVO/HORA (FILE/TIME)
para
seleccionar la hora de la pantalla en el modo 12 o 24
horas.
2
Oprima y mantenga presionado MODO/PAUSA
(MODE/PAUSE) durante dos segundos y suéltelo.
En la pantalla aparecerá “CONFIGURAR” (SET).
Oprima MODO/PAUSA (MODE/ PAUSE) una vez
más para entrar al modo de configuración de fecha.
7
FUNCIONAMIENTO (CONTINUACIÓN)
3
2
3
1
Oprima REPRODUCIR/DETENER (PLAY/
STOP) 1 para confirmar, el año destellará.
Configure el año con los botones REBOBINAR
(REV) 2 y ADELANTAR (FWD) 3, luego oprima
REPRODUCIR/DETENER (PLAY/STOP) 1
nuevamente para confirmar.
4
2
1
3
Configure el mes con los botones ADELANTAR
(FWD) 1 y REBOBINAR (REV) 2 , luego oprima
REPRODUCIR/DETENER (PLAY/STOP) 3
nuevamente para confirmar. Repita este paso
para configurar día, hora y minuto. Después de
configurar los minutos, oprima REPRODUCIR/
PAUSAR (PLAY/STOP) 3 nuevamente y se
configurarán fecha/hora.
8
FUNCIONAMIENTO (CONTINUACIÓN)
ENCENDIDO/APAGADO (ON/OFF) DE LA UNIDAD
1
2
1
Para encender la unidad, oprima GRABAR/DETENER
(REC/STOP) 1 o REPRODUCIR/DETENER (PLAY/
STOP) 2. Para apagar la unidad, simplemente no toque
ningún botón durante 30 segundos, la unidad se apagará
automáticamente y mostrará la hora.
PARA CAMBIAR ENTRE MODOS
1
3
2
1
Para entrar al modo en espera, oprima
GRABAR/DETENER (REC/STOP) 1 o REPRODUCIR/DETENER (PLAY/STOP) 2 mientras esté en
el modo Hora (Time). La unidad cambiará al modo
Hora (Time) si no se oprime ningún botón en 30
segundos. Para entrar al modo Hora (Time), oprima
MODO/PAUSA (MODE/PAUSE) 3 una vez mientras
esté en el modo en espera.
9
FUNCIONAMIENTO (CONTINUACIÓN)
AJUSTAR EL VOLUMEN
1
1
2
Para ajustar el volumen, mientras esté en el
modo en espera o durante la reproducción de
un archivo, oprima VOL+ 1 o VOL– 2; el
número del volumen subirá o bajará para
indicar el nivel del volumen (es decir, “0” es el
mínimo y “15” el máximo).
ENTRADA PARA AURICULARES
Para escuchar el sonido de manera privada,
conecte los auriculares (no incluidos) en esta
entrada.
El
altavoz
se
desconecta
automáticamente cuando el enchufe del auricular
se introduce en la entrada.
10
FUNCIONAMIENTO (CONTINUACIÓN)
CALIDAD DE GRABACIÓN
Puede elegir entre cuatro modos de calidad de
grabación de voz. Para que la calidad de sonido
sea óptima, seleccione HP (Reproducción
superior) y para que la calidad sea buena,
seleccione MP (Reproducción media). Para un
tiempo de grabación más prolongado (con calidad
de
sonido
razonable),
seleccione
LP
(Reproducción prolongada).
1
2
1
3
Oprima y mantenga presionado MODO/
PAUSA (MODE/PAUSE) 1 durante dos
segundos; aparecerá “CONFIGURAR”
(SET) y la calidad de grabación destellará.
Oprima
REBOBINAR
(REV)
2 o
ADELANTAR (FWD) 3 para seleccionar la
calidad de grabación deseada.
11
FUNCIONAMIENTO (CONTINUACIÓN)
2
Cuando aparezca la calidad de grabación
deseada, oprima MODO/PAUSA (MODE/
PAUSE) dos veces para confirmar y volver
al modo Hora. Si no se oprime ningún
botón en 30 segundos, se cambiará al
modo Hora.
Reproducción superior:.............427 min.
Reproducción media:................853 min.
Reproducción prolongada:......1680 min.
12
FUNCIONAMIENTO (CONTINUACIÓN)
SELECCIONAR UNA CARPETA DE ARCHIVOS
Esta unidad tiene cuatro áreas de memoria de
almacenamiento (carpetas de archivos) de las cuales elegir,
denominadas A, B, C y D. Puede guardar un total de 99
mensajes en cada carpeta de archivos individual, es decir
que si multiplicamos ese número por cuatro carpetas, se
pueden guardar un total de 396 mensajes o 1680 minutos
en modo LP ( 853 min. en MP, 427 min. en HP) en todas las
carpetas. Para seleccionar una carpeta:
1
2
3
1
Presione GRABAR/DETENER (REC/STOP) 1 o
REPRODUCIR/DETENER (PLAY/STOP) 2 para
entrar al modo en espera. Oprima ARCHIVO/HORA
(FILE/TIME) 3 para seleccionar la carpeta de
archivos deseada (A,B,C,D). El número en la parte
superior derecha de la pantalla indica el total de
mensajes grabados. El número en la parte inferior de
la pantalla indica el tiempo total grabado del mensaje
seleccionado.
NOTA:
Cada vez que grabe un mensaje, la unidad le asignará
un número, que será un número superior al último
número de mensaje, que se mostrará en la pantalla.
Si la unidad esté llena, “FULL” aparecerá aparecerá en
la pantalla. En tal caso, borre mensajes.
13
FUNCIONAMIENTO (CONTINUACIÓN)
SENSIBILIDAD DE GRABACIÓN
1
Deslice el interruptor de SENSIBILIDAD DEL
MICRÓFONO (MIC SENS) hasta la posición
BAJA (LOW) si los sonidos que se graban están
cerca. Seleccione la posición ALTA (HIGH) si los
sonidos que se graban están alejados.
BLOQUEO DE TECLAS
1
Deslice el interruptor para BLOQUEO (HOLD) hasta la
posición BLOQUEADO (LOCK) para desactivar los
botones; en la pantalla aparecerá BLOQUEO (HOLD) si la
unidad está en el modo en espera. Deslice el interruptor
BLOQUEO (HOLD) hasta la posición APAGADO (OFF)
para habilitar nuevamente los botones.
14
FUNCIONAMIENTO (CONTINUACIÓN)
GRABACIÓN NORMAL
Esta unidad permite grabar únicamente cuando se oye
algún sonido. Para usar esta función, consulte la
página 17. Para obtener información sobre la
grabación normal, siga los siguientes pasos.
1
Asegúrese de que el interruptor de VOX (Transmisor
activado por la voz) esté en la posición APAGADO (OFF).
Encienda la unidad (con el botón GRABAR/DETENER
(REC/STOP) o REPRODUCIR/DETENER (PLAY/STOP) y
seleccione la calidad de sonido deseada como se describió
antes.
2
1
2
Seleccione una carpeta de archivos como se
describe en la página 13 con el botón
ARCHIVO/HORA (FILE/TIME) 1. Mientras esté en
el modo en espera, oprima GRABAR/DETENER
(REC/STOP) 2 para que se ilumine el indicador
GRABAR (REC) y aparezca el tiempo transcurrido.
15
FUNCIONAMIENTO (CONTINUACIÓN)
3
Hable al micrófono integrado o introduzca un
micrófono en la entrada MIC y hable con un tono de
voz normal. Oprima GRABAR/DETENER (REC/STOP)
nuevamente para detener la grabación.
4
2
1
Oprima y mantenga presionado REPRODUCIR/DETENER
(PLAY/STOP) 1 para ver el tiempo de grabación restante
durante la grabación. Para pausar la grabación, presione
MODO/PAUSA (MODE/PAUSE) 2; en la pantalla destellará
PAUSA (PAUSE). Para desactivar la pausa, oprima
MODO/PAUSA (MODE/PAUSE) 2 nuevamente.
NOTAS:
• El nivel de audio integrado determina
automáticamente el nivel de grabación.
• Para que los niveles de voz sean normales, la
distancia apropiada es de 5-9 pulgadas.
16
FUNCIONAMIENTO (CONTINUACIÓN)
GRABACIÓN ACTIVADA CON LA VOZ (VOX)
La grabación activada con la voz le permitirá
grabar únicamente cuando habla. Cuando la
unidad detecta una pausa de unos pocos
segundos, deja temporalmente de grabar hasta
que detecta sonido nuevamente.
1
Ubique el interruptor VOX localizado en la parte
trasera de la unidad a la posición ENCENDIDO (ON).
Encienda la unidad (con el botón GRABAR/DETENER
(REC/STOP) o REPRODUCIR/DETENER (PLAY/
STOP) y seleccione la calidad de sonido deseada
como se describe en la página 11.
2
Seleccione una carpeta de archivos con el botón
ARCHIVO/HORA (FILE/TIME) (consulte la
página 13).
17
FUNCIONAMIENTO (CONTINUACIÓN)
3
Oprima GRABAR/DETENER (REC/STOP) para
que se ilumine el indicador GRABAR (REC) y
aparezca el tiempo transcurrido. Hable al
micrófono integrado o introduzca un micrófono
en la entrada MIC. Cuando la unidad detecte
sonido, grabará. Cuando no hay grabación, el
indicador GRABAR (REC) y PAUSA (PAUSE)
destellarán en la pantalla hasta que se detecte
sonido. Oprima GRABAR/DETENER (REC/
STOP) nuevamente para detener la grabación.
NOTAS:
• Los primeros sonidos activan el grabador y es
probable que no se graben.
• Las variaciones en el nivel de voz durante la
grabación no detendrán la unidad, son necesarios
dos segundos de silencio para detener la grabación.
• Para que la grabación sea constante, consulte la
página 15.
• Para hacer una pausa, oprima MODO/PAUSA
(MODE/PAUSE).
• El nivel de audio integrado determina
automáticamente el nivel de grabación.
• Para que los niveles de voz sean normales, la
distancia apropiada es de 5-9 pulgadas.
18
FUNCIONAMIENTO (CONTINUACIÓN)
REPRODUCCIÓN DE MENSAJES
1
Encienda la unidad (con el botón GRABAR/
DETENER
(REC/STOP)
o
REPRODUCIR/
DETENER (PLAY/STOP) y seleccione una carpeta
de archivos con el botón ARCHIVO/HORA
(FILE/TIME) (consulte la página 13).
2
1
2
Seleccione el número de mensaje deseado con
el botón REBOBINAR (REV) 1 o ADELANTAR
(FWD) 2; en la pantalla aparecerán el número
de mensaje y su duración.
19
FUNCIONAMIENTO (CONTINUACIÓN)
3
1
2
Presione REPRODUCIR/DETENER (PLAY/STOP) 1; la
unidad reproducirá el mensaje seleccionado en ese
momento y se detendrá. Durante la reproducción, el
indicador Reproducir (Play) y el tiempo transcurrido del
mensaje aparecerán en la pantalla. Puede controlar la
hora de grabación del mensaje y la fecha con el botón
GRABAR/DETENER (REC/STOP) 2. La unidad volverá
al tiempo transcurrido después de cinco segundos.
NOTAS:
• Para ajustar el volumen, simplemente oprima VOL+ o
VOL–.
• Para pausar, presione MODO/PAUSA (MODE/PAUSE);
en la pantalla destellará PAUSA (PAUSE). Para
desactivar la pausa, oprima MODO/PAUSA
(MODE/PAUSE) nuevamente.
• Para realizar búsquedas y revisiones durante la
reproducción, simplemente oprima y mantenga
presionado el botón deseado, REBOBINAR (REV) o
ADELANTAR (FWD). Suelte el botón cuando se
llegue al punto deseado.
• Para saltear o volver a mensajes, simplemente
oprima y libere el botón deseado, REBOBINAR
(REV) o ADELANTAR (FWD) hasta que se llegue al
número de mensaje deseado.
20
FUNCIONAMIENTO (CONTINUACIÓN)
REPRODUCCIÓN REPETIDA DE MENSAJES
Puede configurar la unidad para que repita 1 o repita todos
los mensajes de la carpeta de archivos seleccionada de la
siguiente manera:
1
1
2
REPETIR MENSAJE: Mientras reproduzca un
mensaje, oprima BORRAR/REPETIR (DEL/
REPEAT) 1 una vez; en la pantalla aparecerá
“REPETIR” (REPEAT) y el mensaje se repetirá una
y otra vez hasta que se oprima REPRODUCIR/
DETENER (PLAY/STOP) 2.
2
1
2
REPETIR TODOS LOS MENSAJES DE LA
CARPETA DE ARCHIVOS SELECCIONADA:
Mientras reproduzca un mensaje, oprima BORRAR/
REPETIR (DEL/REPEAT) 1 dos veces; en la pantalla
aparecerá “REPETIR TODO” (REPEAT ALL) y los
mensajes de la carpeta de archivos seleccionada se
repetirán una y otra vez hasta que se oprima
REPRODUCIR/DETENER (PLAY/STOP) 2.
21
FUNCIONAMIENTO (CONTINUACIÓN)
PARA CANCELAR LA REPRODUCCIÓN REPETIDA:
Para cancelar la reproducción repetida, oprima
una o dos veces BORRAR/REPETIR (DEL/
REPEAT) hasta que el indicador REPETIR
(REPEAT) desaparezca de la pantalla.
PARA PAUSAR UN MENSAJE
1
Para pausar la grabación o reproducción,
presione MODO/PAUSA (MODE/PAUSE);
en la pantalla destellará PAUSA (PAUSE).
2
Oprima MODO/PAUSA (MODE/PAUSE) nuevamente para reanudar la grabación o reproducción.
22
FUNCIONAMIENTO (CONTINUACIÓN)
EXPLORACIÓN DE REPRODUCCIÓN
Esta unidad puede reproducir los primeros cinco segundos
de cada mensaje grabado de la siguiente manera:
1
2
1
Mientras esté en el modo en espera, seleccione la carpeta
de archivo (A,B,C,D) con el botón ARCHIVO/HORA
(FILE/TIME) 1. Oprima y mantenga presionado
REPRODUCIR/DETENER (PLAY/STOP) 2 durante 2
segundos; en la pantalla aparecerá EXPLORACIÓN
(SCAN). La unidad explorará automáticamente y
reproducirá los primeros cinco segundos de cada mensaje
de la carpeta de archivos seleccionada, comenzando desde
el mensaje uno.
2
La unidad se detendrá automáticamente después de
reproducir todos los mensajes. Para reproducir el mensaje
durante la exploración, oprima REPRODUCIR/DETENER
(PLAY/STOP) una vez para pasar al modo de reproducción.
Para detener la Exploración de reproducción, oprima dos
veces REPRODUCIR/DETENER (PLAY/STOP).
23
FUNCIONAMIENTO (CONTINUACIÓN)
BORRAR UN SOLO MENSAJE
1
2
3
1
Mientras esté en el modo en espera, seleccione la
carpeta de archivos deseada con el botón
ARCHIVO/HORA (FILE/TIME) 1 y el mensaje que desea
borrar con los botones REBOBINAR (REV) 2 o
ADELANTAR (FWD) 3; en la pantalla aparecerán el
número de mensaje y su duración.
2
Oprima BORRAR/REPETIR (DEL/REPEAT); en la
pantalla aparecerá BORRAR (ERASE) y se
reproducirán los primeros cinco segundos del
mensaje. Para borrar, oprima BORRAR/REPETIR
(DEL/REPEAT) durante los cinco segundos de
reproducción. El resto de los mensajes se
renumerará. Si no desea borrar, no oprima
BORRAR/REPETIR (DEL/REPEAT) durante la
reproducción.
(También
puede
presionar
REPRODUCIR/DETENER (PLAY/STOP) para
cancelar y detener la reproducción.)
24
FUNCIONAMIENTO (CONTINUACIÓN)
BORRAR TODOS LOS MENSAJES
1
1
2
Mientras esté en el modo en espera, oprima y mantenga
presionado primero BORRAR/REPETIR (DEL/REPEAT) 1,
luego oprima y mantenga presionado GRABAR/DETENER
(REC/STOP) 2 durante dos segundos; en la pantalla
destellarán TODOS (ALL) y BORRAR (ERASE).
2
Para borrar todos los mensajes, oprima nuevamente
BORRAR/REPETIR (DEL/REPEAT) antes de que transcurran
cinco segundos. Si no se oprime nuevamente BORRAR/
REPETIR (DEL/REPEAT) en los cinco segundos, no se borrarán
los mensajes.
NOTAS IMPORTANTES:
•
Una vez que se borraron los mensajes, no pueden
recuperarse.
•
Si la memoria está llena, en la pantalla aparecerá
LLENA (FULL) cuando oprima GRABAR/DETENER
(REC/STOP) para comenzar a grabar. No se permitirá la
grabación.
25
CUIDADO Y MANTENIMIENTO
Reiniciar de la Unidad
Si la unidad está expuesta a una carga
eléctrica
estática
fuerte,
puede
bloquearse o se puede apagar la pantalla.
Esto ocurre en casos excepcionales, pero
si lo hace, quite las pilas y vuelva a
realizar la instalación. Todas las
configuraciones volverán a sus valores
predeterminados, pero los mensajes
previos estarán guardados.
SEGURIDAD EN EL TRÁNSITO
• No utilice la unidad cuando maneja un
vehículo motorizado. Puede ocasionar
un riesgo para el tránsito y es ilegal en
muchas áreas.
• Aunque su auricular sea del tipo abierto
al exterior y diseñado para permitirle oír
los sonidos externos, no suba el
volumen tan alto que no pueda oír lo
que sucede a su alrededor.
• Tenga
precaución
extrema
o
discontinúe temporalmente su uso en
situaciones potencialmente peligrosas.
26
CUIDADO Y MANTENIMIENTO (CONT.)
CUIDADO
• Mantenga la unidad seca. Si se moja,
séquela de inmediato. Los líquidos
pueden contener minerales que pueden
corroer los circuitos.
• Use y guarde la unidad únicamente en
ambientes con temperatura normal. Las
temperaturas extremas pueden reducir
la vida útil de los dispositivos
electrónicos, dañar las pilas o derretir
las piezas plásticas.
• Mantenga la unidad alejada de la
suciedad y el polvo.
• Maneje
la
unidad
suave
y
cuidadosamente. Si se cae se puede
dañar y provocar un funcionamiento
defectuoso.
• Para limpiarla, pásele un paño húmedo
cada tanto para que su apariencia sea
óptima. No use productos químicos
fuertes, solventes para la limpieza o
detergentes potentes.
27
ESPECIFICACIONES
Sistema de grabación ..............Memoria Flash Integrada
Tiempo de grabación ...............1680 minutos en mod LP
Altavoz..................................................0,2 vatio (8 Ohm)
Potencia de Salida .................................................80mW
Fuente de Alimentación..........2 pilas de 3 voltios, tamaño “AAA”
..............................................(las pilas no está incluidas)
Vida útil de las pilas................................Aprox. 15 horas
.......................................................en el modo grabación
.............................................Aprox. 10 horas en el modo
.....................reproducción a un nivel de volumen medio
Dimensiones ....................4,4 (altura) x 1,4 (ancho) x 0,7
(profundidad) pulgadas
Peso .....................................................46g (sin las pilas)
Las especificaciones están sujetas a
cambios sin previo aviso.
PARA
ASISTENCIA
ADICIONAL
SOBRE
LA
CONFIGURACIÓN O EL FUNCIONAMIENTO, INGRESE
EN:
WWW.MEMOREXELECTRONICS.COM
O COMUNÍQUESE CON ATENCIÓN AL CLIENTE:
Si llama desde EE.UU. marque 1-800-919-3647.
Si llama desde México marque 001-866-580-8316.
CONSERVE EL EMBALAJE AL MENOS 90 DÍAS EN
CASO QUE NECESITE DEVOLVER EL PRODUCTO AL
LUGAR DE COMPRA O IMATION ELECTRONICS
PRODUCTS.
PARA OBTENER PIEZAS REEMPLAZABLES POR EL
CONSUMIDOR, CONSULTE EL NÚMERO DE PIEZA EN
LA PÁGINA 4 Y LUEGO COMUNÍQUESE CON FOX
INTERNATIONAL AL 1-800-321-6993.
28
Imation Electronics Products,
A Division of Imation Enterprises Corp.
Weston, FL
Printed in / Impreso en China
www.memorexelectronics.com
ICR411-P04