1
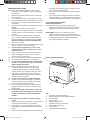
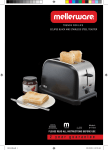
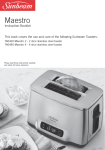
E
X
A l p h a
E
C
S t ee l
complies with
INTERNATIONAL
IEC60335
SAFETY SPECIFICATIONS
U
950W
T
I
V
E
To a s t er
Model:
24109
PLEASE READ ALL INSTRUCTIONS BEFORE USE
2 year guarantee
MW_EX24109 toaster_IM.indd 1
2/21/2008 11:49:48 AM
own plug, are the internal plug connections secure
IMPORTANT SAFEGUARDS
and correctly made (UK only)?
When using electrical this appliances, basic safety
4.
Do not lift or move the toaster by inserting fingers in
precautions should always be followed, including
bread slot.
the following:
5.
If the supply cord is damaged, it must be replaced
1.
Read all the instructions before use and retain for
by the manufacturer, its appointed service agent, or
future reference.
a similar qualified person in order to avoid a hazard.
2.
Do not touch hot surfaces. Use handles or knobs.
3.
To protect against fire and risk of electrical shock do
SAVE THESE INSTRUCTIONS
not immerse cord, plug or toaster itself in water or
Electrical Requirements
other liquid.
Check that the voltage on the rating plate of your
4.
Ensure that this appliance is situated out of reach of
appliance corresponds with your house electricity
children.
supply which must be A.C. (Alternating Current).
NEVER allow a child to use this product.
5.
Unplug from the socket when not in use and before
IMPORTANT: If the plug or supply cord on your
cleaning. Allow to cool before putting on or taking
appliance is faulty send to an authorized service
off parts.
center or agent for replacement or repair. Any repair
6.
Do not operate any appliance with a damaged
or attempted repair by an unauthorized service
plug, or after an appliance has malfunctioned, or
agent will invalidate the warranty.
has been dropped or damaged in any way. This
appliance contains no user serviceable parts.
7.
Do not use outdoors.
8.
Do not let the mains lead overhang the edge of the
table or worktop, or touch hot surfaces.
9.
Do not place the appliance on or near a hot
surface such as a gas or electric stove, or in a
microwave oven.
10. Do not attempt to move the appliance whilst hot.
11. When unplugging turn any control to off, then
remove plug from wall socket.
IINSTRUCTIONS FOR USE:
12. Do not use appliance for other than intended use.
1
9
13. Pre-heating of this appliance is not required.
14. Do not touch the metal top of the toaster during
or after use, as this surface gets very hot. Use
plastic handles and knobs.
15. Ensure that sufficient space is left above and
2
around all sides of your toaster to allow air to
circulate. Place the toaster on a heat resistant
surface. Do watch your toaster during use. A fire
4
2
may occur if toasters are covered or touching
5
flammable material including curtains, draperies,
walls etc, when in operation.
16. Do not use underneath or inside cupboards.
17. Oversize foods, metal foil packages, or utensils
7
must not be inserted into a toaster, as they may
6
involve a risk of fire or electric shock.
18. Do not attempt to dislodge food when toaster is
plugged in and never introduce cooking utensils
8
into the slots.
19. Do not place bread or other items on top of the
bread slot as this will damage your toaster and
Key:
creates a fire hazard. Use the integrated bun
1.
Wide slots with bread centering
warmer.
2.
Bread Carriage Lever with high lift function.
3.
Cancel Button
If your toaster does not work, check the following
4.
Frozen Button
points:
5.
Bagel/Crumpet Button
1.
Has the toaster been set correctly - is the plug in its
6.
Variable browning control knob
socket and the switch in the ‘on’ position?
7.
Removable Crumb Tray
2.
Is the plug itself or the socket faulty? Check this
8.
Cord Storage
by plugging in another appliance of similar power
9.
Integrated Bun Rack Handle
rating.
3.
Does the fuse need replacing-if you have fitted your
MW_EX24109 toaster_IM.indd 2
2/21/2008 11:49:48 AM
Please read before use, taking careful note of points 1
and 2.
1.
Use your toaster once without bread. This will preheat the new elements and burn off any dust that
may have accumulated during storage.
2.
Select the desired level of browning on the
browning control (6) marked 1 to 6. The setting
required will vary according to the moisture content
and thickness of bread. For best results ensure that
the bread slices are of even thickness, freshness
and size. Remember that stale bread toasts more
rapidly than fresh and thin bread toasts quicker than
thick. See additional points for more information.
3.
After selecting the desired browning level, place
your bread in the bread slots and depress the bread
carriage lever (2) downwards until it locks.
Note: The bread carriage lever will not stay down
unless the toaster is plugged in and the mains
switch is on.
4.
After the set degree for browning has been reached,
the bread will pop-up automatically, ready for
removal from the slots. The bread carriage lever will
have returned to its upper position and the heating
element will have switched off, ready for the next
toasting.
•
If the first slices are not dark enough turn the
browning control to a higher setting.
•
If the bread in your toaster becomes jammed
disconnect your toaster at the mains power supply,
allow it to cool, then remove the bread by turning
the toaster upside down. Do not insert any objects
into the toaster.
•
When not in use, switch your toaster off at the
mains and remove the plug from the socket. DO
NOT WRAP THE CABLE AROUND THE MAIN
BODY OF THE APPLIANCE DURING OR AFTER
USE.
lodged in the toasting chamber and pull out the
crumb tray. Empty the tray and replace it.
NB! Never operate the toaster without the crumb tray
fitted.
Additional points
In order to achieve uniform browning, we recommend
you wait a minimum of 30 seconds between each
toasting, so that the control can automatically be
reset.
If toasting one slice only, you may need to adjust the
browning control to a slightly lower setting.
•
Note you will also notice a slight variation in toast
colour on one side of a single slice.
•
Stale bread toasts more rapidly than fresh bread.
The browning control should be set at a lower
setting than usual.
•
All types of bread can be used, as well as teacakes,
and small rolls etc. Slices should not however be
so thick as to cause burning or jamming within the
bread slot.
•
Allow the toaster to cool fully before storing away.
CLEANING AND MAINTENANCE
1.
After use and before cleaning, switch off at the
mains, remove the plug from the mains power
supply and wait for the toaster to cool.
2.
Wipe the outside of the toaster with a damp cloth
only and dry with another cloth or tissue.
3.
NEVER use coarse scouring agents, and never
immerse your toaster in any liquid.
4.
NEVER use any pointed or sharp articles for
cleaning the inside of the toaster otherwise the
heating element will be damaged.
5.
NEVER use a brush or push your fingers or
metal objects down the slots.
Using the cancel setting
If you wish to interrupt the toasting process, press
the cancel button (3).
Using the high lift release
If small bread is toasted, this may be removed more
easily by lifting the bread carriage lever (2).
Using the defrost button
To toast frozen bread, do not adjust the browning control,
place the bread normally in the bread slot, depress
the bread carriage lever and press the frozen bread
button (4). The button will illuminate and the toaster
will automatically toast for an extended period.
Using the Crumpet function
To toast one side of a crumpet or bagel, place the
bread normally in the bread slot, depress the bread
carriage lever and press the crumpet button (5). The
button will illuminate indicating this function is in
operation.
Crumb tray
Crumbs will accumulate in the crumb tray (7) and could
cause a hazard if not emptied periodically. When
the toaster has cooled down completely, tap the
sides of the case lightly to dislodge any crumbs
MW_EX24109 toaster_IM.indd 3
2/21/2008 11:49:48 AM
27 Nourse
Avenue Epping 2
Cape Town
P.O. Box 975 Eppindust 7475 South Africa
Tel: +27 21 534 8114 Fax: +27 21 534 8086
Service Centre Share Call: 086 111 5006
w e b : w w w. c r e a t i v e h o u s e w a r e s . c o . z a
MW_EX24109 toaster_IM.indd 4
2/21/2008 11:49:48 AM