1
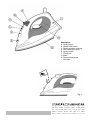
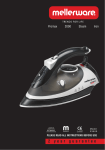
E
X
E
C
U
T
I
V
E
A d r i a 1 4 0 0 I n o x S t e a m I r o n
1400W
Model:
23300
PLEASE READ ALL INSTRUCTIONS BEFORE USE
2 year guarantee
Safety Instructions and Warnings
- Read these instructions carefully before putting the appliance into operation and keep them for future
consultation.
- Before connecting the appliance to the mains, check that the voltage indicated on the nameplate
coincides with the mains voltage.
- Do not use this appliance if it is damaged in any way.
- Unravel the power cable fully.
- Always unplug the iron when out of use, even for a short period.
- Do not leave the appliance within the reach of children or disabled individuals.
- Unplug the iron before filling or emptying the water deposit.
- Never submerge the iron in water or put it under running water.
- In order to avoid overloading, do not plug in another high voltage appliance on the same supply line.
- Any inappropriate use or the nonobservance of the instructions for use, renders the guarantee and the
manufacturer’s liability null and void.
- The appliance must be used and placed on a flat, stable surface
- When placing the appliance on its support, make sure the surface on which the support is fitted is stable.
- Do not use the appliance if it has been dropped, if there are visible signs of damage or if it leaks.
Instructions for Use
Suggestions before using the appliance for the first time:
Some parts of the iron have been lightly greased and thus the iron may produce a little smoke when
plugged in for the first time. This will stop after a short period of time.
- Before putting into use for the first time, remove the plastic cover from the base and clean the base with a
soft cloth.
- Keep the base smooth: do not touch it off metal objects (buttons, zips,…)
- Pure wool fabrics (100%) can be ironed with the iron set to steam. Preferably chose a high steam position
and use a dry ironing cloth.
Temperature setting:
- Always check each garment’s ironing instructions.
- If a garment does not have any ironing
instructions, see the fabric classification below.
- If the garment has several different types of fibre, select the lowest temperature setting.
- Classify the number of garments by ironing temperature. The iron heats up faster than it cools down so
we recommend you start your ironing with those garments that require lower temperatures and then
gradually increase the setting.
- Connect the appliance to the mains. The pilot light will come on. Turn the temperature gauge to the
desired temperature.
* Setting for nylon and acetate
** Setting for wool or silk
*** Setting for cotton or linen
The pilot turns off when the desired temperature is reached.
How to fill the water deposit:
- Unplug the appliance.
- Fill the water deposit through the filling hole (Fig. 1).
- If your tap water is hard, use distilled water only.
-Do not use chemically decalcified water.
-The harder the water the more frequently the iron should be cleaned.
- Throw out any excess water after use, once the iron has been unplugged.
Steam Ironing:
- Fill up the iron as described in the section “How to fill the water deposit”.
- Plug in the iron.
- Steam ironing is only possible if you select the highest temperature***. Otherwise water may seep
through the base of the iron.
- Wait for the pilot light to go off. Turn the steam regulator to the desired position
- During pauses and when the ironing is complete, leave the iron standing upright.
- Unplug the iron by pulling the plug out of the socket. Pour out any leftover water and let the iron cool
down.
Spray:
- The spray can be used when dry ironing or when steam ironing.
- To do so, press the spray button. The spray button has to be pressed repeatedly to release the first
spray.
Steam blast:
Steam blasts gives an extra steam jet to help remove tough creases.
- Select the maximum temperature*** on the temperature gauge. Wait for the pilot light to go off.
- Press the steam blast button Wait a few seconds for the steam to penetrate into the fabric before
pressing again. For optimum steam quality, do not apply more than three successive blasts. The spray
button has to be pressed repeatedly to release the first spray.
Cleaning
- Unplug the appliance before proceeding to clean.
- Do not use solvents or abrasive products for cleaning.A damp cloth with a few drops of washing up liquid
is enough.
“Self-cleaning”
- It is important to self-clean the appliance at least once a month to remove calcium and any other built-up
minerals inside the iron.
- Fill up the deposit to the top.
- Stand the iron upright and press the plug it in.
- Turn the temperature gauge to the *** position.
-Lets the iron heat up until the pilot light turns off and back on again.
- Unplug the iron and place it over the sink.
- Put it into the self-cleaning position.
- Let the water flow out through the steam vents in the base whilst lightly shaking the iron.
- Release the self-cleaning button after a moment or when the deposit has been emptied and place the
iron in an upright position.
- Let the iron cool and then clean it.
Maintenance
- Any stains that may form on the base of the iron can be cleaned off using a cloth dampened with water
and white vinegar.
Problems and Solutions
- In the event of malfunctions, take the appliance to an authorized Technical Support Service.
- Do not try to dismantle or repair it yourself as this may be dangerous.
- If the mains connection is to be replaced, proceed as in the event of a malfunction.
This appliance complies with Low Voltage Directive 73/23/ EC and with Electromagnetic Compatibility
Directive 89/336 EC.
Description
A Spray button
B Steam blast button
C Steam regulator controls
D Self-cleaning position
E Spray nozzle
F Filling hole
G Base
H Temperature gauge
I Pilot light
18 Jig Avenue Montague Gardens Cape Town
P.O. Box 37153 Chempet 7442 South Africa
Tel: +27 21 551 5760 Fax: +27 21 551 1189
Service Centre Share Call: 086 111 5006
w e b : w w w. c r e a t i v e h o u s e w a r e s . c o . z a