1
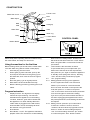
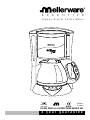
E
X
E
C
U
T
I
V
E
Te m p u s D i g i t a l C o f f e e M a k e r
SABS
IEC60355
1000W
Model:
29800
PLEASE READ ALL INSTRUCTIONS BEFORE USE
2 year guarantee
CONSTRUCTION
Water Tank Cover
Funnel Cover
Filter
Water Spout
MAX
MIN
Water Tank
Funnel
Handgrip
Valve
Glass Jug
Body
Control Panel
Display
CONTROL PANEL
Bottom Board
Please study these operating instructions before using
the coffee maker, and keep it for future use.
Using the machine for the first time
Before making coffee you should use the coffee maker
once with water only (without coffee or filter paper).
1.
Insert the plug into the socket.
2.
Fill the glass jug with cold water, open up the lid, and pour the water from the glass jug into the water tank, then close the lid to its original position.
3.
Place the glass jug in its original position.
4.
Note that the lid should be fitted securely.
5.
Start the brewing process by pressing the on/off switch.
Program Instruction
1.
2.
2.1
Display Function: four digit 24 hours display, real time and pre-set timing. The red LED indicates that the appliance is in the heating condition, while the green LED indicates that the appliance is on timer standby. When the coffee maker is plugged into the wall socket, and both LED’s are off, the display will show
the real time or any pre-set time.
Push Buttons
Press Button “on/off”: The appliance will start to prepare coffee. The unit will turn off automatically 2.2
2.3
2.3.1
2.3.2
after 2 hours as a safety feature, and the LCD will show the real time. Press this “on/off” button when the green LED is on and it will cancel the pre-set time.
“Auto” Button is the automatic on switch.
To pre-set the timer you must press the “pro” button twice and start to set the required time, then press the “pro” again to switch the appliance in standby mode (with green LED on). Pressing “auto” will cancel the pre-set timer program.
“Pro” program setting
Setting present time: plug in the appliance and the system will show 12:00. Press and hold the “pro” button for 3 seconds and the word “set time” will show on the top left of the LCD, then press “hr” to set hour and press “min” to set minute. Press and hold the pro button for 3 seconds again to exit the time setting.
If you do not, the pre-set time will be exit after 10 seconds. Unplugging the appliance will cancel the preset present time, and resetting the time will be required.
Setting of timer: press the “pro” button twice to enter the “set timer” function, the word “set timer” will show at the top right hand corner.
Press “hr” button for hours setting and press “min” for minute setting. Press the “pro” button
to confirm and press “auto” button to switch 2.4
2.5
the appliance to timer standby mode (green LED will be on). Pressing the “auto” button again will switch off the standby mode. Resume the standby mode again by pressing the “auto” button. Press the “pro” button to check the timer pre-set time. Press the “pro” button again to confirm and the display will go back to the present time. Pressing “on/off” at any time will switch on the appliance and red LED will be on. The appliance will start functioning at the pre-set time (red LED will be on). The appliance will turn off automatically after 2 hours and the LCD will show the present time. Adjustable time range :
23 hours 59 minutes.
“Hr” hour button: this button only functions while setting the time and timer. Press this button for every hour increasing. Holding this button will make the hour setting run quickly.
“Min” minute button: same as “hr” setting.
To make coffee
1.
2.
3.
4.
5.
6.
7.
8.
9.
10.
Open up the lid of the coffee maker and fill the fresh water container with as much water as cups of coffee are desired.
Ensure that the water level does not exceed the max level mark inside the water tank.
Close the lid of the coffee maker.
The water level display in the glass jug indicates the number of cups.
Put ground coffee as you need into the permanent filter or proper paper filter before making coffee. (Take 6-7 g medium fine ground coffee per cup).
Close the lid.
Ensure that the glass jug is placed properly in its position.
Switch on the appliance and the pilot lamp illuminates, to indicate the unit is on.
After the brewing process, the heating element will keep the coffee warm for 2 hours, after which the appliance will switch off to prevent overheating.
If the glass jug is empty, do not leave the appliance on, as the heating element may crack the glass jug.
Cleaning and maintenance
1.
2.
3.
4.
Disconnect the appliance.
Never immerse the appliance in water.
Clean the appliance with a damp cloth only.
The glass jug and permanent filter can be cleaned with warm water, some washing-up liquid and a soft brush. Do not clean the glass jug in a dishwasher.
De-scaling
To ensure a long lifespan of the coffee maker, you will
need to de-scale it from time to time. Frequency will
depend on how hard the water is in your area, and how
often you use the coffee maker. If you use your coffee
maker once or twice a day, the following guidelines for
de-scaling should be used:
• Soft water, every 6 months.
• Medium water, every 2-3 months.
• Hard water, every 6-8 weeks.
If the time it takes to brew a cup of coffee is suddenly
increased, it is recommended that the coffee maker
be de-scaled. The harder the water is in your area, the
more often the coffee maker needs to be de-scaled.
The hardness of the water can be advised at your local
waterworks.
Environmental tip
An electronic appliance should, when it is no longer
capable of functioning be disposed with least possible
environmental damage. The appliance should be
disposed according to the local regulations of your
municipality. In most cases you can discharge the
appliance at your local recycling center.
Caution
•
•
•
•
•
•
•
•
•
The supply voltage from the wall socket must correspond with the voltage stated on the rating label at the bottom of the appliance.
Use only cold water to fill the water tank!
Ensure the glass jug is placed properly in its position when brewing coffee.
Between the brewing processes switch off the appliance and let it cool down for about 5 minutes. Then refill with cold water.
After the brewing process, always switch off the appliance.
Disconnect the appliance before cleaning.
Keep the appliance out of reach of children.
To switch off the appliance use the on/off switch.
The control lamp going out indicates when the machine is off.
Other
•
•
•
•
The appliance must only be used for purposes as laid out by this instruction manual.
The supplier will not be held liable for damages caused by improper use of the appliance.
Only an authorized repair agent may carry out repairs on this appliance. Any attempts to repair the appliance without using an authorized repair agent will negate the guarantee.
In order to locate the authorized repair agent in your area, please consult the supplier.
Service Centre Share Call: 086 111 5006
w e b : w w w. c r e a t i v e h o u s e w a r e s . c o . z a