1
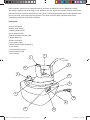
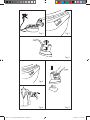
E
X
E
C
U
T
I
V
E
B R A V I S S I M O I I P R O - S T E A M S TAT I O N
complies with
INTERNATIONAL
IEC60355
SAFETY SPECIFICATIONS
2100W
Model:
23810
PLEASE READ ALL INSTRUCTIONS BEFORE USE
2 year guarantee
MW_EX_23810_BRAVISSIMO_PRO 2_IM.indd 1
7/15/2009 4:32:44 PM
Dear Customer, thank you for having decided to purchase an appliance from the Mellerware range.
The design, features and technology of this appliance as well as the strict quality controls used during
manufacture will provide full satisfaction for many years. The packing materials used for this appliance are
part of a pick-up, sorting and recycling system. If you wish to discard them, please use the public
containers provided for each kind of material.
Description
A Iron on/off switch.
B Boiler on/off switch.
C Boiler operation LED.
D Iron operation LED.
E Steam pressure indicator LED.
F Water filling cap.
G Mains connexion.
H Iron steam switch.
I Steam switch control (depending
on the model).
J Iron thermostat control.
K Iron thermostat LED.
L Iron housing.
I
J
K
H
F
D
A
L
G
E
C
MW_EX_23810_BRAVISSIMO_PRO 2_IM.indd 2
B
7/15/2009 4:32:44 PM
Fig. 1
Fig. 2
Fig. 3
Fig. 4
Fig. 6
MW_EX_23810_BRAVISSIMO_PRO 2_IM.indd 3
Fig. 5
7/15/2009 4:32:44 PM
Tips and safety warnings
-Please read these instructions carefully before using the appliance and keep them for future reference.
-Unpack the appliance and check it is in perfect
condition and working order, as any factory fault
or damage caused by transport is covered by the
MELLERWARE guarantee.
-This device has been designed for household
use, not for commercial use.
-Do not leave the appliance without supervision if
you are not going to use it immediately. This will
save energy and prolong the working life of the
appliance.
-Keep the appliance out of the reach of children.
-The appliance must not be connected to the
mains while the boiler is being filled (Fig. 1).
-Before connecting the appliance to the mains,
ensure the supply voltage is the same as that
marked on the appliance. English -The water filling
inlet must not be open during operation.
-This appliance must be connected to an electrical
socket with an earth connection.
-Any improper use or failure to comply with the instructions for use will invalidate the warranty and
free the manufacturer from any liability
concerning the appliance.
-IF THE IRON IS IN ITS HOUSING AT MAXIMUM
TEMPERATURE FOR A LONG TIME, THIS MAY
CAUSE ALTERATIONS TO ITS COLOUR, BUT
THIS HAS NO EFFECT ON THE PROPER
OPERATION OF THE APPLIANCE.
- The appliance must be used and placed on a flat,
stable surface
- When placing the appliance on its support, make
sure the surface on which the support is fitted is
stable.
- Do not use the appliance if it has been dropped,
if there are visible signs of damage or if it leaks.
parts of the iron have been slightly greased.
They can therefore give off steam on first use, but
this steam will disappear after a short time.
Practical tips
-Keep the sole plate smooth, do not apply it to
metallic objects (i.e., to the ironing-board, butons,
zips...).
-Fit the iron in its housing (L) for transport and storage, in order to improve its stability.
-To avoid burns, do not lean Bravissimo 2 Pro’s
iron on its back.
Steam ironing
When you start to iron, proceed as follows:
-Unscrew the cap (F) and fill the boiler with water,
using a jug (Fig. 1) (if you fill it with hot water, the
appliance will be ready for use sooner).
-Even if the boiler has a certain level of water, it is
always recommended to fill it to the top for a longer range, thanks to its large 1l capacity.
-Carefully close the cap (F), screwing it to the
end.
-Place the boiler on a flat , stable surface.
-Plug the appliance into the mains.
-Switch on the boiler and the iron by pressing the
relevant switches (B) and (A). The corresponding
LEDs will light (Fig. 2).
Thermostat
control
position
Type of
fabric
Steam
•
Nylon / Silk
No
••
Wool
No
•••
Cotton, Linen
Yes
Before using the appliance for the first time
This professional iron works with tap water.
However, the use of distilled water is recomended
in areas with a high lime level in the water. Some
MW_EX_23810_BRAVISSIMO_PRO 2_IM.indd 4
It is recommended not to use steam in the • and
•• thermostat positions, as water could drip.
7/15/2009 4:32:44 PM
-Set the desired temperature with the thermostat
control (J), depending on the type of cloth to be
ironed (Fig. 3).
-The appliance will be ready for use when the
pressure indicator LED (E) lights up (Fig. 4).
While ironing, this LED (E) goes on and off automatically, this is normal.
-By pressing the steam switch (H) you will get a
constant steam jet (Fig. 5). The steam stops when
you release the switch.
How to fill the boiler while ironing
To fill the boiler, proceed as follows:
-Eliminate steam pressure from inside the boiler
by switching on the steam switch (H) (Fig. 5).
-Turn off the boiler (B) and iron (A) switches.
-Unplug the appliance from the mains.
-Carefully unscrew the cap (F) to let the residual
steam out of the boiler.
-Wait for some minutes and carefully pour 1l of
water into the boiler using a jug (Fig. 1).
-Carefully close the cap (F) again, screwing it to
the end.
Vertical ironing
It is possible to iron hanging curtains, garments
on their own hangers... (Fig.6)
-Adjust the iron thermostat control (J) to the maximum temperature.
-Iron from top to bottom and press the iron steam
switch (H).
Important: For cotton and linen clothes, it is recommended to put the base of the iron in contact
with the fabric. For more delicate fabrics, it is recommended to keep the base of the iron at a distance of some centimetres.
Dry ironing
-Connect the professional iron to the
mains.
-Turn on the iron switch (A).
-Set the iron temperature with the thermostat control (J), depending on the fabric to be ironed.
MW_EX_23810_BRAVISSIMO_PRO 2_IM.indd 5
After each ironing
-Switch off the professional iron by pressing
switches (B) and (A).
-Unplug the network connection cable (G) from the
mains.
-Clean the base of the iron while it is still hot,
using a damp cloth, after each use.
-The rest of the appliance can also be cleaned using a damp cloth.
Never submerge the appliance in water or any
other liquid, or hold it under a running tap. Do
not use solvents or abrasive products to clean
it.
Maintenance
With the boiler’s descaling system, limescale incrustations are reduced thanks to the exclusive
features of the stainless material used. To clean the
inside of the boiler, you simply have to proceed as
follows every three months:
Fill the boiler with tap water, shake and empty. Repeat these steps two or three times consecutively.
To prevent lime sticking to the appliance, MELLERWARE offers quick-action descaling bags. To descale:
-Unplug. Empty the content of a bag into the boiler.
Fill with water and select the steam position.
-Plug in. Switch the professional iron on.
-Place the iron in the ironing position. Activate the
steam, shake the iron softly.
-Let the product work for 10 minutes.
-Rinse thoroughly with water & empty completely.
Breakdowns and repairs
In the event of any breakdown, check the following chart.
- In the event of malfunctions, take the appliance to
an authorized Technical Support Service.
- Do not try to dismantle or repair it yourself as this
may be dangerous.
- If the mains connection is to be replaced, proceed as in the event of a malfunction.
7/15/2009 4:32:44 PM
Breakdowns
Causes
Solutions
Water drips Iron thermos- Set the thermostat
tat control (J) control to the
from the
holes on the set to the mi- steam zone "···".
base of the nimum posiiron when tion "·""··".
turning on
the steam
switch (H).
The boiler is
too full.
Remove some
water.
The boiler
is in a tilted
position.
Place it on a
horizontal surface.
The iron does The switch
not heat and
the LED (K)
does not light
up.
Iron thermostat control (J) set to
the minimum
position.
Faulty power
connection.
Switch it to
“on” (A).
No steam co- Empty boiler.
mes out
when pressing the
steam switch Switches (B)
and (A) are
(H).
Fill the boiler
with water.
Leak Cap (F) not
from the
properly closed.
cap (F).
Let the boiler cool
and screw the cap
(F) to the end
again.
Adjust the thermostat control.
Check the power
points.
Switch them
on.
Safety valve Go to an authoriactivated.
zed Technical
Service.
The boiler cap
(F) does not
unscrew easily.
There is
steam remaining inside the
boiler.
Press the steam
switch (H) to let
the steam out.
MW_EX_23810_BRAVISSIMO_PRO 2_IM.indd 6
7/15/2009 4:32:44 PM
MW_EX_23810_BRAVISSIMO_PRO 2_IM.indd 7
7/15/2009 4:32:44 PM
27 Nourse
Avenue Epping 2
Cape Town
P.O. Box 975 Eppindust 7475 South Africa
Tel: +27 21 534 8114 Fax: +27 21 534 8086
Service Centre Share Call: 086 111 5006
w e b : w w w. c r e a t i v e h o u s e w a r e s . c o . z a
MW_EX_23810_BRAVISSIMO_PRO 2_IM.indd 8
7/15/2009 4:32:44 PM