1
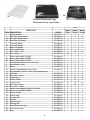
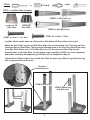
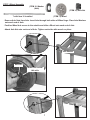
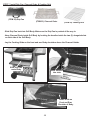
Aussie
®
by Meco®
Monaro Charcoal Grill
®
Assembly and Use Manual
Model 7652K1
Model 7652K5 & 7652K6
FOR OUTDOOR HOUSEHOLD USE ONLY. NOT FOR COMMERCIAL USE.
For Customer Service, call 1-800-251-7558 or visit our web site at www.meco.net
• Failure to follow these instructions could result in fire or explosion which could cause property
damage, personal injury or death.
• Read and follow instructions carefully before assembly or use.
• Do not use this product for any other purpose than which it is intended.
• These instructions must be kept with the user. SAVE THESE INSTRUCTIONS.
— NOTICE —
MECO CORPORATION STRIVES TO BE A QUALITY SUPPLIER OF CONSUMER PRODUCTS. IF
WE OMITTED ANY PARTS NEEDED FOR ASSEMBLY, OR YOU NEED TROUBLESHOOTING
INFORMATION, PLEASE CONTACT US USING OUR TOLL FREE NUMBER. THANK YOU FOR
PURCHASING A MECO CORPORATION PRODUCT.
1-(800)-251-7558
8 am - 6 pm E.S.T Mon. - Fri.
1-(423)-639-1171 (TELEPHONE)
1-(423)-639-2570 (FAX)
www.meco.net
CONSUMER SERVICE DEPARTMENT
MECO CORPORATION
1500 INDUSTRIAL ROAD
GREENEVILLE, TN. 37745 USA
CONTENTS
I. Assembly Instructions........................................................2
Parts Illustrations................................................................3
Parts List..........................................................................4
Step 1-Leg/Side Table Assembly.........................................5
Step 2-Bottom Shelf/Leg Assembly.....................................6
Step 3-Wheel Assembly......................................................7
Step 4-Slide Vent Assembly................................................8
Step 5-Hood Handle Assembly...........................................9
Step 6-Grill Body/Cart Assembly.........................................9
Step 7-Install Drip Pan, Charcoal Grate & Cooking Grid...12
II. Operating and Maintaining Your Charcoal Grill...............13
A) Before Using Your Charcoal Grill..................................13
1) Using Charcoal..........................................................13
2) Selecting a Location.................................................13
3) Operating the Charcoal Grill......................................13
4) Starting a Fire...........................................................13
B) Grill Cooking................................................................14
1) Cooking on the Grids............... ...............................14
2) Smoking .................................. ...............................14
C) End of Cooking Session..........................................15
D) Care and Maintenance..............................................15
1) Cleaning the Grill.................................................15
a) Drip Tray...........................................................15
b) Cooking Grid....................................................15
c) Grill Body..........................................................15
d) Side Tables and Wood parts.............................15
2) Storage.................................................................15
The use of alcohol, prescription or non prescription drugs could impair the consumer’s ability to
properly assemble or safely operate this appliance.
ASSEMBLY INSTRUCTIONS
PREPARATION FOR ASSEMBLY: Removing parts from carton and some assembly will require
two people. Before starting assembly, read the instructions and your manual.
Remove all the parts from the carton and lay them on a smooth, clean surface. (You may cut the carton,
spread it out, and use it as a pad to protect part finishes.) Look in the Parts List under the model number
to find the exact parts you need. Do not throw away any packaging until you have located all the parts.
Follow instructions of each step in the order they are written as you look at the diagrams. This will allow
little confusion and easier assembly. If you have any questions which require help, contact Customer
Service and be sure to mention the model number of your grill.
To reduce the risk of a cut injury:
· Wear protective gloves when handling parts that have sharp edges.
· Some assembly may require help from another person. Observe where noted.
© Meco Corporation® 2005
2
PARTS ILLUSTRATIONS
3
2 or 2A
2B
1
3A
5
4
6 or 6A
4A
5A
6B
9
10-See Item 7
8
7 with Item 10 installed
11
11A
12
13
14
17
15
18 or 18A
17A
16
21
20
23
22
3
19
26
24
25 Hood w/Embossed Logo
25A Hood w/Decal Logo Shown
ITEM
1
2
2A
2B
3
3A
4
4A
5
5A
6
6A
6B
7
8
9
10
11
12
13
14
15
16
17
17A
18
18A
19
20
21
22
23
24
25
25A
26
PARTS LIST
DESCRIPTION
Owner's Manual
Side Table (Metal Insert)
Side Table (Metal Insert )
Side Table (All Wood)
Fixed Leg (Metal)
Fixed Leg (Wood)
Wheel Leg (Metal)
Wheel Leg (Wood)
Bolt, 1/4-20 x 1 3/8"
Bolt, 1/4-20 x 1 "
Bottom Shelf (Model 7652K5)
Bottom Shelf (Model 7652K6)
Bottom Shelf (Model 7652K1)
Axle (Assembled with Item 10 Axle Nut)
Steel Washer, (Axle)
Wheel
Axle Nut (Assembled on Item 7 Axle)
Body Assembly (See 25, 25A & 26 for Replacement)
Slide Vent
Bolt, 6mm x 16mm
Washer, 6mm
Spacer, Sleeve
Locknut, 6mm
Bolt, 6mm x 90mm
Bolt, 6mm x 110mm
Handle, Hood (Models 7652K1 & 7652K5)
Handle, Hood (Model 7652K6)
Spacer, Handle
Spacer, Body
Wing Nut, M6
Drip Pan
Charcoal Grate
Cooking Grid
Hood (Embossed Logo)
Hood (Decal Logo)
Body
4
PART #
03.6077.01
03.6495.00
03.6597.00
03.5845.00
03.6496.00
03.6066.00
03.6497.00
03.6065.00
03.6498.00
03.4062.00
03.6499.00
03.6598.00
03.6067.00
03.5014.00
03.4072.00
03.5003.00
03.4073.00
-03.6072.00
03.6070.00
03.6501.00
03.6071.00
03.4070.00
03.6020.00
03.4066.00
03.6036.00
03.6599.00
03.6023.00
03.4074.00
03.6003.00
03.6069.00
03.6074.00
03.6075.00
03.6502.00
03.6503.00
03.6068.00
QTY.
Model Model
Model
7652K1 7652K5 7652K6
1
1
1
-2
2
--2
2
---2
2
2
---2
2
2
---24
24
24
---1
---1
1
--1
1
1
2
2
2
2
2
2
2
2
2
1
1
1
2
2
2
8
8
8
18
18
18
8
8
8
10
10
10
2
10
10
8
--1
1
---1
2
2
2
8
8
8
8
8
8
1
1
1
1
1
1
2
2
2
1
---1
1
1
1
1
TOOLS:
and/or
or
STEP 1- Leg/Side Table Assembly
(ITEM 3 or 3A) Fixed Leg
(ITEM 2 or 2A
Side Table
(ITEM 2B)
Side Table
(ITEM 4 or 4A) Wheel Leg
(ITEM 5A) 1/4-20 x 1” Bolt
(ITEM 5) 1/4-20 x 1 3/8” Bolt
· Lay Side Tables upside down on a flat surface. Side tables will fit on either side of grill.
· Attach the two Fixed Legs to one Side Table. Align four recessed holes of a Fixed Leg with four
inserted holes in a Side Table. The four large recessed holes in the Fixed Leg should face away
from Side Table. Attach four 1/4 -20 Bolts (Item 5 or 5A) through each Fixed Leg into the
threaded holes in the Side Table. Do not tighten bolts completely. (NOTE: For easier alignment
and further assembly, final tightening of all bolts will be completed in Step 6).
· Attach the two Wheel Legs to the second Side Table the same way. (Wheel Leg is the short leg
with a large axle hole at one end.)
Recessed
holes face out
(ITEM 4) Fixed Leg
(ITEM 3) Wheel Leg
with Axle hole
Wood Side
Table/Legs
5
STEP 2- Bottom Shelf/Leg Assembly
(ITEM 5)
1/4-20 x 1 3/8” Bolt
(ITEM 5A)
1/4-20 x 1” Bolt
(ITEM 6 or 6A)
Bottom Shelf
(ITEM 6B)
Bottom Shelf
· Place both Leg/Side Table Assemblies opposite each other as shown with Bottom Shelf
between them.
· Align Bottom Shelf holes with holes of Wheel Legs and attach with four 1/4-20 Bolts (Item 5 or
5A). Do not tighten Bolts completely.
· Secure Fixed Legs to Bottom Shelf with 1/4 -20 Bolts. Go ahead and tighten Wheel Leg bolts
securely. (This will not be possible after the Wheel is assembled.)
Fixed Legs
Wheel Legs
All Wood Bottom
Shelf/ Leg Assembly
Fixed Legs
Wheel Legs
6
STEP 3-Wheel Assembly
(ITEM 8) Washer
(Axle)
(ITEM 10) Axle Nut
(ITEM 9) Wheel
7 with Item 10 installed
· Remove Axle Nuts from Axle. Insert Axle through both sides of Wheel Legs. Place Axle Washers
onto each end of Axle.
· Position Wheel hub recess to the outside and slide a Wheel onto each end of Axle.
· Attach Axle Nut onto each end of Axle. Tighten each side with wrench or pliers.
Axle Washer
Axle Nut
Wheel hub recess
this side
7
STEP 4-Slide Vent Assembly
(ITEM 12)
Slide Vent
(ITEM 13) Bolt, 6mm
(ITEM 11 or 11A)
Body Assembly
(ITEM 16)
Locknut, 6mm
(ITEM 15)
Sleeve
Spacer, 6mm
(ITEM 14)
Washer, 6mm
· Open the Hood on the Grill Body.
· Align slotted holes in Slide Vent with holes in Grill Body Side.
· Insert a 6 mm x 16 Bolt through the 6mm Steel Washer and Sleeve Spacer. Position this
assembly with the Sleeve Spacer inside the Slide Vent slotted hole. Attach 6mm Steel Washer
and Locknut to Bolt from inside of Grill Body to secure the Slide Vent. Repeat for each slotted
hole on both Slide Vents.
· Make sure the Vents slide back and forth freely over the Sleeve Spacers. If not, loosen the bolts
slightly and reset the Spacers inside the Slide Vent slotted holes and retighten.
Sleeve Spacer inside
slotted hole of Slide vent
8
STEP 5-Hood Handle Assembly
(ITEM 14) Washer
6 mm
(ITEM 17) Bolt, 6mm x 90 mm
(ITEM 16) Locknut
6mm
(ITEM 19) Handle Spacer
(ITEM 18 or 18A) Hood Handle
· Open Hood and lay it on on its backside.
· Insert 6 mm x 90 mm Bolt through recessed hole of
Hood Handle, through Handle Spacer through a
hole in Hood. (Note: Wide end of Handle Spacer
goes against the Hood.)
· Attach a 6mm Washer and Locknut to the Bolt from
inside Hood. Do not over tighten; it may crack the
Hood finish.
· Repeat for other end of Handle.
Assembled Handle
STEP 6-Grill Body/Cart Assembly (Continues on next page)
Assembly of Grill Body will require
two people.
(ITEM 17) Bolt, 6mm x 90 mm
(ITEM 17A) Bolt, 6mm x 110 mm
(ITEM 11 or 11A)
Body Assembly
(ITEM 20) Body Spacer
9
(ITEM 21) Wingnut, 6mm
STEP 6-Continued Grill Body/Cart Assembly (See also page 11 for Wood Cart Assembly)
· Carefully lay Grill Body Assembly on its back side with Front panel facing up and Hood open.
Lay Cart Assembly on the back side with the Grill Body between Side Tables. (Note: Wheels on
Cart assembly are to the left.) (FIG. A)
· Align slotted holes on sides of Grill Body Assembly with holes in edges of legs (FIG. B). Insert
Body Spacers between Leg and Grill Body. (You can pull the legs away from the body since
all the bolts are loose.) Insert two 6mm x 90mm Body Bolts through Leg, Spacers and slotted
holes in Grill Body. Attach a 6mm Wing Nut to the Bolts, but do not tighten. Repeat this
assembly for remaining three Cart Legs.
· With help from a second person, turn full Grill and Cart Assembly upright. The Grill Body
should slide down to seat itself within the slotted
holes. If not, loosen the Body bolts and push
down at all four corners.
· Tighten all Body Bolts and Wing Nuts.
Wingnut
· Tighten all other Bolts at his time.
View from inside
Body/Cart Assembly
Body Spacer
FIG. B
View from back side of
Leg/Body Assembly
after standing up
FIG. A
10
Bolt
STEP 6-Grill Body/Wood Cart Assembly
Wingnut
Body Spacer
View from inside
Body/Leg Assembly
Bolt
FIG. B
View from back side of
Body/Leg Assembly
after standing up
FIG. A
11
STEP 7- Install Drip Pan, Charcoal Grate & Cooking Grid
(ITEM 22) Drip Pan
(ITEM 23) Charcoal Grate
(ITEM 24) Cooking Grid
· Slide Drip Pan back into Grill Body. Make sure the Drip Pan is pushed all the way in.
· Hang Charcoal Grate inside Grill Body by hooking the handles inside the two (2) elongated slots
on each side of the Grill Body.
· Lay the Cooking Grids on the front and rear Body shoulders above the Charcoal Holder.
Slide Drip Pan
under Body
Hook Handles
into slots
Install Grids on
Front and Rear
Shoulder of Body
12
OPERATING AND MAINTAINING YOUR CHARCOAL GRILL
BEFORE USING YOUR CHARCOAL GRILL
USING CHARCOAL
To reduce the risk of serious bodily injury or death:
· Be careful when burning charcoal to avoid getting
burned from flame, heat or hot coals.
· Burning charcoal consumes oxygen and produces
toxic gases, including carbon monoxide that can kill.
· Be aware of the wind blown sparks.
· Always have an ABC fire extinguisher, baking soda, a
bucket of sand or a garden hose ready in case of an
uncontrolled fire.
Use a high quality hardwood charcoal to make sure you get a
good fire. Charcoal briquettes made from maple, oak, birch or
elm woods will burn clean with very little smoke and without
unpleasant odors.
SELECTING A LOCATION
To reduce the risk of serious bodily injury or death:
· Locate your charcoal in an open area away from
buildings, dry leaves, or brush.and at least 10 feet
away from your house or building.
· Always make sure the grill is on a level, stable surface
and not tilted toward the front or back.
· Do not use the grill in a garage, breezeway, carport,
porch, high traffic area, on or under any surface that
can catch fire.
· Do not use a charcoal grill indoors, on recreational
vehicles, or boats.
· Do not use a charcoal grill as a space heater.
OPERATING THE CHARCOAL GRILL
To reduce the risk of serious bodily injury or death:
· Never use a barbecue grill unless all parts of the unit
are firmly in place and the grill is stable.
· Never use gasoline, kerosene, alcohol or other volatile
fluids as a starter. They can explode.
· Do not use aerosols or store flammable liquids or
materials near this charcoal grill. Cap Lighter fluid
immediately and place a safe distance from the grill.
· Instant light briquettes already have the starter blended
in, do not use lighter fluid, an electric starter, solid, or
metal chimney starters.
· Do not add more instant light briquettes once the fire
has been lit. To avoid flame-ups, unpleasant fumes and
odors, add regular charcoal briquettes if needed.
13
· Once the barbecue grill has been lit, do not touch the
charcoal briquettes/wood chunks to see if they are hot.
· Never add lighter fluid to already hot or warm coals.
· Do not close Hood on flaming charcoal. If closed and
re-opened, the flames could leap out and burn.
· Do not wear loose clothing (example: hanging shirt
tails, clothing with frills, etc.) around a charcoal grill
while in use or hot.
· Do not lean your body over the charcoal grill when
lighting it, while it hot or is in use.
· Do not touch hot surfaces. Use heat resistant gloves,
long-handled tongs, or cooking mitts at all times
since the grill will become very hot.
· Open the hood carefully when cooking to avoid burn
from the hot air and steam trapped inside.
· Do not move a charcoal grill when in use or hot.
· Do not douse or spray the grill or cooking surfaces
with water when hot. Burns from grease or the water
splatters could occur.
· Do not allow children to operate or play near a
charcoal grill. Keep animals and bystanders out of the
grill area. Do not leave grill unattended.
· Allow grill to cool before handling parts or cleaning.
· To avoid a fire, allow coals to burn out completely and
let the ashes cool for 48 hours before disposing of
them.
· Do not attempt to extinguish a grease fire with water
or other liquids. Have a BC fire extinguisher nearby.
· If your Charcoal grill catches on fire:
- Evacuate everyone from the area.
- If you can, close the Hood.
- If the fire is a grease fire, and you can safely
extinguish, use baking soda, a BC fire extinguisher or
a bucket of sand.
- If the fire is any other type and cannot be
extinguished with water, leave it alone and call the
fire department.
- If there is any type of fire that threatens either
personal safety or endangers property, call the fire
department.
STARTING A FIRE
To reduce the risk of serious bodily injury or death:
· Make certain you leave the Hood all the way open until
the flames have died down.
· Should electrically operated starters be used, be sure
they are properly grounded according to local codes.
Electrical cords should be placed away from walkways
or traffic areas.
STEP 1. Open the Hood and the Slide Vents.
FOR GRILLING
STEP 2. Remove the Cooking grids. Make sure the
Drip Pan is pushed all the way in.
STEP 3. Place about five pounds of charcoal (7275 briquettes) on the Charcoal Grate. Make a
pyramid shaped stack near the front of the
Charcoal Grate. (See Illustration Starting A Fire.)
STEP 4a. For regular charcoal or wood, apply
the lighter fluid, following the container instructions.
Let the lighter fluid soak in for approximately one
minute.You may use an electric fire starter; just
leave off the lighter fluid and follow manufacturer's
instructions on the container).
STEP 4b. For instant light briquettes, do not use
lighter fluid, an electric fire starter solid, or chimney
starters. The starter accelerant is blended into the
briquettes and will cause flame-ups, unpleasant
fumes and odors.
STEP 5. Carefully light the charcoal and let it burn
for about 30 minutes or until it is covered with a
light gray ash. Do not close the hood.
STEP 6. Using long-handled tongs and barbecue
mitts, spread the charcoal out inside the Charcoal
Holder. Leave about one-half inch of space
between each piece of charcoal. This will help to
avoid flare-up from the meat drippings and more
even heat for grilling. (See Illustration For Grilling.)
STEP 7. You may begin cooking by placing the
grids in the grill and food on the grids. Then close
the hood for smoke cooking.
STARTING A FIRE
GRILL COOKING
To reduce the risk of serious bodily injury or death:
· Avoid burns from the hot air and steam trapped inside,
by opening the hood carefully when grill roasting.
· Avoid burns by using barbecue mitts and long handled
tongs when placing wood chips or chunks on the
charcoal and for handling the Cooking Grids when they
are hot.
· If flare-ups occur, close the vents for at least one
minute to stop flare-up. Do not use water.
· Do not cover more than half (50%) the cooking area if
using griddle plates. Full coverage of cooking area will
cause overheating below the plates and could damage
the grill or cause a possible hazard.
1) Cooking on the Grids is heated by the burning charcoal
underneath. The natural food juices from the juices fall onto
the hot Charcoal and vaporize. Rising smoke bastes the food,
giving it that unique barbecued flavor.
Leave the Slide Vents open for the most heat. Close the vents
partially to lower the heat. It takes a few minutes for the
charcoal to react to the vent adjustment.
Leave the hood open for "Texas Style" open air barbecuing.
Close the hood for "Smoker" cooking or when you want to
hold in all the heat.
2) Smoking: For true smoke flavor, use chips or chunks of
wood from nut or fruit trees such as hickory, walnut, cherry or
apple. Soak the chips in water overnight so they will not burn
when you put them on the charcoal.
After you get the fire started, put the soaked chips on top of
the hot charcoal. Place the meat on the grid or rotisserie spit
and close the hood.
Continue adding chips while the meat cooks to maintain the
appropriate amount of smoke. Smoking is a very slow
process. Therefore, allow plenty of cooking time.
14
3) Cooking Grids-Clean the residue off with a baking soda
and water solution. Use a non-abrasive scouring powder.
for stubborn stains. Some char may remain; ok to leave it.
4) Grill Body-Remove excess grease and/or fat with a soft
plastic or wooden scraper. Do not use steel wool or other
abrasive cleansers that can scratch the porcelain coated
surfaces. It is not necessary to remove all the grease from
the body. Wipe it down with paper towels or soft damp
cloth. For further cleaning, use hot soapy water and a
cloth, or nylon-bristled brush only.
5) Side Tables and Wood parts-Wipe off with damp cloth.
END OF COOKING SESSION
To reduce the risk of serious injury from burns or fire:
· Wait until hot ashes or charcoal is completely
extinguished before disposal in a safe place.
· Allow the grill to cool before cleaning, moving or
putting on a grill cover.
· Empty and clean the Drip Pan after each cooking
session so excessive grease does not accumulate.
Never light the charcoal grill without the Drip Pan in
place.
STORAGE
1) After each cooking session, close the hood.
2) Close the Slide Vents and allow the charcoal to die down.
3) Wait until the grill is cool.
4) Regularly clean your charcoal grill between uses and after
extended storage periods. To maintain the condition and
extend the life of your grill, we strongly recommend that
the unit be covered when stored outside for any length of
time, especially during the winter months.
To reduce the risk of serious bodily injury or death:
· Do not store a charcoal grill while it is hot.
· Store your charcoal grill in a cool dry place.
· Do not store charcoal and lighter fluid indoors. Store it
outdoors out of the reach of children.
· To avoid an fire or explosion, do not store charcoal or
lighter fluid near a heat source.
· Do not store additional charcoal and lighter fluid under
or near the charcoal grill while it is hot.
· Always cap the lighter fluid when not in use.
CARE AND MAINTENANCE
To reduce the risk of a cut injury:
· Be careful or wear protective gloves when cleaning grill
parts that have sharp edges.
CLEANING THE GRILL
1) Charcoal Grate-Remove and shake expended ashes into
a safe receptacle or area. If any unburned charcoal, just
leave it until next time. (Optional) Scrape any residue from
the grate. Wash with warm soapy water if you wish, or just
spray with garden hose.
2) Drip Pan-Remove and clean out excess grease and
drippings. Wash with soap and water or mild abrasive
cleanser.
15
1) Clean your grill before storing.
2) Remove the Cooking Grid. Rub with a coat of light cooking
oil and wrap with aluminum foil. Store wrapped Cooking
Grid back into the grill.
3) You may also wrap the Charcoal Grate in aluminum foil or
just leave it alone.
4) Store Charcoal and lighter fluid separate from the grill.
5) Place a grill cover over the grill and store it outdoors if
possible. It may be stored indoors only if the charcoal and
lighter fluid are not stored with it.
6) Before next use, remove aluminum foil from Cooking Grids
and Charcoal Grate and reinstall in grill.
7) Periodically check and tighten all nuts, bolts, and screws.
Aussie
16
®
P/N 03.6077.01
REV. C 12/06