1
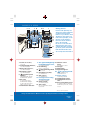
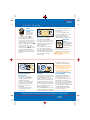
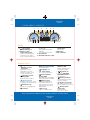
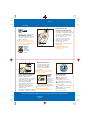
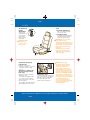
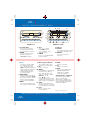
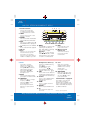
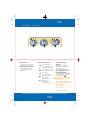
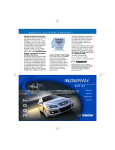
ROADSIDE ASSISTANCE/WARRANTY
Mazda Roadside Assistance
Exhilaration, liberation and inspiration,
are great reasons to drive a
Mazda car, truck, SUV or minivan.
In addition to all the other great
standard features, you also get peace
of mind with our basic warranty
period Emergency Roadside
Assistance Plan, it’s just a phone
call away, 24 hours a day, 365
days a year, call 1-800-866-1998.
Mazda ‘’bumper-to-bumper”
Limited Warranty
We design and build every Mazda
to give you driving pleasure now
and far down the road. We’re so
confident in our quality that we cover
the entire vehicle against defects
in materials and workmanship for
36 months/36,000 miles, whichever
comes first, plus we provide a
powertrain warranty for 60 months/
60,000 miles, whichever comes first.
This Quick Tips® guide is
provided by Mazda North
American Operations to make
your Mazda ownership
experience more convenient.
It is not intended to replace
your Owner’s Manual.
If you have any questions about
your vehicle, you are invited to
contact your local dealer.
Or if you need additional help,
feel free to call our
Customer Assistance Center
at 1-800-222-5500
Monday through Friday,
8 a.m.- 4:45 p.m., Pacific
9 a.m.- 5:45 p.m., Eastern/Central
Gasoline
Unleaded
87-octane
minimum
For fuel
capacity, see
Instrument
Cluster tab
©2006 Calcar, Quick Tips® is a trademark
of Calcar, made in USA 2/06 8.75M DOT
Mazda North American Operations reserves
the right to change product specifications
at any time without incurring obligations.
9999-95-023C-07QT
7L5J-19A285-AA
MAZDA B-SERIES TRUCK
Quick Tips
®
Reference
Guide for
2007
Controls and
Functions
®
DRIVER’S VIEW
9
67 8
C
3
H
10
E
F
40
5
80
80
5
4
3
2
1
20
6
0
RPMx1000
0
7
6
60
4
2
1
11 12
40
120
160
100
200
MPH
km/h
120
13
14
15
16
RES
ON
SET+
OFF
CST-
20
17
24 23 22
21
19
Getting Started
B-Series Truck Quick Tips® are
designed to quickly familiarize
you with some important
features of your B-Series Truck
This Driver’s View tab is your
index to the Quick Tips®, locate
the item you would like to
learn more about and then
turn to the listed tab
Be sure to see the tab called
Getting Started, this section
contains important operating
tips about your B-Series Truck
Items identified in blue text
call out important information
18
15
1. Power door locks*,
8. Turn signals/headlight high
see Locks
beams/wiper/washer lever,
see Getting Started
2. Power window switches*,
see Switches/Lights
9. Horn/Air bag
Press to sound horn
3. Dual power mirrors*,
10.
Hazard warning switch
see Switches/Lights
Press on/off
4. Headlamp control,
11. Gearshift lever (A/T)*,
see Switches/Lights
see Transmission
5.
Instrument panel
12. 4x4 control*,
lighting
see Transmission
To brighten/dim: Rotate
13. Passenger’s front air bag
thumb-wheel up/down
deactivation light,
6. Air vents
see Getting Started
To open/close: Move
14. Audio system,
thumb-wheel left/right
see Audio Systems
To direct air flow: Move
tab in center of vent
15. 12V socket*
Use for optional electrical
7. Side window defroster
accessories
16. Climate control
panel,
see Climate Control
17. Storage*
18. Cupholders*
19. Cigarette lighter*
20.
Hood release handle
Pull to unlatch hood,
see Under Hood
21. Cruise control*,
see Getting Started
22. Parking brake pedal
23. Parking brake release
lever
24. Tilt steering-wheel lever*
To change position: Pull lever,
tilt wheel up or down, release
to lock
*Denotes optional equipment
Always check the Owner’s Manual for more operating information and safety features
Driver’s
View
Getting
Started
GETTING STARTED
2 Keyless
3 remote entry
system*
Functions only
with ignition in
OFF position
To lock doors: Press (1),
pressing (1) again within 3
seconds causes doors to relock,
horn to beep once if all doors are
closed, twice if any door is ajar
To unlock driver’s door: Press
(2), press again within 3 seconds
to unlock passenger’s door
Panic alarm: Press
(3); horn
sounds, parking lights flash and
interior lights illuminate; press
(3) again to stop or insert key
and turn ignition to ON or ACC
position
1
4
ON
OFF
8
5
6
7
RES
SET+
CST-
Cruise control*
Operates above 30 mph
Press and release ON (4)
To set speed: Press and release
SET+ (6) at desired speed, cruise
control indicator on instrument
cluster illuminates, hold
(6) to accelerate
To decelerate: Press and hold
CST– (7), release at desired
speed; or tap brake pedal, press
and release (6) at desired speed
Incremental deceleration: Press
and release (7), each tap =
minus 1 mph
60
40
80
80
40
120
160
100
200
MPH
km/h
120
1
PASS
AIRBAG
OFF
RES
Turn signals/headlight
high beams/wiper/
washer lever
High beams on/off: Push
forward to detent/pull back
To flash high beams: Pull
rearward and release
To turn on wipers: Rotate knob
forward; first 7 detents are
progressively faster intervals,
8th detent is low speed,
9th is high
To activate washers: Push
in end of knob; will also
operate wipers
Passenger Air Bag Off
indicator
Front passenger sensing system
is designed to turn off passenger
frontal air bag when a low
weight is detected, a person of
adult size that is sitting properly
in the passenger front seat will
enable passenger frontal air bag
The front passenger air bag will
also be deactivated if the sensor
detects an empty seat
PASS AIR BAG OFF indicator (1)
will be illuminated to remind you
the passenger air bag is deactivated
Incremental acceleration: Press
and release (6), each tap =
plus 1 mph
To cancel: Tap brake/clutch
pedal or push OFF button (8)
Return to preset speed
(after braking): Press and
release RES (resume) button (5)
Fuel pump
shutoff
Disables fuel pump
after a substantial
jolt or collision;
located under righthand side of glove box, just
above carpet
To reset: Press down top of
exposed red reset button (9)
WARNING: Do not reset
shutoff switch if you see
or smell fuel
9
See Owner’s Manual for
complete details and warnings
WARNING: If PASS AIR BAG
OFF light goes on or off or
stays off unexpectedly, please
see Owner’s Manual for
various ways this system may
indicate a false reading
Tire Pressure Monitoring
System (TPMS)
Warning light illuminates on
instrument cluster for a few
seconds with ignition on
If tire pressure is low, warning
light illuminates, adjust tire
pressure to correct specifications,
perform tire pressure adjustment
before driving, a digital tire
pressure gauge is recommended
Flashing warning light may
indicate malfunction, dealer
inspection required
*Denotes optional equipment
Always check the Owner’s Manual for more operating information and safety features
Getting
Started
Instrument
Cluster
INSTRUMENT CLUSTER
1
2
3
C
3
4
E
H
2
5
F
60
4
2
40
5
80
80
1
0
20
6
x1000r/min
0
7
4x4
LOW
9
8
120
40
160
0
100
200
MPH
120
4x4
7
6
GAUGES
1. Tachometer
2.
Turn signals/
hazard warning on
3. Engine coolant
temperature gauge
If above normal range, stop
truck and turn off engine;
check coolant level when safe
4. Fuel gauge
Regular Cab:
16.5-gallon/62.5-liter tank
CabPlus4:
19.5-gallon/73.8-liter tank
5. Speedometer
6. Gearshift indicator* (A/T)
7. Trip odometer
reset button
Push to reset
8. Odometer
9. Trip odometer
WARNING LIGHTS
•
High beams on
•
Engine coolant
temperature
High engine coolant
temperature; stop truck
and turn off engine; check
coolant level when safe
•
Charging system
warning light
Dealer inspection required
•
Cruise control*
Illuminates when cruise control
is engaged, see Getting Started
•
•
•
•
Foglamps* on
•
Check engine
Dealer inspection required
•
•
Check fuel cap
Fuel cap not securely tightened
Low fuel
Tire Pressure
Monitoring System (TPMS),
see Getting Started
•
Anti-lock Brake
System (ABS)
ABS malfunction, normal brakes
only, dealer inspection required
Brake system
Indicates parking brake on
or low brake fluid level, if
brake fluid level is low, have
vehicle inspected by nearest
Mazda Dealer
Door ajar
Door not completely shut
•
•
Overdrive off
indicator* (A/T)
When lit, transmission does
not shift into overdrive
Anti-theft on*
4x4
• 4x4 / LOW 4X4 HIGH/
4X4 LOW Indicator*,
see Transmission
•
Air bag readiness
Air bag malfunction; dealer
inspection required
•
Engine oil pressure
Immediately stop truck and
turn off engine; check oil level
•
Always fasten
safety belts
Light and chimes
*Denotes optional equipment
Always check the Owner’s Manual for more operating information and safety features
Instrument
Cluster
Locks
LOCKS
AU
TO
CK
LO
UN
CK
LO
Key
Operates ignition and all locks
Immobilizer system*
Prevents engine from running
unless coded key is used; see
Owner’s Manual
Tip: If coded key is lost or
stolen, new coded key will
need to be programmed at
an authorized dealer
1
Keyless
remote
entry
system*,
see Getting
Started
3
4
1
AU
TO
2
Power window switches*
Operate only with ignition
in ACC or ON position
Both windows may be controlled
from driver’s door; passenger
door has separate switch
Driver’s window (1): One
touch-down; press and release,
window goes all the way
down; tap front of switch to
stop; press and hold top of
switch to close
Passenger window switch (2): Press
bottom/top of switch to open/close
Dual power mirrors*
To adjust left/right mirror:
Press control switch (3)
left/right, tilt knob (4) in
direction of desired mirror
movement
Tip: To lock mirrors in place,
move control switch (3) to
center position
Courtesy/
reading
lamps*
Courtesy lamp
illuminates
when any door
is opened,
instrument panel dimmer switch is
rotated upward past detent or
remote entry is used with ignition off
Tip: Battery saver shuts
off dome lamp after 5
minutes with ignition off
Power door locks*
Front door lock switches
To lock/unlock both doors: Press
bottom/top on either door switch (1)
To lock doors without key, exit
the vehicle, press lock on either
door, close the door
To unlock: Use key to unlock
either front door, open door
and press top of switch to
unlock other door
Manual door locks will override
power locks
WARNING: Never leave
a child in car with key
in the vehicle
Headlamp control
= Headlights off
= Tail, parking and
dashboard lights on:
Rotate knob to first notch
= Tail, parking, dashboard
and headlights on: Rotate knob
to second notch
= Foglamps* on: Pull lighting
switch towards you; indicator
light will illuminate
*Denotes optional equipment
Always check the Owner’s Manual for more operating information and safety features
Switches/
Lights
Seats
SEATS
Shoulder belt
height
adjustment
To raise belt:
Slide adjuster up
To lower belt:
Push release
button (1) and
slide down
Seats
1. Fore/aft adjustment
Raise lever and hold, slide
seat, release lever
2. Seatback angle
To adjust: Lift and hold lever,
lean forward or backward
to tilt seat, release lever
1
WARNING: Make
sure adjuster
locks in one of
its positions
2
WARNINGS: Do not adjust
seats while driving
Safety belts must always be
worn when vehicle is in motion
All air bags are supplemental
and do not replace safety
belt usage
Always wear your safety
belt and properly secure
children in age appropriate
child restraints
1
Safety belt emergency
locking mode
Belts lock only on hard
acceleration, braking, cornering
or impacts of about 5 mph
or more
Automatic locking mode
(front passenger safety
belt only)
Must be used when installing
child-safety seat
To activate: Pull webbing fully
out of retractor, allow belt to
retract until click is heard; belt
will only tighten
To disengage: Unbuckle belt and
allow webbing to retract fully
Child-safety seat
To install, use dual-locking mode
retractor safety belts; see Owner’s
Manual for proper installation
and child seat tether and
LATCH system instructions
WARNINGS: Use age
appropriate child restraints,
see Owner’s Manual and
state or province laws
If you must install a frontfacing child-seat, put it in the
outboard seat and slide it all
the way rearward and ensure
that the PASSENGER AIR BAG
OFF indicator is illuminated,
this signifies that the passenger
air bag has been deactivated
For CabPlus4 vehicles,
do not put child restraints
in the center facing jump seats,
for complete details see
Owner’s Manual
Always check the Owner’s Manual for more operating information and safety features
Seats
Audio
Systems
AM/FM STEREO/COMPACT DISC
9
13 7 18
12
CD
VOL-PUSH ON
AM-FM
1
CLK
4
8
SEEK
1
2
2
AUDIO
3
4
AM/FM Stereo
1. Power/Volume
Press to turn on/off; turn
clockwise/counterclockwise
to increase/decrease volume
2. AUDIO
Press to select Bass, Treble,
or Balance; then press
AUDIO/
to adjust
5
7
3
6
CLK
1
4
MUTE
VOL-PUSH
SCAN
11
8
AM FM AUX
MENU
SEEK/TRACK
10
TUNE
REW
FF
REPEAT
16
17
15
1
2
3
4
SHUFF
5
6
14
AM/FM Stereo/CD*
6. Tune
Press / to change
frequency down/up
Press and hold to move
down/up quickly
7. AM/FM
Press to select AM/FM1/FM2
frequency bands
8. Memory preset buttons
3. Clock
To set: Tune to station, press
Press CLK to set time; adjust
and hold until sound returns
hour up/down by pressing
(2), (6); press CLK
/
9. CD
again to select minutes, adjust
Press to select CD
minutes up/down by pressing 10. MENU
(2), (6); press CLK
/
Press MENU to toggle through
to switch display between
following modes; Autoset,
clock and frequency
Bass, Treble, Balance, and
4. SEEK/TRACK
Fade; press
to adjust
/
Radio: Press and release /
Autoset
for next strong station down/up;
Press
to set 6
/
press and hold to skip stations
strongest stations into AM, FM1,
CD: Press and release /
or FM2 memory buttons; press
to select previous/next track
again to return to normal stations
5. MUTE
11. SCAN
Press to mute playing media;
Press to briefly sample next
press again for normal volume
listenable selections, press again
to cancel; functions in all modes
12. Eject
Press to eject CD; radio
resumes playing
13. CD slot
14. Shuffle
Press to play CD changer* single
disc tracks in random order
15. REPEAT
Press to repeat current
CD track
16. REW
Reverse in CD track
17. FF
Advance in CD track
18. AUX
Press to access AUX modes;
NO AUX AUDIO will be
displayed if no auxiliary
devices are available
Satellite Radio* equipped:
Press AUX to cycle through
SAT1, SAT 2 and SAT 3
Satellite radio is available only
in the continental United States
with a valid SIRIUS subscription,
see Owner's Manual
*Denotes optional equipment
Always check the Owner’s Manual for more operating information and safety features
Audio
Systems
3
5
6
Audio
Systems
AM/FM STEREO/COMPACT DISC
3 4 5
6
1. Volume Push On
Press to turn on/off; turn
AM FM AUX
CD
clockwise/counterclockwise
LOAD
7
2
to increase/decrease volume
VOL-PUSH
2. LOAD
8
CLK
1
Press to load one CD or auto
MUTE
9
10
load up to six discs
20
SEEK/TRACK
TUNE/DISC
SCAN
MENU
3. AM/FM
11
19
Press to select radio and alternate
18
among AM/ FM1/ FM2 bands
1
2
3
4
5
6
4. AUX
17
16
15
14
13
12
Press to access AUX modes; NO
Premium AM/FM Stereo/CD6/MP3*
AUX AUDIO will be displayed if
no auxiliary devices are available 11. MENU
17. REW
5. CD
Press MENU to toggle through
Press and hold to play
Press to select CD mode or play CD
following modes; Autoset,
previous disc tracks
6. CD slot
Bass, Treble, Balance, and Fade; 18. Memory preset
press
to adjust
/
7. Eject
buttons 1–6
Autoset
Press once to eject current CD
To set: Tune to station,
Press
to set 6 strongest
/
Press and hold to eject all
press and hold until
stations into AM, FM1, or FM2
stored discs one at a time
sound returns
memory buttons; press again
Press once, then press desired
to return to normal stations
number 1-6 (18) to eject a CD
REW
8. Clock
Press CLK to set time;
adjust hour up/down by
pressing /
(10); press
CLK again to select minutes,
adjust minutes up/down
by pressing / (10);
press CLK to display time
with ignition off
9. MUTE
Press to mute playing media;
press again for normal volume
10. TUNE/DISC
Radio: Press / to change
frequency down/up
CD: Press / to select
previous/next disc
Hold for rapid movement
MP3: Access previous/next
directory
12.
13.
14.
15.
16.
FF
REPEAT
COMP
SHUFF
TEXT
Next/previous directory
19. Scan
Previous or next MP3 directory;
Radio: Press to briefly
Press /
sample listenable stations
Flat file/directory mode
CD/MP3: Press to briefly
To select; press
/
sample tracks
Track number/normal music
Press again to stop
/
name/file name: Press
20.
SEEK/TRACK
TEXT
Radio: Press / for next
Press to view next 12 characters
listenable station down/up
in MP3 music name/file name of
CD: Press / to select
current MP3 track and directory
previous/next track
Shuffle
Press to select SHUFFLE which
Satellite Radio* equipped:
plays random tracks from
Press AUX to cycle through
CD/MP3 discs
SAT1, SAT 2 and SAT 3
COMP
Satellite radio is available only
Press to combine loud and
in the continental United States
soft passages
with a valid SIRIUS subscription,
REPEAT
see Owner's Manual
Press to repeat CD/MP3 track
FF
Press and hold to play next
disc tracks
*Denotes optional equipment
Always check the Owner’s Manual for more operating information and safety features
Audio
Systems
Transmission
TRANSMISSION
1
Automatic transmission*
Gearshift must be in Park or
Neutral to start engine; it
must be in Park to remove
ignition key
P = Park
To move gearshift from Park:
You MUST press firmly on the
brake pedal and the ignition
must be in the ON position
Never put moving vehicle
in Park
Always apply parking brake
when exiting the vehicle
Manual
transmission
Depress clutch
pedal completely
to start engine
2 4 R
and change
gears; stop
truck completely before shifting
into reverse
Tip: Extended use of other than
manufacturer’s specified tires
on a limited-slip rear axle* may
result in damage, this may not
affect normal driving and may
not be noticeable by the driver
1
3
5
R = Reverse
Do not engage Reverse when
vehicle is moving forward
N = Neutral
No gear is engaged; vehicle
can roll freely, even on a
slight incline, unless the
brakes are applied
D (Overdrive)
For normal driving: Shifts
through all forward gears
automatically for more relaxed
highway driving and optimum
fuel economy
Tip: Torque converter lock-up
improves fuel economy and
can feel like an additional gear
D (Overdrive Off)
Press (1) to disengage
overdrive; an indicator light
on the instrument cluster
will illuminate
2H
4H
4L
4-wheel drive system*
2H (2WD) = Two-wheel drive
Power to rear axle only, 4X4
indicator lights off
4H (4x4 HIGH) = Four-wheel drive
Power to front and rear axles
at normal speed, 4X4 light on
4L (4x4 LOW) = Four-wheel drive
(low range)
Power to front and rear axles
at reduced speed, 4X4 LOW
light on
Driving without overdrive provides
a lower gear for climbing hills and
engine braking when descending
hills; you can depress (1) at
any speed
To re-engage overdrive, press
(1) again and the instrument
cluster light will go out
Tip: A flashing Overdrive
Off light indicates a system
malfunction; dealer
inspection required
2 = Second
To aid in accelerating on slippery
roads, place vehicle in second and
vehicle will start from a standstill
in second gear, second will also
provide additional engine braking
at low speed on downgrades
1 = Low
Low provides maximum
engine braking at low speed
on steep downgrades
To shift from 2WD to 4X4
HIGH: Rotate switch from
2WD to 4x4 HIGH
To shift from 4X4 HIGH to 2WD:
Rotate switch from 4x4 HIGH
to 2WD
Tip: You do not need to shift
into reverse to disengage
front hubs
To shift into/out of 4X4 LOW:
Stop vehicle, depress brake,
place automatic transmission in
neutral (with manual transmission,
depress clutch pedal); rotate
switch to desired setting
Tip: Pulsation may occur during
cornering in 4X4 mode
*Denotes optional equipment
Always check the Owner’s Manual for more operating information and safety features
Transmission
Climate
Control
CLIMATE CONTROL
OFF
A/C
MAX
A/C
1
1. Fan control
To increase speed and flow:
Rotate knob clockwise
2. Temperature selection
Cooler/warmer = rotate
knob counterclockwise/
clockwise
2
3
3. Air flow selections
= air to dash vents,
A/C compressor* off
OFF = system off, no air flow
= air to dash/floor vents,
A/C compressor* on
= air to floor,
A/C compressor* off
= air to floor and
windshield,
A/C compressor* on
= defrost, air to
windshield,
A/C compressor* on
Air conditioning
system*
MAX A/C = cooling with
inside air, air to dash only
A/C = cooling with
outside air, air to dash only
Control positions for
maximum defrost
Fan to maximum, temperature
to maximum hot, air flow
selector knob to
Tips: To prevent moisture
buildup, never drive with
system off
When
, or
selected,
air is dried when temperature
is above 50° F
A/C compressor* is on in
defrost position
*Denotes optional equipment
Always check the Owner’s Manual for more operating information and safety features
Climate
Control
Under Hood
UNDER HOOD
11
12
9
4
2
8
3
6
5
10
5
6
10
12
13
11
9
8
4
3
13
7
1
7
2
1
2.3-Liter Engine
3.0-Liter Engine
6
5
10
12
13
7
2
9
11
8
4
3
1
4.0-Liter Engine
1. Hood latch
7. Battery
Pull inside hood release handle, 8. Windshield washer
hood pops up slightly; while
reservoir
applying upward pressure on
Fill with windshield washer
hood, lift auxiliary latch handle
fluid, not water; use fluids
and raise hood
containing non-methanol
2. Radiator or reservoir cap
antifreeze agents only, they
Remove cap only when safe
will not damage paint, wiper
and engine is cool
blades and washer system
3. Air filter
9. Engine oil filler cap
Use SAE 5W-20 (2.3L, 3.0L)
4. Engine coolant reservoir
5W-30 (4.0L) oil for all
Level should be at fill line
temperatures; use only oils
indicator mark; remove cap only
displaying American
when safe and engine is cool
Petroleum Institute Certified
WARNING: Never remove
for Gasoline Engines
coolant reserve tank cap
10. Brake fluid reservoir
while engine is running or
Clean filler cap before
hot; you could get burned
removing; use only DOT 3
5. Clutch fluid reservoir
fluid from a sealed container
With cap on, check that fluid
level is at ridge in reservoir
If brake fluid level is low,
body, use DOT 3 brake fluid
have vehicle inspected by
your closest Mazda Dealer
6. Fuse block
11. Automatic
transmission fluid
dipstick*
Check with engine on at
normal operating temperature;
fluid should be within
crosshatched area on dipstick
12. Engine oil dipstick
Check with engine off and
at normal temperature; fluid
should be within crosshatched
area on dipstick; do not fill
above MAX line
13. Power steering
fluid reservoir
Check with engine off and at
normal temperature; fluid level
on dipstick should be between
arrows in FULL HOT range
*Denotes optional equipment
Always check the Owner’s Manual for more operating information and safety features
Under Hood
Driving Tips
DRIVING TIPS
Break-in period
First 1,000 miles: Avoid heavy
repeated brake use; avoid full
throttle, rapid acceleration or
kick-down of transmission; drive
at varying road and engine speeds
Do not tow a trailer for first
500 miles
Do not use special “break-in” oils
Tip: Follow the same break-in
period procedures with newly
overhauled engine or when
brakes are replaced
4-wheel Anti-lock Braking
System (ABS)
ABS automatically reduces
hydraulic pressure to all four
wheels (4-wheel ABS) on the
verge of locking up
NORMAL
5,000 miles
SPECIAL
E
15,000 miles
A
F
30,000 miles
A B
G H
45,000 miles
A
60,000 miles
A B C
75,000 miles
A
90,000 miles
A B
100,000 miles
D
I
J
You may feel a slight pulsing
of the brake pedal and hear a
clicking noise, this tells you the
ABS is functioning properly
Tips: Maintain constant
pressure on the brake pedal
Do not pump the brakes
ABS self test
A self-diagnostic test is
performed when the engine is
started; you may feel some
pulsation and hear some
noise; this is normal
Tire economy and tips
Check pressure monthly when
tires are cold
Check for unusual wear and
overall condition, do not exceed
weight limit on tires and axles
Maintain correct front-end alignment
and tire balance; see Owner’s
Manual for rotation chart
Tire pressure
Decal on the edge of the
driver’s door provides tire
size and pressure information
Tire chains*†
Tire chains can damage aluminum
wheels; use on steel wheels only
Tips: Use only SAE class “S”
chains, install only on rear tires;
install as tightly as possible
and retighten periodically
Never exceed 30 mph with
tire chains
Special operating
Change engine oil/replace filter
conditions
every 3,000**/5,000 miles
Towing, extensive idling, low
Check lug nut torque every
speed driving, dusty conditions
5,000 miles, for tire rotation
and off-road operation, see
intervals, see Owner’s Manual
Owner’s Manual
Normal operating conditions
A. Inspect: Engine cooling system, E . Inspect: Brake system
F . Replace: Fuel filter
hoses and clamps, steering
linkage, suspension, brake system G. Change: Automatic
transmission fluid
Inspect/lubricate: 4x2 ball
H. Lubricate: Front wheel
joints, caliper slide rails
bearings (4x2)
B. Replace: Air filter/fuel filter
I . Change: Transfer case fluid (4x4)
Inspect: Exhaust system,
J . Replace: Spark plugs
automatic transmission
fluid level
Perform maintenance as required
Inspect/lubricate: U-joints, clutch
C. Lubricate: 4x2 wheel bearings
fluid level
D. Inspect: Accessory drive belt(s)
Replace: Manual transmission fluid Replace: Engine air filter
Change: Manual transmission fluid
Replace: Spark plugs
Replace: PCV valve†
*Denotes optional equipment
(2.3L/3.0L/4.0L)
**Special operating conditions
Change: Yellow engine coolant † See Owner’s Manual
Always check the Owner’s Manual for more operating information and safety features