1
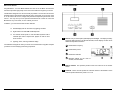
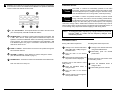
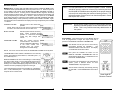
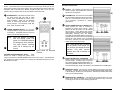
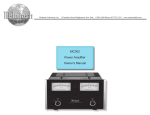
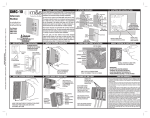
M&S SYSTEMS
Model MC302
Musical Intercom System
Owner's Guide
Copyright © 2001 M&S Systems
This booklet contains the information you need to get the most from your musical
intercom system. It also tells you what to do if your system develops operating
problems, and contains applicable statements of warranty. Keep this booklet for future
reference.
CONTENTS
About Your System . . . . . . . . . . . . . . . . . . . . . . . . . . . . . . . . 1
Controls and Features . . . . . . . . . . . . . . . . . . . . . . . . . . . . . .
Display . . . . . . . . . . . . . . . . . . . . . . . . . . . . . . . . . . . . . .
Master speaker . . . . . . . . . . . . . . . . . . . . . . . . . . . . . . . .
Intercom . . . . . . . . . . . . . . . . . . . . . . . . . . . . . . . . . . . . .
Controls . . . . . . . . . . . . . . . . . . . . . . . . . . . . . . . . . . . . .
1, 2, 3, and 4 buttons . . . . . . . . . . . . . . . . . . . . . . .
SOURCE button . . . . . . . . . . . . . . . . . . . . . . . . . . .
TUNE +/– buttons . . . . . . . . . . . . . . . . . . . . . . . . . .
POWER button . . . . . . . . . . . . . . . . . . . . . . . . . . . .
2
2
2
2
3
3
3
3
3
Tuning Radio Stations . . . . . . . . . . . . . . . . . . . . . . . . . . . . . . 4
Automatic Tuning . . . . . . . . . . . . . . . . . . . . . . . . . . . . . . 4
Manual Tuning . . . . . . . . . . . . . . . . . . . . . . . . . . . . . . . . 4
Using Memory Presets . . . . . . . . . . . . . . . . . . . . . . . . . . . . . 4
Storing radio station frequencies . . . . . . . . . . . . . . . . . . 4
Recalling radio station frequencies . . . . . . . . . . . . . . . . 4
Adjusting the Sound . . . . . . . . . . . . . . . . . . . . . . . . . . . . . . . 5
MENU buttons . . . . . . . . . . . . . . . . . . . . . . . . . . . . . 5
Optional Hand-Held RF Remote Control . . . . . . . . . . . . . . . .
Programming . . . . . . . . . . . . . . . . . . . . . . . . . . . . . . . . .
Operation . . . . . . . . . . . . . . . . . . . . . . . . . . . . . . . . . . . .
SOURCE button . . . . . . . . . . . . . . . . . . . . . . . . . . .
TUNING UP/DOWN buttons . . . . . . . . . . . . . . . . . .
VOLUME UP[ON]/DOWN[OFF] button . . . . . . . . . .
6
6
7
7
7
7
Room Station Features . . . . . . . . . . . . . . . . . . . . . . . . . . . . .
Speaker . . . . . . . . . . . . . . . . . . . . . . . . . . . . . . . . . . . . .
VOLUME knob . . . . . . . . . . . . . . . . . . . . . . . . . . . . . . . .
UP/ON - DOWN/OFF buttons . . . . . . . . . . . . . . . . . . . .
ROOM LISTEN button . . . . . . . . . . . . . . . . . . . . . . . . . .
ROOM TALK button . . . . . . . . . . . . . . . . . . . . . . . . . . . .
MONITOR button . . . . . . . . . . . . . . . . . . . . . . . . . . . . . .
DOOR TALK button . . . . . . . . . . . . . . . . . . . . . . . . . . . .
8
8
8
8
8
8
8
9
Operating the Intercom . . . . . . . . . . . . . . . . . . . . . . . . . . . . .
Calling other rooms . . . . . . . . . . . . . . . . . . . . . . . . . . . .
Listening to other rooms . . . . . . . . . . . . . . . . . . . . . . . . .
Hands free communication . . . . . . . . . . . . . . . . . . . . . .
Communicating with the door . . . . . . . . . . . . . . . . . . . . .
Monitoring rooms . . . . . . . . . . . . . . . . . . . . . . . . . . . . . .
9
9
9
9
9
9
Troubleshooting Tips . . . . . . . . . . . . . . . . . . . . . . . . . . . . . . 10
Warranty Information . . . . . . . . . . . . . . . . . . . . . . . . . . . . . . 11
ABOUT YOUR SYSTEM
CONTROLS AND FEATURES
Congratulations! Your new Model MC302 is a state of the art Music and Intercom
Center that provides high quality music and communication throughout your house.
The MC302 is designed to be as user friendly as possible. The remote scan intercom
speakers and the optional hand-held remote control, each allow you to turn the music
on or off, select music source, change radio presets and adjust the system wide music
volume. You may use up to four optional hand-held remote controls to control the
MC302 from any room inside, or even outside your home.
In addition, your new musical intercom also features:
#
backlit display that can be read in any lighting condition
#
digital radio tuner with 8AM and 8FM presets
#
two external audio inputs for use with M&S Systems' built-in
cassette tape and/or compact disc players as well as other
music sources
#
1
lightning, static, and surge resistant design
Your MC302 is designed to make your home more functional and enjoyable. Prepare
yourself for a more satisfying home living experience.
1
DISPLAY Easy to read Liquid Crystal Display with backlight. The display normally
shows the radio frequency for AM and FM radio, but the display can also show
additional important information.
A
Radio station frequency
B
Radio station preset
C
Radio band indicator
D
Bargraph display for the level of
volume, bass and treble
2
MASTER SPEAKER This speaker provides music and intercom at the master
station.
3
INTERCOM These controls operate the intercom feature of the MC302. These
buttons operate whether the power is on or off.
2
4
CONTROLS These buttons are used to operate the various features of the MC302.
Some of these functions are available from the N65RS room speakers, NRC65RS
remote controls and wireless remote control.
TUNING RADIO STATIONS
AUTOMATIC
TUNING
The TUNE +/– buttons are momentarily pressed to scan radio
frequencies, until the next strong station is found. The audio is muted
and the displayed frequency changes during this automatic tuning.
Once the MC302 locks onto a strong station, it will stop scanning.
The TUNE +/– buttons are pressed and held, to perform manual
tuning of the radio. After about 1 second of holding a TUNE button,
the MC302 will go into the manual mode. The displayed frequency
changes and the audio plays at each frequency. The frequency
continues to change until the TUNE button is released. The manual tuning is used to
select a station that is not strong enough to be picked up by the automatic search, or
to scan through many frequencies without stopping on each strong station.
MANUAL
TUNING
A
1, 2, 3, and 4 buttons - These preset buttons are used to save and recall
your most frequently used FM and AM radio stations.
B
SOURCE button - This button is used to select the audio source (FM 1, FM
2, AM 1, AM 2, AUX or TAPE inputs) which the MC302 will output to the
speakers. Each time the SOURCE button is momentarily pressed the audio
source changes. The active source is displayed on the LCD display. Note:
If the MCD6 compact disc player is connected to the MC302, the source
AUX will be shown as CD.
C
D
E
TUNE +/– buttons - These buttons are used to scan up/down through the
FM or AM radio stations.
VOLUME +/– buttons - These buttons are used to change the volume.
(See ADJUSTING THE SOUND on page 5.)
NOTE: To change the radio frequency by a single increment, press and
hold the TUNE +/– button until the frequency changes, then
immediately release.
USING MEMORY PRESETS
Storing radio station frequencies
1
Change to the desired radio band
(FM1, FM2, AM1 or AM2), using the
SOURCE button.
2
Tune the radio to the desired
station.
3
Press and hold a preset button until
the preset number is displayed.
POWER button - This button is used to turn the MC302 music ON and OFF.
Example: Save a radio station in band
FM2, preset 3.
Note: The intercom is always on.
1
3
Press the SOURCE button to
change to FM2.
2
Tune the radio to the desired
station.
3
Hold the 3 button until a 3 appears
as the preset number.
4
Recalling radio station frequencies
1
Change to the desired radio band,
using the SOURCE button.
2
Momentarily press the desired
preset button.
Example: Recall the radio station saved
in band AM1, preset 2.
1
Press the SOURCE button to
change to AM1.
2
Momentarily press the 2 button.
ADJUSTING THE SOUND
NOTE: For best performance, the individual speaker volume controls
should be turned to maximum volume (fully clockwise) and then
the VOLUME UP/DOWN buttons adjusted for the proper listening
volume (this is really setting the maximum listening volume). The
individual speaker volume control can then be adjusted in rooms
that require less volume.
MENU buttons - Pressing both VOLUME buttons together enables the MENU mode.
The MENU mode operates differently when the power is off or on. When the power is
off, the MENU mode selects either INTERCOM VOLUME, SPEAKER VOLUME or
monitor enable functions. Pressing the two VOLUME buttons together, alternately
selects between the three modes. The selected function is indicated on the display and
it may be adjusted by the VOLUME +/– buttons. When the power is on, the MENU
mode steps through the following functions MUSIC VOLUME, SPEAKER VOLUME,
BASS, TREB (Treble), LOUD (Loudness) and then back to MUSIC VOLUME. Again,
the selected function is indicated on the display and it may be adjusted by the VOLUME
+/– buttons.
IMPORTANT: Do not set the "system volume" to a high number and then
adjust all individual speaker volume controls down to low
levels. This is very inefficient and may add distortion to
the system.
SPEAKER VOLUME
Sets the level of the master unit
speaker.
NOTE: Each room has its own volume control which can
be used to turn down the audio level for that room.
MUSIC VOLUME
INTERCOM VOLUME
Sets the system level for the music
audio. Either a Remote Scan
speaker or a hand-held remote
control may also change this
volume.
OPTIONAL HAND-HELD RF REMOTE CONTROL
Sets the volume level for
communications. The intercom
volume is adjusted independent
of the music volume and
generally does not require
change from the initial setting.
STEP 1 The MC302 must be put into its test mode by
PROGRAMMING - Upon initial power up of the MC302, the unit
must be programmed or taught the unique code that is
present in the REMOTE CONTROL TRANSMITTER.
momentarily pressing the VOLUME +
and
SOURCE buttons at the same time. The display
on the MC302 should show TEST.
NOTE: The music must be OFF before the INTERCOM VOLUME can be adjusted.
STEP 2 Now press the TUNING UP button on the
The MONITOR function enables or disables the room monitor
feature. This feature is turned either on, indicated by the '+', or
off, indicated by the '–'.
REMOTE CONTROL TRANSMITTER until the
display flashes SAVE twice. The MC302 has now
learned the TRANSMITTER.
BASS and TREB are two tone control settings. These settings
are used to either boost or cut the appropriate frequencies to
optimize the music quality. The bar graph indicates a cut by
starting in the middle and displaying segments to the left, and
indicates a boost by displaying segments to the right.
STEP 3 If more than one transmitter is to be used with the
system, press a different button for each
TRANSMITTER to be programmed.
STEP 4 The test mode is exited by momentarily pressing
The LOUD (loudness) function is turned either on, indicated by
the '+', or off, indicated by the '–'. This function boosts the bass
response at low volume levels.
the VOLUME + and POWER buttons at the same
time.
Hand Held RF
Remote Control
5
6
OPERATION - Your HAND HELD REMOTE CONTROL is an RF (radio frequency)
device. This means that it will work anywhere in or around your house (you do not
have to be in the same room as the master). The system also has a unique code in the
transmitter that is learned by the MC302, virtually ensuring that no one else can
interfere with your system and you will not interfere with anyone else.
1
2
SOURCE button - This button is used to select
the audio source (FM, AM, AUX or TAPE
inputs) which the MC302 will output to the
Music Speakers. Each time the SOURCE
button is momentarily pressed, the audio
source changes. The sequence is FM, AM,
AUX, TAPE, and back to FM.
A
Speaker - This speaker provides music and
intercom output. This speaker also serves as
the intercom microphone.
B
VOLUME knob - This control is used to adjust
the output level of both the intercom and music.
Note: It is recommended to keep this control
set at maximum (clockwise) for optimum
performance.
C
UP/ON - DOWN/OFF buttons (N65RS only) These buttons are used to increase or
decrease the system music volume. These
buttons can also be used to turn the MC302
ON and OFF. These buttons also provide
radio preset tuning and source select functions.
Momentarily pressing both the MUSIC
VOLUME UP and DOWN buttons at the same
time will perform a scan function which will step
through the radio presets. Once all presets
have been scanned, the radio station band
and/or music source will change.
TUNING UP/DOWN buttons - To go to the
next preset station, simply press the UP button
momentarily. The MC302 will tune in the next
station from the last stationed tuned.
Note:
3
ROOM STATION FEATURES
When the MC302 is installed
with the MCD6 6-disc CD
player, the UP/DOWN buttons
will change the track selection.
This track function operates
when CD is selected as the
source.
Note: When the MC302 is installed
with the MCD6 6-disc player, the
scan function will change the track
selection. This track function
operates when CD is selected as
the source.
Hand Held RF Remote
Control
VOLUME UP[ON]/DOWN[OFF] button - These
buttons are used to change the system music
volume. Pressing the VOLUME DOWN button reduces the volume. The MC302 will
turn off when the volume reaches zero. Pressing the VOLUME UP button turns the
MC302 ON if it is OFF.
7
N65RS room station
D
ROOM LISTEN button (N65/N65RS) - This
button is used for listening to the other rooms
and the master. To listen to other rooms and
N34M room station
the master hold the ROOM LISTEN button in.
Release the ROOM LISTEN button when you
are finished listening. NOTE: This feature is not available at the N34M station.
E
ROOM TALK button - This button is used for talking to the other rooms and to
the master. To talk to other rooms and the master hold the ROOM TALK button
in while talking in the direction of the speaker. Release the ROOM TALK button
when you are finished talking.
F
MONITOR button (N34Monly) - This button when pressed allows the room
station to be used as a monitor input. This feature allows for easy continuous
monitoring of an infant or those requiring special care.
8
G
DOOR TALK button - This button is used for talking to visitors at the door.
Release this button to listen to the door. To end the door communication,
momentarily press the ROOM TALK or wait approximately 25 seconds.
OPERATING THE INTERCOM
Calling other rooms
To talk to someone in another room, hold in the ROOM TALK button. Release the
ROOM TALK button when you are finished talking.
Listening to other rooms
To listen to other rooms, hold in the ROOM LISTEN button. Release the ROOM
LISTEN button when you are finished listening.
Hands free communication
To get the maximum benefit from this Hands Free system, make it a house rule that
whoever initiates a call will always follow up by pressing the ROOM LISTEN button.
This allows someone to respond to the call without getting up or stopping their current
activities.
Communicating with the door
To talk to someone at the door speaker(s) hold the ROOM LISTEN and ROOM TALK
buttons or DOOR TALK on the N34M. Release the ROOM LISTEN and ROOM TALK
buttons when you are finished talking. The MC302 will automatically listen to the person
at the door for approximately 25 seconds. The 25 second listening time can be
canceled by momentarily pressing either the ROOM LISTEN or the ROOM TALK button
by itself.
Monitoring rooms
The monitor function is only available with N34M stations. To monitor a room, press in
the locking MONITOR button. Monitor must be enabled at the MC302 master, see
page 5. Rooms in monitor mode cannot hear any communications from other rooms.
9
TROUBLESHOOTING TIPS
System squeals when
TALK or LISTEN buttons
are pressed
Make sure room station volume controls are set to
maximum and reduce intercom volume at the MC302
master unit.
Cannot MONITOR rooms
This feature is only available on the N34M station.
Make sure the MONITOR button is pushed in.
The monitor fuction must be enabled at the MC302
master.
Static noise is heard while
listening to music
Disable the monitor function at the MC302 master.
(see page 5)
Door chime volume at the
master is too high or too
low
Adjust the volume setting on the chime unit behind
the MC302 master.
Door chime is heard only at
the master
Turn the room stations up (clockwise)
Wireless remote control no
longer operates the
system.
Dead batteries in transmitter - Replace with two
CR2032 or equivalent batteries.
For technical troubleshooting support, contact your installer or visit our web site at
www.mssystems.com
M&S Systems
2861 Congressman Lane
Dallas, TX 75220
10
WARRANTY INFORMATION
M&S Systems Limited 2-Year No-Fault Product Warranty
M&S Systems warrants for 2 years all products to be free of defects (M&S Systems honors the 10-Year NoFault warranty for AirVac Gold power units. See section below). The warranty period begins from either
(1) the date of “first user” purchase of this product or (2) the first close of escrow date on a residence in
which this new product was originally installed. This warranty extends to the original user of the product
and to each subsequent owner of the product during the term of this warranty. M&S Systems will repair
or replace, at its option, parts and materials at no charge. Parts supplied under this warranty may be new
or rebuilt at the option of M&S Systems.
If, during the limited warranty period, it appears as though this product contains a defect which is
covered by this limited warranty, call our toll free service number before dismantling the product
(1-800-877-6631). Remember to attain a Return Authorization Number (RAN) before returning any
product to M&S Systems. Send this product freight pre-paid and insured to our service center for
warranty repair. You will be advised on shipping instructions when you call the toll free service
number. M&S Systems will return the repaired product freight pre-paid within the U.S.A. The
installing dealer or distributor may assist you, at your choice and expense, with returning product
for repair. Please include a brief description of the problem and a dated proof-of-purchase receipt
with any product that is returned for warranty repair. ANY PRODUCT RETURNED WITHOUT A
RETURN AUTHORIZATION NUMBER WILL BE REFUSED.
Distributed by:
This limited warranty is in lieu of any other warranties, express or implied, including any implied
warranty of merchantability or fitness for a particular purpose or otherwise, and of any other
obligations or liability on the seller’s part. This limited warranty does not cover damage caused by
improper installation, the violation of applicable building or electrical codes or the use of nonM&S/non-AirVac wire (excluding structured wire packages), cable (excluding structured wire
packages) or wall housings. This limited warranty applies only to products installed in a private
residence.
Under no circumstances shall the seller be liable for consequential, incidental or special damages arising
in connection with use, or inability to use this product. In no event shall seller’s liability, for breach of
warranty, breach of contract, negligence, or strict liability, exceed the cost of the product covered hereby.
No person is authorized to assume for us any other liability in connection with the sale of this product.
Some states do not allow the exclusion or limitation of consequential, incidental or special damages, so the
above limitation or exclusion may not apply to you. This limited warranty gives you specific legal rights,
and you may also have other rights which vary from state to state.
"%!!
115844 Rev 11
Printed in U.S.A.