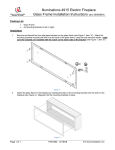
1
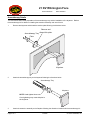
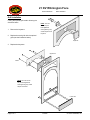
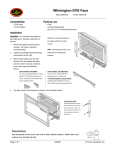
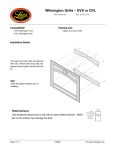
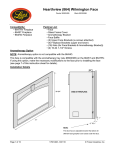
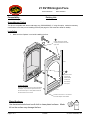
21 DV Wilmington Face
Pewter 98500340
Compatibility:
Black 98500341
Packing List:
• 21DV Fireplace
• Face
Aromatherapy Option
This face is compatible with the aromatherapy tray (SKU 98500385). If using this option, make the necessary
modifications to the face prior to installing the face (see page 2 of this instruction sheet for details).
Installation
!
Make sure the fireplace is cool while installing the face.
b
Lift and rotate the face forward
until the top brackets lock into the
upper slots.
36-3/4”
a
Tilt the face back
and insert the
bottom brackets
into the lower
slots until they
lock in place.
PLATED SURFACES:
Make sure the plated surfaces are clean before starting
the fireplace. Any marks left on plated surfaces may
22-1/8”
become etched in place. Clean plated surfaces with
denatured alcohol and a soft cloth.
The bottom of the face is 1-1/4” below the
base of the fireplace when installed.
Plated Surfaces
Use denatured alcohol and a soft cloth to clean plated surfaces. Marks
left on the surface may damage the face.
Page 1 of 3
8/19/05
Denatured
Alcohol
Soft Cloth
© Travis Industries, Inc.
21 DV Wilmington Face
Pewter 98500340
Black 98500341
Aromatherapy Details
The instructions below detail preparation of the aromatherapy tray and the installation of the keystone. Refer to
the aromatherapy kit for details on installing the extension assembly and use of the kit.
1
Remove the keystone and discard the retainer plate following the directions below.
Remove and
Aromatherapy Tray
discard this plate.
Plate
Keystone
2
Attach the aromatherapy tray to the keystone following the directions below.
Aromatherapy Tray
Keystone
NOTE: Hand-tighten these nuts.
Over-tightening may create dimples in
the keystone.
3
Attach the extension assembly to the fireplace following the directions included with the aromatherapy kit.
Page 2 of 3
8/19/05
© Travis Industries, Inc.
21 DV Wilmington Face
Pewter 98500340
Black 98500341
Grill Installation
If using the optional grill install it following the
directions below.
NOTE: The nuts
should only be
hand-tightened.
1
Remove the keystone.
Over-tightening may
create dimples in the
keystone.
2
Replace the stock grills with the optional
grills (see the illustration below).
Keystone
3
Replace the keystone.
Upper Grill
T-Nuts
NOTE: The nuts should
only be hand-tightened.
Over-tightening may create
dimples in the face.
Lower Grill
Page 3 of 3
8/19/05
© Travis Industries, Inc.