1
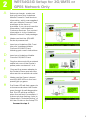
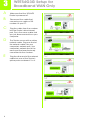
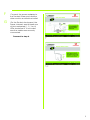
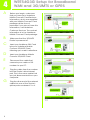
®
A Division of Cisco Systems, Inc.
Package Contents
• Wireless-G Router for 3G/UMTS Broadband
• Setup CD-ROM
• Quick Installation Guide
• User Guide on CD-ROM
• Power Adapter
• 2 x RJ-45 Ethernet Cables
24
, GHz Wireless-G
802.11g
Router for 3G/UMTS Broadband
Wireless
Quick Installation Guide
Quick Installation Guide
Model
No.
WRT54G3G
(EU)
Model No.
1
1
A
Configuring the WRT54G3G via
the Setup Wizard
Insert the Setup CD-ROM into
your CD-ROM drive. The Setup
Wizard should run automatically
and the Welcome screen should
appear. If it does not, click Start
and then Run. In the field
provided, enter
D:\WRT54G3G.exe (if “D” is the
letter of your CD ROM drive).
The Setup Wizard automatically
detects the operating system’s
country setting and selects the
Wizard language according to it.
You can manually select the
desired language via the dropdown menu.
B
C
D
2
A
Click Next to begin the setup
process.
Press Click Here to Start to start
the setup process. Click User
Guide to go to the User Guide, or
click Exit to stop the setup
process.
Click the appropriate radio
button:
a. 3G/UMTS or GPRS Only for
use of the Router with
3G/UMTS or GPRS Service,
proceed to step 2.
b. Broadband WAN Only for
use of the Router with a
broadband cable/DSL
network, proceed to step 3.
c. Broadband WAN and
3G/UMTS or GPRS for use of
the Router with both network
types, proceed to step 4.
C
D
2
A
B
C
D
E
F
G
H
WRT54G3G Setup for 3G/UMTS or
GPRS Network Only
Before you begin, make sure
that you have your Vodafone
Mobile Connect Card Services
information, which was supplied
with your Mobile Connect Card
package at the time of
purchase. If you do not have this
information, call Vodafone
Customer Services. The contact
information is in the Vodafone
Mobile Connect Card package.
Make sure that the 3G/UMTS
Router is powered off.
Insert your Vodafone SIM Card
into your Vodafone Mobile
Connect 3G/UMTS Card,
following your card’s instructions.
D
Insert your Vodafone Mobile
Connect 3G/UMTS Card.
Plug the other end of the network
cable into one of the Router’s
yellow ports numbered 1 to 4.
Connect the power adapter to
the Router's Power port and the
other end to an electrical outlet.
E
Make sure the Power, Internet
and 3G/UMTS LEDs on the front
panel light up green.
The Power LED will flash green for
a few seconds when the Router
goes through its self-diagnostics
test. This LED will stay solidly lit
when the self-test is complete. If
it does not stop flashing, refer to
“Appendix A: Troubleshooting” of
the User Guide on the Setup CD.
F
Proceed to step 5.
3
3
A
B
C
D
E
WRT54G3G Setup for
Broadband WAN Only
Make sure that the 3G/UMTS
Router is powered off.
Disconnect the cable that
connects your cable or DSL
modem to your PC.
Plug the cable from the modem
into the Router’s blue Internet
port. This is the same cable that
you just disconnected from your
computer.
The Router comes with a yellow
network cable. Plug one end of
the network cable into your
computer's network port. Your
computer's network port is the
same port that was previously
connected to the modem.
Plug the other end of the network
cable into one of the Router’s
yellow ports numbered 1 to 4.
B
C
D
E
4
F
G
Connect the power adapter to
the Router's Power port and the
other end to an electrical outlet.
On the Router's front panel, the
Power, Internet, and at least one
of the numbered (1, 2, 3 or 4)
LEDs should be lit. If not make
sure the cables are securely
connected.
Proceed to step 6.
F
G
5
4
A
B
C
D
E
F
G
WRT54G3G Setup for Broadband
WAN and 3G/UMTS or GPRS
Before you begin, make sure
that you have your Vodafone
Mobile Connect Card Services
information, which was supplied
with your Mobile Connect Card
package at the time of
purchase. If you do not have this
information, call Vodafone
Customer Services. The contact
information is in the Vodafone
Mobile Connect Card package.
D
Make sure that the 3G/UMTS
Router is powered off.
Insert your Vodafone SIM Card
into your Vodafone Mobile
Connect 3G/UMTS Card,
following your card’s instructions.
Insert your Vodafone Mobile
Connect 3G/UMTS Card.
E
Disconnect the cable that
connects your cable or DSL
modem to your PC.
Plug the cable from the modem
into the Router’s blue Internet
port. This is the same cable that
you just disconnected from your
computer.
F
Plug the other end of the network
cable into one of the Router’s
yellow ports numbered 1 to 4.
G
6
H
I
J
Plug the other end of the network
cable into one of the Router’s
yellow ports numbered 1 to 4.
Connect the power adapter to
the Router's Power port and the
other end to an electrical outlet.
On the Router's front panel, the
Power, Internet, and at least one
of the numbered (1, 2, 3 or 4)
LEDs should be lit. If not make
sure the cables are securely
connected.
H
Proceed to step 5.
I
J
7
5
A
B
Configuring the Vodafone
3G/UMTS or GPRS Service
If the Mobile Connect Card is
not inserted or recognized, you
will be prompted to insert a
Vodafone Mobile Connect
3G/UMTS Card. If you wish to
configure the Router without your
Vodafone Mobile Connect
3G/UMTS Card, proceed to step
7; otherwise, insert a Vodafone
Mobile Connect 3G/UMTS Card
with the SIM card already
inserted, and proceed to step B.
If a SIM card is not inserted into
the Vodafone Mobile Connect
3G/UMTS Card, the message in
Figure B will be displayed, and
you will be prompted to check
that the SIM card is correctly
inserted. Click the OK button.
If you wish to configure the
Router without a SIM card,
proceed to step 7; otherwise,
insert the SIM card into your
Vodafone Mobile Connect
3G/UMTS Card, and proceed to
step C.
C
A
B
The vendor ID and firmware
version settings are checked. If
your Vodafone Mobile Connect
Card needs to be upgraded, the
screen shown in Figure C will be
appear. Follow the on-screen
instructions.
C
8
D
Based on the SIM country
settings, the following information
will be displayed:
a. Home Network
b. Service
c. 3G/UMTS/GPRS connection
d. APN
e. Username (country
dependent)
f. Password (country
dependent)
g. Pin code (SIM card
dependent)
D
Choose:
• the required Service option.
• the required Connect
method.
E
The selected settings are
displayed, as shown in Figure E.
Click Confirm and follow the
appropriate instructions:
• Vodafone 3G/UMTS Only proceed to step7.
• Broadband WAN Only or
Broadband WAN and
3G/UMTS or GPRS - Proceed
to step 6.
E
9
6
Configure the Broadband WAN
Service (Internet Port)
NOTE: If the Internet connection type
you use is not listed here, keep the default,
Cable (DHCP) for now, and click the Next
button. After you have completed the Setup
Wizard, you will use the Router’s Webbased Utility to configure the Internet
connection type settings. Refer to the User
Guide on the Setup CD-ROM for
instructions.
A
B
C
D
Static IP. If your ISP assigns you a
static IP address, select Static IP
from the drop-down menu.
Complete the Internet IP
Address, Subnet Mask, Gateway,
and DNS fields. You need to
enter at least one DNS address.
PPPoE. If you are connecting
through PPPoE, select PPPoE from
the menu. Complete the User
Name and Password fields. Enter
the password again the Confirm
field.
Cable (DHCP). If you are
connecting through DHCP or a
dynamic IP address from your ISP,
keep this default setting. If you
want to make changes to the
default DHCP setting, select the
appropriate Internet type and
complete the requested fields. If
you are unsure about these
settings, do not change them.
A
B
C
Click Save to save your settings.
Proceed to step 7.
D
10
7
A
Configuring the Password
Setting
Create a new password and
enter it in the new Password field.
Re-enter the password in the
Confirm field.
Proceed to step 8.
A
11
8
A
Configuring the Wireless Settings
Wireless Network Name (SSID).
The SSID is the network name
shared among all points in a
wireless network. The SSID must
be identical for all points in the
wireless network. It is casesensitive and must not exceed
32 characters (use any of the
characters on the keyboard).
Make sure this setting is the same
for all points in your wireless
network. For added security, you
should change the default SSID
(linksys) to a unique name.
Channel. Select the appropriate
channel from the list provided to
correspond with your network
settings. All devices in your
wireless network must broadcast
on the same channel in order to
function correctly.
Proceed to step 9.
12
A
9
A
B
WRT54G3G Setup for 3G/UMTS
or GPRS and Broadband WAN
Choose one of the listed wireless
security options:
a. Disable
b. WEP (64-Bit)
c. WEP (128-Bit)
d. WPA-Personal
Based on the selection you
made in step A, the
corresponding Wireless Security
Settings screen will appear.
Complete the requested fields
by following the instructions on
the setup screens.
If you selected WEP (64- or 128Bit), use the passphrase option to
automatically generate the WEP
key. You can also enter the WEP
key manually.
C
D
E
If you selected WPA-Personal,
enter the passphrase (also called
the WPA key).
B
C
If you selected Disable in step A,
a warning message will appear.
The new wireless settings will be
displayed. After you have saved
your settings, proceed to step
10. If you did not save the new
settings, you will be redirected to
step 9A.
D
E
13
10
Congratulations!
Congratulations! The installations of
the Wireless-G Router for
3G/UMTS Broadband is complete.
Register the Router online by clicking
Online Registration.
For additional information or troubleshooting help,
refer to the User Guide on the Setup CD-ROM. You
can also call or e-mail for further support.
VODAFONE
Vodafone Germany
Vodafone Greece
Vodafone Ireland
Vodafone Italy
Vodafone New Zealand
Vodafone Portugal
Vodafone Spain
Vodafone Sweden
Vodafone UK
Vodacom (South Africa)
0800-172-1234
800 11 127 127
1800 30 80 20
800-227755
0800 800 021
800 91 0 200
607 100 122
020-222 222
08700 746 464
082155
LINKSYS
Website
http://www.linksys.com/international
Product Registration
http://www.linksys.com/registration
Linksys is a registered trademark or trademark of
Cisco Systems, Inc. and/or its affiliates in the U.S.
and certain other countries. Copyright © 2005
Cisco Systems, Inc. All rights reserved.
WRT54G3G-EU-QIG-50819NC JL
14