1
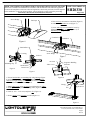
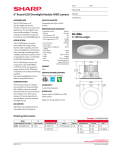
READ AND UNDERSTAND THESE INSTRUCTIONS BEFORE INSTALLING FIXTURE INSTRUCTION SHEET NO.
This fixture is intended for installation in accordance with the National Code and local regulations.
To assure full compliance with local codes and regulations, check with your local electrical inspector
before installation. To prevent electrical shock, turn off electricity at fuse box before proceeding.
Page 1 0f 2
Retain these instructions for maintenance reference.
INSTRUCTIONS FOR INSTALLATION OF AGILI-T FIXTURES
SH20330
T-Bar
Support to Building
Structure
1/4-20 Screw
Suspension Kit
Mounting Clip
Figure 1
Canopy
Figure 2
1. Install mounting clip on T-Bar (Figure 1) and insert canopy onto suspension kit (Figure
2). Fasten Power Feed Suspension Kit or regular Suspension Kit to 1/4-20 screw
provided (Figure 2). Attach clips to upper deck when required by local code by inserting
support to building structure through the supplied holes (Figure 3).
Plastic End Cap
Figure 3
Aircraft Cable
Plunger
Mechanism
Aluminum
Joiner
Figure 4
Figure 5
Power Feed
Connection
2. Install luminaire temporarily by inserting die-cast aluminum joiner mechanism at the end of aircraft cables (Figure 5).
into plastic end cap of fixture (Figure 4). Manually plug in power feed connection (plus 2 extra communication cables for
Agili-T Network) when installing single luminare or first of a row (Figure 5).
3. Adjust height using aircraft cable plunger mechanism (Figure 5). Adjust level by sliding Aluminum Joiner sideways as
needed (Figure 4). Final level adjustment can be performed before or after installing end-cap or next luminaire in a row.
525 Education Road, Cornwall K6H 6C7
Tel:(613)938-6221 Fax:(613)938-0961
Page 1
Rev.01
READ AND UNDERSTAND THESE INSTRUCTIONS BEFORE INSTALLING FIXTURE INSTRUCTION SHEET NO.
This fixture is intended for installation in accordance with the National Code and local regulations.
To assure full compliance with local codes and regulations, check with your local electrical inspector
before installation. To prevent electrical shock, turn off electricity at fuse box before proceeding.
Page 2 0f 2
Retain these instructions for maintenance reference.
INSTRUCTIONS FOR INSTALLATION OF AGILI-T FIXTURES
SH20330
Screw Wedge
End-Caps
4. Place end-caps at luminaire extremities (Figure 6)
or connect next luminaire in row (Figure 7).
5. Secure end-caps or next luminaire in row by
tightnening two screw wedges (Figure 6-7) of
aluminum joiner (Figure 4).
Luminaire 1
Luminaire 2
Figure 6
Junction Box
Screw Wedge
Lancing
#8 Screw
Figure 7
#8 Screw
Mounting Clip
Figure 8
Bushing
Strain Relief
Power Feed
Support to Building
Structure
J-Box Cover
Figure 9
6. Locate Junction Box on mounting clip using lancings (Figure
8) and secure from inside with #8 screw provided. Pull power
feed wire through bushing into J-Box, secure with strain relief
and make electrical connections (Figure 9).
7. Install J-Box cover using #8 screw provided and secure J-Box
to building structure as per local building codes (Figure 10).
Figure 10
Canopy
Set Screw
Tile
8. Notch (1-1/2" x 1-1/2" max) and place tile (Figure 11).
9. Secure canopy using set screw provided (Figure 11).
Figure 11
525 Education Road, Cornwall K6H 6C7
Tel:(613)938-6221 Fax:(613)938-0961
Page 2
Rev.01