Transcript
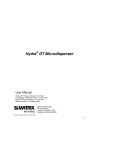
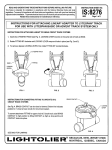
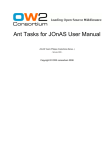
INSTRUCTION
SHEET
NO.
IS:8626
!NSTRUCTIONSFOR INSTALLATIONOF
L~EDROP FIXTURE
1189
FOR USE WITH 8600 SERIES POWER JACKS ONLY
READ AND UNDERSTAND THESE INSTRUCTIONS BEFORE INSTALLING FIXTURE.
This fixture is intended for installation
in accordance with the National Electrical Code and local regulations.
To assure full compliance with local codes and regulations, check with your local electrical inspector before
installation. To prevent electrical shock, turn off electricity at fuse box before proceeding.
Retain these Instructions for maintenance
reference.
MOUNTING
1. If used with POINT POWER JACK #8605, use the cap marked “35W MAX’ If used with other POWER
JACKS, make certain that the STEM BUSHING is removed from the POWER JACK ENTRY (Fig. 2).
2. Screw the JACK ASSEMBLY
fully into the POWER JACK (Fig. 2).
INSTRUCTIONSFOR LAMPING
CAUTION: MAKECERTAIN
THATTHELYTEDROP FIXTURE IS COOL BEFORE HANDLING. SINCE THE IAMP
HENS QUICKLY, MAKE SURE THAT THE POWER IS DISCONNECTED
INTO THE LAMP SOCK=.
1, SEPARATE
Lift the GLOBE ASSEMBLY (with STYLE JACK SHADE) while
the LAMP SOCKET ASSEMBLY (Fig. 1).
rotating
BEFORE INSERTING
to the LE~
until it
LAMP
is released from
2, lN~ALL LAMP
CAUTION: DO NOT TOUCH THE IAMP WITH BARE HANDS.
Oils from the hands could reduce L4MP life. Use tissue paper or a soft cloth. Insert the LAMP into the
SOCKET holes as far as it will go. Pins will be exposed approximately
h“ outside of the SOCKET when
fully enaaaed.
No ~olarity. of Dins is required.
.3. REASSEMBLE
(Fig. 2).
POWER JACK ENTRY
~35wMAx.cAp
o
NOTE: Lamp replacement:
Tungsten-Halogen,
T-4
Bi-Pin 6.35 base 35W mex
JACK ASSEMBLY
-/II
LAMP SOCKET
I
/
‘SSEMBLY
I
LAMP (SEE NOTE)
GLOBE ASSEMBLY
STEM 1[
/
\
‘--------
FIG.
FIG. 1
TO SEPARATE
NOTE: THE STEM HAS A
CONCEALED FLEX TO
ABSORB IMPACT.
TO REPLACE
69
OR
STEM BUSHING
REMOVED