Transcript
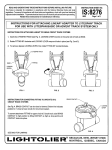
r
READ AND UNDERSTANDTHESE INSTRUCTIONSBEFOREINSTALLINGFIXTURE
“his fixture is intended for installation in accordana+with the National Electrical Code and local
emulations. To assure full compliance with local codes and regulations, check with your local electrical
mpectorbefore installation. To prevent electrical shock, turn off electricity at fuse box before proceeding.
Retain these instructions for maintenance reference.
INSTALLATION
INSTRUCTION SHEET NO.
IS:1029
0892
PROCEDURE OF LYTECASTER 1029 SERIES REFLECTOR
IN THE 1000PI FRAME-IN KIT
TRIMS
WARNING: READ MARKINGSIN TRIMTO DETERMINELAMP
WAllAGE AND TYPE,ALWAYS USE CORRECTLAMP.
1. FRAME-IN
SeeFrame-In Kit Instruction Sheet for installation procedure.
2. ROTATE
ROTO-CLIPS
(Fig. A)
Rotate (3) ROTO-CLIPS so that the short legs extend inwardly toward the
center opening.
3. TRIM INSTALLATION
A. Inserl SOCKET SPRING into SLOTS in neck of REFLECTOR. (Fig. B)
B. Push REFLECTOR TRIM straight up into ceiling opening until it is tight
against ceiling.
C. Lamp fixture with recommended lamp wattage and type. (See wattage
label,)
D. Vertical adjustment can be done by inserting a screwdriver into slot in
YOKE, and using it as a lever, tilting the YOKE to the desired angle.
(Fig. C.)
E. Horizontal adjustment can be done by rotating LAMP/YOKE to desired
position.
NOTE:To remove Reflector Trim, turn Reflector Trim counterclockwise
while pulling downward.
10OOP1 also accepts the following reflector Trims: 1005, 1008, 1010, 1011,
1012,1013, 1013BK, 1013WH, 1021,1022, 1023,1024,1035,1045,
1046,
1071, 1076, 1076WH, 1078, 1082, 1085, Rotate ROTO CLIPS so that the
LONG LEGS extend inwardly toward the center opening.
WARNING: USE ONLY WITH FRAME-INKITS PROVIDEDBY
LIGHTOLIERINC. USE OF OTHERMANUFACTURERS’FRAMEIN KITS VOIDSTHE UNDERWRITERSLABORATORIESLISTING
AND COULDCONSTITUTEA FIRE HAZARD.
LONGLEG
(w[thReturn)
SHORT LEG
\$
~
ROTOCLIP (4)
\ ]:_
FIG. A
1-
I
<>1-1
i<>
14 E la” ~i’%?~;::y~:::!