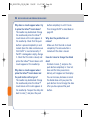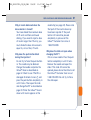
1
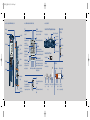
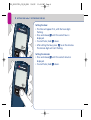
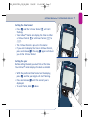
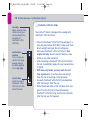
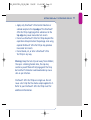
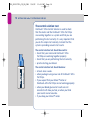
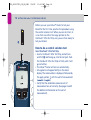
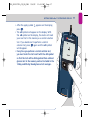
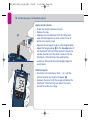
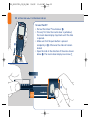
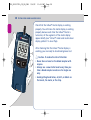
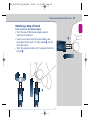
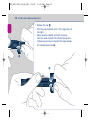
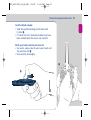
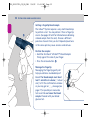
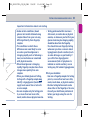
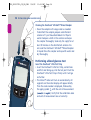
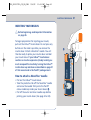
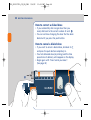
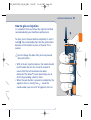
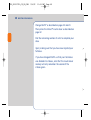
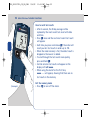
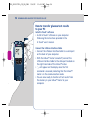
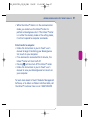
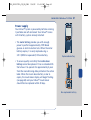
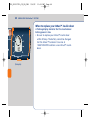
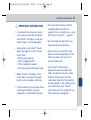
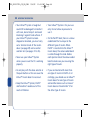
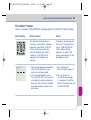
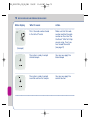
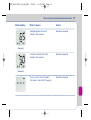
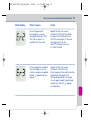
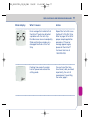
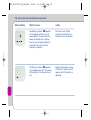
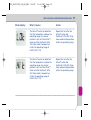
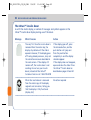
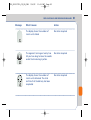
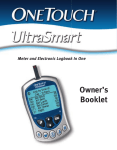
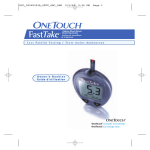
DCO_06153701A_ID_OBC_CAN
9/6/02
11:34 AM
Page 1
2
Manufactured by:
Diagram of the InDuo™ System and accessories
LifeScan Inc.
Milpitas, California 95035, U.S.A.
© LifeScan / Novo Nordisk 2002
Revision date: 06/02
Look at the diagram of the InDuo™ System inside this cover for the names of
the different parts of the system. You can unfold the diagram to help you while
you follow the instructions.
InDuo™ SYSTEM AND ACCESSORIES
OneTouch®
UltraClear™ Cap
for alternate puncture site
OneTouch® UltraSoft™
Sterile Lancet
Combined blood glucose
monitoring and
insulin dosing system
InDuo™
Blood Glucose Meter
User manual
OneTouch® Ultra
Control Solution
OneTouch® Ultra
Test Strips
OneTouch® UltraSoft™
Adjustable Blood Sampler
The InDuo™ System should only be used in combination with products that are
compatible with it and allow the InDuo™ System to function safely and effectively.
OneTouch® Ultra Test Strips are designed to be used with the InDuo™ blood
glucose meter.
Penfill® 3 ml cartridges and NovoFine® needles are designed to be used with the
InDuo™ insulin doser.
Innovo®, NovoFine®, Novolin-Pen® 3, Penfill® and w are trademarks owned by
Novo Nordisk A/S and used by Novo Nordisk Canada Inc. under licence.
InDuo™, In Touch®, OneTouch®, UltraClear™, UltraSoft™ and Penlet®
are trademarks owned by Johnson & Johnson and used by LifeScan Canada Ltd.
InDuo™
Insulin Doser
NovoFine® 8 mm needles
(10-pack sample included in kit)
Penfill® 3 ml
Insulin cartridge
(not included)
DCO_06153701A_ID_OBC_CAN
9/6/02
11:34 AM
Page 2
InDuo™ BLOOD GLUCOSE METER AND INSULIN DOSER
InDuo™ METER AND INSULIN DOSER DISPLAY SYMBOLS
Data port
Ctl
Ketones?
OneTouch® UltraSoft™ Adjustable Blood Sampler
Test port
Indicates a control solution
test result.
Appears when a blood glucose test
result is above 13.3 mmol/L.
Release button
Code
Mem
Cap
Appears with the code
number of the
OneTouch® Ultra Test
Strip currently in use.
Indicates a test result stored in the
memory.
Meter display
Dose selector
LOT number
Slide
M button
Test results are displayed here.
(A decimal point appears when the unit
of measurement is millimoles per litre.)
Tells when to apply
the sample.
Window
Battery symbol
Piston rod
Appears when the meter
battery power is low or
must be replaced.
C button
Insulin doser
display
Deep puncture
Indicator mark
Puncture depth
setting knob
Unit of measurement
Month Day Hour Minutes
The meter has been pre-set in either
mmol/L or mg/dL. Confirm that the
unit of measurement is correct when
the apply symbol appears during
blood application.
The segments indicate the
time passed since delivery.
1 segment represents 1 hour.
Confirms that the delivery has been
completed.
Dose
Shows the number of insulin units
dialed.
OneTouch® Ultra
Test Strip
Top edge
Confirmation
window
Shallow puncture
OneTouch® UltraSoft™ Lancet
Contact bars
Protective disk
NovoFine®
Penfill® 3 ml
6 mm or 8 mm w
Rubber membrane
White bar code band
Rubber
stopper
Circle
Time segment
Push button
Release button
Ejection / Cocking control
Test result area
Apply symbol
Residual scale
InDuo™ COMPONENTS
Outer needle
cap
Inner
needle
cap
Needle
Protective
tab
Colour-coded
cap
Colourcoded
band
Glass ball
(for insulin
suspensions only)
DCO_06153701A_ID_OB_CAN
9/6/02
11:36 AM
Page 3
3
CONTENTS
Welcome
Getting your InDuo™ System ready for use
Preparing your InDuo™ meter
Preparing your InDuo™ insulin doser to inject insulin
Testing your blood glucose levels
Injecting your insulin
Using the InDuo™ memory functions
Checking your previous test results
Checking your previous injection
Viewing blood glucose test results on a personal computer
Comparing the InDuo™ meter and laboratory results
Caring for your InDuo™ System
Important information
Display messages and problem-solving guide
The InDuo™ meter
The InDuo™ insulin doser
Specifications
The InDuo™ meter
The InDuo™ insulin doser
Guarantee
Blood glucose value targets
4
5
5
21
27
41
51
51
54
55
58
60
65
68
69
82
88
88
89
89
90
DCO_06153701A_ID_OB_CAN
9/6/02
11:36 AM
Page 4
4
WELCOME
You have chosen the InDuo™ System,
designed to simplify the way you manage
your diabetes. Featuring an integrated blood
glucose meter and insulin doser, InDuo™
System will enable you to check your blood
glucose levels and administer insulin using
one compact system. This manual contains
instructions for using, storing, and looking
after your InDuo™ System. Read it carefully.
Your InDuo™ meter provides you with
accurate, plasma calibrated test results.
This feature makes it easier for you and your
doctor to compare your meter results with
laboratory results. The InDuo™ meter is
designed for use only with OneTouch® Ultra
Test Strips.
Your InDuo™ insulin doser provides you with
state-of-the-art insulin delivery including a
memory to tell you how much you injected,
and how long ago you made your injection.
By combining meter and insulin doser into
one, the InDuo™ System helps you simplify
your insulin therapy and increase your
confidence in managing your diabetes.
A warranty registration card is included with
your InDuo™ System. Please complete it and
mail it to us. Or if you prefer you may
complete the warranty card online by visiting
our Web site www.InDuo.ca. If you have any
questions or need to change your address
please call us at 1 888 729-2299.
We are sure that you will find the InDuo™
System simple and easy to use. Before using
the InDuo™ System, see Important
Information on page 65.
The InDuo™ meter is intended for use
outside the body (in vitro diagnostic use).
It should be used only for testing glucose
(sugar) and only with fresh capillary whole
blood samples. It should not be used for the
diagnosis of diabetes or for the testing of
newborns.
DCO_06153701A_ID_OB_CAN
9/6/02
11:36 AM
Page 5
GETTING YOUR InDuo™ SYSTEM READY FOR USE
GETTING YOUR InDuo™ SYSTEM
READY FOR USE
Preparing your InDuo™ meter
Setting the time, date and unit of measurement
Your InDuo™ meter comes with pre-set values for
the time, date, and unit of measurement. However,
you can reset these if you need to change the date
or time, or if you remove the meter battery. Since
the InDuo™ meter also gives average values
(14 days and 30 days) for your blood glucose tests
(see page 53), you may find that changing the date
and time will also alter the values for the 14-day
and 30-day averages. To set the time, date and unit
of measurement, you must first enter the setting
mode on the InDuo™ meter display.
Enter the setting mode
• Press and hold down ˛ for 3 seconds.
• The InDuo™ meter is now in the setting mode
and you are ready to change the time using the
meter display.
5
DCO_06153701A_ID_OB_CAN
6
9/6/02
11:36 AM
Page 6
GETTING YOUR InDuo™ SYSTEM READY FOR USE
Setting the hour
• The time will appear first, with the hour digits
flashing.
• Press and release Ñ until the correct hour is
displayed.
• To scroll faster, hold Ñ down.
• After setting the hour, press ˛ to set the minutes.
The minute digits will start flashing.
Setting the minutes
• Press and release Ñ until the correct minute is
displayed.
• To scroll faster, hold Ñ down.
DCO_06153701A_ID_OB_CAN
9/6/02
11:36 AM
Page 7
GETTING YOUR InDuo™ SYSTEM READY FOR USE
Setting the time format
• Press ˛ and the 12-hour format Ä will start
flashing.
• Your InDuo™ meter can display the time in either
a 12-hour format ¸ or a 24-hour format | to
‹.
• The 12-hour format is pre-set in the meter.
• If you wish to display the time in 24-hour format,
press and release Ñ. Pressing Ñ again will return
you to the 12-hour format.
Setting the year
Before setting the date you must first set the time.
Your InDuo™ meter displays the date as mm/dd.
• With the preferred time format on the display,
press ˛ and the year digits will start flashing.
• Press and release Ñ until the correct year is
displayed.
• To scroll faster, hold Ñ down.
7
DCO_06153701A_ID_OB_CAN
8
9/6/02
11:36 AM
Page 8
GETTING YOUR InDuo™ SYSTEM READY FOR USE
Setting the month
• Press ˛ and the date will appear on the display
with the month display flashing.
• Press and release Ñ until the correct month is
displayed.
• To scroll faster, hold Ñ down.
Setting the day
• Press ˛ and the day setting will start flashing.
• Press and release Ñ until the correct day is
displayed.
• To scroll faster, hold Ñ down.
DCO_06153701A_ID_OB_CAN
9/6/02
11:36 AM
Page 9
GETTING YOUR InDuo™ SYSTEM READY FOR USE
Selecting the unit of measurement
• With the correct day on the display, press ˛
and the current unit of measurement will start
flashing.
• Your meter has been preset to fi which
is the unit of measurement generally used in
Canada. It should be changed only at the
recommendation of your healthcare professional.
• You can determine if the meter has been
accidentally reset to the wrong unit of
measurement by looking at a test result on the
display. Either Á or fi will appear with
the result. Also, a test result in fi will have
a decimal point.
• If the unit is incorrect or has been changed, press
Ñ to select the correct unit. If the unit is correct,
just press the ˛ button to exit the setting mode.
The InDuo™ meter can display test results in
milligrams per decilitre (Á) or in millimoles per
litre (fi). The Á unit is the standard used
in the United States. The fi unit is the standard
used in Canada.
9
DCO_06153701A_ID_OB_CAN
10
9/6/02
11:36 AM
Page 10
GETTING YOUR InDuo™ SYSTEM READY FOR USE
Top edge
Apply a sample here,
where the narrow
channel meets the
top edge of
OneTouch® Ultra
Test Strip.
Confirmation
window
This is where you
confirm if a large
enough sample
has been applied
to the top edge.
Contact bars
Insert this end of
OneTouch® Ultra
Test Strip into the
InDuo™ meter.
æ OneTouch® Ultra Test Strips
Your InDuo™ meter is designed for use only with
OneTouch® Ultra Test Strips.
• Store the OneTouch® Ultra Test Strip package in a
cool, dry place below 30°C (86ºF). Keep away from
direct sunlight and heat. Do not refrigerate.
• Store your OneTouch® Ultra Test Strips in their
original vial only; do not transfer them to a new
bottle or any other container.
• After removing a OneTouch® Ultra Test Strip from
the vial, immediately replace the vial cap and close
it tightly.
• With clean, dry hands, you may touch the test
strip anywhere on its surface when removing it
from the vial or inserting it into the meter.
• Use each OneTouch® Ultra Test Strip immediately
after removing it from the vial.
• Write the discard date on the vial label when you
open it for the first time. Discard remaining
OneTouch® Ultra Test Strips and the vial 3 months
after the vial was first opened.
DCO_06153701A_ID_OB_CAN
9/6/02
11:36 AM
Page 11
GETTING YOUR InDuo™ SYSTEM READY FOR USE
• Apply only OneTouch® Ultra Control Solution or
a blood sample to the top edge of the OneTouch®
Ultra Test Strip. Applying other substances to the
top edge may cause inaccurate test results.
• Do not use OneTouch® Ultra Test Strips beyond the
expiration date printed on the package since using
expired OneTouch® Ultra Test Strips may produce
inaccurate test results.
• Do not bend, cut, or alter a OneTouch® Ultra
Test Strip in any way.
Warning: Keep the test strip vial away from children;
the cap is a choking hazard. Also, the cap may
contain a pouch filled with drying agents that may
be harmful if inhaled or swallowed and may cause
skin or eye irritation.
OneTouch® Ultra Test Strips are single use. Do not
reuse a test strip that has had a sample applied to it.
Refer to your OneTouch® Ultra Test Strip insert for
additional information.
11
DCO_06153701A_ID_OB_CAN
12
9/6/02
11:36 AM
Page 12
GETTING YOUR InDuo™ SYSTEM READY FOR USE
Coding your InDuo™ meter
Code numbers are used to calibrate the
OneTouch® Ultra Test Strips with the InDuo™ meter.
You must code the InDuo™ meter before using it for
the first time, and then every time you change to
another vial of OneTouch® Ultra Test Strips. Each time
you do a blood glucose test, check that the code
number on the meter display matches the code
number on the OneTouch® Ultra Test Strip vial.
æ Caution: If the code numbers do not match,
your blood glucose tests may be inaccurate.
(Example)
Entering the code mode for the first time
• Start with the InDuo™ meter turned off.
• Insert a OneTouch® Ultra Test Strip to turn on the
meter. Push the test strip in until it will go no
further.
• All segments of the meter display will appear.
When you first use the InDuo™ meter, 3 dashes Q
will appear, showing there is no code stored in the
meter memory.
If three dashes Q appear at any other time,
see page 69 of the Display Messages and Problem
Solving Guide.
DCO_06153701A_ID_OB_CAN
9/6/02
11:36 AM
Page 13
GETTING YOUR InDuo™ SYSTEM READY FOR USE
Match the code numbers
The calibration code is stored in the meter memory
until it is changed by the user. The current code
number will appear on the display for 3 seconds.
• Compare the code number on the meter display
with the code number on the OneTouch® Ultra
Test Strip vial.
• If the two code numbers match, you may begin
testing.
• If the code numbers do not match, follow the next
procedure to recode the InDuo™ meter.
Code the InDuo™ meter
• Press Ñ to select the correct code.
• Each time you press and release Ñ, the number
on the display will increase by one.
• To scroll faster, simply hold down Ñ.
• After you have selected the correct code number,
it will flash for 3 seconds and then appear solid for
3 seconds.
• The apply symbol R will appear with the unit of
measurement (fi or Á), indicating that
the InDuo™ meter is ready for testing.
13
(Example)
DCO_06153701A_ID_OB_CAN
14
9/6/02
11:36 AM
Page 14
GETTING YOUR InDuo™ SYSTEM READY FOR USE
The control solution test
OneTouch® Ultra Control Solution is used to check
that the meter and the OneTouch® Ultra Test Strips
are working together as a system and that you are
performing the test correctly. It is very important that
you do this simple test routinely to check that the
system is providing accurate test results.
The control solution test should be used to:
• check that your meter and OneTouch® Ultra
Test Strips are working together properly.
• check that you are performing the test correctly.
• practice testing your blood.
The control solution test should be done:
• at least once a week.
• when you begin using a new vial of OneTouch® Ultra
Test Strips.
• if you suspect that your InDuo™ meter or
OneTouch® Ultra Test Strips are not working properly.
• when your blood glucose test results are not
consistent with how you feel, or when you think
your results are not accurate.
• if you drop your InDuo™ meter.
DCO_06153701A_ID_OB_CAN
9/6/02
11:36 AM
Page 15
GETTING YOUR InDuo™ SYSTEM READY FOR USE
æ Caution:
• Use only OneTouch® Ultra Control Solution.
• Check the expiration date on the control solution
vial. Do not use if expired.
• Store control solution tightly closed at temperatures
below 30°C (86ºF).
• Do not refrigerate control solution.
• The control solution, the InDuo™ meter, and the
OneTouch® Ultra Test Strips should be at room
temperature 20-25ºC (68-77ºF) before testing.
• Shake the vial, discard the first drop of control
solution and wipe off the dispenser tip with
a clean tissue to obtain a good sample and an
accurate result.
• Use only for 3 months after the first opening.
Record the discard date (date opened plus 3 months)
on the control solution vial. Discard after 3 months.
• The control solution range printed on the
OneTouch® Ultra Test Strip vial is for
OneTouch® Ultra Control Solution only. It is used
to test meter and OneTouch® Ultra Test Strip
performance. It is not a recommended range for
your blood glucose level.
15
DCO_06153701A_ID_OB_CAN
16
9/6/02
11:36 AM
Page 16
GETTING YOUR InDuo™ SYSTEM READY FOR USE
a
Before you use your InDuo™ meter to test your
blood for the first time, practice the procedure using
the control solution test. When you can do 3 tests in
a row that are within the range printed on the
OneTouch® Ultra Test Strip vial, you are then ready to
test your blood.
How to do a control solution test
Insert OneTouch® Ultra Test Strip
• Insert a OneTouch® Ultra Test Strip, contact bars
end first a and facing up, into the test port. Push
the OneTouch® Ultra Test Strip in firmly until it will
go no further.
• The InDuo™ meter will turn on automatically.
• All segments will appear briefly on the meter
display. The code number is displayed, followed by
the apply symbol R with the unit of measurement
(fi or Á).
• Verify that the calibration code and unit of
measurement are set correctly. (See pages 5 and 9
for additional information on the unit of
measurement).
DCO_06153701A_ID_OB_CAN
9/6/02
11:36 AM
Page 17
GETTING YOUR InDuo™ SYSTEM READY FOR USE
• After the apply symbol R appears on the display,
press Ñ.
• The Ë symbol will appear on the display. With
the Ë symbol on the display, the meter will mark
your next test in the memory as a control solution
test. If you decide not to perform a control
solution test, press Ñ again and the Ë symbol
will disappear.
• Every time you perform a control solution test,
you must mark the test result with the Ë symbol
so that the test will be distinguished from a blood
glucose test in the memory and not included in the
14-day and 30-day blood glucose test averages.
17
DCO_06153701A_ID_OB_CAN
18
9/6/02
11:36 AM
Page 18
GETTING YOUR InDuo™ SYSTEM READY FOR USE
Apply control solution
• Shake the control solution vial well.
• Remove the cap.
• Squeeze the vial and discard the first drop and
wipe off the dispenser tip with a clean tissue to
obtain an accurate result.
• Squeeze the vial again to get a small hanging drop.
• Apply the hanging drop b to the top edge area of
the OneTouch® Ultra Test Strip (where it meets the
narrow channel) until the drop is drawn into the
OneTouch® Ultra Test Strip, the confirmation
window is filled, and the meter display begins to
count down.
b
c
Read test results
• The meter will count down from N to A and the
control solution test result will appear c.
• Compare the result with the range printed on the
OneTouch® Ultra Test Strip vial label. The result
should fall within this range.
DCO_06153701A_ID_OB_CAN
9/6/02
11:36 AM
Page 19
GETTING YOUR InDuo™ SYSTEM READY FOR USE
æ Caution
• If control solution test results fall outside the
range printed on the OneTouch® Ultra Test Strip
vial, repeat the test.
• If you continue to get control solution test results
that fall outside of the range printed on the vial,
the InDuo™ meter may not be working properly.
• Do not use the InDuo™ meter to continue testing
your blood if the control solution test results
continue to fall outside the expected range.
• If you are unable to resolve the problem please
call the InDuo™ Customer Care Line at
1 888 729-2299.
19
DCO_06153701A_ID_OB_CAN
20
9/6/02
11:36 AM
Page 20
GETTING YOUR InDuo™ SYSTEM READY FOR USE
The control solution test troubleshooting
There are several reasons why the results of a control solution test may fall
outside the expected range (as printed on the OneTouch® Ultra Test Strip vial label).
Probable reasons
Action
Error in performing the test
Repeat the test, closely following the
instructions on page 18
Improper coding of the meter
Check that the meter is coded correctly
Failure to shake the OneTouch Ultra
Control Solution vial vigorously
Shake the control solution vial and
repeat the test
Expired or contaminated
OneTouch® Ultra Control Solution
Please check the expiration date or use
another new control solution
InDuo™ meter, OneTouch® Ultra Control
Solution, or Test Strips that are too
warm or too cool
Check that the room temperature is
between 20-25°C (68-77°F)
Failure to discard the first drop of
OneTouch® Ultra Control Solution
Repeat the test
OneTouch® Ultra Test Strip
deterioration
Repeat the test with a new vial of test
strips. Remember to recode the meter
InDuo™ meter malfunction
Call the InDuo™ Customer Care Line
at 1 888 729-2299 for advice
®
DCO_06153701A_ID_OB_CAN
9/6/02
11:36 AM
Page 21
GETTING YOUR InDuo™ SYSTEM READY FOR USE
PREPARING YOUR InDuo™
INSULIN DOSER TO INJECT INSULIN
To use the InDuo™ insulin doser to inject your
insulin, you must first insert a Penfill® 3 ml cartridge,
attach a NovoFine® 6 mm or 8 mm needle and prime
the InDuo™ insulin doser.
How to load Penfill®
Before inserting a Penfill® 3 ml insulin cartridge check
that it is full and intact (e.g. no cracks). Do not use
Penfill® if any damage is seen, or if more of the
rubber stopper is visible than equal to the width of
the white bar code band.
If your Penfill® cartridge contains an insulin
suspension (cloudy insulin) such as Novolin®ge NPH or
Novolin®ge 30/70 you must first mix the insulin. To do
this hold Penfill® in your hand and carefully move
your arm up and down 10 times as shown in your
Penfill® package insert.
21
DCO_06153701A_ID_OB_CAN
22
a
9/6/02
11:36 AM
Page 22
GETTING YOUR InDuo™ SYSTEM READY FOR USE
To insert Penfill®:
• Pull out the InDuo™ insulin doser a.
• The very first time the insulin doser is pulled out,
the insulin doser display stays blank until the slide
is opened.
• Make sure that the push button is pressed
completely in b. Otherwise the slide will remain
locked.
• Open the slide in the direction of the arrow shown
below c. The insulin doser display now shows 0
c
b
b
DCO_06153701A_ID_OB_CAN
9/6/02
11:36 AM
Page 23
GETTING YOUR InDuo™ SYSTEM READY FOR USE
• Insert Penfill® into the InDuo™ insulin doser by
pushing it slightly backwards as shown d. The end
with the rubber stopper goes in first. Make sure
that the colour-coded cap fits firmly into place e.
• Close the slide completely f. The release button is
locked until the slide has been closed.
• You should keep the slide closed until it is
time to change Penfill®.
• See page 42 for what to do if the slide is
opened while the InDuo™ insulin doser
contains a partially filled Penfill®.
f
d
e
23
DCO_06153701A_ID_OB_CAN
24
9/6/02
11:36 AM
Page 24
GETTING YOUR InDuo™ SYSTEM READY FOR USE
How to attach a NovoFine® needle
• Take the protective tab off a NovoFine® needle.
• Screw the NovoFine® needle firmly onto the
colour-coded cap.
• Pull off the outer and inner needle caps before
priming the InDuo™ insulin doser.
How to prime the InDuo™ insulin doser
Priming the InDuo™ insulin doser makes sure that
insulin will flow when you give your injection. The
InDuo™ insulin doser is primed when a drop of
insulin appears at the tip of the NovoFine® needle.
æ The InDuo™ insulin doser should always be
primed:
•
•
•
•
Before each injection.
After changing Penfill®.
After changing the NovoFine® needle.
After opening and closing the InDuo™ insulin
doser slide.
DCO_06153701A_ID_OB_CAN
9/6/02
11:36 AM
Page 25
GETTING YOUR InDuo™ SYSTEM READY FOR USE
25
Priming your InDuo™ insulin doser
for the first time
æMake sure that a NovoFine® needle is attached,
the push button is pressed completely in, and the
slide is closed. If the slide is not closed, the release
button will be locked.
• Press the release button a.
• You will see that the push button jumps out b.
b
a
DCO_06153701A_ID_OB_CAN
26
9/6/02
11:36 AM
Page 26
GETTING YOUR InDuo™ SYSTEM READY FOR USE
c
d
e
• Dial 8 units c.
• Hold the InDuo™ insulin doser with the NovoFine®
needle pointing upwards and tap the slide gently
with your finger a few times d, to ensure that any
air in Penfill® rises to the top.
• Press the push button completely in until it locks e.
• A drop of insulin should appear at the needle-tip.
• If the slide is opened while the InDuo™ insulin
doser contains a partially filled Penfill® see priming
instructions on page 42.
If a drop of insulin does not appear, repeat the
procedure dialing 1 unit at a time until a drop of
insulin appears. It is important that insulin appears at
the tip of the needle before you dial your dose. This
ensures that the piston rod is in the proper position to
deliver your next dose.
• If not injecting immediately remove the NovoFine®
needle and discard it safely.
• If you are injecting immediately, leave the
NovoFine® needle on the insulin doser until you
have completed the injection then discard the
needle safely.
DCO_06153701A_ID_OB_CAN
9/6/02
11:36 AM
Page 27
TESTING YOUR BLOOD GLUCOSE LEVELS
TESTING YOUR BLOOD GLUCOSE LEVELS
Be sure to read this section, Important Information
on page 65, and the OneTouch® Ultra Test Strip
package insert found in this system kit box carefully
before testing.
Before using your InDuo™ meter to test your blood
glucose level, check that you have all the items
needed to complete the procedure.
You will need:
• InDuo™ meter
• OneTouch® Ultra Test Strips
• OneTouch® UltraSoft™ Sterile Lancets
• OneTouch® UltraSoft™ Adjustable Blood Sampler
• OneTouch® UltraClear™ Cap for alternate
puncture site
27
DCO_06153701A_ID_OB_CAN
28
9/6/02
11:36 AM
Page 28
TESTING YOUR BLOOD GLUCOSE LEVELS
Check that the InDuo™ meter display is working
properly. You will know the meter display is working
properly because each time the InDuo™ meter is
turned on, all the segments of the meter display
appear briefly (see “InDuo™ meter and insulin doser
display symbols” in cover flap).
After checking that the InDuo™ meter display is
working, you are ready to do a blood glucose test.
æ Caution. To reduce the risk of infection:
• Never share a lancet or the blood sampler with
anyone.
• Always use a new sterile lancet every time you
take a blood sample. Lancets are for single use
only.
• Avoid getting hand lotion, oil, dirt, or debris on
the lancet, the meter, or the strip.
DCO_06153701A_ID_OB_CAN
9/6/02
11:36 AM
Page 29
TESTING YOUR BLOOD GLUCOSE LEVELS
Obtaining a drop of blood
Insert a lancet in the blood sampler
• Twist the cap of the blood sampler counterclockwise to remove it.
• Insert a new lancet into the lancet holder, and
push down firmly until it is fully seated a. Do not
twist the lancet.
• Twist the protective disk until it separates from the
lancet b.
b
a
29
DCO_06153701A_ID_OB_CAN
30
9/6/02
11:36 AM
Page 30
TESTING YOUR BLOOD GLUCOSE LEVELS
• Replace the cap c.
• Turn the cap clockwise until it fits snugly but not
too tight.
• Adjust puncture depth setting if necessary.
Twist the knob towards the smaller bumps for a
shallower puncture or towards the larger bumps
for a deeper puncture d.
TENO
rtlU
c
d
ONETOUCH®
UltraSoft
DCO_06153701A_ID_OB_CAN
9/6/02
11:36 AM
Page 31
TESTING YOUR BLOOD GLUCOSE LEVELS
Cock the blood sampler
• Slide the ejection/cocking control back until
it clicks e.
• If it does not click, the blood sampler may have
been cocked when the lancet was inserted.
Wash your hands and the puncture site
• Use warm, soapy water to wash your hands and
the puncture site f.
• Rinse and dry thoroughly.
f
e
ONETOUCH®
UltraSoft
31
DCO_06153701A_ID_OB_CAN
11:36 AM
Page 32
TESTING YOUR BLOOD GLUCOSE LEVELS
g
O
Getting a fingertip blood sample
The InDuo™ System requires a very small blood drop
to perform a test. You may obtain it from a fingertip
or arm. (See pages 33 to 35 for information on obtaining
a blood sample from the arm). Choose a different
puncture site each time you test. Repeated punctures
in the same spot may cause soreness and calluses.
U
Massage the fingertip
Massaging the fingertip gently will
help you obtain a rounded drop of
blood. The blood sample must be at
least 1 microlitre in volume [ • actual
size ] to fill the confirmation window
or you may get an Æ message (see
page 77) or possibly an inaccurate
test result. Do not smear the blood
sample. Proceed with your blood
glucose test.
UltraSo H ®
ft
Position the sampler
• Hold the OneTouch® UltraSoft™ Blood Sampler
firmly against the side of your finger.
• Press the release button g.
ONETOUC
32
9/6/02
DCO_06153701A_ID_OB_CAN
9/6/02
11:36 AM
Page 33
TESTING YOUR BLOOD GLUCOSE LEVELS
33
Important information about arm testing
• Under certain conditions, blood
glucose test results obtained using
samples taken from your arm may
differ significantly from fingertip
samples.
• The conditions in which these
differences are more likely to occur
are when your blood glucose is
changing rapidly such as following a
meal, an insulin dose or associated
with physical exercise.
• When blood glucose is changing
rapidly, fingertip samples show these
changes more quickly than arm
samples.
• When your blood glucose is falling,
testing with a fingertip sample may
identify a hypoglycemic (low blood
sugar) level sooner than a test with
an arm sample.
• Use arm samples only for testing prior
to, or more than two hours after,
meals, insulin dose or physical exercise.
• Testing performed within two hours
after meals, an insulin dose or physical
exercise, or whenever you feel that your
glucose levels may be changing rapidly,
should be done from the fingertip.
• You should also use fingertip testing
whenever you have a concern about
hypoglycemia (insulin reactions) such
as when driving a car, particularly if
you suffer from hypoglycemic
unawareness (lack of symptoms to
indicate an insulin reaction), as arm
testing may fail to detect hypoglycemia.
What you should do:
• Use arm or fingertip samples for testing
prior to, or more than two hours after,
meals, insulin dose, or physical exercise.
• Routine testing before meals can be
done either at the fingertip or the arm.
• Consult your healthcare professional
before you begin using the arm for
testing.
DCO_06153701A_ID_OB_CAN
34
•
9/6/02
11:36 AM
Page 34
TESTING YOUR BLOOD GLUCOSE LEVELS
Actual size of
required blood
volume (rounded
drop).
Correct
Getting a blood sample from the arm
The arm has fewer nerve endings than the fingertip so you may
find that obtaining a blood sample from the arm may be much less
painful than using the fingertip. The technique for obtaining a
blood drop from the arm is different from fingertip sampling. Also
there are differences between arm samples and fingertip samples
that you should understand. Please read “Important information
about arm testing” on the previous page carefully. Use the
Penlet® Plus or UltraSoft™ Blood Sampler to obtain a drop of
blood. When puncturing the arm, you may choose to set the
Penlet® Plus or UltraSoft™ Blood Sampler for a greater puncture
depth. Note - consult your healthcare professional before you
begin using the arm for testing. For more detailed information on
the test procedure, please read your test strip package insert and
this manual carefully.
Install the clear cap
To aid in obtaining a blood sample from the arm, replace the
regular sampler cap with the clear cap. If necessary, set the
sampler for a deeper puncture.
Wash your hands and the puncture site
Use warm, soapy water to wash your hands and the puncture
site. Rinse and dry thoroughly.
Choose the puncture site
Select a soft, fleshy area on your arm that is away from bone
and free of visible veins and excess hair.
Incorrect
Massage the area
To increase blood from the puncture site, massage the area
gently. For individuals who experience difficulty in getting
DCO_06153701A_ID_OB_CAN
9/6/02
11:36 AM
Page 35
TESTING YOUR BLOOD GLUCOSE LEVELS
sufficient blood for a test, rubbing the area more vigorously
or the brief application of heat may be helpful.
Position the sampler
Press and hold the sampler against the arm for a few seconds.
Press the release button.
Allow blood drop to form
Continue holding the sampler against the skin for a few
seconds until the blood drop forms. Allow enough blood to
form under the cap until you have a blood sample that is
sufficient to fill the confirmation window of the test strip.
If bruising occurs, you may choose to lance a fingertip
instead. If you are having difficulty obtaining blood from the
arm, call the InDuo™ Customer Care Line at 1 888 729-2299
for assistance. The blood sample must be at least 1 microlitre
in volume or you may get an Æ or possible inaccurate test
result. If you must massage the area to obtain more blood,
do not squeeze the site excessively.
Removing the lancet
• To remove the cap, twist it counter clockwise h.
• Optional: To replace the protective disk on the lancet, place
the disk on a hard surface and push the exposed tip into
the protective disk.
æ Always use caution when removing the lancet. Point the
lancet down and away. Push forward on the
ejection/cocking control and eject the lancet directly into
an appropriate container for sharp objects i. Used test
strips can go into the same container. Return the
ejection/cocking control to the middle position. Replace
the cap.
h
NE
CUT
OOUCH
TENO®
UltraSoft
foSartlU
i
35
DCO_06153701A_ID_OB_CAN
36
9/6/02
11:36 AM
Page 36
TESTING YOUR BLOOD GLUCOSE LEVELS
Cleaning the OneTouch® UltraSoft™ Blood Sampler
• Clean the sampler with soapy water as needed.
To disinfect the sampler, prepare a disinfectant
solution of 1 part household bleach to 10 parts
water. Dampen a cloth in this solution and wipe
the sampler thoroughly. Soak only the cap(s) for at
least 30 minutes in the disinfectant solution. Do
not soak the OneTouch® UltraSoft™ Blood Sampler
in liquid. Rinse the sampler and cap with water and
dry thoroughly.
Performing a blood glucose test
Insert the OneTouch® Ultra Test Strip
• Insert the OneTouch® Ultra Test Strip, contact bars
end-first and facing up, into the test port. Push the
OneTouch® Ultra Test Strip in firmly until it will go
no further.
• The InDuo™ meter will turn on automatically. All
segments on the meter display will appear briefly.
Then the code number is displayed, followed by
the apply symbol R with the unit of measurement
(fi or Á). Verify that the calibration code
and unit of measurement are set correctly.
DCO_06153701A_ID_OB_CAN
9/6/02
11:36 AM
Page 37
TESTING YOUR BLOOD GLUCOSE LEVELS
(See page 9 for additional information on the units
of measurement).
• Code the meter if necessary.
Correct
Apply blood sample
• Obtain a rounded drop of blood from your finger
using the OneTouch® UltraSoft™ Blood Sampler.
The blood sample must be at least 1 microlitre in
volume [ • actual size of rounded drop ] to fill the
confirmation window or you may get an Æ or
possible inaccurate test result. See page 32 for
how to obtain a drop of blood.
• When the apply symbol R appears on the display,
touch and hold the drop of blood to the top edge of
the OneTouch® Ultra Test Strip where it meets the
narrow channel. Do not push your finger against the
test strip or try to apply a smeared sample. Do not
apply blood to the front or back of the test strip.
• Hold the blood drop to the top edge of the test
strip until blood has completely filled the
confirmation window before the meter begins to
count down. The InDuo™ meter display will begin
to count down from N to A.
Incorrect
37
DCO_06153701A_ID_OB_CAN
38
9/6/02
11:36 AM
Page 38
TESTING YOUR BLOOD GLUCOSE LEVELS
Good sample
Sample too small
• If the confirmation window does not fill
completely before the meter begins to count
down, do not add more blood to the test strip;
discard the test strip and repeat the test with a
new test strip.
• Ensure sufficient sample.
• Do not use a smeared sample.
• Hold the test strip in contact with blood.
• If you have trouble filling the test strip, call the
InDuo™ Customer Care Line at 1 888 729-2299 for
assistance.
• If you do not apply a blood sample within
2 minutes, the meter will turn itself off
automatically. You must remove the test strip and
insert it back into the InDuo™ meter to restart the
test.
DCO_06153701A_ID_OB_CAN
9/6/02
11:36 AM
Page 39
TESTING YOUR BLOOD GLUCOSE LEVELS
Reading the results:
• Your blood glucose test result will appear after the
InDuo™ meter counts down from N to A.
• 150 blood glucose test results are automatically
stored in the InDuo™ meter memory.
• The InDuo™ meter provides accurate, plasmacalibrated test results that can be compared
directly with laboratory results.
• Record all test results in your logbook. This helps
keep track of your test results.
• Turn off the InDuo™ meter by removing the
OneTouch® Ultra Test Strip.
39
Plasma-Calibrated Test Result
(Example)
DCO_06153701A_ID_OB_CAN
40
9/6/02
11:36 AM
Page 40
TESTING YOUR BLOOD GLUCOSE LEVELS
Special messages
HI: If your blood glucose test result is above
33.3 mmol/L (600 mg/dL), S will appear on the
meter display. This indicates severe hyperglycemia
(high blood glucose). You should re-check your
glucose level, and if S appears call your healthcare
professional immediately.
When your blood glucose test result is above
13.3 mmol/L (240 mg/dL) or reads S, Ç will
appear on the meter display. This message does not
mean that the system detected ketones, but that
testing with a ketone test strip may be advisable.
LO: If your test result is lower than 1.1 mmol/L
(20 mg/dL), T will appear on the meter display.
This indicates severe hypoglycemia (low blood
glucose). You should treat this condition according
to the recommendations of your healthcare
professional.
DCO_06153701A_ID_OB_CAN
9/6/02
11:36 AM
Page 41
INJECTING YOUR INSULIN
INJECTING YOUR INSULIN
æ Before beginning, read Important Information
on page 65.
To begin preparation for injecting your insulin,
pull out the InDuo™ insulin doser. Do not press any
buttons on the meter cap while you remove the
insulin doser. Attach a NovoFine® needle. You will
then be ready to prime your insulin doser and dial
your insulin dose. If your InDuo™ insulin doser
contains an insulin suspension (cloudy insulin) you
must resuspend the insulin by turning the InDuo™
insulin doser up and down as described on page 21
of this manual and in the Penfill® package insert.
How to attach a NovoFine® needle
• Pull out the InDuo™ insulin doser.
• Take the protective tab off the NovoFine® needle
and screw the needle firmly onto the Penfill®
colour-coded cap inside your insulin doser a.
• Pull off the outer and inner needle caps before
priming your insulin doser. (See page 24 or 42).
a
41
DCO_06153701A_ID_OB_CAN
42
9/6/02
11:36 AM
Page 42
INJECTING YOUR INSULIN
How to prime your InDuo™ insulin doser
c
b
d
e
• Make sure that a NovoFine® needle is attached
(see page 41), the push button is pressed in
completely, and the slide is closed. If the slide is
not closed, the release button will be locked.
• Press the release button b. You will see that the
push button jumps out c.
• Dial 1 unit d (When inserting a new Penfill® start
with 8 units).
• Hold the InDuo™ insulin doser with the needle
pointing upwards and tap the slide gently with
your finger a few times e.
• Press the push button completely in until it locks f.
• A drop of insulin should appear at the needle-tip.
If not, repeat the procedure until a drop of insulin
appears. If the slide is opened and closed while it
contains a partially filled Penfill® you will need to
dial a larger number of units, depending on the
amount of insulin left in Penfill®.
Remember that priming is not finished until a drop
of insulin appears at the needle-tip.
f
DCO_06153701A_ID_OB_CAN
9/6/02
11:36 AM
Page 43
INJECTING YOUR INSULIN
How to dial your dose
• Make sure that a NovoFine® needle is attached and
that the push button is pressed completely in.
• Press the release button a and the push button
will jump out b. The display will show 0
• Dial the number of units you need by turning the
dose selector at a steady speed c. In this example
a dose of 10 units has been dialed.
b
c
a
43
DCO_06153701A_ID_OB_CAN
44
9/6/02
11:36 AM
Page 44
INJECTING YOUR INSULIN
How to correct a dialed dose
• If you accidentally dial a larger dose than you
need, dial back to the correct number of units a.
• You can continue changing the dose that has been
dialed until you press the push button.
How to cancel a dialed dose
• If you want to cancel a dialed dose, dial back to 0
and press the push button completely in.
• Your last delivered dose (or priming) and the time
passed since its delivery will reappear on the display.
• Begin again with “How to dial your dose”.
(See page 43)
a
DCO_06153701A_ID_OB_CAN
9/6/02
11:36 AM
Page 45
INJECTING YOUR INSULIN
How to give an injection
It is important that you follow the injection method
recommended by your healthcare professional.
To inject, press the push button completely in until it
locks a. You will probably feel that the push button
becomes a little harder to press at the end. This is
normal.
æDo not change the dose after you have pressed
the push button.
• With all insulin injection devices, the needle should
be left under the skin for at least 6 seconds to
ensure that the full insulin dose has been
delivered. The InDuo™ insulin doser helps you to
do this by providing a built-in timer.
• When the push button is pressed in completely, the
segments turn on two by two “ . Leave the
needle under your skin until all segments turn on.
a
45
DCO_06153701A_ID_OB_CAN
46
9/6/02
11:36 AM
Page 46
INJECTING YOUR INSULIN
b
c
• When the circle symbol § appears b, the full
insulin dose has been delivered and you can
withdraw the needle.
• After the injection, put the outer needle cap on
and unscrew the needle c.
• Discard the needle carefully.
• Always replace the insulin doser into the meter cap.
DCO_06153701A_ID_OB_CAN
9/6/02
11:36 AM
Page 47
INJECTING YOUR INSULIN
What to do when Penfill® is nearly empty
•
Do not try to inject an insulin suspension (cloudy
insulin) if the rubber stopper is below the arrow
marks on the slide as shown in the picture. The
glass ball must have adequate space to resuspend
the insulin. If the glass ball does not have enough
room to move around freely, change to a new
Penfill®.
• The InDuo™ insulin doser will not let you dial a
larger dose than that remaining in Penfill®.
æDo not force the dose selector to turn; instead
change to a new Penfill® cartridge.
If you need more insulin than the amount left in the
Penfill® cartridge, you can:
either
• change Penfill® and inject the whole dose at once,
or
• inject the remaining insulin and insert a new
Penfill® cartridge for the rest of your dose.
47
DCO_06153701A_ID_OB_CAN
48
9/6/02
11:36 AM
Page 48
INJECTING YOUR INSULIN
Change Penfill® as described on pages 22 and 23.
Then prime the InDuo™ insulin doser as described on
page 42.
Dial the remaining number of units to complete your
dose.
Inject, making sure that you have now injected your
full dose.
If you have changed Penfill® so that your total dose
was divided into 2 doses, note that the insulin doser
memory will only remember the second of the
2 doses given.
DCO_06153701A_ID_OB_CAN
9/6/02
11:36 AM
Page 49
INJECTING YOUR INSULIN
How to change Penfill®
• Make sure that the push button is pressed
in completely a.
• Make sure the NovoFine® needle has been
removed from the insulin doser.
• Open the slide.
• Take out the used Penfill® cartridge b.
• Take a new Penfill® cartridge and continue
as described from page 21.
b
a
49
DCO_06153701A_ID_OB_CAN
50
9/6/02
11:36 AM
Page 50
INJECTING YOUR INSULIN
InDuo™ insulin doser function check
If you think that the InDuo™ insulin doser is not
working properly, follow this procedure:
20
• Screw on a new NovoFine® needle, as described
on page 41.
• Prime the insulin doser as described on page 42.
• Put the outer needle cap over the needle.
• Dispense 20 units into the outer needle cap.
The insulin should fill the lower part of the outer
needle cap.
• If too much or too little insulin is released,
repeat the test.
• If the InDuo™ insulin doser again releases too
much or too little insulin, do not use your insulin
doser. Do not try to repair a faulty insulin doser.
Call the InDuo™ Customer Care Line at
1 888 729-2299.
DCO_06153701A_ID_OB_CAN
9/6/02
11:36 AM
Page 51
USING THE InDuo™ MEMORY FUNCTIONS
USING THE InDuo™ MEMORY FUNCTIONS
(Example)
Both the InDuo™ meter and the InDuo™ insulin
doser have memory functions.
Checking your previous test results
Your InDuo™ meter has a memory that can store the
150 most recent blood glucose and control solution
test results, together with the date and time at
which they were carried out.
Using the memory mode
Enter the memory mode
• With the meter turned off, press ˛.
• The 14-day average will appear, indicating that you
are in the memory mode a.
• After 3 seconds, the 30-day average will appear for
3 seconds b.
• You can now recall the last 150 test results in the
meter memory (see page 52).
• You can also enter memory mode from the test
mode. After completing a blood glucose or control
solution test, and while the test result is still on
the display, press ˛ to enter the memory mode.
a
b
51
DCO_06153701A_ID_OB_CAN
52
9/6/02
11:36 AM
Page 52
USING THE InDuo™ MEMORY FUNCTIONS
How to recall test results
• After 3 seconds, the 30-day average will be
replaced by the most recent test result with date
and time.
• Press Ñ once and the next most recent test result
will appear.
• Each time you press and release Ñ, the meter will
recall your last test results in order up to 150.
• When the meter memory is full, the oldest result is
dropped as the newest is added.
• To scroll through the test results more quickly,
press and hold Ñ.
• Control solution test results will appear on the
display with Ë ˘.
• When using the meter for the first time,
˘ Q will appear, showing that there are no
test results in the memory.
(Example)
Exit the memory mode
• Press ˛ to turn off the meter.
DCO_06153701A_ID_OB_CAN
9/6/02
11:36 AM
Page 53
USING THE InDuo™ MEMORY FUNCTIONS
Other memory functions of
the InDuo™ meter
The InDuo™ meter can provide valuable information
on variations in your blood glucose levels.
Average blood glucose test results
over 14 days and 30 days
• The meter provides 2 averages of your blood
glucose tests.
• The first average, † is calculated from tests
performed over the last 2 weeks (14 days).
• The second average, ü is calculated from tests
performed over the last month (30 days).
• The meter ignores control solution test results when
properly marked as control tests and only uses blood
glucose test results to calculate these averages.
• The meter also tells you how many blood glucose
tests were performed and therefore used to
calculate the average. For example, if you see √
on the meter display, this means 64 tests were
performed.
• When the meter is used for the first time, you will
see † Q and ü Q, showing that there
are no test results stored yet in the meter memory.
53
DCO_06153701A_ID_OB_CAN
54
9/6/02
11:36 AM
Page 54
USING THE InDuo™ MEMORY FUNCTIONS
Checking your previous injection
• Pull out the InDuo™ insulin doser. When the
insulin doser is pulled out all the insulin doser
display symbols are turned on telling you that the
insulin doser display is fully functioning.
• After the display test (see page 82), your previous
dose (or priming) and the time passed since
delivery can be seen on the insulin doser display.
Each segment represents 1 hour.
• For example, if 4 segments are displayed £,
4 hours have passed since the previous injection.
• If 12 segments are displayed ∞,12 hours or more
have passed.
• Always replace the insulin doser into the meter cap.
(Example)
DCO_06153701A_ID_OB_CAN
9/6/02
11:36 AM
Page 55
VIEWING BLOOD GLUCOSE TEST RESULTS ON A PC
VIEWING BLOOD GLUCOSE
TEST RESULTS ON A PERSONAL COMPUTER
You can transfer blood glucose test results to your PC
for home viewing. This requires a LifeScan Interface
Cable and In Touch® Diabetes Management Software
which is available from LifeScan. To order, or for
more information call 1 888 729-2299.
(In Touch® Software and the LifeScan Interface Cable
are not included with your InDuo™ System
and must be obtained separately).
55
DCO_06153701A_ID_OB_CAN
56
9/6/02
11:36 AM
Page 56
VIEWING BLOOD GLUCOSE TEST RESULTS ON A PC
How to transfer glucose test results
to your PC
Install In Touch® software
• Install In Touch® software on your computer
following the instructions provided in the
In Touch® user’s manual.
Connect the LifeScan Interface Cable
• Connect the LifeScan Interface Cable to a serial port
on the back of your computer.
• With the InDuo™ meter turned off, connect the
LifeScan Interface Cable to the data port located on
the right hand side of the InDuo™ meter.
• O will appear on the display once the first
command is received, indicating that the InDuo™
meter is in the communication mode.
• You are now ready to transfer all test results from
the memory in your InDuo™ meter to your
computer.
DCO_06153701A_ID_OB_CAN
9/6/02
11:36 AM
Page 57
VIEWING BLOOD GLUCOSE TEST RESULTS ON A PC
• While the InDuo™ meter is in the communication
mode, you cannot use the InDuo™ meter to
perform a blood glucose test. If the InDuo™ meter
is in either the memory mode or the setting mode,
it will not respond to computer commands.
Data transfer to computer
• Follow the instructions in your In Touch® user’s
manual to begin transferring your blood glucose
test results to your computer.
• If no command is received within 2 minutes, the
InDuo™ meter will turn itself off.
• Pressing ˛ will also turn off the InDuo™ meter.
• Follow the instructions in your In Touch® user’s
manual to view your blood glucose test results on
your computer.
To learn more about In Touch® Diabetes Management
Software, or to obtain a LifeScan Interface Cable, call
the InDuo™ Customer Care Line at 1 888 729-2299.
57
DCO_06153701A_ID_OB_CAN
58
9/6/02
11:36 AM
Page 58
COMPARING THE InDuo™ METER AND LABORATORY RESULTS
COMPARING THE InDuo™ METER
AND LABORATORY RESULTS
The InDuo™ meter blood glucose test
results and laboratory results are both
expressed in plasma-equivalent units.
However, the results you obtain from
your meter may differ from your
laboratory results due to normal
variations. The InDuo™ meter test
results can be affected by factors and
conditions that do not affect laboratory
results in the same way. Your InDuo™
meter glucose value should agree with
a laboratory measurement within +/20% most of the time under normal
conditions. See the OneTouch® Ultra
Test Strip package insert for typical
accuracy and precision data, and for
important information on Limitations
of Procedure. However, results can
differ by more than +/- 20% in some
situations. See the OneTouch® Ultra Test
Strip package insert for more
information.
Making an accurate comparison
between the InDuo™ meter and
laboratory results
Before going to the laboratory
• Perform a control solution test to
check that the InDuo™ meter is
working properly.
• It is best to fast for at least 8 hours
before doing comparison tests.
• Take your InDuo™ System with you
to the laboratory.
At the laboratory
• Make sure that the samples for both
tests (the meter test and the
laboratory test) are taken and tested
within 15 minutes of each other.
• Wash your hands before obtaining a
blood sample.
DCO_06153701A_ID_OB_CAN
9/6/02
11:36 AM
Page 59
COMPARING THE InDuo™ METER AND LABORATORY RESULTS
• Never use your InDuo™ meter with
blood that has been collected in a
test-tube with a grey-coloured top.
• Use only fresh capillary blood
obtained from the fingertip.
59
Other reasons for variation
Besides the factors listed in the
OneTouch® Ultra Test Strip package insert
there are other reasons for variations:
to fast for 8 hours before doing a
comparison test between an InDuo™
meter result and a laboratory result.
• Physical factors, such as the amount
of red blood cells in the blood (a high
or low hematocrit) or the loss of
body fluids (severe dehydration) may
also cause an InDuo™ meter test
result to be different from a
laboratory result.
• Blood glucose levels can change
significantly over short periods,
especially if you have recently eaten,
exercised, taken medication, or
experienced stress1.
• If you have eaten recently, the blood
glucose level from a fingertip blood
sample can be up to 3.9 mmol/L
(70 mg/dL) higher than blood drawn
from a vein (venous sample) used for
a laboratory test2. It is therefore best
References
1. Surwitt, R.S., and Feinglos, M.N.:
Diabetes Forecast (1988), April, 49-51
2. Sacks, D.B.: “Carbohydrates”. Burtis,
C.A., and Ashwood, B.R. (ed.), Tietz
Textbook of Clinical Chemistry.
Philadelphia: W.B. Saunders Company
(1994), 959
DCO_06153701A_ID_OB_CAN
60
9/6/02
11:36 AM
Page 60
CARING FOR YOUR InDuo™ SYSTEM
CARING FOR YOUR
InDuo™ SYSTEM
• Your InDuo™ System is a precision
instrument. To ensure it works
accurately and safely, please handle it
with care.
• Avoid situations where your InDuo™
component parts can be damaged.
• Store your InDuo™ System in its
carrying case after each use.
• Always replace the meter cap after
using your InDuo™ insulin doser.
• Please read the package insert in the
Penfill® carton. This will tell you how
to store the Penfill® cartridges and
how long to keep them.
• With Penfill® inserted, the InDuo™
insulin doser can be stored for up to
one month at room temperature
(maximum 37°C, 98.6°F). Follow the
guidelines on insulin storage supplied
in the Penfill® package insert.
• Do not refrigerate your InDuo™ System.
• As no blood or control solution
comes in contact with the meter,
there is no special cleaning required.
• Take care to avoid getting dirt, dust,
blood, control solution, or water
inside the InDuo™ meter through the
test port or data port.
• Clean off dirt and dust with a dry,
soft brush or cloth.
• A cloth dampened with water and
mild detergent can be used to wipe
down the outside of the meter.
• Do not soak, wash, or lubricate your
InDuo™ System. This will damage the
mechanism.
• Your InDuo™ System is a precision
instrument and will be damaged if
wiped with alcohol.
DCO_06153701A_ID_OB_CAN
9/6/02
11:36 AM
Page 61
CARING FOR YOUR InDuo™ SYSTEM
61
Power supply
Your InDuo™ System is powered by batteries making
it portable and self-contained. Your InDuo™ comes
with 2 battery systems already installed:
• The meter battery provides you with enough
power to perform approximately 1000 blood
glucose or control solution tests. When the meter
battery expires, it is easily replaced using a
3.0 V (#2032 or equivalent) lithium battery.
Replaceable battery
• To ensure quality and safety the insulin doser
battery cannot be replaced. It has an extended life
that allows it to operate for approximately 5 years
from the manufacturing date printed on the carton
label. When the insulin doser battery is due to
expire, the insulin doser display will begin flashing
(see page 64) and your InDuo™ insulin doser
should then be replaced within 30 days.
Non-replaceable battery
DCO_06153701A_ID_OB_CAN
62
9/6/02
11:36 AM
Page 62
CARING FOR YOUR InDuo™ SYSTEM
When to change your InDuo™ meter
battery
Your InDuo™ meter will alert you when the power is
getting low by displaying the following messages.
a
a This message appears when the meter display is
turned on and all the other display messages are
functional.
It is time to change the meter battery. Change the
battery as soon as possible. The meter will not
operate if the battery is allowed to expire. From
the time you see the battery symbol É and the
mmol/L symbol, there is enough power left in
the battery for about 50 tests.
b This message means that the meter battery does
not have enough power left for a test.
Change the battery immediately with one 3.0 V
(#2032 or equivalent) lithium battery.
b
DCO_06153701A_ID_OB_CAN
9/6/02
11:36 AM
Page 63
CARING FOR YOUR InDuo™ SYSTEM
63
How to replace the InDuo™ meter battery
• To replace the meter battery, make sure that the
InDuo™ meter is turned off.
• Turn your InDuo™ meter over and locate the
battery compartment.
• Open the battery door on the back of the meter a.
• Remove the old battery. Insert one 3.0 V (#2032 or
equivalent) lithium battery, making sure the
positive ( + ) side of the battery is facing up b.
• Slide the battery door closed.
• Replacing the meter battery does not affect test
results already stored in the InDuo™ meter
memory. However, the time, date and unit of
measurement settings may need to be updated.
• After replacing the battery, turn the meter on by
inserting a test strip or pressing the ˛ button.
If the meter is in setting mode, confirm that the
time, time format, date, and most importantly, the
unit of measurement are set correctly. If they are
not, use the ˛ and Ñ buttons to reset the meter
before testing. See setting the meter, page 5.
a
b
DCO_06153701A_ID_OB_CAN
64
9/6/02
11:36 AM
Page 64
CARING FOR YOUR InDuo™ SYSTEM
When to replace your InDuo™ insulin doser
A flashing display indicates that the insulin doser
battery power is low.
• Be sure to replace your InDuo™ insulin doser
within 30 days. The battery cannot be changed.
Call the InDuo™ Customer Care Line at
1 888 729-2299 to obtain a new InDuo™ insulin
doser.
(Example)
DCO_06153701A_ID_OB_CAN
9/6/02
11:36 AM
Page 65
IMPORTANT INFORMATION
æ IMPORTANT INFORMATION
• As a precautionary measure, always
carry a spare insulin delivery device,
and a Penfill® cartridge, in case your
InDuo™ doser is lost or damaged.
• Always prime your InDuo™ insulin
doser (see page 24 or 42) to ensure
insulin flow:
• Before each injection.
• After changing Penfill®.
• After changing the needle.
• After opening and closing the slide.
• When a Penfill® cartridge is in the
insulin doser, never press the push
button unless a needle is attached.
• To ensure delivery of your dose make
sure the push button is pressed
completely in and locked into place.
65
• The insulin doser display confirms
completed delivery when the
segments turn on two by two “ and
then the circle symbol § appears.
• Do not change the dose after you
have pressed the push button.
• Always make sure that the insulin
doser is inserted completely into the
meter cap, when not in use. This
shuts the power off.
• Your InDuo™ insulin doser is
designed to work accurately and
safely. The doser has built-in safety
features to help ensure that the
insulin dose injected is the dose that
has been dialed. In the unlikely event
of a malfunction, your InDuo™
insulin doser will lock to prevent you
from receiving a wrong dose.
DCO_06153701A_ID_OB_CAN
66
9/6/02
11:36 AM
Page 66
IMPORTANT INFORMATION
• Your InDuo™ System is tough but
could still be damaged. So handle it
with care, do not drop it and avoid
knocking it against hard surfaces. If
your InDuo™ System has been
dropped or knocked, you must carry
out a function check of the insulin
doser (see page 50) and a control
solution test (see pages 14 to 16).
• Never use your InDuo™ System
unless you are sure that it is working
properly.
• Do not play with the dose selector or
the push button as this can cause the
InDuo™ insulin doser to wear out.
• Keep the InDuo™ System, Penfill®
and NovoFine® needles out of the
reach of children.
• Your InDuo™ System is for your use
only. Do not allow anyone else to
use it.
• On the Penfill® label, there is a colourcoded band that is unique to the
different types of insulin. When
Penfill® is inserted into the InDuo™
insulin doser, the colour-coded band
is visible through the slide. Before
each injection check the colour-coded
band to make sure you are using the
right type of insulin.
• If you are treated with more than
one type of insulin in Penfill® 3 ml
cartridge, you should use an InDuo™
insulin doser for one type of insulin
and another device such as Innovo®
insulin doser or Novolin-Pen® 3 for
the other type of insulin.
DCO_06153701A_ID_OB_CAN
9/6/02
11:36 AM
Page 67
IMPORTANT INFORMATION
• Take the needle off the InDuo™
insulin doser immediately after each
injection. If you do not remove it,
temperature changes may cause
liquid to leak out of the needle.
With an insulin suspension (cloudy
insulin), this may change the
concentration of the insulin.
• Do not start injecting an insulin
suspension (cloudy insulin) if the
rubber stopper is below the arrow
marks on the slide. The glass ball
must have adequate space to
resuspend the insulin. Replace the
Penfill® cartridge.
• Do not use the residual scale to
measure the amount of insulin to be
injected.
• Do not try to repair a faulty InDuo™
component.
67
• The InDuo™ System must only be
used according to the instructions in
this manual. The manufacturer will
not be held responsible for any
equipment problems if you have not
followed these instructions.
• Healthcare professionals, relatives
and other caregivers should follow
general precautionary measures for
removal and disposal of needles to
minimize the risk of unintended
needle penetration.
• Keep the InDuo™ meter,
OneTouch® Ultra Test Strips, and
OneTouch® Ultra Control Solution at
the same relative temperature
before testing. Testing before the
meter, strips, and control solution
reach the same relative temperature
may result in an inaccurate glucose
reading.
DCO_06153701A_ID_OB_CAN
68
9/6/02
11:36 AM
Page 68
DISPLAY MESSAGES AND PROBLEM-SOLVING GUIDE
DISPLAY MESSAGES
AND PROBLEM-SOLVING GUIDE
There are a number of messages and symbols that
appear on the insulin doser and meter displays
during use of the InDuo™ System. The following is a
summary of all display messages. The meter gives an
error message when it detects a problem, which
could cause an inaccurate result. However, the meter
cannot detect all problems, and for those it can
detect, may not produce an error message every time
the problem occurs. There may also be causes for the
display of an error message that are not listed here.
Assistance is available from the InDuo™ Customer
Care Line by calling 1 888 729-2299.
DCO_06153701A_ID_OB_CAN
9/6/02
11:36 AM
Page 69
DISPLAY MESSAGES AND PROBLEM-SOLVING GUIDE
69
The InDuo™ meter
Here is a summary of the different messages given on the InDuo™ meter display.
Meter display
What it means
Action
This indicates that the meter is
running a system check. It appears
whenever a OneTouch® Ultra Test
Strip is inserted and when the
InDuo™ blood glucose meter is
turned on. It verifies that all
segments on the display are
working
If segments are missing, call
the InDuo™ Customer Care
Line at 1 888 729-2299 for
further action. Missing
segments can lead to the
wrong interpretation of the
displayed test result
1. This message appears immediately
after the system check if your
meter has not been coded
2. If this message appears at any
time after the first time the meter
was coded, the code number has
been lost. The test results stored in
the meter memory may be out of
date order
1. See “Coding your
InDuo™ meter”, page 12
2. Do not rely on the
14- and 30-day averages.
It is important to call the
InDuo™ Customer Care Line
at 1 888 729-2299.
DCO_06153701A_ID_OB_CAN
70
9/6/02
11:36 AM
Page 70
DISPLAY MESSAGES AND PROBLEM-SOLVING GUIDE
Meter display
What it means
Action
This is the code number stored
in the InDuo™ meter
Make sure that this code
number matches the code
number on the vial of the
OneTouch® Ultra Test Strips
you are using. If not, you
must recode the meter
(see page 12)
The system is ready to accept
a blood sample
You may now apply the
blood sample
The system is ready to accept
a control solution test sample
You may now apply the
control solution
(Example)
DCO_06153701A_ID_OB_CAN
9/6/02
11:36 AM
Page 71
DISPLAY MESSAGES AND PROBLEM-SOLVING GUIDE
Meter display
What it means
Action
Five-second countdown. The meter
is calculating the result. At the end
of the countdown, the meter will
display the test result
No action required
A blood glucose test result
in mmol/L
No action required
if this is the unit your
healthcare professional
has recommended. If you
should be using mg/dL,
reset the unit of
measurement (see page 9)
A blood glucose test result
in mg/dL
No action required
(Example)
(Example)
71
DCO_06153701A_ID_OB_CAN
72
9/6/02
11:36 AM
Page 72
DISPLAY MESSAGES AND PROBLEM-SOLVING GUIDE
Meter display
What it means
Action
A blood glucose test result with a
suggestion to check your ketone
levels
You may want to check your
ketone levels. Act according
to the instructions of your
healthcare professional
Indicates that you may have a very
high blood glucose level, possibly
exceeding 33.3 mmol/L (600 mg/dL)
You should recheck your
blood glucose level and if
S appears call your
healthcare professional
immediately
Indicates that you may have a very
low blood glucose level, possibly
lower than 1.1 mmol/L (20 mg/dL)
You should treat this
condition according to the
recommendations of your
healthcare professional
(Example)
DCO_06153701A_ID_OB_CAN
9/6/02
11:36 AM
Page 73
DISPLAY MESSAGES AND PROBLEM-SOLVING GUIDE
Meter display
What it means
Action
A blood glucose test result
stored in the memory
No action required
A control solution test result
stored in the memory
No action required
There is no test result stored in
this place in the InDuo™ memory
No action required
(Example)
(Example)
73
DCO_06153701A_ID_OB_CAN
74
9/6/02
11:36 AM
Page 74
DISPLAY MESSAGES AND PROBLEM-SOLVING GUIDE
Meter display
What it means
Action
Average of the last 14 days.
(√ means that 64 tests were
performed within this period)
No action required
Average of the last 30 days.
(∑ means that 138 tests were
performed during this period)
No action required
Error message that indicates
that there is a problem with the
InDuo™ meter
Do not use the InDuo™ meter.
Call the InDuo™ Customer Care
Line at 1 888 729-2299.
(Example)
(Example)
DCO_06153701A_ID_OB_CAN
9/6/02
11:36 AM
Page 75
DISPLAY MESSAGES AND PROBLEM-SOLVING GUIDE
Meter display
75
What it means
Action
Error message could
be caused by a used or
damaged OneTouch® Ultra
Test Strip or there is a
problem with the meter
Repeat the test with a new
OneTouch® Ultra Test Strip. Refer
to page 10 for OneTouch® Ultra
Test Strip information. If the error
message persists call the
InDuo™ Customer Care Line
at 1 888 729-2299
Error message that indicates
that the blood or control
solution sample was applied
before R appeared on the
display
Repeat the test with a new
OneTouch® Ultra Test Strip.
Refer to page 18 (for control solution
application) and pages 37-38
(for blood application, for proper
time to apply sample). Apply blood
sample only after the R appears
on the display
DCO_06153701A_ID_OB_CAN
76
9/6/02
11:36 AM
Page 76
DISPLAY MESSAGES AND PROBLEM-SOLVING GUIDE
Meter display
What it means
Action
Error message that indicates
one of the following conditions
may be present:
1. You may have high glucose
and have tested in an
environment near the low
end of the operating
temperature range
(6-44°C/43-111°F)
2. There may be a problem with
the test strip. For example,
it may have been damaged
or moved during testing
3. The sample was improperly
applied
1. If you tested in a cool
environment, repeat the test
in a warmer environment with
a new test strip. If the error
message appears again, call the
InDuo™ Customer Care Line
at 1 888 729-2299
2. If you were testing in a normal
or warm environment, repeat the
test with a new test strip. Refer
to pages 32 to 38 for proper
sample application procedure. If
the error message appears again,
call the InDuo™ Customer Care
Line at 1 888 729-2299
3. If you applied the blood
incorrectly, review pages 32
to 38 for proper sample
application procedure. Repeat
the test with a new strip. If the
error message appears again,
call the InDuo™ Customer
Care Line at 1 888 729-2299
DCO_06153701A_ID_OB_CAN
9/6/02
11:36 AM
Page 77
DISPLAY MESSAGES AND PROBLEM-SOLVING GUIDE
Meter display
77
What it means
Action
Error message that indicates that
the InDuo™ meter has detected
a problem with the test strip.
Possible causes are an incompletely
filled confirmation window or a
damaged OneTouch® Ultra Test
Strip
Repeat the test with a new
OneTouch® Ultra Test Strip.
Refer to pages 32 to 38 for
proper sample application
procedure. If the error
message appears again,
please call the InDuo™
Customer Care Line at
1 888 729-2299
Flashing time means the meter
has lost power and entered the
setting mode
You must reset the time,
time format, date, and most
importantly, the unit of
measurement. See setting
the meter, page 5
DCO_06153701A_ID_OB_CAN
78
9/6/02
11:36 AM
Page 78
DISPLAY MESSAGES AND PROBLEM-SOLVING GUIDE
Meter display
What it means
Action
The battery symbol É appears
on the display with the unit of
measurement. It means that the
power of the battery is getting
low. You can complete about 50
more tests from the time this
symbol first appears
Test results will still be
accurate, but replace the
battery as soon as possible
The battery symbol É appears
on the display by itself. The power
of the battery is too low to run a
test
Replace the battery at once.
The InDuo™ meter will not
operate until the battery is
replaced
DCO_06153701A_ID_OB_CAN
9/6/02
11:36 AM
Page 79
DISPLAY MESSAGES AND PROBLEM-SOLVING GUIDE
Meter display
79
What it means
Action
The InDuo™ meter has detected
that the temperature is below the
operating range. You cannot
perform a test until the InDuo™
meter and the OneTouch® Ultra
Test Strips reach a temperature
within the operating range of
6–44ºC (43–111ºF)
Repeat the test after the
InDuo™ meter and
OneTouch® Ultra Test Strips
have reached a temperature
within the operating range
The InDuo™ meter has detected
that the temperature is above the
operating range. You cannot
perform a test until the InDuo™
meter and the OneTouch® Ultra
Test Strips reach a temperature
within the operating range of
6–44ºC (43–111ºF)
Repeat the test after the
InDuo™ meter and
OneTouch® Ultra Test Strips
have reached a temperature
within the operating range
DCO_06153701A_ID_OB_CAN
80
9/6/02
11:36 AM
Page 80
DISPLAY MESSAGES AND PROBLEM-SOLVING GUIDE
Here are the answers to some questions you might ask when
using your InDuo™ meter:
What should I do if the InDuo™ meter does not display a message after a
OneTouch® Ultra Test Strip has been inserted?
Probable reasons
Action
Battery exhausted
Replace the battery
Battery incorrectly installed or
absent
Check that the battery is correctly installed
with the positive ( + ) side up
OneTouch® Ultra Test Strip partially
inserted or inserted upside-down
Insert the OneTouch® Ultra Test Strip
correctly with the contact bars end-first and
facing up. Push the strip in firmly until it
will go no further
Defective meter
Call the InDuo™ Customer Care Line at
1 888 729-2299
DCO_06153701A_ID_OB_CAN
9/6/02
11:36 AM
Page 81
DISPLAY MESSAGES AND PROBLEM-SOLVING GUIDE
81
What should I do if the InDuo™ meter does not start running the blood glucose
test after the OneTouch® Ultra Test Strip has been inserted?
Probable reasons
Action
Insufficient blood sample
Repeat the test with a new
OneTouch® Ultra Test Strip and a larger sample
Defective OneTouch® Ultra Test Strip Repeat the test with a new
OneTouch® Ultra Test Strip
Sample applied after automatic
shut-off (2 minutes after last used)
Repeat the test with a new OneTouch® Ultra
Test Strip; apply sample only when the apply
symbol R appears on the display
Meter malfunction
Call the InDuo™ Customer Care Line at
1 888 729-2299
DCO_06153701A_ID_OB_CAN
82
9/6/02
11:36 AM
Page 82
DISPLAY MESSAGES AND PROBLEM-SOLVING GUIDE
The InDuo™ insulin doser
As with the meter display, a number of messages and symbols appear on the
InDuo™ insulin doser display during use of the doser.
Message
What it means
Action
The very first time the insulin doser is
removed from the meter cap, the
display stays blank until the slide is
opened. However, if the display goes
off having already come on, carry out
the correction measures described in
the next column. If the display still
remains off, the insulin doser is not
working. Do not use your insulin
doser, instead call the InDuo™
Customer Care Line at 1 888 729-2299
If the display goes off, press
the release button, and the
push button will jump out.
Press the push button
completely in and the display
should reappear.
If the display does not reappear,
open and close the slide. Prime
the InDuo™ insulin doser as
described on pages 24 and 42
When the insulin doser is removed
from the meter cap, all the display
segments are turned on, telling you
that the display is fully functional
(display test)
No action required
DCO_06153701A_ID_OB_CAN
9/6/02
11:36 AM
Page 83
DISPLAY MESSAGES AND PROBLEM-SOLVING GUIDE
Message
What it means
Action
The display shows the number of
insulin units dialed
No action required
The segments turning on two by two
tell you how long to leave the needle
under the skin during injection
No action required
The display shows the number of
insulin units delivered. The circle
confirms that the delivery has been
completed
No action required
83
DCO_06153701A_ID_OB_CAN
84
9/6/02
11:37 AM
Page 84
DISPLAY MESSAGES AND PROBLEM-SOLVING GUIDE
Message
What it means
Action
The display shows the number of insulin No action required
units delivered. The segments indicate
the time passed since delivery. 1 segment
represents 1 hour. In this example
4 hours have passed since the insulin
doser delivered the previous dose
A flashing display indicates that the
battery power is low
Be sure to replace your
insulin doser within 30 days.
The battery in the insulin
doser cannot be changed.
Call the InDuo™ Customer
Care Line at 1 888 729-2299
to replace your insulin doser
A minus symbol on the display tells
you that the dose selector has been
dialed below zero 0
Dial forward until the
display shows the number
of units required
DCO_06153701A_ID_OB_CAN
9/6/02
11:37 AM
Page 85
DISPLAY MESSAGES AND PROBLEM-SOLVING GUIDE
Here are answers to some
questions you might ask about
your InDuo™ insulin doser display:
Why has the display turned off?
If the display goes off, press the
release button, and the push button
will jump out. Press the push button
completely in, and the display
should reappear. If the display does
not reappear, open and close the
slide. Prime the InDuo™ insulin
doser as described on page 24. If
the display remains off, the insulin
doser is not working. Do not use the
insulin doser, instead call the InDuo™
Customer Care Line at 1 888 729-2299
to replace your insulin doser.
85
Why is the display showing a minus
symbol?
The dose selector has been dialed
below zero 0. Dial forward until the
display shows the correct number of
units.
Why does the display not respond
when I turn the dose selector?
Press the release button so that the
push button jumps out before a dose
can be dialed.
On the next page are the answers
to some questions you might ask
about priming the insulin doser
and injecting insulin:
DCO_06153701A_ID_OB_CAN
86
9/6/02
11:37 AM
Page 86
DISPLAY MESSAGES AND PROBLEM-SOLVING GUIDE
Why does no insulin appear when I try
to prime the InDuo™ insulin doser?
The needle may be blocked. Change
the needle and prime the InDuo™
insulin doser until insulin appears at
the needle-tip. Check that the push
button is pressed completely in and
locked. Open the slide and make sure
that Penfill® is inserted correctly. If
Penfill® is damaged or empty, change
it. Check that the slide is closed, and
prime the InDuo™ insulin doser until
insulin appears at the needle-tip.
Why does no insulin appear when I
prime the InDuo™ insulin doser and
the push button will not go in?
The needle may be blocked. Change
the needle and prime the InDuo™
insulin doser until insulin appears at
the needle-tip. To open the slide, dial
back to zero 0 and press the push
button completely in until it locks.
Then change Penfill® as described on
page 49.
Why does the push button not
release?
Make sure that the slide is closed
completely. The release button is
locked until the slide is closed.
How do I cancel or change the dialed
dose?
Dial back to zero 0 and press the
push button completely in. Your last
dose and the time passed since
delivery will reappear on the display.
You can increase, decrease or cancel
the dialed dose until you press the
push button. Do not change the dose
after you have pressed the push
button.
DCO_06153701A_ID_OB_CAN
9/6/02
11:37 AM
Page 87
DISPLAY MESSAGES AND PROBLEM-SOLVING GUIDE
Why is insulin delivered when the
dose selector is turned?
You have dialed the maximum dose
of 70 units and then continued
dialing. If you need to inject a dose
of insulin larger than 70 units, you
must divide the dose into amounts
equal to, or less than, 70 units.
Why does the push button block
during the injection?
Do not try to force the push button
in. The needle may be blocked.
Change the needle and prime the
InDuo™ doser as described on
page 42. Check to see if Penfill® is
damaged. Dial back to zero 0 and
press the push button completely in
until it locks. Then open the slide
and change Penfill® as described on
page 49. Prime the InDuo™ insulin
doser until insulin appears at the
87
needle-tip (see page 24). Please note
that part of the insulin dose may
have been injected. If the push
button still cannot be pressed
completely in, please call the
InDuo™ Customer Care Line at
1 888 729-2299.
Why does the slide not open when
changing Penfill®?
Put on a new needle. Press the push
button completely in until it locks.
Remove the needle and open the
slide. If the slide still cannot be
opened, please do not hesitate to call
the InDuo™ Customer Care Line at
1 888 729-2299. Do not try to force
the slide open.
DCO_06153701A_ID_OB_CAN
9/6/02
11:37 AM
Page 88
88
SPECIFICATIONS InDuo™ System
Size:
Weight:
123 mm x 54 mm x 35 mm (4.84 in x 2.13 in x 1.38 in)
125 g with battery (4.40 ounces)
Operating ranges:
Temperature:
Relative humidity:
Hematocrit:
6-40°C (43-104ºF)*
10-90%
30-55%
InDuo™ meter
Result range:
Calibration:
Blood sample:
Min. sample size:
Test time:
Assay method:
Power source:
Battery life:
Unit of measurement:
Memory:
Automatic shut-off:
1.1-33.3 mmol/L (20-600 mg/dL)
Plasma-equivalent
Fresh capillary whole blood
1 microlitre
5 seconds
Glucose oxidase biosensor
One replaceable 3.0V (#2032 or equiv.) lithium battery
1000 tests, or about 1 year at 3 tests per day
Either mmol/L or mg/dL
150 blood glucose and control solution tests
Two minutes after last user action
* However the meter will allow for testing at temperatures up to 44°C (111°F).
DCO_06153701A_ID_OB_CAN
9/6/02
11:37 AM
Page 89
89
InDuo™ doser
Cartridge:
Needle:
Dose:
Memory:
Power source:
Battery life:
3 ml Penfill®
NovoFine® max 8 mm length
1IU increment, minimum = 1IU, maximum = 70IU
1 (last dose and time since last dose)
Internal non-replaceable lithium battery
5 years from manufacturing date printed
on the carton label
GUARANTEE
The manufacturer guarantees that the InDuo™ System shall be free of defects
in material and workmanship for a period of 3 years. This guarantee is valid
from the date of purchase. The guarantee extends only to the original
purchaser and is not transferable.
DCO_06153701A_ID_OB_CAN
9/6/02
11:37 AM
Page 90
90
BLOOD GLUCOSE VALUE TARGETS
Times of day
Glucose ranges for people
Your target ranges (mmol/L)
without diabetes (mmol/L)
Before breakfast
3.9 - 5.8
Before lunch or dinner
3.9 - 6.1
1 hour after meals
Less than 8.9
2 hours after meals
Less than 6.7
Between 2 and 4 am
Greater than 3.9
Source: Krall, L.P., and Beaser, R.S.: Joslin Diabetes Manual, Philadelphia:
Lea and Febiger (1989), 138.