1
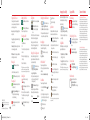
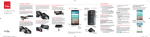
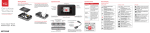
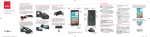
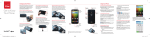
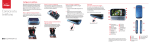
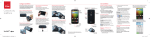
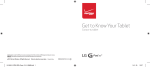
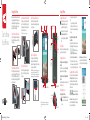
Using Your Phone
Setting Up Your Phone
Get to Know
Your Phone
Welcome to Verizon Wireless. You’re now part
of a growing movement that’s about speed,
signal and strength. This guide will show you
how to set up and use your phone, access
special features, and find help.
Optional: Insert the microSD Card
Step 1. Remove the Back Cover
NOTE: The microSD card is sold separately.
If you have a microSD card, slide it into the
microSD card slot, with the gold contact
facing downwards, (the upper of the two
slots under the back cover).
Step 3. Replace the Back Cover
Place the back cover over the back of the
phone, and then press down along the edges
to secure the cover.
Turning Your Phone On/Off
ED
L
Indicator
Earpiece Proximity
Sensor
Laser Detection
Auto-focus
Front
Camera
Insert your fingernail into the slot located on
the lower left of the back cover and lift the
cover up gently.
Step 4. Charge the Phone
Optional: Replace the SIM Card
The SIM card is pre-installed in your phone. If
you need to replace your SIM card, locate the
slot for the SIM card (the lower of two slots
under the back cover) and gently slide the SIM
card out to remove it.
Step 2. Insert the Battery
Insert the battery, making sure to align the
gold contacts. Press down gently to secure
the battery.
WARNING! Please use only an approved charging accessory
to charge your phone. Improper handling of the USB/
Charger Port, as well as the use of an incompatible charger,
may cause damage to your device and void the warranty.
Rear
Camera
Volume
Keys
Home Key
To turn the screen on, press the Power/Lock
Key once and the screen will light up.
Turning the Screen On Using the KnockOn
Feature
Speaker
USB/Charger Port
LG-VS880_VZW_QRG_EN_V1.0_140704.indd 1-9
Quickly double-tap the center of the screen to
turn the screen on.
Unlocking the Screen
Using the Power/Lock Key
microSD
Card Slot
NOTE: Devices and software are constantly evolving—the
screen images and icons you see here are for reference
only.
Follow the onscreen instructions to quickly set
up your phone and email accounts.
Turning the Screen On Using the Power/
Lock Key
Recent
Apps Key
Microphone
Setup Wizard
Turning the Screen On
NFC
Touch
Point
Back
Key
o turn your phone off, press and hold
T
the Power/Lock Key until the Phone
options are displayed. Tap Power off
> OK.
LED
Flash
Power/
Lock
Key
Your phone comes with a USB/Charger
Adapter and a USB cable that connect
together to charge your phone. Before turning
on your phone, charge it fully.
o turn your phone on, press and hold
T
the Power/Lock Key for a couple of
seconds until the screen lights up.
1.
SIM Card Slot
ress the Power/Lock Key to turn on
P
your screen. Your Lock screen will
appear.
2. Swipe in any direction to unlock it.
OR
To use a shortcut, swipe the shortcut
icon at the bottom of the screen in any
direction. The screen will unlock and open
the app.
Unlocking the Screen Using the Knock
Code Feature
You can unlock the screen when the screen is
off by tapping the correct area and sequence.
1.
>
>
From the Home screen,
tap: Apps > Settings > Lock screen.
2. Tap Select screen lock > Knock Code.
3. Follow the instructions to create your
unlock sequence, as well as a backup PIN
in case you forget your unlock sequence.
EasyHome mode — Simplified and easier
experience for the first time smartphone
user. If selected, your Home screen will look
like this:
Selecting the Home Screen Mode
You can select one of the two modes: Home
and EasyHome. When you first turn on your
phone it will be set to Home mode and the
instructions in this guide are written based on
the Home mode.
>
>
From the Home screen, tap:
Apps > Settings > Home screen > Select Home.
Home mode — Standard experience for users
who are familiar with Android. If selected, your
Home screen will look like this:
14. 7. 4.
11:36
Using the Touch Screen
Use touch gestures to move around the
screen, open menus, select items, zoom in or
out on web pages, and more.
Swipe—Swipe by quickly sliding your finger in
any direction.
Drag—Drag by touching an item and sliding it
to a new position.
Setting Up Voice Mail
ap the Phone icon on the Home
T
screen.
2.
Dial *86 and tap the Phone icon.
3. Follow the setup instructions.
1.
Checking Voice Mail
1.
Double-Tap—Tap two times rapidly to zoom in
or out on a web page or picture.
Multi-Touch—Pinch or spread your thumb and
index finger to zoom in or out.
Making a Call
ap the Phone icon on the Home
T
screen.
2. Enter the number you want to call.
3.
Tap the Phone icon to place the call.
1.
Receiving a Call
wipe the Answer icon in any direction to
S
answer the call.
MBM64520601 (1.0)
This booklet is made from 100% post-consumer recycled paper.
This booklet is printed with soy ink. Printed in China
©2014 Verizon Wireless. All Rights Reserved.
LG-VS880_VZW_QRG_EN_V1.0_140704.indd 10-18
Swipe the Ignore with message icon in
any direction to send a text message
instead of answering.
wipe the Ignore icon in any direction to
S
ignore the call.
From your phone, dial *86 and and
tap the Phone icon.
OR
From other phones call your wireless
number.
2. When you hear the greeting, tap # to
interrupt.
3. Follow the instructions.
NOTE: Voice mailboxes not set up within 45 days will be
canceled. Your voice mailbox is not password protected
until you create a password by following the setup tutorial.
Sending a Text
1.
rom the Home screen, tap
F
Message+.
2.
Tap the Compose icon to start a new
message.
3. Enter a contact’s name or number in the
To field and enter your message in the
text field.
4.
Tap the Send button to send your
message.
Taking Photos
1.
From the Home screen, tap Camera.
ap the Shutter button to take a
T
picture (if shown) or just tap the
screen.
The LG G Vista’s Laser Auto Focus measures
the distance to the subject using laser
technology. Laser Auto Focus allows
for improved focusing speed and object
detection in low-light situations.
2.
Setting Up Your Google Account
Now your Gmail, Google contacts, and
Google calendar events can all be loaded to
your phone automatically.
1.
>
>
From the Home screen,
tap: Apps > Settings > Add account >
Google > Existing or New.
2. Enter your username and password or
any other necessary information (if
creating an account).
3.
Tap the Continue button to sign in.
Record your Google account information.
Please keep this document in a safe place.
Username: Password: @gmail.com
Setting Up Other Email Accounts
Open full screen.
1.
Close the current app.
>
>
From the Home screen,
tap: Apps > Settings > Add account.
2. Tap Email and select the desired provider.
3. Enter your email address and password
and any other necessary information.
Installing Apps
Hundreds of thousands of apps are available
to download from Google Play.
>
From the Home screen, tap:
Apps > Play Store .
QuickMemo+
Use the QuickMemo+ feature to capture a
screenshot and use it to write a memo.
1.
rag the Status Bar down and then
D
tap the QuickMemo+ icon.
2. Tap an option at the top of the screen to
create your memo:
•
U
ndo - Undo the most recent action.
•
edo - Redo the action you just
R
undid.
Now you can pay with your phone.
Isis® lets you pay for purchases and often save
on them too.
Learn more at verizonwireless.com/isis.
•
Text - Add text to the memo.
•
en - Select the pen type and color
P
and use your finger to write on your
memo.
Dual Window
•
rase - Erase what you wrote with
E
the pen.
1. Touch and hold the Back Key to split
the screen.
2. Tap or drag the desired app icon to the
top or bottom portion of the screen. Tap
for the following options:
Switch the two screens.
•
ave - Save the memo to your
S
Gallery or QuickMemo+.
•
Share - Share the memo with others.
Isis Mobile Wallet™
To view two apps at the same time:
Improving Accessibility
Support & More
Customer Information
Adjust accessibility settings to assist users
who have impaired vision or hearing, or
reduced dexterity.
My Verizon App
Your Wireless Device and Third Party Services
Verizon Wireless is the mobile carrier associated with this
wireless device, but many services and features offered
through this wireless device are provided by or in conjunction
with third parties. Verizon Wireless is not responsible for
your use of this wireless device or any non-Verizon Wireless
applications, services and products including any personal
information you choose to use, submit or share with others.
Specific third party terms and conditions, terms of use,
and privacy policies shall apply. Please review carefully all
applicable terms and conditions and policies prior to using
this wireless device and any associated application, product
or service.
>
>
From the Home screen,
tap: Apps > Settings > Accessibility.
2. Set the desired options to improve
accessibility.
Manage your account, track your
usage, edit account information, pay
your bill and more.
1.
Get Help Using Your Phone
se your Help app to get assistance
U
at your fingertips, right from your
phone.
Using TalkBack
TalkBack provides screen reading to assist
people with impaired vision.
1. Tap TalkBack, then tap the TalkBack
switch
to turn it on.
2. Tap Settings at the bottom of the screen
to adjust the TalkBack settings.
From your computer, visit
verizonwireless.com/support.
Customer Service
Call (800) 922-0204.
Follow us @VZWSupport.
NOTE: When TalkBack is on, double-tap when you hear the
item you want. (You can change to single-tap in Settings.)
Hearing Aid Compatibility Information
This phone has been tested and rated for use with hearing
aids for some of the wireless technologies that it uses.
However, there may be some newer wireless technologies
used in this phone that have not been tested yet for use with
hearing aids. It is important to try the different features
of this phone thoroughly and in different locations, using
your hearing aid or cochlear implant, to determine if you
hear any interfering noise. Consult Verizon Wireless or the
manufacturer of this phone for information on hearing aid
compatibility. If you have questions about return or exchange
policies, consult Verizon Wireless or the phone retailer.
More Information
User Guide
Download a User Guide from
support.vzw.com/phones or
call (877) 268-7589 to order a copy.
NOTE: Use your fingertip rather than your fingernail to draw
or erase pen marks.
View the apps list.
14. 7. 4.
11:36