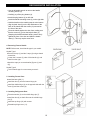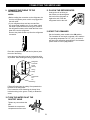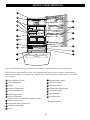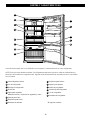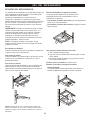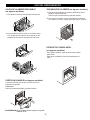
1
BOTTOM FREEZER
REFRIGERATOR
Owner’s Manual
Please read this guide thoroughly
before operating and keep it handy for
reference at all times.
REFRIGERADOR
CON CONGELADOR
INFERIOR
Manual de Usuario
Lea detenidamente estas instrucciones antes de
usar el refrigerador y guárdelas como referencia
para el futuro.
Models / Modelos
LRBN2051#**
LRBC2051#**
LDC2272#**
LBC2252#**
P/No. MFL48165101
TABLE OF CONTENTS
English Version
2
Spanish Version
36
Warranty (U.S.A.)
3
Safety Instructions
Grounding Requirements
Parts and Features
Refrigerator Installation
5 -6
6
7-9
10 - 17
Door Racks
23
Design-A-Door
23
Dairy Bin
24
Ice Bin
24
DuraBase
24
DuraBase Divider
Guide-Out Drawer Basket
Tilting Door
24
25
25
Unpacking Your Refrigerator
10
Wire Durabase
25
Installation
10
Frezzer Shelf
25
Base Grille
10
Care and Cleaning
Removing, Reversing and Replacing
Your Refrigerator Doors
Door Closing and Alignment
Using Your Refrigerator
11 - 17
17
18 - 25
Ensuring Proper Air Circulation
18
Multi Flow
18
Door Alarm
18
Setting the Controls
General Cleaning Tips
26
Outside
26
Inside Walls
26
Door Liner and Gaskets
26
Plastic Parts
26
Condenser Coils
26
Light Bulb Replacement
18 - 19
26 - 27
26 - 27
Power Interruptions
27
When you go on vacation
27
Adjusting Control Settings
19
Food Storage Guide
20
About the Custom Cube Icemaker
Storing Frozen Food
20
Connecting the Water Line
29 -31
Refrigerator Shelves
21
Chef Fresh / Snack Pan
22
Troubleshooting Guide
32 - 35
Crisper Humidity Control
22
Optibin Crisper
22
Crisper cover with lattice on inner surface
23
2
28
LG Electronics
visit our web site/http://www.lgservice.com
LIMITED WARRANTY
United States of America
LG Electronics will repair or at its option replace, without charge, your product which proves to be defective
in material or workmanship under normal use during the warranty period listed below from the date of
original purchase.
This warranty is good only to the original purchaser of the product during the warranty period as long as it is
in the U.S. including Alaska, Hawaii, and U.S. Territories.
LG Refrigerator / Freezer Warranty Period
Product
Parts
Refrigerator / Freezer
1 year
Sealed System
7 years
(Compressor, Condenser, Evaporator)
Labor
1 year [In-Home Service (Except Model GR-051)]
1 year [In-Home Service (Except Model GR-051)]
No other express warranty is applicable to this product. THE DURATION OF ANY IMPLIED WARRANTIES.
INCLUDING THE IMPLIED WARRANTY OF MERCHANTABILITY, IS LIMITED TO THE DURATION OF
THE EXPRESS WARRANTY HEREIN. LG ELECTRONICS SHALL NOT BE LIABLE FOR THE LOSS OF
USE OF THE PRODUCT, INCONVIENCE, LOSS OR ANY OTHER DAMAGES, DIRECT OR
CONSEQUENTIAL, ARISING OUT OF THE USE OF OR INABILITY TO USE, THIS PRODUCT OR FOR
ANY BREACH OF ANY EXPRESS OR IMPLIED WARRANTY, INCLUDING THE IMPLIED WARRANTY
OF MERCHANTABILITY APPLICABLE TO THIS PRODUCT.
Some States do not allow the exclusion or limitation of incidental or consequential damages or limitations on how
long an implied warranty lasts; so these limitations or exclusions may not apply to you. This warranty gives you
specific legal rights and you may also have other rights which vary from state to state.
THE ABOVE WARRANTY DOES NOT APPLY TO:
1.
Service trips to your home to deliver and pickup, install, instruct, or replace house fuses or correct house wiring or
plumbing, or correction of unauthorized repairs.
2. Damage to the product caused by accident, pests, fire, floods, or acts of God.
3. Repairs when your LG product is used in other than normal, single-family household use.
4. Damage resulting from accident, alteration, misuse, abuse, or improper installation.
5. Damages caused during and/or after delivery.
6. Display, discount, or refurbished units purchased with scratches, dents, or defects.
Proof of purchase is required and must be provided to LG in order to validate warranty.
Therefore, these costs are paid by the consumer.
If the product is installed outside the normal service area, any cost of transportation involved in the repair of the product, or the
replacement of defective parts, shall be borne by the owner.
CUSTOMER ASSISTANCE NUMBERS:
To obtain Warranty Coverage:
Retain your Bill of Sale to prove date of purchase.
A Copy of your Sales Receipt must be submitted at the time
warranty service is provided.
To obtain Product or Customer
Call 1-800-243-0000
(24 hrs a day, 7 days per week, 365 days per year)
Press the appropriate menu option, and have your product type
(Refrigerator), model number, serial number, and ZIP/Postal
Code ready.
Service Assistance:
To obtain the nearest
Authorized Service Center:
Call 1-800-243-0000
(24 hrs a day, 7 days per week, 365 days per year)
Press the appropriate option, and have your product type
(Refrigerator), model number, serial number, and ZIP/Postal
Code ready.
3
LG Electronics
Visite nuestro sitio web/http://www.lgservice.com
GARANTÍA LIMITADA
Estados Unidos de América
LG Electronics reparará o en su defecto reemplazará sin cargo, el producto defectuoso en material o mano de
obra bajo uso normal durante el periodo de garantía que se menciona a continuación desde la fecha original de
compra.
Esta garantía es válida solo para el comprador original del producto durante el periodo de garantía mientras
permanezca en los E.E. U.U. Incluyendo Alaska, Hawaii y otros territorios de E.E.U.U.
Período de Garantía del refrigerador/Congelador LG
Producto
Partes
Refrigerador/Congelador
Sistema Sellado
(Compresor, Condensador, Evaporador)
1 año
7 años
Mano de Obra
1 año [Servicio a domicilio (ExceptoModelo GR-051)]
1 año[Servicio a domicilio (ExceptoModelo GR-051)]
No se aplicará otro tipo de garantía a este producto. LA DURACION DE OTRAS GARANTIAS ,
INCLUYENDO LA DE COMPRA, ESTAN LIMITADAS A LA DURACION DE ESTA GARANTIA. LG
ELECTRONICS NO SE HACE RESPONSABLE POR LA PERDIDA EN EL USO DEL PRODUCTO,
POR INCONVENIENCIA O CUALQUIER OTRO DAÑO DIRECTO O CONSECUENTE QUE PROVENGA
DEL USO Y/O NO USO DE ESTE PRODUCTO O POR ALGUNA VIOLACION A LAS GARANTIAS
IMPLEMENTADAS INCLUYENDO LA GARANTIA DE COMPRA APLICADA A ESTE PRODUCTO.
Algunos estados no permiten la exclusión o limitación de daños incidentales o consecuenciales o limitaciones
en cuanto al tiempo que dura una garantía implícita; por lo que algunas de estas limitaciones o exclusiones
pueden no aplicarse a usted. Esta garantía le otorga derechos legales específicos y usted puede además tener
otros derechos los cuales varían de Estado a Estado.
LA GARANTIA ANTERIOR NO APLICA A :
1.
Servicio a su casa para entregar, recoger, instalar o reemplazar fusibles caseros, corregir cableado casero o
plomería corrección de reparaciones no autorizadas.
2. Daño al producto causado por accidente, plagas, incendios, inundaciones o actos por naturaleza.
3. Reparaciones cuando su producto LG sea usado diferente a lo normal.
4. Daño resultante de accidente, alteración, mal uso o instalación inadecuada.
5. Daños causados durante y después de la entrega.
6. Reemplazo, descuento o restauración de unidades compradas con rayones, abolladuras o defectos.
La prueba de la compra se requiere y se debe proporcionar a LG para validar la garantia.
Por lo tanto, estos costos serán pagados por el consumidor.
Si el producto es instalado fuera del área normal de servicio, cualquier costo de transportación relacionado en la
reparación del producto, o el reemplazo de partes defectuosas, serán cargados al propietario.
NÚMEROS DE ASISTENCIA AL CLIENTE:
Para obtener cobertura de la Garantía:
Conserve su factura para comprobar la fecha de
compra.
Una copia de su recibo de compra debe ser entregada
cuando se le proporcione el servicio de garantía.
Para obtener información:
Lla me al 1-800-243-0000
Servicio de Asistencia:
(24 hrs al día, 7 días por semana, 365 días al año)
Presione la opción de menú apropiado, y tenga su tipo de
producto (Refrigerador), número de modelo, número de
serie, y ZIP / Código Postal listos.
Para obtener el Centro de Servicio Autorizado
más cercano:
Lla me al 1-800-243-0000
(24 hrs al día, 7 días por semana, 365 días al año)
Presione la opción adecuada, y tenga su tipo de
producto(Refrigerador), número de modelo, número
de serie, y ZIP /código Postal listos.
4
IMPORTANT SAFETY INSTRUCTIONS
SAFETY MESSAGES
This guide contains many important safety messages. Always read and obey all safety messages.
This is the safety alert symbol. It alerts you to safety messages that inform you
of hazards that can kill or hurt you or others, or cause damage to the product.
All safety messages will be preceded by the safety alert symbol and the hazard
signal word DANGER, WARNING, CAUTION. These words mean:
DANGER
WARNING
CAUTION
You will be killed or seriously injured if you don’t follow instructions.
You can be killed or seriously injured if you don’t follow instructions.
Indicates an imminently hazardous situation which, if not avoided,
may result in minor or moderate injury, or product damage only.
All safety messages will identify the hazard, tell you how to reduce the chance of injury and tell you what can happen if
the instructions are not followed.
WARNING
To reduce the risk of fire, electric shock, or injury
to persons when using your product, basic safety
precautions should be followed, including the following:
NEVER unplug your refrigerator by pulling on the power cord.
Always grip the plug firmly and pull it straight out from the
outlet.
Repair or replace immediately all electric service cords that
have become frayed or otherwise damaged. Do not use a cord
that shows cracks or abrasion damage along its length or at
either the plug or connector end.
When moving your refrigerator away from the wall,
be careful not to roll over or damage the power cord.
DO NOT store or use gasoline or other flammable vapors and
liquids in the vicinity of this or any other appliance.
DO NOT allow children to climb, stand or hang on the
refrigerator doors or shelves in the refrigerator. They could
damage the refrigerator and seriously injure themselves.
Keep fingers out of “pinch point” areas; clearances between
the doors and cabinet are necessarily small. Be careful
when you open the doors when children are in the area.
Unplug your refrigerator before cleaning or making any repairs.
NOTE: We strongly recommend that any servicing be
performed by a qualified individual.
Before replacing a burned-out light bulb, unplug the
refrigerator or turn off power at the circuit breaker or fuse box
in order to avoid contact with a live wire filament. (A burnedout light bulb may break when being replaced.) NOTE: Setting
either or both controls to the OFF position does not remove
power to the light circuit.
Do not store bottles in the freezer compartment - they may
break when frozen, causing damage.
For personal safety, this appliance must be properly grounded.
Have the wall outlet and the circuit checked by a qualified
electrician to make sure the outlet is properly grounded.
Read all instructions before using this appliance.
Use this appliance only for its intended purpose as described
in this use and care guide.
After your refrigerator is in operation, do not touch the cold
surfaces in the freezer compartment when hands are damp or
wet. Skin may adhere to the extremely cold surfaces.
In refrigerators with automatic icemakers, avoid contact with
the moving parts of the ejector mechanism, or with the heating
element that releases the cubes. DO NOT place fingers or
hands on the automatic icemaking mechanism while the
refrigerator is plugged in.
DO NOT refreeze frozen foods which have thawed completely.
The United States Department of Agriculture in Home and
Garden Bulletin No. 69 says:
“...You may safely refreeze frozen foods that have thawed if
they still contain ice crystals or if they are still cold below
40°F (4°C).”
“...Thawed ground meats, poultry, or fish that have any off-odor
or off-color should not be refrozen and should not be eaten.
Thawed ice cream should be discarded. If the odor or color of
any food is poor or questionable, get rid of it. The food may be
dangerous to eat.”
“Even partial thawing and refreezing reduces the eating quality
of foods, particularly fruits, vegetables and prepared foods.
The eating quality of red meats is affected less than that of
many other foods. Use refrozen foods as soon as possible to
save as much of their quality as you can.”
SAVE THESE INSTRUCTIONS
5
DANGER: RISK OF CHILD ENTRAPMENT
Child entrapment and suffocation are not problems of
the past. Junked or abandoned refrigerators are still
dangerous... even if they will sit for “just a few days”. If
you are getting rid of your old refrigerator, please follow
the instructions at right to help prevent accidents.
BEFORE YOU THROW AWAY
YOUR OLD REFRIGERATOR
OR FREEZER
Take off the doors.
Leave the shelves in place so that
children may not easily climb inside.
CFC DISPOSAL
Your old refrigerator may have a cooling system that used
CFCs (chlorofluorocarbons). CFCs are believed to harm
stratospheric ozone.
If you are throwing away your old refrigerator, make sure
the CFC refrigerant is removed for proper disposal by a
qualified servicer. If you intentionally release this CFC
refrigerant, you can be subject to fines and imprisonment
under provisions of environmental legislation.
GROUNDING REQUIREMENTS
IMPORTANT: Please read carefully.
TO CONNECT ELECTRICITY
WARNING
Electrical Shock Hazard
FOR PERSONAL SAFETY, this appliance must be
properly grounded. Have the wall outlet and the
circuit checked by a qualified electrician to make sure
the outlet is properly grounded.
3-prong
grounding type
wall receptacle
Where a standard two-prong wall outlet is encountered,
it is your personal responsibility and obligation to have it
replaced with a properly grounded three-prong wall outlet.
Do not, under any circumstances, cut or remove the
third (ground) prong from the power cord.
NOTE: Before performing any type of installation,
cleaning, or removing a light bulb, turn the control
(Thermostat, Refrigerator Control or Freezer Control,
depending on the model) to OFF and then disconnect the
refrigerator from the electrical source. When you are
finished, reconnect the refrigerator to the electrical source
and reset the control (Thermostat, Refrigerator Control or
Freezer Control, depending on the model) to the desired
setting.
USE OF EXTENSION CORDS
3-prong
grounding
plug
Ensure proper
ground exists
before use.
RECOMMENDED GROUNDING METHOD
The refrigerator should always be plugged into its own
individual properly grounded electrical outlet rated for
115 Volts, 60 Hz, AC only, and fused at 15 or 20 amperes.
This provides the best performance and also prevents
overloading house wiring circuits which could cause a fire
hazard from overheated wires. It is recommended that a
separate circuit serving only this appliance be provided.
Use a receptacle which cannot be turned off with a switch
or pull chain. Do not use an extension cord.
Because of potential safety hazards under certain
conditions, we strongly recommend against the use of
an extension cord. However, if you still elect to use
an extension cord, it is absolutely necessary that it be
a UL-listed (in the United States) or ACNOR (Canada),
3-wire grounding type appliance extension cord having a
grounding type plug and outlet, and that the electrical rating
of the cord be 15 amperes (minimum) and 120 volts.
Use of an extension cord will increase the clearance
needed for the back of the refrigerator.
WARNING
POWER CORD REPLACEMENT
If the power cord is damaged, it must be replaced
by the manufacturer, by our service center or by
qualified personal by LG Electronics, to avoid some
risk.
6
PARTS AND FEATURES
A
B
L
C
D
M
E
N
F
O
G
H
P
I
Q
R
J
K
Use this section to become more familiar with the parts and features.
NOTE: This guide covers several different models. The refrigerator you have purchased may have some
or all of the items listed below. The locations of the features shown below may not match your model.
A Digital Sensor Control
L Dairy Bin
B Refrigerator Light
M Design-A-Door
C Shelves
N Egg Box
D Temperature Control*
O Refrigerator Door Rack
E Chef Fresh / Snack Pan
P Freezer Light
Q Pull out Drawer
F Can Dispenser*
R Customcube Icemaker*
G Optibin Crisper
Keeps fruits and vegetable fresh and crisper
*on some models
H Ice Bin
I Ice Tray (Inside of H)*
J Durabase
K Divider
7
PARTS AND FEATURES
A
B
J
C
K
D
L
E
M
F
N
G
H
I
O
Use this section to become more familiar with the parts and features.
NOTE: This guide covers several different models. The refrigerator you have purchased may have some
or all of the items listed below. The locations of the features shown below may not match your model.
A Digital Sensor Control
J Dairy Bin
B Refrigerator Light
K Design-A-Door
C Shelves
L Pull out Drawer
D Chef Fresh / Snack Pan
M Refrigerator Door Rack
E Optibin Crisper
Keeps fruits and vegetable fresh and crisper
N Freezer Light
F Ice Bin
O Customcube Icemaker*
G Ice Tray (Inside of F)*
*on some models
H Durabase
I Divider
8
PARTS AND FEATURES
A
B
I
C
J
D
K
E
L
F
M
G
H
N
Use this section to become more familiar with the parts and features.
NOTE: This guide covers several different models. The refrigerator you have purchased may have some
or all of the items listed below. The locations of the features shown below may not match your model.
A Digital Sensor Control
I Dairy Bin
B Refrigerator Light
J Design-A-Door
C Shelves
K Wire Freezer Shelf
D Snack Pan
L Refrigerator Door Rack
E Optibin Crisper
Keeps fruits and vegetable fresh and crisp
M Freezer Light
N Freezer Door Rack
F Ice Trays*
*on some models
G Ice Bin
H Wire Durabase
9
REFRIGERATOR INSTALLATION
WARNING
Excessive Weight Hazard
Use two or more people to move and install
refrigerator.
Failure to do so can result in back or other injury.
UNPACKING YOUR REFRIGERATOR
Remove tape and any temporary labels from your
refrigerator before using. Do not remove any warningtype labels, the model and serial number label, or the
TechSheet that is attached to back wall of the refrigerator.
To remove any remaining tape or glue, rub the area
briskly with your thumb. Tape or glue residue can also be
easily removed by rubbing a small amount of liquid dish
soap over the adhesive with your fingers. Wipe with warm
water and dry.
Do not use sharp instruments, rubbing alcohol, flammable
fluids or abrasive cleaners to remove tape or glue. These
products can damage the surface of your refrigerator. For
more information, see the Important Safety Instructions
section.
Refrigerator shelves are installed in the shipping position.
Please reinstall shelves according to your individual
storage needs.
When Moving Your Refrigerator:
Your refrigerator is heavy. When moving the
refrigerator for cleaning or service, be sure to protect
the floor. Always pull the refrigerator straight out when
moving it. Do not wiggle or walk the refrigerator when
trying to move it, as floor damage could occur.
3. Install this appliance in an area where the temperature
is between 55°F (13°C) and 110°F (43°C.) If the
temperature around the appliance is too low or high,
cooling ability may be adversely affected.
CAUTION: Avoid placing the unit near heat sources,
direct sunlight or moisture.
NEXT
1. Clean your refrigerator thoroughly and wipe off all dust
accumulated during shipping.
2. Install accessories such as ice cube bin, drawers,
shelves, etc., in their proper places. They are packed
together to prevent possible damage during shipment.
3. Let your refrigerator run for 2 or 3 hours before putting
food in it. Check the flow of cold air in the freezer
compartment to ensure proper cooling. Your refrigerator
is now ready for use.
WARNING:
Be careful when you work with hinge, base grille,
stopper etc. You may be injured.
Do not put hands or metal sticks into air vents, base
grille or bottom of refrigerator. You may be injured or
receive an electrical shock.
BASE GRILLE
To remove the base grille:
1. Grasp the grille with both hands.
2. Pull the grille toward yourself.
To install the base grille:
1. Place clips in openings in the metal panel.
WARNING
Explosion Hazard
Keep flammable materials and vapors, such as
gasoline, away from refrigerator.
Failure to do so can result in death, explosion or fire.
INSTALLATION
1. Avoid placing the unit near heat sources, direct sunlight,
or moisture.
2. Push the grille toward the refrigerator until it snaps
into place.
A proper distance from adjacent items
Please keep the refrigerator at a proper distance from
other things. Too small a distance from adjacent items
may result in lowered freezing capability and increased
electricity consumption charges.
2. To avoid vibration, the unit must be level. If required,
adjust the leveling screws to compensate for
unevenness of the floor. The front should be slightly
higher than the rear to aid in door closing. Leveling
screws can be turned easily by tipping the cabinet
slightly. Turn the leveling screws clockwise (
) to
raise the unit, counterclockwise (
) to lower it.
(2.54 cm) 1”
10
REFRIGERATOR INSTALLATION
HOW TO REMOVE DOOR HANDLES
TOOLS YOU MAY NEED
10 mm
1/4 in
3/8 in
Hex head socket wrench
1/4 in
3/32 in
Phillips screwdriver
Flat head screwdriver
IMPORTANT: Before you begin, turn the refrigerator OFF
and unplug it. Remove food and any adjustable door or
utility bins from doors.
HOW TO REVERSE DOOR OPENING DIRECT ION
(when converting from the left-opening type to rightopening type)
1. Removing Refrigerator Door
• Remove the top hinge cover (1).
• Remove the 3 screws and lift off the top hinge (2).
• Lift the Refrigerator door (3) slightly and remove it.
• Use a flat tip screwdriver to pry off top hole cover (4)
and attach it on the right.
• Loosen the screw (5), remove the stoppers (6), and
attach them on the left (on the opposite side).
• Loosen the pin (8) and remove it.
• Loosen the 2 screws (9) and the 2 screws (10), and
lift off the middle hinge (11).
• Use a flat tip screwdriver to pry off bottom hole cover
(7) and attach it on the right.
HOW TO REMOVE DOOR HANDLES
NOTE: Handle appearance may vary from illustrations on this page.
2.. Removing Refrigerator Handle
• Loosen the set screws (1) with the 3/32” Allen
wrench and remove the handle (2).
• Loosen the handle mounting fasteners (3)
with the 1/4” Allen wrench.
• Carefully pry off the plug buttons (4).
• Install the plug buttons (4) on the left side.
• Install the handle mounting fasteners (3)
on the right side.
Allen Wrench
Allen wrench
REFRIGERATOR INSTALLATION
3. Replacing Refrigerator Handle
• Turn handle upside down (5)
• Place the handle (2) on the door by adjusting handle
footprints to fit mounting fastners and tighten the set
screws (1) with the 3/32 ” Allen wrench.
4. Installing Refrigerator Door
• Install the middle hinge (1) on the opposite side with the
screws (2), and the screw (3).
• Install the door (4) so that it fits onto the middle hinge
pin (5).
• Install the top hinge (6) with screws.
• Reinstall top hinge cover (7).
REFRIGERATOR INSTALLATION
HOW TO REMOVE AND INSTALL THE
PULLOUT DRAWER
• With both hands, hold both sides of the door and pull it
up to separate it from the rails.
IMPORTANT: To avoid possible injury, product or property
damage, you will need two people to perform the following
instructions.
1. Removing Pullout Drawer
• Pull the drawer open to full lower extension. Remove the
lower basket (1) by lifting basket from rail system.
1
• Press both hangers with yours thumbs to lift it up.
• Separate the left and right rail cover
• With both hands, hold the center of the bar and push it
in to let both rails fitted simultaneously.
• Remove the screws(2) of the rail on both sides.
2
CAUTION: When you remove the drawer, do not hold
handle. If it comes off, it could cause personal injury.
CAUTION: When laying down the drawer, be careful
not to damage the floor or hurt your feet by the sharp
edges on hinge side.
13
REFRIGERATOR INSTALLATION
HOW TO REMOVE AND INSTALL THE
PULL OUT DRAWER
• Make sure you have a right rail cover for each side.
Right
Rail cover
IMPORTANT: To avoid possible injur or product or property
damage, you will need two people to perform the following
instructions.
Left
Rail cover
2. Installing Pullout Drawer
• With both hands, hold the center of the bar and pull it
out to let both rails out to full extension simultaneously.
• Align the top holes of the rail cover with the top holes of
the door supports to assemble the rail cover.
Verify the hole’s assembly
• Hook door supports (1) into rail tabes (2) .
1
• With the drawer pulled out to full extension, insert the
lower basket (4) in the rail assembly.
2
4
• Lower door into final position and tighten the screws (3)
3
WARNING: To prevent accidental child and pet
entrapment or suffocation risk. DO NOT allow them to
play inside of drawer.
WARNING: DO NOT step or sit down on Freezer Door.
14
REFRIGERATOR INSTALLATION
REMOVING, REVERSING AND REPLACING
REFRIGERATOR DOORS (OPTIONAL)
NOTE: See the Parts and Features section
to match your model.
TOOLS NEEDED: 10mm hex-head socket wrench,
No. 2 Phillips screwdriver, flat-head screwdriver, 10mm
open-end wrench, flat 2-inch putty knife.
IMPORTANT: Before you begin, turn the refrigerator OFF
and unplug it. Remove food and any adjustable door or
utility bins from doors.
HOW TO REVERSE DOOR OPENING DIRECT ION
(when converting from the left-opening type to rightopening type)
1. Removing Refrigerator Door
Remove the top hinge cover (1).
Remove the 3 screws and lift of f the top hinge (2).
Lift the Refrigerator door (3) slightly and remove it.
Pry off the cover (4) using a slotted screwdriver and
attach it on the right.
Loosen the screw (5), remove the stoppers (6) and
attach them on the left (on the opposite side).
Loosen the pin (7) and remove it.
Lift off the washer (8).
Pry off the cover (9) using a slotted screwdriver and
attach it on the right.
2. Removing Freezer Door
Lift the door (10) slightly and remove it.
Loosen the 2 screws (11), the 2 screws (12), and lift
off the middle hinge (13).
Take off the base grille (14).
Remove the cap (15) and attach it on the right.
Loosen the 2 screws (16), remove the bottom hinge
(17), and attach on the left.
Loosen the 2 screws (18) and attach the stopper (19)
on the left side of the base.
3. Removing Refrigerator Handle
NOTE: To assist in installing the handle on the right
side, place a small piece of masking tape near the
top of the handle before removing.
Grasp the handle tightly with both hands and slide the
handle up (1)(this may require some force).
The keyhole slots (2) on the back of the handle allow
the handle to separate from the mounting screws (3).
15
REFRIGERATOR INSTALLATION
Use an adjustable wrench to remove the handle
mounting screws (3).
Carefully pry off the plug buttons (4).
Install the plug buttons (4) on left side.
Install the handle mounting screw (3) on the right side
Hold the handle so the masking tape is at the bottom.
Align keyhole slots (2) on the top and bottom of the
back of the handle with the screws (3) mounted on
the front of the door.
Press the handle against the door front, making sure
that the screws (3) go into the keyhole slots (2).
Grasping the handle with both hands, press it firmly
against the front of the door and slide the handle
down (6). This may require some force.
4. Removing Freezer Handle
NOTE: Before start, check handle type in your model.
Handle Type 1
Remove the cap (1) and the 2 caps (2) using a slotted
screwdriver.
Loosen the 2 screws (3), take of f the handle (4), and
install it on the right.
Attach the caps you removed earlier [figures (1) and
(2)].
Handle Type 2
For this handle type is not neccesary remove it.
5. Installing Freezer Door
Install the base grille (1).
Install the door (3) onto the bottom hinge pin.
Install the middle hinge (4) on the opposite side with the
screw (5) and the screws (9).
6. Installing Refrigerator Door
Place the washer (6) on the middle hinge pin (7).
Install the door (8) so that it fits onto the middle hinge
pin (7).
Install the top hinge (10) with screws.
Reinstall top hinge cover (11).
REFRIGERATOR INSTALLATION
AFTER COMPLETING THE JOB
Make sure that the four corners of the door gasket are
not folded over. To ensure a good seal, apply a small
NOTE: Having someone push against the top of the
refrigerator takes some weight off the leveling screws.
This makes it easier to adjust the screws.
3. Open both doors again and check to make sure that
they close easily. If not, tilt the refrigerator slightly more
to the rear by turning both leveling screws clockwise. It
may take several more turns, and you should turn both
leveling screws the same amount.
4. Check, using a level.
5. Replace the base grille.
Door Alignment
If the space between your doors is uneven, follow the
instructions below to align the doors:
1. Pry off the top hinge cover.
DOOR CLOSING AND ALIGNMENT
Door Closing
Your refrigerator has two front leveling screws one on
the right and one on the left. If your refrigerator seems
unsteady or you want the doors to close easier, adjust
the refrigerator tilt using the instructions below:
2. Loosen the top hinge screws using a 10 mm socket
or wrench.
3. Have someone hold the door in place or put a
spacer between the doors while you tighten the
top hinge screws.
4. Replace the top hinge cover.
1. Plug the refrigerator power cord into a 3-prong
grounded outlet. Move the refrigerator into its final
position.
2. Use a screwdriver to adjust the leveling screws. Turn
the leveling screw clockwise to raise that side of the
refrigerator or counterclockwise to lower it. It may take
several turns of the leveling screw to adjust the tilt of
the refrigerator.
17
USING YOUR REFRIGERATOR
ENSURING PROPER AIR CIRCULATION
SETTING THE CONTROLS
In order to ensure proper temperatures, air must flow
between the refrigerator and freezer sections. As shown
in the illustration below, cool air enters through the bottom
of the freezer section and moves up. Most of the air then
flows through the freezer section vents and recirculates
under the freezer floor. The rest of the air enters the
refrigerator section through the top vent.
Your refrigerator has two controls that let you regulate
the temperature in the freezer and refrigerator
compartments.
Initially set the REFRIGERATOR CONTROL at 37°F
(3°C) and the FREEZER CONTROL at 0°F ( -18°C).
Leave it at this setting for 24 hours (one day) to
stabilize. Then adjust the compartment temperature
as desired.
MULTI FLOW
Premium Model
(Identify your control type)
The cooling fan operates more powerful and effective
than in normal operation. This is specially noticeable
when new food is placed in the refrigerator compartment.
If water or foreign substances enter the cool air vent
while cleaning, efficiency will be lowered. In addition, if
gasket is damaged, efficiency may be lowered because
of escaping cool air.
Refrigerator control: 32°F to 47°F (0°C to 8°C)
The lower the number setting, the colder the refrigerator
compartment will become.
Freezer control: - 6°F to 9°F (- 21°C to - 13°C)
When the setting is at a lower number, the freezer
compartment becomes colder. But the refrigerator
compartment becomes warmer because less cold air
flows into the refrigerator.
Ice Plus:
Press the Ice Plus key and the LED will turn
on. This function will remain activated for 24 hours and
intensify the cooling speed of freezer and increase the
amount of ice.
Do not block any of these vents with food packages. If
the vents are blocked, airflow will be interrupted and
temperature and moisture problems may occur.
NOTE: To change °F/°C press and HOLD COLDER key
cof freezer and COLDER key of refrigerator over 1 sec. at
the same time.
IMPORTANT: Because air circulates between both
sections, any odors formed in one section will transfer to
the other. You must thoroughly clean both sections to
eliminate odors. To prevent odor transfer and drying out of
food, wrap or cover foods tightly. (See the Food Storage
Guide section for details.)
DOOR ALARM
With this feature you´ll listen a alarm when the freezer or
refrigerator door is not closed within 1 minute after it is
opened. These tones repeat every 30 seconds.
The alarm is cancelled when the freezer or the refrigerator
is closed correctly.
18
USING YOUR REFRIGERATOR
Middle Models (Identifier your control type)
Refrigerator control: position 1 to 7
(32°F to 47°F or 0°C to 8°C)
The higher the number setting, the colder the refrigerator
compartment will become.
CONDITION/REASON:
REFRIGERATOR section
too warm
Door opened often
Large amount of food added
Room temperature very warm
REFRIGERATOR TEMP
ADJUST
WARMER
FREEZER section too warm/
ice not made fast enough
Door opened often
Large amount of food added
Very cold room temperature
(can’t cycle often enough)
Heavy ice usage
Air vents blocked by items
4 IS RECOMMENDED
Freezer control: position 1 to 7
(-6°F to 8°F or -21°C to -13°C)
When the setting is at a higher number, the freezer
compartment becomes colder. But the refrigerator
compartment becomes warmer because less cold air
flows into the refrigerator.
REFRIGERATOR section too
cold
Controls not set correctly for
your conditions
Ice Plus
Press the Ice Plus key and the LED will turn
on. This function will remain activated for 24 hours and
intensify the cooling speed of freezer and increase the
amount of ice.
FREEZER section too cold
Controls not set correctly for
your conditions
FREEZER TEMP
WARMER
4 IS RECOMMENDED
COLDER
ADJUST
ADJUSTING CONTROL SETTINGS
Give the refrigerator time to cool down completely before
adding food. It is best to wait 24 hours before you put
food into the refrigerator. The mid-settings indicated in the
previous section should be correct for normal household
refrigerator usage. The controls are set correctly when
milk or juice is as cold as you like and when ice cream
is firm.
The refrigerator control functions as the thermostat for the
entire appliance (refrigerator and freezer sections.) The
higher the number setting, the longer the compressor will
run to keep the temperature colder. The freezer control
adjusts the cold air flow from the freezer to the
refrigerator. Setting the freezer control to a lower
temperature keeps more cold air in the Freezer
compartment to make it colder.
If you need to adjust temperatures in the refrigerator or
freezer, start by adjusting the refrigerator first. Wait 24
hours after the refrigerator adjustment to check the
freezer temperature. If it is too warm or too cold, then
adjust the freezer control as well.
Use the settings listed in the chart below as a guide.
Always remember to wait at least 24 hours between
adjustments.
19
RECOMMENDED
ADJUSTMENT:
Turn
REFRIGERATOR
control to next
higher number,
wait 24 hours,
then re-check
Turn FREEZER
control to next
higher number,
wait 24 hours,
Then re-check
Move items out of
airstream
Turn
REFRIGERATOR
control to next
lower number,
wait 24 hours,
then re-check
Turn FREEZER
control to next
lower number,
wait 24 hours,
then re-check
USING YOUR REFRIGERATOR
FOOD STORAGE GUIDE
Storing Fresh Food
Wrap or store food in the refrigerator in airtight and
moisture-proof material unless otherwise noted. This
prevents food odor and taste transfer throughout the
refrigerator. For dated products, check date code to
ensure freshness.
Butter or margarine
Keep opened butter in a covered dish or closed
compartment. When storing an extra supply, wrap
in freezer packaging and freeze.
Cheese
Store in the original wrapping until you are ready to
use it. Once opened, rewrap tightly in plastic wrap or
aluminum foil.
Packaging
Successful freezing depends on correct packaging. When
you close and seal the package, it must not allow air or
moisture in or out. If you do, you could have food odor
and taste transfer throughout the refrigerator and also dry
out frozen food.
Packaging recommendations:
Rigid plastic containers with tight-fitting lids
Straight-sided canning/freezing jars
Heavy-duty aluminum foil
Plastic-coated paper
Non-permeable plastic wraps
Specified freezer-grade self-sealing plastic bags
Follow package or container instructions for proper
freezing methods.
Wipe milk cartons. For best storage, place milk on interior
shelf, not on door shelf.
Do not use:
Bread wrappers
Non-polyethylene plastic containers
Containers without tight lids
Wax paper or wax-coated freezer wrap
Thin, semi-permeable wrap
Eggs
Freezing
Milk
Store in original carton on interior shelf, not on door shelf.
Fruit
Wash, let dry, and store in refrigerator in plastic bags or in
the crisper. Do not wash or hull berries until you are ready
to use them. Sort and keep berries in their original
container in a crisper, or store in a loosely closed paper
bag on a refrigerator shelf.
Leafy vegetables
Remove store wrapping and trim or tear off bruised and
discolored areas. Wash in cold water and drain. Place in a
plastic bag or plastic container and store in the crisper.
Vegetables with skins (carrots, peppers)
Place in plastic bags or plastic container and store
in crisper.
Fish
Use fresh fish and shellfish the same day purchased.
IMPORTANT: Do not store bottles in the freezer
compartment - they may break when frozen,
causing damage.
Your freezer will not quick-freeze any large quantity of
food. Do not put more unfrozen food into the freezer than
will freeze within 24 hours (no more than 2 to 3 lbs of food
per cubic foot of freezer space). Leave enough space in
the freezer for air to circulate around packages. Be careful
to leave enough room at the front so the door can close
tightly.
Storage times will vary according to the quality and type
of food, the type of packaging or wrap used (airtight and
moisture-proof) and the storage temperature. Ice crystals
inside a sealed package are normal. This simply means
that moisture in the food and air inside the package have
condensed, creating ice crystals.
Chef fresh
NOTE: Allow hot foods to cool at room temperature for
30 minutes, then package and freeze. Cooling hot foods
before freezing saves energy.
Store most chef fresh in original wrapping as long as it is
airtight and moisture-proof. Rewrap if necessary.
NOTE: Do not store food near the sensor; it may cause
the sensor to malfunction.
Leftovers
Cover leftovers with plastic wrap or aluminum foil. Plastic
containers with tight lids can also be used.
WARNING
Suffocation Hazard
When using dry ice, provide adequate ventilation.
Dry ice is frozen carbon dioxide (CO2) . When it
vaporizes, it can displace oxygen, causing dizziness,
light-headedness, unconsciousness and death by
suffocation. Open a window and do not breathe
the vapors.
STORING FROZEN FOOD
NOTE: For further information about preparing food for
freezing or food storage times, check a freezer guide or a
reliable cookbook.
20
USING YOUR REFRIGERATOR
REFRIGERATOR SHELVES
The shelves in your refrigerator are adjustable to meet
your individual storage needs. These units are all glass
shelves.
Sliding Out Shelves (optional on some models)
You can slide some glass shelves in and out of your
refrigerator as follows.
To slide the shelf out, carefully pull front of shelf
toward you.
Storing similar food items together in your refrigerator and
adjusting the shelves to fit different heights of items will
make finding the exact item you want easier; it will also
reduce the amount of time the refrigerator door is open,
saving energy.
IMPORTANT: Do not clean glass shelves with warm
water when they are cold. Shelves may break if exposed
to sudden temperature changes or impact, such as
bumping. For your protection, glass shelves are made
with tempered glass, which will shatter into small pebblesized pieces.
NOTE: Glass shelves are heavy. Use special care when
removing them to avoid dropping them.
Adjusting Shelves
Remove shelves from the shipping position and replace
shelves in the position you want.
To remove a shelf : Tilt up the front of the shelf in the
direction of (1) and lift it in the direction of (2). Pull the
shelf out.
To slide shelf in, push shelf in until it stops.
To remove a sliding shelf from its metal frame:
1. Pull the shelf out to the stop position.
2. Tilt the front of the shelf up and pull it past the stop position.
3. Lift up the shelf to remove.
Replace the shelf by reversing the above steps.
Convenience Shelves (optional on some models)
Folding Shelf: You can store taller items such as gallon
containers or bottles by simply sliding the shelf back.
To replace a shelf : Tilt the front of the shelf up and
guide the shelf hooks into the slots at a desired height.
Then lower the front of the shelf so that the hooks drop
into the slots.
NOTE: Make sure that shelves are level from one side to
the other. Failure to do so may result in the shelf falling or
spilling food.
21
USING YOUR REFRIGERATOR
CHEF FRESH / SNACK PAN
CRISPER HUMIDITY CONTROL
(on some models)
While holding the chef fresh with one hand, pull it forward
slightly. Lift slightly and pull it out.
You can control the amount of humidity in the moisturesealed crispers. Adjust the control to any setting between
and
.
lets moist air out of the crisper for best storage of
fruits.
keeps moist air in the crisper for best storage of
fresh, leafy vegetables.
To remove the glass:
1. Lift up the glass after inserting a screwdriver under the
crisper cover.
CRISPER HUMIDITY CONTROL
(on some models)
2. Pull up and out.
You can control the amount of humidity in the moisturesealed crispers. Adjust the control to any setting between
“
” and “ ”.
“
“
”:Lets moist air out of the crisper for best storage of
fruits.
” :Keeps moist air in the crisper for best storage of
fresh, leafy vegetables.
To remove the crisper:
1. Slide crisper straight out to the stop.
2. Lift the front of the crisper, then pull it out to remove.
3. Replace the crisper by sliding it back in fully past the
drawer stop.
OPTIBIN CRISPERS
The OptiBin Crispers provide fresher-tasting fruit and
vegetables by letting you easily control humidity inside the
crisper. The OptiBin Crispers include: 1) a humidity
control knob at the front of the crisper cover and 2) a
large lattice on the inner surface of the cover to hold
or release moisture.
22
USING YOUR REFRIGERATOR
CRISPER COVER WITH LATTICE ON INNER
SURFACE (on some models)
DOOR RACKS
The door racks may be removed for easier cleaning.
To remove the crisper cover:
Snap-on Door Racks
1. Remove both crisper drawers.
2. While holding the crisper cover support (2), pull the
cover up and out(1).
To remove the racks:
1. Remove all items in the door racks.
2. Push the rack against the inside wall of the door (A)
and lift up the door rack (B).
WARNING: Be careful when handing glass cover since
glass is not attached to cover.
To replace the racks:
1. Hold either end of the door rack against the inside wall of the door.
2. Push down the rack until it locks in place.
To remove the lattice on inner surface:
DESIGN-A-DOOR
1. Bins can be moved to either side of the door.
2. To remove the bin, simply lift the bin and pull straight out.
1. Remove crisper cover(as illustrated above).
2. Hold the glass cover and overtum crisper cover.
3. For each lattice hold lattice and pull sides of the cover
outward to remove lattice.
3. To replace the bin, slide it in above the desired
support and push down until it locks completely
so that “click” sounds can be heard.
To replace lattice on inner surface:
1. For each lattice insert middle tab in 1 (closed to glass
cover)and pull sides of the cover to insert lattice.
4. To move to lowest position, make sure if all bins are
correctly assembled so that they don’t fall out of door.
Warning: Somebody can be hurt if door bins are not
firmly assembled.
NOTE: Do not adjust a bin that is loaded with food.
23
USING YOUR REFRIGERATOR
DAIRY BIN
DURABASE (on some models)
1. To remove the dairy bin, simply lift it and pull straight
out.
1. To remove the Durabase, push it back to the end as
much as possible. Tilt up the front of the Durabase and
pull straight out.
2. To replace the dairy bin, slide it in above the desired
location and push down until it stops.
2. To install, insert the Durabase in rail assembly.
1
2
EGG BOX (on some models)
Store Egg Box on interior shelf, not on door shelf.
DURABASE DIVIDER (on some models)
CAUTION: Do not use the egg box as an ice storage
bin in the freezer compartment. The egg box can easily
easily break if it freezes.
The Durabase divider allows you to organize the
Durabase area into sections.
FREEZER SECTION
ICE BIN (on some models)
1. To separate the ice bin, pull out the drawer as much as
possible.
2. Gently lift and pull out the ice bin.
1. To remove, pull divider staight up.
3. To reinstall, pull out the drawer as much as possible and set
the ice bin in its correct position, and then push in the drawer.
2. To install, hook top corners of divider over top edge of
durabase.
DRAWER
ICE BIN
24
USING YOUR REFRIGERATOR
WIRE DURABASE (on some models)
GLIDE - OUT DRAWER BASKET
(on some models)
1. To remove wire Durabase, pull wire durabase out to full
extension.
Tilt up the front of the wire Durabase and pull it straight
out.
1. To remove, lift basket up and pull out straight out.
2. To install, insert the wire Durabase into frame rails and
push back into place.
1
2
2. To Install, pull both rails out to full extension.
Hook the basket supports into the rail tabs and push to
the back of compartment.
FREEZER SHELF (on some models)
To remove the shelf, take it from the front part, and pull it
towards you.
To place the shelf, reverse the removal procedure.
TILTING DOOR (on some models)
The tilting door provides easy access to stored foods.
How to use:
Tilt the door down and pull it out.E
adjust
WARNING: Be careful when you open tilting door so
that you do not injure your foot!
To
25
CARE AND CLEANING
PLASTIC PARTS (covers and panels)
WARNING
Do not use paper towels, window sprays, abrasive
cleansers, or flammable fluids. These can scratch or
damage the material.
CONDENSER COILS
Remove grille base. (See the grille base section)
Explosion Hazard
Use non-flammable cleaner.
Failure to do so can result in death, explosion, or fire.
Both the refrigerator and freezer sections defrost
automatically. However, clean both sections about once
a month to prevent odors. Wipe up spills immediately.
Use a vacuum cleaner with an extended attachment to
clean condenser coils.
Vacuum coils when dusty or dirty. Coils may need to be
cleaned as often as every other month.
Replace grille base.
LIGHT BULB REPLACEMENT
GENERAL CLEANING TIPS
WARNING
Unplug refrigerator or disconnect power.
Electrical Shock Hazard
Remove all removable parts, such as shelves,
crispers, etc.
Before replacing a burned-out light bulb, either unplug
the refrigerator or turn off power at the circuit breaker
or fuse box.
Use a clean sponge or soft cloth and a mild detergent in
warm water. Do not use abrasive or harsh cleaners.
NOTE: Moving the control to the OFF position
does not remove power to the light circuit.
Hand wash, rinse and dry all surfaces thoroughly.
Plug in refrigerator or reconnect power.
OUTSIDE
Waxing external painted metal surfaces helps provide rust
protection. Do not wax plastic parts. Wax painted metal
surfaces at least twice a year using appliance wax (or
auto paste wax). Apply wax with a clean, soft cloth.
For products with a stainless steel exterior, use a clean
sponge or soft cloth and a mild detergent in warm water.
Do not use abrasive or harsh cleaners. Dry thoroughly
with a soft cloth.
NOTE: Not all appliance bulbs will fit your refrigerator. Be
sure to replace the bulb with one of the same size, shape
and wattage.
To change the refrigerator light:
1. Unplug the power cord from the outlet.
2. Remove refrigerator shelves.
3. Release the hooks on the front of the light shield
with the help of a flat screwdriver and pull the
shield down to remove it.
INSIDE WALLS (allow freezer to warm up so
cloth won’t stick)
To help remove odors, you can wash the inside of the
refrigerator with a mixture of baking soda and warm water.
Mix 2 tablespoons baking soda to 1 quart of water (26 g
soda to 1 liter water.) Be sure the baking soda is
completely dissolved so does it not scratch the surfaces
of the refrigerator.
DOOR LINERS AND GASKETS
4. Turn the bulb counterclockwise.
Do not use cleaning waxes, concentrated detergents,
bleaches, or cleaners containing petroleum plastic parts.
26
CARE AND CLEANING
5. To assemble, first insert the hooks at the back and
then push up the light shield.
WHEN YOU GO ON VACATION
If you choose to leave the refrigerator on while you
are away, follow these steps to prepare your refrigerator
before you leave.
1. Use up any perishables and freeze other items.
2. Empty the ice bin.
To change the freezer light:
If you choose to turn the refrigerator off before you
leave, follow these steps.
1. Unplug refrigerator or disconnect power.
1. Remove all food from the refrigerator.
2. Reach behind light shield to remove bulb.
2. Depending on your model, set the thermostat control
(refrigerator control) to OFF. See the Setting the
Controls section.
3. Replace bulb with a wattage indicated in
the refrigerator section, as shown in picture
1
.
3. Clean refrigerator, wipe it and dry well.
1
4. Plug in refrigerator or reconnect power.
4. Tape rubber or wood blocks to the tops of both doors to
prop them open far enough for air to get in. This stops
odor and mold from building up.
WHEN YOU MOVE
When you are moving your refrigerator to a new home,
follow these steps to prepare it for the move.
1. Remove all food from the refrigerator and pack all
frozen food in dry ice.
2. Depending on your model, turn the thermostat control
(refrigerator control) to OFF. See the Setting the
Controls section.
3. Unplug the refrigerator.
4. Empty water from the defrost pan.
POWER INTERRUPTIONS
5. Clean, wipe and dry thoroughly.
If the electricity goes off, call the power company and ask
how long it will be off.
6. Take out all removable parts, wrap them well and tape
them together so they don’t shift and rattle during the
move.
1. If the power will be out for 24 hours or less, keep
both refrigerator doors closed to help foods stay
cold and frozen.
2. If the power will be out for more than 24 hours:
7. Depending on the model, raise the front of the
refrigerator so it rolls more easily OR screw in the
leveling legs all the way so they don’t scrape the floor.
See the Door Closing section.
a) Remove all frozen food and store it in a frozen
food locker.
8. Tape the doors shut and tape the power cord to the
refrigerator cabinet.
OR
When you get to your new home, put everything back
and refer to the Installing Your Refrigerator section for
preparation instructions.
b) Place 2 lbs of dry ice in the freezer for every cubic
foot of freezer space. This will keep the food frozen
for two to four days. While handling dry ice, wear
gloves to protect your hands from frostbite.
OR
c) If neither a food locker nor dry ice is available,
consume or can perishable food at once.
27
ABOUT THE AUTOMATIC ICEMAKER
NOTE: Automatic Ice Maker feature is included only in
certain models. Please check your product specification.
WARNING
Personal Injury Hazard
Avoid contact with the moving parts of the ejector
mechanism, or with the heating element that releases
the cubes. DO NOT place fingers or hands on the
automatic icemaking mechanism while the refrigerator
is plugged in.
NOTE: If the cube size is smaller or larger than you
expected, you can regulate the size with the cube size
button.
Every time you press the cube size button, the indicator
moves up one light. The higher the light position, the larger
the cubes will be. Pressing at highest position returns
indicator to lowest position.
WHEN YOU SHOULD SET THE ICEMAKER
POWER SWITCH TO O (OFF)
• When the water supply will be shut off for several hours.
OPERATION INSTRUCTIONS
A newly-installed refrigerator may take
12 to 24 hours to begin making ice.
• When the ice storage bin is removed for more than a
minute or two.
• When the refrigerator will not be used for several days.
NORMAL SOUNDS YOU MAY HEAR
Icemaker
• The icemaker water valve will buzz as the icemaker fills
with water. If the power switch is in the I (on) position, it
will buzz even if it has not yet been hooked up to water.
To stop the buzzing, move the power switch to O (off).
NOTE: Keeping the power switch in the I (on) position
before the water line is connected can damage the
icemaker.
Feeler Arm
Cube Size
Indicator Light
Power Switch
Cube Size
Select Button
The icemaker will produce eight cubes per cycle—
approximately 100–130 cubes in a 24-hour period,
depending on freezer compartment temperature, room
temperature, number of door openings and other
operating conditions.
If the refrigerator is used before the water connection is
made to the icemaker, set the power switch to O (off).
• You will hear the sound of cubes dropping into the bin
and water running in the pipes as the icemaker refills.
PREPARING FOR VACATION
Set the icemaker power switch to O (off)and shut off the
water supply to the refrigerator.
If the ambient temperature will drop below freezing, have
a qualified servicer drain the water supply system to
prevent serious property damage due to flooding from
ruptured water lines or connections.
When the refrigerator has been connected to the water
supply, set the power switch to I (on).
The icemaker will fill with water when it cools to freezing.
A newly-installed refrigerator may take 12 to 24 hours to
begin making ice cubes.
Throw away the first few batches of ice to allow the water
line to clear.
Be sure nothing interferes with the sweep of the feeler
arm.
When the bin fills to the level of the feeler arm, the
icemaker will stop producing ice.
It is normal for several cubes to be stuck together.
If ice is not used frequently, old ice cubes will become
cloudy, taste stale, and shrink.
28
CONNECTING THE WATER LINE
NOTE: Water line installation is needed when the
Automatic Ice Maker and/or Water Dispenser features
are available on your product.
Two 1/4” outer diameter
compression nuts and
2 ferrules (sleeves) to
connect the copper tubing to
the shutoff valve and the
refrigerator water valve.
If your existing copper water
line has a flared fitting at the
end, you will need an
adapter (available at
plumbing supply stores) to
connect the water line to the refrigerator OR you can
cut off the flared fitting with a tube cutter and then use
a compression fitting.
Shutoff valve to connect to
the cold water line. The
shutoff valve should have a
water inlet with a minimum
inside diameter of 5/32” at
the point of connection to the
COLD WATER LINE. Saddle-type shutoff valves are
included in many water supply kits. Before purchasing,
make sure a saddle-type valve complies with your local
plumbing codes.
BEFORE YOU BEGIN
This water line installation is not warranted by the
refrigerator or icemaker manufacturer. Follow these
instructions carefully to minimize the risk of expensive
water damage.
Water hammer (water banging in the pipes) in house
plumbing can cause damage to refrigerator parts and lead
to water leakage or flooding. Call a qualified plumber to
correct water hammer before installing the water supply
line to the refrigerator.
To prevent burns and product damage, do not hook up
the water line to the hot water line.
If you use your refrigerator before connecting the water
line, make sure the icemaker power switch is in the O
(off) position.
Do not install the icemaker tubing in areas where
temperatures fall below freezing.
When using any electrical device (such as a power
drill) during installation, be sure the device is doubleinsulated or grounded in a manner to prevent the hazard
of electric shock, or is battery-powered.
All installations must be in accordance with local plumbing
code requirements.
NOTE: Wear eye protection.
INSTALLATION INSTRUCTIONS
Install the shutoff valve on the nearest frequently used
drinking water line.
1. SHUT OFF THE MAIN WATER SUPPLY
WHAT YOU WILL NEED
Copper Tubing, 1/4” outer
diameter to connect the refrigerator
to the water supply. Be sure both
ends of the tubing are cut square.
To determine how much tubing you need: measure
the distance from the water valve on the back of the
refrigerator to the water supply pipe. Then add 8 feet
(2.4 m). Be sure there is sufficient extra tubing (about 8 feet
[2.4 m] coiled into 3 turns of about 10 [25 cm] diameter) to
allow the refrigerator to move out from the wall after
installation.
Be sure that the kit you select allows at least 8 feet
(2.4 m) as described above.
A cold water supply. The water pressure must be
between 20 and 120 p.s.i. on models without a water
filter and between 40 and 120 p.s.i. on models with a
water filter.
Power drill.
1/2” or adjustable
wrench.
Straight- and Phillipsblade screwdriver
Turn on the nearest faucet to relieve the pressure on
the line.
2. CHOOSE THE VALVE LOCATION
Choose a location for the valve
that is easily accessible. It is best
to connect into the side of a
vertical water pipe. When it is
necessary to connect into a
horizontal water pipe, make the
connection to the top or side,
rather than at the bottom, to avoid
drawing off any sediment from the water pipe.
3. DRILL THE HOLE FOR THE VALVE
Drill a 1/4” hole in the water
pipe (even if using a selfpiercing valve) using a
sharp bit. Remove any burrs
resulting from drilling the
hole in the pipe. Take care
not to allow water to drain
into the drill. Failure to drill a 1/4 hole may result in
reduced ice production or smaller cubes.
29
CONNECTING THE WATER LINE
INSTALLATION INSTRUCTIONS
(CONTINUED)
7. CONNECT THE TUBING TO THE VALVE
Place the compression nut and ferrule (sleeve)
for copper tubing onto the end of the tubing and
connect it to the shutoff valve. Make sure the tubing is
fully inserted into the valve. Tighten the compression
nut securely.
4. FASTEN THE SHUTOFF VALVE
Fasten the shutoff valve to the cold water pipe with
the pipe clamp.
Pipe Clamp
Saddle-Type
Shutoff Valve
Saddle-Type
Shutoff Valve
Packing
Nut
Vertical Cold
Water Pipe
Outlet
Valve
8. FLUSH OUT THE TUBING
Turn the main water supply on
and flush out the tubing until the
water is clear.
Tighten the clamp screws until the sealing washer
begins to swell.
NOTE: Do not overtighten or you may crush
the tubing.
Washer
Pipe Clamp
Ferrule (sleeve)
NOTE: Commonwealth of Massachusetts Plumbing
Codes 248CMR shall be adhered to. Saddle valves
are illegal and use is not permitted in Massachusetts.
Consult with your licensed plumber.
NOTE: Commonwealth of Massachusetts Plumbing
Codes 248CMR shall be adhered to. Saddle valves
are illegal and use is not permitted in Massachusetts.
Consult with your licensed plumber.
5. TIGHTEN THE PIPE CLAMP
Compression
Nut
Shut the water off at the water
valve after about one quart of
water has been flushed through
the tubing.
Inlet End
Clamp Screw
6. ROUTE THE TUBING
Route the tubing between the cold water line and the
refrigerator.
Route the tubing through a hole drilled in the wall or
floor (behind the refrigerator or adjacent base cabinet)
as close to the wall as possible.
NOTE: Be sure there is sufficient extra tubing (about
8 feet coiled into 3 turns of about 10” diameter) to
allow the refrigerator to move out from the wall after
installation.
30
CONNECTING THE WATER LINE
9. CONNECT THE TUBING TO THE
REFRIGERATOR
11. PLUG IN THE REFRIGERATOR
Arrange the coil of tubing so
that it does not vibrate against
the back of the refrigerator or
against the wall. Push the
refrigerator back to the wall.
NOTES:
Before making the connection to the refrigerator, be
sure the refrigerator power cord is not plugged into
the wall outlet.
If your refrigerator does not have a water filter,
we recommend installing one. If your water supply
has sand or particles that could clog the screen of
the refrigerator’s water valve. Install the filter in the
water line near the refrigerator.
Remove the plastic flexible cap from the refrigerator
connection.
12. START THE ICEMAKER
Set the icemaker power switch to the ON position.
The icemaker will not begin to operate until it reaches
its operating temperature of 15°F (-9°C) or below. It
will then begin operation automatically if the icemaker
power switch is in the I (on) position.
Place the compression nut and ferrule (sleeve) onto
the end of the tubing.
Insert the end of the tubing into the connection as far
as possible. While holding the tubing, tighten the fitting.
Refrigerator
Connection
Ferule
(sleeve)
Tubing
Clamp
1/4”
Compression
Nut
1/4”
Tubing
Fasten the tubing into the tubing Clamp attached to
the back of the refrigerator.
First, loosen the screw fastening the clamp. Next,
insert the tubing in the groove. Finally, re-fasten the
screw.
10. TURN THE WATER ON AT THE
SHUTOFF VALVE
Tighten any connections that
leak.
Reattach the compressor
compartment access cover.
31
TROUBLESHOOTING GUIDE
UNDERSTANDING SOUNDS YOU MAY HEAR
Your new refrigerator may make sounds that your old one
didn’t make. Because the sounds are new to you, you
might be concerned about them. Most of the new sounds
are normal. Hard surfaces, like the floor, walls and
cabinets, can make the sounds seem louder than they
actually are. The following describes the kinds of sounds
and what may be making them.
The defrost timer will click when the automatic defrost
cycle begins and ends. The thermostat control (or
refrigerator control, depending on the model) will also
click when cycling on and off.
Rattling noises may come from the flow of refrigerant, the
water line, or items stored on top of the refrigerator.
Your refrigerator is designed to run more efficiently
to keep your food items at the desired temperature.
The high efficiency compressor may cause your new
refrigerator to run longer than your old one, and
you may hear a pulsating or high-pitched sound.
You may hear the evaporator fan motor circulating the air
through the refrigerator and freezer compartments.
As each cycle ends, you may hear a gurgling sound due
to the refrigerant flowing in your refrigerator.
Contraction and expansion of the inside walls may cause
a popping noise.
Water dripping on the defrost heater during a defrost
cycle may cause a sizzling sound.
You may hear air being forced over the condenser by the
condenser fan.
You may hear water running into the drain pan during the
defrost cycle.
Due to refrigerator's low energy consumption design, the
fans will remain off by the door switch activates the inner
compartment light.
REFRIGERATOR DOES NOT OPERATE
Check if...
Then...
The power supply cord is unplugged.
Firmly plug the cord into a live outlet with proper voltage.
A household fuse has blown or circuit
breaker tripped.
Replace the fuse or reset the circuit breaker.
The refrigerator control is set to the OFF position.
Refer to the Setting the Controls .
Refrigerator is in the defrost cycle.
Wait about 30 minutes for defrost cycle to end.
VIBRATION OR RATTLING NOISE
Check if...
The refrigerator is not resting solidly on
the floor.
Then...
Floor is weak or uneven or leveling legs need adjusting.
See Installation Section.
LIGHTS DO NOT WORK
Check if...
Then...
The power supply cord is unplugged.
Firmly plug the cord into a live outlet with proper voltage.
Light bulb is loose in the socket.
Turn the refrigerator control to the OFF position and unplug
the refrigerator. Gently remove the bulb and reinsert. Then
plug in refrigerator and reset the refrigerator control.
Light bulb has burned out.
Replace with an appliance bulb of the same wattage, size
and shape available at your local hardware store. (See the
Changing the Light Bulb(s) Section.) Turn
the temperature control to the OFF position and unplug the
refrigerator prior to replacement.
32
TROUBLESHOOTING GUIDE
COMPRESSOR MOTOR SEEMS TO RUN TOO MUCH
Check if...
Then...
The refrigerator that was replaced was an
older model.
Modern refrigerators with more storage space require
more operating time.
The room temperature is hotter than normal.
The motor will run longer under warm conditions. At normal
room temperatures, expect your motor to run about 40% to
80% of the time. Under warmer conditions, expect it to run
even more often.
The door is opened often or a large amount
of food has just been added.
Adding food and opening the door warms the refrigerator.
It is normal for the refrigerator to run longer in order to cool
the refrigerator back down. Adding a large amount of food
warms the refrigerator. See the Food Storage Guide Section.
In order to conserve energy, try to get everything
you need out of the refrigerator at once, keep food organized
so it is easy to find and close the door as soon as the food
is removed.
The refrigerator was recently plugged in and
the refrigerator control was set correctly
The refrigerator will take up to 24 hours to cool
completely.
The refrigerator control was not set correctly for the
surrounding conditions.
See the Adjusting control settings Section.
The doors are not closed completely.
Push the doors firmly shut. If they will not shut all the way, see
Doors will not close completely below.
The condenser coils are dirty.
This prevents air transfer and makes the motor work harder.
Clean the condenser coils. Refer to the Care and Cleaning
section.
DOORS WILL NOT CLOSE COMPLETELY
Check if...
Then...
The refrigerator is not level.
See the Installation Section to level refrigerator.
Food packages are blocking the door open.
Rearrange food containers to clear door and door shelves.
The ice bin, crisper cover, pans, shelves, door bins
or baskets are out of position.
Push bins all the way in and put crisper cover, pans, shelves
and baskets into their correct positions. See the Using Your
Refrigerator Section.
The gaskets are sticking.
Clean gaskets and the surface that they touch. Rub a thin
coat of paraffin wax on the gaskets after cleaning.
The refrigerator wobbles or seems unstable.
Level the refrigerator. Refer to the Door Closing and
Alignment Section.
The doors were removed during product installation
and not properly replaced.
Remove and replace the doors according to the Removing,
Reversing and Replacing Refrigerator Doors section
or call a qualified service technician.
FROST OR ICE CRYSTALS ON FROZEN FOOD
Check if...
Then...
The door is not closing properly.
See Doors will not close completely above.
The door is opened often.
When the door is opened, warm, humid air is allowed in
the freezer resulting in frost.
33
TROUBLESHOOTING GUIDE
ICE HAS OFF-TASTE OR ODOR
Check if...
Then...
The icemaker was recently installed.
Discard first few batches of ice to avoid discolored or
off-flavored ice.
The ice has been stored for too long.
Throw away old ice and make new supply.
The food has not been wrapped tightly in
either compartment.
Rewrap foods since odors may migrate to the ice if food
is not wrapped properly.
The water supply contains minerals such as sulfur.
A filter may need to be installed to eliminate taste and
odor problems.
The interior of refrigerator needs cleaning.
See Care and Cleaning section.
Ice storage bin needs cleaning.
Empty and wash bin. Discard old cubes.
THERE IS WATER IN THE DEFROST DRAIN PAN
Check if...
Then...
The refrigerator is defrosting.
The water will evaporate. It is normal for water to drip into the
defrost pan.
It is more humid than normal.
Expect that the water in the defrost pan will take longer to
evaporate. This is normal when it is hot or humid.
THE REFRIGERATOR SEEMS TO MAKE TOO MUCH NOISE
Check if...
The sounds may be normal for your refrigerator.
Then...
Refer to the Understanding Sounds You May Hear section.
THE ICEMAKER IS NOT PRODUCING ICE OR ICE CUBES ARE FREEZING TOO SLOWLY
Check if...
Then...
The freezer temperature is cold enough to produce ice. Wait 24 hours after hook-up for ice production. See the Setting
the Controls Section.
Door left open.
Check to see if something is holding the door open.
CUBES PRODUCED BY ICEMAKER ARE TOO SMALL
Check if...
Then...
Smaller cube size level is selected.
Select larger cube size using cube size selector.
Water shutoff valve connecting refrigerator to water
line may be clogged.
Call a plumber to clear the valve.
THE DOORS ARE DIFFICULT TO OPEN
Check if...
Then...
The gaskets are dirty or sticky.
Clean gaskets and the surfaces that they touch. Rub a thin
coat of appliance polish or kitchen wax on the gaskets after
cleaning
The door is reopened within a short time after having
been opened.
When you open the door, warmer air enters the refrigerator.
As the warm air cools, it can create a vacuum. If the door is
hard to open, wait 5 minutes to allow the air pressure to
equalize, then see if it opens more easily.
34
TROUBLESHOOTING GUIDE
AUTOMATIC ICEMAKER DOES NOT WORK
Check if...
Then...
Icemaker power switch in the O (off) position.
Move the switch to the I (on) position.
Water supply turned off or not connected.
See the Connecting the Water Line section.
Freezer compartment too warm.
Wait 24 hours for the freezer to reach its ideal temperature.
Piled up cubes in the storage bin cause the icemaker
to shut off.
Level cubes by hand.
TEMPERATURE IS TOO WARM OR THERE IS INTERIOR MOISTURE BUILDUP
Check if...
Then...
The air vents are blocked. Cold air circulates
from the freezer to the fresh food section and
back again through air vents in the wall dividing
the two sections.
Locate air vents by using your hand to sense airflow and
move all packages that block vents and restrict airflow. Refer
to multi flow Section for the location of
air vents.
The doors are opened often.
When the door is opened, warm humid air is allowed into
the refrigerator. The more the door is opened, the faster the
humidity builds up, and the more warm air the refrigerator
must cool. In order to keep the refrigerator cool, try to get
everything you need out of the refrigerator at once, keep
food organized so it is easy to find and close the door as
soon as the food is removed.
The control is not set correctly for the surrounding
conditions.
Refer to the Setting the Controls Section.
Wait 24 hours for temperatures to stabilize or even out. If the
temperature is too cold or too warm, move the dial one
number at a time.
A large amount of food has just been added
to the refrigerator or freezer.
Adding food warms the refrigerator. It can take a few hours
for the refrigerator to return to normal temperature.
The food is not packaged correctly.
Wrap food tightly and wipe off damp containers prior to
storing in the refrigerator to avoid moisture accumulation. If
necessary, repackage food according to the guidelines in the
Food Storage Guide Section.
The doors are not closing completely.
See Doors will not close completely.
The weather is humid.
In humid weather, air carries moisture into refrigerator
when doors are opened.
A self-defrost cycle was completed.
It is normal for droplets to form on the back wall after the
refrigerator self-defrosts.
35
TABLE OF
TABLA
DE CONTENTS
CONTENIDO
Versión en Inglés
Versión en Español
Garantía (Estados Unidos de América)
Instrucciones Importantes de Seguridad
Requerimientos Eléctricos
2
36
4
37-38
38
Partes y Características
39-41
Instalación
42-49
Desempaque
42
Instalación
42
Parrilla Inferior
42
Anaqueles de las Puertas
55
Design-A-Door
55
Compartimento para Lácteos
Recipiente para Hielos
56
56
DuraBase
Separador DuraBase
56
56
Puerta Inclinable
57
Durabase de Alambre (Modelos tipo Swing)
57
Estante de Congelador
57
Cuidados de su Refrigerador
58-59
Para Limpiar su Refrigerador
58
Exterior
58
Interior
58
Puertas del Refrigerador: Cómo quitarlas,
cambiarle el Sentido de Apertura
43-48
Cajón Deslizable del Congelador
45-46
Puertas y Sellos
58
Alineación y Cerrado de Puertas
49
Partes Plásticas
58
Serpentín del Condensador
58
Uso del Refrigerador
50-57
Asegurando la Circulación de Aire
50
Multi Flow
50
Alarma de la Puerta
Ajuste de los Controles
Reemplazo de las Bombillas (focos)
50
50-51
Cómo Regular los Ajustes del Control
51
Guía de Almacenamiento de Alimentos
52
Para Guardar Alimentos Congelados
52
Estantes del refrigerador
53
Chef Fresh / Snack Pan
54
Control de Humedad de los Cajones
54
Cajones Optibin
Cubierta de los Cajones con Rejilla Interior
54
55
Interrupciones de Energía
59
Cuidados en Transportación y Vacaciones
59
Acerca de la Fábrica de Hielo Automática
36
58-59
60
Cómo Conectar la Tubería de Agua
61-63
Guía para la Solución de Problemas
64-67
INSTRUCCIONES IMPORTANTES DE SEGURIDAD
MENSAJES DE SEGURIDAD
Hemos incluido muchos mensajes importantes de seguridad en este manual. Lea y obedezca siempre todos los
mensajes de seguridad.
Este es el símbolo de advertencia de seguridad.
Este símbolo le llama la atención sobre peligros potenciales que pueden ocasionar la muerte o una lesión
a usted y a los demás, así como daños al producto.
Todos los mensajes de seguridad irán a continuación del símbolo de advertencia de seguridad y de la
palabra “PELIGRO”, “PRECAUCIÓN” o “ADVERTENCIA”. Estas palabras significan:
PELIGRO Si no sigue las instrucciones de inmediato, usted puede morir o sufrir una lesión grave.
ADVERTENCIA Si no sigue las instrucciones, usted puede morir o sufrir una lesión grave.
Indica una situación de peligro inminente la cual, si no se evita, puede resultar en
PRECAUCION daños menores o daños al producto.
Todos los mensajes de seguridad le dirán el peligro potencial, le dirán cómo reducir las posibilidades de sufrir una lesión
y lo que puede suceder si no se siguen las instrucciones.
ADVERTENCIA
No guarde botellas en el compartimiento del congelador;
ya que podrían estallar al congelarse y causar daños.
Para reducir el riesgo de fuego, choque eléctrico o
lesiones a personas, se deben tomar las siguentes
medidas de precaución:
NUNCA desconecte su refrigerador jalando del
enchufe. Siempre tome firmemente el enchufe y
desconéctelo directamente de la fuente de poder.
Repare o reemplace inmediatamente todos los cables
de servicio que se han dañado. No use cables que
tengan fracturas o daños por abrasión a lo largo del
cable o en el enchufe.
Cuando mueva su refrigerador, tenga cuidado de no
pisar el cable de alimentación con los rodillos del
aparato.
No almacene o use gasolina u otros combustibles
(líquidos o vapores) en las vecindades de este u otro
electrodoméstico.
No permita que los niños se suban, cuelguen o trepen
las puertas o parrillas del refrigerador. Pueden
lesionarse y dañar el refrigerador.
Mantenga sus dedos alejados de aquellas áreas en las
que se pueden lesionar tales como las áreas de cierre
de puertas, bisagras y gabinetes. Tenga cuidado al
cerrar las puertas cuando los niños se encuentren
cerca.
Desenchufe el refrigerador antes de limpiarlo o hacer
cualquier reparación.
NOTA: Le recomendamos realizar cualquier clase de
Servicio con una persona calificada.
Antes de cambiar un foco (bombilla) quemada, desenchufe
el refrigerador o desconecte el circuito de poder para
evitar el contacto con un filamento vivo el foco (bombilla) se
puede romper mientras se cambia. NOTA: Ajustando
los controles a la posición de OFF (apagado) no
desconecta la energía del circuito de la iluminación.
Para su seguridad, este producto debe estar
conectado a tierra de manera apropiada. Haga revisar
su circuito de electricidad por un electricista calificado
para asegurar una buena conexión a tierra.
Lea todas las instrucciones antes de utilizar el producto.
Utilice el producto únicamente para el fin que se
describe en esta guía.
Una vez que el refrigerador se encuentre en operación,
no toque con las manos mojadas las superficies frías
del congelador. La piel puede adherirse a estas
superficies.
En aquellos refrigeradores con fábrica automática de
hielo, evite el contacto de las partes móviles del
mecanismo expulsor, o con el mecanismo de
calentamiento que libera los cubos. No coloque sus
dedos o manos en estos mecanismos cuando el
refrigerador esté conectado.
No vuelva a congelar los alimentos que hayan sido
descongelados previamente. El Departamento de
Agricultura de los Estados Unidos, en su Boletín de
Casas y Jardines No. 69 establece que:
“..Ud. puede volver a congelar los alimentos que han
sido congelados previamente si contienen cristales de
hielo o éstos continúan fríos – de bajo de 40 °F (4 °C).
“...La carne molida, perecederos o pescado que estén
descoloridos o sin olor no deben ser congelados ni
ingeridos. La nieve derretida tampoco debe
consumirse. Si el olor o color de la comida es
cuestionable, deshágase de ella, puede ser peligroso.
“Descongelar parcialmente o volver a congelar los
alimentos reduce la calidad de éstos, especialmente las
frutas, vegetales y alimentos preparados. La calidad de
las carnes rojas puede mantenerse mayor tiempo que
los demás alimentos. Use los productos que vuelva a
congelar tan pronto como sea posible para mantener su
calidad.
GUARDE ESTAS INSTRUCCIONES
37
PELIGRO: LOS NIÑOS PUEDEN QUEDAR ENCERRADOS
ANTES DE TIRAR SU REFRIGERADOR
O CONGELADOR CUANDO YA NO SE
USE:
El atrapamiento y asfixia de niños no es un problema
del pasado. Los refrigeradores tirados y
abandonados son un peligro, aún si van a quedar ahí
“por unos cuantos días”. Si Ud. está por deshacerse
de su refrigerador viejo, por favor siga las
instrucciones que se dan a continuación para
prevenir accidentes.
Saque las puertas
Deje los estantes en su lugar, así los niños
no pueden meterse adentro con facilidad.
CÓMO DESECHAR LOS CFC
Su refrigerador viejo tiene un sistema de refrigeración que
utiliza CFC (clorofluorocarbonos). Los CFC afectan a la
capa estratosférica de ozono.
Si Ud. tira su refrigerador viejo, asegúrese que el
refrigerante CFC sea eliminado de la manera
apropiada por personal calificado. Si Ud. libera
intencionalmente el refrigerante con CFC puede
estar sujeto a multas o prisión de acuerdo a las
legislaciones ambientales vigentes.
REQUERIMIENTOS DE CONEXIÓN A TIERRA
Es su responsabilidad y obligación reemplazar aquellos
receptáculos de 2 terminales por uno de 3 terminales
conectado debidamente a tierra.
IMPORTANTE: Lea con atención lo siguiente.
CONEXIÓN
Bajo ninguna circunstancia corte o arranque la tercera
terminal (tierra) del enchufe
ADVERTENCIA
Peligro de Choque Eléctrico
NOTA: Antes de instalar, limpiar o cambiar los focos,
apague el Control (del termostato, refrigerador o
congelador, según su modelo) a la posición de OFF.
Cuando haya terminado, vuelva a conectar el refrigerador y
ajuste el control (de termostato, refrigerador o congelador,
según su modelo) a la posición deseada.
PARA SU SEGURIDAD PERSONAL, este
aparato debe estar aterrizado apropiadamente.
Haga revisar por un personal experto sus
contactos de pared para asegurarse de que el
enchufe está conectado a tierra apropiadamente.
Receptáculo de
pared aterrizado
para 3 terminales
USO DE CABLES DE EXTENSIÓN
Nosotros le recomendamos que no utilice los cables de
extensión. Sin embargo, si usted desea utilizar un cable de
extensión, es absolutamente necesario que se encuentre
en la lista de UL (en los Estados Unidos) o en la lista de la
CSA (en Canadá), tenga 3 terminales y que soporte una
carga de energía de 15 A (mínimo) y 120 V.
Clavija
de 3 terminales
Asegúrese de
que la conexión
para tierra existe.
Al usar un cable de extensión, podrá dar más espacio a su
refrigerador en la parte de atrás.
MÉTODO DE CONEXIÓN A TIERRA RECOMENDADO
ADVERTENCIA
Su refrigerador debe estar siempre conectado a un circuito
propio que esté conectado adecuadamente a tierra. La
alimentación de energía debe ser únicamente de 115V,
60 Hz, c.a. y con fusibles de 15 o 20 A. Esto brinda
el mejor desempeño y previene de las sobrecargas de
energías que pueden provocar un incendio debido al
sobrecalentamiento de los cables. Se recomienda que se
utilice un circuito separado para este producto, así como un
receptáculo que no pueda ser desconectado con un
interruptor.
No utilice un cable de extensión.
REEMPLAZO DE CABLE DE CORRIENTE
Si el cordón de alimentación se daña, éste debe ser
reemplazado por el fabricante, por nuestro centro de
servicio o personal calificado por LG para evitar
algún riesgo.
38
PARTES
Y CARACTERÍSTICAS
PARTS AND
FEATURES
A
B
L
C
D
M
E
N
F
O
G
H
P
I
Q
R
J
K
Use esta sección para que Ud. se familiarice con las partes y características de su nuevo refrigerador.
NOTA: Esta guía cubre distintos modelos. Su refrigerador puede tener algunos o todas las características y
partes que se muestran en la siguiente lista. Algunas de las localizaciones de las partes tal vez no concuerden
con su modelo.
A Control Digital del Sensor
L Recipiente para Lácteos
B Luz del Refrigerador
M Cajones de Puertas
C Parrillas
N Cajón para Huevos
D Control de Temperatura*
O Canasta Fija del Refrigerador
E Chef Fresh/Snack Pan
P Luz del Congelador
F Recipiente para Latas*
Q Cajón Deslizable
G Cajon para Vegetales
Mantiene frescos y crujientes los vegetales y frutas
H Recipiente para Hielos
R Fabrica de Hielos *
* En algunos modelos
I Charola para Hielos (Dentro de H) *
J Canasta del congelador
K Divisor
39
PARTES Y CARACTERISTICAS
A
B
J
C
K
D
L
E
M
F
N
G
H
I
O
Use esta sección para que Ud. se familiarice con las partes y características de su nuevo refrigerador.
NOTA: Esta guía cubre distintos modelos. Su refrigerador puede tener algunos o todas las características y
partes que se muestran en la siguiente lista. Algunas de las localizaciones de las partes tal vez no concuerden
con su modelo.
A Control digital del sensor
J Recipiente para lácteos
B Luz del refrigerador
K Cajones para Puertas
C Parrillas del refrigerador
L Cajón Deslizable
D Snack Pan
M Canasta fija del refrigerador
E Cajón para vegetales
Mantiene frescos y crujientes los vegetales y frutas
N Luz del congelador
O Fabrica de Hielos *
F Recipiente para hielos
G Charola para hielo (Dentro de F)*
* En algunos modelos
H Canasta del congelador
I Divisor
40
PARTES Y CARACTERISTICAS
A
B
I
C
J
D
K
E
L
F
M
G
H
N
Use esta sección para que Ud. se familiarice con las partes y características de su nuevo refrigerador.
NOTA: Esta guía cubre distintos modelos. Su refrigerador puede tener algunos o todas las características y
partes que se muestran en la siguiente lista. Algunas de las localizaciones de las partes tal vez no concuerden
con su modelo.
A Control digital del sensor
I Recipiente para lácteos
B Luz del refrigerador
J Cajones para puertas
C Parrillas del refrigerador
K Parrilla del congelador
D Snack Pan
L Canasta fija del refrigerador
E Cajón para vegetales
Mantiene frescos y crujientes los vegetales y frutas
M Luz del congelador
N Canastilla del congelador
F Charola para hielo*
G Recipiente para hielos
H Durabase de alambre
* En algunos modelos
41
INSTALACION
3. Instale el refrigerador en un área que se encuentre entre
55°F (13°C) y 110°F (43°C). Si la temperatura se
encuentra fuera de las temperaturas mencionadas, el
enfriamiento del aparato puede afectarse.
ADVERTENCIA
Peligro de Peso Excesivo
Use dos o más personas para mover e instalar el
refrigerador..
No seguir esta instrucción puede ocasionar una lesión
en la espalda u otrotipo de lesiones.
Precaución: Evite colocar el refrigerador cerca de
fuentes de energía, luz solar o humedad.
UNA VEZ INSTALADO
DESEMPAQUE
1. Limpie cuidadosamente su refrigerador y remueva
el polvo acumulado durante el envío.
2. Instale los accesorios tales como la charola de hielos,
cajones, estantes, etc., en los lugares apropiados. Éstos se
encuentran empacados para prevenir daños durante el
transporte.
3. Deje su refrigerador encendido de 2 a 3 h antes de
guardar alimentos.
Verifique el flujo de aire frío en el compartimento del
congelador para asegurarse de que la unidad enfría
apropiadamente.
Su refrigerador está listo para usarse ahora.
Despegue de su refrigerador las cintas y etiquetas
temporales antes de instalarlo. No retire aquellas etiquetas
que muestren advertencias, el modelo y número de serie, o
la ficha técnica del producto que se encuentra en la parte.
posterior del refrigerador.
Para quitar los residuos de cinta o adhesivo, frote bien con
sus dedos un poco de detergente líquido para vajillas
encima del adhesivo. Limpie con agua tibia y seque.
No utilice instrumentos filosos, alcohol para fricciones,
líquidos inflamables, o productos de limpieza abrasivos
para quitar la cinta adhesiva o goma. Estos productos
pueden dañar la superficie de su refrigerador. Para obtener
más información, vea la sección “Instrucciones
Importantes de Seguridad”.
ADVERTENCIA
Tenga cuidado cuando trabaje con la bisagra,
la cubierta de la base, los topes, etc. Puede lastimarse.
No ponga sus manos o herramientas en las salidas de
aire, la cubierta de la base o en la parte de abajo del
refrigerador. Puede lastimarse o recibir un choque
eléctrico.
Los estantes vienen instalados en su posición de fábrica.
Instale los estantes de acuerdo a sus necesidades de
espacio.
PARRILLA INFERIOR
Cómo mover su refrigerador:
Su refrigerador es muy pesado. Cuando mueva
su refrigerador para limpiarlo o darle servicio,
proteja el piso.
Al mover el refrigerador, siempre tire directamente
hacia fuera. No menee el refrigerador de lado a
lado ni lo haga “caminar” cuando lo trate de mover
ya que podría dañar el piso.
Para quitar la parrilla inferior:
1. Agarre firmemente la parrilla inferior con ambas manos.
2. Empuje la parrilla inferior hacia Ud.
Para poner la parrilla inferior:
1. Coloque los sujetadores en las ranuras del panel de
metal.
2. Empuje la parrilla inferior hacia el refrigerador hasta que
quede en su posición.
ADVERTENCIA
Peligro de explosión
Mantenga los materiales y vapores inflamables, tales
como gasolina, alejados del refrigerador.
No seguir esta instrucción puede ocasionar la muerte,
explosión o incendio.
A una distancia adecuada de elementos cercanos
INSTALACIÓN
1. Evite Colocar la unidad cerca de fuentes de calor, rayos
de sol directos o humedad.
2. Para evitar la vibración, la unidad debe estar nivelada.
Si se requiere., ajuste los tornillos niveladores para compensa
el desnivel del suelo.
El frente debe estar ligeramente más alto que la parte
posterior para facilitar el cierre de las puertas.
Los tornillos de nivelación pueden girar fácilmente
levantando un poco el refrigerador de la parte frontal.
Gire los tornillos de nivelación en sentido de las manecillas
del reloj (
) para levantar la unidad o en contra de las
manecillas del reloj (
) para bajarla.
Por favor, mantenga el refrigerador a una distancia prudente
de otros objetos. Una distancia demasiado reducida entre la
unidad y los elementos cercanos podría conllevar una
reducción de la capacidad de congelación y un aumento del
consumo de electricidad.
42
(2.54 cm) 1”
INSTALACION
PUERTAS DEL REFRIGERADOR: CÓMO QUITARLAS,
CAMBIARLES EL SENTIDO DE APERTURA (OPCIONAL)
HERRAMIENTAS QUE USTED PUEDE NECESITAR
10 mm
1/4 in
3/8 in
Llave tubular de cabeza
hexagonal
1/4 in
3/32 in
Destornillador Phillips
IMPORTANTE: Antes de empezar, gire el control del
refrigerador a OFF (apagado), desenchufe el refrigerador o
desconecte el suministro de energía. Quite todos los
alimentos y cualquier recipiente ajustable o de uso múltiple
de las puertas.
CAMBIO DEL SENTIDO DE APERTURA DE
LAS PUERTAS DE IZQUIERDA A DERECHA
(cuando se desea abrir del lado derecho en vez del lado
izquierdo)
1. Para quitar la puerta del Refrigerador
Quite la cubierta de la bisagra superior (1)
Quite los 3 tornillos y levante la bisagra superior (2)
Levante cuidadosamente la puerta del refrigerador (3)
y quítela.
Quite la cubierta (4) usando un destornillador de cabeza
plana y colóquela del lado derecho.
Afloje el tornillo (5), quite los pernos (6), y colóquelos a
la izquierda (lado opuesto)
Afloje el perno (8) y retírelo.
Afloje los 2 tornillos (9) y los dos tornillos (10), y levante
la bisagra de en medio (11).
Quite la cubierta (7) usando un desarmador de cabeza
plana y colóquela del lado derecho.
CÓMO QUITAR LAS JALADERAS DE LA PUERTA
NOTA: La apariencia de la jaladera puede ser diferente.
2.. Para quitar la jaladera del refrigerador
• Afloje los tornillos de fijación (1) con una llave
Allen de 3/32” y retire la manija (2).
• Afloje los tornillos de montaje (3)
con una llave de 1/4” Allen.
• Cuidadosamente retire los tapones de la puerta (4).
• Installe los botones (4) en lado izquierdo.
• Instale los tornillos de montaje en el lado derecho (3)
43
Destornillador plano
Llave Allen
INSTALACION
3. Para colocar la jaladera del refrigerador
• Gire completamente la jaladera (5)
• Sujete la jaladera (2) a los tornillos de montaje y ajuste
los tornillos de fijación (1) con una llave Allen de 3/32 ”.
4. Cómo Instalar la Puerta del Refrigerador
Instale la bisagra central (1) en el lado opuesto junto
con los tornillos (2) y (3).
Instale la puerta (4) de tal manera que ésta se ajuste
en el perno de la bisa gra central (5).
Coloque la bisagra superior (6) junto con los tornillos.
Vuelva a colocar la cubierta de la bisagra (7).
INSTALACION
CÓMO RETIRAR E INSTALAR EL CAJÓN
DESLIZABLE
• Con ambas manos, sujete los dos lados de la puerta y
tire hacia arriba para separarla .
IMPORTANTE: Para evitar una posible lesi ón, daño al
producto o a la propiedad, Ud. necesitará dos personas
para ejecutar las instrucciones siguientes
1. Para Retirar el Cajón Deslizable
• Jale el cajón abierto al máximo. Retire la canasta
inferior (1) levantándola del sistema de rieles.
1
• Presione las dos perchas con los pulgares para
elevarla.
• Con ambas manos, sujete el centro de la barra y
empuje hacia dentro para que las dos guías encajen a
la vez .
• Separe la cubierta izquierda y derecha de la guía.
• Retire los tornillos(2) de ambos lados de la guía.
2
PRECAUCION:Cuando Ud. quite el cajón, no sostenga la
agarradera. Si se sale, podr ía causar lesiones
personales.
PRECAUCION:Al colocar el cajón en el piso, tenga
cuidado de no dañar el piso y lesionarse el pie con las
orillas afiladas en el lado de la bisagra.
45
INSTALACION
CÓMO RETIRAR E INSTALAR EL CAJÓN
DESLIZABLE
• Compruebe la parte izquierda y derecha de la guía
de la cubierta.
Guía
IMPORTANTE: Para evitar una posible lesión, daño al
producto o a la propiedad, Ud. necesitará dos personas
para ejecutar las instrucciones siguientes
derecha
Guía
2. Instalación del Cajón Deslizable
izquierda
• Con ambas manos, sujete el centro de la barra y tire
hacia fuera para que las dos guías salgan a la vez.
• Alinee los orificios superiores de la cubierta de la guía
con los orificios superiores del conector de la puerta
para montar la guía de la cubierta .
Orificio del ensamble
• Monte el conector de la puerta (1) a la percha de la
guía (2).
1
• Con el cajón extraído en toda su extensión, inserte la
canasta inferior (4) en el ensamble del riel hasta que no
se mueva hacia adelante.
2
4
• Empuje hacia abajo y monte el conector de la puerta
apretando los tornillos(3).
3
ADVERTENCIA: Para prevenir riesgos de
atrapamiento y sofocación accidental de niños y
mascotas, NO les permita jugar dentro del cajón.
ADVERTENCIA: NO se pare ni se siente sobre la
puerta del congelador.
46
INSTALACION
PUERTAS DEL REFRIGERADOR: CÓMO QUITARLAS,
CAMBIARLES EL SENTIDO DE APERTURA (OPCIONAL)
NOTA: Ver la sección Partes y Características, para ver su tipo
de modelo.
HERRAMIENTAS NECESARIAS:Llave tubular de cabeza
hexagonal 10mm, destornillador Phillips No.2, destornillador
de cabeza plana, cuchillo para masilla de 2 pulgadas.
IMPORTANTE: Antes de empezar, gire el control del
refrigerador a OFF (apagado) y desenchúfelo. Quite todos
los alimentos de los recipientes de las puertas.
CAMBIO DEL SENTIDO DE APERTURA DE LAS
PUERTAS DE IZQUIERDA A DERECHA
(cuando se desea abrir del lado derecho en vez del lado
izquierdo)
1. Para quitar la puerta del Refrigerador
Quite la cubierta de la bisagra superior (1).
Quite los 3 tornillos y levante la bisagra superior (2).
Levante la puerta del refrigerador (3) y quítela.
Quite la cubierta (4) usando un destornillador de
cabeza plana y colóquela del lado derecho.
Afloje el tornillo (5), quite los pernos (6) y colóquelos
a la izquierda (lado opuesto).
Afloje el perno (7) y retírelo.
Quite la arandela (8).
Quite la cubierta (9) usando un destornillador de
cabeza plana y colóquela de lado derecho.
2. Para quitar la puerta del congelador
Levante la puerta (10) y retírela.
Afloje los 2 tornillos (11), los 2 tornillos (12), y levante
la bisagra central (13).
Quite la parrilla inferior (14).
Quite los tapones (15) y colóquelos del lado derecho.
Afloje los 2 tornillos (16), quite la bisagra inferior (17),
y colóquela del lado izquierdo.
Afloje los 2 tornillos (18) y coloque el perno (19) en el
lado izquierdo de la base.
3. Para quitar las manijas del refrigerador
NOTA: Como ayuda en la instalación de las manijas del
lado derecho, coloque un pedazo pequeño de cinta masking
cerca de la parte superior de la manija antes de quitarla.
· Agarre la manija firmemente con ambas manos y jale la manija
hacia arriba (1) (este puede requerir una cierta fuerza).
· Las ranuras (2) en la parte posterior de la manija permiten
que la manija se separe de los tornillos en la puerta (3).
47
INSTALACION
· Use una llave ajustable para quitar las manijas de los
tornillos (3).
· Cuidadosamente retire los tapones (4).
· Instale los tapones (4) del lado izquierdo.
· Instale los tornillos (3) del lado derecho.
· Sostenga la manija, de manera que la cinta esté en el la
parte de abajo.
· Alinee las ranuras (2) superior e inferior que están detrás de la
manija con los tornillos (3) que están sobre el frente de la puerta.
· Presione la manija contra el frente de la puerta, asegurando
que los tornillos (3) estén dentro de las ranuras (2) de la manija.
· Agarre la manija firmemente con ambas manos y jale la manija
hacia abajo (6)(esto puede requerir una cierta fuerza).
4. Para quitar la manija del congelador
Nota: Antes de empezar, revise el tipo de manija en
su modelo
Manija tipo 1
Quite el tapón (1) y los 2 tapones (2) usando un
destornillador de cabeza plana.
Afloje los 2 tornillos (3), quite la manija (4) e instálela
en el lado derecho.
Coloque los tapones que quitó anteriormente [Figuras (1)
y (2)].
Manija tipo 2
Para este tipo de manija, no es necesario removerla.
5. Para instalar la puerta del congelador
Coloque la parrilla inferior (1).
Instale la puerta (3) en el perno de la bisagra inferior.
Coloque la bisagra central (4) en el lado opuesto con el
tornillos (5) y los tornillos (9).
6. Para instalar la puerta del refrigerador
Coloque la arandela (6) en el perno de la bisagra central (7).
Instale la puerta (8) de manera que ésta quede perfectamente
colocada en el perno de la bisagra central (7).
Instale la bisagra superior (10) con los tornillos.
Vuelva a colocar la cubierta de la bisagra superior (11).
INSTALACION
AL FINALIZAR LA INSTALACIÓN
NOTA: Para facilitar la nivelación del refrigerador,
haga que alguien levante un poco la parte superior
del refrigerador. Esto quitará algo de peso sobre
los tornillos niveladores.
Asegúrese de que las cuatro esquinas de los sellos de las
puertas no se encuentren doblados. Para asegurar un
buen sellado, aplique una pequeña capa de silicón en los
sellos.
3. Abra ambas puertas y asegúrese que cierran con
facilidad. Si no, incline un poco más el refrigerador
hacia atrás, girando los tornillos niveladores a favor
de las manecillas del reloj. Esto puede tomar varias
vueltas, y deberá girar las mismas veces en ambos
lados.
4. Verifique usando un nivelador.
5. Reemplace la vista inferior.
Alineación de Puertas
Si el espacio entre las puertas no está parejo, siga estas
instrucciones para alinearlas.
1. Quite la cubierta de la bisagra superior.
CIERRE Y ALINEAMIENTO DE PUERTAS
Cierre de Puertas
Su refrigerador cuenta con dos tornillos niveladores:
Uno en el lado izquierdo y otro en el derecho. Si su
refrigerador se encuentra inestable o si Ud. desea que
las puertas cierren más fácil, ajuste la inclinación del
refrigerador realizando lo siguiente:
2. Afloje los tornillos de la bisagra superior usando una
llave o dado de 10 mm.
3. Deje que otra persona le ayude a detener la puerta
en su lugar o coloque un espaciador entre las puertas
mientras aprieta los tornillos de la bisagra.
4. Vuelva a colocar la cubierta de la bisagra superior.
1. Conecte el refrigerador a un enchufe de 3 terminales.
Mueva el refrigerador a su posición final.
2. Use un desarmador para ajus tar los tornillos niveladores en el sentido de las manecillas del reloj
para elevar ese lado del refrigerador y en contra
de las manecillas del reloj par a bajarlo. Se deberán
dar las vueltas necesarias para ajustar a la inclinación
deseada.
49
USO DEL REFRIGERADOR
AJUSTE DE LOS CONTROLES
CIRCULACIÓN APROPIADA DE AIRE
Su refrigerador cuenta con dos controles que le permiten
regular la temperatura en los compartimentos del refrigerador y congelador.
Para obtener temperaturas estables, el aire debe flui r
entre las secciones del congelador y refrigerador.
Como se muestra en la ilustración de abajo, el aire
frío entra a través de la parte inferior y circula hacia
arriba. Este aire regresa por debajo del piso del
congelador y el resto del aire entra a la sección del
refrigerador a través de la ventila superior.
Primero ajuste el CONTROL DEL REFR IGERADOR a
37° F (3 °C) y el CONTROL DEL CONG ELADOR A 0 °F
(-18 °C). Deje estos parámetros durante 24 h (Un
día) para estabilizar el refrigerador. Después ajuste
las temperaturas de los compartimentos a su gusto.
MULTI FLOW
Modelo Alto
(Identifica el tipo de control)
El ventilador de enfriamiento es más poderoso y
efectivo que otros. Esto se puede notar considerablemente cada vez que se introduce comida al
compartimento del refrigerador.
Si se introduce agua u o tra sustancia a las ventilas,
la eficiencia disminuirá. Además, si el sello esta dañado
la eficiencia disminuirá ya que el aire frío se escapa.
Control del refrigerador: 32 °F a 47 °F (0 °C a 8 °C)
A menor el valor de ajuste, el compartimento del
refrigerador estará más frío.
Control del congelador: -6°F a 9°F (-21°C a -13°C)
A menor valor de ajuste, el compartimento del
congelador estará más frío. Sin embargo, el compartimento del refrigerador se calentará debido a que
circula menos aire hacia él.
Ice Plus:
Presione el botón Ice Plus. El LED se encenderá.
Esta función permanecerá activada durante 24 h, lo
lo que intensificará la velocidad de enfriamiento del
congelador e incrementará la producción de hielo.
No bloquee ninguna de estas ventilas con paquetes de
comida. Si las ventilas se bloquean, el flujo de aire se
interrumpe, lo que puede ocasionar problemas de
humedad.
IMPORTANTE: Debido a que el aire circula entre ambas
secciones del refrigerador, los olores pueden transferirse
fácilmente. Ud. debe limpiar ambas secciones para
eliminar olores. Para prevenir la transferencia de olores
o resequedad en los alimentos, cubra adecuadamente
la comida. (Vea la sección Guía de Almacenamiento de
Alimentos para mayores detalles)
NOTA: Para cambiar de °F a °C, mantenga presionados
al mismo tiempo y durante 1 s los botones COLDER
del congelador y del refrigerador.
ALARMA DE LA PUERTA
Con esta característica usted escuchará una alarma
cuando la puerta del congelador o del refrigerador no
es cerrada dentro de 1 min después de que se abre.
Estos tonos se repiten cada 30 s.
Esta alarma es cancelada cuando la puerta del congelador
o del refrigerador es cerrada correctamente.
50
USO DEL REFRIGERADOR
Modelo Medio
CONDICIÓN/RAZÓN
Control del Refrigerador: Posición 1 a 7
(32°F a 47°F o 0°C a 8° C)
A mayor valor de ajuste, el compartimiento del refrigerador
estará mas frío.
REFRIGERATOR TEMP
ADJUST
WARMER
4 IS RECOMMENDED
Control del Congelador: Posición 1 a 7
(-6°F a 8°F o -21°C a -13°C)
Cuando el valor de ajuste sea mayor, el congelador
se encontrará más frío. Sin embargo, el compartimIento del
refrigerador estará menos frío debido a que fluye menor
cantidad de aire frío.
Ice Plus:
Presione el botón Ice Plus. El LED se encenderá.
Esta función permanecerá activada durante 24 h, lo
lo que intensificará la velocidad de enfriamiento del
congelador e incrementará la producción de hielo.
FREEZER TEMP
WARMER
4 IS RECOMMENDED
COLDER
ADJUST
CÓMO REGULAR LOS AJUSTES DEL CONTROL
Antes de introducir alimentos a su refrigerador, deje que éste
se enfríe primero, dejando pasar 24 h desde el momento
en que usted conecta el refrigerador. El ajuste medio
indicado en la sección anterior corresponden a un
enfriamiento normal de un refrigerador. Los controles han
sido ajustados de manera correcta, de manera que la leche y
jugo se encuentran tan fríos como Ud. lo desea y los
mantecados tengan una consistencia firme.
El Control del Refrigerador funciona como un termostato
(para las secciones del refrigerador y congelador). Mientras
más alto se encuentre el ajuste, mayor será el tiempo de
operación del compresor para mantener las temperaturas
más frías. El control del Congelador ajusta el flujo de aire frío
del congelador hacia el refrigerador.
Si Ud. necesita ajustar las temperaturas en el refrigerador o
congelador, comience ajustando el refrigerador. Espere 24 h
antes de realizar este ajuste para verificar la
temperatura del congelador. Si ésta se encuentra tibia o muy
fría, entonces ajuste el control del congelador.
Use los ajustes mostrados en la siguiente lista como guía
para realizar cambios.
51
AJUSTE
RECOMENDADO:
La sección del REFRIGERADOR
se encuentra “tibia”
Se abre la puerta frecuentemente
Se almacena gran cantidad de
alimentos
La temperatura ambiente es muy alta.
Ajuste el Control del
REFRIGERADOR
Al siguiente dígito
superior, espere
24 h y verifique.
La sección del CONGELADOR se
encuentra “tibia” / los hielos no
se forman rápidamente
Se abre la puerta frecuentemente
Se almacena gran cantidad de
alimentos
La temperatura ambiente es muy
baja (no se realizan ciclos
suficientemente frecuentes)
Se utilizan hielos muy
frecuentemente
El difusor de aire se ha bloqueado
con algunos artículos
Ajuste el Control
del CONGELADOR
al siguiente dígito
superior, espere
24 h y verifique.
La sección del REFRIGERADOR
está muy fría
El Control no se encuentra
ajustado a las condiciones
deseadas
Ajuste el Control
del
REFRIGERADOR
al siguiente dígito
inferior, espere
24 h y verifique
La sección del CONGELADOR
está muy fría
El Control no se encuentra
ajustado a las condiciones
deseadas
Ajuste el Control
del CONGELADOR
al siguiente dígito
inferior, espere
24 h y verifique
Quite los
objetos que
bloqueen la
salida del aire
USO DEL REFRIGERADOR
GUÍA PARA ALMACENAR ALIMENTOS
Empaque
Una buena congelación depende de un empaque correcto.
Cuando Ud. cierra y sella el empaque, no permitirá el
acceso del aire y humedad a los alimentos. Un mal
empaque resultará en la transmisión de olores y sabores
dentro del refrigerador, así como la resequedad de los
alimentos congelados.
Recomendaciones de empaque:
Usar contenedores plásticos con tapas rígidas.
Utilizar envases o jarras de superficies lisas.
Empacar con papel aluminio de alta resistencia.
Envolver con papel revestido con plástico.
Utilizar plástico impermeable.
Usar bolsas de plástico especiales para congelar.
Siga las instrucciones del empaque o recipiente para lograr
un mejor congelamiento.
No utilice:
Envolturas del pan.
Recipientes de plástico que no sean de polietileno.
Recipientes sin tapas rígidas o firmes.
Papel encerado o plástico encerado.
Envolturas delgadas o poco permeables.
Congelamiento
Para guardar Alimentos Frescos
Guarde o envuelva los alimentos en recipientes cerrados
o bolsas que eviten la entrada de aire y humedad. Esto
evitará que los olores y sabores de los alimentos se
transfieran dentro del refrigerador. Para productos
perecederos, revise la fecha de caducidad para asegurar
su frescura.
Mantequilla o Margarina
Mantenga la mantequilla cubierta en un recipiente o en el
compartimento cerrado. Cuando desee almacenar una
mayor cantidad, envuélvala y guárdela en el congelador.
Queso
Guarde el queso en su envoltura original hasta que se
desee usarlo. Una vez abierto, envuélvalo firmemente
con envoltura plástica o papel aluminio.
Leche
Limpie los cartones de leche. Para un mejor
almacenamiento, coloque la leche en una charola interior.
Huevos
Guárdelos en su empaque original o en la charola para
huevos.
Fruta
Lave y deje secar la fruta. Después guárdela en bolsas
de plástico dentro del refrigerador. No lave o enjuague
las moras hasta que están listas para consumirse. Las
moras deben ser seleccionadas y guardadas en su
empaque original (si lo hay) o en una bolsa de papel a
medio cerrar dentro de uno de los estantes.
Vegetales con Hojas
Quite la envoltura original y remueva de los vegetales
aquellas partes sucias o descoloridas. Lávelas con agua
fría y escúrralas. Colóquelas en una bolsa o contenedor
plástico y guárdelas en el cajón de vegetales del
.
refrigerador.
Vegetales con Piel (pimiento, zanahoria)
Colóquelos en bolsas o contenedores plásticos dentro del
cajón de vegetales del refrigerador.
Pescado
Consuma los pescados y mariscos el mismo día que los
adquirió.
Carne
Conserve la carne en su empaque original, el cual no
debe permitir la entrada de aire y humedad. Vuelva a
envolver si es necesario.
Sobras de Alimentos
Cubra las sobras con envoltura de plástico o papel
aluminio. También puede usar contenedores plásticos
con tapas firmes.
IMPORTANTE: No guarde botellas en el
compartimiento del congelador; ya que podrían
estallar al congelarse y causar daños.
Su refrigerador no congelará rápidamente
cualquier cantidad excesiva de alimentos. No introduzca una
cantidad mayor de alimentos sin congelar que la que pueda
congelarse dentro de 24 h (no más de 2 a 3 libras de
alimento por pie cúbico del espacio en el congelador).
Deje el suficiente espacio en el congelador para que
el aire circule alrededor de los paquetes. Deje espacio
suficiente al frente para que la puerta cierre sin dificultad.
Los tiempos de almacenaje pueden variar de acuerdo a la
calidad y tipo de comida, el tipo de empaque o envoltura
usada (a prueba de humedad y aire), y a la temperatura de
almacenaje. Los cristales de hielo formado adentro de un
empaque cerrado son normales, lo que indica que
la humedad de los alimentos y el aire contenido dentro del
empaque se ha condensado.
NOTA: Deje que los alimentos calientes se enfríen a
temperatura ambiente durante 30 min después
envuélvalos con los métodos mencionados y congélelos. Al
enfriar los alimentos calientes antes de introducirlos al
congelador, Ud. ahorra energía.
ADVERTENCIA
PARA GUARDAR ALIMENTOS CONGELADOS
Peligro de sofocamiento
NOTA: Para mayor información acerca de cómo preparar
los alimentos para congelarlos así como para ver el tiempo
que pueden ser almacenados, consulte una guía sobre
congelamiento o una guía para cocinar.
Ventile adecuadamente la habitación cuando utilice hielo
seco. El hielo seco es dióxido de carbono (CO2)
congelado. Cuando se evapora, éste emana oxígeno,
causando mareos, dolores de cabeza leves, inconciencia o
muerte por sofocamiento. Abra una ventana y no inhale
estos vapores.
52
USO DEL REFRIGERADOR
ESTANTES DEL REFRIGERADOR
Los estantes de su refrigerador se ajustan para cumplir con
sus necesidades de almacenamiento. Su modelo puede
incluir estantes de vidrio o alambre.
Almacenar apropiadamente los alimentos en su
refrigerador, y ajustando los estantes para que tengan
distintas alturas hará más fácil la búsqueda de los artículos
que Ud. necesita. Esto también reducirá el tiempo en el
que se encuentran abiertas las puertas, lo que ahorrará
energía.
Estantes Deslizables (en algunos modelos)
Ud. puede deslizar algunos de los estantes de su
refrigerador hacia fuera o hacia adentro como a
continuación se describe:
Para deslizar el estante hacia fuera, jale cuidadosamente
hacia Ud. el frente del estante.
Para deslizar el estante hacia adentro, empuje el estante
hasta que tope.
IMPORTANTE: No limpie los estantes de vidrio con agua
caliente o tibia cuando estos se encuentren fríos. Los
estantes se pueden quebrar si se exponen a cambios
bruscos de temperatura o impactos fuertes. Para su
seguridad, los estantes están fabricados con vidrio
templado para que al romperse se fracturen en muchos
pedazos pequeños. Esto es normal.
NOTA: Los estantes de vidrio son pesados. Tenga
especial cuidado cuando los mueva de lugar para evitar
impactos por caída.
Para ajustar los Estantes
Retire los estantes de su posición de fábrica y póngalos en
la posición que a Ud. le sea más útil.
Para quitar un estante del marco de metal:
1. Jale el estante hasta que tope.
2. Incline el frente del estante hacia arriba y jálelo un poco
hacia delante.
3. Levante el estante de manera que se mueva a través
de los orificios del soporte
Para quitar un estante
Incline el estante por la parte frontal en la dirección que se
muestra en (1) y levántelo en la dirección (2). Jale el
estante hacia usted.
Vuelva a colocar el estante en orden inverso.
Para poner un estante
Incline la parte frontal del estante y guíe los ganchos del
estante hacia los orificios a la altura que usted desee.
Después baje el frente del estante para que los ganchos
calcen con los soportes del estante.
Estantes Funcionales (en algunos modelos)
Estante Plegable:
Ud. puede guardar artículos altos tales como galones o
botellas simplemente plegando el estante a la mitad.
NOTA: Asegúrese de que el estante está instalado de
manera horizontal. Si no lo hace, puede provocar que el
estante se caiga, lo que causaría el derrame o caída de
alimentos.
53
USO DEL REFRIGERADOR
CHAROLA DE CARNES FRIAS
CONTROL DE HUMEDAD DE LOS CAJONES
(en algunos modelos)
Jale hacia usted la charola de carnes frías mientras la
sostiene con una mano. Levántela un poco y jale.
Ud. puede controlar la cantidad de humedar en los cajones,
ajustando el control en cualq uier posición entre
y
Permite que el aire salga del cajón de vegetales para
la mejor conservación de frutas.
Mantiene la mayor cantidad de aire en el cajón para
la mejor conservación de vegetales frescos.
Para quitar el vidrio:
1. Utilizando un destornillador de cabeza plana, levante el
vidrio desde la cubierta de los cajones de vegetales.
2. Jale hacia arriba y después hacia afuera.
CONTROL DE HUMEDAD DE LOS CAJONES
(en algunos modelos)
Ud. puede controlar la cantidad de humedad en los cajones,
ajustando el control en cualq uier posición entre “
” y “ ”.
“
”: Permite que el aire salga del cajón de vegetales para
la mejor conservación de frutas.
“
”:Mantiene la mayor cantidad de aire en el cajón para
la mejor conservación de vegetales.
Para quitar el cajón de vegetales:
1. Deslice el cajón hacia afuera hasta que tope.
2. Levante la parte frontal del cajón, jale para sacarlo
3. Vuelva a colocar el cajón, deslizándolo hacia adentro
hasta pasar los topes.
CAJONES OPTIBIN
Los cajones OptiBin hacen mas frescos los vegetales y
frutas, permitiéndole controlar fácilmente la humedad
dentro de los cajones. Los cajones Optibin incluyen
1) un control de humedad al frente del cajón y 2) un
sistema que permite conservar o liberar la humedad.
54
USING
USO
YOUR
DELREFRIGERATOR
REFRIGERADOR
CANASTAS DE LAS PUERTAS
CUBIERTA DE LOS CAJONES CON REJILLA
INTERIOR (en algunos modelos)
Las canastas se pueden quitar para una mejor limpieza.
Canastas a Presión
Para quitar la cubierta de los cajones de vegetales:
1. Quite ambos cajones.
2. Jale la cubierta mientras sostiene el soporte (2). Jale
hacia arriba y después hacia fuera (1)
Para quitar las canastas realice lo siguiente:
1. Quite el contenido que se encuentre en la canasta.
2. Empuje la canasta contra la pared interior de la
puerta (A) y después levántela.
PRECAUCION: Tenga cuidad cuando maneje la cubierta
de vidrio, ya que esta se puede soltar.
Para volver a colocar la canasta:
1. Sostenga la orilla de la canasta contra la pared
interior de la puerta.
2. Presione la canasta hasta que se coloque en posición.
Para quitar la rejilla interior:
DESIGN-A-DOOR
1. Los recipientes se pueden mover a lo largo de la puerta
2. Para quitar el recipiente, levántelo y jálelo hacia Usted.
1. Quite la cubierta como se ilustra arriba.
2. Sostenga el vidrio y gire la cubierta de los cajones.
3. Sostenga la rejilla y jale los lados de la cubierta de
los cajones hacia fuera para quitarlas.
3.Para volver a colocar el recipiente, deslícelo sobre la
guía deseada y empuje hacia abajo hasta que quede
asegurado completamente (Ud. escuchará un “tick”).
Para volver a colocar las rejillas interiores:
1. Para cada rejilla, inserte la ceja central 1 (cerca de la
cubierta de vidrio) y jale los lados de la cubierta para
insertarla.
4. Para mover a la última posición, asegúrese de que
todos los recipientes están bien ensamblados y no queden
sueltos.
ADVERTENCIA:Alguien puede resultar herido si los recipientes
no están firmemente ensamblados.
NOTA: Vacíe la carga de comida antes de mover los
recipientes.
55
USING
USO
YOUR
DELREFRIGERATOR
REFRIGERADOR
COMPARTIMENTO PARA LÁCTEOS
DURABASE (en algunos modelos)
1. Para sacar el recipiente para lácteos, levante
el recipiente y jálelo hacia fuera.
1. Para quitar la Durabase (base durable), empuje hacia
atrás lo más que pueda. Levante la parte de enfrente de
la Durabase y jale hacia afuera.
2. Para volver a poner el recipiente para lácteos, deslícelo
en el soporte seleccionado y empuje hacia abajo hasta
que tope.
2. Para volver a colocar, inserte la Durabase en el ensamble
del riel.
1 2
COMPARTIMIENTO PARA HUEVOS (en algunos
modelos)
Guarde la caja para huevos en una parrilla interior, no en
un compartimiento de la puerta.
PRECAUCIÓN: No use la caja para huevos como un
recipiente para guardar hielo en el compartimiento del
congelador. Si se congela, la caja para huevos puede
romperse fácilmente.
SEPARADOR DURABASE
(En algunos modelos)
El separador de la Durabase perm ite organizar el área
de la Durabase en dos secciones.
RECIPIENTE PA RA HIELOS
(en algunos modelos)
1. Para quitar el recipiente para hielos, jálelo hacia afuera.
Tanto como sea posible.
2. Levante y extraiga con cuidado el recipiente para hielo.
3. Extraiga el cajón tanto como sea posible y coloque el
recipiente de hielo en la posicion correcta.
CAJON
1. Para quitar la Durabase, empuje hacia atrás tanto
como le sea posible. Levante la parte superior y retire.
2. Para volver a poner, coloque la Durabase en en ensam.
ble del riel.
RECIPIENTE
PARA HIELOS
56
USING
USO
YOUR
DELREFRIGERATOR
REFRIGERADOR
DURABASE DE ALAMBRE (en algunos modelos)
CAJÓN DE ALAMBRE DESLIZABLE
(en algunos modelos)
1. Para quitar la Durabase de alambre, jálela hacia afuera
hasta su máxima extensión.
Incline un poco la parte frontal y jale para sacarla.
1. Para quitar la canasta, levántela jale hacia afuera
2. Para volver a colocarla, inserte la Durabase de alambre
en el marco de rieles y empuje hasta que tope en el fondo.
1
2
2. Para ensamblar, jale los rieles a su máxima extensión. Enganche los soportes de la canasta en las
pestañas de los rieles y empújela hacia el fondo.
ESTANTE DE CONGELADOR.
(en algunos modelos)
Para quitar el estante, sujete la parte frontal y jálela
hacia usted.
Para poner el estante invierta el procedimiento de
retiro.
PUERTA INCLINABLE (en algunos modelos)
La puerta inclinable provee de un fácil acceso a los
alimentos congelados.
Cómo usar:
E: To adjust
Incline la puerta hacia abajo y jale hacia afuera.
ADVERTENCIA:Tenga cuidado al abrir la puerta, se puede
lastimar un pie.
adjust
57
CUIDADO DE SU REFRIGERADOR
PARTES PLÁSTICAS (cubiertas y paneles)
ADVERTENCIA
No utilice toallas de papel, aspersores para vidrio,
limpiadores abrasivos, o fluidos inflamables. Estos pueden
rayar o dañar el material
SERPENTIN DEL CONDENSADOR
Quite la vista inferior. (Vea la sección de la vista inferior)
Utilice una aspiradora con una extensión para limpiar los
serpentines.
Peligro de Explosión
Utilice limpiadores no inflamables.
No seguir esta instrucción puede ocasionar la muerte,
explosión o incendio.
Aspire los serpentines cuando se encuentren con polvo o
sucios. Estos deben ser limpiados más o menos cada mes
Tanto el refrigerador como el congelador realizan deshielo
automático. A pesar de esto, limpie ambas secciones una
vez al mes para prevenir la formación de olores. Limpie los
derrames de líquidos inmediatamente.
PARA LIMPIAR SU REFRIGERADOR
Vuelva a colocar la vista inferior.
CÓMO CAMBIAR LAS BOMBILLAS (Focos)
ADVERTENCIA
Desconecte su refrigerador
Peligro de choque eléctrico
Quite todas las partes desmontables del interior, tales
como los estantes, compartimentos para verduras, etc.
Use una esponja limpia o un trapo suave con un poco
de detergente con agua tibia. No use limpiadores
abrasivos o detergentes concentrados.
Lave a mano, enjuague y seque las superficies.
Antes de cambiar las bombillas (focos ó lamparas),
desconecte o apague el circuito eléctrico del
refrigerador.
NOTA: Ajustando el Control a la posición de OFF
(apagado) no quitará la circulación de energía a través
de las bombillas (focos ó lamparas).
Enchufe el refrigerador o vuelva a conectar el
suministro eléctrico.
EXTERIOR
Encere las superficies pintadas de metal exteriores para
brindarles mayor protección. No encere las partes
plásticas. Encere las partes pintadas de metal con cera
para electrodomésticos (o cera suave para automóviles).
Aplique la cera con una franela limpia y suave.
Para productos con exterior de acero inoxidable, utilice una
esponja o una franela limpia con detergente suave con
agua tibia. No utilice abrasivos o detergentes
concentrados. Seque la superficie con una franela suave.
NOTA: No todas las bombillas (focos ó lamparas) para
electrodomésticos se ajustarán a su refrigerador.
Asegúrese que las bombillas (focos ó lamparas) sean
del mismo tamaño, forma y potencia (W).
Para cambiar las bombillas (focos) del refrigerador:
1. Desenchufe su refrigerador.
2. Quite los estantes del refrigerador.
3. Presione el gancho frontal de la cubierta de la lámpara
con ayuda de un desarmador plano y jálela hacia abajo
para quitarla.
INTERIORES (permita al congelador calentarse
un poco para
que el trapo no se pegue)
‘
Para eliminar olores, limpie el interior del refrigerador con
una mezcla de polvo para hornear (soda) y agua tibia.
Mezcle 2 cucharaditas de polvo para hornear en ¼ de agua
(26 g de soda por cada litro de agua). Asegúrese de que el
polvo para hornear (soda) se disuelva completamente para
que no raye las superficies del refrigerador.
PUERTAS Y SELLOS
4. Gire la bombilla (foco) en contra de las manecillas
del reloj y retirela.
Para las partes plásticas, no utilice ceras limpiadoras,
detergentes concentrados, blanqueadores o limpiadores
que contengan petróleo.
58
CARE
CUIDADO
DEAND
SU REFRIGERADOR
5. Para ensamblar, primero inserte los ganchos de la
parte de atrás y después empuja la lámpara hacia arriba.
VACACIONES
Si Ud. decide dejar el refrigerador funcionando
mientras está ausente, siga estos pasos para preparar su
refrigerador antes de irse.
1. Consuma todos los artículos perecederos y congele el
resto.
2. Vacíe el recipiente para hielos.
Para cambiar la bombilla (foco) del Congelador
Si Ud. decide apagar el refrigerador antes de irse, siga
estos pasos:
1. Desenchufe el refrigerador o desconecte el suministro
eléctrico.
2. Quite la cubierta de la bombilla (foco).
3. Cambie el foco por uno con los watts indicados en la
sección del refrigerador, como muestra el dibujo 1 .
1. Saque toda la comida del refrigerador.
2. Dependiendo de su modelo, cambie el Control del
Termostato (Control del Refrigerador) a OFF
(apagado). Vea Ajuste de los Controles.
3. Limpie el refrigerador, enjuáguelo y séquelo bien.
4. Fije bloques de goma o de madera con cinta adhesiva a
ambas puertas para que queden abiertas y el aire
circule. Esto evita que se formen olores y que crezcan
hongos.
1
4. Enchufe el refrigerador o vuelva a conectar el
suministro eléctrico .
SI SE MUDA
Si Ud. muda su refrigerador a una casa nueva, siga los
siguientes pasos para prepararse para la mudanza
1. Saque toda la comida del refrigerador y empaque toda
la comida congelada con hielo seco.
2. Dependiendo de su modelo, apague el Control del
Termostato (Control del Refrigerador). Vea la sección
de Ajuste de los Controles.
INTERRUPCIONES DE ENERGÍA
3. Desenchufe el refrigerador.
Si se desconecta la energía de su hogar, llame a su
compañía de energía y pregunte cuánto tiempo durará sin
suministro eléctrico.
4. Vacíe el agua de la bandeja colectora.
5. Limpie, pásele un trapo y seque.
1. Si no habrá energía en las próximas 24 h o menos,
mantenga las puertas del refrigerador cerradas, para
que los alimentos se mantengan fríos y congelados.
6. Saque todas las partes desmontables, envuélvalas bien
y asegúrese con cinta adhesiva para que no se
sacudan durante la mudanza.
2. Si no habrá energía por más de 24 h, use alguna
de las siguientes opciones:
7. Según el modelo, levante la parte delantera del
refrigerador para que ruede con facilidad o atornille las
patas niveladoras para no rayar el piso. Consulte la
sección “Cierre de las puertas” o “Cómo nivelar el
refrigerador”.
a) Saque todos los alimentos congelados y guárdelos
en una hielera.
O
b) Coloque en el congelador 2 lbs (907 g) de hielo
seco por cada pie cúbico (28 L) del espacio del
congelador. Esto ayudará a que los alimentos
congelados duren así de 2 a 4 días. Utilice guantes
para manejar el hielo seco, ya que puede sufrir
quemaduras.
O
c) Si no cuenta con hielo seco o hielera, consuma lo
antes posible los alimentos perecederos.
8. Sostenga las puertas cerradas y el cable pegado al
gabinete del refrigerador con cinta adhesiva.
Cuando llegue a la casa nueva, ponga todo de nuevo y lea
la sección “Instrucciones de instalación” para obtener
instrucciones de preparación. Además, si su refrigerador
tiene fábrica de hielo automática, recuerde volver a
conectar el suministro de agua al refrigerador.
59
ACERCA DE LA FÁBRICA DE HIELO AUTOMÁTICA
NOTA: La Fábrica de hielos Automática la incluyen solo
algunos modelos. Revise la especificación del suyo.
NOTA: Si el tamaño del hielo es más pequeño o más
grande de lo que usted esperaba, puede regular el tamaño
del cubo presionando el botón selector. La presión del agua
afecta considerablemente estos resultados.
ADVERTENCIA
Cada vez que presione el botón selector, un indicador de
luz se encenderá. A mayor cantidad de luces encendidas,
más grandes serán los hielos.
Peligro de daños personales
Evite el contacto con las partes móviles del
mecanismo expulsor, o con el calentador que
libera los cubos. NO introduzca los dedos en
la fábrica de hielo automática cuando el
refrigerador se encuentra conectado.
UD. DEBE ACCIONAR EL INTERRUPTOR A LA
POSICIÓN O (OFF, APAGADO)
Cuando el suministro de agua sea interrumpido por
varias horas.
Cuando el recipiente de hielos se encuentre fuera de su
lugar por más de 1 o 2 min.
INSTRUCCIONES DE OPERACIÓN
Después de instalar su refrigerador, se
empezará a fabricar hielo después de 12 o 24
h.
Cuando el refrigerador no vaya a ser usado por varios
días.
SONIDOS NORMALES
Fábrica de hielo
La válvula emitirá un zumbido cuando llene de agua la
fábrica de hielos. Si el interruptor se encuentra en la
posición de encendido, el zumbido seguirá
escuchándose aún y cuando no se haya conectado
la tubería de agua. Para evitar este sonido, accione el
interruptor a la posición O (apagado)
Brazo
Sensor
Luz Indicadora
del Tama ño del Cubo
NOTA: La fábrica de hielos se puede dañar si se mantiene
accionado el interruptor en la posición I (encendido) antes
de haber conectado a la tubería de agua.
Interruptor
Botón Selector
del Tama ño del Cubo
La fábrica de hielos produce 8 cubos por ciclo – entre 100 y
130 cubos en un periodo de 24 h , dependiendo de la
temperatura del compartimento del congelador, número de
veces en las que se abre la puerta y otras condiciones de
uso.
Si el refrigerador es operado antes de que haya hecho la
conexión de agua de la fábrica de hielos, Ud. debe accionar
el interruptor a la posición de O (apagado).
Cuando ya se hayan realizado las conexiones de agua,
accione el interruptor a la posición I (encendido).
La fábrica de hielos se llenará de agua entre 12 y 24 h
después de haber sido instalado adecuadamente su
refrigerador y empezará a hacer hielos.
Tire los primeros hielos que salgan de la fábrica de hielos
para así limpiar la tubería de agua.
Asegúrese de que nada interfiere con el sensor.
Cuando el recipiente se llena al nivel del sensor, la fábrica
de hielo dejará de producir cubos.
Es normal que algunos cubos queden pegados.
Si el hielo no se usa frecuentemente, los hielos viejos
estarán opacos, con sabor extraño y más pequeños.
60
Mientras la fábrica de hielos se llena de agua y expulsa
los hielos Ud. escuchará ruidos de hielos caer y agua
fluir por las tuberías.
PREPARÁNDOSE PARA LAS VACACIONES
Accione el interruptor de la fábrica de hielos a la posición O
(apagado) y corte el suministro de agua al refrigerador.
Si la temperatura ambiente se encuentra en el punto de
congelación del agua, haga que un técnico especializado
drene el suministro de agua y las tuberías interiores del
refrigerador (en algunos modelos) para evitar daños debido
a conexiones o tuberías rotas.
CÓMO CONECTAR LA TUBERÍA DE AGUA
NOTA: La línea de agua es necesaria instalarla cuando las
características del dispensador de agua y/o del dispensador
de hielo están disponibles en su producto.
ANTES DE COMENZAR
La instalación de la tubería de agua no está garantizada por
el fabricante del refrigerador o de la fábrica de hielos. Siga
las instrucciones cuidadosamente para minimizar el riesgo
de daños al producto.
El aire en la tubería de agua puede provocar martilleos en
las conexiones, lo que puede causar daños a las tuberías
internas del refrigerador o derramamiento de agua al
interior del refrigerador. Llame a un plomero calificado para
corregir los martilleos en las conexiones antes de instalar la
tubería de agua.
Para evitar quemaduras y daños al producto, no conecte su
refrigerador a las tuberías de agua caliente.
Si usa su refrigerador antes de conectar el suministro de
agua, asegúrese de que la fábrica de hielo se encuentra en
la posición O (apagado).
No instale las tuberías de la fábrica de hielos en áreas en
las cuales la temperatura ambiente se encuentre bajo el
punto de congelación del agua.
Dos tuercas de compresión de ¼”(6,35 mm)
de diámetro con 2 mangas para
conectar la tubería de cobre a la
válvula del refrigerador.
Si su tubería de cobre actual cuenta
con alguna reducción en los extremos,
necesitará un adaptador (disponible
en las ferreterías) para conectar la
línea de agua al refrigerador.
También pude cortar la reducción con
un cortador de tubo y después utilizar
las conexiones de compresión arriba
mencionadas.
Cierre la válvula para conectar a la
línea de agua fría. La válvula debe
tener una entrada de agua con un
diámetro mínimo interior de 5/32”
(3,46 mm) en el punto de conexión
del AGUA FRIA. Estas válvulas
se pueden encontrar en cualquier
paquete de conexión de agua. Antes
de comprar, asegúrese de que la válvula
cumpla con los reglamentos locales.
Cuando utilice cualquier dispositivo eléctrico (como un
taladro) durante la instalación, asegúrese de que el
dispositivo esté doblemente aislado o conectado a tierra
para prevenir el riesgo de choque eléctrico.
INSTRUCCIONES DE INSTALACIÓN
Toda instalación deberá hacerse de acuerdo con los
requerimientos locales de agua y drenaje.
1. CIERRE EL SUMINISTRO PRINCIPAL DE AGUA
Instale la válvula en la tubería donde Ud. frecuente ingerir
agua.
Abra la llave más cercana para dejar fluir el agua y
vaciar las tuberías.
REQUERIMIENTOS
Tubería de Cobre de ¼” (6,35 mm) de
diámetro para conectar el
refrigerador a la tubería de agua.
Asegúrese que ambas terminales
se corten cuadradas.
2. SELECCIONE LA LOCALIZACIÓN DE LA
VÁLVULA
Seleccione la localización para la
válvula que mejor se le facilite el
acceso. Es mejor conectar en una
tubería vertical. Cuando sea
necesario conectar en una tubería
horizontal, haga la conexión en la
parte superior o lateral, en vez de
hacerlo en la parte inferior, para
prevenir la acumulación de
sedimentos
Para determinar cuánta tubería puede necesitar, mida la
distancia desde la válvula que se encuentra en la parte de
atrás del refrigerador, hasta el suministro de agua.
Después sume 8 pies (2,4 m). Asegúrese de que exista
suficiente tubería extra para permitir el libre movimiento del
refrigerador desde la pared.
3. TALADRE UN ORIFICIO PARA LA VÁLVULA
Un suministro de agua fría. La presión del agua debe
estar entre 20 y 120 p.s.i. (1.4 y 8.2 bar) en los modelos que
no cuenten con filtro de agua y entre 40 y 120 p.s.i. (2.8 y
8.2 bar) en los modelos que cuenten con filtro de agua.
Taladro.
Llave ajustable de ½ ”(12,7mm).
Desatornillador plano y tipo Phillips (Estrella).
61
Taladre un orificio de ¼”(6,35 mm)
diámetro en la tubería de agua.
Elimine la rebaba que quede
después de hacer la perforación.
Tenga cuidado de que el agua no
llegue al taladro. Si no realiza la
perforación de ¼”(6,35 mm) puede
resultar en una producción pobre
de hielo o cubos más pequeños.
CÓMO CONECTAR LA TUBERÍA DE AGUA
INSTRUCCIONES DE INSTALACIÓN
(CONTINUACIÓN)
7. CONECTE LA TUBERÍA A LA VÁLVULA
Ponga la tuerca de compresión y la férula para la
tubería de cobre al final de la tubería y conéctela a la
válvula. Asegúrese de que la tubería está completamente
insertada en la válvula. Apriete la tuerca con precaución.
4. APRIETE LA VÁLVULA
Apriete la válvula a la tubería de agua fría con una
trampa para tubos.
NOTA: Los códigos de tubería 248 CMR del estado de
Massachusetts deben estar adheridos a la conexión.
Las válvulas de este tipo están prohibidas en Massachusetts.
Consulte con su plomero autorizado.
NOTA: Los códigos de tubería 248 CMR del estado de
Massachusetts deben estar adheridos a la conexión. Las
válvulas de este tipo están prohibidas en Massachusetts.
Consulte con su plomero autorizado.
8. DRENE LA TUBERÍA
5. APRIETE LA TRAMPA
Gire el suministro principal de agua hacia
la derecha y drene la tubería hasta
que el agua esté clara.
Apriete la trampa hasta que la rondana selladora
empiece a agrandarse.
NOTA: No apriete de más, ya que podría romper la
tube
Cierre la llave, así como la válvula
hasta que 1 cuarto (1 L ) de
agua haya sido drenada a través
de la tubería.
6. ACOMODE LA TUBERÍA
Acomode la tubería entre la línea de agua fría y el
refrigerador.
Acomode la tubería a través de una perforación hecha
en la pared o piso (detrás del refrigerador o a un lado
del gabinete) tan cerca de la pared como sea posible.
NOTA: Asegúrese de que exista suficiente tubería extra
(unos 8 pies [244 mm] enrollados en 3 vueltas de 10”
[25 cm] de diámetro) para permitir al refrigerador moverse
fuera de la pared después de la instalación.
62
CÓMO CONECTAR LA TUBERÍA DE AGUA
9. CONECTE LA TUBERÍA AL REFRIGERADOR
11. CONECTE EL REFRIGERADOR
Arregle la tubería de agua de tal
manera que ésta no pueda vibrar
con el refrigerador o la pared.
Empuje el refrigerador hacia la
pared.
NOTAS:
Antes de hacer la conexión al refrigerador, asegúrese
de que éste no esté conectado al suministro de
energía.
Si su refrigerador no cuenta con filtro de agua, le
recomendamos que instale uno. Si su suministro de
agua contiene arena o partículas que puedan ser
llevadas a través de la válvula, instale un filtro de
agua en la tubería cerca del refrigerador.
12. ENCIENDA LA FÁBRICA DE HIELO
Quite la tapa de plástico de la válvula
(del refrigerador).
Accione el interruptor de la fábrica de hielo a la posición
ON (encendido). La fábrica de hielo no empezará a operar
hasta que alcance su temperatura de operación de 15 °F
(-9 °C) o menor. Comenzará su operación automática si el
interruptor se encuentra en la posición I (Encendido).
Coloque la tuerca de compresión y la férula al final de la
tubería.
Inserte la tubería en la válvula de conexión tan adentro
como le sea posible. Apriete mientras sostiene la tubería.
`
Apriete el tubo en los sujetadores que se encuentran
detrás del refrigerador.
Primero afloje el tornillo que sostiene el sujetador. Después,
inserte el tubo en el orificio. Finalmente, vuelva a apretar
el tornillo.
10. ABRA LA VÁLVULA DE PASO
Apriete todas las conexiones
que tengan fugas.
Vuelva a poner la cubierta de
acceso al compresor.
63
GUÍA DE SOLUCIÓN DE PROBLEMAS
El cronómetro del ciclo de deshielo sonará cuando el
ciclo automático de deshielo comience y termine.
Además, el Control del Termostato (o Control del
Refrigerador, dependiendo del modelo), emitirá un
sonido cuando comience y termine el ciclo de
refrigeración.
Se puede escuchar un cascabeleo, el cual es debido al
flujo del refrigerante, la tubería de agua, u objetos
colocados en la parte superior del refrigerador.
Su refrigerador está diseñado para funcionar con más
eficiencia para conservar sus alimentos a la
temperatura deseada y para minimizar el uso de
energía. El compresor de alta eficiencia y los
ventiladores pueden causar que su nuevo refrigerador
funcione por periodos de tiempo más largos que su
refrigerador viejo y Ud. puede escuchar un sonido
pulsante o agudo que proviene del compresor o de los
ventiladores que se ajusten para un rendimiento óptimo.
La contracción y expansión de las paredes internas
pueden causar un ligero sonido de bombeo.
Puede que Ud. escuche el motor del ventilador del
evaporador circulando el aire a través de los
compartimentos del refrigerador y del congelador. Es
posible que aumente la velocidad del ventilador cuando
usted abra la puerta o agregue alimentos calientes.
El agua que gotea durante un ciclo de deshielo, puede
causar ruido de chisporroteo.
Al final de cada ciclo, Ud. puede escuchar un gorgoteo
debido al flujo de líquido refrigerante en su refrigerador.
Ud. puede escuchar aire forzado sobre el condensador
causado por el ventilador del condensador.
Ud. puede escuchar agua corriendo hacia la bandeja
colectora durante el ciclo de descongelación.
Debido al diseño para el bajo consumo de energía
del refrigerador, los abanicos permanecerán apagados,
durante el tiempo en que el interruptor de la puerta active
la luz interna del compartimiento.
SONIDOS NORMALES
Su nuevo refrigerador puede hacer ruidos que su viejo
refrigerador no hacía. Como estos sonidos son nuevos
para Ud., puede ser que se preocupe. La mayoría de los
sonidos nuevos son normales. Superficies duras, como el
piso, las paredes y los gabinetes, pueden hacer que los
sonidos parezcan más fuertes de lo que son en realidad.
A continuación se describen los tipos de sonidos y qué
puede causarlos.
EL REFRIGERADOR NO ENCIENDE
Verifique si...
Está conectado el enchufe.
Se ha fundido un fusible o el circuito de electricidad
tiene fallas.
Entonces...
Conecte firmemente el enchufe en un tomacorriente con el
voltaje adecuado
Reemplace el fusible o haga revisar el circuito eléctrico.
El control del refrigerador se encuentra en la posición OFF. Vea la sección Ajuste de Controles.
El refrigerador se encuentra en el ciclo de descongelación. Espere unos 30 min para que el ciclo termine.
SONIDOS EXTRAÑOS O VIBRACIÓN
Verifique si...
El refrigerador no se encuentra firmemente asentado
en el piso.
Entonces...
Necesita ajustar los tornillos niveladores debido a que el
piso está débil o no uniforme. Vea la sección de Instalación
LAS LUCES NO ENCIENDEN
Verifique si...
El refrigerador está enchufado
Los focos (bombillas) están flojas.
Se ha fundido un foco (bombilla)
Entonces...
Conecte firmemente el enchufe en un tomacorriente con el
voltaje adecuado
Apague (OFF) el Control del Refrigerador y desconecte el
refrigerador. Quite cuidadosamente el foco (bombilla) y vuelva a
colocarla. Enchufe el refrigerador.
Cambie el foco (bombilla) por una del mismo wattaje, tamaño y
forma. Vea la sección Cómo cambiar los focos (bombillas)
Apague el control de temperatura (OFF)
y desconecte el refrigerador.
64
GUÍA DE SOLUCIÓN DE PROBLEMAS
EL COMPRESOR PARECE ESTAR ENCENDIDO POR MUCHO TIEMPO
Verifique si...
Entonces...
El refrigerador que fue reemplazado era un
modelo antiguo.
Los refrigeradores modernos con mayor capacidad de
almacenaje requieren mayor tiempo de operación.
La temperatura ambiente está más caliente de lo
normal.
El motor seguirá en operación cuando la temperatura
ambiente sea alta. El motor puede estar encendido entre un
40% y 80% del tiempo. En condiciones de temperatura
alta, el compresor puede funcionar durante largo tiempo.
La puerta se abre muy seguido o se ha
almacenado una gran cantidad de alimentos.
Al agregar comida o abrir la puerta el refrigerador se
calienta. Es normal que el refrigerador opere por más
tiempo para enfriar los compartimientos. Vea la Guía para
Almacenar Alimentos. Para ahorrar
energía, tome lo que necesite en una sola ocasión,
mantenga la comida ordenada para encontrarla fácilmente,
y cierre la puerta del refrigerador tan pronto como saque
la comida.
El refrigerador está enchufado y el control ha sido
ajustado correctamente
El refrigerador tardará 24 h para enfriarse
completamente.
El control del refrigerador no ha sido ajustado
correctamente para las condiciones de la habitación
Vea la sección Ajuste de los Controles .
Las puertas no cierran correctamente.
Empuje las puertas firmemente. Si no se cierran completamente,
vea a continuación “Las puertas no cierran completamente”.
Los serpentines del condensador están sucios.
Esto evita la transferencia de aire y hace que el motor trabaje
por más tiempo. Limpie los serpentines del condensador. Vea
la sección Cuidados y Limpieza del Refrigerador.
LAS PUERTAS NO CIERRAN COMPLETAMENTE
Verifique si...
El refrigerador no está nivelado.
Entonces...
Vea la sección de Instalación para nivelar el
refrigerador.
Los paquetes de comida están obstruyendo las puertas. Arregle los contenedores de comida para liberar espacio
entre las puertas y los estantes.
El recipiente de hielos, la cubierta de vegetales, los
paneles, estantes, contenedores de puertas o
recipientes están fuera de posición
Empuje los contenedores y ponga la cubierta del cajón de
vegetales, paneles, estantes y otros contenedores en sus
posiciones correctas.
Los sellos se pegan.
Limpie los sellos y las superficies que tocan. Use un trapo
con un poco de parafina y aplíquelo en los sellos.
El refrigerador se tambalea o parece inestable.
Nivele el refrigerador. Vea la sección de
Alineación de Puertas.
Se quitaron las puertas durante la instalación y no se
instalaron apropiadamente.
Quite y vuelva a colocar las puertas de acuerdo a la
sección de instalación de puertas.
HAY CRISTALES DE HIELO EN LA COMIDA
Verifique si...
Entonces...
No se ha cerrado correctamente la puerta.
Vea “Las puertas no cierran completamente” arriba mencionada.
La puerta se abre frecuentemente.
Cuando la puerta se abre, el aire tibio y húmedo entra en el
congelador, provocando la humedad y cristales de hielo.
65
GUÍA DE SOLUCIÓN DE PROBLEMAS
EL HIELO TIENE SABOR Y OLOR EXTRAÑOS
Verifique si...
La fábrica de hielos ha sido instalada
recientemente.
Entonces...
No utilice los primeros hielos que se produzcan.
El hielo ha sido almacenado por mucho tiempo.
Deshágase del hielo viejo y haga una nueva provisión.
La comida no se ha empacado bien en cada
compartimiento
Vuelva a envolver la comida, ya que los olores se pueden
transferir al hielo si la comida no está bien empacada.
El suministro de agua contiene minerales tales
como el sulfuro.
Tal vez necesite instalar un filtro de agua para eliminar los
problemas de olores y sabores.
El interior del refrigerador necesita limpieza.
Vea la sección de Cuidados y Limpieza.
El recipiente de hielos necesita limpieza
Vacíe el recipiente y tire los cubos viejos.
HAY AGUA EN EL RECIPIENTE DE DRENAJE
Verifique si...
El refrigerador se está descongelando.
Está más húmedo que lo normal.
Entonces...
El agua se evaporará. Es normal que el agua caiga en el
recipiente de drenaje.
Puede que el agua que se encuentra en el recipiente tarde
en evaporarse. Es normal cuando el clima esta caliente y
húmedo.
EL REFRIGERADOR HACE MUCHO RUIDO
Verifique si...
Los sonidos son normales en su refrigerador.
Entonces...
Vea la sección Sonidos Normales.
LA FÁBRICA DE HIELO NO PRODUCE HIELO O LOS CUBOS SE ENFRÍAN LENTAMENTE
Verifique si...
Entonces...
La temperatura del congelador está suficientemente
fría para producir hielo.
Espere 24 h para producir hielo. Vea Ajuste de los
Controles.
La puerta se dejó abierta.
Verifique si hay algo que obstruya el cierre de la puerta.
LOS CUBOS FABRICADOS SON MUY PEQUEÑOS
Verifique si...
Se seleccionó el tamaño más pequeño de cubos.
Se ha obstruido la válvula que se conecta al
refrigerador o tuberia.
Entonces...
Seleccione un tamaño mayor para los hielos.
Llame a un plomero para limpiar la válvula o tuberías.
LAS PUERTAS SON DIFÍCILES DE ABRIR
Verifique si...
Los sellos están sucios o pegajosos.
La puerta se vuelve a abrir tan pronto como usted
la cierra.
Entonces...
Limpie los sellos y las superficies que tocan. Utilice un trapo
con parafina y aplíquelo en los sellos.
Cuando usted abre la puerta, el aire a alta temperatura entra
en el refrigerador. Cuando este aire se enfría rápidamente
ocupa un menor volumen y crea un vacío. Si es difícil abrir,
espere 5 min, luego verifique.
66
GUÍA DE SOLUCIÓN DE PROBLEMAS
LA FÁBRICA DE HIELO NO FUNCIONA
Verifique si...
La fábrica de hielo está encendida.
El suministro de agua se ha cortado o no está
conectada.
La temperatura del congelador está tibia.
Los cubos de hielo fabricados apagan la fábrica
de hielos.
Entonces...
Encienda la fábrica de hielos (posición I )
Vea la sección Cómo Conectar la Tubería de Agua.
Espere 24 h para que el congelador alcance
su temperatura ideal.
Nivele los cubos a mano.
LA TEMPERATURA ESTÁ MUY CALIENTE O SE HA FORMADO HUMEDAD EN EL INTERIOR
Verifique si...
Entonces...
Las ventilas de aire están bloqueadas. El aire frío
circula desde el congelador hacia el refrigerador y
regresa a través de las ventilas que dividen estas
secciones.
Localice las ventilas usando su mano para revisar el flujo
de aire y mueva los paquetes que bloqueen las ventilas y
eviten el flujo de aire. Vea la sección Ice Beam Door
Cooling / Door Cooling para mayor referencia.
Las puertas se abren frecuentemente.
Cuando las puertas se abren, el aire tibio y húmedo entra al
refrigerador. Mientras más tiempo estén abiertas, mayor
aire tibio y húmedo entrará al refrigerador, lo que provoca la
formación de humedad. Para mantener el refrigerador frío,
tome lo que necesite de una sola vez y mantenga la comida
organizada para que le sea más fácil encontrarla, y cierre la
puerta tan pronto como la saque.
El control del refrigerador no ha sido ajustado
correctamente para las condiciones de la habitación
Vea la sección Ajuste de los Controles.
Espere 24 h para espabilizar la temperatura. Si la
temperatura es demasiado fría ó caliente, mueva el control
un nivel a la vez.
Una cantidad grande de alimento que acaba de
agregarse al compartimiento del refrigerador.
Agregar comida caliente al refrigerador, puede tomar
varias horas en que el refrigerador regrese a su temperatura
normal.
La comida no se ha empacado bien en cada
compartimiento
Vuelva a envolver la comida, ya que los olores se pueden
transferir al hielo si la comida no está bien empacada.
No se ha cerrado correctamente la puerta.
Vea “Las puertas no cierran completamente”.
El clima está húmedo.
En climas húmedos, el aire contiene humedad, la cual se
introduce al refrigerador cuando las puertas se abren.
El ciclo de auto-descongelación ha terminado.
Es normal que se formen gotas de agua en la pared trasera
después de completar un ciclo de descongelación.
67