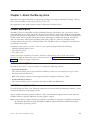
1
ThinkPad Ultrabay Blu-ray Burner
User's Guide
ThinkPad Ultrabay Blu-ray Burner
User's Guide
ATTENTION
Before installing this product, read the ThinkPad System Safety Booklet.
Note
Be sure to keep your proof of purchase, because it might be required for warranty services. See Appendix E, “Lenovo
Limited Warranty,” on page E-1.
First Edition (November 2007)
© Copyright Lenovo 2007.
Portions © Copyright International Business Machines Corporation 2005.
All rights reserved.
LENOVO products, data, computer software, and services have been developed exclusively at private expense and
are sold to governmental entities as commercial items as defined by 48 C.F.R. 2.101 with limited and restricted
rights to use, reproduction and disclosure.
LIMITED AND RESTRICTED RIGHTS NOTICE: If products, data, computer software, or services are delivered
pursuant a General Services Administration ″GSA″ contract, use, reproduction, or disclosure is subject to restrictions
set forth in Contract No. GS-35F-05925.
Contents
Safety information . . . . . . . . . . v
General safety guidelines. . . . . . . vii
Service . . . . . . . . . .
Power cords and power adapters .
Extension cords and related devices
Plugs and outlets . . . . . .
Batteries . . . . . . . . .
Heat and product ventilation . .
.
.
.
.
.
.
.
.
.
.
.
.
.
.
.
.
.
.
.
.
.
.
.
.
.
.
.
.
.
.
.
.
.
.
vii
vii
vii
vii
. viii
. viii
Using DVD Movie Factory . . . . . . . . . 2-7
Using Burn-Now to create data and audio discs 2-8
Using Burn-Now to copy discs. . . . . . . 2-9
Using DVD Disc Recorder to make video discs
2-9
Using the QuickDrop desktop interface . . . . 2-9
Appendix A. Customizing the device
driver configuration settings . . . . . A-1
Enabling DMA for Windows XP .
Enabling digital audio extraction .
.
.
.
.
.
.
.
.
.
.
. A-1
. A-1
Chapter 1. About the Blu-ray drive . . 1-1
Product description . .
Software description . .
Installation requirements .
Installing the drive. . .
Locating the drive controls
.
.
.
.
.
.
.
.
.
.
.
.
.
.
.
.
.
.
.
.
.
.
.
.
.
.
.
.
.
.
Chapter 2. Using the Blu-ray drive
.
.
.
.
.
.
.
.
.
.
1-1
1-1
1-1
1-2
1-2
. . 2-1
Before you begin . . . . . . . . . . .
Caring for the Blu-ray drive. . . . . . . .
Loading a disc . . . . . . . . . . . .
Securing a disc in a vertically mounted drive . .
Manually ejecting a disc . . . . . . . . .
Using media . . . . . . . . . . . . .
Handling and caring for a disc. . . . . .
Using DVD-RAM media . . . . . . . .
Using CDs and DVDs . . . . . . . .
Using CD-Rs and CD-RWs . . . . . . .
Using DVD-Rs and DVD-RWs . . . . . .
Using Blu-ray discs . . . . . . . . .
Installing software . . . . . . . . . . .
Before using the software . . . . . . . .
Using WinDVD . . . . . . . . . . . .
Viewing Blu-ray movies . . . . . . . .
Changing the DVD and Blu-ray region codes .
© Lenovo 2007. Portions © IBM Corp. 2005.
.
.
.
.
.
.
.
.
.
.
.
.
.
.
.
.
.
.
.
.
.
.
2-1
2-1
2-1
2-2
2-2
2-2
2-2
2-3
2-4
2-4
2-5
2-5
2-5
2-6
2-6
2-6
2-7
Appendix B. Troubleshooting
. . . . B-1
Appendix C. Product specifications
C-1
Appendix D. Service and Support . . . D-1
Registering your option . . .
Online technical support . .
Telephone technical support .
.
.
.
.
.
.
.
.
.
.
.
.
.
.
.
.
.
.
. D-1
. D-1
. D-1
Appendix E. Lenovo Limited Warranty E-1
Warranty information . . . . . .
Suplemento de Garantía para Méjico
.
.
.
.
.
.
.
.
. E-4
. E-5
Appendix F. Notices . . . . . . . . . F-1
Recycling information
Trademarks . . . .
.
.
.
.
.
.
.
.
.
.
.
.
.
.
.
.
.
.
. F-2
. F-2
Appendix G. Electronic emission
notices . . . . . . . . . . . . . . G-1
Appendix H. China RoHS . . . . . . H-1
iii
iv
ThinkPad Ultrabay Blu-ray Burner User's Guide
Safety information
Before installing this product, read the Safety Information.
Antes de instalar este produto, leia as Informações de Segurança.
Pred instalací tohoto produktu si prectete prírucku bezpecnostních instrukcí.
Læs sikkerhedsforskrifterne, før du installerer dette produkt.
Ennen kuin asennat tämän tuotteen, lue turvaohjeet kohdasta Safety Information.
Avant d’installer ce produit, lisez les consignes de sécurité.
Vor der Installation dieses Produkts die Sicherheitshinweise lesen.
Prima di installare questo prodotto, leggere le Informazioni sulla Sicurezza.
Lees voordat u dit product installeert eerst de veiligheidsvoorschriften.
Les sikkerhetsinformasjonen (Safety Information) før du installerer dette produktet.
Antes de instalar este produto, leia as Informações sobre Segurança.
Antes de instalar este producto lea la información de seguridad.
© Lenovo 2007. Portions © IBM Corp. 2005.
v
Läs säkerhetsinformationen innan du installerar den här produkten.
vi
ThinkPad Ultrabay Blu-ray Burner User's Guide
General safety guidelines
Always observe the following precautions to reduce the risk of injury and property damage.
Service
Do not attempt to service a product yourself unless instructed to do so by the Customer Support Center.
Use only a service provider who is approved to repair your particular product.
Note: Some parts can be upgraded or replaced by the customer. These parts are referred to as Customer
Replaceable Units, or CRUs. Lenovo expressly identifies CRUs as such, and provides
documentation with instructions when it is appropriate for customers to replace those parts. You
must closely follow all instructions when performing such replacements. Always make sure that
the power is turned off and that the product is unplugged from any power source before you
attempt the replacement. If you have any questions or concerns, contact the Customer Support
Center.
Power cords and power adapters
Use only the power cords and power adapters supplied by the product manufacturer.
Never wrap a power cord around the power adapter or other object. Doing so can stress the cord in ways
that can cause the cord to fray, crack or crimp. This can present a safety hazard.
Always route power cords so that they will not be walked on, tripped over, or pinched by objects.
Protect the cord and power adapters from liquids. For instance, do not leave your cord or power adapter
near sinks, tubs, toilets, or on floors that are cleaned with liquid cleansers. Liquids can cause a short
circuit, particularly if the cord or power adapter has been stressed by misuse. Liquids can also cause
gradual corrosion of the power cord terminals and/or the connector terminals on the adapter which can
eventually result in overheating.
Always connect power cords and signal cables in the correct order and ensure that all power cord
connectors are securely and completely plugged into receptacles.
Do not use any power adapter that shows corrosion at the ac input pins and/or shows signs of
overheating (such as deformed plastic) at the ac input or anywhere on the power adapter.
Do not use any power cords where the electrical contacts on either end show signs of corrosion or
overheating or where the power cord appears to have been damaged in any way.
Extension cords and related devices
Ensure that extension cords, surge protectors, uninterruptible power supplies, and power strips that you
use are rated to handle the electrical requirements of the product. Never overload these devices. If power
strips are used, the load should not exceed the power strip input rating. Consult an electrician for more
information if you have questions about power loads, power requirements, and input ratings.
Plugs and outlets
If a receptacle (power outlet) that you intend to use with your computer equipment appears to be
damaged or corroded, do not use the outlet until it is replaced by a qualified electrician.
© Lenovo 2007. Portions © IBM Corp. 2005.
vii
Do not bend or modify the plug. If the plug is damaged, contact the manufacturer to obtain a
replacement.
Some products are equipped with a three-pronged plug. This plug fits only into a grounded electrical
outlet. This is a safety feature. Do not defeat this safety feature by trying to insert it into a non-grounded
outlet. If you cannot insert the plug into the outlet, contact an electrician for an approved outlet adapter
or to replace the outlet with one that enables this safety feature. Never overload an electrical outlet. The
overall system load should not exceed 80 percent of the branch circuit rating. Consult an electrician for
more information if you have questions about power loads and branch circuit ratings.
Be sure that the power outlet you are using is properly wired, easily accessible, and located close to the
equipment. Do not fully extend power cords in a way that will stress the cords.
Connect and disconnect the equipment from the electrical outlet carefully.
Batteries
All personal computers manufactured by Lenovo contain a non-rechargeable coin cell battery to provide
power to the system clock. In addition many mobile products such as notebook PCs utilize a rechargeable
battery pack to provide system power when in portable mode. Batteries supplied by Lenovo for use with
your product have been tested for compatibility and should only be replaced with Lenovo approved
parts.
Never attempt to open or service any battery. Do not crush, puncture, or incinerate batteries or short
circuit the metal contacts. Do not expose the battery to water or other liquids. Only recharge the battery
pack strictly according to instructions included in the product documentation.
Battery abuse or mishandling can cause the battery to overheat, which can cause gasses or flame to
“vent” from the battery pack or coin cell. If your battery is damaged, or if you notice any discharge from
your battery or the buildup of foreign materials on the battery leads, stop using the battery and obtain a
replacement from the battery manufacturer.
Batteries can degrade when they are left unused for long periods of time. For some rechargeable batteries
(particularly Lithium Ion batteries), leaving a battery unused in a discharged state could increase the risk
of a battery short circuit, which could shorten the life of the battery and can also pose a safety hazard. Do
not let rechargeable Lithium-Ion batteries completely discharge or store these batteries in a discharged
state.
Heat and product ventilation
Computers, AC adapters, and many accessories can generate heat when turned on and when batteries are
charging. Always follow these basic precautions:
v Do not leave your computer, AC adapter, or accessories in contact with your lap or any part of your
body for an extended period when the products are functioning or when the battery is charging. Your
computer, AC adapter, and many accessories produce some heat during normal operation. Extended
contact with the body could cause discomfort or, potentially, a skin burn.
v Do not charge the battery or operate your computer, AC adapter, or accessories near flammable
materials or in explosive environments.
v Ventilation slots, fans, and heat sinks are provided with the product for safety, comfort, and reliable
operation. These features might inadvertently become blocked by placing the product on a bed, sofa,
carpet, or other flexible surface. Never block, cover, or disable these features.
viii
ThinkPad Ultrabay Blu-ray Burner User's Guide
Chapter 1. About the Blu-ray drive
This manual provides information on registering, installing, and using the ThinkPad® Ultrabay™ Blu-ray
Drive, and is available on the Software and User's Guide CD.
The appendixes of this guide contain warranty information and legal notices.
Product description
Your Blu-ray drive is compatible with the DVD-Multi Recorder specification, and can record as well as
read DVD-RAM, DVD-/+RW, and DVD-/+R (for General, 650 nm) media. (Some DVD+R and DVD+RW
media brands may not be compatible.) Your Blu-ray drive can also record CD-R, CD-RW, and High-Speed
CD-RW media, and uses buffer underrun prevention technology for reliable CD burning. Your Blu-ray
drive can read many other formats including DVD Video, Video CD, audio CD, multiple-session,
extended architecture (XA) CDs, and Kodak Photo CDs. The Blu-ray drive is designed for installation in
your Ultrabay Drive Bay.
In addition to this Software and User's Guide CD, your option package includes the following:
v ThinkPad Ultrabay Blu-ray Drive
v Quick Reference Guide
v Laser Safety Guide
Contact your place of purchase if an item is missing or damaged. Be sure to retain your proof of
purchase. It might be required to receive warranty service. See Appendix D, “Service and Support,” on
page D-1 for technical support information.
Software description
Your Blu-ray Drive User's Guide and Software CD contains the following software:
v Intervideo WinDVD 8
This software enables you to play back DVD and Blu-ray videos on your computer or to play video
files from your hard disk drive.
Note: Most graphics adapters cannot support playback of high bit rate Blu-ray videos.
v Ulead DVD Movie Factory 5
This software enables you to record data and videos to BD-R and BD-RE discs.
Installation requirements
To install the Blu-ray drive, your ThinkPad computer must contain either the Microsoft® Windows® Vista®
or Microsoft Windows XP operating systems.
Also, to enable satisfactory playback of Blu-ray video, your ThinkPad computer must contain either the
NVIDIA GeForce or Quadro 7300 Series discrete graphics adapter.
Note: Lenovo offers no support for Blu-ray playback or recording on computers with Microsoft Windows
95, Microsoft Windows 98, Microsoft Windows 2000, or Microsoft Windows Millennium Edition
(Me) desktop operating systems.
© Lenovo 2007. Portions © IBM Corp. 2005.
1-1
Installing the drive
Your ThinkPad computer includes the Access ThinkPad help system, that provides drive installation
instructions specific to your computer.
Locating the drive controls
The following diagram shows the location of the controls on the front of the drive.
1 Power light: This light is visible when the drive is in use.
2 Eject button: Press this button to eject a DVD or CD.
3 Manual eject hole: Use this emergency release to eject a DVD or CD when the Eject button does not
work. For more information on manually ejecting a DVD or CD, see “Manually ejecting a disc” on page
2-2
1-2
ThinkPad Ultrabay Blu-ray Burner User's Guide
Chapter 2. Using the Blu-ray drive
This section provides information on how to handle, load, and care for DVDs and CDs, and how to care
for your Blu-ray drive.
Before you begin
For best results, review the following guidelines before using the drive:
v Do not move your ThinkPad computer while formatting or writing a disc as this might cause data
errors. Also, minimize typing while formatting or writing to a disc, as this might also cause data errors.
v Keep the ThinkPad computer on a flat surface when writing to a disc.
v Make sure the ThinkPad computer is plugged into an AC outlet when using the drive. The disc might
be damaged if the battery runs out while writing to a disc.
v Turn screensavers off. Using a screensaver might interrupt the formatting and writing process.
v Do not put your ThinkPad computer into hibernation or suspend mode while writing to a disc.
Note: The read and write results of the drive depend upon the quality and characteristics of the DVD or
CD media used.
Caring for the Blu-ray drive.
To protect your drive during operation, observe these precautions:
v Remove the disc from the drive before moving the drive.
v Do not insert foreign objects into the drive.
v Do not stack objects on the drive.
v Do not remove the drive cover or attempt to service the drive.
v Do not operate the drive under any of these conditions:
– High temperature, high humidity, or direct sunlight
– Excessive vibration, sudden shock, or inclined surface
– Excessive dust
Loading a disc
1. Press the Eject button. The tray slides out of the drive.
2. Place a disc in the tray with the label facing up.
3. Close the tray by gently pushing the tray in until it latches.
© Lenovo 2007. Portions © IBM Corp. 2005.
2-1
Attention: Do not use force or insert foreign objects to open the tray. If your tray does not open when you press
the Eject button, see “Manually ejecting a disc” for more information.
Securing a disc in a vertically mounted drive
The drive has four retainers molded into the loading tray for vertical mounting operation. To insert a
disc, place it in the lower two retainers before closing the tray. To remove a disc, open the tray and lift
the disc from the two lower retainers.
Manually ejecting a disc
If you press the Eject button and the tray does not slide out, turn off the computer and straighten a large
paper clip to form a tool, as shown in the illustration. The straightened end must extend at least 45 mm
(1.8 inches). Insert the extended end into the manual-eject hole on the front of the drive. Push the paper
clip until the tray opens. Gently pull out the tray until you can remove the disc.
45 mm
1.8 in
Using media
This section contains information on using media.
Handling and caring for a disc
Carefully handle and clean discs, especially writable media types such as CD-R and CD-RW discs, so that
they remain readable. You can prolong the life of your discs by using these precautions:
v Always store discs in their original packaging.
v Always store discs out of direct sunlight.
v Always store discs away from direct heat sources.
v Remove discs from the computer when not in use.
v Check discs for cracks BEFORE each use.
Important: Do not use discs that are cracked.
v
v
v
v
v
v
v
Do not force discs into the computer or packaging.
Do not bend or flex discs.
Do not use commercial cleaners to clean discs.
Do not write on the surface of discs.
Handle discs by the edges or the center hole.
Do not touch the surface of discs.
To remove dust or fingerprints, wipe discs from the center to the edge with a soft, lint-free cloth.
Attention:
2-2
Wiping a disc using a circular motion can cause data loss.
ThinkPad Ultrabay Blu-ray Burner User's Guide
Your drive can use many different types of media. Not all media is used in the same way. The following
sections describe what you can do with the different media types.
Using DVD-RAM media
This section contains information on using DVD-RAM media in the Blu-ray drive.
Removing the disc from the cartridge
2a
3a
DVD-RAM media is available in bare-disc or cartridge form. To use cartridge media in your Blu-ray
drive, you must first remove the disc from the cartridge.
Using the tip of a ball point pen, push and break the lock pin tab 1. To remove the disc, use the ball
point pen to push down on the cartridge lid lock 2 and pull the cartridge lid out 3. When the
cartridge lid is open, the disc can be removed.
Note: The cartridge lid lock and the cartridge lid tab are located on the side of some cartridges, as shown
in 2aand 3aabove.
Attention:
Do not touch the recording area of the disc when handling bare media.
Chapter 2. Using the Blu-ray drive
2-3
Returning the disc to the cartridge
To return the disc to the cartridge, align the label side of the disc 1with the DVD-RAM cartridge label
side. Insert the disc and close the cartridge lid 2. A clicking sound will occur when the lid closed.
Precautions for handling
Be careful when handling the removed disc. Debris, dust particles, fingerprints, smears, or scratches may
impair recording and playback of the media. To clean dust or other debris, use a CD Cleaning Kit. Use a
soft, dry cloth to clean the disc. Do not use solvents to clean the disc surface. When labeling a disc, write
only on the printed label side or the cartridge using a soft felt-tip marker. Keep out of direct sunlight,
high temperatures, and humidity. Do not attach labels to either side of the disc.
Using single and double-sided DVD-RAM media
DVD-RAM media is available in single-sided and double-sided versions.
The 2.6 GB and 4.7 GB versions are single-sided. The 9.4 GB versions are double-sided. To access the data
on both sides of the media, you must remove the media from the drive, turn it over, and re-insert it into
the drive.
Using CDs and DVDs
Complete these steps to read a data disc:
1. Turn on the computer.
2. Press the Open/Close button on the front of the drive.
3. Insert a disc or cartridge in the tray with the label facing up.
4. Close the tray by pressing the Open/Close button or by gently pushing in the loading tray.
Attention:
Do not use force or insert foreign objects to open the loading tray.
5. Wait for the drive busy indicator to turn off; then double-click My Computer.
6. Double-click the CD-ROM or DVD-RAM/DVD-R/DVD-RW icon.
Using CD-Rs and CD-RWs
The Blu-ray drive can write to both CD-R and CD-RW discs. CD-R discs cannot be erased, but can be
used with standard CD-ROM drives and CD players.
You can use CD-R discs to record audio tracks, store data, archive files, and copy files from another CD.
CD-RW discs can be erased and rewritten, but can be used only with newer CD-RW-compatible CD-ROM
and DVD-ROM drives. You can use CD-RW discs to back up, store, and update files or to copy files from
another CD.
Notes:
1. CD-R discs are playable on audio CD players. CD-RW discs are not playable on most audio CD
players.
2. The software included with this drive does not enable the drive CD-recording capabilities with DOS,
Windows 3.x, or OS/2® operating systems.
2-4
ThinkPad Ultrabay Blu-ray Burner User's Guide
For more information on using the software, refer to “Using DVD Movie Factory” on page 2-7.
Using DVD-Rs and DVD-RWs
The Blu-ray drive can write to both DVD-R and DVD-RW discs. DVD-R discs cannot be erased, but can
be used with standard DVD-ROM drives and DVD players.
You can use DVD-R discs to record audio tracks, store data, archive files, and copy files from another
DVD.
DVD-RW discs can be erased and rewritten, but can be used only with newer MR- and
DVD-RW-compatible DVD-ROM drives. You can use DVD-RW discs to back up, store, and update files or
to copy files from another DVD.
For more information on using the software, refer to “Using DVD Movie Factory” on page 2-7.
Using Blu-ray discs
The Blu-ray drive can read pressed Blu-ray discs, and can read and write to BD-R and BD-RE discs.
Pressed Blu-ray discs are read-only and can contain movies or data. Pressed Blu-ray discs come in two
sizes, 50 Gigabytes (GB) and 25 GB. Your Blu-ray drive can read both single-layer (25 GB) and double
layer (50 GB) discs. Most pressed Blu-ray discs are encoded using a UDF 2.5 file system. Windows Vista
can natively read UDF 2.5 discs. Windows XP cannot natively read UDF 2.5 discs.
BD-R discs can be written once, and cannot be erased. You can use BD-R discs to store data, archive files,
and copy files from another disc.
BD-RE discs can be erased and rewritten. You can use BD-RE discs to store data, archive files, and copy
files from another disc.
You can easily copy Blu-ray discs and the data on them to hard disk drive or other media. Data files that
are copied will act as if they were on the disc. Movies that are copied from Blu-ray discs are protected by
the Advanced Access Content System (AACS) and cannot be played back after copying.
Notes:
1. Blu-ray discs cannot be read at all in a normal DVD drive or player.
2. The Blu-ray drive does not read or write HD DVD discs.
For more information on using the software, refer to “Using DVD Movie Factory” on page 2-7.
Installing software
After you connect the Blu-ray drive to the computer, you can install application software from the
Ultrabay Blu-ray Drive User's Guide and Software CD. Complete these steps to install application software:
1. Insert the Ultrabay Blu-ray Drive User's Guide and Software CD into the drive.
2. The CD should automatically start. If it does, proceed to Step 5.
3. If the CD does not automatically start, click Start > Run.
4. In the Run box type e:\launch.bat where e is the drive letter of the ThinkPad CD/DVD Ultrabay Slim
Burner.
5. If you get a warning from Internet Explorer about malicious scripts, right-click on the warning bar,
and select Allow Blocked Content.
6. Select Software from the left-hand navigator bar.
7. Check the boxes by the software applications that you wish to install.
8. Click Go. The software you selected will install silently.
9. Restart the computer after the completion message.
Chapter 2. Using the Blu-ray drive
2-5
Note: If the software fails to install silently, you can select interactive installs of individual packages from
the bottom line of the installer page.
Before using the software
Video playback requires a compatible video device driver and IDE bus mastering in order to work. See
Appendix A, “Customizing the device driver configuration settings,” on page A-1 for information on
enabling DMA bus mastering and for locating video device drivers.
Using WinDVD
To view the video content of a Blu-ray or DVD disc, launch WinDVD from the Start menu or by clicking
the shortcut on your desktop and insert the disc into the drive.
On startup of the WinDVD, the drive light will run for several seconds, then the video output window
will resize to the size of the video. Once the video is playing, the WinDVD controls can be used to
navigate through the video and disc menus.
With Microsoft Windows XP, you can also play DVD Video content by using the Windows Media Player
application.
With Microsoft Windows Vista, you can also play DVD Video content by using the Windows Media
Player or Windows Media Center applications.
Notes:
1. Windows Vista 64 will not always autoplay video content. For more Information see Appendix B,
“Troubleshooting,” on page B-1.
2. Microsoft Windows built-in applications cannot play Blu-ray movies.
3. Blu-ray movie discs will not autoplay in Windows XP. Windows XP cannot natively read the UDF 2.5
file system, so these Blu-ray movie discs are considered blank.
Viewing Blu-ray movies
You can use WinDVD to watch Blu-ray movies with the Blu-ray drive. These movies are usually of very
high resolution, and have better picture and sound performance than normal DVDs. Blu-ray movies also
have additional features such as games and internet content. WinDVD can play back Blu-ray movies with
excellent sound and picture quality.
Most Blu-ray movies are recorded at 1920×1080 resolution. WinDVD can scale this size to fit on your
monitor or into a screen window. If the resolution of your monitor is sufficient, you can watch the movies
at full size.
The cost of such a large resolution is that few video cards have enough power to display some Blu-ray
movies without jerking. The only currently supported ThinkPad graphics adapter is the Nvidia Quadro
7300. ThinkPad with Intel® or ATI graphics will be able to play Blu-ray videos, but some discs will not
play smoothly. For best results on Blu-ray video, the 'Hardware Acceleration' box in the WinDVD control
panel should be checked.
Blu-ray movies are more interactive than DVD movies. In Blu-ray, the disc is allowed to determine what
controls (stop, pause, etc.) function and whether the mouse can be used. Most Blu-ray discs have chapter
and set-up menus that can be used while the movie is playing. Right-clicking on the video window and
selecting 'Pop-up on' will activate any in-line menu.
2-6
ThinkPad Ultrabay Blu-ray Burner User's Guide
Changing the DVD and Blu-ray region codes
Commercial DVD movies are protected by the Content Scrambling System (CSS). Blu-Ray movies are
protected by the AACS. Both these protections divide the world into regions for playback of different
discs. Content designated for one region cannot be read by playback systems in another region.
The CSS specification divides the world into seven unique regions. These regions are numbered '1' to '7'.
The region code for CSS is stored in the drive. CSS allows an initial setting and four setting changes. On
the initial setting, no disc is required to change the code. On a region change, a single region disc from
the proper region must be in the drive. After the last change is used, the drive becomes locked into the
last setting forever.
Since the drive manages the regionalization of DVD CSS, both the drive and the disc can be checked for
the region. WinDVD will alert you if a wrong region disc is inserted, and offer you the choice of
changing the region. You can decide at that time to change the region or cancel playback.
The Blu-ray specification divides the world into three unique regions. Blu-ray regions are lettered 'A' to
'C'. The region code for Blu-ray is stored in your computer’s registry. Blu-ray allows an initial setting and
four setting changes. Blu-ray does not allow a player to check the region before playing. So the disc in
the drive during Blu-ray region change does not matter. After the last change is used, Windows becomes
locked into the last setting forever. As the setting is stored in the software, re-installing Windows will
reset the Blu-ray player to 'no region'.
Blu-ray regionalization does not allow WinDVD to view the region before playback. The first time that
you insert a Blu-ray disc into the drive, WinDVD will prompt you to select a region. If you later insert a
region mismatched disc, the disc will play to its own region error message. Most Blu-ray discs will
display a message and require that the disc be ejected on a region mismatch.
You can change the DVD or Blu-ray region code at any time by completing these steps:
1. Turn on your computer and start your operating system.
2. Click Start > Programs > Intervideo WinDVD > WinDVD 8.
3. Click the Properties icon to open the Properties window.
4. Click the General Properties tab.
5. Select DVD region or BD Region in the drop-down box.
6. If you are changing the DVD region, insert a single region DVD of the new region.
7. Select the correct region code for your country.
8. Click OK.
Using DVD Movie Factory
You can use DVD Movie factory to write data, audio, and movies to BD-RE, BD-R, DVD-RAM, DVD-RW,
DVD-R, DVD+RW, DVD+R, CD-R, and CD-RW media. BD-RE, DVD-RAM, DVD-RW, DVD+RW, and
CD-RW media can be written to many times, while DVD-R, DVD+R, and CD-R media can only be
formatted and written to once.
DVD Movie Factory comes with a number of programs to perform different tasks:
v Burn-Now: You can use this program to create data, audio, mp3, or bootable discs.
v DVD Disc Recorder: You can use this program to create DVD Videos or Video CDs from your own
video files or camera.
v Blu-ray Disc Recorder: You can use this program to create Blu-ray movies from your own video files
or camera.
v DVD Movie Factory Launcher: This interface allows quick access to several additional features:
– Copying discs
– Saving and burning disc images
– Erasing discs
Chapter 2. Using the Blu-ray drive
2-7
– Video disc resizing
– DVD-VR on disc editing
v QuickDrop: You can use this program to quickly add data or music to an existing disc.
The following table lists how functions can be accessed in DVD Movie Factory 5.
Launch BDDR
from the Start
Menu
Launch DDR from
the Start Menu
Capture Video from a camera
X
X
Create a Blu-ray Video
X
Task
Create a DVD Video
Launch Burn-Now
from the Start
Menu
DVD Movie
Factory Launcher
X
X
X
X
Create a VCD or SVCD Video
X
Create an Audio CD
X
X
Create an Audio DVD
X
X
X
X
Create a data CD, DVD, or BD
X
X
Copy a disc
X
X
Erase or format a disc
X
X
Save or Burn disc images
X
X
X
X
Create a slideshow
X
Copy a DVD or CD Layout to
discs
X
Create a HD-DVD compatible
disc layout
Capture video directly to discs
X
X
X
X
Using Burn-Now to create data and audio discs
Burn-Now enables you to write data to DVD-RAM, DVD-RW, DVD-R, DVD+RW, DVD+R, CD-R, and
CD-RW media. BD-RE, DVD-RAM, DVD-RW, DVD+RW, and CD-RW media can be written to many
times, while BD-R, DVD-R, DVD+R, and CD-R media can only be written to once.
To create a data or audio disc using Burn-Now, click Start > Programs > DVD Movie Factory 5 >
Burn-Now.
When you first open Burn-Now for a new project, you are prompted to select the project type. You can
select from the following:
v Data Disc – Copy data to a disc
v Audio Disc – Create a CD Audio, DVD Audio, or a Music DVD
v MP3 Disc – A disc of data mp3s that can be played in some DVD or CD players
v Bootable Disc – Create a disc with a bootable floppy image that starts it
You can also use Burn-Now to append data to editable data discs or DVD-VR video discs.
Once you have the project selected, drag and drop the items that you want to record into the disc target
area in the lower half of the screen. ClickBurn to write the items to disc.
2-8
ThinkPad Ultrabay Blu-ray Burner User's Guide
Using Burn-Now to copy discs
Burn-Now can also copy data, video, and audio discs. You can make copies either to similar discs or to
disc images saved on a hard disc or network drive. You can also create discs from images that you have
previously saved on your hard disc. You can burn DVD, HD-DVD, and Blu-ray layouts that you have
stored on your hard disc.
To copy a disc or image using Burn-Now, click Start > Programs > DVD Movie Factory 5 > Burn-Now.
Then select the task Copy a Disc.
Burn-Now is also called from the DVD Movie Factory 5 Launcher when the task 'Copy a Disc' is selected.
Notes:
1. Copy protected CDs and DVDs cannot be copied.
2. Copying or imaging discs without the copyright owner’s permission can result in legal penalties. For
more information on copyright laws, consult your legal advisor.
3. Saved Blu-ray images can be as large as 25 GB. Ensure that you have adequate hard drive disk space
before proceeding.
4. Burn-Now can only save and write images in ISO, IXA and IXB formats.
Using DVD Disc Recorder to make video discs
You can use the DVD Disc Recorder application to capture, trim, and record your own video to DVD-R,
DVD-RW, DVD+R, DVD+RW or DVD-RAM discs. DVD Disc Recorder allows ‘one click’ disc recording
from a camera to a disc. You can also create a compilation video disc with simple menus, or a picture
slideshow disc.
To start DVD Disc Recorder from the Start Menu, click Start > Programs > DVD Movie Factory 5 >
DVD Disc Recorder.
DVD Disc recorder is also called from the DVD Movie Factory 5 Launcher when the task 'Create a Video
Disc' is selected for DVD media.
DVD Disc recorder is called from the DVD Movie Factory 5 Launcher when the task 'Create a Slideshow'
is selected for DVD media. In this case, you can also save your slideshow to CD.
For detailed instructions on using the DVD Disc Recorder, consult the DVD Movie Factory 5 online help.
Using the QuickDrop desktop interface
You can activate QuickDrop, a small floating toolbar, from DVD Movie Factory. QuickDrop allows you to
drop files directly onto it to record them to disc. The Quick-drop interface can also create on-the-fly audio
discs.
To start the QuickDrop interface, click Start > Programs > DVD Movie Factory 5 > QuickDrop.
Once the QuickDrop is started, you can drop files onto it. When you click the Burn button you will be
prompted to insert a disc.
Chapter 2. Using the Blu-ray drive
2-9
2-10
ThinkPad Ultrabay Blu-ray Burner User's Guide
Appendix A. Customizing the device driver configuration
settings
Microsoft Windows Me and Windows 2000 Professional have two device-driver configuration parameters:
Auto Insert Notify and DMA.
The Auto Insert Notify parameter enables the computer to start playing or accessing the disc
automatically after being inserted in the drive. The DMA parameter improves the computer performance
by having the computer DMA controller handle data transfers from the CD to memory, freeing the
computer’s microprocessor to perform more important tasks. For example, activating DMA might make
movies and games run more smoothly because the microprocessor is allocating more processing time to
video.
Enabling DMA for Windows XP
To change the DMA parameter setting from the Windows XP desktop, complete these steps:
1. Click Start.
2. Click Control Panel.
3. Click Switch to classic view.
4. Double-click System.
5. Click the Hardware tab.
6. Click the Device Manager button.
7. Click the IDE ATA/ATAPI controller to expand the tree.
8. Double-click on the controller where your CD/DVD Burner is located (Primary IDE or Secondary
IDE).
9. Click the Advanced Settings tab.
10. Select the appropriate Transfer Mode pull-down that corresponds to the CD/DVD Burner location
(Device 0 for Master, Device 1 for Slave).
11. Select DMA if it is available.
12. Click OK.
Enabling digital audio extraction
Your system must be properly configured to play back digital audio from this drive. There are two
setting that must be configured. One setting is in the device properties, and a second setting is in
Windows Media Player.
To set the device properties, complete these steps:
1. Right-click on My Computer, and select Properties.
© Lenovo 2007. Portions © IBM Corp. 2005.
A-1
2. Select Device Manager from the Hardware tab. In Windows Me, the Hardware tab shows the Device
Manager directly without clicking the button, as shown in the figure below.
3. In the Device Manager tab, open the ’+’ for DVD/CD-ROM drives, right-click on your drive, and
select Properties.
4. Click the Properties tab and select the Enable Digital Audio, as shown in the figure below.
A-2
ThinkPad Ultrabay Blu-ray Burner User's Guide
To
1.
2.
3.
enable Digital Audio Playback in Windows Media Player, complete these steps:
Open Windows Media Player.
Select Tools > Options from the Media Player menu.
Click the CD Audio tab and select the Digital Playback, as shown in the figure below.
Appendix A. Customizing the device driver configuration settings
A-3
A-4
ThinkPad Ultrabay Blu-ray Burner User's Guide
Appendix B. Troubleshooting
Computer problems can be caused by hardware, software, or user error. The information in this section
might be useful to help you solve problems or to gather helpful information you can pass on to a service
technician. You might also need to refer to your computer, operating-system, or sound-adapter
publications.
Review the following list for any problem descriptions that might fit your situation.
You cannot create a multi-session CD or DVD.
Be sure that there is enough space left on the disc for another session. Writing a session requires lead-in
and lead-out space (about 15 MB) in addition to the data that is recorded.
You cannot successfully write to a CD-R, CD-RW, DVD-R, DVD-RW, BD-R, BD-RE, or DVD-RAM
disc.
Complete these steps:
1. Verify that the process is not being interrupted by a screen saver, an antivirus program, an Internet or
e-mail program, or other software. Disable the functions that might interrupt the write operation.
2. Verify that the hard disk has been defragmented.
3. Consult the hard disk drive manufacturer or vendor if an older hard disk drive is conducting a
thermal recalibration during a write operation.
4. Replace the CD if it is bad or scratched.
5. Disable the Windows Auto Insert Notify function on your CD-ROM and CD-RW drives.
You cannot eject a CD or DVD disc.
Complete these steps after ensuring that the drive is not in the process of writing to a disc:
1. Eject the CD through software.
2. Use the Eject button.
3. Turn off the computer. Wait 45 seconds; then turn on the computer and try using the Eject button
again.
4. If other methods do not work, use the manual-eject hole. Refer to the instructions in “Manually
ejecting a disc” on page 2-2.
You cannot read from the CD or DVD disc after successfully writing to it.
Complete these steps:
1. If you can read the CD or DVD Disc in another CD or DVD player or you can see previous sessions,
the directory information might be damaged on the volume, making it unreadable. To get ideas for
troubleshooting, check the documentation that comes with the software.
2. You might have a damaged CD-R, CD-RW, DVD-R, DVD-RW, or DVD-RAM disc. Try a new disc or
another brand of CD or DVD disc.
3. If you can read from a CD-RW, DVD-RW, or DVD-RAM disc in the writing drive, but not in another
CD drive, be sure that a UDF Reader program is installed in the computer.
4. Avoid writing at the slower 1X speed unless required by your computer.
Blu-ray Video drops frames or is jerky.
1. Ensure that DMA is turned on for the drive as described in this User's Guide.
2. Ensure that 'Hardware Acceleration' is checked in the WinDVD Tools dialog.
3. Ensure that your disc is clean an free of scratches.
© Lenovo 2007. Portions © IBM Corp. 2005.
B-1
Note: Some Blu-ray video content cannot be played at full frame rate without advanced video hardware.
Blu-ray video menus don't always work with the mouse.
This is normal. BD-J menus are controlled by the disc. Use the system keyboard to navigate the menu.
While playing a Blu-ray video, a 'Region Error' appears and the WinDVD controls do not function
correctly.
This is not unusual on a region mismatch. Close WinDVD and eject the disc. Reopen WinDVD and
change the region to match the disc. Re-insert the disc to play it.
The controls for 'Menu', 'Play', 'Fast forward', 'Stop', or 'Skip' are grayed out during Blu-ray playback.
This is normal. The disc is written so that you cannot use those controls at the current time.
'Copy protection error. Playback Stopped' when using WinDVD.
1. If an external display is connected, ensure that it supports Macrovision copy protection.
2. Ensure that under Windows Vista, your video driver supports the Protected Media Path.
3. Disable the analog display if only watching on the attached LCD screen.
Blu-ray Playback has poor performance in battery mode only.
The system is overheating and throttling the GPU. To solve, try one of these items:
1. Move the system to a cooler location.
2. Turn off Hardware Acceleration in WinDVD temporarily.
3. Connect the AC adapter during playback.
'DLA' errors occur when Blu-ray media is inserted, or I cannot shut down.
Uninstall Sonic Drive Letter access. That program is not compatible with the Blu-ray drive.
Windows Vista shows a red screen 'Cannot close QuickDrop.'
You missed the QuickDrop dialog that pops up when you shut down. Go back and select Yes.
After changing users in Windows Vista 64, Autoplay no longer works for DVD or Blu-ray.
This is a Windows Vista defect. To correct it:
1. Log on as the new user.
2. Go to Control Panel > Autoplay.
3. Select WinDVD for autoplay of DVD and Blu-ray media.
B-2
ThinkPad Ultrabay Blu-ray Burner User's Guide
Appendix C. Product specifications
This appendix includes the following information:
v Power requirements
v Environmental requirements
Power requirements
The following table lists the power specifications by voltage level for the drive. The power specifications
are measured at the drive power connector and are nominal values.
Power specifications
Voltage
Average
Maximum
At voltage
DC 5V
1100 mA
1800 mA
Environmental requirements
Specification
Operational
Non-operational
Temperature (non-condensing)
+5° C to +50° C
-20° C to +60° C
(+41° F to +122° F)
(-4° F to +140° F)
10% to 80%
5% to 90%
Relative humidity (non-condensing)
© Lenovo 2007. Portions © IBM Corp. 2005.
C-1
C-2
ThinkPad Ultrabay Blu-ray Burner User's Guide
Appendix D. Service and Support
The following information describes the technical support that is available for your product, during the
warranty period or throughout the life of your product. Refer to the Lenovo Limited Warranty for a full
explanation of Lenovo warranty terms.
Registering your option
Register to receive product service and support updates, as well as free and discounted computer
accessories and content.
Go to http://www.lenovo.com/register
Online technical support
Online technical support is available during the lifetime of a product at http://www.lenovo.com/
support.
Product replacement assistance or exchange of defective components also is available during the
warranty period. In addition, if your option is installed in a Lenovo computer, you might be entitled to
service at your location. A Lenovo technical support representative can help you determine the best
alternative.
Telephone technical support
Installation and configuration support through the Customer Support Center will be available until 90
days after the option has been withdrawn from marketing. After that time, the support is cancelled, or
made available for a fee, at Lenovo’s discretion. Additional support is also available for a nominal fee.
Before contacting a Lenovo technical support representative, please have the following information as
possible: option name and number, proof of purchase, computer manufacturer, model, serial number and
manual, the exact wording of any error message, description of the problem, and the hardware and
software configuration information for your system.
Your technical support representative might want to walk you through the problem while you are at your
computer during the call.
For a list of Service and Support phone numbers, visit http://www.lenovo.com/support/phone.
© Lenovo 2007. Portions © IBM Corp. 2005.
D-1
D-2
ThinkPad Ultrabay Blu-ray Burner User's Guide
Appendix E. Lenovo Limited Warranty
L505-0010-00 09/2006
This Lenovo Limited Warranty applies only to Lenovo hardware products you purchased for your own
use and not for resale. This warranty may sometimes be referred to as the ″Statement of Limited
Warranty″ (SOLW) in other documents from Lenovo.
What this Warranty Covers
Lenovo warrants that each hardware product is free from defects in materials and workmanship under
normal use during the warranty period. The warranty period for the product starts on the original date
of purchase specified on your invoice unless Lenovo informs you otherwise in writing. The warranty
period and type of warranty service that apply to your product are designated below under the section
titled ″Warranty Information.″
THIS WARRANTY IS YOUR EXCLUSIVE WARRANTY AND REPLACES ALL OTHER
WARRANTIES OR CONDITIONS, EXPRESS OR IMPLIED, INCLUDING, BUT NOT LIMITED TO,
THE IMPLIED WARRANTIES OR CONDITIONS OF MERCHANTABILITY AND FITNESS FOR A
PARTICULAR PURPOSE. SOME STATES OR JURISDICTIONS DO NOT ALLOW THE EXCLUSION
OF EXPRESS OR IMPLIED WARRANTIES, SO THE ABOVE EXCLUSION MAY NOT APPLY TO
YOU. IN THAT EVENT, SUCH WARRANTIES APPLY ONLY TO THE EXTENT REQUIRED BY LAW
AND ARE LIMITED IN DURATION TO THE WARRANTY PERIOD. NO WARRANTIES APPLY
AFTER THAT PERIOD. SOME STATES OR JURISDICTIONS DO NOT ALLOW LIMITATIONS ON
HOW LONG AN IMPLIED WARRANTY LASTS, SO THE ABOVE LIMITATION ON DURATION
MAY NOT APPLY TO YOU.
How to Obtain Warranty Service
If the product does not function as warranted during the warranty period, you may obtain warranty
service by contacting Lenovo or an approved service provider. Each of them is referred to as a ″Service
Provider.″ A list of Service Providers and their telephone numbers is available at www.lenovo.com/
support/phone.
Warranty service may not be available in all locations and may differ from location to location. Charges
may apply outside a Service Provider’s normal service area. Contact a local Service Provider for
location-specific information.
What Your Service Provider Will Do to Correct Problems
When you contact a Service Provider, you must follow the problem determination and resolution
procedures specified.
Your Service Provider will attempt to diagnose and resolve your problem over the telephone or through
remote assistance. Your Service Provider may direct you to download and install designated software
updates.
Some problems can be resolved with a replacement part that you install yourself (such as keyboard,
mouse, speaker, memory, hard disk drive, or port replicator), called a ″Customer Replaceable Unit″ or
″CRU.″ If so, your Service Provider will ship the CRU to you for you to install.
© Lenovo 2007. Portions © IBM Corp. 2005.
E-1
If your problem cannot be resolved over the telephone or remotely, through your application of software
updates, or with a CRU, your Service Provider will arrange for service under the type of warranty service
designated for the product under the section titled ″Warranty Information.″
If your Service Provider determines that it is unable to repair your product, your Service Provider will
replace it with one that is at least functionally equivalent.
If your Service Provider determines that it is unable to either repair or replace your product, your sole
remedy is to return the product to your place of purchase or to Lenovo and your purchase price will be
refunded.
Exchange of a Product or Part
When the warranty service involves the exchange of a product or part, the item your Service Provider
replaces becomes Lenovo’s property and the replacement becomes yours. All removed items must be
genuine and unaltered. The replacement may not be new, but will be in good working order and at least
functionally equivalent to the item replaced. The replacement assumes the warranty status of the replaced
item.
Before your Service Provider exchanges a product or part, you agree to:
1. remove all features, parts, options, alterations, and attachments not under warranty service;
2. ensure that the product is free of any legal obligations or restrictions that prevent its exchange; and
3. obtain authorization from the owner to have your Service Provider service a product that you do not
own.
Your Additional Responsibilities
Where applicable, before service is provided, you agree to:
1. follow the service request procedures that your Service Provider specifies;
2. backup or secure all programs and data contained in the product;
3. provide your Service Provider with all system keys or passwords and sufficient, free, and safe access
to your facilities to permit the terms of this warranty to be fulfilled; and
4. ensure that all information about identified or identifiable individuals (″Personal Data″) is deleted
from the product or that, with respect to any remaining Personal Data you did not delete, you are in
compliance with all applicable laws.
Use of Personal Information
If you obtain service under this warranty, Lenovo will store, use, and process information about your
warranty issue and your contact information, including name, phone numbers, address, and e-mail
address. Lenovo will use this information to perform service under this warranty and to improve our
business relationship with you, such as to conduct internal reviews of the efficiency of the warranty
service we provide to you. We may contact you to inquire about your satisfaction regarding our warranty
service or to notify you about any product recalls or safety issues. In accomplishing these purposes, we
may transfer your information to any country where we do business and may provide it to entities acting
on our behalf. We also may disclose it where required by law or legal authorities to do so.
What this Warranty Does not Cover
This warranty does not cover the following:
v uninterrupted or error-free operation of a product;
v loss of, or damage to, your data;
v any software programs, whether provided with the product or installed subsequently;
v failure or damage resulting from misuse, accident, modification, unsuitable physical or operating
environment, natural disasters, power surges, or improper maintenance by you;
E-2
ThinkPad Ultrabay Blu-ray Burner User's Guide
v any third party products, including those that Lenovo may procure and provide with or integrate into
the Lenovo product at your request; and
v any technical or other support, such as assistance with ″how-to″ questions and those regarding product
set-up and installation.
This warranty is voided by removal or alteration of identification labels on the product or its parts.
Limitation of Liability
Lenovo is responsible for loss of, or damage to, your product only while it is 1) in your Service
Provider’s possession or 2) in transit in those cases in which the Service Provider is responsible for the
transportation.
Neither Lenovo nor your Service Provider is responsible for any of your data including confidential,
proprietary, or personal data contained in a product. You should remove and/or backup all such
information from the product prior to its service or return.
Circumstances may arise where, because of a default on Lenovo’s part or other liability, you may be
entitled to recover damages from Lenovo. In each such instance, regardless of the basis on which you are
entitled to claim damages from Lenovo (including fundamental breach, negligence, misrepresentation, or
other contract or tort claim), except and to the extent that liability cannot be waived or limited by
applicable laws, Lenovo is liable for no more than the amount of actual direct damages suffered by you,
up to the amount you paid for the product. This limit does not apply to damages for bodily injury
(including death) and damage to real property and tangible personal property for which Lenovo is
required by law to be liable.
This limit also applies to Lenovo’s suppliers, resellers, and your Service Provider. It is the maximum for
which Lenovo, its suppliers, resellers, and your Service Provider are collectively responsible.
UNDER NO CIRCUMSTANCES IS LENOVO, ITS SUPPLIERS, RESELLERS, OR SERVICE
PROVIDERS LIABLE FOR ANY OF THE FOLLOWING EVEN IF INFORMED OF THEIR
POSSIBILITY: 1) THIRD PARTY CLAIMS AGAINST YOU FOR DAMAGES; 2) LOSS OF, OR
DAMAGE TO, YOUR DATA; OR 3) SPECIAL, INCIDENTAL, OR INDIRECT DAMAGES OR FOR
ANY ECONOMIC CONSEQUENTIAL DAMAGES, INCLUDING LOST PROFITS, BUSINESS
REVENUE, GOODWILL, OR ANTICIPATED SAVINGS. SOME STATES OR JURISDICTIONS DO
NOT ALLOW THE EXCLUSION OR LIMITATION OF INCIDENTAL OR CONSEQUENTIAL
DAMAGES, SO THE ABOVE LIMITATION OR EXCLUSION MAY NOT APPLY TO YOU.
Dispute Resolution
If you acquired the product in Cambodia, Indonesia, Philippines, Vietnam or Sri Lanka, disputes
arising out of or in connection with this warranty shall be finally settled by arbitration held in Singapore
and this warranty shall be governed, construed and enforced in accordance with the laws of Singapore,
without regard to conflict of laws. If you acquired the product in India, disputes arising out of or in
connection with this warranty shall be finally settled by arbitration held in Bangalore, India. Arbitration
in Singapore shall be held in accordance with the Arbitration Rules of Singapore International Arbitration
Center (″SIAC Rules″) then in effect. Arbitration in India shall be held in accordance with the laws of
India then in effect. The arbitration award shall be final and binding for the parties without appeal and
shall be in writing and set forth the findings of fact and the conclusions of law. All arbitration
proceedings shall be conducted, including all documents presented in such proceedings, in the English
language, and the English language version of this warranty prevails over any other language version in
such proceedings.
Other Rights
Appendix E. Lenovo Limited Warranty
E-3
THIS WARRANTY GIVES YOU SPECIFIC LEGAL RIGHTS AND YOU MAY HAVE OTHER RIGHTS
WHICH VARY FROM STATE TO STATE OR JURISDICTION TO JURISDICTION. YOU ALSO MAY
HAVE OTHER RIGHTS UNDER APPLICABLE LAW OR WRITTEN AGREEMENT WITH LENOVO.
NOTHING IN THIS WARRANTY AFFECTS STATUTORY RIGHTS, INCLUDING RIGHTS OF
CONSUMERS UNDER NATIONAL LEGISLATION GOVERNING THE SALE OF CONSUMER
GOODS THAT CANNOT BE WAIVED OR LIMITED BY CONTRACT.
European Economic Area (EEA)
Customers in the EEA may contact Lenovo at the following address: Lenovo Warranty & Service Quality
Dept., PO Box 19547, Inverkip Road, Greenock, Scotland PA16 9WX. Service under this warranty for
Lenovo hardware products purchased in EEA countries may be obtained in any EEA country in which
the product has been announced and made available by Lenovo.
This Lenovo Limited Warranty is available in other languages at www.lenovo.com/warranty.
Warranty information
Product or Machine Type
Country or Region of Purchase
ThinkPad Ultrabay Blu-ray Worldwide
Burner
Warranty Period
1 year
Type of Warranty
Service
1, 4
If required, your Service Provider will provide repair or exchange service depending on the type of
warranty service specified for your product and the available service. Scheduling of service will depend
upon the time of your call, parts availability, and other factors.
A warranty period of 1 year on parts and 1 year on labor means that Lenovo provides warranty service
during the first year of the warranty period (or a longer period as required by law).
Types of Warranty Service
1. Customer Replaceable Unit (″CRU″) Service
Under CRU Service, your Service Provider will ship CRUs to you for you to install. Most CRUs are easy
to install whereas others may require some technical skill and tools. CRU information and replacement
instructions are shipped with your product and are available from Lenovo at any time upon request. You
may request that a Service Provider install some CRUs under one of the other types of warranty service
designated for your product. Installation of external CRUs (such as mice, keyboards, or monitors) is your
responsibility. Lenovo specifies in the materials shipped with a replacement CRU whether the defective
CRU must be returned. When return is required, 1) return instructions, a prepaid return shipping label,
and a container are included with the replacement CRU, and 2) you may be charged for the replacement
CRU if your Service Provider does not receive the defective CRU within thirty (30) days of your receipt
of the replacement.
2. On-site Service
Under On-Site Service, your Service Provider will either repair or exchange the product at your location.
You must provide a suitable working area to allow disassembly and reassembly of the Lenovo product.
For some products, certain repairs may require your Service Provider to send the product to a designated
service center.
3. Courier or Depot Service
E-4
ThinkPad Ultrabay Blu-ray Burner User's Guide
Under Courier or Depot Service, your product will be repaired or exchanged at a designated service
center, with shipping arranged by your Service Provider. You are responsible for disconnecting the
product. A shipping container will be provided to you for you to return your product to a designated
service center. A courier will pick up your product and deliver it to the designated service center.
Following its repair or exchange, the service center will arrange the return delivery of the product to you.
4. Customer Carry-In or Mail-In Service
Under Customer Carry-In or Mail-In Service, your product will be repaired or exchanged at a designated
service center, with delivery or shipping arranged by you. You are responsible to deliver or mail, as your
Service Provider specifies, (prepaid unless specified otherwise) the product suitably packaged to a
designated location. After the product has been repaired or exchanged, it will be made available for your
collection. Failure to collect the product may result in your Service Provider disposing of the product as it
sees fit. For Mail-in Service, the product will be returned to you at Lenovo’s expense, unless your Service
Provider specifies otherwise.
Suplemento de Garantía para Méjico
Este Suplemento se considera parte integrante de la Garantía Limitada de Lenovo y será efectivo única y
exclusivamente para los productos distribuidos y comercializados dentro del Territorio de los Estados
Unidos Mejicanos. En caso de conflicto, se aplicarán los términos de este Suplemento.
Todos los programas de software precargados en el equipo sólo tendrán una garantía de treinta (30) días
por defectos de instalación desde la fecha de compra. Lenovo no es responsable de la información
incluida en dichos programas de software y/o cualquier programa de software adicional instalado por
Usted o instalado después de la compra del producto.
Los servicios no cubiertos por la garantía se cargarán al usuario final, previa obtención de una
autorización.
En el caso de que se precise una reparación cubierta por la garantía, por favor, llame al Centro de soporte
al cliente al 001-866-434-2080, donde le dirigirán al Centro de servicio autorizado más cercano. Si no
existiese ningún Centro de servicio autorizado en su ciudad, población o en un radio de 70 kilómetros de
su ciudad o población, la garantía incluirá cualquier gasto de entrega razonable relacionado con el
transporte del producto a su Centro de servicio autorizado más cercano. Por favor, llame al Centro de
servicio autorizado más cercano para obtener las aprobaciones necesarias o la información relacionada
con el envío del producto y la dirección de envío.
Para obtener una lista de los Centros de servicio autorizados, por favor, visite::
http://www.lenovo.com/mx/es/servicios
Manufactured by:
SCI Systems de México, S.A. de C.V.
Av. De la Solidaridad Iberoamericana No. 7020
Col. Club de Golf Atlas
El Salto, Jalisco, México
C.P. 45680,
Tel. 01-800-3676900
Marketing by:
Lenovo México S de RL de C. V.
Av. Santa Fe 505, Piso 15
Col. Cruz Manca
Appendix E. Lenovo Limited Warranty
E-5
Cuajimalpa, D.F., México
C.P. 05349
Tel. (55) 5000 8500
E-6
ThinkPad Ultrabay Blu-ray Burner User's Guide
Appendix F. Notices
Lenovo may not offer the products, services, or features discussed in this document in all countries.
Consult your local Lenovo representative for information on the products and services currently available
in your area. Any reference to a Lenovo product, program, or service is not intended to state or imply
that only that Lenovo product, program, or service may be used. Any functionally equivalent product,
program, or service that does not infringe any Lenovo intellectual property right may be used instead.
However, it is the user’s responsibility to evaluate and verify the operation of any other product,
program, or service.
Lenovo may have patents or pending patent applications covering subject matter described in this
document. The furnishing of this document does not give you any license to these patents. You can send
license inquiries, in writing, to:
Lenovo (United States), Inc.
1009 Think Place - Building One
Morrisville, NC 27560
U.S.A.
Attention: Lenovo Director of Licensing
LENOVO PROVIDES THIS PUBLICATION “AS IS” WITHOUT WARRANTY OF ANY KIND, EITHER
EXPRESS OR IMPLIED, INCLUDING, BUT NOT LIMITED TO, THE IMPLIED WARRANTIES OF
NON-INFRINGEMENT, MERCHANTABILITY OR FITNESS FOR A PARTICULAR PURPOSE. Some
jurisdictions do not allow disclaimer of express or implied warranties in certain transactions, therefore,
this statement may not apply to you.
This information could include technical inaccuracies or typographical errors. Changes are periodically
made to the information herein; these changes will be incorporated in new editions of the publication.
Lenovo may make improvements and/or changes in the product(s) and/or the program(s) described in
this publication at any time without notice.
The products described in this document are not intended for use in implantation or other life support
applications where malfunction may result in injury or death to persons. The information contained in
this document does not affect or change Lenovo product specifications or warranties. Nothing in this
document shall operate as an express or implied license or indemnity under the intellectual property
rights of Lenovo or third parties. All information contained in this document was obtained in specific
environments and is presented as an illustration. The result obtained in other operating environments
may vary.
Lenovo may use or distribute any of the information you supply in any way it believes appropriate
without incurring any obligation to you.
Any references in this publication to non-Lenovo Web sites are provided for convenience only and do not
in any manner serve as an endorsement of those Web sites. The materials at those Web sites are not part
of the materials for this Lenovo product, and use of those Web sites is at your own risk.
Any performance data contained herein was determined in a controlled environment. Therefore, the
result obtained in other operating environments may vary significantly. Some measurements may have
been made on development-level systems and there is no guarantee that these measurements will be the
same on generally available systems. Furthermore, some measurements may have been estimated through
extrapolation. Actual results may vary. Users of this document should verify the applicable data for their
specific environment.
© Lenovo 2007. Portions © IBM Corp. 2005.
F-1
Recycling information
Lenovo encourages owners of information technology (IT) equipment to responsibly recycle their
equipment when it is no longer needed. Lenovo offers a variety of programs and services to assist
equipment owners in recycling their IT products. Information on product recycling offerings can be found
on Lenovo’s Internet site at http://www.pc.ibm.com/ww/lenovo/about/environment/.
Trademarks
The following terms are trademarks of Lenovo in the United States, other countries, or both:
v Lenovo
v ThinkPad
v Ultrabase
v Ultrabay
IBM and OS/2 are trademarks of International Business Machines Corporation in the United States, other
countries, or both and are used under license.
Microsoft, Vista, and Windows are trademarks of Microsoft Corporation in the United States, other
countries, or both.
Intel is a trademark of Intel Corporation in the United States, other countries, or both.
Other company, product, or service names may be trademarks or service marks of others.
F-2
ThinkPad Ultrabay Blu-ray Burner User's Guide
Appendix G. Electronic emission notices
The following information refers to the ThinkPad Ultrabay Blu-ray Burner.
EU-EMC Directive (2004/108/EC) EN 55022 class B Statement of Compliance
Deutschsprachiger EU Hinweis:
Hinweis für Geräte der Klasse B EU-Richtlinie zur ElektromagnetischenVerträglichkeit Dieses Produkt entspricht den Schutzanforderungen der
EU-Richtlinie 2004/108/EG (früher 89/336/EWG) zur Angleichung der Rechtsvorschriften über die elektromagnetische Verträglichkeit in den
EU-Mitgliedsstaaten und hält die Grenzwerte der EN 55022 Klasse B ein.
Um dieses sicherzustellen, sind die Geräte wie in den Handbüchern beschrieben zu installieren und zu betreiben. Des Weiteren dürfen auch nur von
der Lenovo empfohlene Kabel angeschlossen werden. Lenovo übernimmt keine Verantwortung für die Einhaltung der Schutzanforderungen, wenn das
Produkt ohne Zustimmung der Lenovo verändert bzw. wenn Erweiterungskomponenten von Fremdherstellern ohne Empfehlung der Lenovo
gesteckt/eingebaut werden.
Deutschland:
Einhaltung des Gesetzes über die elektromagnetische Verträglichkeit von Betriebsmitteln Dieses Produkt entspricht dem ″Gesetz über die
elektromagnetische Verträglichkeit von Betriebsmitteln″ EMVG (früher ″Gesetz über die elektromagnetische Verträglichkeit von Geräten″). Dies ist die
Umsetzung der EU-Richtlinie 2004/108/EWG (früher 89/336/EWG) in der Bundesrepublik Deutschland.
Zulassungsbescheinigung laut dem Deutschen Gesetz über die elektromagnetische Verträglichkeit von Betriebsmitteln, EMVG vom 20. Juli 2007
(früher Gesetz über die elektromagnetische Verträglichkeit von Geräten), bzw. der EMV EG Richtlinie 2004/108/EC (früher 89/336/EWG), für Geräte
der Klasse B.
Dieses Gerät ist berechtigt, in Übereinstimmung mit dem Deutschen EMVG das EG-Konformitätszeichen - CE - zu führen. Verantwortlich für die
Konformitätserklärung nach Paragraf 5 des EMVG ist die Lenovo (Deutschland) GmbH, Gropiusplatz 10, D-70563 Stuttgart.
Informationen in Hinsicht EMVG Paragraf 4 Abs. (1) 4:
Das Gerät erfüllt die Schutzanforderungen nach EN 55024 und EN 55022 Klasse B.
European Union - Compliance to the Electromagnetic Compatibility Directive
This product is in conformity with the protection requirements of EU Council Directive 2004/108/EC on the approximation of the laws of the Member
States relating to electromagnetic compatibility. Lenovo cannot accept responsibility for any failure to satisfy the protection requirements resulting from
a non-recommended modification of the product, including the installation of option cards from other manufacturers.
This product has been tested and found to comply with the limits for Class B Information Technology Equipment according to European Standard EN
55022. The limits for Class B equipment were derived for typical residential environments to provide reasonable protection against interference with
licensed communication devices.
Avis de conformité à la directive de l’Union Européenne
Le présent produit satisfait aux exigences de protection énoncées dans la directive 2004/108/EC du Conseil concernant le rapprochement des
législations des Etats membres relatives à la compatibilité électromagnétique. Lenovo décline toute responsabilité en cas de non-respect de cette
directive résultant d’une modification non recommandée du produit, y compris l’ajout de cartes en option non Lenovo.
Ce produit respecte les limites des caractéristiques d’immunité des appareils de traitement de l’information définies par la classe B de la norme
européenne EN 55022 (CISPR 22). La conformité aux spécifications de la classe B offre une garantie acceptable contre les perturbations avec les
appareils de communication agréés, dans les zones résidentielles.
Unión Europea - Normativa EMC
Este producto satisface los requisitos de protección del Consejo de la UE, Directiva 2004/108/EC en lo que a la legislatura de los Estados Miembros
sobre compatibilidad electromagnética se refiere.
Lenovo no puede aceptar responsabilidad alguna si este producto deja de satisfacer dichos requisitos de protección como resultado de una
modificación no recomendada del producto, incluyendo el ajuste de tarjetas de opción que no sean Lenovo.
Este producto ha sido probado y satisface los límites para Equipos Informáticos Clase B de conformidad con el Estándar Europeo EN 55022. Los
límites para los equipos de Clase B se han establecido para entornos residenciales típicos a fin de proporcionar una protección razonable contra las
interferencias con dispositivos de comunicación licenciados.
© Lenovo 2007. Portions © IBM Corp. 2005.
G-1
Unione Europea - Directiva EMC (Conformidad électromagnética)
Questo prodotto è conforme alle normative di protezione ai sensi della Direttiva del Consiglio dell’Unione Europea 2004/108/EC sull’armonizzazione
legislativa degli stati membri in materia di compatibilità elettromagnetica.
Lenovo non accetta responsabilità alcuna per la mancata conformità alle normative di protezione dovuta a modifiche non consigliate al prodotto,
compresa l’installazione di schede e componenti di marca diversa da Lenovo.
Le prove effettuate sul presente prodotto hanno accertato che esso rientra nei limiti stabiliti per le apparecchiature di informatica Classe B ai sensi del
Norma Europea EN 55022. I limiti delle apparecchiature della Classe B sono stati stabiliti al fine di fornire ragionevole protezione da interferenze
mediante dispositivi di comunicazione in concessione in ambienti residenziali tipici.
Korea Class B Compliance
Lenovo product service information for Taiwan
G-2
ThinkPad Ultrabay Blu-ray Burner User's Guide
Appendix H. China RoHS
The information in the following table is only applicable to products for sale in the People’s Republic of
China.
© Lenovo 2007. Portions © IBM Corp. 2005.
H-1
H-2
ThinkPad Ultrabay Blu-ray Burner User's Guide
Part Number: 43N3201
Printed in XXX
(1P) P/N: 43N3201