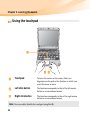
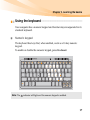
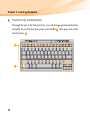
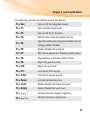
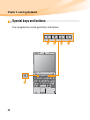
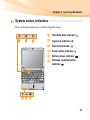
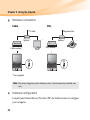
1
S12 User Guide V1.0 cover_1-4 Lenovo IdeaPad S12 User Guide V1.0 TM www.lenovo.com ©Lenovo China 2009 New World. New Thinking. P/N: 147002293 Printed in China S12 User Guide V1.0 cover_2-3 Notes • Before using this information and the product it supports, be sure to read Important safety information on page iii and Notices in Appendix E first. • Some instructions in this guide may assume that you are using Windows® XP. If you are using other Windows operating system, some operations may be slightly different. If you are using other operating systems, some operations may not apply to you, but it won’t substantially affect your use of this computer. • The features described in this guide are common to most models. Some features may not be available on your computer and/or your computer may include features that are not described in this user guide. If your product is not working correctly, DO NOT RETURN IT TO THE STORE. For technical assistance, contact a Lenovo support specialist 24 hours a day by calling toll free 1-877-4 LENOVO (1-877-453-6686). First Edition (April 2009) © Copyright Lenovo 2009. All rights reserved. U.S. GOVERNMENT USERS – RESTRICTED RIGHTS: Our products and/or services are provided with RESTRICTED RIGHTS. Use, duplication or disclosure by the Government is subject to the GSA ADP Schedule contract with Lenovo, if any, or the standard terms of this commercial license, or if the agency is unable to accept this Program under these terms, then we provide this Program under the provisions set forth in Commercial Computer Software–Restricted Rights at FAR 52.227-19, when applicable, or under Rights in Data-General, FAR 52.227.14 (Alternate III). Additionally, you can find support information and updates on the Lenovo Web site located at http://consumersupport.lenovo.com. * Only for the users from the United States. S12 User Guide V1.0 cover_2-3 Notes • Before using this information and the product it supports, be sure to read Important safety information on page iii and Notices in Appendix E first. • Some instructions in this guide may assume that you are using Windows® XP. If you are using other Windows operating system, some operations may be slightly different. If you are using other operating systems, some operations may not apply to you, but it won’t substantially affect your use of this computer. • The features described in this guide are common to most models. Some features may not be available on your computer and/or your computer may include features that are not described in this user guide. If your product is not working correctly, DO NOT RETURN IT TO THE STORE. For technical assistance, contact a Lenovo support specialist 24 hours a day by calling toll free 1-877-4 LENOVO (1-877-453-6686). First Edition (April 2009) © Copyright Lenovo 2009. All rights reserved. U.S. GOVERNMENT USERS – RESTRICTED RIGHTS: Our products and/or services are provided with RESTRICTED RIGHTS. Use, duplication or disclosure by the Government is subject to the GSA ADP Schedule contract with Lenovo, if any, or the standard terms of this commercial license, or if the agency is unable to accept this Program under these terms, then we provide this Program under the provisions set forth in Commercial Computer Software–Restricted Rights at FAR 52.227-19, when applicable, or under Rights in Data-General, FAR 52.227.14 (Alternate III). Additionally, you can find support information and updates on the Lenovo Web site located at http://consumersupport.lenovo.com. * Only for the users from the United States. Respective Users Dear user, Thanks for purchasing Lenovo notebook! Before using this product, please make sure to read this User Guide carefully. We are most honored to have you as our customer. In order to make sure you master the usage of Lenovo notebook soon, we have prepared this User Guide for you. This manual has been made very simple and comprehensive. In this manual, you can get information on the system configuration, installation steps and the basic operating systems. We strongly recommend that in using this product, please be sure to carefully read the manual. It will actually help you make better use of the computer. We have done our best to avoid human errors in making sure that the information provided in the manual is accurate and reliable. However, we cannot completely guarantee that there will not be any mistakes that were not found and checked out before printing. Please bear with us because there might also be some uncontrolled omissions while printing, binding or distributing. Because we are trying to improve the full performance and reliability of our equipment, the hardware and software components might need some little adjustment. In this case, this might lead to an inconsistency in the actual makeup of the equipment to that of the information stated in the manual, but it will not substantially affect your use. Thanks for your cooperation! Explanation of hard disk capacity Dear user, While using your computer, you may find that the nominal hard disk capacity indicated is somewhat different from the disk capacity displayed by the operating system. For example, a nominal 40GB hard disk will appear as less than 40GB in the operating system. This discrepancy is not an error in hard disk installation nor any other problem, but a normal phenomenon of computers. This phenomenon is primarily due to the following reasons: I. Different standards used by the manufacturer and operating system when calculating hard disk capacity Hard disk manufacturers use a radix of 1000, i.e., 1G = 1,000MB, 1MB = 1,000KB, 1KB = 1,000 bytes. However, when identifying hard disk capacity, operating systems use a radix of 1024, i.e., 1GB = 1,024MB, 1MB = 1,024KB, 1KB = 1,024 bytes. The standard adopted by your computer is that of the hard disk manufacturers. Since the standards adopted by the hard disk manufacturer and operating system are different, the hard disk capacity displayed by the operating system will be different from the nominal hard disk capacity. For example, if the hard disk is nominally X G, even when it is completely empty, the capacity displayed by the operating system will be: X × 1000 × 1000 × 1000/ (1024 × 1024 × 1024) ≈ X × 0.931 G In addition, if a portion of the hard disk space has been used for some specific purpose, then the capacity indicated by the operating system will be even less than X × 0.931 G. II. A portion of the hard disk space is used for specific purposes Lenovo computers may come with preinstalled OneKey Rescue System, so the hard disk has a special portion partitioned before delivery, which is used to store hard disk mirror and OneKey Rescue System program files. The size of the reserved space for this partition varies according to the model, operating system and software of the computer. For the sake of safety, this partition is not apparent, which is commonly referred to as a “hidden partition”. In addition, after the hard disk is partitioned or formatted, the system will assign a certain amount of hard disk space for the system files. For the above reasons, the available hard disk space indicated by the operating system is always less than the computer’s nominal hard disk capacity. Contents Important safety information...... iii Important safety information ....iii Chapter 1. Getting to know your computer ....................................... 1 Top view ........................................ 1 Left-side view ............................... 4 Right-side view............................. 5 Front view ..................................... 7 Bottom view .................................. 8 Chapter 2. Learning the basics .......................................... 10 First use........................................ 10 Using AC adapter and battery .......................................... 13 Using the touchpad.................... 16 Using the keyboard.................... 17 Special keys and buttons........... 20 System status indicators............ 23 Securing your computer............ 24 Connecting external devices..... 26 Using Lenovo Quick Start (specific models only)................ 31 Chapter 3. Using the Internet .... 33 Wired connection ....................... 33 Wireless connection ................... 35 Chapter 4. OneKey Rescue System .........................................43 OneKey Rescue System .............43 Chapter 5. Troubleshooting .......49 Frequently Asked Questions ....49 Troubleshooting .........................52 Chapter 6. Upgrading and replacing devices ........................61 Replacing the battery .................61 Replacing memory .....................63 Appendix A. Getting help and service..........................................67 Getting help on the Web ...........68 Calling the customer support center ............................................68 Getting help around the world ............................................71 Lenovo warranty service telephone numbers.....................71 Appendix B. Use, and care information ..................................72 Caring your computer ...............72 Accessibility and comfort..........78 Maintenance................................80 i Contents Appendix C. Lenovo limited warranty ...................................... 85 Warranty information ............... 94 Appendix D. Customer replaceable units (CRUs)................................ 98 Appendix E. Notices................. 100 Notices ....................................... 100 ENERGY STAR model information ............................... 103 Wireless related information ............................... 105 Electronic emissions notices........................................ 109 WEEE and recycling statements ................................. 116 EU WEEE statements .............. 117 Japan recycling statements ..... 118 Notice for users in the U.S.A.......................................... 120 Notice on deleting data from your hard disk ................................... 120 Appendix F. Features and Specifications ........................... 122 Trademarks ............................... 124 Index .......................................... 125 ii Important safety information Important safety information ----------------------------------------This information can help you safely use your notebook personal computer. Follow and retain all information included with your computer. The information in this document does not alter the terms of your purchase agreement or the Lenovo Limited Warranty. For more information, see “Appendix C. Lenovo limited warranty” on page 85. Read this first Personal computers are electronic devices. Power cords, power adapters, and other features can create potential safety risks that can result in physical injury or property damage, especially if misused. The safety risks are categorized as follows: Danger: Physical injury or even death may be caused. Attention: Property damage or even minor injury may be caused. To protect yourself from hazards and create a safer computer work environment, follow the instructions hereafter. iii Important safety information Unpack Inspect the covers of the computer and the AC adapter, especially parts with the following labels attached for any crack or damage. Danger: • Hazardous voltage, current, and energy levels are present inside any component that has this label attached. iv Important safety information Working place Do NOT use the computer in humid places such as a bathroom. Keep the computer and other parts away from liquids. Danger: • An electric shock may be caused by spilled liquid. Do NOT use the computer during a lightning storm. Attention: • Lightning storm may damage the computer and result in an electric shock. Keep a good ventilation of the computer and other parts. Danger: • Placing the working computer or other parts on a bed, sofa or other flexible surface may block the ventilation slots causing overheat of your computer or other parts to overheat or even catch a fire. Turn off wireless devices where they may cause interference, such as in a hospital or at an airport. v Important safety information On using Use ONLY the power cord, power adapter and battery pack shipped with the computer and never use them with another product. Be sure the power outlet is suitable for the plug and provides the correct voltage and current for the product you are installing. Danger: • An unsuitable power supply may damage your computer or cause an electric shock or fire. Do NOT use a power outlet, power cord, power adapter or battery pack that appears to be damaged or corroded. Do NOT share an electrical outlet with other home or commercial appliances that draw large amounts of electricity. If power strips are used, the load should NOT exceed the power strip’s input rating. Unplug the power cord if there is a cracking, hissing, or a popping sound, or a strong odor comes from the computer. Danger: • Overloading the power supply may cause unstable voltages which might damage the computer, data, or attached devices, or even cause a fire. vi Important safety information Do NOT wrap the power cord around the power adapter or other objects. Do NOT squeeze or pinch the cord, or place heavy objects on it. Attention: • Stressing the cord may cause the cord to fray, crack or crimp which may present a safety hazard. Avoid keeping your hands, your lap, or any other part of your body in contact with a hot section of the working computer for any extended length of time. Attention: • Extended contact with your body, even through clothing, could cause discomfort or even a skin burn. Do not drop, bump, scratch, hit or place heavy objects on the liquid crystal display (LCD) of your computer. Attention: • Direct contact with liquid crystal material from a broken LCD is hazardous; if contact occurs, rinse with large amount of running water for more than 15 minutes. vii Important safety information Service and upgrades Do NOT attempt to service a product yourself unless instructed to do so by the customer support center or your documentation. Attention: • DO NOT take risks or attempt to diagnose the situation yourself. Contact the customer support center for further guidance. For a list of service and support phone numbers, go to http://consumersupport.lenovo.com. Lenovo provides documentation with instructions when it is appropriate for customers to install options or replace units (CRUs). Closely follow all instructions when installing or replacing parts. Disconnect the attached power cords, battery pack, and all the cables before you open the device covers, unless instructed otherwise in the installation and configuration procedures. Keep the covers closed whenever the computer is plugged in. viii Chapter 1. Getting to know your computer Top view ------------------------------------------------------------------------------------------- a b c j d e f g h j MMC - MS - MS pro - SD i Note: The illustrations in this manual may differ from the actual product. Please refer to the actual product. 1 Chapter 1. Getting to know your computer Attention: • Do NOT open the display panel beyond 130 degree. When closing the display panel, be careful NOT to leave pens or any other objects in between the display panel and the keyboard. Otherwise, the display panel may be damaged. Power button OneKey Rescue System button Press this button to turn on the computer. Press this button to open OneKey Rescue System (If OneKey Rescue System has been preinstalled) when the computer is powered off. Note: For details, see “Chapter 4. OneKey Rescue System” on page 43. Built-in microphone The built-in microphone (with noise reduction) can be used for video conferencing, voice narration, or simple audio recordings. Volume buttons Use these buttons to adjust volume. Quick Start When the computer is powered-off, press this button to enter the Lenovo Quick Start if it has been installed. button Integrated Use the camera for video communication. camera Wireless module antennas (specific models only) Computer display 2 The built-in antennas ensure optimal reception of wireless communication radio. The LCD display with LED backlight provides brilliant visual output. Chapter 1. Getting to know your computer Touchpad The touchpad functions as a conventional mouse. Note: For details, see “Using the touchpad” on page 16. 10 System status indicators For details, see “System status indicators” on page 23. 3 Chapter 1. Getting to know your computer Left-side view ------------------------------------------------------------------------------ a AC power adapter b c d e Connect the AC adapter here. jack Note: For details, see “Using AC adapter and battery” on page 13. Fan louvers Dissipate internal heat. Note: Make sure that none of the fan louvers are blocked or else overheating of the computer may occur. Integrated wireless device switch USB port Use this switch to turn on/off the wireless radio of all wireless devices on your computer. Connects to USB devices. Note: For details, see “Connecting a universal serial bus (USB) device” on page 28. Memory card slot Insert memory cards (not supplied) here. Note: For details, see “Using memory cards (not supplied)” on page 26. 4 Chapter 1. Getting to know your computer Right-side view -------------------------------------------------------------------------- a ExpressCard ® b c d e f g Insert ExpressCard devices here. slot (specific models only) Note: For details, see “Connecting an ExpressCard device (specific models only)” on page 28. Headphone jack Connects to an external headphone. Attention: • Listening to music at high volume over extended periods of time may damage your hearing. Microphone jack Connects to an external microphone. 5 Chapter 1. Getting to know your computer USB port Connects to USB devices. Note: For details, see “Connecting a universal serial bus (USB) device” on page 28. VGA port RJ-45 port Connects to external display devices. Connects to an Ethernet network. Note: For details, see “Wired connection” on page 33. Kensington slot Attach a security lock (not supplied) here. Note: For details, see “Attaching a security lock (not supplied)” on page 24. 6 Chapter 1. Getting to know your computer Front view --------------------------------------------------------------------------------------- a Speakers The stereo speakers provide rich and powerful sound. 7 Chapter 1. Getting to know your computer Bottom view ---------------------------------------------------------------------------------- a 8 b c d e Battery latch spring loaded The spring-loaded battery latch keeps the battery pack secured in place. Expansion slot (PCI Mini ExpressCard slot) compartment Battery pack For details, see “Using AC adapter and battery” on page 13. Memory/PCI Mini ExpressCard slot compartment Battery latch manual The manual battery latch is used to keep the battery pack secured in place. 9 Chapter 2. Learning the basics First use ---------------------------------------------------------------------------------------------- Read the manuals Read the supplied manuals before using your computer. Connect to the power The supplied battery pack is not fully charged at purchase. To charge the battery and begin using your computer, insert the battery pack and connect the computer to an electrical outlet. The battery is automatically charged while the computer is running on AC power. Install the battery pack Refer to the supplied Setup Poster to install the battery pack. Connect the computer to an electrical outlet 10 1 Connect the power cord to the AC adapter. 2 Connect the AC adapter to the AC power adapter jack of the computer. 3 Plug the power cord into an electrical outlet. Chapter 2. Learning the basics Turn on the computer Press the power button to turn on the computer. Configure the operating system You may need to configure the operating system when it is first used. The configuration process may include the procedures below. • Accepting the end user license agreement • Configuring the Internet connection • Registering the operating system • Creating a user account Putting your computer into standby/sleep state or shutting it down When you finish working with your computer, you can put it into standby/sleep state or shut it down. Putting your computer into standby/sleep state If you will be away from your computer for only a short time, put the computer into standby/sleep state. When the computer is in standby/sleep state, you can quickly wake it to resume use, and bypass the startup process. 11 Chapter 2. Learning the basics To put the computer into standby state, do one of the following. • Click start and select Stand By from the Turn Off Computer menu. • Press Fn + F1. Note: Wait until the power indicator light starts blinking (indicating that the computer is in standby state) before you move your computer. Moving your computer while the hard disk is spinning can damage the hard disk, causing loss of data. To wake the computer, do one of the following. • Press the power button. • Press any key on the keyboard. Shutting down your computer If you are not going to use your computer for a day or two, shut it down. To shut down your computer, click start and select Turn Off from the Turn Off Computer menu. 12 Chapter 2. Learning the basics Using AC adapter and battery ---------------------------------------------- Checking battery status You can determine the percentage of battery power remaining by using Windows Power Options. Note: As each computer user has different habits and needs, it is difficult to predict how long a battery charge will last. There are two main factors: • The amount of energy stored in the battery when you commence work. • The way you use your computer: for example, how often you access the hard disk drive and how bright you make the computer display. Charging the battery When you find that the battery power is low, you need to charge the battery or replace it with a fully charged one. The battery is charged when the AC adapter is connected to the computer and the battery is installed. Charging time will depend on the usage environment. You need to charge the battery in any of the following situations: • When you purchase a new battery • If the battery status indicator starts blinking • If the battery has not been used for a long time 13 Chapter 2. Learning the basics Notes: • You are advised to insert the battery pack when using your computer to prevent small particles from entering the inside of your computer. • To increase the life of the battery pack, the computer does not start recharging the battery immediately after it drops from fully charged. • Charge the battery at a temperature between 50 °F and 80 °F (10 °C-30 °C). • Full charge or discharge is not required. Removing the battery pack If you are not going to use the computer for an extended period of time, or if you need to send your computer to Lenovo for service, etc. remove the battery pack from the computer. Before removing the battery pack, make sure the computer has been shut down. 14 Chapter 2. Learning the basics Handling the battery If the rechargeable battery pack is replaced with an incorrect type, there may be danger of an explosion. The battery pack contains a small amount of harmful substances. To avoid possible injury and detriment to the environment, pay attention to the following points. Notes: • Replace only with a battery of the type recommended by Lenovo. • Keep the battery pack away from fire. • Do not expose the battery pack to water or rain. • Do not attempt to disassemble the battery pack. • Do not short-circuit the battery pack. • Keep the battery pack away from children. • Do not put the battery pack in trash that is disposed of in landfills. When disposing of the battery, comply with local ordinances or regulations and your company’s safety standards. 15 Chapter 2. Learning the basics Using the touchpad --------------------------------------------------------------------- a MMC - MS - MS pro - SD b c Touchpad To move the cursor on the screen, slide your fingertip over the pad in the direction in which you want the cursor to move. Left click button The function corresponds to that of the left mouse button on a conventional mouse. Right click button The function corresponds to that of the right mouse button on a conventional mouse. Note: You can enable/disable the touchpad using Fn+F6. 16 Chapter 2. Learning the basics Using the keyboard ---------------------------------------------------------------------Your computer has a numeric keypad and function keys incorporated in its standard keyboard. Numeric keypad The keyboard has keys that, when enabled, work as a 10-key numeric keypad. To enable or disable the numeric keypad, press Fn+Insert. Note: The indicator will light on if the numeric keypad is enabled. 17 Chapter 2. Learning the basics Function key combinations Through the use of the function keys, you can change operational features instantly. To use this function, press and hold Fn ; then press one of the function keys . b a 18 Chapter 2. Learning the basics The following describes the features of each function key. Fn + Esc: Turn on/off the integrated camera. Fn + F1: Enter standby/sleep mode. Fn + F2: Turn on/off the LCD screen. Fn + F3: Shift to other connected display devices. Fn + F5: Open the interface for integrated wireless devices settings (enable/disable). Fn + F6: Enable/Disable the touchpad. Fn + F7: Start/Pause playback of Windows Media Player. Fn + F8: Stop playback of Windows Media Player. Fn + F9: Skip to the previous track. Fn + F10: Skip to the next track. Fn + F11: Activate the F12 function. Fn + PrtSc: Activate the system request. Fn + Pause Activate the break function. Fn + Insert Enable/Disable the numeric keypad. Fn + Delete Enable/Disable the Scroll Lock. Fn + ↑/↓ : Increase/Decrease display brightness. Fn + ←/→ : Decrease/Increase volume level. 19 Chapter 2. Learning the basics Special keys and buttons --------------------------------------------------------Your computer has several special keys and buttons. d e MMC - MS - MS pro - SD 20 c b a Chapter 2. Learning the basics Quick Start button ( ) Quick Start button: • When the computer is powered-off, press this button to enter Lenovo Quick Start if it has been installed. Note: For details, see “Using Lenovo Quick Start (specific models only)” on page 31. • Under Windows operating systems, press this button to launch a selfdefined program, file or a Website. Note: To re-define the Quick Start button, select Self-defined program setting (start →All Programs →Lenovo →Energy Management →Self-defined program setting). Volume buttons ( ~ ) Volume up Volume down Mute 21 Chapter 2. Learning the basics OneKey Rescue System button ( ) • When the computer is powered-off, press this button to enter the OneKey Rescue System if Lenovo OneKey Rescue System has been preinstalled. • Under Windows operating systems, press this button to start Lenovo OneKey Recovery. Note: For details, see “OneKey Rescue System” on page 43. 22 Chapter 2. Learning the basics System status indicators ---------------------------------------------------------These indicators inform you of the computer status. a c b Hard disk drive indicator Caps lock indicator Num lock indicator Power status indicator Battery status indicator Wireless communication indicator MMC - MS - MS pro - SD d e f 23 Chapter 2. Learning the basics Securing your computer ----------------------------------------------------------This section provides information about how to help protect your computer from theft and unauthorized use. Attaching a security lock (not supplied) You can attach a security lock to your computer to help prevent it from being removed without your permission. For details on installing the security lock, please refer to the instructions shipped with the security lock that you have purchased. Refer to the “Right-side view” on page 5 for the location of the Kensington slot. Notes: • Before purchasing any security product, verify that it is compatible with this type of security keyhole. • You are responsible for evaluating, selecting, and implementing the locking devices and security features. Lenovo offers no comment judgement or warranty regarding the function, quality or performance of locking devices and security features. 24 Chapter 2. Learning the basics Using VeriFace™ VeriFace is a face recognition software which takes a digital snapshot, extracts key features of your face, and creates a digital map that becomes the system’s “password”. Note: The face registration and verification works best in an environment with steady and even light. For more instructions on VeriFace, see the help file on your software. Using passwords Using passwords helps prevent your computer from being used by others. Once you set a password and enable it, a prompt appears on the screen each time you power on the computer. Enter your password at the prompt. The computer cannot be used unless you enter the correct password. Note: This password can be from one to seven alphanumeric characters in any combination. For details about how to set the password, see the help to the right of the screen in BIOS setup utility. Note: To enter BIOS setup utility, press F2 when the Lenovo logo appears on the screen while the computer is starting up. 25 Chapter 2. Learning the basics Connecting external devices ----------------------------------------Your computer has a wide range of built-in features and connection capabilities. Using memory cards (not supplied) Your computer supports the following types of memory cards: • Secure Digital (SD) card • MultiMediaCard (MMC) • Memory Stick (MS) • Memory Stick PRO (MS PRO) Notes: • Insert ONLY one card in the slot at a time. • This card reader does not support SDIO devices (e.g., SDIO Bluetooth, etc.). 26 Chapter 2. Learning the basics Inserting a memory card 1 Push the dummy card until you hear a click. Gently pull the dummy card out of the memory card slot. Note: The dummy card is used for preventing dust and small particles from entering the inside of your computer when the memory card slot is not in use. Retain the dummy card for future use. 2 Slide the memory card in until it clicks into place. Removing a memory card 1 2 Push the memory card until you hear a click. Gently pull the memory card out of the memory card slot. Note: Before removing the memory card, unable it by Windows Safely Remove Hardware utility to avoid data corruption. 27 Chapter 2. Learning the basics Connecting a universal serial bus (USB) device Your computer comes with 3 USB ports compatible with USB devices. Note: When using a high power consumption USB device such as USB ODD, use the external device’s power adapter. Otherwise, the device may not be recognized, or system shut down may result. Connecting an ExpressCard device (specific models only) Your computer comes with an ExpressCard/34 slot used for connecting ExpressCard devices. Note: Only use the ExpressCard/34 devices. Inserting an ExpressCard/34 device 28 1 Push the dummy card until you hear a click. Gently pull the dummy card out of the ExpressCard slot. 2 Slide the ExpressCard device in with the front label facing upward until it clicks into place. Chapter 2. Learning the basics Removing an ExpressCard/34 device 1 2 Push the ExpressCard device until you hear a click. Gently pull the ExpressCard device out of the ExpressCard slot. Notes: • Before removing the ExpressCard device, unable it by Windows Safely Remove Hardware utility. • The dummy card is used for preventing dust and small particles from entering the inside of your computer when the ExpressCard slot is not in use. Retain the dummy card for future use. Connecting a Bluetooth enabled device (specific models only) If your computer has an integrated Bluetooth adapter card, it can connect to and transfer data wirelessly to other Bluetooth enabled devices, such as notebook computers, PDAs and cell phones. You can transfer data between these devices without cables at up to 10 meters range in open space. Enabling Bluetooth communications on your computer 1 2 Slide the integrated wireless device switch to . Press Fn + F5 to make configuration. Note: When you do not need to use the Bluetooth function, turn it off to save battery power. 29 Chapter 2. Learning the basics Pairing devices 1 Enable the Bluetooth function on the devices that you need to connect to the computer. 2 Open My Bluetooth Places in All Programs from start menu, click Add a Bluetooth Device, follow the Bluetooth Setup Wizard to pair the devices. Notes: • Pairing methods may vary by operating systems. • For details on pairing devices, please refer to the instructions of the relevant device. 30 Chapter 2. Learning the basics Using Lenovo Quick Start (specific models only) --------------------------------------------------------With a boot time of just a few seconds, Lenovo Quick Start offers a handy environment that allows you to enjoy an instant access to functions such as Web browsing, instant messaging and other entertainment functions without entering the traditional operating system. Notes: • If Lenovo Quick Start is not installed, a prompt notice will appear on the screen when you start it. • The Web browser of Lenovo Quick Start is designed for you to get an instant access to online information and does not fully support video streaming. You may experience low frame rate when watching online video in Lenovo Quick Start. To view online video, restart the computer to your Windows operating system and use Internet Explorer to play the online video. 31 Chapter 2. Learning the basics Starting Lenovo Quick Start Press the QS button when the computer is powered-off. The following will appear on the screen after a few seconds. 32 Exiting Lenovo Quick Start • Click to restart the computer. • Click to turn off the computer. Chapter 3. Using the Internet As a global network, the Internet connects computers worldwide, providing services such as e-mailing, information searching, electronic commerce, Web browsing and entertainment. You can connect the computer to the Internet in the following ways: Wired connection: uses physical wiring to connect. Wireless network technology: connect without wiring. Wired connection -----------------------------------------------Wired connection is a reliable and safe way to connect the computer to the Internet. Generally, the following two accessing methods are widely used. Cable Cable Internet services use a cable modem connected to the residential cable TV line. DSL DSL is a family of related technologies that bring high-speed network access to homes and small businesses over ordinary telephone lines. 33 Chapter 3. Using the Internet Hardware connection: Cable DSL Telephone line TV cable Splitter * * Splitter * * DSL modem * Cable modem * * Not supplied. Note: The above diagrams are for reference only. Actual connection method may vary. Software configuration Consult your Internet Service Provider (ISP) for details on how to configure your computer. 34 Chapter 3. Using the Internet Wireless connection ---------------------------------------------- Wireless connection provides mobile access to the Internet, allowing you to stay online anywhere the wireless signal covers. Divided by the signal scales, wireless connection to the Internet can be built based on the following standards. Wi-Fi Wi-Fi networks cover a small physical area, like a home, office, or small group of buildings. An access point is necessary for the connection. WiMAX WiMAX networks connect several Wireless LAN systems to cover a metropolitan area, providing high-speed broadband access without the need for cables. Mobile Broadband The Mobile Broadband network provides Internet access to computers, cell phones and other devices over a large geographic area. Mobile networks are used for data transmission, and access is usually provided by a mobile network operator. A Mobile Broadband SIM card is necessary for the connection. Note: Your computer may not support all wireless connection methods. 35 Chapter 3. Using the Internet Using Wi-Fi/WiMax (specific models only) Enabling wireless connection To enable wireless communications, do the following: 1 2 Slide the integrated wireless device switch to Press Fn + F5 to make configuration. . Hardware connection Access point * S12 Wi-Fi/WiMax network * Not supplied Software configuration Consult your Internet Service Provider (ISP) and search Windows Help and Support Center for details on how to configure your computer. 36 Chapter 3. Using the Internet Using Mobile Broadband (specific models only) Before getting started with Mobile Broadband, you first need to choose a mobile network operator and make sure you are in the coverage area of the network. After that, you also need: • To activate the Mobile Broadband service through your local mobile network operator. You will get a Subscriber Identity Module (SIM) card after activation. For instructions on inserting the SIM card, refer to “Inserting the SIM card” on page 38. Notes: • Various standards are in use by mobile operators to provide Mobile Broadband services. The Lenovo Mobile Broadband module may support one or more of the following standards: GSM (Global System for Mobile Communications) TD-SCDMA (Time Division-Synchronous Code Division Multiple Access) SCDMA (Synchronous Code Division Multiple Access) EV-DO (Evolution Data Optimized) HSPA (High Speed Packet Access) • Mobile Broadband is a subscription service. Refer to your local mobile network operator for availability, cost and other information. • A SIM card is a type of smart card used by mobile network operators to identify their service subscribers on the mobile network. You will get the SIM card from your mobile network operator after you have activated the Mobile Broadband service. 37 Chapter 3. Using the Internet • A connection management utility to connect/disconnect to your Mobile Broadband network. Note: In general, your mobile service provider provides this utility. Inserting the SIM card To insert the SIM card: 38 1 Turn off the computer; then disconnect the AC adapter and all cables from the computer. 2 Close the computer display and turn it over. 3 Remove the battery. Chapter 3. Using the Internet 4 Remove the screw on the expansion slot cover , and then remove the expansion slot cover . a b 39 Chapter 3. Using the Internet 5 Unlock the card holder , lift it up and then insert the SIM card firmly into the card holder . Note: Insert the SIM card in the direction shown below. Inserting the SIM card in the wrong direction may damage the SIM card holder. c a b 40 6 Pivot the card holder downward, and then lock the holder. 7 Attach the expansion slot cover and reinstall the screw. 8 Put the battery back in place, turn the computer over again, and reconnect the cables. Chapter 3. Using the Internet Removing the SIM card To remove the SIM card: 1 Turn off the computer, then disconnect the AC adapter and all cables from the computer. 2 3 4 Close the computer display and turn it over. Remove the battery. Remove the screw on the expansion slot cover , and then remove the expansion slot cover . a b 41 Chapter 3. Using the Internet 5 Unlock the card holder , lift it up and then remove the SIM card from the card holder . c a b 6 7 8 Pivot the card holder downward, and then lock the holder. Attach the expansion slot cover and reinstall the screw. Put the battery back in place, turn the computer over again, and reconnect the cables. Notes: • Never insert or remove the SIM card while the computer is on. Doing so may cause permanent damage to the SIM card as well as the SIM card reader. • Be sure to lock the card holder when the SIM card is inserted. 42 Chapter 4. OneKey Rescue System OneKey Rescue System ------------------------------------- Introduction The Lenovo OneKey Rescue System is an easy-to-use application that can be used to back up the data on your system partition (C drive) for easy restore when required. You can run Lenovo OneKey Recovery under a Windows operating system, and the OneKey Rescue System without starting the Windows operating system. Attention: • In order to utilize the features of the OneKey Rescue System, your hard disk already includes a hidden partition by default to store a system image file and OneKey Rescue System program files. This default partition is hidden for security reasons and is the reason the available disk space is less than it claims. The exact available hard disk space depends on the file size of the mirror image file (based on the size of operating system and pre-installed software). • You can use the Restore to factory default feature to restore the system partition (C drive) back to the factory default, i.e., the state your computer was when you purchased it. However, once you restore to this state, you will not be able to restore the system to another previously backed up state. Therefore, make sure you back up any critical data stored on the system partition (C drive) to other media, such as another disk partition, CD/DVD discs or removable storage devices. 43 Chapter 4. OneKey Rescue System Using Lenovo OneKey Recovery in Windows In Windows, you can create a backup of an entire system partition, saving it your local hard disk. You can back up your data to a CD, DVD, network drive or other removable disk. In addition, you can also create Windows recovery disc(s) to boot and recover your system. Create full backup There are two backup types that can be created: full backup and incremental backup. Selecting Full backup backs up your system partition to a folder on the hard disk in order to recover it in the future. The program will save the backed up data to the default location, i.e., to D:\Lenovo\OneKey App\OneKey Recovery. You may also select another destination, such as a removable storage device, network drive or a CD/ DVD. If you choose to back up the system partition to a disc (CD/DVD), the created discs can be used to recover your system to the current status. We suggest you do the following before you create recovery discs: Use the latest version of your system’s anti-virus software to scan your computer and make sure it is virus-free. Optimize your system, including scanning and defragmenting your hard disk drive. Note: The backup process may take a long time, connect the AC adapter and battery pack to your computer. 44 Chapter 4. OneKey Rescue System Create Incremental backup An incremental backup is a backup of your data based on previous backed up files located in the default path. This backup includes different data than the full backup, such as application variations and user data. Incremental backup can only be saved to the default path; it cannot be backed up to another location. Create recovery disc You can burn the backup image to CD/DVDs as recovery discs. The recovery discs can be used to boot up your computer automatically and restore your system back to previously backed up status. If your hard disk fails and you are unable to use Lenovo OneKey Recovery on your computer, you can use these discs to recover your system on a reformatted hard drive. Notes: • For the computers without an optical drive, an external optical drive is needed to backup or to create a recovery disc. • A full backup needs considerable storage space, be sure to have enough CDs/ DVDs in hand. • Please make sure to create recovery discs, so that you can recover your system, even when replacing the hard drive. • After the recovery discs are burned, please number them so that you can use them in order. • When burning the recovery discs, please use good quality discs with to ensure the burning process and backed up data is complete and correct. 45 Chapter 4. OneKey Rescue System Using Lenovo OneKey Rescue System without the main Windows operating system In the event that the operating system cannot be loaded, you need to recover your system with the OneKey Rescue System, which includes several applications to help you detect and remove viruses, and recover Windows system and data. Pressing the OneKey Rescue System key will activate Lenovo OneKey Rescue System when your PC is turned off. Within the program, you can restore your system partition to the original factory status, or to a previously generated backup. You may also transfer critical data or documents to other storage devices. All these features make Lenovo OneKey Rescue System an important utility for securing your data. 46 Chapter 4. OneKey Rescue System Restore of factory default In order to save application files and the initial backed up files of the system, the hard disk in a Lenovo PC includes a hidden partition when it is shipped. If you need to restore the system to the point of your first boot up, just enter the Lenovo OneKey Rescue System and run Restore to factory default. This will delete all the new data on the system partition (C partition), which is not recoverable. Make sure to back up any critical data before you run this feature. Restore from backup If you want to recover the system to a previous status, you just need to enter Lenovo OneKey Rescue, and select Restore from user’s backup. Select the appropriate image file or, if you have run incremental backup before, you can use the incremental file to restore your system. The process above will remove all data on the current system partition (C partition), which is not recoverable. Please back up any important data before restoring to a previous backup. Using recovery discs When you replace a hard disk drive in your computer, you will be unable to use the pre-installed Lenovo OneKey Recovery and OneKey Rescue System. However, you can use the recovery discs that store your backed up data to restore your new hard drive to a previous backup status. When you use the recovery discs to boot your computer, the system will enter the system recovery user interface automatically. Please follow the 47 Chapter 4. OneKey Rescue System prompt to insert the backup discs in order to complete the entire recovery process. Back up my data Within the Lenovo OneKey Rescue System you can transfer your data from your computer’s hard disk to other devices, so you may easily find it if your Windows system ever encounters a critical failure. System repair When you use the Lenovo OneKey Rescue System, the program detects whether Windows has been damaged. If the system kernel files are damaged, the Lenovo OneKey Rescue System will prompt you to proceed with a system repair. The system will reboot after the repair process is complete. If there are no damaged files, the Lenovo OneKey Rescue System should start normally. System repair only works for system data files. Using this feature will not affect your own data. Set and manage user password You can set up your user password within Lenovo OneKey Rescue System to ensure other users cannot use the system recovery or Back Up My Data functions. By default, the user password within the Lenovo OneKey Rescue System is blank and it is recommended that you immediately set a new password to ensure your system is protected. 48 Chapter 5. Troubleshooting Frequently Asked Questions ------------------------------------------------This section lists frequently asked questions and tell where you can find detailed answers. For details about each publication included in the package with your computer, see Lenovo IdeaPad S12 Setup Poster. What safety precautions should I follow when using my computer? See “Important safety information” on page iii of this guide. How can I prevent problems with my computer? See “Appendix B. Use, and care information” on page 72 of this guide. More tips can be found in Chapter 1 and 2. What are the main hardware features of my new computer? More information can be found in Chapter 1 and 2. Where can I find the detailed specifications for my computer? See http://consumersupport.lenovo.com. I need to upgrade a device or I need to replace one of the following: the hard disk drive, memory, or the keyboard. See “Appendix D. Customer replaceable units (CRUs)” on page 98 of this guide. 49 Chapter 5. Troubleshooting Where are the recovery discs? Your computer did not come with a recovery disc. For an explanation of the alternative recovery methods offered by Lenovo, see “Chapter 4. OneKey Rescue System” on page 43. How can I contact the customer support center? See “Appendix A. Getting help and service” on page 67 of this guide. Where can I find warranty information? For the warranty applicable to your computer, including the warranty period and type of warranty service, see “Appendix C. Lenovo limited warranty” on page 85. How can I install the device drivers? A compatible device driver is a requirement to ensure correct operation and performance of each component in your computer. If your computer is pre-installed with an operating system, Lenovo provides all the drivers you need in your hard disk. 50 Chapter 5. Troubleshooting What can I do if the backup process fails? If you can start the backup feature without a problem, but it fails during the backup process, please try the following steps: 1 2 Close other applications, then restart the backup process. Check if the destination media is damaged, try to select another path and then try again. When do I need to use the Restore to factory default feature? You can use this feature when your system fails or you need to re-install your operating system. This will restore your computer back to the initial status when you first booted up your computer after receiving it from the store. By doing this, the data on your system partition will be restored to the factory default. If there is critical data on your current partition, please back it up before you run this recovery feature. When do I need to use the Back Up My Data feature? If your system fails or is unable to boot up, you can use the Back Up My Data feature to retrieve the data you need immediately from your PC. 51 Chapter 5. Troubleshooting Troubleshooting ---------------------------------------------------------------------------If you do not find your problem here, see Chapter 2. The following section only describes problems that might negate the need to refer to the more comprehensive information in Chapter 2. Display problems When I turn on the computer, nothing appears on the screen. • • When I turn on the computer, only a white cursor appears on a blank screen. 52 • If the screen is blank, make sure that: - The battery is installed correctly. - The AC adapter is connected to the computer and the power cord is plugged into a working electrical outlet. - The computer power is on. (Press the power button again for confirmation.) - The memory is installed correctly. If these items are properly set, and the screen remains blank, have the computer serviced. Restore backed-up files to your Windows environment or the entire contents of your hard disk to the original factory contents using OneKey Recovery. If you still see only the cursor on the screen, have the computer serviced. Chapter 5. Troubleshooting My screen goes blank while the computer is on. • Your screen saver or power management may be enabled. Do one of the following to exit from the screen saver or to resume from standby or hibernation mode: - Touch the touchpad. - Press any key on the keyboard. - Press the power button. • If you forget your user password, you must take your computer to a Lenovo authorized servicer or a marketing representative to have the password changed. If you forget your HDD password, a Lenovo authorized servicer cannot reset your password or recover data from the hard disk. You must take your computer to a Lenovo authorized servicer or a marketing representative to have the hard disk drive replaced. Proof of purchase is required, and a fee will be charged for parts and service. If you forget your supervisor password, a Lenovo authorized servicer cannot reset your password. You must take your computer to a Lenovo authorized servicer or a marketing representative to have the system board replaced. Proof of purchase is required, and a fee will be charged for parts and service. A Password problem I forgot my password. • • 53 Chapter 5. Troubleshooting Keyboard problems A number appears when you enter a letter. • The numeric lock function is on. To disable it, press Fn + Insert. Standby or hibernation problems The computer enters standby mode unexpectedly. • If the processor overheats, the computer automatically enters standby mode to allow the computer to cool and to protect the processor and other internal components. Check the settings for standby mode. The computer enters standby mode immediately after Power-on self-test (POST). • Make sure that: - The battery is charged. - The operating temperature is within the acceptable range. See “Appendix B. Use, and care information” on page 72. Note: If the battery is charged and the temperature is within range, have the computer serviced. The critical low-battery error message appears, and the computer immediately turns off. 54 • The battery power is getting low. Connect the AC adapter to the computer, or replace the battery with a fully charged one. Chapter 5. Troubleshooting The computer does not return from standby mode and does not work. • • • If the computer does not return from standby mode, it may have entered hibernation mode automatically because the battery is depleted. Check the power indicator. If your computer is in standby mode connect the AC adapter to the computer, then press any key or the power button. If your computer is in hibernation mode or power-off state. Connect the AC adapter to the computer, then press the power button to resume operation. Note: If the system still does not return from standby mode, your system has stopped responding, and you cannot turn off the computer, reset the computer. However, unsaved data may be lost. To reset the computer, press and hold the power button for 4 seconds or more. If the computer is still not reset, remove the AC adapter and the battery. 55 Chapter 5. Troubleshooting Computer screen problems 56 The screen is blank. • Do the following: - If you are using the AC adapter, or using the battery, and the battery status indicator is on, press Fn + ↑ to make the screen brighter. - If the power indicator is blinking, press the power button to resume from the standby mode. - If the problem persists, follow the solution in the following problem “The screen is unreadable or distorted.” The screen is unreadable or distorted. • Make sure that: - The display device driver is installed correctly. - The screen resolution and color quality are correctly set. - The monitor type is correct. Incorrect characters appear on the screen. • Did you install the operating system or application program correctly? If they are installed and configured correctly, have the computer serviced. Chapter 5. Troubleshooting Sound problems • Make sure that: - The Mute function is off. - The headphone jack is not used. - Speakers is selected as a playback device. Your computer shuts down before the battery status indicator shows empty. -orYour computer operates after the battery status indicator shows empty. • Discharge and recharge the battery. The operating time for a fully charged battery is short. • For details, see “Handling the battery” in Chapter 2. The computer does not operate with a fully charged battery. • The surge protector in the battery might be active. Turn off the computer for one minute to reset the protector, then turn on the computer again. The battery does not charge. • For details, see “Handling the battery” in Chapter 2. • In the Boot menu in BIOS Setup Utility, make sure that the hard disk drive is included in the Boot priority order correctly. No sound can be heard from the speaker even when the volume is turned up. Battery problems A hard disk drive problem The hard disk drive does not work. 57 Chapter 5. Troubleshooting A startup problem The Microsoft® Windows operating system does not start. • Use the OneKey Rescue System to help solve or identify your problem. For details on the OneKey Rescue System, see “Chapter 4. OneKey Rescue System” on page 43. OneKey Rescue System problems Full backup cannot be made. • • • • Incremental backup cannot be made. • • • 58 You are not currently using a Windows operating system. There is not enough space to store the backed up data. You will need to free more hard disk space on your system partition (C drive). If you are backing up your data to a CD/DVD, make sure you are using compatible burning devices. If you are burning backed up files to CD/DVD, make sure the burning devices are compatible with the CD/DVD discs. You did not run Full backup in the default path. Please make sure you ran Full backup in this path before running Incremental backup. You did not select the default path for Incremental backup. Incremental backup files can only be saved to the default path. Please do not specify a different location. The free disk space for the default location is insufficient. Please free more space on that hard drive. Chapter 5. Troubleshooting A prompt to repair system kernel files appears when using System Repair. • Make sure you have installed the latest Microsoft service pack on your system. Restore to factory default feature cannot be used. • The system partition, such as the partition size or the drive capacity of C, has been modified. • To turn off your computer, press and hold the power button for 4 seconds or more. If the computer still does not respond, remove the AC adapter and the battery. Your computer might lock when it enters standby mode during a communication operation. Disable the standby timer when you are working on the network. Other problems The computer does not respond. • The computer does not start from the desired device. • • See the Boot menu of BIOS Setup Utility. Make sure that Boot priority order in BIOS Setup Utility is set so that the computer starts from the device you want. Also make sure that the device from which the computer starts is enabled. In the Boot menu in BIOS Setup Utility, make sure that the device is included in the Boot priority order list. 59 Chapter 5. Troubleshooting The connected external device does not work. • • 60 Do not connect or disconnect any external device cables other than USB while the computer power is on; otherwise, you might damage your computer. When using a high power consumption external devices such as an external USB optical disk drive, use external device power adapter. Otherwise, the device may not be recognized, or system shut down may result. Chapter 6. Upgrading and replacing devices Replacing the battery ----------------------------------------Note: Use only the battery provided by Lenovo. Any other battery could ignite or explode. To replace the battery 1 Turn off the computer, or enter hibernation mode. Disconnect the AC adapter and all cables from the computer. Note: If you are using an ExpressCard device, the computer might not be able to enter hibernation mode. If this happens, turn off the computer. 2 Close the computer display, and turn the computer over. 61 Chapter 6. Upgrading and replacing devices 3 Unlock the manual battery latch . Hold the spring-loaded battery latch in the unlocked position , remove the battery pack in the direction shown by the arrow . c a b 4 5 6 62 Install a fully charged battery. Slide the manual battery latch to the locked position. Turn the computer over again. Connect the AC adapter and the cables to the computer again. Chapter 6. Upgrading and replacing devices Replacing memory ---------------------------------------------You can increase the amount of memory in your computer by replacing a double data rate (DDR2) small outline dual inline memory module (SODIMM) - available as an option - in the memory slot of your computer. SODIMMs are available in various capacities. Note: Use only the memory types supported by your computer. If you incorrectly install optional memory, or install an unsupported memory type, a warning beep will sound when you try to start the computer. To install an SO-DIMM, do the following: 1 Touch a metal table or a grounded metal object to reduce any static electricity in your body, which could damage the SO-DIMM. Do not touch the contact edge of the SO-DIMM. 2 Turn off the computer. Disconnect the AC adapter and all cables from the computer. 3 4 Close the computer display, and turn the computer over. Remove the battery again. 63 Chapter 6. Upgrading and replacing devices 5 Remove the Memory/PCI Mini ExpressCard slot compartment cover. a. Remove the screws that secure the compartment cover . b. Remove the compartment cover . a b 64 Chapter 6. Upgrading and replacing devices 6 Press outwards on the latches on both edges of the socket at the same time, remove the SO-DIMM. Be sure to save the old SO-DIMM for future use. b a a 7 Insert the notched end of the DIMM into the socket. Press the DIMM firmly, and pivot it until it snaps into place. Make sure that it is firmly fixed in the slot and does not move easily. 8 9 0 Reinstall the Memory/PCI Mini ExpressCard slot compartment cover. Reinstall the battery. Turn the computer over, and reconnect the AC adapter and the cables to the computer. 65 Chapter 6. Upgrading and replacing devices To make sure that the SO-DIMM is installed correctly, do as follows: 1 2 Turn the computer on. Hold F2 during startup. The BIOS Setup Utility screen opens. The System Memory item shows the total amount of memory installed in your computer. The following table provides a list of CRUs (Customer Replaceable Units) for your computer, and informs you of where to find replacement instructions. Setup Poster 66 AC adapter O Power cord for AC adapter O Battery O User Guide O Bottom access doors O Memory O Appendix A. Getting help and service If you need help, service, technical assistance, or just want more information about Lenovo computers, you will find a wide variety of sources available from Lenovo to assist you. This section contains information about where to go for additional information about Lenovo computers, what to do if you experience a problem with your computer, and whom to call for service should it be necessary. Microsoft Service Packs are the latest software source for Windows product updates. They are available by means of a Web download (connection charges may apply) or from a disc. For more specific information and links, go to the Microsoft Web site at http://www.microsoft.com. Lenovo offers Up and Running technical assistance with installation of, or questions related to, Service Packs for your Lenovo-preinstalled Microsoft Windows product. 67 Appendix A. Getting help and service Getting help on the Web ----------------------------------------------------------The Lenovo Web site on the World Wide Web has up-to-date information about Lenovo computers and support. The address for the Lenovo home page is http://consumersupport.lenovo.com. You can find support information for your Lenovo IdeaPad™ computer at http://consumersupport.lenovo.com. Research this Web site to learn how to solve problems, find new ways to use your computer, and learn about options that can make working with your Lenovo computer even easier. Calling the customer support center -----------------------------------If you have tried to correct the problem yourself and still need help, during the warranty period, you can get help and information by telephone through the customer support center. The following services are available during the warranty period: • Problem determination - Trained personnel are available to assist you with determining if you have a hardware problem and deciding what action is necessary to fix the problem. • Lenovo hardware repair - If the problem is determined to be caused by Lenovo hardware under warranty, trained service personnel are available to provide the applicable level of service. 68 Appendix A. Getting help and service • Engineering change management - Occasionally, there might be changes that are required after a product has been sold. Lenovo or your reseller, if authorized by Lenovo, will make selected Engineering Changes (ECs) available that apply to your hardware. The following items are not covered: • Replacement or use of parts not manufactured for or by Lenovo or non warranted parts • Identification of software problem sources • Configuration of BIOS as part of an installation or upgrade • Changes, modifications, or upgrades to device drivers • Installation and maintenance of network operating systems (NOS) • Installation and maintenance of application programs To determine if your Lenovo hardware product is under warranty and when the warranty expires, go to http://consumersupport.lenovo.com. Refer to your Lenovo hardware warranty for a full explanation of Lenovo warranty terms. Be sure to retain your proof of purchase to obtain warranty service. 69 Appendix A. Getting help and service If possible, be near your computer when you make your call in case the technical assistance representative needs to help you resolve a computer problem. Please ensure that you have downloaded the most current drivers and system updates, and recorded information before you call. When calling for technical assistance, please have the following information available: • Machine Type and Model • Serial number of your computer and your proof of purchase • Description of the problem • Hardware and software configuration information for your system Note: For the latest list of customer support center telephone numbers and hours of operation, visit the Support Web site at http://consumersupport.lenovo.com. If the number for your country or region is not listed, contact your Lenovo reseller or Lenovo marketing representative. 70 Appendix A. Getting help and service Getting help around the world ---------------------------------------------If you travel with your computer or relocate it to a country where your Lenovo machine type is sold, your computer might be eligible for International Warranty Service, which automatically entitles you to obtain warranty service throughout the warranty period. Service will be performed by service providers authorized to perform warranty service. Service methods and procedures vary by country, and some services might not be available in all countries. Service centers in certain countries might not be able to service all models of a particular machine type. In some countries, fees and restrictions might apply at the time of service. To determine whether your computer is eligible for International Warranty Service and to view a list of the countries where service is available, go to http://consumersupport.lenovo.com. Lenovo warranty service telephone numbers ------------Warranty Service Telephone Numbers A list of warranty service telephone numbers is available at www.lenovo.com/support/phone. For the latest warranty service number in a country or region, please contact Lenovo, or your reseller in your country or region. 71 Appendix B. Use, and care information Caring your computer ---------------------------------------------------------------Though your computer is designed to function reliably in normal work environments, you need to use common sense in handling it. By following these important tips, you will get the most use and enjoyment out of your computer. Be careful about where and how you work. • Do not eat or smoke over your keyboard. Particles that fall into your keyboard can cause damage. • Store packing materials safely out of the reach of children to prevent the risk of suffocation from plastic bags. • Keep your computer away from magnets, activated cellular phones, electrical appliances, or speakers (within 13 cm or 5 in). • Avoid subjecting your computer to extreme temperatures (below 5°C/ 41°F or above 35°C/95°F). • Some appliances, such as certain portable desktop fans or air purifiers, can produce negative ions. If a computer is close to such an appliance, and is exposed for an extended time to air containing negative ions, it may become electrostatically charged. Such a charge may be discharged through your hands when you touch the keyboard or other parts of the computer, or through connectors on I/O devices connected to it. Even though this kind of electrostatic discharge (ESD) is the opposite of a 72 Appendix B. Use, and care information discharge from your body or clothing to the computer, it poses the same risk of a computer malfunction. Your computer is designed and manufactured to minimize any effects of electrostatic charge. An electrostatic charge above a certain limit, however, can increase the risk of ESD. Therefore, when using the computer close to an appliance that can produce negative ions, give special attention to the following: - Avoid directly exposing your computer to the air from an appliance that can produce negative ions. - Keep your computer and peripherals as far as possible from such an appliance. - Wherever possible, ground your computer to facilitate safe electrostatic discharge. Notice of static-electricity When you handle options or CRUs, or perform any work inside the computer, take the following precautions to avoid static-electricity damage: - Limit your movement. Movement can cause static electricity to build up around you. - Always handle components carefully. Handle adapters, memory modules, and other circuit boards by the edges. Never touch exposed circuitry. - Prevent others from touching components. 73 Appendix B. Use, and care information - When you install a static-sensitive option or CRU, touch the staticprotective package containing the part to a metal expansion-slot cover or other unpainted metal surface on the computer for at least two seconds. This reduces static electricity in the package and your body. - Whenever possible, remove the static-sensitive part from the staticprotective packaging and install the part without setting it down. When this is not possible, place the static-protective packaging on a smooth, level surface and place the part on it. - Do not place the part on the computer cover or other metal surface. Be gentle with your computer • Avoid placing any objects (including paper) between the display and the keyboard or under the keyboard. • Do not drop, bump, scratch, twist, hit, vibrate, push, or place heavy objects on your computer, display, or external devices. • Avoid turning the display beyond 130°. Carry your computer properly • Before moving your computer, be sure to remove any media, turn off attached devices, and disconnect cords and cables. • Be sure your computer is in standby or hibernation mode, or turned off, before moving it. This will prevent damage to the hard disk drive and data loss. 74 Appendix B. Use, and care information • When picking up your open computer, hold it by the bottom. Do not pick up or hold your computer by the display. • Use a quality carrying case that provides adequate cushion and protection. Do not pack your computer in a tightly packed suitcase or bag. For outdoor use • Backup your critical data before you take your computer outdoors. • Ensure that the battery is full. • Be sure to turn off the power and close the LCD well. • When you leave the computer in your car, place it on the back seat to avoid being insolated. • Carry the AC adapter and power cord with the computer. Handle storage media and drives properly • If your computer comes with an optical drive, do not touch the surface of a disc or the lens on the tray. • Wait until you hear the CD or DVD click into the center pivot of an optical drive before closing the tray. • When installing your hard disk, follow the instructions shipped with your hardware, and apply pressure only where needed on the device. 75 Appendix B. Use, and care information Data safety • Do not delete unknown files or change the name of files or directories that were not created by you; otherwise, your computer software might fail to work. • Be aware that accessing network resources can leave your computer vulnerable to computer viruses, hackers, spyware, and other malicious activities that might damage your computer, software, or data. • It is your responsibility to ensure that you have adequate protection in the form of firewalls, antivirus software, and anti-spyware software and keep this software up to date. Take care in setting passwords • Remember your passwords. If you forget a supervisor or hard disk password, Lenovo authorized service providers will not reset it, and you might have to replace your system board or hard disk drive. Other important tips • Do not put the battery pack in trash that is disposed of in landfills. When disposing of the battery, comply with local ordinances or regulations and your company's safety standards. • Your computer might have both an Ethernet connector and a modem connector. If so, be sure to connect your communication cable to the correct one, so your connector is not damaged. 76 Appendix B. Use, and care information • Register your Lenovo products with Lenovo (refer to the Web page: http://consumersupport.lenovo.com). This can help authorities return your computer to you if it is lost or stolen. Registering your computer also enables Lenovo to notify you about possible technical information and upgrades. • Only an authorized Lenovo repair technician should disassemble and repair your computer. • Do not modify or tape the latches to keep the display open or closed. • Take care not to turn your computer over while the AC adapter is plugged in. This could break the adapter plug. • Turn off your computer if you are replacing a device, or else verify that the device is warm- or hot-swappable. • Before you install any of the following devices, touch a metal table or a grounded metal object. This action reduces any static electricity from your body. The static electricity could damage the device. - ExpressCard - Memory Card, such as SD Card, Memory Stick, MultiMediaCard, and Memory Stick Pro card. - Memory module • When transferring data to or from a Flash Media Card, such as an SD card, do not put your computer in standby or hibernation mode before the data transfer is complete. To do so might cause damage to your data. 77 Appendix B. Use, and care information Accessibility and comfort ------------------------------------------------------- Ergonomic information Working in the virtual office may mean adapting to frequent changes in your environment. Following some simple rules will make things easier and bring you the maximum benefits of your computer. Keeping in mind such basics as good lighting and proper seating, for example, can help you improve your performance and achieve greater comfort. Note: This example shows someone in a conventional setting. Even if you work in a casual, less conventional setting, many of the tips in this section still apply. Develop good habits, and they will serve you well. Head and neck in upright A suitable brightness avoid glare or reflection Good back support and seat height Type softly Support the forearms Parallel to the floor Flat on the floor 78 Appendix B. Use, and care information What if you are traveling? It may not be possible to observe the best ergonomic practices when you are using your computer while on the move or in a casual setting. Regardless of the setting, try to observe as many of the tips as possible. Sitting properly and using adequate lighting, for example, will help you maintain desirable levels of comfort and performance. Questions about vision? Your computer’s visual display screen is designed to meet the highest standards and to provide you with clear, crisp images and large, bright displays that are easy to see, yet easy on the eyes. Of course, any concentrated and sustained visual activity can be tiring. If you have questions on eye fatigue or visual discomfort, consult a vision care specialist for advice. 79 Appendix B. Use, and care information Maintenance --------------------------------------------------------------------------------An important part of owning your computer is maintenance. With proper care, you can avoid common problems. The following sections provide information that can help you to keep your computer running smoothly. General tips for maintenance 1 Check the capacity of your hard disk drive from time to time. If the hard disk drive gets too full, Windows® will slow down and might produce errors. 2 3 Empty your recycle bin on a regular basis. Use Diskeeper Lite or the Microsoft Disk Defragmenter on your hard disk drive on a regular basis to improve data seek and read time. • To free up disk space, uninstall unused application programs. • Clean out your Inbox, Sent, and Trash folders from your e-mail client program. • At least once a week, make a point to back up your data. If critical data is present, it is a good idea to perform a daily backup. Lenovo has many backup options available for your computer. CD-RW drives and CD-RW/DVD drives are available for most computers and are easily installed. • Use or schedule System Restore to take a system snapshot periodically. 80 Appendix B. Use, and care information Note: Always take a system snapshot before installing new drivers, updating software, or installing new software. • Update device drivers and BIOS when needed. • Profile your machine at http://consumersupport.lenovo.com to keep up to date with current drivers and revisions. • Keep up to date on device drivers on other non-Lenovo hardware. You might want to read the device driver information release notes prior to updating for compatibility or known issues. • Keep a log book. Entries might include major hardware or software changes, driver updates, minor issues you have experienced and how you resolved them. • If you ever need to run a recovery operation on your computer by OneKey Rescue System, see “Chapter 4. OneKey Rescue System” on page 43. • If required, you can find your country’s customer support center at the following Web address: http://consumersupport.lenovo.com. When calling the customer support center, please make sure you have your machine type, model, and serial number available and the computer is in front of you. Also, if the machine is producing error codes, it is helpful to have the error screen on or the message written down. 81 Appendix B. Use, and care information Cleaning the cover of your computer Occasionally clean your computer as follows: 1 Prepare a mixture of a gentle kitchen-use detergent (one that does not contain abrasive powder or strong chemicals such as acid or alkaline). Use 5 parts water to 1 part detergent. 2 3 4 Absorb the diluted detergent into a sponge. 5 6 7 8 9 Wipe the surface to remove the detergent. Squeeze excess liquid from the sponge. Wipe the cover with the sponge, using a circular motion and taking care not to let any excess liquid drip. Rinse the sponge with clean running water. Wipe the cover with the clean sponge. Wipe the surface again with a dry, soft lint-free cloth. Wait for the surface to dry completely and remove any cloth fibers from the computer surface. Note: Shut down the computer and then disconnect the power cord before cleaning the computer. 82 Appendix B. Use, and care information Cleaning your computer keyboard 1 2 Absorb some isopropyl rubbing alcohol on a soft, dust-free cloth. 3 4 Allow to dry. Wipe each keytop surface with the cloth. Wipe the keys one by one; if you wipe several keys at a time, the cloth may hook onto an adjacent key and possibly damage it. Make sure that no liquid drips onto or between the keys. To remove any crumbs and dust from beneath the keys, you can use a camera blower with a brush or cool air from a hair drier. Note: Avoid spraying cleaner directly on the display or the keyboard. 83 Appendix B. Use, and care information 84 Cleaning your computer display 1 Gently wipe the display with a dry, soft lint-free cloth. If you see a scratchlike mark on your display, it might be a stain transferred from the keyboard when the cover was pressed from the outside. 2 3 Wipe or dust the stain gently with a soft, dry cloth. 4 5 6 Wring out as much of the liquid as you can. If the stain remains, moisten a soft, lint-free cloth with water or a 50-50 mixture of isopropyl alcohol and water that does not contain impurities. Wipe the display again; do not let any liquid drip into the computer. Be sure to dry the display before closing it. Appendix C. Lenovo limited warranty This Lenovo Limited Warranty applies only to Lenovo branded hardware products you purchased for your own use and not for resale. This Lenovo Limited Warranty is available in other languages at www.lenovo.com/warranty. What this warranty covers Lenovo warrants that each hardware product that you purchase is free from defects in materials and workmanship under normal use during the warranty period. The warranty period for the product starts on the original date of purchase specified on your sales receipt or invoice unless Lenovo informs you otherwise in writing. The warranty period and type of warranty service that apply to your product are designated below under the section titled “Warranty information.“ THIS WARRANTY IS YOUR EXCLUSIVE WARRANTY AND REPLACES ALL OTHER WARRANTIES OR CONDITIONS, EXPRESS OR IMPLIED, INCLUDING, BUT NOT LIMITED TO, THE IMPLIED WARRANTIES OR CONDITIONS OF MERCHANTABILITY AND FITNESS FOR A PARTICULAR PURPOSE. SOME STATES OR JURISDICTIONS DO NOT ALLOW THE EXCLUSION OF EXPRESS OR IMPLIED WARRANTIES, SO THE ABOVE EXCLUSION MAY NOT APPLY TO YOU. IN THAT EVENT, SUCH WARRANTIES APPLY ONLY TO THE EXTENT REQUIRED BY LAW AND ARE LIMITED IN DURATION TO THE WARRANTY PERIOD. NO WARRANTIES APPLY AFTER THAT PERIOD. SOME STATES OR JURISDICTIONS DO NOT ALLOW LIMITATIONS 85 Appendix C. Lenovo limited warranty ON HOW LONG AN IMPLIED WARRANTY LASTS, SO THE ABOVE LIMITATION ON DURATION MAY NOT APPLY TO YOU. How to obtain warranty service If the product does not function as warranted during the warranty period, you may obtain warranty service by contacting Lenovo or an approved service provider. Each of them is referred to as a “Service Provider.” A list of Service Providers and their telephone numbers is available at www.lenovo.com/support/phone. Warranty service may not be available in all locations and may differ from location to location. Charges may apply outside a Service Provider’s normal service area. Contact a local Service Provider for location-specific information. What your service provider will do to correct problems When you contact a Service Provider, you must follow the problem determination and resolution procedures specified. Your Service Provider will attempt to diagnose and resolve your problem over the telephone, e-mail or through remote assistance. Your Service Provider may direct you to download and install designated software updates. 86 Appendix C. Lenovo limited warranty Some problems can be resolved with a replacement part that you can install yourself called a “Customer Replaceable Unit” or “CRU.” If so, your Service Provider will ship the CRU to you to install. If your problem cannot be resolved over the telephone or remotely, through your application of software updates or the installation of a CRU by you, your Service Provider will arrange for service under the type of warranty service designated for the product under the section titled “Warranty information.” If your Service Provider determines that it is unable to repair your product, your Service Provider will replace it with one that is at least functionally equivalent. If your Service Provider determines that it is unable to either repair or replace your product, your sole remedy is to return the product to your place of purchase or to Lenovo for a refund of your purchase price. 87 Appendix C. Lenovo limited warranty Replacement of a product or part When the warranty service involves the replacement of a product or part, the replaced product or part becomes Lenovo’s property and the replacement product or part becomes your property. Only unaltered Lenovo products and parts are eligible for replacement. The replacement product or part provided by Lenovo may not be new, but it will be in good working order and at least functionally equivalent to the original product or part. The replacement product or part shall be warranted for the balance of the period remaining on the original product. Before your Service Provider replaces a product or part, you agree to: 88 1 remove all features, parts, options, alterations, and attachments not under warranty service; 2 ensure that the product or part is free of any legal obligations or restrictions that prevent its replacement; and 3 obtain authorization from the owner to have your Service Provider service a product or part if you do not own it. Appendix C. Lenovo limited warranty Your additional responsibilities Where applicable, before service is provided, you agree to: 1 follow the service request procedures that your Service Provider specifies; 2 3 backup or secure all programs and data contained in the product; 4 ensure that all information about identified or identifiable individuals (“Personal Data”) is deleted from the product or that, with respect to any Personal Data that you did not delete, you are in compliance with all applicable laws. provide your Service Provider with all system keys or passwords and sufficient, free, and safe access to your facilities to perform service; and Use of personal information If you obtain service under this warranty, Lenovo will store, use and process information about your warranty service and your contact information, including name, phone numbers, address, and e-mail address. Lenovo will use this information to perform service under this warranty and to improve our business relationship with you. We may contact you to inquire about your satisfaction regarding our warranty service or to notify you about any product recalls or safety issues. In accomplishing these purposes, we may transfer your information to any country where we do business and may provide it to entities acting on our behalf. We may also disclose it where required by law. 89 Appendix C. Lenovo limited warranty What this warranty does not cover This warranty does not cover the following: • uninterrupted or error-free operation of a product; • loss of, or damage to, your data; • any software programs, whether provided with the product or installed subsequently; • failure or damage resulting from misuse, accident, modification, unsuitable physical or operating environment, natural disasters, power surges, or improper maintenance by you; • damage caused by a non-authorized service provider; • failure of, or damage caused by, any third party products, including those that Lenovo may provide or integrate into the Lenovo product at your request; and • any technical or other support, such as assistance with “how-to” questions and those regarding product set-up and installation. This warranty is voided by removal or alteration of identification labels on the product or its parts. 90 Appendix C. Lenovo limited warranty Limitation of liability Lenovo is responsible for loss or damage to your product only while it is: 1) in your Service Provider’s possession; or 2) in transit in those cases where the Service Provider is responsible for the transportation. Neither Lenovo nor your Service Provider is responsible for any of your data including confidential, proprietary, or personal data contained in a product. You should remove and/or backup all such information from the product prior to its service or return. Circumstances may arise where, because of a default on Lenovo’s part or other liability, you may be entitled to recover damages from Lenovo. In each such instance, regardless of the basis of your claim against Lenovo (including breach, negligence, misrepresentation, or other contract or tort claim), except and to the extent that liability cannot be waived or limited by applicable laws, Lenovo shall not be liable for more than the amount of actual direct damages suffered by you, up to the amount you paid for the product. This limit does not apply to damages for bodily injury (including death) and damage to real property or tangible personal property for which Lenovo is liable under law. This limit also applies to Lenovo’s suppliers, resellers, and your Service Provider. It is the maximum amount for which Lenovo, its suppliers, resellers, and your Service Provider are collectively responsible. 91 Appendix C. Lenovo limited warranty UNDER NO CIRCUMSTANCES SHALL LENOVO, ITS SUPPLIERS, RESELLERS, OR SERVICE PROVIDERS BE LIABLE FOR ANY OF THE FOLLOWING EVEN IF INFORMED OF THEIR POSSIBILITY: 1) THIRD PARTY CLAIMS AGAINST YOU FOR DAMAGES; 2) LOSS OR DAMAGE TO YOUR DATA; OR 3) SPECIAL, INCIDENTAL, INDIRECT OR CONSEQUENTIAL DAMAGES, INCLUDING LOST PROFITS, BUSINESS REVENUE, GOODWILL OR ANTICIPATED SAVINGS. AS SOME STATES OR JURISDICTIONS DO NOT ALLOW THE EXCLUSION OR LIMITATION OF INCIDENTAL OR CONSEQUENTIAL DAMAGES, THE ABOVE LIMITATION OR EXCLUSION MAY NOT APPLY TO YOU. Dispute resolution If you acquired the product in Cambodia, Indonesia, Philippines, Vietnam or Sri Lanka, disputes arising out of or in connection with this warranty shall be finally settled by arbitration held in Singapore and this warranty shall be governed, construed and enforced in accordance with the laws of Singapore, without regard to conflict of laws. If you acquired the product in India, disputes arising out of or in connection with this warranty shall be finally settled by arbitration held in Bangalore, India. Arbitration in Singapore shall be held in accordance with the Arbitration Rules of Singapore International Arbitration Center (“SIAC Rules”) then in effect. Arbitration in India shall be held in accordance with the laws of India then in effect. The arbitration award shall be final and binding on the parties without appeal. Any award shall be in writing and set forth the findings of fact and the conclusions of law. All 92 Appendix C. Lenovo limited warranty arbitration proceedings, including all documents presented in such proceedings, shall be conducted in the English language, and the English language version of this warranty prevails over any other language version in such proceedings. Other rights THIS WARRANTY GIVES YOU SPECIFIC LEGAL RIGHTS AND YOU MAY HAVE OTHER RIGHTS WHICH VARY FROM STATE TO STATE OR JURISDICTION TO JURISDICTION. YOU MAY ALSO HAVE OTHER RIGHTS UNDER APPLICABLE LAW OR WRITTEN AGREEMENT WITH LENOVO. NOTHING IN THIS WARRANTY AFFECTS STATUTORY RIGHTS, INCLUDING RIGHTS OF CONSUMERS UNDER NATIONAL LEGISLATION GOVERNING THE SALE OF CONSUMER GOODS THAT CANNOT BE WAIVED OR LIMITED BY CONTRACT. European Economic Area (EEA) Customers in the EEA may contact Lenovo at the following address: EMEA Service Organisation, Lenovo (International) B.V., Floor 2, Einsteinova 21, 851 01, Bratislava, Slovakia. Service under this warranty for Lenovo hardware products purchased in EEA countries may be obtained in any EEA country in which the product has been announced and made available by Lenovo. 93 Appendix C. Lenovo limited warranty Warranty information -----------------------------------------------------------Product or machine type Country or region of purchase Warranty period Taiwan Type of warranty service 3, 4 India, China (Hong Kong S.A.R.), China (Macau S.A.R.) Notebook: 20021, 2959 Indonesia, Malaysia, Singapore, Thailand, Philippines, Vietnam, South Africa, France, Austria, Belgium, Croatia, Czech Republic, Denmark, Egypt, Finland, Germany, Greece, Hungary, Israel, Ireland, Italy, Lithuania, Latvia, Netherlands, Norway, Romania, Spain, Sweden, Switzerland, the United Kingdom, Saudi Arabia, UAE parts and Labor 1 year battery pack 1 year Australia, New Zealand, Japan 1, 4 1, 3 United States of America, Canada, Mexico, Brazil parts and Labor 1 years limited warranty * battery pack - 1 year 1, 4 Russia, Ukraine, the republic of Kazakhstan parts and Labor 1 years battery pack - 1 year 4 Poland, Turkey parts and Labor 2 years battery pack - 1 year 1, 4 * Excludes some components. 90-day limited warranty for power adapters, keyboards, plastics and hinges. 94 Appendix C. Lenovo limited warranty If required, your Service Provider will provide repair or exchange service depending on the type of warranty service specified for your product and the available service. Scheduling of service will depend upon the time of your call, parts availability, and other factors. Types of warranty service 1 Customer Replaceable Unit (“CRU”) Service Under CRU Service, your Service Provider will ship CRUs to you for installation by you. CRU information and replacement instructions are shipped with your product and are available from Lenovo at any time upon request. CRUs that are easily installed by you are called Self-service CRUs, while Optional-service CRUs may require some technical skill and tools. Installation of Self-service CRUs is your responsibility. You may request that a Service Provider install Optional-service CRUs under one of the other types of warranty service designated for your product. An optional service offering may be available for purchase from Lenovo to have Lenovo install Self-service CRUs for you. You may find a list of CRUs and their designation in the publication that ships with your product or at www.lenovo.com/CRUs. The requirement to return a defective CRU, if any, will be specified in the materials shipped with a replacement CRU. When return is required: 1) return instructions, a prepaid return shipping label, and a container will be included with the replacement CRU; and 2) you may be charged for the replacement CRU if your Service Provider does not receive the defective CRU within thirty (30) days of your receipt of the replacement. 95 Appendix C. Lenovo limited warranty 2 On-site Service Under On-Site Service, your Service Provider will either repair or exchange the product at your location. You must provide a suitable working area to allow disassembly and reassembly of the Lenovo product. For some products, certain repairs may require your Service Provider to send the product to a designated service center. 3 Courier or Depot Service Under Courier or Depot Service, your product will be repaired or exchanged at a designated service center, with shipping arranged by your Service Provider. You are responsible for disconnecting the product. A shipping container will be provided to you for you to return your product to a designated service center. A courier will pick up your product and deliver it to the designated service center. Following its repair or exchange, the service center will arrange the return delivery of the product to you. 4 Customer Carry-In or Mail-In Service Under Customer Carry-In or Mail-In Service, your product will be repaired or exchanged at a designated service center, with delivery or shipping arranged by you. You are responsible to deliver or mail, as your Service Provider specifies, (prepaid by you unless specified otherwise) the product, suitably packaged to a designated location. After the product has been repaired or exchanged, it will be made available for your collection. Failure to collect the product may result in your Service Provider disposing of the 96 Appendix C. Lenovo limited warranty product as it sees fit. For Mail-in Service, the product will be returned to you at Lenovo’s expense, unless your Service Provider specifies otherwise. 5 Product Exchange Service Under Product Exchange Service, Lenovo will ship a replacement product to your location. You are responsible for its installation and verification of its operation. The replacement product becomes your property in exchange for the failed product, which becomes the property of Lenovo. You must pack the failed product in the shipping carton used to ship the replacement product and return it to Lenovo. Transportation charges, both ways, are paid by Lenovo. Failure to use the carton in which the replacement product was received may result in your responsibility for damage to the failed product during shipment. You may be charged for the replacement product if Lenovo does not receive the failed product within thirty (30) days of your receipt of the replacement product. 97 Appendix D. Customer replaceable units (CRUs) Customer Replaceable Units (CRUs) are computer parts that can be upgraded or replaced by the customer. There are two types of CRUs: internal and external. External CRUs are easy to install, whereas internal CRUs require some technical skills and in some cases might require tools such as a screwdriver. However, both internal and external CRUs are safe for removal by the customer. Customers are responsible for replacing all external CRUs. Internal CRUs can be removed and installed by customers or by a Lenovo service technician during the warranty period. Your computer contains the following types of external CRUs: • External CRUs (pluggable): These CRUs unplug from the computer. Examples of these types of CRUs include the AC adapter and power cord. • External CRUs with latches: These CRUs include a latch to help you remove and replace the part. Examples of these types of CRUs include the notebook main battery, an optical drive, a hard-disk drive, and an extended battery. 98 Appendix D. Customer replaceable units (CRUs) Your computer contains the following types of internal CRUs: • Internal CRUs (located behind an access panel): These CRUs are isolated parts within the computer that are concealed by an access panel that is typically secured by either one or two screws. Once the access panel is removed, only the specific CRU is visible. Examples of these types of CRUs include memory modules and hard disk drives. • Internal CRUs (located within the product): These CRUs are accessible only by opening the computer’s outer case. Examples of these CRUs include PCI Express Mini Cards and the integrated keyboard. 99 Appendix E. Notices Notices ---------------------------------------------------------------------------------------------Lenovo may not offer the products, services, or features discussed in this document in all countries. Consult your local Lenovo representative for information on the products and services currently available in your area. Any reference to a Lenovo product, program, or service is not intended to state or imply that only that Lenovo product, program, or service may be used. Any functionally equivalent product, program, or service that does not infringe any Lenovo intellectual property right may be used instead. However, it is the user’s responsibility to evaluate and verify the operation of any other product, program, or service. Lenovo may have patents or pending patent applications covering subject matter described in this document. The furnishing of this document does not give you any license to these patents. You can send license inquiries, in writing, to: Lenovo (United States), Inc. 1009 Think Place - Building One Morrisville, NC 27560 U.S.A. Attention: Lenovo Director of Licensing LENOVO PROVIDES THIS PUBLICATION “AS IS” WITHOUT WARRANTY OF ANY KIND, EITHER EXPRESS OR IMPLIED, INCLUDING, BUT NOT LIMITED TO, THE IMPLIED WARRANTIES OF NON-INFRINGEMENT, MERCHANTABILITY OR FITNESS FOR A PARTICULAR PURPOSE. Some jurisdictions do not allow disclaimer of 100 Appendix E. Notices express or implied warranties in certain transactions, therefore, this statement may not apply to you. This information could include technical inaccuracies or typographical errors. Changes are periodically made to the information herein; these changes will be incorporated in new editions of the publication. Lenovo may make improvements and/or changes in the product(s) and/or the program(s) described in this publication at any time without notice. The products described in this document are not intended for use in implantation or other life support applications where malfunction may result in injury or death to persons. The information contained in this document does not affect or change Lenovo product specifications or warranties. Nothing in this document shall operate as an express or implied license or indemnity under the intellectual property rights of Lenovo or third parties. All information contained in this document was obtained in specific environments and is presented as an illustration. The result obtained in other operating environments may vary. Lenovo may use or distribute any of the information you supply in any way it believes appropriate without incurring any obligation to you. Any references in this publication to non-Lenovo Web sites are provided for convenience only and do not in any manner serve as an endorsement of those Web sites. The materials at those Web sites are not part of the materials for this Lenovo product, and use of those Web sites is at your own risk. Any performance data contained herein was determined in a controlled environment. Therefore, the result obtained in other operating environments may vary significantly. Some measurements may have been 101 Appendix E. Notices made on development-level systems and there is no guarantee that these measurements will be the same on generally available systems. Furthermore, some measurements may have been estimated through extrapolation. Actual results may vary. Users of this document should verify the applicable data for their specific environment. The software interface and hardware configuration described in all the manuals included with your computer may not match the actual configuration of the computer you purchased. Export classification notice This product is subject to the Untied States Export Administration Regulations (EAR) and has an Export Classification Control Number (ECCN) of 4A994.b. It can be re-exported except to any of the embargoed countries in the EAR E1 country list. 102 Appendix E. Notices ENERGY STAR model information ----------------------------- ENERGY STAR® is a joint program of the U.S. Environmental Protection Agency and the U.S. Department of Energy aimed at saving money and protecting the environment through energy efficient products and practices. Lenovo® is proud to offer our customers products with an ENERGY STAR compliant designation. Lenovo computers of the following machine types, if the ENERGY STAR mark is affixed, have been designed and tested to conform to the ENERGY STAR program requirements for computers. • 20021 • 2959 By using ENERGY STAR compliant products and taking advantage of the power-management features of your computer, you reduce the consumption of electricity. Reduced electrical consumption contributes to potential financial savings, a cleaner environment, and the reduction of greenhouse gas emissions. For more information about ENERGY STAR, visit http://www.energystar.gov. 103 Appendix E. Notices Lenovo encourages you to make efficient use of energy an integral part of your day-to-day operations. To help in this endeavor, Lenovo has preset the following power-management features to take effect when your computer has been inactive for a specified duration: Table 1. ENERGY STAR power-management features, by operating system Windows® XP • Turn off monitor: After 10 minutes • Turn off hard disks: After 30 minutes • System standby: After 20 minutes • System hibernates: After 2 hours To awaken your computer from a System standby/sleep mode, press any key on your keyboard. For more information about these settings, refer to your Windows Help and Support information system. 104 Appendix E. Notices Wireless related information ----------------------------------------- Wireless interoperability Wireless LAN PCI Express Mini Card is designed to be interoperable with any wireless LAN product that is based on Direct Sequence Spread Spectrum (DSSS), Complementary Code Keying (CCK), and/or Orthogonal Frequency Division Multiplexing (OFDM) radio technology, and is compliant to: • The IEEE 802.11a/b/g/n Standard on Wireless LANs, as defined and approved by the Institute of Electrical and Electronics Engineers. • The Wireless Fidelity (WiFi) certification as defined by the Wi-Fi Alliance. Bluetooth Daughter Card is designed to be interoperable with any Bluetooth product that is compliant to Bluetooth Specification 2.1 + EDR as defined by the Bluetooth SIG. Following profiles are supported by Bluetooth Daughter Card: • Generic Access • Service Discovery • Serial Port • Dial-up Networking • FAX • LAN Access using PPP • Personal Area Network 105 Appendix E. Notices • Generic Object Exchange • Generic Object Push • File Transfer • Synchronization • Audio Gateway • Headset • Printer • Human Interface Devices (Keyboard/Mouse) • Basic Image • Handsfree • AV Usage environment and your health Wireless LAN PCI Express Mini Card and Bluetooth Daughter Card emit radio frequency electromagnetic energy like other radio devices. However, the level of energy emitted is far much less than the electromagnetic energy emitted by wireless devices like for example mobile phones. Due to the fact that wireless LAN PCI Express Mini Card and Bluetooth Daughter Card operate within the guidelines found in radio frequency safety standards and recommendations, Lenovo believes the integrated wireless cards are safe for use by consumers. These standards and recommendations reflect the consensus of the scientific community and 106 Appendix E. Notices result from deliberations of panels and committees of scientists who continually review and interpret the extensive research literature. In some situation or environment, the use of wireless LAN PCI Express Mini Card or Bluetooth Daughter Card may be restricted by the proprietor of the building or responsible representatives of the organization. These situations may for example include: • Using the integrated wireless cards on board of airplanes, or in hospitals • In any other environment where the risk of interference to other devices or services is perceived or identified as harmful. If you are uncertain of the policy that applies on the use of wireless devices in a specific organization (e.g., airport or hospital), you are encouraged to ask for authorization to use wireless LAN PCI Express Mini Card or Bluetooth Daughter Card prior to turning on the computer. Safety information related to Mobile Broadband 1 Do not use the Mobile Broadband feature on your computer in highly flammable areas (e.g. gas station) or near blasting. Though it is rare, the Mobile Broadband module, like other cellular network devices, could generate a spark. 2 Avoid using Mobile Broadband feature outdoors during a thunderstorm. 107 Appendix E. Notices 108 3 Use of mobile devices on board aircraft is explicitly prohibited by many airlines companies, especially during take-off and landing. The built-in Mobile Broadband module on your computer is a low-power radio transceiver. When it is turned on, it intermittently receives and transmits radio frequency (RF) energy which could cause interference with the operation of the airplane communication or navigation system. Refer to rules or regulations of your airline company for Mobile Broadband use. Never enable Mobile Broadband feature on your computer unless you are explicitly permitted to do so. 4 Follow restrictions when using your computer in hospitals. Some equipments in hospitals are sophisticated and are susceptible to electromagnetic interference. Do not enable Mobile Broadband feature near medical equipment without requesting permission. 5 The Mobile Broadband communication may affect the operation of implanted cardiac pacemakers and other medically implanted equipment. Patients with cardiac pacemakers should be well aware that use of Mobile Broadband feature on this computer may cause the implanted device to malfunction. If patients have any doubt that there is interference taking place, immediately disable the wireless radio on the computer and contact the doctor for more information. 6 The Mobile Broadband module embedded in your computer does not support voice calls, hence their use for essential communications is not possible. Therefore you should never rely upon the device for essential communications. Appendix E. Notices Electronic emissions notices -----------------------------------------------The following information refers to Lenovo IdeaPad S12, machine type 20021 2959. Federal Communications Commission (FCC) Statement This equipment has been tested and found to comply with the limits for a Class B digital device, pursuant to Part 15 of the FCC Rules. These limits are designed to provide reasonable protection against harmful interference in a residential installation. This equipment generates, used, and can radiate radio frequency energy and, if not installed and used in accordance with the instructions, may cause harmful interference to radio communications. However, there is no guarantee the interference will not occur in a particular installation. If this equipment does cause harmful interference to radio or television reception, which can be determined by turning the equipment off and on, the user is encouraged to try to correct the interference by one or more of the following measures: • Reorient or relocate the receiving antenna. • Increase the separation between the equipment and receiver. • Connect the equipment into an outlet on a circuit different from that to which the receiver is connected. • Consult an authorized dealer or service representative for help. Properly shielded and grounded cables and connectors must be used in order to meet FCC emission limits. Proper cables and connectors are 109 Appendix E. Notices available from Lenovo authorized dealers. Lenovo is not responsible for any radio or television interference caused by using other than recommended cables or connectors or by unauthorized changes or modifications to this equipment. Unauthorized changes or modifications could void the user’s authority to operate the equipment. This device complies with Part 15 of the FCC Rules. Operation is subject to the following two conditions: (1) this device may not cause harmful interference, and (2) this device must accept any interference received, including interference that may cause undesired operation. Responsible party: Lenovo (United States) Incorporated 1009 Think Place - Building One Morrisville, NC 27650 U.S.A. Telephone: (919) 294-5900 Industry Canada Class B Emission Compliance Statement This Class B digital apparatus complies with Canadian ICES-003. 110 Appendix E. Notices Avis de conformité à la réglementation d’Industrie Canada Cet appareil numérique de la classe B est conforme à la norme NMB-003 du Canada. German Class B Compliance Statement Deutschsprachiger EU Hinweis: Hinweis für Geräte der Klasse B EU-Richtlinie zur Elektromagnetischen Verträglichkeit Dieses Produkt entspricht den Schutzanforderungen der EU-Richtlinie 2004/108/EG (früher 89/336/EWG) zur Angleichung der Rechtsvorschriften über die elektromagnetische Verträglichkeit in den EU-Mitgliedsstaaten und hält die Grenzwerte der EN 55022 Klasse B ein. Um dieses sicherzustellen, sind die Geräte wie in den Handbüchern beschrieben zu installieren und zu betreiben. Des Weiteren dürfen auch nur von der Lenovo empfohlene Kabel angeschlossen werden. Lenovo übernimmt keine Verantwortung für die Einhaltung der Schutzanforderungen, wenn das Produkt ohne Zustimmung der Lenovo verändert bzw. wenn Erweiterungskomponenten von Fremdherstellern ohne Empfehlung der Lenovo gesteckt/eingebaut werden. 111 Appendix E. Notices Deutschland: Einhaltung des Gesetzes über die elektromagnetische Verträglichkeit von Betriebsmittein Dieses Produkt entspricht dem “Gesetz über die elektromagnetische Verträglichkeit von Betriebsmitteln” EMVG (früher “Gesetz über die elektromagnetische Verträglichkeit von Geräten”). Dies ist die Umsetzung der EU-Richtlinie 2004/108/EG (früher 89/336/EWG) in der Bundesrepublik Deutschland. Zulassungsbescheinigung laut dem Deutschen Gesetz über die elektromagnetische Verträglichkeit von Betriebsmitteln, EMVG vom 20. Juli 2007 (früher Gesetz über die elektromagnetische Verträglichkeit von Geräten), bzw. der EMV EG Richtlinie 2004/108/EC (früher 89/336/ EWG), für Geräte der Klasse B. Dieses Gerät ist berechtigt, in Übereinstimmung mit dem Deutschen EMVG das EG-Konformitätszeichen - CE - zu führen. Verantwortlich für die Konformitätserklärung nach Paragraf 5 des EMVG ist die Lenovo (Deutschland) GmbH, Gropiusplatz 10, D-70563 Stuttgart. Informationen in Hinsicht EMVG Paragraf 4 Abs. (1) 4: Das Gerät erfüllt die Schutzanforderungen nach EN 55024 und EN 55022 Klasse B. 112 Appendix E. Notices European Union Compliance Statement Class B Compliance European Union - Compliance to the Electromagnetic Compatibility Directive This product is in conformity with the protection requirements of EU Council Directive 2004/108/EC on the approximation of the laws of the Member States relating to electromagnetic compatibility. Lenovo cannot accept responsibility for any failure to satisfy the protection requirements resulting from a non-recommended modification of the product, including the installation of option cards from other manufacturers. This product has been tested and found to comply with the limits for Class B Information Technology Equipment according to European Standard EN 55022. The limits for Class B equipment were derived for typical residential environments to provide reasonable protection against interference with licensed communication devices. Properly shielded and grounded cables and connectors must be used in order to reduce the potential for causing interference to radio and TV communications and to other electrical or electronic equipment. Such cables and connectors are available from Lenovo authorized dealers. Lenovo cannot accept responsibility for any interference caused by using other than recommended cables and connectors. 113 Appendix E. Notices Lenovo Product Service Information Japanese VCCI Class B Statement 114 Appendix E. Notices Japan Compliance Statement for Power line Harmonics A statement of compliance to the IEC 61000-3-2 harmonics standard is required for all products connecting to the power mains and rated less than 20A per phase. Korea Class B 115 Appendix E. Notices WEEE and recycling statements ---------------------------------------- General recycling statement Lenovo encourages owners of information technology (IT) equipment to responsibly recycle their equipment when it is no longer needed. Lenovo offers a variety of programs and services to assist equipment owners in recycling their IT products. Information on product recycling offerings can be found on Lenovo’s Internet site at http://www.pc.ibm.com/ww/lenovo/about/environment 116 Appendix E. Notices EU WEEE statements -------------------------------------------------------------The Waste Electrical and Electronic Equipment (WEEE) mark applies only to countries within the European Union (EU) and Norway. Appliances are labeled in accordance with European Directive 2002/96/EC concerning waste electrical and electronic equipment (WEEE). The Directive determines the framework for the return and recycling of used appliances as applicable throughout the European Union. This label is applied to various products to indicate that the product is not to be thrown away, but rather reclaimed upon end of life per this Directive. Users of electrical and electronic equipment (EEE) with the WEEE marking per Annex IV of the WEEE Directive must not dispose of end of life EEE as unsorted municipal waste, but use the collection framework available to them for the return, recycle, recovery of WEEE and minimize any potential effects of EEE on the environment and human health due to the presence of hazardous substances. For additional WEEE information go to: http://consumersupport.lenovo.com. 117 Appendix E. Notices Japan recycling statements --------------------------------------------- Collecting and Recycling a Disused Lenovo Computer or Monitor If you are a company employee and need to dispose of a Lenovo computer or monitor that is the property of the company, you must do so in accordance with the Law for Promotion of Effective Utilization of Resources. Computers and monitors are categorized as industrial waste and should be properly disposed of by an industrial waste disposal contractor certified by a local government. In accordance with the Law for Promotion of Effective Utilization of Resources, Lenovo Japan provides, through its PC Collecting and Recycling Services, for the collecting, reuse, and recycling of disused computers and monitors. For details, visit the Lenovo Web site at www.ibm.com/jp/pc/service/recycle/pcrecycle http://www.ibm.com/jp/pc/service/recycle/pcrecycle Pursuant to the Law for Promotion of Effective Utilization of Resources, the collecting and recycling of home-used computers and monitors by the manufacturer was begun on October 1, 2003. This service is provided free of charge for home-used computers sold after October 1, 2003. For details, visit the Lenovo Web site at www.ibm.com/jp/pc/service/recycle/personal http://www.ibm.com/jp/pc/service/recycle/personal 118 Appendix E. Notices Disposing of a Lenovo Computer Components Some Lenovo computer products sold in Japan may have components that contain heavy metals or other environmental sensitive substances. To properly dispose of disused components, such as a printed circuit board or drive, use the methods described above for collecting and recycling a disused computer or monitor. Disposing a Disused Battery Pack from Lenovo Notebook Computers Your Lenovo notebook computer has a lithium ion battery pack or a nickel metal hydride battery pack. If you are a company employee who uses a Lenovo notebook computer and need to dispose of a battery pack, contact the proper person in Lenovo sales, service, or marketing, and follow that person’s instructions. You also can refer to the instructions at www.ibm.com/jp/pc/environment/recycle/battery http://www.ibm.com/jp/pc/environment/recycle/battery If you use a Lenovo notebook computer at home and need to dispose of a battery pack, you must comply with local ordinances and regulations. You also can refer to the instructions at www.ibm.com/jp/pc/environment/recycle/battery http://www.ibm.com/jp/pc/environment/recycle/battery 119 Appendix E. Notices Notice for users in the U.S.A. ----------------------------------------------California Perchlorate Information: Products containing CR (manganese dioxide) lithium coin cell batteries may contain perchlorate. Perchlorate Material — special handling may apply. See http://www.dtsc.ca.gov/hazardouswaste/perchlorate. Notice on deleting data from your hard disk ---------------As computers spread into every corner of life, they process more and more information. The data on your computer, some of it sensitive, is stored on a storage device called the hard disk. Before you dispose of, sell, or hand over your computer, you need to delete that data. Handing your computer over to someone else without deleting the loaded software, such as operating systems and application software, may even violate License Agreements. You are advised to check the terms and conditions of those Agreements. Deleting the data from the hard disk is not easy. There are methods that seem to delete the data: • Move the data to the recycle bin, and then choose the Empty recycle bin command. • Use the Delete command. 120 Appendix E. Notices • Format your hard disk, using the software for initializing it. • Using the preinstalled recovery program, bring the hard disk back to factory-ship state. These operations, however, only change the file allocation of the data; they do not delete the data itself. In other words, the data retrieval processing is disabled under an operating system such as Windows. The data is still there, even though it seems to be lost. Thus, it is sometimes possible to read the data by use of special software for data recovery. There is a risk that people of bad faith may read and misuse the critical data on hard disks for unexpected purposes. To prevent the leakage of data, it becomes very important that you take responsibility for deleting all the data from the hard disk when you dispose of, sell, or hand over your computer. You can destroy the data physically by smashing the hard disk with a hammer, or magnetically by means of strong magnetic power, thus making the data unreadable. But we recommend that you make use of the software (payware) or service (pay service) specifically developed for the purpose. 121 Appendix F. Features and Specifications Model Name: IdeaPad S12 Machine Type 2959/20021 Note: The following specifications may contain technical inaccuracies or typographical errors. Lenovo reserves the right to improve and/or change specifications at any time without notice. Intel VIA Form Factor Size Appr. 292 x 216mm, Depth: 22-28.9mm Weight Appr. 1.43kg/1.33kg System CPU Memory Intel Atom processor VIA Nano processor DDR II SO-DIMM LCD 12.1'' WXGA LCD with LED backlit HDD 2.5" SATA 160/250/360G or SSD 8/16/32G Keyboard Integrated Camera Battery AC Adapter 122 6-row Lenovo Keyboard 1.3M/0.3M 28Wh, 3 cells Li-ion battery/48Wh, 6 cells Li-ion battery/ 52Wh, 6 cells Li-ion battery 40W/20V Appendix F. Features and Specifications I/O Ports USB Communication USB 2.0 x 3 ports RJ-45 port Audio Headphone/Mic-In Jack Video D-sub port ExpressCard slot 34mm width x 1 Memory card slot 4 in 1 slot x 1 (MMC/ SD/ MS/ MS PRO) Kensington slot Yes 123 Trademarks --------------------------------------------------------- Lenovo, the Lenovo logo, IdeaPad, VeriFace, OneKey Rescue (OneKey Recovery, OneKey AntiVirus), APS, Power Express, Energy Management and ReadyComm are either registered trademarks or trademarks of Lenovo in the United States and/or other countries. Microsoft and Windows are trademarks of Microsoft Corporation in the United States, other countries, or both. Other company, product or service names may be trademarks or service marks of others. All other trademarks and registered trademarks are trademarks or registered trademarks of their respective holders. In this manual, ™ and ® marks are not specified. 124 Index A AC adapter Jack .............................................. 4 Using ......................................... 13 B Battery Charging.................................... 13 Bluetooth Connecting ................................ 29 Interoperability ....................... 105 Usage environment................. 106 C list .......................................................98 customer support center ....................68 D Display Cleaning ....................................84 E ExpressCard/34 slot ..........................28 F FCC Statement .................................109 Frequently Asked Questions .............49 Function key combinations ...............18 Camera ........................................... 2, 19 Card reader ........................................ 26 Caring your computer ....................... 72 Cleaning Computer cover ........................ 82 Computer display ..................... 84 Computer keyboard.................. 83 Customer Replaceable Unit (CRU) parts 125 Index H M Hard disk drive Problems ................................... 57 Help customer support center .......... 68 Help and service ....................... 67 on the Web ................................ 68 Hibernation mode problems ............. 54 Maintenance ....................................... 80 Microphone Built-in......................................... 2 K Kensington slot .................................... 6 Keyboard Cleaning .................................... 82 Problems ................................... 54 Using ......................................... 17 L Lenovo Limited Warranty................. 85 126 N Notice Electronic emissions ............... 109 for US users ............................. 120 Numeric Keypad ............................... 17 O OneKey Rescue System button ........... 2 Index P T Password Problems.................................... 53 Using ......................................... 25 Power button........................................ 2 Problems Battery ....................................... 57 Computer screen ....................... 56 Display ...................................... 52 Hard disk drive ......................... 57 Hibernation mode ..................... 54 Keyboard ................................... 54 Password ................................... 53 Sound ........................................ 57 Standby mode ........................... 54 Startup ....................................... 58 Touch pad...........................................16 Trademarks ......................................124 Troubleshooting .................................52 S Security ............................................... 24 SIM ..................................................... 38 Storage media Handling ................................... 75 U USB port ...............................................4 V VeriFace ..............................................25 W Warranty information ........................94 Web Help ...........................................68 Wireless LAN Interoperability .......................105 Usage environment .................106 Wireless module antennas ...................2 127 S12 User Guide V1.0 cover_1-4 Lenovo IdeaPad S12 User Guide V1.0 TM www.lenovo.com ©Lenovo China 2009 New World. New Thinking. P/N: 147002293 Printed in China