1
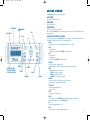
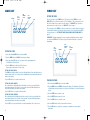
6955 GUD V2
3/19/07
9:47 AM
Page 1
LER 6955
™
For a dealer near you, call:
(847) 573-8400 (U.S. & Int’l)
(800) 222-3909 (U.S. & Canada)
+44 (0) 1553 762276 (U.K. & Europe)
© Learning Resources, Inc., Vernon Hills, IL (U.S.A.)
Learning Resources Ltd., King’s Lynn, Norfolk (U.K.)
Please retain our address for future reference.
Made in China.
LRM 6955-GUD
USE AND CARE GUIDE
6955 GUD V2
3/19/07
9:47 AM
Page 2
Right Timer
TM
Visual Timer & Clock
The Right TimerTM and clock helps manage time
in a new way.
Your modes allow you to:
• keep time with a 12 or 24 hour clock
• set time with a timer
• chrono feature to use as a stop watch
• fits on your overhead projector and leaves
room for a transparency
• also perfect for desk top use!
CONTENTS
Insert Batteries . . . . . . . . . . . . . . . . . .3
Getting Started . . . . . . . . . . . . . . . . . .5
Clock
Setting . . . . . . . . . . . . . . . . . . . .6
Timer
Starting . . . . . . . . . . . . . . . . . . . .7
Quick Set . . . . . . . . . . . . . . . . . . .8
Setting . . . . . . . . . . . . . . . . . . .8-9
Personal Program Setting . . . . . . .9
Pausing the Timer . . . . . . . . . . . .9
Reversing the Count . . . . . . . . . .10
Chronograph (Stop Watch) Set
Starting . . . . . . . . . . . . . . . . . . .10
Freezing . . . . . . . . . . . . . . . . . .10
Resuming . . . . . . . . . . . . . . . . .10
Stopping . . . . . . . . . . . . . . . . . .10
Use and Care Instructions . . . . . . . . .11
Replacing Batteries . . . . . . . . . . . . . .11
Important Battery Information . . . . . . .11
se the Right TimerTM to time tests, practice sessions, study sessions, experiments,
phone calls, speeches or any timed activity. It’s also the perfect for desktop use.
Simply slide the reflective door behind the LCD screen and set it on your desk. For
convenience, we’ve added a feature that will let you save one time setting to use over
and over at the press of a button. This is especially helpful if you a particular activity,
test or task that requires the same amount of time – say a 5 minute quiz for example.
Just press the PROG button to get started right away! Whatever the activity, whatever
the time, whatever the time duration, you can always make it "the right time"!
U
INSERTING THE BATTERIES
You will need:
2 AAA batteries
Phillips screwdriver
1. Turn the Right TimerTM over. Use the Phillips screwdriver to turn the screw on the battery door
in a counter clockwise direction to loosen the screw.
2. Remove the screw and open the door.
3. Insert the 2 AAA batteries, being careful to match the + and – ends of the batteries to the
diagram inside the battery compartment.
4. Replace the battery compartment door and insert the screw. Tighten the screw by using the
Phillips screw driver to turn the screw in a clockwise direction until secure. Do not over-tighten
the screw.
2
3
6955 GUD V2
3/19/07
9:47 AM
Page 3
GETTING STARTED
The Right TimerTM has three modes of operation:
CLOCK MODE
Keep time with 12 or 24 hour clock.
TIMER MODE
Set time with the timer.
TIMER MODE
CHRONOGRAPH
CHRONOGRAPH
MODE
Use the chrono-feature as a stop watch.
Before setting the Right TimerTM, get to know all your control features. They’ll help make setting
the timer a snap!
STOP
CLOCK MODE
SLIDING COVER BEHIND THE SCREEN
START
UP
This cover allows you to use the Right TimerTM on your desktop. Simply slide it behind the screen
for desktop, or out of the way for use on the overhead projector.
ON/OFF
–to turn the unit on or off press and hold this button for 3 seconds
START
–to begin the timer
–to unfreeze the marked time in CHRONO (stop watch) mode
STOP
–to stop the timer
–to stop the alarm
–to do final stop in CHRONO (stop watch) mode
UP/DOWN
–to scroll to the time setting you want
(holding down either arrow button will move the numbers more quickly!)
REVERSE
SLIDING DOOR WITH
REFLECTIVE BACKING
FOR DISPLAY SCREEN
DOWN
FREEZE
ON/OFF
PROGRAM
SECONDS
MODE
–to toggle through the three modes of:
–CLOCK (to set the clock mode)
–TIMER (to set the timer mode)
–CHRONO (to set the stop watch mode)
REVERSE
–to reverse the timer count from up to down, or down to up
–to move back to a previous programming step
SET BUTTON
–to activate "programming" mode
–to accept entries
CLEAR
–to clear any count from the screen
FREEZE
–to freeze the screen with CHRONO (stop watch) still running in the background
–press again to unfreeze (or use the START button)
SEC
–to turn the seconds display on or off
4
PROG
–to set and save your own personal amount of time
5
6955 GUD V2
3/19/07
9:47 AM
Page 4
CLOCK SET
FLASHES
TIMER SET
1ST
HOURS
FLASH
2ND
MINUTES
FLASH
3RD
SECONDS
FLASH
SETTING THE TIMER
12 HR
There are two ways to set the TIMER function. The first way to set the TIMER is to use the
QUICK SET keys to set values in increments of 1, 5 or 10 minutes. This is a quick way to set the
timer if the amount of time you desire is in whole minutes. The QUICK SET keys only work for
whole minutes, not seconds or hours. See “QUICK SET” section on page 8.
The second way to set the TIMER is to enter the amount of time you desire using the arrow keys to
scroll through the numbers to the amount of time you want for each section and pressing SET to
lock in your number. See “SETTING THE TIMER USING SECONDS, MINUTES AND HOURS” on
page 8.
PLEASE NOTE: During programming, if you enter a number and find that you want to change it,
you can press the REV button. Each time you press the button it will back up one step in the
programming.
SETTING THE CLOCK
3RD
HOURS
FLASH
2ND
MINUTES
FLASH
FLASHES
IST
SECONDS
FLASH
1. Press and hold the ON/OFF button to turn the unit ON.
2. Press the MODE button until CLOCK is showing on the display
3. Press and hold the SET button for 3 seconds to enter the programming mode.
The default is the 12 hour format.
3. Press the REV button to switch to the 24 hour format.
Press it again to switch back to 12 hour format.
SETTING THE CLOCK (HOURS)
The CLOCK mode indicator and the "hours" place will begin flashing. Press and hold either arrow
button to advance to the "hour" of time you want. Holding down an arrow button will advance the
numbers more quickly!
Press the SET button to accept and confirm the hour.
STARTING THE TIMER
SETTING THE CLOCK (MINUTES)
After setting the hours, the display will now flash minutes. As before, press and hold either
arrow button to advance to the "minute" of time you want. Remember that holding down an
arrow button will advance the numbers more quickly!
1. Press and hold the ON/OFF button to turn the unit ON.
Press the SET button to accept and confirm the minute.
SETTING THE CLOCK (SECONDS)
After setting the minutes, the display will now flash seconds. As before, press and hold either
arrow button to advance to the "seconds" of time you want. Remember that holding down an
arrow button will advance the numbers more quickly!
Press the SET key to accept and confirm the seconds. Congratulations, the clock is now set!
2. Press the MODE button until TIMER is showing on the display. The default time is 30 minutes,
or it will display your personal setting once you have set that feature (see Personal Program Set
section).
3. Press the START button to begin the count.
4. Press the FREEZE button to pause the count.
5. Press the START button to resume the count.
6. Press the STOP button to end the count and silence the alarm.
7. Press the REV button to change from counting up to counting down, or press again to
change back.
6
7
6955 GUD V2
3/19/07
9:47 AM
Page 5
QUICK SET FOR WHOLE MINUTES
PERSONAL PROGRAM SET
1. Press the MODE button until TIMER is showing on the display.
The Right Timer™ has a feature that allows you to set and save your own personal programmed
amount of time. This is very convenient for setting a standard time for a reoccurring task or test.
Once you set and save a setting for this feature, you will see this amount of time displayed every
time you enter the TIMER mode. Then all you have to do is press the START key to begin timing!
2. Press and hold the SET button for three (3) seconds to enter the programming mode. The
TIMER mode will flash on the screen indicating that you can program your time.
3. Use the 1, 5 and 10 minute buttons to "quick set" your time. For example, if you want to set
for 38 minutes, you would:
–press the 10 button three times (the screen shows 30 min)
–press the 5 button once (the screen shows 35 min)
– the 1 button three times (the screen now has total of 38 minutes).
4. Press the SET button three (3) times to accept and lock in your entry.
5. Press the START button to begin timing!
1. To your save your personal time, press the MODE button until TIMER mode is selected.
2. Press and hold the PROG button for three (3) seconds. The word TIMER will begin flashing on
the screen.
3. Use the arrow buttons to enter the desired amount of time beginning with the "seconds" section.
Press the SET button to lock in your entry. Repeat these steps with the minute and hour
sections.
Press the REV button to change the direction of the count. So your unit can count
either up or down. The choice is yours!
4. If the amount of time you wish to enter is in whole minutes (no hours or seconds) you can use
the QUICK SET buttons to enter the total amount and press the SET button three (3) times to
lock in the entry.
SETTING TIMER USING SECONDS, MINUTES and HOURS
5. Once you have saved your own setting, this will become the default time each time you enter
the TIMER mode. You can change this amount at any time by repeating the steps above.
The procedure for setting the TIMER begins with SECONDS, then MINUTES, then HOURS.
1. To enter the timer mode from any other mode, press the MODE button until TIMER is shown
on the display screen.
6. Press the START button once to activate the timer when the timer mode is displayed on screen.
The screen will show TIMER COUNT UP or TIMER COUNT DOWN to indicate the direction of
the count!
2. Press and hold the SET button for three (3) seconds to enter the programming mode. The
word TIMER and the "seconds" will begin flashing, indicating you are now in the programming
mode. The first time you set the timer, the screen will show 30 minutes. This is the default
setting. Once you set your own personal setting for the PROG button (see Personal Program
Setting), that number will become the default time.
SETTING THE TIMER (SECONDS)
1. The display will flash the TIMER indicator. The display will now flash "seconds". As before,
press and hold either arrow button to advance to the "seconds" of time you want. Remember
that holding down an arrow button will advance the numbers more quickly!
2. Press the SET key to accept and confirm the seconds.
SETTING THE TIMER (MINUTES)
BARS APPEAR
1. After setting the hours, the display will now flash "minutes". As before, press and hold either
arrow button to advance to the "minute" of time you want. Remember that holding down an
arrow button will advance the numbers more quickly!
2. Press the SET button to accept and confirm the minute.
SETTING THE TIMER (HOURS)
1. The "hours" place will begin flashing. Press and hold either arrow button to advance to the
"hour" of time you want. Holding down an arrow button will advance the numbers more quickly!
2. Press the SET button to accept and confirm the hour.
8
BARS DISAPPEAR
FLASHES WHEN
TIME IS PAUSED
When the timer is in COUNT UP mode, the bars on the graphic display will fill in as time passes.
When the timer is in COUNT DOWN mode, the bars will disappear as time passes.
Press the REV button to change the direction of the count. So your unit can count either up or
down. The choice is yours!
PAUSING THE TIMER
Press the FREEZE button to pause in mid-count. The display will flash "!", indicating the pause.
9
6955 GUD V2
3/19/07
9:47 AM
Page 6
RESUMING THE COUNTDOWN
When you want to start the TIMER again, press the START button to resume counting from
where the unit was paused.
ALARM
An alarm will sound when the time remaining reaches one minute (60 seconds).
STOPPING THE ALARM
Use and Care Instructions
To protect your Right Timer™ :
• Do not submerge the unit in water.
• Prevent spilling food or beverages on the unit.
• To clean, wipe gently with a barely damp, soft cloth.
• Do not throw the unit and do not push sharp objects through the speaker holes or
LCD display screen.
The alarm will then sound until you press the STOP button to silence the alarm.
Press the CLEAR button to return the display to the full countdown.
Replacing Batteries
Change the batteries when the sound becomes garbled or slows down, or when pressing a button
does not trigger a response from the unit. Follow the instructions for inserting the batteries found
on page (?) of this manual.
CHRONOGRAPH (Stop Watch) SET
1. Press the MODE button until CHRONO is displayed on the screen.
ONE HUNDRETHS
OF A SECOND
DISPLAYED
2. Press the START button to begin counting.
Important Battery Information
Please read and understand these additional battery usage instructions.
To insure proper function:
Battery installation and replacement should be done by an adult only.
Do not mix old and new batteries.
Do not mix alkaline, standard or rechargeable batteries.
Non-rechargeable batteries are not to be recharged.
Rechargeable batteries are to be removed from the product before being charged (if removable).
Only batteries of the same or equivalent type as recommended are to be used.
Batteries are to be inserted with the correct polarity.
Exhausted batteries are to be removed from the product.
Remove batteries if product is to be inactive for long periods of time, to avoid leakage.
The supply terminals are not to be short-circuited.
Replace batteries at the first signs of erratic operations.
WARNING: DO NOT DISPOSE OF BATTERIES IN FIRE.
BATTERIES MAY EXPLODE OR LEAK.
FREEZE THE STOP WATCH!
1. To freeze the display to mark a lap or amount of time, press the FREEZE button once quickly to
pause the display to mark time. The real time count will continue to run even though the screen
is frozen.
2. Press the START button once to un-freeze the display and resume the count at actual elapsed
time.
3. Press the STOP button to receive final readout when you are finished timing.
4. Press the CLEAR button to reset the count to zero after the final count.
10
11