1
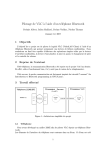
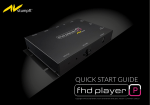
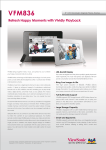
Digital Photo Frame
10.4 INCN SERIALS
USER MANUAL
VER:AM104L2007032801
Contents
What`s in the box
SPECIFICATIONS
2
Features
Front
3
4
Side
4
Back
5
User Operation Guide
6
REMOTER
16
Connect to TV
17
What`s in the box
18
DPF
Digital Photo Frame
7INCH SERIALS
USER MANUAL
Use r Manual
Digital Photo Frame
TV Cable
12VDC
Remote
controller
Power Adaptor
1
18
SPECIFICATIONS
Connect to TV
Display: 10.4 inch TFT LCD
File format: Audio(MP3)/Photo(JPG)/Video(MPEG1/2/4)
USB interface connect to computer
AV OU T
Digital Photo Frame
Support HOST USB /SD/MMC/MS/XD/CF card, System
dectect USB first ,If USB device and card all in system,
system read USB device.
Video System: Support NTSC/PAL
Output Port: One AV(Audio/Video output port)
Remote Control: Key press control
Memory can copy to cards,cards can copy to memory.
OTG :Hot-plug file transfer between many devices.
Internal NAND flash(option)
Other Function: Slideshow automatically
Power: DC 9V input /100-240V
Power Consumption:9W
Operation Temperature: -5-40C
Operation Humidity:20%-80% relative humi
TV
Storage Temperature:-15C-50C
Speaker: Speaker inside (2*1W)
When connected to the TV, your digital images
will be displayed on your TV screen.
17
2
Features
Remoter
Playback of photo, music, or video files stored
in data storage devices through dual HighSpeed USB 2.0 port or various card-reader
port, or internal memory.
Supported data storage devices include USB
disk, memory card, MP3 player, hard disk, etc.
Dual High-Speed USB 2.0 can be configured
as OTG, Host, or Device
Supports up to 8000x8000 mega pixel image
files (JPEG format)
Compatible with most digital cameras stored
JPEG images including Motion JPEG files
Automatic slideshow with multiple transition
effects and adjustable display time
Dedicated hardware JPEG decoder for super
fast JPEG display
Plays slideshow with MP3 music on in the
background
Plays MP3 music through the integrated speakers
Plays MPEG-I, II, or IV video files (including
DIVX) stored on supported memory cards or
external USB devices.
Supports SD, SM, MS, CF, MMC, and xD
memory cards
User friendly on-screen display
Build in alarm clock and calendar
3
Up Joystick button:
a) Move up the cursor at the menu
b) Open brightness adjustment menu at
playing interface
c) Switch picture control bar and music
control bar (After ENTER button open
control bar).
d) Shift up when zoom in picture
16
The setup items are shown as below
Menu language setup it includes Simplified Chinese, English
Front
two items.
Picture setup, it includes the speed of automatic slide show,
picture play mode two items.
Clock setup
Alarm setup
The buttons’ operation method is shown as below
button shift items or choose parameters.
Outline
Display
or ENTER button enter the selected item, confirm thesetup
result.
or OSD button Back to the up-level item/the last picture or
Receive
Side
forward to the next picture
POWER LED
USB
MENU
ENTER
SD/MMC/MS/XD SLOT
RIGHT VOL+
LEFT VOLDOWN
UP
POWER SWITCH
CF SLOT
15
12VDC INPUT
4
Back
When alarm goes off, the screen displays current
date and time. Press any button to return to the
previous mode
Video out Audio out
Wall Mount Holes
Adjustable Stand
5
7. SetupMenu
Press OSD /MENUto return to function select menu.
14
User Operation Guide:
Turn on DPF,Then the screen display as below :
Actions:
Press OSD to return to function select menu . Press / to
move to the previous or next month.
Display Information:
· Monthly calendar display
· Picture display
1. Function select
In the function select menu ,you can Press
/ / / to select to play picture ,music ,
movie , combo or text, then Press enter to
card select menu .And you can also select
to edit the files, setup the system or display
the calendar
· Time display
· Alarm display
6. Alarm screen
13
6
2. Card slect menu
In the function select menu , you can press
/ to select to the highlight icon which shows
the card is inserted or not.Press enter to display file
list in the card . Press OSD /MENU to return to function select menu.
Info bar layout and functions:
3. File List Screen
Actions:
a) Press
/
to select a volume label, then
press ENTER to enter the filelist.
b) Press
press
/
to select a file/folder, then
to enter the folder or press
ENTER to play the file.
c) Press
·
Status indicator
·
Play/Pause
·
Stop
·
Previous song
·
Fast backward
·
Fast forward
·
Next song
·
Show file info
·
ID3 ta g displa y
·
Play mode (Standard, Repeat, Directory repeat)
5. Calendar
to return to previous directory.
d) Press OSD to return to card select menu.
7
12
4.2 Picture display screen
File management screen Action:
a) Select a file to copy, press
I n fo b a r l ay o u t an d f u n ct io n s :
·
Statu s indica tor
·
Play/Pause
·
Stop
·
Pictu re rota te
·
Zoom
on the
original file. A « will appear in front of
the file name indicating the file has
been selected.
b) Press
/
to locate and enter the
copy-to destination directory.
c) Press OSD and Cancel/Paste/Del
menu displays on the screen.
Prev ious pic tu r
d) Select Paste and press ENTER to
paste the file.
4.3 Music playback screen
11
Press ENTER (ok) to return to the file list.
8
4. Playback screens
Actions:
During Playback, press ENTER and info bar
displays on the screen. Then select a function
item by pressing
/ , and press ENTER to
perform the corresponding function.
Press OSD to return t o file list display screen .
4.1 Movie playback screen
In fo
9
b a r la y o u t a n d
·
S ta tu s in dic a tor
·
P la y b a c k
·
P la y / P a u s e
·
S to p
·
P re v io u s m o v ie
·
F a s t b a c k w a r d
·
F a s t fo rw a r d
·
N e x t m o v ie
·
S h o w
·
Z o o m
·
S u b -title s w itch
file
fu n c tio n s :
ti m e
clip
clip
in fo
10