1
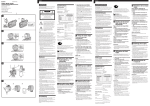
OWNERS MANUAL KMA16 / KMA16R Thank you for purchasing the Kustom KMA16/16R model keyboard/mixer amplifier. Kustom has listened to musicians throughout the world and stands proudly behind each and every one we make. It was designed with your needs in mind. Flexible, feature laden, great sounding, able to adapt to all kinds of music, this amplifier really delivers what you have been looking and waiting for. Whatever style you choose, its ready! Kustom, with a 30 year tradition of excellence in design, proudly delivers to you this amp and rewards you with a rugged and dependable amp designed and engineered in the USA. Again, thank you for your purchase. Please take a few minutes to learn about all the professional features that are built in. SPECIFICATIONS Model Power Equalizer Channels Impedance Effects Amplifier Type Dimensions Weight KMA16 16 W 4 Band Two 8 Ohms N/A Bi-Polar Transistor 15.25x8.5x13 18 lbs. KMA16R 16 W 4 Band Two 8 Ohms Bi-Polar Transistor 33x40x25.5cm. 9.59 kg. Reverb DANGER EXPOSURE TO EXTREMELY HIGH NOISE LEVELS MAY CAUSE A PERMANENT HEARING LOSS. INDIVIDUALS VARY CONSIDERABLY TO NOISE INDUCED HEARING LOSS BUT NEARLY EVERYONE WILL LOSE SOME HEARING IF EXPOSED TO SUFFICIENTLY INTENSE NOISE FOR A SUFFICIENT TIME. THE U.S. GOVERNMENT'S OCCUPATIONAL SAFETY AND HEALTH ADMINISTRATION (OSHA) HAS SPECIFIED THE FOLLOWING PERMISSIBLE NOISE LEVEL EXPOSURES: DURATION PER DAY IN HOURS 8 6 4 3 2 1 1/2 HR. or LESS SOUND LEVEL db FLOW RESPONSE 90 93 95 97 100 103 110 ACCORDING TO OSHA, ANY EXPOSURE IN THE ABOVE PERMISSIBLE LIMITS COULD RESULT IN SOME HEARING LOSS. EAR PLUGS OR PROTECTORS IN THE EAR CANAL OR OVER THE EARS MUST BE WORN WHEN OPERATING THIS AMPLIFICATION SYSTEM IN ORDER TO PREVENT A PERMANENT HEARING LOSS. IF EXPOSURE IN EXCESS OF THE LIMITS AS PUT FORTH ABOVE, TO INSURE AGAINST POTENTIALLY HARMFUL EXPOSURE TO HIGH SOUND PRESSURE LEVELS. IT IS RECOMMENDED THAT ALL PERSONS EXPOSED TO EQUIPMENT CAPABLE OF INDUCING HIGH SOUND PRESSURE LEVELS, SUCH AS THIS AMPLIFICATION SYSTEM, BE PROTECTED BY HEARING PROTECTORS WHILE THIS UNIT IS IN OPERATION. THIS APPARATUS SHALL NOT BE EXPOSED TO DRIPPING OR SPLASHING. NO OBJECTS FILLED WITH LIQUIDS SUCH AS VASES SHALL BE PLACED ON THE APPARATUS. IMPORTANT Read all safety and operating instructions before using this product. All safety and operating instructions should be kept for future reference. Obey all cautions in the operating instructions and on the back of the unit. All operating instructions should be followed. This product should not be used near water i.e. bathtub, sink, swimming pool, wet basement, etc. 6. This product should be located so that its position does not interfere with proper ventilation. It should not be placed flat against a wall or placed in a built-in enclosure that will impede the flow of cooling air. 7. This product should not be placed near a source of heat, such as a stove, radiator, or another heat producing amplifier. 8. Connect only to a power supply of the type indicated on the back of the amplifier near the power supply cord. 9. Do not break off the ground pin of the power supply cord. 10. Power supply cords should always handled carefully. Never walk or place equipment on power supply cords. Periodically check cords for cuts or signs of stress, especially at the point where the cord exits the unit. 11. The power supply cord should be unplugged when the unit is unused for long periods of time. 12. If this product is to be mounted in an equipment rack, rear support should be provided. 13. Metal parts and vinyl covering may be cleaned with a damp rag. 14. Care should be taken so that objects do not fall and liquids are not spilled into the unit through the ventilation ports or any other openings. 15.This unit should be checked by a qualified service technician if: A. The power supply cord or plug has been damaged. B. Anything has fallen or been spilled into the unit. C. The unit does not operate correctly. D. The unit has been dropped or the enclosure damaged. 1. 2. 3. 4. 5. 16. The user should not attempt to service this equipment. All service work must be done by a qualified service technician for warranty repairs. TO AVOID ELECTRICAL SHOCK, DO NOT DISASSEMBLE. REFER SERVICING TO QUALIFIED PERSONAL ONLY! CAUTION RISK OF ELECTRIC SHOCK DO NOT OPEN CAUTION: TO REDUCE THE RISK OF ELECTRIC SHOCK, DO NOT REMOVE CHASSIS. NO USER-SERVICEABLE PARTS INSIDE. REFER SERVICING TO QUALIFIED SERVICE PERSONNEL. AVIS: RISQUE DE CHOC ELECTRIQUE-NE PAS OUVRIR. CAUTION THIS AMPLIFIER HAS BEEN DESIGNED AND CONSTRUCTED TO PROVIDE ADEQUATE POWER RESERVE FOR PLAYING MODERN MUSIC WHICH MAY REQUIRE OCCASIONAL PEAK POWER. EXTENDED OPERATION AT ABSOLUTE MAXIMUM POWER IS NOT RECOMMENDED SINCE THIS COULD DAMAGE THE ASSOCIATED LOUDSPEAKER SYSTEM. PLEASE BE AWARE THAT MAXIMUM POWER CAN BE OBTAINED WITH VERY LOW SETTINGS OF THE MASTER VOLUME CONTROLS IF THE INPUT SIGNAL IS VERY STRONG. THIS SYMBOL IS INTENDED TO ALERT THE USER TO THE PRESENCE OF UNINSULATED DANGEROUS VOLTAGE WITHIN THE PRODUCTS ENCLOSURE THAT MAY BE OF SUFFICIENT MAGNITUDE TO CONSITUTE A RISK OF ELECTRIC SHOCK TO PERSONS. THIS SYMBOL IS INTENDED TO ALERT THE USER TO THE PRESENCE OF IMPORTANT OPERATING AND MAINTENANCE (SERVICING) INSTRUCTIONS IN THE LITERATURE ACCOMPANYING THE UNIT. Kustom Inc., 4940 Delhi Pike, Cincinnati, OH USA (800) 999-5558 Fax: (513) 347-2192 / www.kustom.com KMA16R 1 6 1 2 W AT T 3 R E V E R B 4 K E Y B O A R D / M I X E R 5 6 7 A M P L I F I E R 8 9 10 11 12 1.) Mic/Line Input Jack 1 - this is a 1/4 2 conductor input jack for plugging in your instrument. It is intended for keyboards or Hi-Z microphones but will accept other instruments as well. 2.) Mic/Line Input Jack 2 - this is a 1/4 2 conductor input jack for plugging in your instrument. It is intended for keyboards or Hi-Z microphones but will accept other instruments as well. 3.) Volume 1 - this control is the output volume control for the Input #1. Slowly increase the control to increase the volume. If you are using a keyboard with a preamp, set its level for a mid position before increasing this control otherwise distortion may occur. Both inputs follow the same tone circuit as the other input. 4.) Volume 2 - this control is the output volume control for the Input #2. Slowly increase the control to increase the volume. If you are using a high impedance microphone, be careful when increasing the volume. Depending on mic position, it may feedback if mic is in front of speaker. Both inputs follow the same tone circuit as the other input. 5.) Low - this control is the bass control. It is active and set to boost or cut frequencies at 55 Hz. This will effect the low frequency signals. Turning it fully clockwise, the signal is boosted 18 db. Turning it counterclockwise, the low will be rolled off -18db. Especially good for cleaning up preset patches or making thin patches sound fuller. 6.) Lo Mid - this control is the Low Midrange control. It is active and set to boost or cut frequencies at 350 Hz. This will effect the mid-low frequency signals. Turning it fully clockwise, the signal is boosted 12 db. Turning it counterclockwise, the low-mids will be rolled off -12db. Especially good for cleaning up preset patches. 7.) Hi Mid - this control is the High Midrange control. It is active and set to boost or cut frequencies at 2.5KHz. This will effect the mid-high frequency signals. Turning it fully clockwise, the signal is boosted 12 db. Turning it counterclockwise, the low-mids will be rolled off -12db. Increasing this will add punch to keyboard patches or vocal presence. 8.) High - this is the high frequency tone control. It is active and set to boost or cut frequencies at 8KHz. This will effect the high frequency signals. Turning it fully clockwise, the signal is boosted 18 db. Turning it counterclockwise, the low-mids will be rolled off -18db. This will add or subtract the high end shimmer and clarity. 9.) Reverb Level - (only on the KMA16R). This control adds the spring reverb and mixes it into the main signal buss. Reverberation creates a trail like effect with the sound. It lets the notes hang in the air longer, extending the sound. 10.) Headphone Jack - this is a 1/4 3 conductor jack for plugging headphones. It will sum the signal and put the sound in both ears, thereby creating a pseudo-stereo sound. Volume will be determined by the volume control on the channel you are on. It will disconnect the internal speaker when plugged in. This will allow quiet practicing. 11.) Jewel Light - this jewel light lets you know that the amplifier is on. 12.) Power - this switch turns on and off the AC power to the amp. Back Panel - this is a 2 conductor 1/4 speaker output jack. This will disconnect the internal speaker and allow an external speaker cabinet to be employed. Rating is 8 ohms. Suggested Settings (These settings are general starting points. They are designed to get you close to the sound you are looking for. If the control is not shown, then it doesnt apply to this particular sound. ) Standard Dual Instrument Setup - in this setup two keyboards or instruments are plugged into Inputs 1 & 2. (Remember, if you are using pre-amplified keyboards or a drum machine, we suggest that you turn their output levels to about mid way up and this will give you a cleaner sound as well as giving you available headroom for leads.) You can also plug in any combination of keyboards, microphones or guitars. The two guitar setup is especially useful for teaching studios. Of course, you can adjust the tone controls to any desired sound but in this setup, we suggest these tone control settings. It will deliver a clear, clean sound that has enough top end clarity to cut through. Add low and low mid for a beefier presence but be careful as this can muddy up the sound. If you have the KMA16R, adjust the reverb to suit the music or to your taste. Standard Dual Microphone Setup - in this setup two Hi-Z microphones are plugged into Inputs 1 & 2. This is a basic mini-PA system. This can be also be used for plugging in a CD player or cassette decks and a microphone for karaoke, teaching studios, small public address or even DJ work. It can be used for singing over prerecorded tapes with mixing capabilities. As mentioned earlier, you can adjust the tone controls to any desired sound but in this setup, we suggest these tone control settings. Of course it depends on the listening environment. It will deliver a clear, clean sound that has enough top end clarity to let the voices cut through. If you have the KMA16R, adjust the reverb to suit the music or to your taste. In public address work, you usually dont use reverb unless you are singing.