1
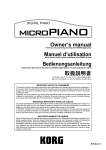
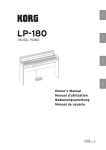
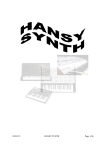
DIGITAL PIANO
Owner’s manual
Thank you for purchasing the Korg microPIANO digtal piano.
Manuel d’utilisation
Merci d’avoir choisi la piano numérique microPIANO de Korg.
Bedienungsanleitung
Vielen Dank, dass Sie sich für einen microPIANO digtal-Klavier von Korg entschieden haben.
IMPORTANT NOTICE TO CONSUMERS
This product has been manufactured according to strict specifications and voltage requirements that are applicable in
the country in which it is intended that this product should be used. If you have purchased this product via the internet,
through mail order, and/or via a telephone sale, you must verify that this product is intended to be used in the country
in which you reside.
WARNING: Use of this product in any country other than that for which it is intended could be dangerous and could
invalidate the manufacturer’s or distributor’s warranty. Please also retain your receipt as proof of purchase otherwise
your product may be disqualified from the manufacturer’s or distributor’s warranty.
REMARQUE IMPORTANTE POUR LES CLIENTS
Ce produit a été fabriqué suivant des spécifications sévères et des besoins en tension applicables dans le pays où ce
produit doit être utilisé. Si vous avez acheté ce produit via l’internet, par vente par correspondance ou/et vente par
téléphone, vous devez vérifier que ce produit est bien utilisable dans le pays où vous résidez.
ATTENTION: L’utilisation de ce produit dans un pays autre que celui pour lequel il a été conçu peut être dangereuse
et annulera la garantie du fabricant ou du distributeur. Conservez bien votre récépissé qui est la preuve de votre achat,
faute de quoi votre produit ne risque de ne plus être couvert par la garantie du fabricant ou du distributeur.
WICHTIGER HINWEIS FÜR KUNDEN
Dieses Produkt wurde unter strenger Beachtung von Spezifikationen und Spannungsanforderungen hergestellt, die im
Bestimmungsland gelten. Wenn Sie dieses Produkt über das Internet, per Postversand und/oder mit telefonischer
Bestellung gekauft haben, müssen Sie bestätigen, dass dieses Produkt für Ihr Wohngebiet ausgelegt ist.
WARNUNG: Verwendung dieses Produkts in einem anderen Land als dem, für das es bestimmt ist, verwendet wird,
kann gefährlich sein und die Garantie des Herstellers oder Importeurs hinfällig lassen werden. Bitte bewahren Sie
diese Quittung als Kaufbeleg auf, da andernfalls das Produkt von der Garantie des Herstellers oder Importeurs ausgeschlossen werden kann.
E F G
1
Precautions
Location
Using the unit in the following locations can result in a malfunction.
• In direct sunlight
• Locations of extreme temperature or humidity
• Excessively dusty or dirty locations
• Locations of excessive vibration
• Close to magnetic fields
Power supply
Please connect the designated AC adapter to an AC outlet of the correct voltage.
Do not connect it to an AC outlet of voltage other than that for which your unit is
intended.
Interference with other electrical devices
Radios and televisions placed nearby may exence receptioninterference.Operate this unit at a suitable distance from radios and televisions.
Handling
To avoid breakage, do not apply excessive force to the switches or controls.
Care
If the exterior becomes dirty, wipe it with a clean, dry cloth. Do not use liquid
cleaners such as benzene or thinner, or cleaning compounds or flammable polishes.
Keep this manual
After reading this manual, please keep it for later reference.
Keeping foreign matter out of your equipment
Never set any container with liquid in it near this equipment. If liquid gets into
the equipment, it could cause a breakdown, fire, or electrical shock.
Be careful not to let metal objects get into the equipment. If something does slip
into the equipment, unplug the AC adapter from the wall outlet. Then contact
your nearest Korg dealer or the store where the equipment was purchased.
* All product names and company names are the trademarks or registered
trademarks of their respective owners.
THE FCC REGULATION WARNING (for USA)
This equipment has been tested and found to comply with the limits for a Class
B digital device, pursuant to Part 15 of the FCC Rules. These limits are designed
to provide reasonable protection against harmful interference in a residential
installation. This equipment generates, uses, and can radiate radio frequency
energy and, if not installed and used in accordance with the instructions, may
cause harmful interference to radio communications. However, there is no guarantee that interference will not occur in a particular installation. If this equipment does cause harmful interference to radio or television reception, which
can be determined by turning the equipment off and on, the user is encouraged
to try to correct the interference by one or more of the following measures:
• Reorient or relocate the receiving antenna.
• Increase the separation between the equipment and receiver.
• Connect the equipment into an outlet on a circuit different from that to
which the receiver is connected.
• Consult the dealer or an experienced radio/TV technician for help.
Unauthorized changes or modification to this system can void the user’s authority to operate this equipment.
Notice regarding disposal (EU only)
If this symbol is shown on the product, manual, battery, or package,
you must dispose of it in the correct manner to avoid harm to human
health or damage to the environment. Contact your local administrative
body for details on the correct disposal method. If the battery contains
heavy metals in excess of the regulated amount, a chemical symbol is
displayed below the symbol on the battery or battery package.
Note concernant les dispositions (Seulement EU)
Si ce symbole apparait sur le produit, le manuel, les piles ou les packs de
piles, cela signifie que vous devez le recycler d’une manière correcte afin
de prévenir les dommages pour la santé humaine et les dommages potentiels pour l’environnement. Contactez votre administration locale
pour de plus amples renseignements concernant la bonne méthode de
recyclage. Si la pile contient des métaux lourds au-delà du seuil réglementé, un symbole chimique est affiché en dessous du symbole de la
poubelle barrée d’une croix sur la pile ou le pack de piles.
Hinweis zur Entsorgung (Nur EU)
Wenn Sie das Symbol mit der „durchgekreuzten Mülltonne“ auf Ihrem
Produkt, der dazugehörigen Bedienungsanleitung, der Batterie oder
der Verpackung sehen, müssen Sie das Produkt in der vorgeschriebenen
Art und Weise entsorgen um Schäden an der menschlichen Gesundheit
und der Umwelt zu vermeiden. Batterien oder Akkus, die Schadstoffe
enthalten, sind auch mit dem Symbol einer durchgekreuzten Mülltonne
gekennzeichnet. In der Nähe zum Mülltonnensymbol befindet sich die
chemische Bezeichnung des Schadstoffes. Cd oder NiCd steht für Cadmium, Pb
für Blei und Hg für Quecksilber.
Précautions
Emplacement
L’utilisation de cet instrument dans les endroits suivants peut en entraîner le
mauvais fonctionnement.
• En plein soleil
• Endroits très chauds ou très humides
• Endroits sales ou fort poussiéreux
• Endroits soumis à de fortes vibrations
• A proximité de champs magnétiques
Alimentation
Branchez l’adaptateur secteur mentionné à une prise secteur de tension appropriée. Evitez de brancher l’adaptateur à une prise de courant dont la tension ne
correspond pas à celle pour laquelle l’appareil est conçu.
Interférences avec d’autres appareils électriques
Les postes de radio et de télévision situés à proximité peuvent par conséquent
souffrir d’interférences à la réception. Veuillez dès lors faire fonctionner cet
appareil à une distance raisonnable de postes de radio et de télévision.
Maniement
Pour éviter de les endommager, manipulez les commandes et les boutons de
cet instrument avec soin.
Entretien
Lorsque l’instrument se salit, nettoyez-le avec un chiffon propre et sec. Ne vous
servez pas d’agents de nettoyage liquides tels que du benzène ou du diluant,
voire des produits inflammables.
Conservez ce manuel
Après avoir lu ce manuel, veuillez le conserver soigneusement pour toute référence ultérieure.
Evitez toute intrusion d’objets ou de liquide
Ne placez jamais de récipient contenant du liquide près de l’instrument. Si le
liquide se renverse ou coule, il risque de provoquer des dommages, un courtcircuit ou une électrocution.
Veillez à ne pas laisser tomber des objets métalliques dans le boîtier (trombones,
par ex.). Si cela se produit, débranchez l’alimentation de la prise de courant
et contactez votre revendeur korg le plus proche ou la surface où vous avez
acheté l’instrument.
* Tous les noms de produits et de sociétés sont des marques commerciales
ou déposées de leur détenteur respectif.
Vorsichtsmaßnahmen
Aufstellungsort
Vermeiden Sie das Aufstellen des Geräts an Orten, an denen
• es direkter Sonneneinstrahlung ausgesetzt ist;
• hohe Feuchtigkeit oder Extremtemperaturen auftreten können;
• Staub oder Schmutz in großen Mengen vorhanden sind;
• das Gerät Erschütterungen ausgesetzt sein kann.
• in der Nähe eines Magnetfeldes.
Stromversorgung
Schließen Sie das optionale Netzteil nur an eine geeignete Steckdose an. Verbinden Sie es niemals mit einer Steckdose einer anderen Spannung.
Störeinflüsse auf andere Elektrogeräte
Dieser kann bei in der Nähe aufgestellten Rund-funkempfängern oder Fernsehgeräten Empfangsstörungen hervorrufen. Betreiben Sie solche Geräte nur
in einem geeigneten Abstand von diesem Erzeugnis.
Bedienung
Vermeiden Sie bei der Bedienung von Schaltern und Reglern unangemessenen
Kraftaufwand.
Reinigung
Bei auftretender Verschmutzung können Sie das Gehäuse mit einem trockenen,
sauberen Tuch abwischen. Verwenden Sie keinerlei Flüssigreiniger wie beispielsweise Reinigungsbenzin, Verdünnungs- oder Spülmittel. Verwenden Sie
niemals brennbare Reiniger.
Bedienungsanleitung
Bewahren Sie diese Bedienungsanleitung gut auf, falls Sie sie später noch einmal benötigen.
Flüssigkeiten und Fremdkörper
Stellen Sie niemals Behältnisse mit Flüssigkeiten in der Nähe des Geräts auf.
Wenn Flüssigkeit in das Gerät gelangt, können Beschädigung des Geräts, Feuer
oder ein elek-trischer Schlag die Folge sein.
Beachten Sie, daß keinerlei Fremdkörper in das Gerät gelangen. Sollte ein
Fremdkörper in das Gerät gelangt sein, so trennen Sie es sofort vom Netz.
Wenden Sie sich dann an Ihren KORG-Fachhändler.
* Alle Produkt- und Firmennamen sind Warenzeichen oder eingetragene
Warenzeichen der betreffenden Eigentümer.
Part Names
Lid
Cord hook
Headphone jack
Top panel
DC9V jack Damper pedal jack
Lid prop
Battery
case
cover
SOUND button SONG button
Top panel
Power LED
Volume knob
Internal Setup and Connections
1. Connecting the Power
Connect the DC plug of the supplied AC
adapter to the DC9V jack on the rear panel,
then connect the AC adapter to an AC outlet.
Pass the AC adapter cord through the
cord hook so that the plug won’t be removed from the jack accidentally. When
you unhook the cord, don’t pull the cord
with force.
Be sure to use the AC adapter that’s included. Using other AC adapters may
cause the unit to malfunction.
■ Using a Damper Pedal
You can use an optional KORG PS-1 or PS-3 pedal as a
damper pedal by connecting it to the DAMPER SW jack on
the rear panel.
While you press down on the pedal, the note will sustain
as it would on a traditional piano, creating a rich, lingering
sound.
DC
plug
You can also use an optional DS-1H damper pedal. The
pedal’s half-damp function can be used only for the Grand
Piano preset sound.
AC adapter
To AC
outlet
Be sure to plug the unit into an AC outlet of the appropriate
voltage.
■ Connecting audio components
You can use the PHONES jack as a line-out to connect the
microPIANO to powered speakers or audio components. For
such connections, use commercially-available cables that are
appropriate for the components that you’re using.
Before connecting the audio components, make sure that
you turn off the power to the unit as well as the audio
components. Otherwise, malfunctions or damage to the
unit or components may occur.
2.Turning the microPIANO
• Lift the lid and securely support it using the lid prop.
Be careful not to pinch your fingers when you prop up
or close the lid.
• Press the power switch located on the front right of the top
panel to turn on the power.
The power LED will light up.
Power switch
■ Using the unit with batteries
Remove the battery case cover that’s located in the center
of the top panel, then insert six AA alkaline batteries (or
NiMH batteries) into the battery case in the correct orientation as shown in the figure below.
• To turn the power off, press the power switch again.
The power LED and the power to the unit will turn off.
Please note that batteries are not included in the package.
To take advantage of the acoustic characteristics of the microPIANO, we recommend that you use the unit with the lid
propped up.
Do not mix new batteries with old or different types of
batteries.
When you replace the battery cover, be sure
to push this part firmly until it clicks and locks.
3.Adjust the volume
• Rotate the VOLUME knob clockwise to raise the volume
level. Rotate it counter-clockwise to lower the level.
Battery case cover
The VOLUME knob controls the output level of the built-in
speakers and the headphones jacks.
■ Using headphones
When you plug in the headphones, the built-in speakers
will be muted. This is useful when you want to play the
keyboard in the evening without bothering your family or
neighbors.
Insert the stereo headphone plug into one of the PHONES
jacks on the rear panel.
If your headphones feature a standard-to-mini adapter plug,
be sure to hold the adapter plug when you connect or disconnect the headphones.
Replacing batteries
A flashing power LED indicates that the batteries are nearly
exhausted. Replace the batteries with new ones.
If battery power decreases, sounds from the microPIANO may become distorted.
Remove old batteries immediately. Otherwise, battery
leakage may occur, resulting in a malfunction. If you
don’t think that you’ll be using the unit for a long period
of time, remove the batteries.
To protect your hearing, do not listen to loud, highvolume sounds for a long period of time through the
headphones.
1
Playing Different Preset Sounds
(Play Mode)
You can select a sound for your performance from 61 preset
sounds. Each sound already has a suitable effect applied.
When you turn the unit on or stop song playback, the unit will enter Play mode.
1. While pressing and holding down the SOUND button (located on the top panel), press one of the keys ranging from
C2 to C7.
The sound will change depending on the key that you press.
(See "Sound and Song List" on the next page.) Short Phrase
sounds are assigned to the black keys.
When you turn the unit on, the default sound (Grand Piano) will
be selected.
3. To stop playback, press the SOUND and SONG buttons simultaneously.
You can select a different song by pressing and holding down
the SOUND and SONG buttons and pressing one of the keys
within that range.
You can also select a song in Song mode. To do so, press and
hold down the SONG button to stop playback, and enter Song
mode while pressing a desired key to select the song.
You cannot select the preset Short Phrase sounds that are assigned to black keys. If you select any of them, Music Box 1 will
automatically be selected.
Using Other Functions
What are Short Phrase sounds?
Listening to Songs (Song Mode)
The microPIANO features 40 songs.
Each song uses an appropriate sound and effect.
1. While pressing and holding down the SONG button, press
#
one of the keys ranging from C2 to D 5.
Playback starts from the selected song (see "Sound and Song
List" on the next page), then continues and repeats all of the
songs in ascending order until you stop playback.
2. Press the SONG button again to stop playback.
You can select a different song by pressing and holding down
the SONG button and pressing one of the keys within that
range.
Playing the keyboard while listening to a song
You can play the keyboard using your favorite preset sound
while listening to a song.
While a song is playing, press and hold down the SOUND button and press one of the keys ranging from C2 to C7 to select
your favorite sound.
You can also select a different preset sound (for your performance) in Play Mode before the song starts playing back.
If you select a preset sound during playback of a song, the effect that’s applied to the selected preset sound will also be applied to the current song. If you switch to a different song, the
effect that’s applied to the selected song will also be applied to
the preset sound of your performance on the keyboard.
Listening to a Song using a Different
Sound (User Auto perform Mode)
Each song uses a recommended preset sound. You can switch this
sound to one of your choosing.
1. While pressing and holding down the SOUND and SONG
buttons on the top panel, press one of the keys ranging from
#
C2 to D 5.
Playback starts from the selected song (see "Sound and Song
List" on the next page), then continues and repeats all of the
songs in ascending order until you stop the playback.
2. While the song is playing, on the top panel press and hold
down the SOUND button and press one of the keys ranging
from C2 to C7 to select a different sound.
The song will start using the newly selected preset sound.
You can also select a sound in Play Mode before you start playing back the song.
2
�
G3
Press
these
simultaneously
C2
�
�
G
�
�
G
A
�
C
A
B
C
D
D
Transpose (F �2–F3)
C3
Off
F
E
F
On
Twenty-five Short Phrase sounds are assigned to the black keys.
If you select one of these sounds by pressing the corresponding black key, the microPIANO will automatically play the programmed phrase. These Short Phrases include accompaniment
tunes including (those often heard played with a barrel (roller)
organ), part of a famous piece for pipe organs, a short piano
phrase of low-range accompaniment typically played by the
left hand (so that you can play a melody with your right hand),
etc.
A3
Confirmation sound On/Off
Transpose function
In some cases, a song may be written in a difficult key (e.g., using
many black keys), or you may wish to shift the key to match another instrument or vocalist. In such cases, you can transpose (shift
the key) to use an easier fingering, or to use the same familiar fingering to play in a different key. You can shift the key in a range of
eleven semitones.
For example if you transpose upward by one semitone, playing the
notes shown in the score on the left below will produce the pitches
shown in the score on the right.
#
• To transpose the key, press and hold down the C2 and C 2
keys (on the left end of the keyboard), and press a key in the
#
#
range from F 2 to B2 or from C 3 to F3.
For example, if you wish to use the C4 key to play note A3 (lower
#
by three semitones), press and hold down the C2 and C 2 keys
(on the left end of the keyboard), and press the A2 key.
#
If you wish to use the C4 key to play note D 4 (higher by three
#
semitones), press and hold down the C2 and C 2 keys (on the
#
left end of the keyboard), and press the D 3 key.
To reset the Transpose function to “No Transposition (+/-0),”
#
press and hold down the C2 and C 2 keys (on the left end of the
keyboard), and press the C3 key.
The default setting (when you turn on the unit) is “No Transposition.”
About the confirmation sound
When you simultaneously press the C2 and C #2 keys (on the
left end of the keyboard), or when you press a key to select a
preset sound or song, you will hear the confirmation sound.
You can turn this sound off, as described below.
While simultaneously pressing and holding down the C2 and
#
#
C 2 keys, press G 3 to turn off the confirmation sound. To turn
it on, press A3 while simultaneously pressing and holding
#
down the C2 and C 2 keys.
The default setting (when you turn on the unit) is "Confirmation sound On.”
Sound and Song List/Liste des sons et des morceaux/Übersicht der Klänge und Stücke
No.
C2 1
2
3
4
5
6
7
8
9
10
11
12
C3 13
14
15
16
17
18
19
20
21
22
23
24
C4 25
26
27
28
29
30
31
32
33
34
35
36
C5 37
38
39
40
41
42
43
44
45
46
47
48
C6 49
50
51
52
53
54
55
56
57
58
59
60
C7 61
SOUND/SON/KLANG
Grand Piano
SONG/MORCEAU/STÜCK (Title)
Composer/Compositeur/Komponist
(Sound)
C.Debussy
Grand Piano
Arabesque No.1
Piano Phr.1
Je Te Veux
E.Satie
Grand Piano
OctDown Piano
Nocturne Op.9-2
F.Chopin
Grand Piano
Piano Phr.2
Waltz No.6 Db-major Op.64-1
F.Chopin
Grand Piano
OctUp Piano
Fantaisie-Impromptu Op.66
F.Chopin
Grand Piano
Jazz Piano
Etude Op.10-3
F.Chopin
Grand Piano
Jazz Piano Phr. *S
Etude Op.10-5
F.Chopin
Grand Piano
MorningOrchPiano
Etude Op.10-12
F.Chopin
Grand Piano
Latin piano
La fille aux cheveux de lin
C.Debussy
Grand Piano
Honky Tonk
Golliwog's Cake walk
C.Debussy
Grand Piano
Honky Tonk Phr.
Claire de lune
C.Debussy
Grand Piano
Piano&Strings
Spring Song Op.62-6
F.Mendelssohn
Grand Piano
Club E.Piano
Dolly's Dreaming and Awakening
T.Oesten
Grand Piano
E.Piano.Phr.1 *S
Turkish March Sonata K.331-3
W.A.Mozart
Grand Piano
Tine E.Piano
SONATA K331 1st Mov. Theme
W.A.Mozart
Grand Piano
E.Piano Phr.2
Piano Sonate Op.27-2-1
L.v.Beethoven
Grand Piano
Trem.E.Piano
Piano Sonate Op.13-2
L.v.Beethoven
Grand Piano
Clav.
Moments Musicaux Op.94-3
F.P.Schubert
Grand Piano
Clav. Phr.
Spinning Song
A.Ellmenreich
Grand Piano
Harpsichord
“Prelude 1” The Well-Tempered Clavier, Book 1
J.S.Bach
Grand Piano
Baroque Phr.
Invention No.1
J.S.Bach
Grand Piano
Harpi&Strings
Anitras Tanz Op.46 No.3
E.H.Greig
Grand Piano
Toy's Kingdom
Libesträume Nr.3
F.Liszt
Grand Piano
Toy Piano
Salut d'Amour
E.Elgar
Grand Piano
Vibraphone
La Violette Op.99-1
R.Streabbog
Grand Piano
Vibe Phr.
Sicilienne, Op.78
Marimba
Kinderszenen Op.15-1 Von fremden Ländern und Menschen
Marimba Phr.
A Maiden's Prayer
Celesta
Amazing Grace
Traditional (arr. : N.Nishi)
Jazz Piano
Karimba
The Entertainer
Scott Joplin
Honky Tonk
Karimba Phr.
“Promenade” Tableaux d'une exposition
M.P.Moussorgsky
Pipe Organ
Steel Drum
Toccata in D moll
J.S.Bach
Pipe Organ
Steel Drum Phr.
Wedding March
Music Box 1
Air on the G string
J.S.Bach
Strings
M.Box Phr.
Italian Concert in F major BWV.971-1
J.S.Bach
Harpsichord
Music Box 2
Gymnopédie No.1
Pipe Organ
Für Elise
Pipe Organ Phr.
“Träumerei” Op.15-7
Electric Organ
Jesu,Joy of Man's Desiring
E.Organ Phr.
Bridal Chorus (Lohengrin)
G.Fauré
Grand Piano
R.Schumann
Grand Piano
T.Badarzewska
Grand Piano
F.Mendelssohn WeddingOrch.Bell
E.Satie
Music Box 2
L.v.Beethoven
Music Box 2
R.Schumann
Music Box 1
J.S.Bach
Music Box 1
W.R.Wagner
Music Box 2
Reed Organ
Street Organ
Merry Organ
Theatre Organ
Opera Organ
Flute
Flute Mirror
Accordion
Strings
StringsHarpGls
Sounds assigned to the black keys are Short Phrases.
“*S” represents a Short Phrase sound of low-range accompaniment.
Les “sons” assignés aux touches noires sont de brèves phrases.
“*S” désigne une brève phrase d’accompagnement de la partie basse.
Den schwarzen Tasten sind kurze Phrasen zugeordnet.
„*S“ verweist auf kurze Begleitphrasen im tieferen Bereich.
Silky Strings
Cinematic Phr.
Cinema Strings
Harp
Harp Dream
Tublar Bell
Church Bell
WeddingOrch.Bell
Xmas Bells
Merry Xmas
Snow Crystal
3
Troubleshooting
If you perceive any malfunction, check the following suggestions.
If the problem persists, contact your nearest Korg distributor.
Keyboard
natural-touch mini-keyboard: 61 keys (C2–C7)
Power does not turn on
- Make sure that there are working batteries installed.
Maximum polyphony
120 notes /60 notes (Stereo)
- If using the AC adapter make sure that it’s securely connected to
the microPIANO and the AC outlet.
Sound/Song
61 sounds/40 songs
- Make sure that the power LED is lit-up.
Jacks
Headphones (also function as outputs), Pedal (Damper)
No sound from the speakers
- Rotate the VOLUME knob clockwise to raise the volume level.
- The speakers will be muted if the headphones are connected.
Sound cuts off unexpectedly
- The preset sounds of the microPIANO have been created by
sampling (recording) the sounds of actual instruments, then analyzing and processing the samples. When you press a key, some
sounds play a single piece of sampled data, while other sounds
play two pieces of sampled data. The microPIANO uses two
pieces or more of data for most of its preset sounds. When one of
these two-sample sounds is selected (regardless of whether the
damper pedal is being pressed), the maximum polyphony is 60
notes or less. However, with vibraphone, marimba, celesta, kalimba, reed organ, harp and some other sounds, the maximum
polyphony is 120 notes.
The pitch or tone seems imperfect.
- The microPIANO’s sounds replicate sound from actual instruments as faithfully as possible. This means some of the natural
characteristics of the source instruments are retained. Because
of this, you may notice slight variances in overtones, dynamics
or tuning from key to key.
Pedal does not sustain notes
- Make sure that one of the pedals listed earlier is securely connected.
4
Specifications
Amp output/Speakers
1 W × 2/Oval (10cm x 5cm) x 2
Power supply
AC adapter DC 9V (included), AA alkaline batteries x 6,
or NiMH batteries x 6
Battery life
Approx. 15 hours (using six AA alkaline batteries)
Varies depending on the type of batteries and usage.
Power consumption Rated
2.0 W
Weight
5.2kg / 11.46 lbs. (excluding batteries)
Dimensions (W x D x H)
782 ×291 ×338 mm / 30.79 ×11.46 ×13.31 inches
(With the lid propped up)
Included items
AC adapter (
)
* Specifications and appearance are subject to change without
notice for improvement.
Description
Couvercle
Crochet pour câble
Prises pour casques
Panneau supérieur
Prise pour Prise pour pédale forte
DC 9V
Béquille
Couvercle du
compartiment
à piles
Bouton SOUND Bouton SONG
Panneau
supérieur
Témoin
d’alimentation
Commande
de volume
Installation et connexions
■ Utilisation d’une pédale forte
Vous pouvez brancher une pédale KORG PS-1 ou PS-3 comme
pédale forte en la branchant à la prise DAMPER SW en face arrière.
1. Connexion au secteur
Branchez la fiche CC de l’adaptateur secteur
fourni à la prise DC9V en face arrière puis
branchez l’adaptateur à une prise de courant.
Faites passer le câble de l’adaptateur par
le crochet prévu à cet effet pour éviter
que la fiche ne se débranche accidentellement. Lorsque vous retirez le câble du
crochet, évitez de tirer sur le câble avec
une force excessive.
Interrupteur
Quand vous enfoncez la pédale, le son est maintenu comme sur
un piano traditionnel.
Vous pouvez aussi utiliser une pédale de maintien (forte) DS1H disponible en option. La détection mi-course de la pédale
forte n’est disponible qu’avec le son d’usine “Grand Piano”.
Fiche
CC
Adaptateur
secteur
A une prise
de courant
Utilisez uniquement l’adaptateur secteur fourni. L’utilisation
d’un autre adaptateur risque d’entraîner des dysfonctionnements.
■ Connexion de périphériques audio
Vous pouvez utiliser les prises PHONES comme sorties lignes
pour brancher des enceintes actives ou d’autres périphériques
audio au clavier. Utilisez pour cela des câbles conçus pour ces
périphériques et disponibles dans le commerce.
Avant de brancher des périphériques audio, n’oubliez pas
de mettre l’instrument et les périphériques audio hors tension. Faute de quoi, vous risquez d’endommager l’instrument ou les périphériques.
Veillez à brancher le produit à une prise secteur d’une tension
adéquate.
2. Mise sous tension du microPIANO
• Ouvrez le couvercle et fixez-le convenablement avec la béquille.
Veillez à ne pas vous coincer les doigts en ouvrant ou en
fermant le couvercle.
• Appuyez sur l’interrupteur situé du côté droit du panneau supérieur pour mettre l’instrument sous tension.
Le témoin d’alimentation s’allume.
■ Alimentation par piles
Retirez le couvercle du compartiment à piles situé au centre
du panneau supérieur puis insérez six piles AA alcalines (ou
NiMH) dans le compartiment en respectant la polarité indiquée dans l’illustration ci-dessous.
Notez que les piles ne sont pas fournies.
Ne mélangez jamais des piles neuves et usées ou des piles
de types différents.
• Pour mettre l’instrument hors tension, appuyez de nouveau sur
l’interrupteur.
Le témoin d’alimentation et l’instrument s’éteignent.
Quand vous refermez le couvercle du compartiment à piles,
veillez à enfoncer cette partie jusqu’au déclic
afin de la bloquer.
Couvercle du
compartiment
à piles
Pour profiter au mieux des caractéristiques acoustiques du microPIANO, nous vous conseillons d’ouvrir le couvercle de l’instrument.
3. Réglage du volume
• Tournez la commande VOLUME vers la droite pour augmenter
le volume. Tournez-la vers la gauche pour diminuer le volume.
La commande VOLUME règle le volume des haut-parleurs internes et des prises pour casques.
■ Utilisation de casques
La connexion d’un casque coupe les haut-parleurs internes.
Cela permet de jouer du clavier le soir sans déranger votre entourage.
Branchez la fiche de casque stéréo à une des prises PHONES en
face arrière. Si votre casque est doté d’une fiche adaptatrice jack
standard/mini-jack, veillez à tenir la fiche adaptatrice lorsque
vous branchez ou débranchez le casque.
Remplacer les piles
Le témoin d’alimentation clignote pour indiquer que les piles
sont presque épuisées. Remplacez-les par des piles neuves.
Quand l’alimentation fournie par les piles devient insuffisante, le son du microPIANO peut s’en ressentir.
Retirez immédiatement les piles épuisées. Faute de quoi,
les piles risquent de fuir et d’endommager l’instrument.
Si vous pensez laisser le produit inutilisé pendant une période assez longue, retirez les piles.
Pour protéger votre ouïe, évitez une écoute au casque prolongée à volume élevé.
5
Jouer avec différents sons d’usine
(mode Play)
Vous pouvez choisir un son parmi 61 sons d’usine. Chaque son est
déjà pourvu d’un effet adéquat.
A la mise sous tension ou quand vous arrêtez la lecture d’un morceau,
l’instrument est en mode de jeu (Play).
1. Maintenez le bouton SOUND enfoncé (sur le panneau supérieur) et actionnez une des touches comprises entre Do2 et Do7.
Le son change selon la touche que vous avez actionnée. (Voyez la
“Liste des sons et des morceaux” à la page 3). Quand vous actionnez une touche noire, vous entendez une brève phrase.
Vous pouvez sélectionner un autre morceau en maintenant les
boutons SOUND et SONG enfoncés et en appuyant sur une des
touches de la plage.
Vous pouvez aussi choisir un morceau en mode Song Maintenez
le bouton SONG enfoncé pour arrêter la lecture et passer en mode
Song et actionnez une touche pour sélectionner un morceau.
Vous ne pouvez pas sélectionner les brèves phrases assignées aux
touches noires. Si vous en sélectionnez une, “Music Box 1” est
automatiquement sélectionné.
Autres fonctions
A la mise sous tension, le son de piano à queue (“Grand Piano”) est
sélectionné par défaut.
Que proposent ces brèves phrases?
Ecouter des morceaux (mode Song)
Le microPIANO dispose de 40 morceaux.
Chaque morceau utilise un son et un effet appropriés.
1. Maintenez le bouton SONG enfoncé et actionnez une des tou#
ches comprises entre Do2 et Ré 5.
La lecture des morceaux commence à partir du morceau sélectionné (voyez la “Liste des sons et des morceaux” à la page 3) et se
poursuit par ordre ascendant jusqu’à ce que vous l’arrêtiez..
2. Appuyez sur le bouton SONG pour arrêter la lecture.
Vous pouvez sélectionner un autre morceau en maintenant le bouton SONG enfoncé et en appuyant sur une autre touche de la plage.
�
F
Enfoncez
ces touches
simultanément
C2
�
�
G
�
�
G
A
�
C
A
B
C
Coupé
G3
D
D
E
Transposition (F �2~F3)
C3
F
Activé
25 phrases brèves sont assignées aux touches noires. Quand vous
sélectionnez une de ces phrases en appuyant sur une touche noire,
le microPIANO joue la phrase programmée. Il peut s’agir de brèves phrases d’accompagnement comme celles souvent jouées sur
un orgue de barbarie, de petites mélodies pour orgues à tuyaux,
d’accompagnements brefs joués dans la partie basse du piano (qui
vous permettent de vous concentrer sur la mélodie que vous jouez
de la main droite) etc.
A3
Sonorité de confirmation
activée/coupée
Transposition (décalage de hauteur)
Il peut arriver qu’un morceau soit écrit dans une tonalité difficile (impliquant de nombreuses altérations) ou que vous souhaitiez adapter la
hauteur à celle d’un autre instrument ou d’un chanteur. Dans ce cas,
vous pouvez transposer le clavier (décaler la hauteur des notes) afin de
pouvoir jouer comme vous en avez l’habitude mais dans une tonalité
différente. C’est ce que nous appelons la fonction de transposition.
Vous pouvez transposer la tonalité sur une plage de 11 demi-tons.
Après une transposition vers le haut d’un demi-ton, par exemple, le
fait de jouer les notes de la portée gauche produit les notes de la portée
droite.
Jouer sur le clavier en écoutant un morceau
Vous pouvez jouer sur le clavier avec un son de votre choix tout en
écoutant un morceau.
Durant la lecture du morceau, maintenez le bouton SOUND enfoncé et appuyez sur une des touches comprises entre Do2 et Do7.
Vous pouvez aussi choisir un autre son (pour votre jeu) en mode
Play avant que la lecture du morceau ne commence.
Si vous sélectionnez un son d’usine durant la lecture d’un morceau, l’effet appliqué au son d’usine sera aussi appliqué au morceau en cours de lecture. Si vous changez de morceau, l’effet appliqué au morceau choisi sera aussi appliqué au son d’usine que vous
utilisez pour jouer sur le clavier.
Ecouter un morceau avec un son de
votre choix (mode User Auto Perform)
Chaque morceau utilise un son d’usine recommandé. Vous pouvez cependant changer ce son.
1. Maintenez les boutons SOUND et SONG enfoncés sur le panneau supérieur et actionnez une des touches comprises entre
#
Do2 et Ré 5.
La lecture des morceaux commence à partir du morceau sélectionné (voyez la “Liste des sons et des morceaux” à la page 3) et se
poursuit par ordre ascendant jusqu’à ce que vous l’arrêtiez.
2. Durant la lecture du morceau, maintenez le bouton SOUND enfoncé sur le panneau supérieur et appuyez sur une des touches
comprises entre Do2 et Do7 pour choisir un autre son.
Le morceau utilise alors le son d’usine que vous venez de choisir.
Vous pouvez aussi choisir un son en mode Play avant de lancer la
lecture du morceau.
3. Pour arrêter la lecture, appuyez simultanément sur les boutons
SOUND et SONG.
6
• Pour effectuer la transposition, maintenez les touches Do2 et
#
Do 2 enfoncées (à l’extrémité gauche du clavier) et actionnez
#
#
une touche de la plage Fa 2~Si2 ou Do 3~Fa3.
La transposition est effectuée par rapport à une note de référence.
Si vous souhaitez une transposition telle que la touche Do4 (référence) produise la note La3 (transposition vers le bas de trois demi#
tons), maintenez les touches Do2 et Do 2 enfoncées et appuyez sur
la touche La2.
Si vous souhaitez une transposition telle que la touche Do4 (réfé#
rence) produise la note Ré 4 (transposition vers le haut de trois de#
mi-tons), maintenez les touches Do2 et Do 2 enfoncées et appuyez
#
sur la touche Ré 3.
Pour annuler la transposition (±0), maintenez les touches Do2 et
#
Do 2 enfoncées et appuyez sur la touche Do3.
Par défaut (à la mise sous tension), il n’y a pas de transposition.
Signal de confirmation
#
Quand vous appuyez simultanément sur les touches Do2 et Do 2 (à
l’extrémité gauche du clavier) ou quand vous actionnez une touche
pour sélectionner un son ou un morceau, vous entendez un signal
de confirmation. Vous pouvez couper ce signal de la façon décrite
ci-dessous.
#
Maintenez les touches Do2 et Do 2 enfoncées et actionnez la tou#
che Sol 3 pour couper le signal de confirmation. Pour l’activer,
#
maintenez les touches Do2 et Do 2 enfoncées et actionnez la touche La3.
Par défaut (à la mise sous tension), le signal de confirmation est
activé.
Dépannage
Fehlersuche
L’instrument ne s’allume pas
Das Instrument kann nicht eingeschaltet werden
- Si vous utilisez l’adaptateur secteur, vérifiez qu’il est correctement
branché au microPIANO et à une prise secteur.
- Wenn Sie das Netzteil angeschlossen haben, müssen Sie überprüfen,
ob es ordnungsgemäß mit dem microPIANO und der Steckdose verbunden ist.
Si vous rencontrez le moindre problème, vérifiez les points suivants.
Si le problème persiste, contactez le service après-vente Korg le plus
proche.
- Vérifiez que les piles sont en état de fonctionner.
- Vérifiez que le témoin d’alimentation est allumé.
Les haut-parleurs ne produisent aucun son
- Tournez la commande VOLUME vers la droite pour augmenter le
volume.
- Les haut-parleurs sont coupés si un casque est branché.
Coupures inattendues du son
- Les sons internes du microPIANO résultent de l’échantillonnage
(l’enregistrement) de sons d’instruments réels suivi d’une analyse
et d’un traitement des échantillons. Certains sons ne sont constitués
que d’un échantillon par note alors que d’autres en combinent deux.
La plupart des sons internes du microPIANO utilisent deux échantillons par note. Quand vous sélectionnez un son à deux échantillons par note, la polyphonie maximum est de 60 notes (que la
pédale forte soit actionnée ou non). Cependant, avec les sons Vibraphone, Marimba, Celesta, Kalimba, Reed Organ, Harp et quelques
autres sons, la polyphonie maximale est de 120 notes.
La hauteur ou le timbre ne semble pas parfait
- Les sons du microPIANO sont conçus pour restituer le son des
instruments réels aussi fidèlement que possible. Cela signifie que
certaines caractéristiques naturelles des instruments originaux ont
été conservées. Il peut donc y avoir de légères variations dans les
harmoniques, la dynamique ou l’accord d’une note à l’autre.
La pédale ne maintient pas les notes
- Vérifiez si le câble de la pédale est branché correctement (utilisez
une des pédales préconisées plus haut).
- Überprüfen Sie, ob die Batterien noch funktionieren.
- Schauen Sie nach, ob die Netzdiode leuchtet.
Die Lautsprecher bleiben stumm
- Drehen Sie den VOLUME-Regler nach rechts, um die Lautstärke zu erhöhen.
- Wenn Sie einen Kopfhörer anschließen, werden die Lautsprecher
stummgeschaltet.
Bestimmte Noten werden plötzlich ausgeschaltet
- Die Klänge des microPIANO beruhen auf Samples (Digital-Aufnahmen
von Natur- und anderen Klängen), die nach der Aufnahme noch bearbeitet wurden. Bestimmte Klänge beruhen auf einem Sample, das beim
Drücken der Tasten angesteuert wird. Andere Klänge steuern dagegen
zwei Samples an. Die meisten Klangfarben des microPIANO beruhen auf jeweils zwei Samples. Bei Anwahl eines solchen Klangs (und
unabhängig davon, ob das Dämpferpedal gedrückt wird), beträgt die
Polyphonie noch maximal 60 Noten. Bei Klangfarben wie „Vibraphone“, „Marimba“, „Celesta“, „Kalimba“, „Reed Organ“, Harp“ und noch
einigen anderen beträgt die Polyphonie dagegen 120 Noten.
Die Tonhöhe bzw. Klangfarbe lässt zu wünschen
übrig.
- Das microPIANO enthält besonders realistische Simulationen von Naturinstrumenten, die sogar die typischen Merkmale der betreffenden
Instrumente berücksichtigen. Deshalb ändern sich die Obertonstruktur, die Dynamik und die Stimmung fast von Note zu Note.
Die Noten werden vom Pedal nicht gehalten
- Überprüfen Sie, ob das Pedal ordnungsgemäß angeschlossen wurde.
Spécification
Clavier
Mini-clavier d’une réponse naturelle: 61 touches (Do2~Do7)
Polyphonie maximale
120 notes /60 notes (Stereo)
Sons/Morceaux 61 sons/40 morceaux
Prises
Casques (servent aussi de sorties), Pédale (Damper)
Amplification/Haut-parleurs
1 W × 2/Ovales (10cm x 5cm) x 2
Autonomie des piles
Environ 15 heures (avec six piles AA alcalines)
Dépend du type de piles et de l’utilisation qui en est faite.
Consommation nominale
Technische Daten
Tastatur
Minitastatur mit natürlicher Ansprache: 61 Tasten (C2–C7) Maximale Polyphonie
120 noten /60 noten (Stereo)
Klänge/Song 61 Klangfarben/40 songs
Anschlüsse
Kopfhörer (fungieren auch als Audio-Ausgänge), Pedal (Dämpfer)
Ausgangleistung/Lautsprecher 1 W × 2/Oval (10cm x 5cm) x 2
Alimentation
Adaptateur secteur DC 9V (fourni),
piles AA alcalines ou NiMH x 6
Poids
Wenn Sie den Eindruck haben, dass etwas nicht nach Plan läuft, sollten
Sie zunächst folgende Punkte überprüfen. Lässt sich die Störung dadurch
nicht beheben, so wenden Sie sich bitte an Ihren Korg-Händler.
2,0 W
5,2kg (piles non comprises)
Stromversorgung
DC 9V, Netzteil (liegt bei), AA-Alkalibatterien x6 oder NiMH-Batterien x6
Batterielaufzeit
±15 Stunden (bei 6x AA-Alkalibatterien)
Das richtet sich entscheidend nach dem Batterietyp und der Verwendungsintensität.
Dimensions (L x P x H)
782 ×291 ×338 mm (Avec le Couvercle a soutenu)
Gewicht
Accessoires inclus
Adaptateur secteur (
Lieferumfang
)
* Les caractéristiques et l’aspect du produit sont susceptibles d’être
modifiés sans avis préalable en vue d’une amélioration.
2,0 W
Leistungsaufnahme (Nennwert)
5,2kg (ohne Batterien)
Abmessungen (W x D x H) 782 ×291 ×338 mm (Mit dem Deckel stützte)
Netzteil (
)
* Änderungen der technischen Daten und des Designs ohne vorherige Ankündigung vorbehalten.
7
Bedienelemente und Funktionen
Deckel
Kabelhaken
Kopfhörerbuchsen
Oberseite
Buchse für Buchse für das Dämpferpedal
das DC 9V
Deckelstütze
Batteriefachdeckel
SOUND-Taster
SONG-Taster
Oberseite
Netzanzeige
Lautstärkeregler
Vorbereitungen und Anschlüsse
■ Verwendung eines Dämpferpedals
Bei Bedarf können Sie ein optionales KORG PS-1 oder PS-3 Pedal
als Dämpfer verwenden, indem Sie es an die DAMPER SW-Buchse
auf der Rückseite anschließen.
1. Anschließen ans Netz
Verbinden Sie das eine Ende des beiliegenden
Netzteils mit der DC9V-Buchse auf der Rückseite und das andere Ende mit einer geeigneten Steckdose.
Wickeln Sie das Netzteilkabel um den Kabelhaken, um zu verhindern, dass sich der
Netzanschluss aus Versehen löst. Beim
Entfernen des Kabels dürfen Sie nie mit
Gewalt daran ziehen.
Netzschalter
Solange Sie das Pedal gedrückt halten, werden die angeschlagenen
Noten gehalten.
Sie könnten auch ein optionales DS-1H Dämpferpedal verwenden.
Dessen stufenlose Dämpferbefehle werden aber nur vom „Grand
Piano“-Klang ausgewertet.
Netzteilbuchse
Netzkabel für
das Netzteil
Zu einer
Steckdose
Verwenden Sie nur das beiliegende Netzteil. Bei Verwendung eines anderen Netzteils wird das Gerät eventuell beschädigt.
■ Anschließen anderer Audiogeräte
Die PHONES-Buchsen lassen sich auch als Audio-Ausgänge für
Aktivboxen oder andere Audiogeräte nutzen. Für eine solche Verbindung benötigen Sie handelsübliche Kabel mit den für Ihr Gerät
geeigneten Steckern.
Vor dem Herstellen von Audioverbindungen müssen Sie das
Instrument und die externen Audiogeräte ausschalten. Andernfalls könnten das Instrument und die übrigen Geräte beschädigt werden.
Verbinden Sie das Instrument ausschließlich mit einer Steckdose
der geeigneten Netzspannung.
2. Einschalten des microPIANO
• Heben Sie den Deckel an und stützen Sie ihn mit der Stütze ab.
Seien Sie vorsichtig, um sich beim Öffnen und Schließen des
Deckels nicht die Finger zu klemmen.
• Drücken Sie den Netzschalter rechts an der Vorderseite, um die
Stromzufuhr zu aktivieren.
Die Netzdiode leuchtet.
■ Verwendung des Instruments mit Batterien
Entfernen Sie den Deckel des Batteriefachs, das sich in der Mitte
der Oberseite befindet und legen Sie sechs AA-Alkalibatterien (oder
NiMH-Batterien) unter Wahrung der Polarität in das Batteriefach
(siehe die Abbildung).
Die Batterien gehören nicht zum Lieferumfang.
• Drücken Sie den Netzschalter erneut, um das Instrument wieder
auszuschalten.
Die Netzdiode erlischt beim Ausschalten wieder.
Wechseln Sie immer alle Batterien gleichzeitig aus und verwenden Sie nur Batterien desselben Typs.
Beim Anbringen des Batteriefachs müssen Sie auf diese
Partie drücken, bis sie einrastet und
sich nicht mehr lösen kann.
Um die akustischen Vorzüge des microPIANO zu nutzen, sollten Sie
den Deckel anheben und abstützen.
3. Einstellen der Lautstärke
Batteriefachdeckel
• Drehen Sie den VOLUME-Regler nach rechts, um die Lautstärke zu
erhöhen. Drehen Sie ihn nach links, um die Lautstärke zu verringern.
Der VOLUME-Regler bestimmt den Pegel der internen Lautsprecher
und Kopfhörerbuchsen.
■ Kopfhörerbetrieb
Beim Anschließen eines Kopfhörers werden die internen Lautsprecher stummgeschaltet. Das ist z.B. praktisch, wenn Sie spät abends
oder früh morgens üben oder spielen möchten.
Verbinden Sie die Klinke des Kopfhörers mit einer PHONES-Buchse auf der Rückseite.
Wenn Ihr Kopfhörer mit einem Standard–Miniklinken-Adapter
versehen ist, müssen Sie zum Anschließen oder Lösen der Verbindung jeweils den Adapter festhalten.
Bedenken Sie, dass ein hoher Wiedergabepegel im Kopfhörer
schon nach kurzer Zeit zu Hörschäden führen kann.
8
Auswechseln der Batterien
Wenn die Netzdiode anfängt zu blinken, sind die Batterien nahezu
erschöpft. Wechseln Sie die Batterien dann aus.
Wenn die Spannung der Batterien nachlässt, verzerrt die
Klangwiedergabe des microPIANO eventuell.
Erschöpfte Batterien müssen sofort entnommen werden. Sonst
könnten sie nämlich anfangen zu lecken, was zu Funktionsstörungen führt. Wenn Sie das Gerät längere Zeit nicht verwenden möchten, entfernen Sie am besten die Batterien.
Anwahl unterschiedlicher Klangfarben (Play-Modus )
3. Drücken Sie den SOUND- und SONG-Taster gleichzeitig, um die
Wiedergabe anzuhalten.
Sie können jederzeit ein anderes Stück wählen, indem Sie den
SOUND- und SONG-Taster gedrückt halten und eine zugeordnete
Taste drücken.
Auch im Song-Modus können andere Stücke gewählt werden. Hierfür
müssen Sie den SONG-Taster gedrückt halten, um die Wiedergabe
anzuhalten und in den Song-Modus zu wechseln, und gleichzeitig die
Taste des gewünschten Stücks drücken.
1. Halten Sie den SOUND-Taster (auf der Oberseite) gedrückt, während Sie eine Klaviaturtaste drücken im Bereich C2–C7.
Die gewählte Klangfarbe richtet sich nach der gedrückten Taste. (Siehe
„Übersicht der Klänge und Stücke“ auf S. 3). Den schwarzen Tasten
sind kurze Phrasen zugeordnet.
Die den schwarzen Tasten zugeordneten kurzen Phrasen können nicht
gewählt werden. Wenn Sie trotzdem eine zu wählen versuchen, wird
automatisch „Music Box 1“ aufgerufen.
Das Instrument enthält 61 verschiedene Klangfarben, die Sie zum Spielen
verwenden können. Alle Klänge werden bereits mit einem geeigneten Effekt bearbeitet.
Wenn Sie das Instrument einschalten oder die Liedwiedergabe anhalten,
wird der Play-Modus aufgerufen.
Beim Einschalten des Instruments wird wieder die vorgegebene Klangfarbe (Grand Piano) gewählt.
Verwendung der übrigen Funktionen
Über die kurzen Phrasen
Das Instrument enthält 25 Phrasen, die den schwarzen Tasten zugeordnet sind. Wenn Sie während der Klanganwahl eine schwarze Taste
drücken, spielt das microPIANO die betreffende Phrase automatisch
ab. Die kurzen Phrasen sind in der Regel Begleitungen, die man z.B.
von Drehorgeln oder bekannten Pfeifenorgelstücken kennt, aber auch
Klavierbegleitungen der linken Hand (zu denen Sie dann den Part der
rechten Hand spielen können) usw.
Anhören der Stücke (Song-Modus)
Das microPIANO enthält 40 Stücke.
Jedes Stück verwendet einen geeigneten Klang und einen passenden Effekt.
1. Halten Sie den SONG-Taster gedrückt, während Sie eine Klaviatur#
taste drücken im Bereich C2–D 5.
Die Wiedergabe beginnt mit dem gewählten Stück (siehe „Übersicht
der Klänge und Stücke“ auf S. 3). Danach werden alle nachfolgenden
Stücke so lange abgespielt, bis Sie die Wiedergabe anhalten.
2. Drücken Sie den SONG-Taster erneut, um die Wiedergabe anzuhalten.
Sie können jederzeit ein anderes Stück wählen, indem Sie den SONGTaster gedrückt halten und eine zugeordnete Taste drücken.
�
Gleichzeitig
drücken
C2
�
�
G
�
�
G
A
�
C
A
B
C
D
D
Transposition (F �2–F3)
C3
E
F
An
F
Aus
G3
A3
Bestätigungston An/Aus
Transposition (Spielen in einer anderen Tonart)
Bestimmte Stücke verwenden eine schwierige Tonart (mit vielen schwarzen Tasten). Und bestimmte Sänger bestehen auf eine ganz bestimmte
Tonart. Statt dann Ihren Fingersatz zu ändern, können Sie die Tastatur
„verschieben“, um weiterhin in der vertrauten Tonart zu spielen und sich
nicht um die schwarzen Tasten kümmern zu müssen. Das nennen wir die
„Transpositionsfunktion“. Die Tonhöhe kann um 11 Halbtonschritte versetzt werden.
Beispiel: Wenn Sie die Tastatur z.B. einen Halbton höher transponieren,
hören Sie beim Spielen der links gezeigten Noten die rechts gezeigten Noten.
Spielen zu einem Stück
Bei Bedarf können Sie eines der vorprogrammierten Stücke mit dem
gewünschten Klang begleiten.
Starten Sie die Wiedergabe des Stücks und halten Sie den SOUNDTaster gedrückt, während Sie eine Taste im Bereich C2–C7 betätigen,
um den gewünschten Klang zu wählen.
Bei Bedarf können Sie den zum Spielen benötigten Klang zuerst im
Play-Modus wählen und erst danach die Wiedergabe starten.
Wenn Sie während der Wiedergabe einen anderen Klang wählen,
wird der für diesen Klang aktivierte Effekt auch zum Bearbeiten der
Liedwiedergabe verwendet. Wenn Sie dann ein anderes Stück wählen,
wird der Effekt des neuen Stücks auch zum Bearbeiten des der Tastatur zugeordneten Klangs verwendet.
Abspielen eines Stücks mit einem anderen Klang (User Auto Perform-Modus)
Jedes Stück verwendet anfangs den vorprogrammierten Klang. Bei Bedarf
kann aber ein ganz anderer Klang gewählt werden.
1. Halten Sie die Taster SOUND und SONG auf der Oberseite ge#
drückt, während Sie eine Klaviertaste im Bereich C2–D 5 betätigen.
Die Wiedergabe beginnt mit dem gewählten Stück (siehe „Übersicht
der Klänge und Stücke“ auf S. 3). Danach werden alle nachfolgenden
Stücke so lange abgespielt, bis Sie die Wiedergabe anhalten.
2. Halten Sie den SOUND-Taster auf der Oberseite bei laufender Wiedergabe gedrückt, während Sie mit den Tasten C2–C7 einen anderen Klang wählen.
Die Wiedergabe wird jetzt mit dem neu gewählten Klang gestartet.
Bei Bedarf können Sie bereits im Play-Modus, d.h. vor Starten der
Wiedergabe, einen anderen Klang wählen.
• Um die Tonhöhe zu transponieren, müssen Sie die Tasten C2
#
und C 2 (ganz links auf der Tastatur) gedrückt halten, während
#
#
Sie eine Taste im Bereich F 2–B2 oder C 3–F3 drücken.
Beispiel: Wenn bei Drücken der Taste C4 die Note „A3“ (drei Halbtöne
#
tiefer) erklingen soll, müssen Sie die Tasten C2 and C 2 gedrückt halten, während Sie das A2 betätigen.
#
Wenn bei Drücken der Taste C4 die Note „D 4“ (drei Halbtöne höher)
#
erklingen soll, müssen Sie die Tasten C2 and C 2 gedrückt halten,
#
während Sie das D 3 betätigen.
Um wieder die normalen Notentonhöhen zu verwenden (±0), müssen
#
Sie die Tasten C2 and C 2 gedrückt halten, während Sie das C3 betätigen.
Unmittelbar nach dem Einschalten wird die Normaltonhöhe (keine
Transposition) gewählt.
Über den Bestätigungston
#
Wenn Sie die Tasten C2 und C 2 (ganz links) gedrückt halten oder
eine Taste betätigen, mit der man einen Klang oder ein Stück wählt,
erklingt ein Bestätigungston. Diese Bestätigung kann man folgendermaßen ausschalten.
#
#
Halten Sie die Tasten C2 und C 2 gedrückt, während Sie die Taste G 3
betätigen, um den Bestätigungston auszuschalten. Betätigen Sie die
#
Taste A3, während Sie das C2 und C 2 gedrückt halten, um den Bestätigungston wieder zu aktivieren.
Unmittelbar nach dem Einschalten wird der Bestätigungston wieder
aktiviert.
9
DIGITAL PIANO
E F G
1
4015-2 Yanokuchi, Inagi-city, Tokyo 206-0812 Japan
© 2010 KORG INC.