1
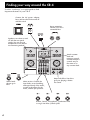
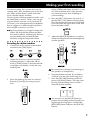
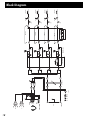
Owner’s Manual
1
Precautions
Location
Using the unit in the following locations can result in a
malfunction.
• In direct sunlight
• Locations of extreme temperature or humidity
• Excessively dusty or dirty locations
• Locations of excessive vibration
• Close to magnetic fields
Power supply
Please connect the designated AC adapter to an AC outlet
of the correct voltage. Do not connect it to an AC outlet of
voltage other than that for which your unit is intended.
Interference with other electrical devices
Radios and televisions placed nearby may experience
reception interference. Operate this unit at a suitable distance from radios and televisions.
Handling
To avoid breakage, do not apply excessive force to the
switches or controls.
Care
If the exterior becomes dirty, wipe it with a clean, dry cloth.
Do not use liquid cleaners such as benzene or thinner, or
cleaning compounds or flammable polishes.
Keep this manual
After reading this manual, please keep it for later reference.
Keeping foreign matter out of your equipment
Never set any container with liquid in it near this equipment. If liquid gets into the equipment, it could cause a
breakdown, fire, or electrical shock.
Be careful not to let metal objects get into the equipment. If
something does slip into the equipment, unplug the AC
adapter from the wall outlet. Then contact your nearest
Korg dealer or the store where the equipment was
purchased.
CE mark for European Harmonized
Standards
CE mark which is attached to our company’s products
of AC mains operated apparatus until December 31,
1996 means it conforms to EMC Directive (89/336/
EEC) and CE mark Directive (93/68/EEC).
And, CE mark which is attached after January 1, 1997
means it conforms to EMC Directive (89/336/EEC), CE
mark Directive (93/68/EEC) and Low Voltage Directive
(73/23/EEC).
Also, CE mark which is attached to our company’s
products of Battery operated apparatus means it conforms to EMC Directive (89/336/EEC) and CE mark
Directive (93/68/EEC).
COPYRIGHT WARNING
This professional device is intended only for use with
works for which you yourself own the copyright, for
which you have received permission from the copyright
holder to publicly perform, record, broadcast, sell, and
duplicate, or in connection with activities which constitute “fair use” under copyright law. If you are not the
copyright holder, have not received permission from the
copyright holder, or have not engaged in fair use of the
works, you may be violating copyright law, and may be
liable for damages and penalties. If you are unsure about
your rights to a work, please consult a copyright attorney. KORG TAKES NO RESPONSIBILITY FOR ANY
INFRINGEMENT COMMITTED THROUGH USE OF
KORG PRODUCTS.
THE FCC REGULATION WARNING (for U.S.A.)
This equipment has been tested and found to comply with the
limits for a Class B digital device, pursuant to Part 15 of the FCC
Rules. These limits are designed to provide reasonable protection against harmful interference in a residential installation.
This equipment generates, uses, and can radiate radio frequency energy and, if not installed and used in accordance with
the instructions, may cause harmful interference to radio communications. However, there is no guarantee that interference
will not occur in a particular installation. If this equipment does
cause harmful interference to radio or television reception,
which can be determined by turning the equipment off and on,
the user is encouraged to try to correct the interference by one
or more of the following measures:
• Reorient or relocate the receiving antenna.
• Increase the separation between the equipment and receiver.
• Connect the equipment into an outlet on a circuit different
from that to which the receiver is connected.
• Consult the dealer or an experienced radio/TV technician for
help.
Unauthorized changes or modification to this system can void
the user’s authority to operate this equipment.
2
*Company names, product names, and names of formats
etc. are the trademarks or registered trademarks of their
respective owners.
Table of Contents
Introduction - - - - - - - - - - - - - - - - - - - - - - - - - - - - - - - - - - - Unpacking your CR-4 - - - - - - - - - - - - - - - - - - - - - - - - - - - - - About this manual - - - - - - - - - - - - - - - - - - - - - - - - - - - - - - - Features of the CR-4 - - - - - - - - - - - - - - - - - - - - - - - - - - - - - - A few dos and don’ts - - - - - - - - - - - - - - - - - - - - - - - - - - - - - About multitrack recording - - - - - - - - - - - - - - - - - - - - - - - - - - About the Ampworks effects - - - - - - - - - - - - - - - - - - - - - - - - - Finding your way around the CR-4 - - - - - - - - - - - - - - - - - - - - Setting up the CR-4 - - - - - - - - - - - - - - - - - - - - - - - - - - - - - - Connections to the CR-4 - - - - - - - - - - - - - - - - - - - - - - - - - - - Connections from the CR-4 - - - - - - - - - - - - - - - - - - - - - - - - - - Connecting the power - - - - - - - - - - - - - - - - - - - - - - - - - - - - - Inserting the tape - - - - - - - - - - - - - - - - - - - - - - - - - - - - - - - - Making your first recording - - - - - - - - - - - - - - - - - - - - - - - - - Recording the rhythm machine - - - - - - - - - - - - - - - - - - - - - - - Recording a bass - - - - - - - - - - - - - - - - - - - - - - - - - - - - - - - - Recording a guitar - - - - - - - - - - - - - - - - - - - - - - - - - - - - - - - Recording vocals - - - - - - - - - - - - - - - - - - - - - - - - - - - - - - - - Mixdown - - - - - - - - - - - - - - - - - - - - - - - - - - - - - - - - - - - - More advanced techniques - - - - - - - - - - - - - - - - - - - - - - - - - Multi-track recording - - - - - - - - - - - - - - - - - - - - - - - - - - - - - Expanding the inputs - - - - - - - - - - - - - - - - - - - - - - - - - - - - - Expanding the number of tracks - - - - - - - - - - - - - - - - - - - - - - Using the noise reduction - - - - - - - - - - - - - - - - - - - - - - - - - - - Ampworks effects - - - - - - - - - - - - - - - - - - - - - - - - - - - - - - - What is REMS? - - - - - - - - - - - - - - - - - - - - - - - - - - - - - - - - - Controls - - - - - - - - - - - - - - - - - - - - - - - - - - - - - - - - - - - - - Modeling type - - - - - - - - - - - - - - - - - - - - - - - - - - - - - - - - - Effects - - - - - - - - - - - - - - - - - - - - - - - - - - - - - - - - - - - - - - The TAP control - - - - - - - - - - - - - - - - - - - - - - - - - - - - - - - - - Further uses for the CR-4 - - - - - - - - - - - - - - - - - - - - - - - - - - - Using the CR-4 as a guitar combo - - - - - - - - - - - - - - - - - - - - - Using the CR-4 as a pre-amplifier - - - - - - - - - - - - - - - - - - - - - Specifications - - - - - - - - - - - - - - - - - - - - - - - - - - - - - - - - - - Cassette recorder - - - - - - - - - - - - - - - - - - - - - - - - - - - - - - - Physical specifications - - - - - - - - - - - - - - - - - - - - - - - - - - - - - Audio specifications and performance - - - - - - - - - - - - - - - - - - Effects - - - - - - - - - - - - - - - - - - - - - - - - - - - - - - - - - - - - - - Dimensional drawing - - - - - - - - - - - - - - - - - - - - - - - - - - - - - Block Diagram - - - - - - - - - - - - - - - - - - - - - - - - - - - - - - - - - -
4
4
4
4
4
5
5
6
7
7
7
7
7
9
9
10
11
11
12
13
13
13
13
13
14
14
14
14
15
15
16
16
16
17
17
17
17
17
17
18
3
Introduction
...............
Unpacking your CR-4
When you first open the packing for your CR4, you should find the following (as well as this
manual):
• The CR-4 itself
• An AC power adapter
• Your warranty card and other service information.
Contact your KORG dealer if any of these
items are missing.
Save the packing in case you ever need to
return the CR-4 for service.
Only use the AC adaptor supplied with
your CR-4, and make sure that the voltage
marked on the adapter matches your
household AC voltage. If you are in any
doubt, consult your KORG dealer.
...............
About this manual
In this manual, we’ll use the following conventions :
• Steps that you follow are marked in order,
like:
1 Connect the power.
2 Switch on the power switch.
• When we mention a control or indicator on
the CR-4, we put it in brackets, like [PLAY].
• This symbol
indicates a caution.
• This symbol
indicates advice.
Ampworks guitar effects
The integrated Ampworks guitar effects provide you with a wide range of guitar and bass
amplifiers, that include high-quality professional-sounding digital effects such as reverb,
delay, chorus, etc. Just plug into the CR-4 and
go!
And you can use the Ampworks effects with
the CR-4 to feed a larger amplification system,
or practice your favorite licks and riffs using
the CR-4 on its own.
Other Ampworks effects
The CR-4 also provides two microphone models, allowing you to simulate the sound of two
of the world’s most famous microphones, as
well as an “acoustic” model bypass effect. The
built-in 3-band EQ features a sweepable
midrange frequency control for these modes.
Built-in amplifier and speakers
To cut down on the number of cables and connections you need to record, you can use the
built-in bass-reflex speaker system.
Or, if you get a bit carried away, you can keep
your playing to yourself (and a friend!) using
the dual headphone facilities—this means that
a singer and guitarist can both use headphones
at the same time.
Easy operation
The CR-4 has been designed to be as easy as
possible to operate. If you can use a stereo cassette deck, you can use the CR-4 to make your
own recordings.
Read through this manual to find out what you
can do with the CR-4, and how to do it.
............... ...............
• We’ll point you to other pages in the manual like this: (→p.6).
Features of the CR-4
Key features of the CR-4 include the following:
A few dos and don’ts
High-quality multitrack cassette tape deck
There are some basic safety precautions at the
beginning of this manual which you should
read and note. In addition, please note the following:
• Keep the tape heads clean using cassette
head cleaning kits—available from most
electronic stores.
• Cassette tapes are sensitive to magnetic
fields. Don’t use the CR-4 near TV sets or
computer monitors, and don’t store the
cassettes anywhere near these devices, or
near equipment with large electric motors.
The CR-4 includes a multitrack cassette tape
deck, allowing you to use everyday low-cost
cassette media to make your own multitrack
recordings. You can record up to four tracks at
a time, mixing guitars, bass, keyboards, and
microphone inputs before creating your own
mixes using a stereo cassette deck, CD, or even
to a computer where you can make your own
MP3s.
4
Introduction
• Avoid smoking, eating or drinking over the
CR-4. Smoke particles, food crumbs and
spilled liquids are the enemies of fine audio
gear.
• Use the best possible new cassettes (Type
II) wherever possible, for high quality
results.
• Use shorter tapes whenever you can. Avoid
C-90 (or longer) tapes if possible because
the tapes are thin, and may stretch or even
break. Because the CR-4 only plays tapes in
one direction, you will get half the stated
recording time on a tape.
• Keep the listening levels low. High levels
can destroy hearing (and you never get it
back!).
...............
About multitrack recording
As we mentioned earlier, the CR-4 allows you
to perform multitrack recording. Multitracking allows you to record the different parts of a
piece of music separately, meaning that if you
play a perfect guitar solo, but make a mess of
the vocals, you don’t have to record everything
again—just the vocals.
There are three basic phases to multitrack
recording: tracking, overdubbing and mixdown. We’ll explain a sample session in this
manual (→p.9) and also give tips on more
advanced recording you can do with your CR4 (→p.13).
In tracking, the basic foundations of the song
are recorded.
(left and right of side B) are played back
with the tape traveling in the other direction. With the CR-4, all four tracks play in
the same direction. Also, the CR-4 does not
feature noise reduction.
...............
About the Ampworks effects
When you play an electric guitar or bass, part
of the total sound comes from the instrument
itself, and a significant part comes from the
amplifier and speakers.
Although you may love the sound of your
favorite guitarist, you know that it’s going to
be difficult to set up a massive stack of tube
amplifiers and speakers in your home to sound
just like him.
The Ampworks effects in your CR-4 simulate
some of the world’s most famous and bestloved amplifier/speaker combinations, allowing you to get just the sound you want without
the large heavyweight stacks.
In addition, there is a digital effects unit allowing you to add reverb, delay and so on, giving
that extra professional touch to your playing.
Full tone controls, and gain and volume controls, just like on a full-sized guitar amplifier,
give you complete control.
When you use an acoustic guitar, the two
microphone models and the “acoustic” setting
provide you with added flexibility and control.
Full instructions on how to make the most of
this feature are provided in this manual
(→p.14).
Most people find it easiest to record the
rhythm parts (for example, drums and percussion, bass and rhythm guitar first, and
then add the lead and vocal lines).
When overdubbing, you add other parts on top
of the basic parts you recorded earlier.
And when you mix down, you adjust the level
of the individual parts and their position in the
stereo field (their “pan” position) and make a
stereo recording on a separate “master” cassette, MD or CD recorder.
Note that if you try play back the CR-4
tapes in an ordinary stereo cassette deck (or
the other way round), on an ordinary stereo cassette two tracks (left and right of
side A) are played back with the tape traveling in one direction and the other two
5
Finding your way around the CR-4
Use this “road map” as a quick guide to find
important features of your CR-4.
Connect the AC power adapter
here, and turn the CR-4 on and off
with this switch
Stereo mastering
cassette, CD, etc. is
connected here
Speakers: turn these on and
off with the rear panel
switch. You can also use
headphones as an alternative monitoring method.
4-track cassette
deck and
transport controls.
Cassette transport
controls are just
the same as on
any cassette deck.
Stereo headphones go in
here
Mixer section. Controls the
input levels, record enabling,
and output levels of the tracks,
as well as the effects for the
tracks, and the pan positions.
Ampworks effect. Use this to
give your playing a distinctive sound.
Guitars, basses, microphones, synthesizers and
so on go into these 1/4-inch jacks.
6
Setting up the CR-4
To use the CR-4, you need to make enough
room on a level firm surface for the unit itself,
and also leave enough space for connections.
There are two kinds of connections to make (as
well as the power connection): the audio connections to the CR-4 and the connections from
the unit.
You may want to look at the “road map”
(→p.6) before going much further.
...............
...............
Connecting the power
Making sure that the AC adapter is the correct
voltage for your region, connect the plug of the
power cord to the power inlet of the CR-4, and
the plug of the adapter to an AC outlet.
Switch on any rhythm machines, synthesizers
or other input devices connected to the CR-4.
Then switch on the CR-4.
Connections to the CR-4
Connections to the CR-4 include microphones,
guitars, synthesizers and rhythm units, etc.
Now you can switch on the recorder, if this is
connected.
All of these are made through the 1/4" jacks on
the front panel.
We always suggest that you connect and
disconnect equipment to and from the CR4 and turn equipment on and off with the
headphone and speaker [MASTER] volume turned down. This protects your ears,
as well as the speakers and headphones.
...............
Connections from the CR-4
The connections that you need to make from
the CR-4 are the headphones and the connections to the master stereo recorder.
Connect headphones to the 1/4" [PHONES]
jacks on the front panel. Use the [MAIN] jack if
you are only connecting one pair of headphones (the [SUB] output doesn’t work on its
own).
We always recommend switching on
equipment starting with the source, and
finishing with the final destination. Switch
off equipment in the reverse order, ending
with the source.
...............
Inserting the tape
It’s a good idea to invest in a tape-cleaning
kit, and clean the heads of the CR-4 before
and after every recording session (we do
not suggest that you use dry cassette-type
head cleaners—cotton swabs and tape
head and rubber cleaning fluid kits are
ideal). This will help you maintain a high
standard of recording, and will make your
work sound much better.
You may also want to consider the use of a
tape head demagnetizer. Follow the
instructions of the demagnetizer for optimum results.
Remember to use only CrO2 tape (Type II)
tapes.
Connect any standard cassette recorder, etc.
using the RCA jacks on the rear panel of the
CR-4. These should be connected to the [REC
IN] or [IN] of the recorder.
7
Setting up the CR-4
You may want to take up any slack in the tape
cassette, using a pencil, before you load it into
the CR-4.
1 Lift the cassette lid (use your fingers—
there’s no eject button).
2 Mark the tape with your project (song)
name and the date, and add “CR-4” so that
you know in the future that it’s a multitrack tape.
3 Insert the tape, fully rewound to the start
(with the full spool on the left side).
It’s a good idea to always use the same side
(side A) of tapes for multitrack recording.
That way, you won’t be confused in the
future.
4
5
Close the cassette lid.
Press [PLAY] to play the tape for about ten
seconds, press [STOP] and press the tape
counter reset button.
This prevents you recording on the nonrecording leader tape at the start of cassettes.
You are now ready to start recording as
explained below (→p.9).
8
Making your first recording
For this recording, let’s assume that you are
starting with a bass and drum part on the first
two tracks and the drum sounds will come
from a rhythm (drum) machine.
The bass guitar will be recorded on track 1, and
the drum part on track 2. There’s also one guitar part (track 3) and one vocal part (track 4).
Of course, your arrangement may be different,
but we suggest you read through and follow
this example as closely as you can.
We’ll record the bass using the Ampworks
effects. We’ll record the rhythm machine
first with no effects, and then play the bass
part, backed by the recorded rhythm
machine, using the Ampworks effects.
...............
Set the [TRIM] and faders of tracks 1, 3 and
4 to their minimum levels (this prevents
any unwanted noise from intruding on
your recording).
4
Press the [REC/OL] button for track 2, so
that the [REC/OL] indicator flashes green.
Play the rhythm machine again. If the indicator turns red, the signal is too loud. Pull
down the fader a little.
5
Adjust the [MASTER] fader for a comfortable monitoring level from the headphones
and the speakers.
Recording the rhythm machine
1
Connect the mono output of the rhythm
machine to the [TR 2] input.
2
Adjust the level, etc. of the the rhythm
machine and play it. Adjust the CR-4’s
track 2 [TRIM] control so that the red indicator lights very briefly on only the very
loudest parts.
Be careful not to damage your hearing (or
the speakers or headphones).
6
3
Move the fader up for track 2 so that it’s
between [7] and [8] (the unity gain position).
7
Stop the rhythm machine. If you need to
“rewind” it to the start of the song, do so.
Press the [RECORD] button (which also
presses the [PLAY] button. The tape starts
moving and recording starts on track 2.
Start the rhythm machine.
You can also use the [PAUSE] button to
prepare for recording without actually having the tape moving (press and hold the
[RECORD] button and press the [PAUSE]
button).
9
Making your first recording
8
9
When you reach the end of the rhythm
track, stop the rhythm machine, press the
[PAUSE] button, and then press the [STOP]
button. Rewind the tape to the zero position (where you started the recording).
Turn down track 2’s [TRIM] control and
disconnect the rhythm machine .
There is no “right” or “wrong” model to
choose here; different amplifier models suit
different guitars and playing styles. Experiment until you find the basic sound that
suits you best.
4
IMPORTANT! Press the [REC/OL] button
for track 2 to make it safe, and prevent you
from recording over it.
When you start recording, you will record
on any “armed” track, with its [REC/OL]
button pressed, even if nothing is connected to the track inputs! Remember to
“disarm” (or “safe”) a track when you have
finished recording it.
Use the Ampworks controls to adjust the
tone of the bass, as well as the gain and
amount of effect if you use one.
...............
Recording a bass
1
For full details of how to use the Ampworks effect, see the appropriate section
(→p.14).
Connect your bass to the [TR 1] input.
5
2
3
Play your bass and adjust the [TRIM] control for track 1 so that the [TRIM] indicator
only lights briefly on the very loudest
notes.
6
Now we’ll use the effects. Turn on the effect
for track 1, using the track’s [EFFECT]
switch.
10
Prepare the track for recording (“arm” it)
using the [REC/OL] button, and adjust the
fader as you did for the rhythm machine
(so that the [REC/OL] indicator barely
lights on the loudest bass passages).
Press [PLAY] and play the bass part along
with the recorded rhythm part.
Use the fader of track 2 (the rhythm track)
to adjust the relative levels, so that you can
hear the bass, while still having the rhythm
section loud enough to play in time.
7
Select an amplifier/speaker model using
the Ampworks rotary control:
You can add an effect such as chorus, to
thicken up the sound, using the Ampworks
rotary control:
Record the bass part as you did the rhythm
part. Remember to “safe” the track by
pressing the [REC/OL] button when
you’re done.
Making your first recording
............... ...............
Recording a guitar
Recording vocals
This is almost the same as recording the bass.
Use track 3 for the guitar part. Unplug the bass
from input 1, and connect the guitar to input 3.
Adjust the [TRIM] as you did for the bass (and
don’t forget to turn down the [TRIM] on track
1).
You will probably want to choose another
Ampworks amp/speaker combination and
effect for the guitar as well as adjusting the
tone controls, etc. (→p.14).
Remember to turn track 3’s [EFFECT] switch
on and track 1’s [EFFECT] switch off (a maximum of one [EFFECT] switch can be on at a
time—you can turn off all [EFFECT] switches
by pressing the switch that’s on lightly to turn
it off).
When you have adjusted the guitar recording
volume using fader 3, you should use faders 1
and 2 to adjust the playback volume of the previously-recorded bass and rhythm to match the
volume of the guitar. Remember that this is
only to help you play in time—when you’re
ready for the final mixdown, you can adjust the
volumes as you want.
For this track (track 4), use a microphone for
the vocals. If you use speakers while you
record with a microphone, there’s a risk of
feedback. Turn the speakers off, using the
switch on the rear panel, and use headphones
for this track.
Let’s take a look at the [PAN] controls.
These allow you to position the tracks
between the left and right speakers (or all
in the left or right speaker, if you want).
When you’re recording, especially when
you’re using headphones, you may find it
helpful to play back the previously
recorded tracks in one channel, and the
track you’re recording in the other.
Turn down the track 3 [TRIM] control, and
unplug the guitar. Turn the track 3 [EFFECT]
switch off, and “safe” the guitar track when
you’re done, so you don’t accidentally record
over the top of it.
When you use the [TRIM] control to adjust the
input volume, you will probably have to turn it
clockwise in order to get the correct level
(microphones have lower levels than other
input sources).
There are two built-in microphone modelers
(VOCAL1 and VOCAL2) which you can use
with your vocal line as well as the acoustic (AC
EQ) position, but you can use other models if
you want.
You will probably want to add a little reverb or
echo to your vocal line to make it sound a bit
more spacious.
Make sure the track 4 [EFFECT] switch is on to
enable the models and/or effects.
Use the [REVERB] or the [DELAY] setting here
and adjust the tone, etc. so that it suits your
voice (you may want to make a few test recordings and listen to them to see how you really
sound. Remember to turn the [REC/OL button] on while you’re recording, and off when
you’re playing back).
You don’t need to record all the vocals in
one take. You can record the first verse and
chorus, for example, stop the tape, record
the next verse, etc. This works as long as
there is a short space between the vocal
passages, otherwise the vocals will start to
sound a little “patchy”.
Once you’ve recorded the vocals, you’re ready
to start mixing down to make a stereo recording. Once again, remember to “safe” the vocal
track so you don’t record over it!
To prevent any accidental recording on
your multitrack cassette, you can punch
out the write-protect tab from the recording
side (side A).
11
Making your first recording
...............
Mixdown
For mixdown, it’s a good idea to use speakers,
rather than headphones, so turn the speakers
back on.
Unplug the headphones to achieve the best
sound quality from the [LINE OUT].
Mixing levels
When you’re mixing down, make sure that the
master meter’s [+6] indicator is only lighting in
the louder passages. If it is continuously lit,
you will overload the amplifier of the CR-4 and
cause distortion.
If you’re recording to a digital recorder (such as
a CD or MD recorder), remember that digital
distortion is extremely unpleasant—you
should adjust the input levels of your recorder
or (if it has no recording level controls) the
[MASTER] fader).
On the other hand, if you make the recording
too quiet, you may hear background noises
and tape hiss which you don’t want.
You may want to move the [MASTER] fader to
about the [4] position, and get a balance before
adjusting the master level.
There are no absolute rules for mixing, but you
should try to avoid making one part too loud at
the expense of all the others.
Mix positions
You can also use the [PAN] controls to position
the different tracks in the mix.
Typically, lead vocals reside in the center,
equally balanced between the left and right
channels.
If you have recorded a stereo source (stereo
rhythm machine, synthesizer, etc.) on two
tracks, you will probably want to pan these
12
tracks hard left and hard right to keep the original stereo image produced by the source.
Typically, the aim is to make the listeners feel
as though they are “really there”, listening to
the original performance, but you can often use
pan positions for special effects, and an unnatural pan position (or change to the pan position) is an attention-grabber. Remember that
people listening on mono equipment (AM
radio, etc.) won’t hear the benefits of this,
though.
Making the mix
When you’ve adjusted the level, you should:
1 Rewind the CR-4 tape to a little before the
start of your recording.
2 If you’re mixing to a tape, rewind the stereo tape to a little before you want to start
the mix (you don’t need to do this if you’re
recording to disc). Put your stereo recorder
in record ready mode.
3 Play back the CR-4 tape, and if your stereo
recorder has meters, watch them carefully
at the loudest parts to make sure that you
are not recording at too high a volume.
Adjust the recording level (or if your stereo
recorder has no recording level controls,
lower the CR-4’s [MASTER] fader).
4 Rewind the CR-4 tape to a little before the
start of your song.
5 Play back your CR-4 tape.
6 Start recording on your stereo recorder in
the quiet passage before the song actually
starts.
7 At the end of the song, stop your recorder,
and then stop the CR-4 tape.
8 You can now listen to the mixed tape. It’s
quite possible that you will not get it perfectly right first time, so be prepared to do
it again (and again!) until you get it right.
When you’ve finished, we suggest you
clean the tape heads of your CR-4 before
turning it off and putting it away.
More advanced techniques
...............
3
The CR-4 allows you to record four tracks at
once. The example we gave above only
recorded one track at a time.
If you are recording a group of musicians, you
can record more than one track at once, and
adjust the balance later.
You can record on a pair of tracks (either 1+2 or
3+4). Press one [REC/OL] button, and then the
other [REC/OL] button of the pair to arm. You
can also arm and record on all four tracks by
using four fingers to press all four [REC/OL]
buttons together.
If you are recording on more than one track,
remember that only one track at the most can
use the Ampworks effects. Don’t try to press
more than one [EFFECT] switch at the same
time.
4
Here are a few more techniques that you can
use to help with your recording.
Multi-track recording
5
6
If you’re using a cassette recorder as your
stereo recorder, you can take the mixed cassette from the stereo recorder and put it in
the CR-4. The stereo tracks will become
tracks 1 and 2 on the CR-4. Remember you
cannot use noise reduction on your stereo
cassette recorder, and because the track layout of the CR-4 is different to that of an
ordinary cassette recorder, you must use
only one side of the stereo cassette.
...............
Expanding the inputs
You can use a small mixer to mix together several different instruments (for example, a stereo chorus rhythm guitar and a buttonboard
with the bass), and use this to feed two tracks.
The other two tracks can then be used for lead
guitar and vocals.
Typically, you’ll create a stereo sub-mix using
the small external mixer, and record the left
and right outputs of the mixer on two tracks.
When you come to mix down, you’ll pan these
two tracks hard right and hard left.
...............
Expanding the number of tracks
The CR-4 is restricted to four tracks on a cassette, but you can record more than four tracks
in a song if you use a mixdown stereo recorder.
It’s probably best to use a digital (CD or
MD) recorder as your stereo recorder, to
avoid tape hiss and noise building up.
1
2
Record the first four tracks as described
above (→p.9).
Mix down to the stereo recorder(→p.12)
and rewind your CR-4 tape to the start of
the recording (or insert a new tape).
Connect the [LINE OUT] of the stereo
recorder to inputs 1 and 2 of the CR-4. You
may not want to add any effects to these
tracks just yet, so make sure all [EFFECT]
switches are off.
Arm all the CR-4 tracks from 1 through 4
(so that you write over the previously
recorded tracks). Move the [TRIM] controls
and the faders of tracks 3 and 4 to their
lowest level (all the way down).
Play back the stereo recording, and adjust
the [TRIM] controls of tracks 1 and 2.
Start recording on the CR-4 and play back
the mixed stereo recording from the beginning. Disconnect the stereo recorder from
the CR-4 inputs, and safe all CR-4 tracks.
7
Now you can use tracks 3 and 4 for new
tracks, along with the previous tracks now
bounced onto 1 and 2.
Once you’ve mixed your first four tracks to
stereo, there’s no way of separating them
again! So if you decide after recording
tracks 5 and 6 that the bass is too quiet (or
you notice a wrong note!), there’s not a lot
you can do about it. You may want to use a
new cassette for the bounced tracks, and
preserve your first four tracks on the original cassette.
...............
Using the noise reduction
As part of the Ampworks effector, there is a
noise-reduction system built in. If you’re playing a noisy guitar, or using a microphone in a
noisy situation, this allows you to cut out the
unwanted sound in quiet passages while letting through the wanted sound when the
threshold level is reached.
Adjust the threshold level by pressing and
holding the [TAP] button and turning the
[EFF. DEPTH] control.
13
Ampworks effects
............... ...............
These rotary dials allow you to choose a model
to add life to your playing, as well as allowing
you to select a digital effect.
What is REMS (
)?
(Resonant structure and Electronic circuit Modeling System) is KORG’s proprietary
sound modeling technology which precisely
reproduces the complex character and nature of
both acoustic and electric instruments as well
as electronic circuits in real world environments.
emulates a wide variety of
sound generation characteristics including
instrument bodies, speakers & cabinets, acoustic fields, microphones, vacuum tubes,
transistors, etc.
...............
Controls
[MID-FC/GAIN] With the VOCAL1, VOCAL2,
VALVE, LA STUDIO and AC EQ modeling settings, adjusts the mid frequency. With other
settings, acts as a gain control. The higher you
turn this control, the more distortion you will
add to the sound.
[TREBLE] adjusts the amplifier high-frequency
range.
[MIDDLE] adjusts the amplifier mid-frequency
range.
[BASS] adjusts the amplifier low-frequency
range.
[VOLUME] adjusts the amp volume.
[EFF.DEPTH] adjusts the level of the digital
effects.
[TAP] sets the speed of some of the digital
effects (→p.15).
14
There is also another “combination” function:
noise reduction (→p.13).
Modeling type
The models available are:
BTQ CLN
BLK212
AC30TB
UK ’80S
UK MDN
NU METAL
VALVE
LA STUDIO
AC EQ
VOCAL 1
VOCAL 2
Clean channel of a high-end 100
watt hand-made amp
2 x 12 combo amp indispensible
for country or blues players
Brilliant channel of a VOX
AC30TB
UK-manufactured 100 watt master volume head (from 1983)
UK-manufactured 100 watt modern amp
High-gain amp with metal plate
A tube bass amp with the ULTRA
LO switch turned ON
A bass amp that is typical of the
LA sound
3-band EQ for direct line input,
and acoustic guitar
Widely used Austrian condenser
microphone sound
Standard dynamic microphone
...............
Effects
In addition, there are eleven digital effects you
can apply to your playing and vocals. These
are listed here:
COMP
WAH
CHORUS
FLANGE
PHASER
TREM
ROTARY
DELAY
REVERB
CHO+DL
CHO+RV
Produces consistent levels and
sustain
Auto wah, applying a wah effect
that responds to picking. When the
[EFF.DEPTH] control is in the left
half, this effect produces a down
sweep, and when in the right half,
produces an up sweep.
Vintage chorus.
Vintage flanging.
Vintage phasing.
Vintage tremolo.
Simulates a rotary speaker.
Delay
Simulates a spring reverb
Vintage chorus and delay
Vintage chorus and spring reverb.
Ampworks effects
TREM
DELAY,
CHO+DL
REVERB,
CHO+RV
Sets the tremolo modulation
speed, from 65 ms to 2 seconds.
The tap interval is equal to twice
the modulation speed.
Sets the delay time, from 80 ms to
1 second. The tap interval is
exactly equal to the delay time.
Sets the reverb decay time, from
about 0.5 seconds to 8 seconds.
The tap interval is equal to half
the reverb decay time.
Note that you cannot use the [TAP] button
with the COMP or WAH effects.
If you want to use an external amp modeler (or
record Ampworks effects without modeling),
turn the [MODELING TYPE ] control to AC
EQ. This position turns off Ampworks’ amp
modeling function and allows you to use threeband EQ, noise reduction and effects as
desired.
...............
The TAP control
Use the [TAP] control to match the timing of
the digital effects with your music.
Use it in the following way—press the [TAP]
button a number of times. The last two taps
determine the timing of the effect. The indicator by the [TAP] button shows the current
effect speed.
Use tap timing with the following effects:
CHORUS,
PHASER,
ROTARY
FLANGE
Sets the modulation speed for
these effects, from 80 ms to 4 seconds. The tap interval is exactly
equal to the modulation speed.
Sets the flanger modulation
speed, from 160 ms to 8 seconds.
The tap interval is equal to half
the modulation speed.
15
Further uses for the CR-4
...............
Using the CR-4 as a guitar combo
To use the CR-4 as a very portable guitar
combo, with built-in amp modeling and builtin effects:
1 Connect your guitar to track 1. Press the
[REC/OL] button and adjust the [TRIM]
and fader levels (→p.10).
2 Switch track 1’s [EFFECT] switch on, and
select your amp/speaker model and effects
(→p.14).
3 Now you can play. Adjust the overall volume with the [MASTER] fader.
...............
Using the CR-4 as a pre-amplifier
If the CR-4’s speakers aren’t loud enough for
you, use the [LINE OUT] jacks to connect to a
suitable stereo input of another system, allowing you to use the amp/speaker modeling and
effects through a larger system.
Be sure that the input of the other system
matches the output of the CR-4 (see the
specifications). You can damage the CR-4
and the other equipment if they do not
match.
Simply press the [REC/OL] button of any
tracks that you want to output through the
other system. After setting the [TRIM] levels,
adjust the pan position [PAN] and level (faders) of each track.
The [MASTER] fader is probably best left at the
[7] or [8] position. Adjust the overall level with
the other unit’s volume control.
You can use the CR-4 to do solo gigs in this
way, if you’ve recorded your backing on
two tracks of a CR-4 cassette. Play back
these backing tracks, with a microphone
connected to one of the unused tracks, and
a guitar connected to the other. You can use
a separate guitar processor or stomp box to
give one set of effects for the guitar, and use
the CR-4’s reverb to add some depth and
warmth to your vocals.
16
...............
Cassette recorder
Track format
Head configuration
Motor type
Tape speed
Wow and flutter
Fast wind time
Tape
4 tracks, 4 channels
1 x 4-track record/replay
head (Permalloy)
1 x 4-track erase head
(ferrite)
1 x DC motor (capstan
and reel motor)
1 7/8 in./sec (4.76 cm/
sec)
0.25%
Approx 120 seconds (C60 tape)
Compact Cassette (recommended tape < C-60)
High-bias (CrO2 TypeII,
70µs+3180µs only)
Specifications
Headphone outputs (1/4" stereo phone jacks)
10 mW + 10 mW
Output level
30Ω
Output impedance
Frequency response 50 Hz to 12.5 kHz ±3 dB
Signal-to-noise ratio 43 dB
Better than 3.0% (at
Total Harmonic
1 kHz)
Distortion
Channel separation Better than 40 dB (at
1 kHz)
65 dB (at 1 kHz).
Erasure
...............
Effects
Amp/cabinet
models
Effects
EQ
11 models
11 + noise reduction
Bass, midrange and
treble controls
............... ...............
Physical specifications
Power requirements
(supplied power
adapter):
USA/CANADA/EX:
120VAC60Hz (KA233)
Power consumption:
AUSTRALIA/NZ:
240VAC 50Hz (Not
included.)
13 W, via the supplied
adaptor
434 x 103 x 322 (mm),
17.1 x 4.1 x 12.7 (in.),
Physical dimensions
(w x h x d):
Weight (main unit):
Dimensional drawing
434 mm
(17.1")
UK/EUR: 230VAC,50Hz
(UK:KA236,EUR:KA239)
...............
4.9 kg (10.8 lb)
46 mm
(1.8")
Mic/line inputs (1/4" unbalanced phone jacks)
–50 dBV or higher
Input level
1 MΩ
Input impedance
Speakers
Bass reflex, 8 cm (3.1")
Speaker type:
2.5 W + 2.5 W
Peak output power
LINE OUT (2 x RCA jacks)
–10 dBV
Output level
10 kΩ
Output impedance
322 mm
(12.7")
4 mm 94 mm 5mm
(0.15") (3.7") (0.2")
Audio specifications and performance
17
Block Diagram
INOUT 1
-10dBV/-50dBV
INOUT 2
-10dBV/-50dBV
INOUT 3
-10dBV/-50dBV
INOUT 4
-10dBV/-50dBV
TRIM
TRIM
TRIM
TRIM
CH1
OL
CH2
OL
CH3
OL
CH4
OL
A/D
EFF
EFFECTOR
EFF SW 1
EFF SW 2
EFF SW 3
EFF SW 4
D/A
REC FUNCTION
TRK1
TRK2
TRK3
TRK4
LEVEL
TAPE OUT
4ch RECORDER
MTR
REC sig
PAN
PAN
PAN
PAN
R
L
L
R
L
R
R
L
MASTER LEVEL
SPEAKER SW
ON
ON
OFF
OFF
METER
-10dB
-5dB
0dB
+6dB
-10dBV
LINE-OUT
L
R
HEAD-PHONE
SUB
MAIN
L
R
18
3
D00802300A
Owner’s Manual
IMPORTANT NOTICE TO CONSUMERS
This product has been manufactured according to strict specifications and voltage
requirements that are applicable in the country in which it is intended that this
product should be used. If you have purchased this product via the internet,
through mail order, and/or via a telephone sale, you must verify that this product
is intended to be used in the country in which you reside.
WARNING: Use of this product in any country other than that for which it is
intended could be dangerous and could invalidate the manufacturer's or distributor's warranty.
Please also retain your receipt as proof of purchase otherwise your product may be
disqualified from the manufacturer's or distributor's warranty.
1