1
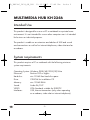
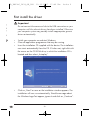
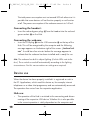
CV_KH2346_V439_LB3
27.12.2007
10:29 Uhr
Seite 1
3
MULTIMEDIA HUB
KH 2346
MULTIMEDIA HUB
Operating instructions
KOMPERNASS GMBH · BURGSTRASSE 21 ·
D-44867 BOCHUM
www.kompernass.com
ID-Nr.: KH2346-10/07-V1
CV_KH2346_V439_LB3
27.12.2007
10:29 Uhr
Seite 4
KH 2346
q
w
e
t
y
u
i
r
f
d
s
a
o
IB_KH2346_V439_GB_LB3
19.12.2007
CONTENT
17:46 Uhr
Seite 1
PAGE
Intended Use
2
System requirements
2
Safety instructions
3
Technical data
4
Package contents
5
Device description
5
First install the driver
6
Connection
7
Device use
8
„Amcap” test software
9
Uninstall or repair
20
Cleaning
21
Disposal
21
Warranty & Service
22
CE-Conformity
23
Importer
23
Read the operating instructions carefully before using the appliance for the first
time and preserve this booklet for later reference. Pass the manual on to
whomsoever might acquire the scale at a later date.
-1-
IB_KH2346_V439_GB_LB3
19.12.2007
17:46 Uhr
Seite 2
MULTIMEDIA HUB KH 2346
Intended Use
This product is designed for use on a PC or notebook in a private home
environment. It is not intended for use on other computers nor is it intended
for business or industrial purposes.
The product is usable as an extension and add-on of USB and sound
card connections as well as for internet telephones, video chat and as
a webcam.
System requirements
This product requires a PC or notebook with the following minimum
system requirements:
Operating System:
Processor:
Hard disc:
Drive:
Memory:
Sound:
VIDEO:
Interfaces:
Windows 98SE/ME/2000/XP/Vista
Pentium 200 or higher
min. 20 MB free hard disc space
CD-ROM for installation CD
min. 32 MB RAM
Audio IN/OUT
VGA-Standard, suitable for DIRECTX
USB, Internet connection (only when operating
as a webcam, video chat or internet telephone).
-2-
IB_KH2346_V439_GB_LB3
19.12.2007
17:46 Uhr
Seite 3
Safety instructions
•
•
Do not open device parts: there are no user-serviceable elements
inside. Repairs must only be carried out by authorized specialists or
the service department.
Protect the camera from extreme temperatures, moisture, dirt and
dust. Do not touch the camera lens with bare fingers. If you do the
camera lens could become clouded.
NEVER submerse the appliance in water.
Wipe it off only with a soft dry cloth.
•
•
•
•
•
Do not pull the USB plug out of the computer or the camera out of
the hub while the programme is running. If you do it could result in
data loss.
In unfavourable circumstances the installation of new drivers onto
your computer could cause system crashes and the loss of data.
Therefore before every installation save any important data on an
external storage facility.
Be aware of the fact that by using the camera in video chat and
internet telephone applications you are allowing insight, from outside, into your personal sphere. Always disengage the camera and
headset after you have finished this type of usage. Many damaging
software applications (viruses, trojans etc.) may be capable of
switching the camera on unnoticed.
Do not use the camera in order to record or transmit the image of
other people without their knowledge. This would violate criminally
protected rights.
This product is not designed to be used by persons (including children)
with limited physical, sensorial or mental abilities or who lack experience
and/or knowledge unless, of course, for their own safety they are
-3-
IB_KH2346_V439_GB_LB3
19.12.2007
17:46 Uhr
Seite 4
supervised by a competent person or receive instructions from such
a person on how to use the device. Children should be supervised in
order to make sure that they do not play with the product.
Technical data
USB Webcam:
Sensor:
Resolution:
Video format:
Max. Pixel:
Lens:
USB-Standard:
Power consumption:
Transmission:
Functions:
Features:
1/4” CMOS
max. 640 x 480 (VGA)
24 bit True Colour
1,3 M
F = 2.2
1.1
140 mA
30 images per second with 320 x 240
15 images per second with 640 x 480
automatic whitening adjustment, manual focusing
Snapshot button, 4 white LEDs for lighting
USB HUB:
Number of ports:
USB-Standard:
Power supply:
Interfaces:
3, 1 of which is for the webcam
2.0
via USB connection from the computer
2 x 3,5 mm jackplugs/jackplug sockets
Headset:
Frequency response:
Sensitivity:
Impedance:
Power input:
20 Hz– 20 kHz
111 dB +/- 3 %
32 Ohm
100 mW max.
-4-
IB_KH2346_V439_GB_LB3
Cable length:
Interfaces:
19.12.2007
17:46 Uhr
Seite 5
approx. 2 m
2 x 3,5 mm jackplugs
Package contents
1 x USB Webcam (Camera)
1 x USB Hub
1 x Headset
1 x Installation CD
1 x Operating Instructions
•
Check to ensure that the device is undamaged, all component parts
are present and that packaging remnants are removed.
Device description
1
2
3
4
5
6
7
8
9
0
q
w
e
Webcam: Snapshot button
Webcam: Lens, turn the white ring to focus
Webcam: Swan neck
Webcam: USB to HUB plug
HUB: Red and green audio plug to the computer
HUB: USB to PC plug
Headset: Microphone
Headset: Earbud
Headset: Volume control
Headset: Audio plug to the HUB
HUB: Audio socket for the Headset
HUB: USB connection for other USB devices
HUB: USB connection for the Webcam
-5-
IB_KH2346_V439_GB_LB3
19.12.2007
17:46 Uhr
Seite 6
First install the driver
Important
Do not connect the camera or hub to the USB connection on your
computer until the relevent drivers have been installed. Otherwise
your computer system may possibly install inappropriate generic
drivers automatically.
•
•
•
Switch your computer on and start Windows.
Close all application programmes that may be running.
Insert the installation CD supplied with the device. The installation
now starts automatically from the CD. If it does not, right click with
the mouse on the CD ROM drive, in which the installation CD is
located and then select „Autoplay“.
•
Click on „Next“ as soon as the installation window appears. The
installation will now run automatically. Should a message about
the Windows-Logo-Test appear, ignore it and click on „Continue“.
-6-
IB_KH2346_V439_GB_LB3
•
19.12.2007
17:46 Uhr
Seite 7
Click on „Finish“ as soon as this window appears. With this the
installation is complete.
In the chapter „uninstall and repair“ is described how you can remove
the software and, in the event of problems, reinstall the driver.
Connection
When the driver and software installation is complete, as described
previously, you can now connect the device.
Connecting the Hub
•
•
•
Insert the USB plug 6 from the Hub into a vacant USB connector on
your computer.
Insert the red and green plugs 5 from the Hub into the red and
green audio sockets on your computer.
You can now connect other USB devices, for example, a USB mouse
or USB keyboard to the USB connectors w on the Hub.
-7-
IB_KH2346_V439_GB_LB3
19.12.2007
17:46 Uhr
Seite 8
The total power consumption must not exceed 500 mA otherwise it is
possible that some devices will not function properly or not function
at all. The power consumption of the webcam amounts to 140 mA.
Connecting the headset:
•
Insert the red and green plugs 0 from the headset into the red and
green sockets q on the Hub.
Connecting the webcam:
•
Insert the USB plug 4 into the USB connector e on the top of the
Hub. This will be recognized by the computer and the following
message appears on the bottom right of the screen: „Found new hardware“. It could be a few minutes before the message appears to
indicate that the webcam has been installed and is ready for use.
Info: The webcam has built in object lighting (4 white LEDs next to the
lens). These switch on and off automatically according to the lighting
circumstances. For this no connections or settings are required.
Device use
When the device has been properly installed it is registered as such in
the PC. Applications, which need this device as, for example, internet
telephones or a video chat programme, and are automatically accessed.
The operation then arises from the respective application.
Hub use:
•
The operation of the Hub is restricted to the connecting and disconnecting of the respective USB device. Whether this is also possible
in the current operation is solely dependent on the computer and
-8-
IB_KH2346_V439_GB_LB3
19.12.2007
17:46 Uhr
Seite 9
operations system, not on the Hub. First make certain of this by means
of your computers documents otherwise it could lead to data loss.
Headset use:
•
•
Put the headset 8 on in such a way that the neck yoke is supported
over the collar. Subsequently bend the flexible neck of the microphone 7 so that it is close to your mouth.
With the volume control 9 you can set the headphone volume.
Webcam use:
•
•
•
•
Start the respective application (video chat, webcam), for which you
want to use the camera and select a function there, with which the
current camera image is displayed for adjustment.
Bend the flexible swan neck 3 of the camera in the direction that
you want the camera to capture.
Turn the lens 2 until the image sharpness on the test image in your
application is satisfactory.
With the „snapshot button” 1 you can capture an individual fixed
image if your application supports this.
„Amcap” test software
A test software is also installed with the driver, with which you can check
the camera as well as, for test purposes, prepare and save
simple video recordings.
Starting test software:
•
Double click on the „amcap” symbol on the Windows desktop. Or
you can select from the start menu under „Programmes“ the folder
„USB PC-Camera“ and there click on „amcap”.
-9-
IB_KH2346_V439_GB_LB3
19.12.2007
17:46 Uhr
Seite 10
Checking the camera:
After the test programme is started the camera image appears, after
a few seconds, in a small flip open window.
If you do not see an image:
• Click on „Devices” in the menu list. Check to see if the input „ZSMC USB
PC Camera“ is present and that there is a tick in front of it. If not click
on this input. If no input is present reinstall the driver.
• Also check in the amcap test programme menu „Options“ if there is a
tick in front of the „Preview“ menu item.
• Also check in the Windows device manager under „Image processing devices“ if the input „ZSMC USB PC Camera“ is present. If not reinstall
the driver.
- 10 -
IB_KH2346_V439_GB_LB3
19.12.2007
17:46 Uhr
Seite 11
Setting the microphone sensitivity
•
Click on „Options” in the menu list. When the appropriate selection
flips open select the „Audio-Capture-Filter” function. The setting window
„Properties” now appears:
Here you can set the sensitivity of the microphone input on your PC.
• Select „Microphone” as the audio source on the female header.
• Push the volume control completely up (p. arrow).
• Place a tick in the window „Enable”.
When you have carried out all settings:
• Click on „OK” to accept the settings.
- 11 -
IB_KH2346_V439_GB_LB3
19.12.2007
17:46 Uhr
Seite 12
Selecting sound quality
•
Click on „Options” in the menu list. When the appropriate selection
flips open select the „Audio-Format” function. The setting window
„Sound Selection” now appears:
Here you can set the audio quality of the sound recording. The optimal
settings are preset at the factory as can be seen from the picture.
If you want to try a few settings:
• Under „Format” you can select other preset audio formats.
• Under „Attributes” you can select the desired setting from other quality
levels.
• Click on „Save as…” to give your personal selection a name and then
to save it.
• Click on „Name” to select from a list of previously saved settings.
• Click on „Remove” if you want to delete a selected setting from the list.
When you have carried out all settings:
• Click on „OK” to accept the settings.
- 12 -
IB_KH2346_V439_GB_LB3
19.12.2007
17:46 Uhr
Seite 13
Selecting image quality:
•
Click on „Options” in the menu list. When the appropriate selection
flips open select the „Video Capture Pin…” function. A setting window
for the video properties now appears:
Here you can set the quality of the image recording. The optimal settings
are preset at the factory as can be seen from the picture. If you want to
try a few settings:
• Under „Frame Rate” you can now set the image quality. The higher the
value the more power that the PC must provide.
• Under „Output Size” „320 x 240” and „480 x 640” are meaningful settings.
Other sizes are admittedly setable however they have no effect.
• Under „Color Space/Compression” you can carry out settings on the
colour presentation according to personal preference.
When you have carried out all settings:
• Click on „Apply” to accept the setting and to continue to remain in this
setting window.
• Click on „OK” to accept the setting and to close this setting window.
• Click on „Cancel” to reject the setting and close this setting window.
- 13 -
IB_KH2346_V439_GB_LB3
19.12.2007
17:46 Uhr
Seite 14
Setting the image
•
Click on „Options” in the menu list. When the appropriate selection
flips open select the „Video Capture Filter” function. Another setting
window for the video properties appears:
You can change various image properties with the slider control according to personal preferences.
• When a tick is placed in the selection box „Auto Enable” the optimal
settings are automatically applied.
• Click on „Restore”, to automatically apply the optimal settings for all
slider controls.
• Click on „Reset”, to cancel the changes that you have made.
• Click on „Save” to permanently save the changes that you have made.
- 14 -
IB_KH2346_V439_GB_LB3
19.12.2007
17:46 Uhr
Seite 15
You can set the image effects, as indicated, with the squared selection
boxes.
• Select under „No Flicker” the setting „50Hz”, if you are using electrical
lighting on the image object.
• Select „Vertical Flip” if you want to stand the image „on its head“.
• Select „Mirror Flip” if you want to mirror the image horizontally.
• Select „Backlight Comp” if you want to offset interfering light from
behind.
When you have carried out all settings:
• Click on „Apply” to accept the setting and to continue to remain in this
setting window.
• Click on „OK” to accept the setting and to close this setting window.
• Click on „Cancel” to reject the setting and close this setting window.
- 15 -
IB_KH2346_V439_GB_LB3
19.12.2007
17:46 Uhr
Seite 16
Capture setting:
With the test programme you can capture simple audio/video data in the
media format „AVI“ and with a suitable player play them back on your
computer. Here you only carry out settings for the capturing, how you
start the capturing is explained later under „Capture function“.
•
Click on „Capture” in the menu list. When the appropriate selection
flips open, …
– select the function „Master Stream”, in order to specify, as the main
data stream, the audio or video signal or in regard to this that
there are no encounters with predefinitions (None).
– Select the function „Set Frame Rate”, to set the transmission rate
(Images per second). When you place a tick in the selection box
„Use Frame Rate” this value will be used.
– Select the function „Capture Time Limit”, to enter a maximum time
for the capturing, i. e. 10 seconds. When you place a tick in the
selection box „Use Time Limit” any capturing started in future will
stop after this entered time.
- 16 -
IB_KH2346_V439_GB_LB3
19.12.2007
17:46 Uhr
Seite 17
When you have carried out the respective settings:
• Click on „OK” to accept the setting and to close the respective
setting window.
• Click on „Cancel” to reject the setting and to close the setting window.
Capture function:
When you have carried out the Capture settings as described previously
you can use this function to start the capturing, stop the capturing and
save this capturing as data.
To start the capturing:
•
Click on „Capture” in the menu list. When the appropriate selection
flips open, …
– select the function „Start Capture”.
– Click on „OK” to now start the capturing.
– Click on „Cancel” to cancel the start.
- 17 -
IB_KH2346_V439_GB_LB3
19.12.2007
17:46 Uhr
Seite 18
To stop the current capturing:
•
•
Click on „Capture” in the menu list.
When the appropriate selection flips open select the „Stop Capture”
function. The capturing will now stop.
To save the capturing as data:
- 18 -
IB_KH2346_V439_GB_LB3
•
19.12.2007
17:46 Uhr
Seite 19
Click on „File” in the menu list. When the appropriate selection flips
open, …
– select the „Set Capture File” function to select the folder where
the data is to be filed and enter a data name,
– select the „Allocate File Space” function to access the setting window
„Set File Size”. There you can preset a maximum size for your captured data. Should this already exist then by clicking on „OK” the
data is lost.
When you have set the data size:
• Click on „OK” to accept the setting and to close the setting window.
• Click on „Cancel” to reject the setting and to close the setting window.
• When you now click on „Save Capture Video”, the data will be saved
under the previously set data name.
- 19 -
IB_KH2346_V439_GB_LB3
19.12.2007
17:46 Uhr
Seite 20
Uninstall or repair
When you want to remove the software (uninstall) or reinstall, in the event of
a malfunction, first proceed as described in the chapter „Driver installation“.
The software automatically recognizes that this is already installed and
therefore accesses, as opposed to the initial installation, the following
selection.
Click on „Repair”, when you want to reinstall the driver and test
programme (i. e. because the device manager could not find the
webcam or no image is displayed).
• Click on „Remove”, when you want to remove the driver and the test
programme from your computer.
• Click on „Modify”, when you want to add new programme features or
remove already installed programme features.
Reboot your operating system if after installing the driver again the
camera is still showing no image. If this does not improve the situation
then there is a conflict with some other computer component. In this case,
contact your computer dealer.
•
- 20 -
IB_KH2346_V439_GB_LB3
19.12.2007
17:46 Uhr
Seite 21
Cleaning
•
•
Clean the device with a dry or lightly moistened cloth only. To avoid
potential damage to the upper surfaces, do not use any abrasive or
chemical cleaning agents.
Do not submerge any of the device components in any form of liquid
as this could damage the device.
Disposal
Do not dispose of the appliance in your normal domestic
waste. This product is subject to the European guideline
2002/96/EC.
Dispose of the appliance through an approved disposal centre or at your
community waste facility.
Observe the currently applicable regulations.
In case of doubt, please contact your waste disposal centre.
Dispose of all packaging materials in an
environmentally friendly manner.
- 21 -
IB_KH2346_V439_GB_LB3
19.12.2007
17:46 Uhr
Seite 22
Warranty & Service
The warranty for this appliance is for 3 years from the date of purchase.
Should you have grounds for complaint, despite our high quality standards,
please contact our Service Hotline.
In the event that your complaint cannot be resolved over the telephone,
you will receive from them
• a processing number (RMA number) as well as
• an address, to which you can send your product for warranty
processing.
In the case of a mail-in shipment please enclose a copy of the purchase
receipt (sales slip). The appliance must be securely packed and the RMA
number clearly visible. Shipments without an RMA number can not be
processed.
Note:
The warranty provisions cover only material or factory defects.
The warranty provisions do not cover
• worn out parts
• damage to breakable parts like switches or rechargeable
batteries.
This product is for private use only and is not intended for commercial
use. The warranty is void in the case of abusive and improper handling,
use of force and internal tampering not carried out by our authorized
service branch.
Your statutory warranty claims are not restricted by this warranty.
- 22 -
IB_KH2346_V439_GB_LB3
19.12.2007
17:46 Uhr
Seite 23
CE-Conformity
This device has been checked and approved regarding conformance
with the fundamental requirements and other relevent provisions of the
EMV directive 2004/108/EG.
Importer
KOMPERNASS GMBH
BURGSTRASSE 21
D-44867 BOCHUM
www.kompernass.com
- 23 -
19.12.2007
- 24 -
17:46 Uhr
Seite 24
✄
IB_KH2346_V439_GB_LB3
✄
- 25 -
Date/Signature
Telephone
17:46 Uhr
Country
City/Town
Street
www.mysilvercrest.de
19.12.2007
First name
Last name
Sender, please write clearly:
In order to guarantee a cost free repair procedure please get in
touch with the service hotline. Make sure you have your sales
slip handy.
MULTIMEDIA HUB KH 2346
Warranty
DES Ltd
Tel.: 0870 787 6177
Fax: 0870 787 6168
e-mail: [email protected]
Completely fill out this section and enclose with the appliance!
IB_KH2346_V439_GB_LB3
Seite 25
D
19.12.2007
17:46 Uhr
Seite 26
Description of fault :
✄
IB_KH2346_V439_GB_LB3