1
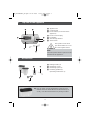
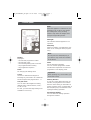
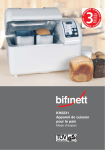
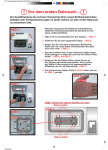
IB_Breadmaker_GB.qxd
04.02.2005
10:13 Uhr
Seite 1
KH2231
Automatic
Bread Maker
Operating instructions
IB_Breadmaker_GB.qxd
04.02.2005
10:13 Uhr
2
Seite 2
IB_Breadmaker_GB.qxd
04.02.2005
10:13 Uhr
Seite 3
Contents
1 Top view of the appliance ..................................................................................4
2 Accessories..........................................................................................................4
3 Proper use of the appliance ..............................................................................5
4 Important information for your safety ..............................................................5
5 Before the first time use ....................................................................................6
6 Features................................................................................................................6
7 Control panel........................................................................................................7
8 Baking methods ..................................................................................................8
9 Setting the Timer ................................................................................................9
10 Before baking ....................................................................................................10
11 Baking bread......................................................................................................10
12 Cleaning and maintenance ..............................................................................12
13 About ingredients ..............................................................................................13
14 Baking tips ........................................................................................................15
15 Table of programming sequences ..................................................................16
16 FAQs/ Troubleshooting ....................................................................................20
17 Technical data....................................................................................................23
18 Warranty & Service ............................................................................................23
19 Disposal ..............................................................................................................23
20.Bread recipes ......................................................................................................24
To know your bread machine better, please read the operating instructions
carefully. Keep the instructions booklet in a safe place for ready reference and
for handing it over to a possible new owner.
3
IB_Breadmaker_GB.qxd
1
04.02.2005
10:14 Uhr
Seite 4
Top view of the appliance
Appliance lid
Control panel
Power switch (on the rear of the
appliance)
Power cord and plug
Lid handle
See-through window
Steam vents
This symbol on the lid of
your bread maker is to caution users against burns.
Note:
The main power switch is placed on the
backside of the appliance.
2
Accessories
Baking moulds (2)
Measuring cup (1)
Measuring spoon (1)
Kneading paddles (2)
Operating instructions (1)
Tip: You can order an extra large baking mould for your
Bifinett Automatic Bread Maker to bake breads up to
2,5 lb g. Use the enclosed form for placing an order.
4
IB_Breadmaker_GB.qxd
3
04.02.2005
10:14 Uhr
Proper use of the appliance
Do not use the bread machine in the
outdoors.
Use your Bifinett Automatic Bread
Maker only for baking bread for home
use.
Use accessories recommended by the
manufacturer only.
Accessories not recommended may
cause damage to the appliance.
Do not use the appliance for drying
foodstuffs or other objects.
4
Important information for your safety
Setup
•
•
•
•
•
•
•
Seite 5
•
After unpacking, check the bread
machine for any damage during transportation. In the event of damages,
contact the supplier.
Do not place the appliance near a gas
burner, electric stove or other sources
of heat.
Do not place the appliance near any
inflammable materials, explosive
and/or self-igniting gases.
Before connecting to mains, make
sure that the power supply and the
voltage match with the ratings specified on the appliance label.
Do not draw the power cord over
sharp edges or close to hot surfaces
or objects.This may damage the insulation of the power cord.
To prevent anyone from tripping over,
the appliance is provided with a short
power cord.
If you plan to use an extension cable,
make sure that the maximum permissible power rating of the cable corresponds with that of the bread maker.
Place the extension cable in such a
way as to prevent anyone from tripping over it or pulling it accidentally.
During operation
•
•
•
•
•
5
Check the condition of the power cord
and plug frequently. If the connecting
cable of the appliance is damaged, it
must be replaced by the manufacturer,
his customer service or by a qualified
technician so as to prevent hazards.
Children using electrical appliances or
standing close to them may be allowed only under the supervision of an
adult.
This appliance complies with the normal safety regulations.Inspection,
repairs and technical maintenance
may be carried out only by a qualified
technician.
Do not place any objects on the appliance and do not cover it during operation. Fire Hazard!
Keep the air vent free to allow vapours
to escape.
IB_Breadmaker_GB.qxd
•
•
•
•
•
•
•
•
04.02.2005
10:14 Uhr
Caution: The bread maker becomes
very hot during operation. Only touch
the handles and touch buttons of the
appliance. If necessary, use a kitchen
cloth.
Before taking out the accessories or
inserting them, allow the appliance to
cool down and unplug the power
cord.
Do not move the bread maker from its
location, if hot or liquid contents are
still inside the baking moulds.
Avoid contact with the rotating kneading paddles during operation.Injury
hazard!
To disconnect, switch the appliance
off (switch is on the rear side of the
appliance) and unplug the power cord.
Do not pull at the cable but pull out
the plug from the socket.
When not in use or before cleaning the
appliance, unplug the power cord as a
safety measure.
Do not use the bread maker to store
cooked food or other utensils inside.
5
•
Before the First Use
Disposing the packaging material
Unpack your appliance and dispose of
the packaging material in accordance
with the prevailing regulations.
Initial cleaning
Before starting to use the appliance,
wipe the baking moulds, kneading
paddles and outer surface of the bread
maker with a clean and slightly wet
cloth. Do not use any abrasive scrubbers or cleaning powders. Remove the
protective film on the control panel.
6
Features
You can use the automatic bread maker
to bake according to your taste.
• Both the baking moulds allow you
to bake 2 loaves of bread weighing
1.0 lb each.
• You can select any of the 10 different baking methods
• You can use ready-to-use baking
mixtures.
• You can knead dough for buns and
noodles and also prepare marmalades.
Cleaning
•
Seite 6
Never dip the bread machine in water
or other liquids. Hazard of lethal electrical shocks!
Do not clean the appliance with abrasive scrubbers.
Detached particles of the scrubber
may come into contact with the electrical components and cause severe
electrical shocks.
6
IB_Breadmaker_GB.qxd
7
04.02.2005
10:14 Uhr
Seite 7
Control panel
Note:
When the appliance is switched on, the
presetting is at 2.5 lb. Do not change
this setting when using 2 baking
moulds. Only select the weight when
using the large baking mould.
Pilot light
This indicates that the appliance is in
operation.
Start/Stop
Switch for starting and ending the operation or for erasing the timer programming.
Note:
Do not press the Start/Stop key, if
you wish to only check the condition
of the bread.
Display
Display for
- the selected programme number
- the selected colour
- the remaining baking time in minutes
- the programmed time setting
- the programme sequence.
Menu
For the desired Programme.
You can read the programme number
and the time required for the selected
programme on the display panel.
Timer
for changing the baking times.
Important:
When pressing any touch button you
must hear a beep.
Colour
Use this to determine the degree of
browning for your bread or to activate the
function Rapid in the programmes 1 - 3.
Memory function
In case of a power failure less than 10
minutes, the programme will continue
from the same setting on restoration of
power. However, this is not applicable, if
the Start/Stop key is activated for interrupting the baking operation.
One pan mode
You can select the weights for baking
different sizes of bread loaves.( 1.5 lb /
2.0 lb / 2.5 lb).
For this, you need the large baking moul
available as accessory.
See-through window
You can watch the baking operation
through this window.
7
IB_Breadmaker_GB.qxd
8
04.02.2005
10:14 Uhr
Seite 8
Baking programme
Using the key Menu, select the desired
programme. The corresponding programme number will be displayed in the display
field.
The baking time depends on the selected
programme combinations. For this, refer to
the table "Programme sequence" in
Section 15
Note that in this Programme the bread is
less fluffy and may not be so tasty.
Baking programme 6: Dough (kneading)
For preparing the yeast dough for buns,
pizza or plaits. In this programme no
baking is done.
Programme 7: Pasta
For preparing noodle dough.
In this programme no baking is done.
Baking programme 1: Regular
For white and mixed breads made mainly
out of wheat or rye flour.The bread has a
compact consistency. You can set the
degree of browning for the bread using the
key Colour.
Baking Programme 8: Buttermilk
For breads made with buttermilk or
curds.
Programme 9: Jam
For preparing marmalades.
Baking programme 2: French
For light breads made from fine flour.
Normally the bread is fluffy and has a crispy crust. This is not suitable for baking
recipes requiring butter, margarine or milk.
Programme 10: Bake
For re-baking breads if they are too light
or not well baked. In this Programme
there is no kneading or resting. The
bread will be warm for nearly an hour
after the end of the baking operation.
This prevents it from becoming messy.
Baking programme 3: Whole-Wheat
For breads with heavy varieties of flour that
require a longer phase of kneading and
rising (for example, whole wheat flour and
rye flour). The bread will be more compact
and heavy.
To end this function, switch the appliance off or disconnect from the mains.
Note
You can simultaneously bake
- two different varieties of bread using
the same Programme,
- two loaves of the same variety or
- only a single loaf (in this case place
the second baking mould without
the kneading paddles inside the
appliance).
Baking programme 4: Sweet
For breads with additives such as fruit
juices, grated coconut, raisins, dry fruits,
chocolate or added sugar. Due to a longer
phase of rising the bread will be light and
airy.
Baking programme 5: Super-Rapid
The baking operation takes only half the
normal time. For this programme, however,
use only such recipes that do not contain
any heavy ingredients or heavy varieties of
flour.
8
IB_Breadmaker_GB.qxd
04.02.2005
10:14 Uhr
Seite 9
In the case of Programmes 1, 3 and 4
you will hear a beep as the programme
is running.
Soon thereafter, add the ingredients
such as fruits or nuts.
The kneading paddles will not crush the
ingredients.
If you have set the timer, you can put
various ingredients into the baking
mould even at the beginning of the programme. In this case, however, fruits
and nuts should be cut into smaller pieces.
9
Setting the timer
The Timer function enables you to bake
bread while you attend to other work.
Using the arrow keys ▲ and ▼ , set the
desired end time for the baking operation.
Select a Programme. The display shows
the required baking time.
Using the arrow key ▲ you can change
the end time of baking operation in
steps of 10 minutes to a later point of
time.
Keep the arrow key pressed to carry out
this function faster. The display shows
the total duration of baking time and the
delayed time.
The colon symbol in the display field
starts to blink and the countdown for
the programmed time begins to run.
On completion of the baking operation,
a beep can be heard and the display will
show 0:00.
Example:
It is 9.30 hrs and you wish to have fresh
bread after 8 hours and 30 minutes, that
is to say, at 18:00 hrs. First, select the
Programme and press the Timer key till
you see 8:30 in the display. This indicates 8 hours and 30 minutes needed.
Note that the Timer function may not be
available in some Programmes. (Refer to
Section 11)
If you overshoot while changing the
time, you can correct it using the arrow
key ▼.
Confirm the Timer setting using the
ON/OFF key.
Note
Do not use the Timer function, if you
are working with rapidly perishable
foodstuffs like eggs, milk, cream or
cheese.
9
IB_Breadmaker_GB.qxd
04.02.2005
10:14 Uhr
Seite 10
2.
10 Before baking
3.
In order to achieve successful results
with your baking efforts, please consider
the following factors:
Ingredients
• Before you fill in the ingredients,
remove the baking mould from the
casing. If bits of ingredients are
dropped inside the baking area,
they may start burning due to
excess heat in the heating coils.
• Always, put the ingredients inside
the baking mould in the specified
sequence.
• All ingredients should be brought to
room temperature in order to achieve optimum fermentation of yeast.
• Measure the ingredients precisely.
Even negligible deviations from the
quantities specified in the recipe
may affect the baking results.
Never use larger quantities than
those specified. Too much dough
can flow over the baking mould and
cause fire in the heating coils.
Note
Make sure that yeast does not come
into contact with salt or liquids.
4.
5.
6.
7.
8.
11 Baking bread
Place the baking mould inside the
appliance. Make sure that it is positioned properly.
Close the lid.
Insert the plug into the power sokket and switch the appliance on by
using the main power switch on the
backside of the appliance.
You will hear a beep and the display
shows the programme number and
the duration for the normal programme 1.
Using the Menu key, select your
programme. Every input is acknowledged with a beep.
Select the colour for your bread.
The display shows the marking
lines, if you have set the range of
light, medium or dark baking.
Here you can also select the function
"Rapid" to minimize the baking operation.
Preparation
Follow the safety notes given in Section
4 of this manual.
Place the bread machine on an even
and firm base.
1.
Mount the kneading paddles on the
drive shaft inside the baking mould.
Make sure that it is fixed properly.
Put the ingredients for your recipe
into the baking mould in the specified sequence. First put the liquids,
and then add flour, sugar and salt.
Add the yeast at the end.
Note
This function is not possible for
Programmes 4-10.
Take out the baking mould from the
appliance in the upward direction.
10
IB_Breadmaker_GB.qxd
9.
04.02.2005
10:14 Uhr
If you wish you can set the end
point of your programme now using
the Timer function. You can adjust
the time up to 14 hours and 55
minutes.
Seite 11
Tip: After a kneading phase of 5 minutes
check the consistency of the dough.
It should have the consistency of a
soft adhesive mass. If it is too dry,
add some liquid to it.
if it is too moist, add some flour (as
the case may be, once or several
times1/2 - 1 teaspoonful).
Note
This function is not possible for
Programmes 5, 6, 7, 9 and 10.
Ending a programme
At the end of a programme, the appliance is automatically switched over to a
stand-by mode to keep the items warm
for 60 minutes.
In this mode, warm air circulates inside
the appliance. You can stop the warming function at any time by pressing
the Start/Stop key till you hear a beep.
10. Using the key "One pan mode",
select the weight of your bread. This
setting is possible only when you
use the large baking mould available
as accessory. When you use the
small baking moulds, leave the
weight setting at 2.5 lb (standard
setting), no matter if you are baking
one or two breads.
Warning!
Before opening the appliance lid,
switch the appliance off
and unplug the power cord.
Note
This function is not possible for
Programmes 5, 6, 7, 8, 9 and 10.
If not in use, the appliance should
always be disconnected from the power
supply.
Starting a Programme
Use the Start/Stop key to start the programme.
The programme will automatically run
various operations.
You can watch the programme sequence through the window provided on your
Automatic Bread Maker. Sometimes
there may be formation of water vapour
on the see-through window during the
baking operation. You can open the lid
during the kneading phase.
Taking out the bread
For taking out the baking moulds, use
potholders or kitchen gloves.
Hold the baking mould in a slanting
position supported by a metal grill and
shake it gently till the bread is released
from the mould.
If the bread is released from the kneading paddles, try to release the paddles
with a wooden spatula or a blunt object.
Note
Do not open the lid during the baking
phase. If you do so, the bread may
collapse.
11
IB_Breadmaker_GB.qxd
04.02.2005
10:14 Uhr
Do not use any metallic objects as these
may cause scratches on the non-stick
coating.
Rinse the baking mould with warm water
immediately after taking out the bread. This
prevents the kneading paddles from becoming rigid on the drive shaft.
Seite 12
12 Cleaning and maintenance
Warning!
Do not attempt to start operating the
bread maker, before it has either cooled down or warmed up.
Tip: If you remove the kneading paddles
before the bread rises for the last time, the
bread can be released from the baking
mould easily.
Please also read the safety instructions
in Section 4 in this regard.
Important
The parts and accessories of the
appliance should not be washed in a
dish washing machine.
• For this, open the lid of the appliance
and remove the baking mould. Apply
some flour to your hands to remove
the dough and then the kneading
paddles.
Casing, lid and baking area:
Remove all particles left behind inside
the baking area using a wet cloth or a
slightly wet soft sponge. Wipe the
casing and the lid too with a wet cloth
or sponge. Make sure that the inside
area is fully dry.
• Put the dough back in its place and
close the lid.
Allow the bread to cool down for 15-30
minutes before you attempt to taste it.
Before slicing the bread, always make sure
that there are no kneading paddles in the
dough.
Baking moulds and kneading paddles:
The surface of the baking moulds and
the kneading paddles are provided with
a non-stick coating. While cleaning, do
not use any corrosive detergents, cleaning powders or objects that may cause
scratches on the surface.
Warning!
Do not attempt to start operating the
appliance, before it has either cooled
down or warmed up.
If the display on the bread maker shows
"E 01", the appliance is not sufficiently
cooled down.
If the display shows "E 00", the temperature is too low. Wait till the display disappears.
Due to moisture and vapours the surface of various parts may undergo changes in their appearance over a period of
time. This does not affect the quality or
functional performance of the appliance.
Tip: While using the Timer function
especially, make sure that yeast
does not mingle with the moist
ingredients. This may affect the
rising of the dough.
12
IB_Breadmaker_GB.qxd
04.02.2005
10:14 Uhr
Before cleaning, take out the baking
moulds and the kneading paddles from
the baking area. Wipe the outer surface
of the baking moulds with a wet cloth.
Seite 13
YEAST
In the fermentation process, yeast splits
the sugar and carbohydrate contained in
the dough and converts them into carbon dioxide, which causes the dough to
rise.
Yeast is available in different forms: as
dry yeast, as fresh yeast or as fast fermenting yeast. We recommend using
dry yeast for the Automatic Bread Maker
to obtain the best results.
Important
Never dip the baking moulds in water
or any other liquids.
Use warm soap water to clean the inside of the baking moulds.
If hard layers of crusts have formed on
the kneading paddles and are difficult to
remove, fill the baking moulds with
warm water and allow them to soak for
about 30 minutes.
If the insertion grip in the kneading
paddle is blocked, use a wooden peg to
carefully clean it.
When using fresh yeast instead of dry
yeast, follow the instructions given on
the package.
Normally, 1 packet of dry yeast corresponds to 25g of fresh yeast.
Always store yeast in the refrigerator, as
heat decomposes it. Before use, check
the expiry date. After opening the pakket, unused yeast should be carefully
wrapped again and stored in the refrigerator
Do not use any chemical cleaning
agents or thinners to clean the bread
maker.
Note:
For recipes suggested in this instructions manual, we recommend the use
of dry yeast.
13 About ingredients
FLOUR
Most of the commercially available varieties of flour such as wheat or rye flour are
suitable for baking (Type 405-1150).
You can also use ready-to-use bread
baking mixtures.
Programmes 1 and 2 are ideal for adding
small proportions (10-20%) of grains or
bruised grain.
In case of larger proportions of whole meal
(70-95%) use programme 3.
13
IB_Breadmaker_GB.qxd
04.02.2005
10:14 Uhr
Seite 14
FATS: BAKING FAT, BUTTER OR OIL
Baking fats, butter and oil make the
yeast containing bread mellow. The unique form of crust and structure in breads according to French style is due to
its fat-free ingredients. However, bread
stays fresh longer if fat has been used in
its processing. If you use butter directly
from the refrigerator, cut it into small bits
to optimise mixing with the dough
during the kneading phase.
SUGAR
Sugar has the decisive influence on the
degree of browning and taste of the
bread. For the recipes in this manual of
instructions, it is necessary to use crystallized sugar. Do not use powdered
sugar, unless it is expressly specified.
Sweeteners are not suitable as alternatives to sugar.
SALT
Salt is an important ingredient for taste
as well as for the degree of browning of
the bread. Salt also has an inhibiting
effect on the fermenting of the yeast.
Therefore, do not exceed the quantity of
salt specified in the recipes. In case of
dietary restrictions salt can be omitted.
In such cases, the dough may rise faster
than normal.
MEASURING THE INGREDIENTS
Along with our Automatic Bread Maker,
you will receive the following measuring
cups, which make the task of measuring
the ingredients easier for you:
1 Measuring cup with quantity level markings
1 Large measuring spoon corresponding
to one tablespoon
(TBSP)
1 Small measuring spoon corresponding
to one teaspoon
(TSP)
Place the measuring cups on an even
surface. Make sure that the quantities
reach the measuring lines correctly.
While measuring dry ingredients, make
sure that the measuring cup is dry. All
quantity specifications for TBSP/ TSP
refer to the lines on the measuring
spoon.
LIQUIDS
Liquids like milk, water or milk powder
dissolved in water can be used for
making bread. Milk adds to the taste of
the bread and softens the crust, whereas pure water gives a crispy crust. In
some recipes, the use of fruit juices is
indicated in order to give a particular flavour to the bread.
EGGS
Eggs enrich the bread and provide a
soft structure to it. Use eggs while
baking according recipes given in this
instructions manual for large sized breads.
14
IB_Breadmaker_GB.qxd
14
04.02.2005
10:14 Uhr
Seite 15
Baking tips
Slicing and storing the bread
You can achieve the best results, if you
place the freshly baked bread on a grill
before slicing it and allow it to cool
down for 15 to 30 minutes. Use a bread
slicing machine or a toothed knife to
slice the bread. Unconsumed bread can
be stored at room temperature for up to
3 days in suitable plastic bags or containers. If you wish to store the bread for
longer periods (up to 1 month), you
should freeze it.
Since homemade bread does not contain preservatives, it gets spoilt faster
than the commercially manufactured
bread.
Baking in different climatic regions
In areas located at higher altitudes, the
lower atmospheric pressure causes
yeast to ferment faster. Hence, less
amount of yeast is required here.
In dry regions, the flour will be drier and
requires more liquids.
In humid regions, the flour will be more
moist and thus absorbs less amount of
liquids. In such areas, more flour is
required.
Ready-to-use baking mixtures
You can also use ready-to-use baking
mixtures with this Automatic Bread
Maker.
Follow the manufacturer’s instructions
on the package.
The following table provides you the
examples of conversion for some of the
baking mixtures. For the small baking
mould use 2/3 of the quantity that is
required for a 750g bread.
Varieties of bread
Baking mixture for a
750 g bread
Baking mixture for a
500 g bread (small baking mould)
White bread
500 g baking mixture
300 ml water
330 g baking mixture
200 ml water
500 g baking mixture
320 ml water
330 g baking mixture
213 ml water
500 g baking mixture
340 ml water
330 g baking mixture
226 ml water
Whole meal bread
Peasant bread
Note: A large baking mould for breads up to 1250 g is available as accessory.
Use the enclosed form for placing an order.
15
IB_Breadmaker_GB.qxd
04.02.2005
10:14 Uhr
Seite 16
15 Table of programming sequences
Time plan for the Programme phases
Programme
Programme 1
Size (lb)
1.5 lb (One pan mode)
2.0 lb (O
Colour
Light
Medium
Dark
Rapid
Light
M
Total duration (hrs)
3:13
3:13
3:13
2:12
3:18
3:
Preheat
-
-
-
-
-
-
Knead 1 (min)
5
5
5
5
5
5
Rest (min)
5
5
5
5
5
5
Knead 2 (min)
20
20
20
20
20
2
Rise 1 (min)
39
39
39
15
39
3
Mixing the dough (s)
10
10
10
10
10
1
approx.
25
a
2
15
1
approx.
49
a
4
Rise 2 (min)
approx.
25
Shaping the dough (s)
15
approx. approx.
25
25
15
15
10
Rise 3 (min)
approx.
49
Bake (min)
48
48
48
48
53
5
Keep warm (min)
60
60
60
60
60
6
Set time (hrs)
14:53
14:53
14:53
14:57
14:58
1
Additional time (hrs)
2:51
2:51
2:51
1:50
2:56
2
16
approx. approx.
49
49
approx.
8
approx.
29
IB_Breadmaker_GB.qxd
04.02.2005
10:14 Uhr
Seite 17
Programme 1 Regular
n mode)
2.0 lb (One pan mode)
2.5 lb
rk
Rapid
Light
Medium Dark
Rapid
Light
Medium Dark
Rapid
3
2:12
3:18
3:18
3:18
2:17
3:25
3:25
3:25
2:24
-
-
-
-
-
-
-
-
-
5
5
5
5
5
5
5
5
5
5
5
5
5
5
5
5
5
5
5
5
0
20
20
20
20
20
20
20
20
20
9
15
39
39
39
15
39
39
39
15
0
10
10
10
10
10
10
10
10
10
approx.
25
approx. approx. approx.
25
25
8
approx.
25
approx. approx. approx.
25
25
8
15
15
15
15
approx.
49
approx. approx. approx.
49
49
29
approx.
49
approx. approx. approx.
49
49
29
rox.
5
5
rox.
9
approx.
8
10
approx.
29
15
10
15
10
8
48
53
53
53
53
60
60
60
53
0
60
60
60
60
60
60
60
60
60
53
14:57
14:58
14:58
14:58
14:57
14:55
14:55
14:55
14:57
51
1:50
2:56
2:56
2:56
1:55
3:03
3:03
3:03
2:02
17
IB_Breadmaker_GB.qxd
04.02.2005
10:14 Uhr
Programme number
Programme name
2
3
4
5
French
Whole-Wheat
Sweet
Super-Rapid
2.0
2.0
2.0
2.5
Size (lb)
Colour
Seite 18
Do
medium
fast
medium
fast
-
-
3:32
2:32
3:45
2:30
3:22
1:20
Preheat
-
-
30
5
-
-
Knead 1 (min)
5
5
5
5
5
20
Rest (min)
5
5
5
5
5
-
Knead 2 (min)
20
20
15
15
20
-
2
Rise 1 (min)
39
15
49
24
39
12
6
Knead 3 (s)
10
10
10
10
10
-
Total duration (hrs)
Rise 2 (min)
Shaping the dough (s)
Rise 3 (min)
approx. 30approx. 15approx. 25approx. 10approx. 25
10
10
10
10
5
approx. 59approx. 38approx. 44approx. 34approx. 51
-
Bake (min)
52
52
50
50
55
48
Keep warm (min)
60
60
60
60
60
60
14:52
14:52
14:55
14:50
14:52
-
-
-
3:23
2:08
3:00
-
Set time (hrs)
Additional time (rsh)
Please note: For the setting "Size 1.5 lb", the total time is reduced by 2 minutes.
18
1
IB_Breadmaker_GB.qxd
04.02.2005
10:14 Uhr
Seite 19
5
6
7
8
9
Super-Rapid
Dough
Pasta
Buttermilk-
Jam
2.5
-
-
2.0
-
-
-
-
-
-
1:20
1:30
0:14
3:55
1:05
-
-
-
30
-
20
5
3
5
-
-
5
-
10
-
-
20
11
20
-
12
60
-
39
-
-
-
-
10
1
-
-
-
approx. 25
-
-
-
-
10
-
-
-
-
approx. 44
10
48
-
-
60
50
60
-
-
60
60
-
-
-
14:55
-
-
-
-
3:33
-
x. 25
x. 51
Please note: For the setting "Size 2.5", the total time is increased by 3 minutes.
19
IB_Breadmaker_GB.qxd
04.02.2005
10:14 Uhr
Seite 20
16 FAQs / Troubleshooting
QUESTION
What should I do, if the kneading paddle
is stuck in the bread?
ANSWER
Remove the kneading paddles with a
wooden spatula. Do not use any sharp
objects, which may damage the coating
of the kneading paddles.
Why does my bread occasionally have
some flour on the side crusts?
Your dough may be too dry. The next
time measure the ingredients correctly.
Add1/2 to 1 TBSP of more liquid.
Why doesn't the dough get stirred, even
if the motor is running?
Make sure that the kneading paddles
and baking mould are positioned properly.
How long does it take to bake bread?
Please refer to the precise timings in the
table Programme sequence in Section
16.
Why can't I use the Timer function while
baking with fresh milk?
Fresh products such as milk or eggs get
spoilt, if they remain in the appliance for
too long. Therefore, do not use the
Timer.
What happens if there is a power failure
when a Programme is running?
In case of power failure for less than 10
minutes, the bread maker will run the
last implemented Programme till the
end.
Why do I need to add the ingredients in
a particular sequence?
This is the best way to prepare the
dough.When the Timer function is used,
it prevents yeast from mingling with
liquids, before the dough is stirred.
What size breads can I bake?
You can simultaneously bake 2 loaves of
1.5 lb each or, you can use the large
baking mould (can be ordered) to bake
breads of up to 2.5 lb.
20
IB_Breadmaker_GB.qxd
04.02.2005
10:14 Uhr
Seite 21
Fill the baking mould with hot water and
turn the kneading paddle to release the
crusts underneath it
What should I do if the kneading paddle
is stuck inside the baking mould after
baking?
What is the Watt rating of the appliance?
The appliance is rated for 855 Watts
(see label on the model).
Can the baking moulds be washed in a
dishwasher?
No. Please wash the baking moulds and
kneading paddles with hands. Do not
dip the baking moulds in water.
The function "Keep warm" ensures that
the bread is kept warm for nearly 1 hour
and protected from humidity. If the
bread is left inside the bread maker for
more than 1 hour, it may become moist.
What happens if the finished bread is
left inside the bread maker?
Check that the kneading paddles and
baking moulds are positioned properly
Also check the consistency of the dough
and add 11/2 to 1 TBSP of liquids or
flour, one or more times after kneading.
For ready-to-use baking mixtures: the
quantity of ready-to-use baking mixture
and the ingredients is not based on the
capacity of the small baking moulds (500
g). Reduce the quantities of the ingredients as described in Section 14.
Why has the dough been kneaded only
partially?
The yeast used was too old or no yeast
has been added.
Why hasn't the bread risen?
You will hear a beep, when you are
expected to add the ingredients. If you
add these ingredients to the dough in
the beginning itself, the nuts or fruit may
get crushed at the time of kneading.
When should I add nuts and fruits to the
dough?
21
IB_Breadmaker_GB.qxd
04.02.2005
10:14 Uhr
Seite 22
The baked bread is too moist.
Check the dough consistency 5 minutes
after beginning of the kneading operation and add1/2 to 1 TBSP of liquid or
flour, if necessary.
There are air bubbles on the surface of
the bread.
You may have used too much yeast.
The added raisins get crushed in the
appliance.
To prevent ingredients such as fruits or
nuts from being crushed, add these to
the dough only after you hear the beep.
Check the consistency of the dough If
too dry, the dough will not hold the raisins.
The bread rises but collapses later.
Can other recipes be used?
The bread may be rising too fast. To
prevent this, reduce the water quantity
and / or increase the quantity of salt and
/ or reduce the quantity of yeast.
You can use other recipes, but follow
the specified quantities. Get to know
your appliance well and the recipes
given here, before you try out your own
recipes. Never exceed flour quantity of
350 g. Adjust the quantities of your recipes to the quantities specified for the
recipes given in this booklet.
Why do different breads vary in their size
and weight?
Whole wheat flour and rye flour are heavier than all-purpose white flour; so,
bread made of these flours rise less
during baking. Grains and nuts also
make them dense and suppress the
size.
22
IB_Breadmaker_GB.qxd
04.02.2005
10:14 Uhr
17 Technical Data
Model
bifinett
Automatic Bread
Maker
Power supply
Power consumption
Dimensons
Weight
KH 2231
230V~50Hz
850 Watt
29.5 x 23.5 x 39.5
6300 g
18 Warranty & Service
The warranty conditions and service
address can be found in the enclosed
warranty slip.
Light
19 Disposal
Never throw the Automatic Bread Maker
into the normal household waste.
Enquire with local authorities about the
method of environment-friendly and safe
disposal.
23
Seite 23
IB_Breadmaker_GB.qxd
04.02.2005
10:14 Uhr
Seite 24
20 Recipes for one bread (1.5 lb)
Programme 1 Regular
Programme 2 French
Wheat Bread
200 ml Water
7g Sugar
5g Salt
50g Sunflower seeds
12g Butter
170g Wheat flour Type 550
85g Wheat flour Type 1050
85g Rye flour Type 1150
4g Dry yeast
French White Bread
210 ml Water
1,5 Tbsp Oil
1,5 Tsp Salt
1 Tbsp Sugar
350g Wheat flour Type 405
0,25 Tsp Dry yeast
Fine White Bread
210 ml Lukewarm milk
30 g Mellow butter
1,5 Tsp Salt
0,5 Tsp Sugar
340 g Wheat flour Type 405
1,5 Tsp Dry yeast
Regular White Bread
180 ml Water
4 Tsp Oil
4 Tsp Sugar
1 Tsp Salt
315 g Wheat flour Type 405
1,5 Tsp Dry yeast
Programme 3 Whole-Wheat
Wheat Bread
260g Milk
7g Salt
9g Sugar
20 g Butter
340g Wheat flour Type 1050
2g Dry yeast
Onion Bread
180 ml Water
4 Tsp Oil
2 Tbsp Instant-onion soup
1 Tsp Sugar
1 Tsp Salt
315 g Wheat flour Type 405
1,5 Tsp Dry yeast
Wheat Bread
350 ml Water
4 Tbsp Oil
1-2 Tsp Salt
400 g Fine shredded wheat
100 g Wheat flour Type 1050
2TL Dry yeast
Rye Bread
180 ml Water
4 Tsp Oil
2 Tsp Caraway seeds
4 Tsp Brown sugar
1 Tsp Salt
210 g Wheat flour Type 405
94 g Dark rye flour Type 1150
1,5 Tsp Dry yeast
24
IB_Breadmaker_GB.qxd
04.02.2005
Sweet Raisin Bread
120 ml Water
1 Egg
4 Tbsp Oil
4 Tbsp Sugar
1 Tsp Salt
315 g Wheat flour Type 405
40 g Raisins
1,5 Tsp Dry yeast
Whole-Wheat Bread
180 ml Water
2 El oil
2 Tbsp brauner Sugar
1 Tsp Salt
281 g Whole-wheat flour
1,5 Tsp Dry yeast
Oatmeal-Bread
180 ml Water
2 Tbsp Oil
2 Tbsp Brown sugar
0,5 Tsp Salt
105 g Wheat flour Type 405
188 g Whole-wheat flour
85 g Oatmeal
2,25 Tsp Dry yeast
Pumpernickel-Bread
180 ml Water
1 Tbsp Oil
2 Tbsp Brown sugar
1 Tsp Salt
30 g Dark rye flour Type 1150
105 g Whole-wheat flour
190 g Wheat flour Type 405
1 Tsp Unsweetened cocoa
1 Tsp Instant-coffee
1,5 Tsp Dry yeast
10:14 Uhr
Seite 25
Programme 4 Sweet
Raisins-Nuts-Cinnamon-Bread
180ml Water
4 Tsp Oil
0,5 Tsp Cinnamon
2 Tsp Brown sugar
1 Tsp Salt
315 g Wheat flour Type 405
60 g Raisins
45 g Chopped nuts
1,5 Tsp Dry yeast
Holiday Bread
60 ml Water
120 ml Milk
1 Tbsp Oil
1,5 Tsp Salt
3 Tbsp Sugar
315 g Wheat flour Type 405
40 g Chopped walnuts
55 g Candied fruits
1,5 Tsp Dry yeast
Sweet Bread
210 ml Milk
1,5 Tbsp Oil
1,5 Tsp Salt
3 Tbsp Sugar
350g Wheat flour Type 405
0,25 Tsp Dry yeast
Raisin-Bread
120 g Lukewarm milk
30 g Melted butter
1 Egg
50 g Sugar
1 Pinch salt
300 g Wheat flour Type 405
1,5 Tsp Dry yeast
50 g Raisins
IB_Breadmaker_GB.qxd
04.02.2005
10:14 Uhr
Seite 26
Programme 5 Super-Rapid
Programme 7 Pasta
Express White Bread
180 ml Water
4 Tbsp Oil
4 Tbsp Sugar
1 Tsp Salt
315 g Wheat flour Type 405
2 Tsp Dry yeast
Dough for Noodles
180 ml Water
1 Tbsp Oil
1 Tsp Salt
280 g Wheat flour Type 405
Express White Bread
200 ml Water
4g Salt
3g Sugar
100g Durum wheat semolina
230g Flour Type 550
1,2 g Dry yeast
Buttermilk-Bread
225 ml Buttermilk
1,5 Tbsp Margarine or butter
1 Tsp Salt
2 Tbsp Sugar
400 g Wheat flour Type 405
0,75 Tsp Dry yeast
Quick Bread
225 ml Water
1 Tsp Salt
1 Tbsp Sugar
350 g Flour (Type 204)
1,5 Tsp Dry yeast
Buttermilk-Bread
160 ml Buttermilk
1 Tsp Salt
1 Tbsp Sugar
280 g Wheat flour
0,5 Tsp Dry yeast
Programme 6 Dough
Buttermilk-Bread
220 ml Buttermilk
30 g Low fat durd cheese
1 Tbsp Sun flower oil (10 g)
40 g Wheat corns (soaked in water for
one day)
1,5 Tsp Salt (15g)
0,5 Tsp Sugar
80 g Whole-wheat shred
30 g Oatmeal
200 g Wheat flour Type 405
1,5 Tsp Dry yeast
Programme 8 Buttermilk
Dough for Pizza (für 2 Pizzas)
150 ml Water
2 Tsp Oil
0,75 Tsp Salt
0,5 Tsp Sugar
300 g Wheat flour Type 405
1,25 Tsp Dry yeast
Dough for Baps
160 ml Milk
1 Tbsp Oil
1 Tsp Salt
1 Tbsp Sugar
280g Wheat flour Type 405
0,5 Tsp Dry yeast
26
IB_Breadmaker_GB.qxd
04.02.2005
10:14 Uhr
Programme 9 Jam
Put any fruits and jellifying sugar at a
ratio of 2:1 in the baking mould.
Maximum quantities:
500 g fruits (cut in pieces)
250 g jellifying sugar
Suitable fruits are strawberries, raspberries or other kinds of berries, apricots,
oranges, cherries etc.
Tip: Adding one teaspoon of lemon juice
gives your jam a special flavour.
Fill the hot and fluid jam in preserving
glasses. Close the glasses and place
them on the lid. This way you can be
sure your jam is vacuum sealed.
Note:
The jam will be hard when it gets cool.
27
Seite 27
IB_Breadmaker_GB.qxd
04.02.2005
10:14 Uhr
Seite 28
Kompernaß Handelsgesellschaft mbH · Burgstraße 21 · D-44867 Bochum
06/2004-KH2231