1
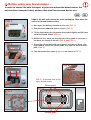
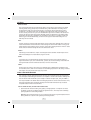
Before using your bread-maker …
In order to ensure the safe transport of your new automatic bread-maker, the
unit contains transport safety devices that must be removed before use.
FIG 1.
Unpack the unit and remove the outer packaging. Then place the
unit on a flat and stable surface.
1. Now open the baking chamber of the unit. (FIG. 1.)
2. Remove the cardboard spacer inserts. (FIG. 2.)
3. Tilt the two baking tins forward or backward slightly and lift them
out of the bread-maker. (FIG. 3.)
4. Below the tins, there are four pairs of silicon pads in recesses in
the base, as shown at the left. (FIG. 4. and FIG. 5.)
FIG 2.
5. Grasp the silicon pads with your fingers and remove them. You
may need to loosen the silicon pads, e.g. with the aid of a toothpick. (FIG. 4.)
6. The removed silicon pads (8 pieces) are shown in FIG. 6..
FIG 6.
FIG 3.
(8 pieces)
FIG. 5. Overhead view of the
open bread-maker
Silicon pads
FIG 4.
FIG 5.
Silicon pads
KH 2230
OPERATING MANUAL
IMPORTANT SAFETY INSTRUCTIONS
FOLLOW THESE SAFETY INSTRUCTIONS CLOSELY:
•
•
•
•
•
•
•
•
•
•
•
•
•
•
•
•
•
•
•
•
•
•
•
•
Read all instructions thoroughly.
Do not touch any hot surfaces. Use handles, knobs or a potholder.
Do not close or clog the steam vent openings. A steam outlet to a certain degree is normal. Do not
cover the steam vent openings.
To avoid the danger of electric shock, do not immerse the lead, plug or any other part of this bread
machine in water or other liquids.
Electric appliances should not be used by or near children unless they are under close supervision.
Unplug the power supply lead when the appliance is not in use, or before cleaning. Allow it to cool
down before putting on or taking off any parts.
Do not use or operate the appliance with a damaged lead or plug or after the appliance
malfunctions or has been damaged in any way. Return the appliance to the nearest authorized
service facility for inspection, maintenance and repair.
The use of accessory attachments not recommended or sold by the manufacturer may cause injuries.
Do not use the bread machine outdoors.
Do not let the power supply lead hang over sharp edges or come into contact with hot surfaces.
Do not place the appliance on or near any hot gas, electric burners, or a heated oven.
Extreme caution must be used when moving the appliance with hot or liquid contents.
To disconnect the appliance from the mains, press STOP and then remove the plug from the socket.
Always pull on the plug itself and never on the lead.
Do not use the bread machine for any other than the intended purpose.
Avoid contact with moving parts while they are operating.
Ingredients must be poured only into the baking tins. This must be done before placing the baking
tins into the appliance.
Do not use the appliance in the vicinity of explosive and/or inflammable gases.
The appliance is intended for household use only and not for commercial or industrial use.
To avoid damaging the machine, do not place the baking tin or any object upon the unit.
Do not clean with scouring pads. Pieces can break off the pad and touch electrical parts, creating
the risk of electric shock.
Do not use the bread machine for storage purposes or insert any utensils, as they may cause a
fire or electric shock.
The power-supply lead quite short so as to reduce the risk of becoming entangled with or tripping
over keep it. An extension lead may be used, provided that the necessary caution is exercised.
If an extension lead is used, make sure that the specified electrical rating of the extension lead is at
least as high as the electrical rating of the appliance.
The lead should be arranged in such a way that nobody can trip over it accidentally and children
cannot pull on it.
3
TABLE OF CONTENTS
IMPORTANT SAFETY INSTRUCTIONS
TABLE OF CONTENTS
BFEORE YOUR FIRST USE
ABOUT YOUR BREAD MACHINE
KNOW YOUR BREAD MACHINE
CONTROL PANEL
SETTINGS
USING YOUR BREAD MACHINE
USING THE TIMER
MEINTENANCE AND CLEANING
HELPFUL INFORMATION ABOUT INGREDIENTS
RECIPE TIPS
BREAD MACHINE CYCLE TIMES
RECIPES
QUESTIONS AND ANSWERS / TROUBLESHOOTING
BEFORE FIRST USE
Before first usage, please read this Instruction Manual thoroughly and keep it handy for future
reference. Please pay particular attention to the safety instructions.
Carefully unpack the bread machine and remove all packaging materials. To remove any dust that
may have accumulated during packing, wipe the baking tins, kneading blades and outer surface of
the bread machine with a clean, damp cloth. Do not use scouring pads or any abrasives to clean any
part of the machine.
ABOUT YOUR BREAD MACHINE
•
•
•
•
•
•
•
•
•
Your new bread machine is able to bake two 1-pound loaves of bread.
A special EXPRESS-setting makes it possible to complete the bread-making process in a shorter time.
This applies to special recipes only.
The Fruit and Nut Beep signals at the time when you can add ingredients, such as fruits, nuts or
chips. Instead of being chopped by the kneading blade, the ingredients will maintain their shape
and texture. If you use the TIMER to delay baking, you may add all the ingredients at once and
bypass the function. However, the fruits, nuts or chips may get somewhat chopped in this case.
The colour at the end of the bread crust can be adjusted according to your personal preference.
The TIMER enables you to program the end of the baking process.
The VIEWING WINDOW allows you to observe the bread-making process.
The KEEP WARM function prevents the bread from getting soggy by keeping the finished bread
warm up to an hour after the completion of the baking process. This function stops when the unit
is turned off or unplugged.
The machine has got a POWER LOSS MEMORY, which resumes the interrupted cycle after a shortterm power loss.
After unplugging the unit and letting it cool off, remove any spilled ingredients or crumbs from the
baking chamber, using a damp sponge or cloth.
IMPORTANT: Always add the ingredients exactly in the order specified in the recipe. To obtain the best
results, accurate measuring of ingredients is vital. Do not put larger quantities than recommended into
the baking tin, as this may produce poor results and even damage the bread machine.
4
KNOW YOUR BREAD MACHINE BIFINETT KH 2230
1.
2.
3.
4.
5.
6.
7.
8.
9.
10.
11.
12.
Lid
Lid Handle
Viewing Window
Air Vents
Baking Tin
Baking Chamber
Control Panel
Main Housing
Power Flex
Power Plug
Drive Shaft
Kneading blade
CONTROL PANEL OF THE BIFINETT KH 2230
Note: Please peel off the plastic sticker on the control panel before its first use.
Note: When using the touch pad controls, be sure to press the pad until you hear a beep.
WINDOW-DISPLAY
•
•
•
•
Shows the MENU number(s) selected.
Shows the CRUST COLOUR selected.
Shows minute-by-minute baking time countdown.
Shows the DELAY BAKING TIME selected.
TIMER
•
•
•
Use this button when setting the TIMER to delay baking.
Press the and buttons to set the timer for delayed completion.
The arrows move the time up or down in 10-minute intervals. Keep pressing the buttons for
faster movement. The TIMER function is not available on some cycles; check the Bread Machine
Cycle Times.
MENU
•
Press this button to select the cycle or cycle combination of your choice. The time needed by the
selected cycle to complete its process appears in the display.
COLOUR
•
•
By pressing this button, you can either select the desired crust colour or, alternatively, activate the
Express mode.
Choose from Light, Medium or Dark, or activate the Express mode.
START/STOP
•
•
Press to start the operation of the machine or to begin TIMER countdown for delayed completion.
Keep pressing this button until you hear a beep to stop the operation of the
machine or to cancel a TIMER setting.
Note: Do not press STOP when just checking the progress of bread
5
SETTINGS
BREAD SETTINGS:
Your new bread machine has four bread settings (Basic, French, Wheat, Sweet) and two time modes
(Normal [default setting] and Express). Each bread setting is described below. The baking times in
the Normal time mode vary from 2:00 to 3:30 hours, according to the selected setting or setting
combination. In the Express time mode, the baking times range between 0:45 and 1:50 hours. For
the exact setting times we refer you to the “Bread Machine Cycle Times” schedule. The Normal time
will give you the best results. Only specially designed recipes are appropriate for the Express mode.
Heavy flours and other heavy ingredients are not suitable for this setting. It is possible to make two
different types of bread simultaneously, to make the same type of bread in both baking tins or to
make only one loaf of bread.
BASIC
The basic settings are used for breads that primarily consist of white flour, although some recipes may
include small amounts of whole wheat flour. These settings have the minimum number of rising cycles
and the shortest overall operating times. Therefore, loaves will be slightly denser than French or Sweet
breads. Choose from Basic settings and select the desired crust colour.
FRENCH
Traditionally, French bread has a crispier crust and lighter texture than Basic bread. Recipes for this
kind of bread usually do not include butter, margarine or milk.
WHEAT
In this setting you can make bread with significant amounts of heavier types of wheat requiring a
longer knead and rise cycle, such as whole wheat, rye flour, oats or bran. Generally, whole wheat and
multi-grain breads are shorter and denser than basic, French or sweet breads.
SWEET
Use this setting for recipes in which fruit juice, additional sugar or added sweet ingredients such as
coconut flakes, raisins, dried fruit or chocolate are used. Baking temperature in this setting is reduced
and a longer rise cycle gives the loaf a light, airy texture.
USING YOUR BREAD MACHINE
After a setting or setting combination has been selected, your new bread machine will automatically
move through its bread making process down to its completion. Thanks to the automatic TIMER you can
have the machine make bread while you are asleep or otherwise occupied. (See „Using the TIMER“.)
The recipes included in this booklet have been thoroughly tested so as to ensure the best results. They
have been prepared by home economists especially for these bread machines and may not lead to
acceptable results with other bread machines.
FOR ALL BREAD SETTINGS, FOLLOW THESE INSTRUCTIONS:
1. Open the lid and remove the baking tin by pulling it straight upwards. It is important to remove
the baking tin from the unit before putting any ingredients into it. This will prevent accidentally
spilling ingredients into the baking chamber.
Warning: Place the bread machine on a level, stable and safe surface. Ingredients spilled into the
baking chamber can cause fire when ignited by the heating element.
6
2. Attach the kneading blades onto the shafts inside the baking tins by lining up the flat side of the
blade with the flat side on the shaft. Push the blade firmly onto the shaft.
Attention: Be sure to fix the kneading blade firmly to its place to prevent it from loosening during
its operation, which might have a detrimental effect on the kneading or mixing process. Be sure
the shaft is clean of any residue (i. e. dough). This will keep the kneading blade firmly fixed in
its place and prevent it from sticking to the shaft.
3. Select a recipe from the recipe section of this booklet and follow these instructions:
Measure the ingredients carefully and accurately. To measure liquids, use a see-through liquid
measuring cup and check the measurement at eye level. When measuring dry ingredients, use a
standard dry measuring cup and level the ingredients with a straight-edge knife. Even a slightly
inaccurate measurement can make a difference in results. Use standard measuring spoons and level
off with a straight-edge knife. (For further information see „Measuring Your Ingredients.“)
Always add the ingredients to the baking tin in the specified order.
Always add yeast last. Be sure that the yeast does not come into touch with liquid ingredients.
Attention: Be careful not to mix the yeast with any wet ingredients, especially when using the
TIMER feature. Otherwise, the bread may no not rise properly.After 5 minutes of kneading, open the
lid of the bread machine and check the dough consistency. The dough should form a soft, sticky ball.
If it is too dry, add liquid. If it is too wet, add flour (1/2 to 1 tablespoon at a time)
4. Place the baking tin into the unit and push it down until you hear it click firmly into its place.
Special note: If one of the baking tins is not fixed properly, the blade will not operate.
5. Close the lid. Connect the plug with a 220 – 240-volt-rated AC-outlet. You will hear a beep.
The display will show the default settings of Basic & Basic in its Normal time mode (2:10) for
both baking tins.
6. Choose the desired setting by pressing the MENU button. Each time MENU is pressed you will hear
a beep and the number in the display window will advance to the next cycle. There are 10 preset
combinations. If no selection is made, the default setting is BASIC & BASIC.
Setting combinations:
1
2
3
4
5
6
7
Basic
Basic
Basic
Basic
French
French
French
Basic
Wheat
Sweet
French
French
Sweet
Wheat
7
8 Wheat
9 Wheat
10 Sweet
Wheat
Sweet
Sweet
7. Press the COLOUR button to choose the crust colour. When you press the button you will hear a
beep and the display window will show the colour you selected. Alternatively, you can also select
the Express mode with this button.
Note: At this point, you can press the TIMER button to delay the completing of the baking process
for up to 13 hours For further details see Using the Timer.
8. Press the START/STOP button to start the chosen setting. The remaining time will count down in
one-minute intervals. At the end of the baking time a beep will sound five times.
Bread-making Tip: After 5 minutes of kneading, open the lid of the unit and check the dough
consistency. The dough should form a soft, sticky ball. If it is too dry, add liquid. If it is too wet,
add flour (1/2 to 1 tablespoon at a time).
9. The bread machine is designed with a Keep Warm feature, which automatically begins functioning
as soon as the baking time has ended. This will continue for up to 60 minutes after the end of
the baking process. During this time, the system will circulate hot air to keep the bread warm. You
can turn off the Keep Warm feature before the end of the 60 minutes. Simply press the START/STOP
button and keep it pressed until you hear a beep. UNPLUG THE UNIT AFTER ITS USE! Never leave the
unit plugged in when not in use.
10. The bread machine has a convenient viewing window so that you may observe the progress of the
bread as the bread-making process goes through its stages. Occasionally, some moisture may form
on the window during the bread-making process. You may open the lid to look into the unit during
the mixing and kneading stages. HOWEVER, DO NOT OPEN THE LID DURING THE BAKING CYCLE, as
this may cause the bread to collapse.
Warning: To avoid damaging the bread machine, do not put any objects upon it.
11. To remove the baking tins from the unit, use pot holders or oven gloves and pull the tins
upwards. Turn the tins upside down and shake the bread out onto a wire cooling rack. Do not use
any metal utensil to remove the bread, as they may scratch the non-stick surface. If you have
difficulty removing the bread from the baking tin, use a plastic spatula or something similar to
loosen the loaf. Turn the tin over and shake the loaf out.
Before slicing the bread, allow it to cool off. See Slicing and Storing Bread. If the kneading blade
sticks to the shafts at the bottom of the baking tin, put hot water into the tin for the kneading
blade to loosen. If the kneading blade remains in the bottom of the bread, use the end of a plastic
spoon or other non-metal utensil to remove it. Do not use a knife or any other sharp metal object
as it will scratch the non-stick coating.
Attention: Before slicing the bread, always make sure that the kneading blade is removed from the loaf.
Important: To prevent the blade from sticking to the shaft, put warm water into the tin
immediately after removing the bread.
12. In case of overheating of the unit, the DISPLAY WINDOW will show „E 01“, if the temperature is too
low, „E 00“ will show up. When either of these error messages is displayed, the bread machine will
not function until it has either cooled off or warmed up.
Caution: Do not try to make another loaf until the bread machine has cooled down or warmed up.
8
USING THE TIMER
Use the TIMER button to delay the completion of the bread-making process. You can set the machine
to start up to almost 13 hours later.
TO SET THE TIMER, FOLLOW THESE INSTRUCTIONS:
Note: First, follow the steps 1 through to 7 in Using Your Bread Machine. Do not use the TIMER with
recipes that call for perishable ingredients, such as eggs, fresh milk, sour cream or cheese.
1. Determine the time you want to have the bread finished. For example: It is 7:30 p.m. and you want
the bread to be finished at 08:00 a.m. next morning. After selecting the correct setting according to
the recipe, keep the TIMER button pressed until 12:30 appears in the display, as the time until the
end of the baking process amounts to 12 hours and 30 minutes.
2. There is no need to calculate the difference between the setting time and the total hours up to the
end of the bread-making process. The machine will automatically adjust to include the setting time.
If you pass the desired time, simply press to go back.
3. After setting the desired time, press START. The colon (:) in the display will flash to indicate that
the Timer has been set, and the countdown will begin. The TIMER will count down the remaining
period in one-minute intervals. When the TIMER reaches 0:00, the bread-making process will have
finished and the beeper will sound.
MAINTENANCE AND CLEANING
Caution: Before you clean the unit, always disconnect the plug from the power supply and allow the
bread machine to cool off. Protect the unit from splashes or any liquid so as to avoid the danger of
causing damage and/or electric shock.
To ensure best performance and maintenance of the bread machine, clean it after each use as follows:
OUTER BODY, LID, BAKING CHAMBER
Wipe the lid and outer body of the unit with a damp cloth or slightly damp sponge. Use a damp
sponge or cloth to wipe out any flour, crumbs or other materials from the baking chamber. Dry the
unit thoroughly.
BAKING TINS AND KNEADING BLADES:
The baking tins and kneading blades have non-stick surfaces. Do not use any hard cleansers, abrasive
materials or utensils that may scratch the surfaces. In course of time, the non-stick surface may
change its appearance due to moisture and steam. This is normal and has no adverse effect on its
use or quality.
Before cleaning the unit, remove the baking tins and kneading blades from the baking chamber. Wipe
the outside of each baking tin with a damp cloth. Never immerse the baking tin into water or other
liquids. Wash the inside of the baking tin with warm, soapy water. If the kneading blade gets stuck, fill
the baking tin with hot water and wait for 30 minutes so that it loosens and can be removed easily.
Never use any of the following to clean your bread machine:
•
•
•
•
•
Paint thinner
Benzine
Steel wood pads
Polishing powder
Chemical dustcloths
9
Caution: Do not clean any part(s) of the bread machine in a dishwasher!
STORING THE UNIT
Before storing the unit, be sure to dry all parts of it, including the viewing window. Close the lid, and
do not place any items upon the machine.
TROUBLESHOOTING
Specific questions about the functions of the bread machine as well as problems with ingredients or
recipe are addressed under Questions and Answers / Troubleshooting. To obtain optimal baking results
allow the unit to cool down completely before beginning to bake a second time. You can accelerate the
cooling process by opening the lid and removing the baking tins.
HELPFUL INFORMATION ABOUT INGREDIENTS
IMPORTANT NOTE ON FLOURS
Flours, while similar in appearance, can be very different by virtue of how they were grown, milled,
stored, etc. To obtain the best baking results, you may have to experiment with different types of flour.
The information under Recipe Tips will be helpful to you.
YEAST
Yeast, through a fermentation process, causes bread to rise by releasing carbon dioxide. Three different
types of yeast are available: Fresh, dried and fast-rising yeast. To obtain the best results, use
traditional dried yeast. However, fast-rising yeast can also be used in smaller amounts. Note: The
recipes in this manual were prepared using traditional dried yeast.
Always store yeast in a refrigerator to keep it fresh, as heat will spoil it. Ensure that your yeast is fresh
by checking its expiry date. Once a package or jar of yeast has been opened, it is important that the
remaining contents will be immediately resealed and refrigerated for future use. By the following test
you can find out whether or not your yeast is still usable:
1. Place one cup of lukewarm water (43 - 46°C) into a liquid measuring cup.
2. Stir one teaspoon of sugar into the water and then sprinkle two teaspoons of yeast over the surface.
3. Place the cup in a warm environment and leave it there for ten minutes.
4. The mixture should foam and rise to the 1-cup mark. If this does not occur, discard the yeast.
Conversion Chart for Fast-Rising Yeast
1 teaspoon active dried yeast
1 1/2 teaspoon active dried yeast
2 1/4 teaspoon active dried yeast
3 teaspoon active dried yeast
= 3/4 teaspoons fast-rising yeast
= 1 teaspoons fast-rising yeast
= 1 1/2 teaspoons fast-rising yeast
= 2 teaspoons fast-rising yeast
SUGAR
Sugar has an immense influence on the colour and flavour of bread. Recipes in this manual calling for
sugar require granulated sugar. Do not used icing sugar unless otherwise indicated. Artificial sweeteners
cannot be used as a substitute for sugar, as the yeast will not react properly with them.
SALT
Salt is necessary to balance the flavour of breads and cakes as well as for their crust colour. Salt limits
the growth of yeast. Therefore do not exceed the amount of salt specified in the recipes. For dietary
10
reasons, salt may be left out. However, in this case the bread may rise higher than it normally does.
LIQUIDS
Liquids, such as milk, water, or a combination of powdered milk and water, can be used when making
bread. While milk improves the flavour of the bread, it also gives it a velvety texture and softens its
crust, water alone produces a crispier crust. Some recipes call for juice (orange, apple, etc.) to be
added as a flavour enhancer.
EGGS
Eggs add richness and velvety texture to bread doughs and cakes. Use large-size eggs with these recipes.
FATS: SHORTENING, BUTTER, OIL
Shortening, butter and oil shorten or tenderize the texture of yeast breads. French bread owes its
unique crust and texture to the lack of fat in the ingredients used. However, breads containing fat
stay fresh longer. If butter is used directly from the refrigerator, it should be cut into small pieces for
easier blending during the kneading cycle.
BAKING POWDER
Baking powder is a leavening agent used in quick breads and cakes. This type of leavening agent
does not require a rising time before baking, as the chemical reaction works when liquid ingredients
are added
BAKING SODA
Baking soda is another leavening agent not to be confused with or substituted for baking powder. It
also does not require rising time before baking, as the chemical reaction works during the baking
process.
MEASURING YOUR INGREDIENTS
You find enclosed the following measuring instruments that will help you measure the ingredients
easily:
1 measuring cup with the measuring units ml, oz and cup
1 big measuring spoon, equal to 1 tablespoon
1 small measuring spoon, equal to 1 teaspoon
Place the cup on a horizontal flat surface while measuring the ingredients. The ingredients level must
be aligned to the mark of measurement. It is very important to measure each ingredient accurately
when baking with your bread machine. Faulty measurements — even if small— can cause poor baking
results. The ingredients must also be added in the order specified in each recipe.
When measuring dry ingredients make sure the measuring cup is DRY. When measuring with the
measuring spoons, measurements must be level, not heaped. You can use a knife to level off. Do not
scoop or tap a measuring cup as this will pack the ingredients.
RECIPE TIPS
The recipes included with this manual are tailored especially to this bread machine. To obtain the
best baking results, it is extremely important not no exceed the amounts of flour specified in each of
the recipes. When trying your own recipes, use the recipes in this manual as a guide for converting
proportions from your recipe to your bread machine.
11
SPECIAL GLAZES FOR YEAST BREADS
Give your freshely-baked bread a professional finish. After glazing, generously sprinkle with your choice
of poppy, sesame or caraway seeds, if desired. Select one of the following special glazes to enhance
your bread:
EGG GLAZE
Beat 1 large egg and 1 tablespoon of water together, brush generously over dough.
Melted Butter Crust
Brush melted butter over just-baked bread for a softer, tender crust.
MILK GLAZE
For a softer, shiny crust, brush just-baked bread with milk or cream.
SWEET ICING GLAZE
Mix 1 cup sieved icing sugar with 1 to 2 tablespoons of milk to make a consistent glaze. Drizzle over
Raisin Bread or sweet Breads when almost cool.
USING BREAD MIXES
You can use prepackaged bread mixes in your bread machine. Follow the package directions. Do not
exceed the capacity of the baking tin.
CHECKING DOUGH CONSISTENCY
Although the bread machine will mix, knead and bake bread, it is absolutely necessary that you learn to
recognize the condition of your dough. Open the machine after five minutes into the KNEAD stage. The
dough should take the shape of a soft, sticky ball. If it is too dry, add liquid 1/2 to 1 tablespoons at a
time. If it is too wet, add 1 tablespoon flour at a time.
HIGH-ALTITUDE BAKING
In high-altitude areas, dough tends to rise faster as there is less air pressure. Therefore less yeast is
necessary. In dry climates, flour is drier and requires slightly more liquid. In humid climates, flour is
wetter and will absorb less liquid. Therefore slightly more flour is required.
SLICING AND STORING BREAD
To obtain the best results, place bread on a wire rack and allow it to cool down 15 to 30 minutes before
slicing. Use an electric knife or a serrated knife for even slices.
Store unused bread tightly covered (re-closable plastic bags or plastic containers work well) at room
temperature for up to three days. For longer storage (up to one month), place the bread in a tightly
covered container in the freezer. Since home-made bread has no preservatives, it tends to dry out and
become stale faster then commercially-made bread.
Leftover slightly hardened bread may be cut into 1/2-inch or -1-inch cubes and used in recipes to make
croutons, bread pudding or stuffing.
CAKE MAKING
When using your own cake recipes, always pay attention to the volume of the baking tins.
12
BREAD MACHINE CYCLE TIMES
NORMAL CYCLE SETTINGS AND TIMES
BASIC
&
BASIC
Delay
2:10time
12:50
Preheat
Knead 1
0:05:00
Rest
0:05:00
Knead 2 0:10:00
Rest
0:00:30
Knead 3
0:10:00
Rise 1
0:15:00
Knead 4
0:00:30
Rise 2
0:08:30
Knead 5
0:00:30
Rise 3
0:27:00
Baking
0:48:00
Keep
1:00:00
warm
Total2:10:00
Time
Fruit1:50:00
Nut-Signal
BASIC
&
WHEAT
2:3512:55
0:05:00
0:05:00
0:05:00
0:10:00
0:00:30
0:09:30
0:15:00
0:00:30
0:12:30
0:00:30
0:31:30
1:00:00
1:00:00
BASIC
&
SWEET
BASIC
FRENCH FRENCH FRENCH WHEAT
&
&
&
&
&
FRENCH FRENCH SWEET WHEAT WHEAT
2:2512:55
2:50
12:50
3:3012:50
2:3512:55
0:05:00
0:05:00
0:10:00
0:00:30
0:09:30
0:15:00
0:00:30
0:08:30
0:00:30
0:30:30
1:00:00
1:00:00
0:05:00
0:05:00
0:10:00
0:00:30
0:09:30
0:10:00
0:00:30
0:24:30
0:00:30
0:39:30
1:05:00
1:00:00
0:05:00
0:05:00
0:10:00
0:00:30
0:09:30
0:39:00
0:00:10
0:30:50
0:00:10
0:59:50
0:50:00
1:00:00
0:05:00
0:05:00
0:10:00
0:00:30
0:09:30
0:15:00
0:00:30
0:14:30
0:00:30
0:39:30
0:55:00
1:00:00
2:5012:50
0:05:00
0:05:00
0:05:00
0:10:00
0:00:30
0:09:30
0:15:00
0:00:30
0:20:30
0:00:30
0:43:30
0:55:00
1:00:00
3:1512:55
0:05:00
0:05:00
0:05:00
0:05:00
0:00:30
0:09:30
0:45:00
0:00:10
0:24:50
0:00:10
0:44:50
0:50:00
1:00:00
WHEAT
&
SWEET
SWEET
&
SWEET
2:4512:55
0:05:00
0:05:00
0:05:00
0:10:00
0:00:30
0:09:30
0:24:00
0:00:30
0:10:30
0:00:30
0:41:30
0:53:00
1:00:00
2:0012:50
0:05:00
0:05:00
0:10:00
0:00:30
0:09:30
0:05:00
0:00:30
0:34:50
0:50:00
1:00:00
2:35:00 2:25:00 2:50:00 3:30:00 2:35:00 2:50:00 3:15:00 2:45:00 2:00:00
2:10:00 2:05:00 2:30:00 3:10:00 2:15:00 2:10:00 2:55:00 2:20:00 1:40:00
EXPRESS CYCLE SETTINGS AND TIMES
BASIC
&
BASIC
Delay
time
Preheat
Knead 1
Rest
Knead 2
Rest
Knead 3
Rise 1
Knead 4
Rise 2
Knead 5
Rise 3
Baking
Keep
warm
Totaltime
FruitNut-Signal
BASIC
&
WHEAT
BASIC
&
SWEET
BASIC
FRENCH FRENCH FRENCH WHEAT
&
&
&
&
&
FRENCH FRENCH SWEET WHEAT WHEAT
WHEAT
&
SWEET
SWEET
&
SWEET
0:05:00 0:07:00 0:05:00 0:05:00 0:10:00 0:05:00 0:08:00 0:08:00 0:05:00 0:05:00
0:00:30 0:00:30 0:00:30 0:00:30 0:00:30 0:00:30 0:00:30 0:00:30 0:00:30 0:00:30
0:04:30 0:04:30 0:04:30 0:04:30 0:09:30 0:04:30 0:06:30 0:06:30 0:04:30 0:04:30
0:08:00 0:28:00 0:10:00 0:15:00 0:35:00 0:10:00 0:30:00 0:40:00 0:12:00 0:08:00
0:27:00 0:40:00 0:35:00 0:45:00 0:55:00 0:38:00 0:45:00 0:45:00 0:38:00 0:32:00
1:00:00 1:00:00 1:00:00 1:00:00 1:00:00 1:00:00 1:00:00 1:00:00 1:00:00 1:00:00
0:45:00 1:20:00 0:55:00 1:10:00 1:50:00 0:58:00 1:30:00 1:40:00 1:00:00 0:50:00
-
-
-
-
-
-
13
-
-
-
-
BREAD RECIPES
Basic White Bread
5/8 cup water
1 tablespoon oil
1 tablespoon sugar
1 teaspoon salt
2 1/4 cups bread flour
5/6 teaspoons dry yeast
Use Basic cycle
Express White Bread
¾ cup + 2 tablespoons warm water (43°C)
1 tablespoons oil
4 tablespoons sugar
1 teaspoon salt
2 1/4 cups bread flour
1 tablespoon dry yeast
Use Basic cycle, Express mode
Egg Bread
5/8 cups water (including 1 egg)
1 tablespoon oil
1 tablespoon sugar
1 teaspoon salt
2 cups bread flour
5/6 teaspoons dry yeast
Use Basic cycle — do not use timer
Express Egg Bread
¾ cups water (43°C; including 1 egg)
1 tablespoon oil
2 tablespoons sugar
1 teaspoon salt
2 cups bread flour
1 tablespoon dry yeast
Use Basic cycle, Express mode
Honey Oats Bread
¾ cup water
4 teaspoons oil
2 tablespoons honey
½ teaspoon salt
1/3 cup oatmeal
1/3 cup whole wheat flour
1 ½ cups bread flour
1 ½ teaspoons dry yeast
Use Basic cycle
Onion Bread
3/4 cup water
4 teaspoons oil
4 teaspoons fresh chopped onion
1 teaspoon sugar
1 teaspoon salt
2 ¼ cups bread flour
1 ½ teaspoons dry yeast
Use Basic cycle
Express Pesto Bread
¾ cup warm water (43°C)
2 tablespoons prepared pesto
1 tablespoon dry milk
1 tablespoon sugar
½ teaspoon salt
2 cups bread flour
1 ¼ tablespoons dry yeast
Use Basic cycle, Express mode
Molasses Bread
¾ cup + 1 tablespoon water
2 tablespoons oil
2 tablespoons molasses
½ teaspoon salt
¾ cup bread flour
1 ½ cups whole wheat flour
2 ¼ teaspoons dry yeast
Use Wheat cycle
100% Whole Wheat Bread
2/3 cup water
2 tablespoons oil
4 tablespoons brown sugar
½ teaspoon salt
1 tablespoon milk powder
1½ cup whole wheat flour
3 teaspoons dry yeast
Use Wheat cycle
Pumpernickel Bread
¾ cup water
1 tablespoon oil
1 tablespoon molasses
1 tablespoon sugar
1 teaspoon salt
¾ cup whole wheat flour
1 1/3 cups bread flour
1 tablespoon unsweetened cocoa
1 teaspoon instant coffee
1 1/2 teaspoons dry yeast
or
1 teaspoon fast-rising yeast
Use Wheat cycle
Sweet Bread
2/3 cup water
1 tablespoon oil
½ teaspoon salt
¼ cup sugar
1 tablespoon milk powder
2 cups bread flour
1 teaspoon dry yeast
Use Sweet cycle
French Bread
2/3 cup water
1 tablespoon oil
1 tablespoon sugar
¾ teaspoon salt
2 cups bread flour
1 teaspoon dry yeast
Use French cycle
Express French Bread
¾ cup warm water (43°C)
1 tablespoon oil
1 tablespoon sugar
¾ teaspoon salt
2 cups bread flour
1 teaspoon dry yeast
Use French cycle, Express mode
Chevre-cracked pepper Bread
5/8 cup water
30 g soft goat cheese
4 tablespoons dry milk
¾ teaspoon salt
1 tablespoon sugar
2 teaspoons cracked black pepper
2 ¼ cups bread flour
5/6 teaspoon dry yeast
Use Basic cycle
Express Chevre-cracked pepper Bread
¾ cup warm water (43°C)
40 g soft goat cheese
4 tablespoons dry milk
¾ teaspoon salt
1 tablespoon sugar
2 teaspoons cracked black pepper
2 ¼ cups bread flour
1 tablespoon dry yeast
Use Basic cycle, Express mode
Express Sweet Bread
5/8 cup warm water (43°C)
1 tablespoon oil
½ teaspoon salt
3 tablespoons sugar
1 tablespoon milk powder
2 cups bread flour
2 ½ teaspoons dry yeast
Use Sweet cycle, Express mode
Banana Nut Bread
½ cup milk
2 tablespoons oil
1 cup ripe bananas, mashed
2 eggs
¼ cup sugar
¼ cup dark brown sugar, packed
½ cup almonds, chopped
1 ½ cups bread flour
1 teaspoon baking soda
1 teaspoon salt
Use Basic cycle, Express mode
QUESTIONS AND ANSWERS / TROUBLESHOOTING
Question
Answer
What should I do if the kneading blade
comes out with the bread?
Remove it with a crochet hook or a sandwich pick
before slicing the bread. Since the blade can be
separated from the tin, the remaining of the kneading
blade is not due to a failure of the appliance.
Why does my bread sometimes have some
flour on the side crust?
Your dough might be too dry. Next time,
check your recipe and measuring. You may need to
add more liquid, 1/2 to 1 tablespoon at a time. You
can simply trim off that portion of the outer crust.
Why does the appliance fail to mix up
the dough? I can hear the motor running.
The kneading blade or baking tin may not be inserted
properly. Make sure the tin has clicked into its place.
How long does it take to make bread?
See Cycle Times Chart.
Why can’t I use the timer when baking
with fresh milk?
The milk will get spoiled if it is left in the machine
too long. Perishable ingredients, such as eggs and
milk, should never be used when working with the
timer feature.
What will happen if there is power supply
failure in the middle of a cycle?
If the power supply failure does not last longer than
approximately 10 minutes, the bread machine resumes
its cycle at the stage in which the interruption took place.
Why do I have to add the ingredients
in a certain order?
This allows the bread machine to mix the ingredients
in the most efficient manner possible. When using the
timer, it also keeps the yeast from combining with the
liquid before the dough is mixed.
When setting the timer for the morning, why
does the machine make sounds late at night?
The machine must start operating several hours
before the bread will be ready. So these sounds are
made by the motor when kneading the dough. It is a
normal operation, not a malfunction.
The bread machine makes loafs of what size?
Your bread machine makes 1-pound loaves of bread.
The kneading blade is stuck in the baking
tin after baking. How do I get it out?
If the kneading blade gets stuck, pour hot water into
the baking tin. Rotate the kneading blade to remove
any incrustrations that may have devloped underneath.
What is the wattage of the appliance?
Please refer to the rating label on the machine.
Can I clean the baking tins in the dishwasher?
No. The baking tins and kneading blades must be
washed by hand. Do not immerse the tins into water.
What will happen if I leave the finished
bread in the baking tin?
The keep warm cycle will keep it warm and thus
prevent it from becoming soggy for 1 hour. If the bread
is left in the tin longer than 1 hour, it may start to
become soggy.
Why did the dough only partially mix?
Check to make sure that the kneading blades and
baking tins are inserted properly. Also check the dough
consistency. After 5 minutes of kneading, check the
dough. If it is too dry, add liquid, if it is too moist, add
flour. Only add 1/2 to 1 tablespoon at a time.
Why didn’t the bread rise?
The yeast might have passed the expiry date.
Possibly no yeast was added at all. Check the condition
of the yeast.
How will I know when to add fruits and
nuts to the bread?
The Fruit & Nuts beep signals when to add raisins,
nuts, etc. If it is more convenient for you to add them
at the start, you will still have acceptable results.
However, the added ingredients may be chopped during
the kneading process.
My baked bread is too moist. What can I do?
Humidity may affect the dough. After 5 minutes of
kneading, check the dough. If it appears too moist, add
more flour, 1/2 to 1 tablespoon at a time. To obtain the
best results, take the baked bread out of the tin soon
after the end of the baking process.
Why do I get air bubbles at the top
of the bread?
This can be caused by using too much yeast.
When using raisins, the bread machine
crushes them. How can I avoid this?
To avoid the chopping of ingredients as raisins, nuts etc.,
do not add them before the Fruit & Nuts Beep. To get
the best results, use dry raisins. Also check your dough
consistency, as the dough will not incorporate the
raisins easily if it is too dry.
Why does my bread rise and collapse?
The bread may be rising too fast. To reduce the speed
of rising, reduce the amount of water and / or increase
the amount of salt and / or decrease the amount of yeast.
Can I use my own recipes in my bread machine?
Yes, but you will need to experiment to get the right
proportion of ingredients. Before trying your own
recipes, familiarize yourself with the appliance and
make several loaves following the recipes provided in
this manual. Never use more flour than the specified
total amount of 2 1/4 cups. Use the recipes in this book
to help you determine the ratio of flour to the amounts
of liquid, yeast, sugar, salt and fat.
Why do the loaves vary in height and weight?
The whole wheat and multi-grain breads are
always shorter. Am I doing something wrong?
No, it is normal for whole wheat and multi-grain
breads to be shorter and denser than Basic or French
breads. Whole wheat and rye do not rise less during the
bread making process. The typically added ingredients,
such as oats, bran, nuts and raisins, also contribute to
the shorter height and denser texture.
DECLARATION OF CONFORMANCE
We, Kompernaß Handelsgesellschaft mbH, Burgstr. 21, D-44867 Bochum, Germany, declare this
appliance to be in conformance with all applicable international standards, safety requirements and
the EC Directives.
No. of appliance/Type: KH 2230
Bochum, 31.03.2003
Hans Kompernaß
— Manager —
18


![PDF format [User manual]](http://vs1.manualzilla.com/store/data/005732328_1-c6f560cc59c28b45e6e6b9e007201668-150x150.png)