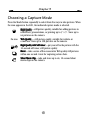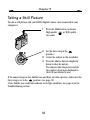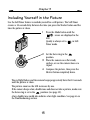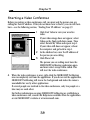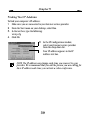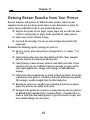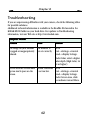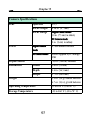
1
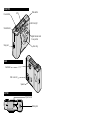
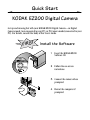
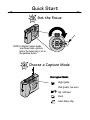
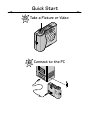
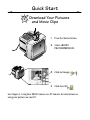
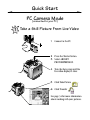
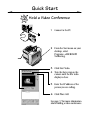
Digital Camera Eastman Kodak Company Rochester, NY 14650 © Eastman Kodak Company, 2000. Kodak is a trademark of Eastman Kodak Company P/N 6B4802 User’s Guide FRONT/TOP Power button Mode button LCD Self-timer light Shutter button Digital Camera mode focus position Strap post Focus ring BACK Viewfinder USB connector Speaker BOTTOM Tripod socket Battery door Quick Start KODAK EZ200 Digital Camera Get up and running fast with your KODAK EZ200 Digital Camera—in Digital Camera mode (not connected to your PC) or PC Camera mode(connected to your PC). For details, consult the body of this User’s Guide. FIRST Install the Software 1 Insert the KODAK EZ200 Software CD. 2 Follow the on-screen instuctions. 3 Connect the camera when prompted. 4 Restart the computer if prompted. Quick Start Digital Camera Mode (not connected to your PC) 1 Load the Batteries 2 Turn On the Camera Quick Start 3 Set the Focus NOTE: In Digital Camera mode you cannot take a picture unless the focus ring is set to the position shown. 4 Choose a Capture Mode Five Capture Modes: High Quality Web Quality (no icon) HQ, Self-timer Burst Silent Movie Clip Quick Start 5 Take a Picture or Video 6 Connect to the PC Quick Start 7 Download Your Pictures and Movie Clips 1 Press the Shutter button. 2 Select ARCSOFT PHOTOIMPRESSIONS. 3 Click Get Images 4 Click Save All . . See Chapter 4, Using Your EZ200 Camera as a PC Camera, for instructions on using your pictures on your PC. Quick Start PC(connected Camera Mode to your PC) 1 Take a Still Picture From Live Video 1 Connect to the PC. 2 Press the Shutter button. 3 Select ARCSOFT PHOTOIMPRESSION. 4 Turn the focus ring until the live video display is clear. 5 Click Take Picture 6 Click Transfer . . See page 34 for more information about working with your pictures. Quick Start 2 Hold a Video Conference 1 Connect to the PC. 2 From the Start menu on your desktop, select Programs→MICROSOFT NetMeeting. 3 Click Start Video. 4 Turn the focus ring on the camera until the live video display is clear. 5 Enter the IP address of the person you are calling. 6 Click Place Call. See page 37 for more information about holding a video conference. KODAK EZ200 Digital Camera User’s Guide Congratulations on your purchase of the new KODAK EZ200 Digital Camera—a compact and fun digital camera that you can use two ways: Digital Camera Mode (not connected to a PC) ! take great digital still pictures, perfect for e-mailing ! capture fast action shots with the Burst feature ! capture silent movie clips PC Camera Mode (connected to a PC) ! ! ! ! take digital still pictures, close-up capture movie clips with audio download your pictures and video clips to a PC. It’s easy and quick. make live video phone calls (video conferencing) Visit Kodak on the World Wide Web at www.kodak.com Eastman Kodak Company 343 State Street Rochester, N.Y. 14650 Eastman Kodak Company, 2000 Kodak is a trademark of Eastman Kodak Company. P/N 6B4802 Table of Contents 1 Getting Started With Your Camera . . . . . . . . . . . . . . . . . . 1 Loading the Batteries . . . . . . . . . . . . . . . . . . . . . . . . . . . . . . . .2 Turning the Camera On and Off . . . . . . . . . . . . . . . . . . . . . . . .2 Power Save Feature. . . . . . . . . . . . . . . . . . . . . . . . . . . . . . . . . . 3 LCD Overview . . . . . . . . . . . . . . . . . . . . . . . . . . . . . . . . . . . . . . . 3 Checking the Batteries . . . . . . . . . . . . . . . . . . . . . . . . . . . . . . .4 Displaying the Picture/Video Count . . . . . . . . . . . . . . . . . . . . .5 Turning Camera Sounds On and Off . . . . . . . . . . . . . . . . . . . 6 2 Installing the Software . . . . . . . . . . . . . . . . . . . . . . . . . . . 8 WINDOWS System Requirements . . . . . . . . . . . . . . . . . . . . . 8 Software Programs . . . . . . . . . . . . . . . . . . . . . . . . . . . . . . . . . 9 Installing the Software . . . . . . . . . . . . . . . . . . . . . . . . . . . . . . 9 3 Using Your EZ200 Camera as a Digital Camera. . . . . . . 11 Checking the Focus Setting—Digital Camera Mode . . . . . . 12 Choosing a Capture Mode. . . . . . . . . . . . . . . . . . . . . . . . . . . . 13 Taking a Still Picture . . . . . . . . . . . . . . . . . . . . . . . . . . . . . . . . 14 Including Yourself in the Picture. . . . . . . . . . . . . . . . . . . . . . . 15 i Shooting a Burst Series of Pictures. . . . . . . . . . . . . . . . . . . 16 Shooting Silent Movie Clips . . . . . . . . . . . . . . . . . . . . . . . . . . 17 Deleting Your Images from the Camera. . . . . . . . . . . . . . . . .18 4 Using Your EZ200 Camera as a PC Camera . . . . . . . . . 19 Using the Camera Base. . . . . . . . . . . . . . . . . . . . . . . . . . . . . 20 Connecting the Camera to Your Computer . . . . . . . . . . . . . . 21 Storing Your Pictures on Your PC. . . . . . . . . . . . . . . . . . . . . 22 Downloading Pictures From the Camera . . . . . . . . . . . . . . . 23 Taking Still Pictures . . . . . . . . . . . . . . . . . . . . . . . . . . . . . . . . 24 Saving Still Pictures . . . . . . . . . . . . . . . . . . . . . . . . . . . . . . . 26 Shooting Video Clips . . . . . . . . . . . . . . . . . . . . . . . . . . . . . . . .27 Using Video Conferencing . . . . . . . . . . . . . . . . . . . . . . . . . . . .27 5 Using the Software . . . . . . . . . . . . . . . . . . . . . . . . . . . . . 28 Using KODAK EZ200 Software . . . . . . . . . . . . . . . . . . . . . . 29 Getting Started with ARCSOFT PHOTOIMPRESSION 2000 . . . . . . . . . . . . . . . . . . . . . . . . . . 34 Getting Started with ARCSOFT VIDEOIMPRESSION . . . . 35 Getting Started with MICROSOFT NetMeeting . . . . . . . . 37 ii 6 Tips and Troubleshooting . . . . . . . . . . . . . . . . . . . . . . . . 40 Connecting Your Camera . . . . . . . . . . . . . . . . . . . . . . . . . . . . 40 Adjusting Your Monitor for Better Viewing. . . . . . . . . . . . . 40 Getting Better Results from Your Printer . . . . . . . . . . . . . . 41 Troubleshooting . . . . . . . . . . . . . . . . . . . . . . . . . . . . . . . . . . . 42 7 Getting Help . . . . . . . . . . . . . . . . . . . . . . . . . . . . . . . . . . . 48 Software Help. . . . . . . . . . . . . . . . . . . . . . . . . . . . . . . . . . . . . 48 Kodak Online Services . . . . . . . . . . . . . . . . . . . . . . . . . . . . . . 48 Kodak Fax Support . . . . . . . . . . . . . . . . . . . . . . . . . . . . . . . . 48 Telephone Customer Support. . . . . . . . . . . . . . . . . . . . . . . . 49 8 Warranty and Regulatory Information . . . . . . . . . . . . . .51 Limited Warranty . . . . . . . . . . . . . . . . . . . . . . . . . . . . . . . . . . . 51 Limited Warranty Coverage . . . . . . . . . . . . . . . . . . . . . . . . . . . 51 Limitations . . . . . . . . . . . . . . . . . . . . . . . . . . . . . . . . . . . . . . . 52 Your Rights . . . . . . . . . . . . . . . . . . . . . . . . . . . . . . . . . . . . . . . 53 Outside the United States . . . . . . . . . . . . . . . . . . . . . . . . . 53 Regulatory Information . . . . . . . . . . . . . . . . . . . . . . . . . . . . . 53 iii 9 Appendix . . . . . . . . . . . . . . . . . . . . . . . . . . . . . . . . . . . . . . 55 EZ200 Camera Specifications . . . . . . . . . . . . . . . . . . . . . . 56 General Camera Maintenance. . . . . . . . . . . . . . . . . . . . . . . . 58 General Safety . . . . . . . . . . . . . . . . . . . . . . . . . . . . . . . . . . . . 58 Using Your Batteries . . . . . . . . . . . . . . . . . . . . . . . . . . . . . . . 59 Index . . . . . . . . . . . . . . . . . . . . . . . . . . . . . . . . . . . . . . . . . . . 60 iv 1 Getting Started With Your Camera This chapter describes your KODAK EZ200 Digital Camera features and how to prepare the camera for taking pictures. Loading the Batteries........................................................page 2 Turning the Camera On and Off................................................ 2 Power Save Feature .................................................................. 3 LCD Overview........................................................................... 3 Checking the Batteries.............................................................. 4 Displaying the Picture/Video Count .......................................... 5 Turning Camera Sounds On and Off ......................................... 6 1 Chapter 1 Loading the Batteries 1 Slide the latch as illustrated, then lift the battery door. 2 Insert the four AAA batteries in the correct orientation, as illustrated. See the orientation label inside the battery compartment. 3 Close the door. Turning the Camera On and Off ! Push the Power button to turn the camera on and off. When you turn on the camera, it beeps a high tone and the LCD Panel turns on. When you turn off the camera, it beeps a low tone and the LCD Panel turns off. 2 Chapter 1 Power Save Feature The power save feature automatically turns off the camera after 30 minutes of non-use. Your pictures and videos are saved when the camera turns off. To resume taking pictures, turn the camera back on. LCD Overview The KODAK EZ200 LCD displays the camera settings and status. A A. LCD B. Speaker C. Picture Quality D. Self-timer B C F G D E. Picture/Video count F. Battery G. Video clip/Burst H. Focus (error if blinking) E H 3 Chapter 1 Checking the Batteries The power level of your batteries is displayed in the LCD when you turn on the camera. 1 Turn on the camera. 2 Check the battery symbol that appears in the LCD Panel. Full—batteries are fully charged. Full Low—power level is low, batteries need to be replaced. Low We do not recommend the use of rechargeable batteries in the KODAK EZ200 Digital Camera. For guidelines on battery usage, see page 59. 4 Chapter 1 Displaying the Picture/Video Count Pictures or Videos Taken (A) The number displayed on the LCD indicates how many pictures or videos you have taken (currently stored in camera memory). A C B Pictures or Seconds of Video Remaining (B) To display how many pictures or seconds of video are still available for capture: 1 Press the Shutter button half-way down and hold for one second. The LCD displays the number of pictures remaining on the camera. If you are in video capture mode (C), (C) the LCD displays the number of seconds of video remaining (B). (B) 2 Release the Shutter button and the number of pictures or videos taken is redisplayed. 5 Chapter 1 Turning Camera Sounds On and Off The camera provides sounds to let you know when certain functions are being performed and to warn you of problems. You can set the camera to make sounds for most functions, or to make no sounds at all. NOTE: Turn the camera sounds off when taking pictures at events that require a quiet environment. To turn Camera Sounds on or off: ! Press and hold the Mode button down for 3 seconds. Speaker on ! The camera beeps and the Speaker icon in the LCD changes to the opposite setting. Speaker off 6 Chapter 1 Typical Camera Sounds The camera provides sounds (shutter clicks or tones) when you: ! Capture a still picture ! Turn the camera on or off ! Capture a Burst series ! Change the Capture mode ! Start and stop a video capture The camera sounds a low pitched double warning tone when: ! The camera is out of focus ! A low-light condition exists ! Camera memory is full Page 46 of the Troubleshooting section explains what to do if you hear a warning tone. 7 2 Installing the Software This chapter describes how to install the software programs included with your camera, and contains the sections listed below. WINDOWS System Requirements......................................page 8 Software Programs................................................................... 9 Installing the Software.............................................................. 9 See Chapter 5, Using the Software, for instructions on how to begin using the software with your camera. WINDOWS System Requirements ! WINDOWS 98, WINDOWS 2000, WINDOWS ME ! Available USB port ! Personal computer with a Pentium 266-MHz microprocessor (minimum) and a CD-ROM drive ! Color display monitor with a minimum resolution of 640 x 480 and 256 colors (16 bit), (high color, 16 bit preferrer) ! 32 MB or more of available RAM ! 100 MB of available hard disk space 8 Chapter 2 Software Programs The KODAK EZ200 Software CD includes these software programs: ! KODAK EZ200 Software—allows your camera to communicate with the Software PC, download pictures from the camera, and use your camera with the other programs listed here. ! ARCSOFT PHOTOIMPRESSION Software—Edit and enhance your Software pictures, add special effects, add text and borders, create calendars and invitations, and much more. ! ARCSOFT VIDEOIMPRESSION Software—create and edit video files. Software ! MICROSOFT NetMeeting Software—make live video telephone calls over Software the Internet (video conferencing). Installing the Software You must install the KODAK EZ200 Software before you can download pictures from the camera or use your camera with the software programs included with your camera. Install the software: 1 Close any open software programs that are running on your computer. 2 Do not connect your camera to the PC until you are prompted to do so in step 5. 3 Place the KODAK EZ200 Software CD into the CD-ROM drive. The first install window appears automatically if Auto Play is enabled. If the first install window does not appear automatically, select Run from the Start menu. In the Run dialog box, type the drive letter that contains the CD and type :\setup.exe. For example: d:\setup.exe 4 Follow the on-screen instructions to install the software. 9 Chapter 2 We suggest you install the KODAK EZ200 Software first. You must have the KODAK EZ200 Software installed before you can begin using the camera with your computer and the other software applications. You can install all of the applications from the CD now, or go back at any time and install them later. 5 When prompted, plug the camera into your PC with the provided USB Cable (see page 21). A series of dialog windows appear indicating that the EZ200 software drivers are being loaded. Follow the on-screen instructions. 6 If prompted, restart the computer when the software installation is complete. NOTE: While the Installer is automatically loading your software, take a few minutes to fill out and send in the camera product registration card. This allows you to receive information regarding software updates. 10 3 Using Your EZ200 Camera as a Digital Camera This chapter describes the many fun ways you can use your KODAK EZ200 camera in Digital Camera mode (not connected to a PC). Checking the Focus Setting—Digital Camera Mode........page 12 Choosing a Capture Mode ...................................................... 13 Taking a Still Picture .............................................................. 14 Including Yourself in the Picture ............................................ 15 Shooting a Burst Series of Pictures......................................... 16 Shooting Silent Movie Clips .................................................... 17 Deleting Your Images from the Camera .................................. 18 To download pictures and video clips from the camera to your computer, see “Downloading Pictures From the Camera” on page 23. 11 Chapter 3 Checking the Focus Setting—Digital Camera Mode ! When you use the camera in Digital Camera mode (not connected to your computer), you must set the focus ring to the position. All other positions of the focus ring are for use in PC Camera mode only. See page 24. ! If you set the focus ring to any position other than , the camera alerts you in the following ways: - The focus icon in the LCD blinks. - The camera beeps a low, double tone when you press the Shutter button. - The camera cannot take a picture. 12 Chapter 3 Choosing a Capture Mode Press the Mode button repeatedly to select from five ways to take pictures. When the icon appears in the LCD, the indicated capture mode is selected. No icon High Quality—still picture quality, suitable for adding pictures to Quality newsletters, presentations, or printing up to 3" x 5". Store up to 64 pictures on the camera. Web Quality— Quality still picture quality, suitable for website or e-mail use. Store up to 128 pictures on the camera. High Quality with Self-timer—put yourself in the picture with the Self-timer 10-second self-timer, still picture quality. Burst—take a series of five consecutive Web quality still pictures Burst within one second. Great for capturing action shots. Silent Movie Clip—take and store up to six, 10-second silent Clip movie clips on the camera. 13 Chapter 3 Taking a Still Picture To take a still picture with your EZ200 Digital Camera (not connected to your computer): 1 Press the Mode button to choose High quality or Web quality (no icon). 2 Set the focus ring to the position. 3 Center the subject in the viewfinder. 4 Press the Shutter button completely down to take the picture. The camera takes the picture and the the number of pictures displayed in the LCD increments by one. If the camera beeps a low, double tone and does not take a picture, make sure the focus ring is set to the position (see page 12). A low, double tone could also indicate a low light condition. See page 46 in the Troubleshooting section. 14 Chapter 3 Including Yourself in the Picture Use the Self-Timer feature to include yourself in a still picture. The Self-Timer creates a 10-second delay between the time you press the Shutter button and the time the picture is taken. 1 Press the Mode button until the icons are displayed in the LCD. Quality is always set to in SelfTimer mode. 2 Set the focus ring to the position. 3 Place the camera on a flat steady surface, or use the camera base or a tripod. 4 Compose the picture, then press the Shutter button completely down. The red light flashes and the camera beeps progressively faster for 10 seconds until the picture is taken. The picture count on the LCD increases by one. If the camera beeps a low, double tone and does not take a picture, make sure the focus ring is set to the position (see page 12). A low, double tone could also indicate a low light condition. See page 46 in the Troubleshooting section. 15 Chapter 3 Cancelling the Self-Timer To cancel the shot before the picture is taken, press the Shutter button again. Shooting a Burst Series of Pictures With the Burst mode, take five Web quality still pictures in quick succession with one press of the Shutter button. NOTE: The Burst feature is ideal for capturing fast action sequences. One Burst series of five pictures takes more memory on your camera than one still picture. 1 Press the Mode button repeatedly until the icon is displayed in the LCD. 2 Set the focus ring to the position. 3 Center the subject in the viewfinder. 4 Press the Shutter button completely down. The camera takes five pictures within one second. The picture count on the LCD increases by one. If the camera beeps a low, double tone and does not operate, make sure the focus ring is set to the position (see page 12). 16 Chapter 3 A low, double tone could also indicate a low light condition. See page 46 in the Troubleshooting section. Shooting Silent Movie Clips You can capture and store up to six, ten-second silent movie clips with your EZ200 in Digital Camera mode. 1 Press the Mode button until the icon is displayed in the LCD. 2 Set the focus ring to the position. 3 Center the subject in the viewfinder. 4 Press the Shutter button completely down to begin taking the silent movie clip. Release the Shutter button to end the clip. Maximum clip length is ten seconds. The camera sounds a double tone when you start and stop taking the clip. The picture count on the LCD increases by one. If the camera beeps a low, double tone and does not operate, make sure the focus ring is set to the position (see page 12). A low, double tone could also indicate a low light condition. See page 46 in the Troubleshooting section. 17 Chapter 3 Deleting Your Images from the Camera To delete all pictures and video clips from the camera: 1 Make sure the camera is not connected to the computer. 2 Turn on the camera. 3 Press and hold down both the Mode button and the Shutter button for 3 seconds. Make sure to press the Mode button first. The picture count in the LCD is replaced with two dashes. 4 Release the buttons. All images stored in the camera memory are deleted and the number 00 is displayed in the LCD. 18 4 Using Your EZ200 Camera as a PC Camera When you connect your KODAK EZ200 camera to the PC with the provided USB cable, you are in PC Camera mode. Using the Camera Base...................................................page 20 Connecting the Camera to Your Computer.............................. 21 Storing Your Pictures on Your PC........................................... 22 Downloading Pictures From the Camera ................................ 23 Taking Still Pictures................................................................ 24 Saving Still Pictures ................................................................ 26 Shooting Video Clips .............................................................. 27 Using Video Conferencing ...................................................... 27 19 Chapter 4 Using the Camera Base The camera base provides adjustable, hands-free support when you use the camera in PC Camera mode (connected to the computer). . 1 Slide the camera into the base until it clicks in place. 2 Position the camera and base where it can capture your subject in the live video display on the screen (for example, on top of the monitor). 20 Chapter 4 Connecting the Camera to Your Computer Connect the camera to your PC using the provided USB cable. Before you begin, make sure to install the KODAK EZ200 Software on your computer (see “Installing the Software” on page 9). Connect the Camera 1 Connect the USB cable from your computer USB port to the camera USB port. When your camera is connected to the computer, it is powered by the USB cable, not the batteries. Start the EZ200 Software 1 Place the camera in the base. 2 Press the Shutter button all the way down. A dialog window appears listing the imaging applications on your computer that are compatible with the EZ200 Software. 21 Chapter 4 3 Select ARCSOFT PHOTOIMPRESSION for capturing and editing digital still pictures; or select ARCSOFT VIDEOIMPRESSION for capturing and editing videos. 4 Click OK. ! The imaging application and the EZ200 Software open. ! The camera captures a live video image and displays it on the EZ200 Software screen. CAUTION: Do not unplug the camera while the EZ200 Software is running. The application freezes and connot be used. To recover, plug the camera back in and click Exit. Storing Your Pictures on Your PC There are two ways to get your KODAK EZ200 pictures stored on your PC, depending on which mode you are using: Pictures you take in Digital Camera Mode—download and save your pictures to Mode the PC using the Get Images and Save All buttons in the KODAK EZ200 Software. See “Downloading Pictures From the Camera” on page 23. Pictures you take in PC Camera Mode—transfer your pictures to your imaging Mode application using the Transfer and Transfer All buttons in the KODAK EZ200 Software. See “Saving Still Pictures” on page 26. 22 Chapter 4 Downloading Pictures From the Camera You can download pictures and silent movie clips stored on the camera and save them on your computer. You can then work with your pictures and movie clips in the software application of your choice. NOTE: The pictures are not deleted from the camera when you download them. To delete pictures from the camera, see page 18. 1 2 3 4 5 Connect the camera to your computer and press the Shutter button to open the imaging application and the KODAK EZ200 Software. See “Connecting the Camera to Your Computer” on page 21. In the EZ200 Software window, click Get Images . Thumbnail representations of all of the pictures and videos on your camera are displayed. For details on how to work with the EZ200 Software screen, see “Using KODAK EZ200 Software” on page 29. Click Save All . In the Choose Folder window, select the location on your computer in which to save your pictures. In the Save All window, click Yes to confirm the save. ! All pictures and video clips on the camera are saved to the following folder: mmddyyyy_hhmmss, representing today’s month, day, year_hour (24-hr format), minute, and second. For example, pictures saved on May 26, 2000 at 23 Chapter 4 11:06:26 am are saved in a folder named 05262000_110626. This ensures that you cannot overwrite existing picture files, no matter how often you download. ! Pictures are named and saved with consecutive numbers in the following formats: Video clip Clip0.AVI, Clip1.AVI, Clip2.AVI, etc. High quality still image HQ0.JPG, HQ1.JPG, HQ2.JPG, etc. Web quality still image WQ0.JPG, WQ1.JPG, WQ2.JPG, etc. Burst still image Burst0.JPG, Burst1.JPG, Burst2.JPG When the pictures and movie clips are stored on your computer, you can open them in the software application of your choice. The images are not displayed automatically in the imaging application. Taking Still Pictures Take still pictures in PC Camera mode (connected to the PC) and save them in your imaging application. 1 Connect the camera to your computer. 2 Place the camera in the base (see page 20). Position the camera to capture your subject in the live video display on the screen. 3 Press the Shutter button to open the imaging application and the KODAK EZ200 Software. See “Connecting the Camera to Your Computer” on page 21. 24 Chapter 4 4 Adjust the focus. Turn the focus ring on the front of the camera until the live video display on the screen is clear. You can use the focus ring to get clear pictures as close as 2.0 inches (5 cm). or press the 5 Click Take Picture Shutter button on the camera. A thumbnail representation of the picture is displayed on the right side of the screen. These pictures are stored in temporary memory on your computer, not your camera, until you save them. See next page. 25 Chapter 4 Saving Still Pictures Save the still pictures you took in PC Camera mode (connected to your computer) to your imaging application. Click to select the thumbnail of the picture you wish to transfer and save. The selected thumbnail is highlighted in red. ! Control-click to select non-adjacent thumbnails. ! Shift-click to select adjacent thumbnails. ! Control-click to de-select a thumbnail. ! Use the up and down arrows to scroll through more than one page of pictures. to transfer the selected pictures to the imaging 1 2 Click Transfer application. Click Transfer All to transfer all of the pictures at once. ! The selected pictures are transferred to the imaging application and saved automatically on your computer hard drive in a folder called My Pictures. ! The EZ200 Software closes and you are returned to the imaging application where the pictures are displayed as thumbnail images. 26 Chapter 4 Shooting Video Clips Use ARCSOFT VIDEOIMPRESSION software and your KODAK EZ200 Digital Camera to capture and edit video clips. See page 35 to get started with ARCSOFT VIDEOIMPRESSION. Using Video Conferencing Use MICROSOFT NetMeeting Software and your KODAK EZ200 Digital Camera to make live video phone calls over the Internet. See page 37 to get started with MICROSOFT NetMeeting software. 27 5 Using the Software This chapter describes the software included with your KODAK EZ200 Digital Camera. Using KODAK EZ200 Software ........................................page 29 Getting Started with ARCSOFT PHOTOIMPRESSION 2000........ 34 Getting Started with ARCSOFT VIDEOIMPRESSION.................. 35 Getting Started with MICROSOFT NetMeeting .......................... 37 28 Chapter 5 Using KODAK EZ200 Software KODAK EZ200 Software allows your camera to communicate with the PC. You must install EZ200 Software before you can download pictures from the camera, take pictures in PC Camera mode (connected to the PC), or use your camera with other imaging software applications. KODAK EZ200 Software Overview A C D A. Live video display B. Buttons B C. Scrolling arrows D. Thumbnail images E. Tool tip E KODAK EZ200 Software Screen Live Video Display (A) When the camera is connected to your computer, the camera captures and displays a live video image on the EZ200 Software screen. 29 Chapter 5 Buttons (B) The buttons allow you to capture and transfer images and work with the pictures in your camera. Get Images—downloads and displays all pictures and silent movie Images clips stored on the camera. Save All—saves all pictures and video clips (downloaded from the All camera with the Get Images button) to your computer hard drive. Take Picture—captures a still picture of the current live video Picture display. Settings—opens a dialog box that allows you to select camera and Settings picture settings (see “Changing Camera Settings” on page 32). Transfer—transfers selected pictures taken with the Take Picture Transfer button to the imaging application. Transfer All—transfers all pictures taken with the Take Picture All button to the imaging application. Exit—exits and closes the EZ200 Software. Exit Scrolling Arrows (C) If more than one page of thumbnail images are displayed, the up and down scrolling arrows appear on the screen. Click and hold an arrow to scroll up or down through the images. 30 Chapter 5 Thumbnail Images (D) The thumbnail images represent the pictures or video clips downloaded from the camera, or pictures taken with the Take Picture button. To view information about the picture, roll the mouse pointer over the thumbnail image (see Viewing Picture Information on this page). Tool Tips (E) When you roll over a screen feature with the mouse pointer, a description of the feature (button or thumbnail image) appears under the live video display. Viewing Picture Information The thumbnail images displayed on the right side of the screen represent the pictures or silent movie clips that were downloaded from the camera, or the pictures taken with the Take Picture button. To view information about a picture, roll the mouse pointer over the thumbnail image. The picture information appears under the live video display in the following format: Still picture, 640 x 480, 2/21 Type of image Image resolution Image number/total number 31 Chapter 5 There are four types of images, each with a specific resolution: Type of Image Image Resolution Description Still picture Still picture Burst picture 640 x 480 pixels 320 x 240 320 x 240 High quality still image Web quality still image Web quality, burst still image. All images in the burst series are displayed. Silent movie clip, first frame only is displayed. To play the movie clip, doubleclick on the thumbnail image. image. Video Clip 160 x 120 Changing Camera Settings Click the Settings button to change camera, video, and anti-flicker settings. 1 Click Settings . The Properties window appears. Three Properties tabs are available: ! Camera Controls tab ! Video Processor Amplifier tab ! Anti Flicker tab* *To minimize video flicker sometimes caused by flourescent lights, change the Anti Flicker option to the opposite setting. 32 Chapter 5 2 For the options with sliders, click and slide the indicator. For anti-flicker, select the appropriate radio button. The change is dynamically previewed in the live video display. Options that are greyed out are inactive. 3 When you have made all your selections, click OK. The Properties window closes and your changes are applied. The Apply button accepts your changes but does not close the window. Starting KODAK EZ200 Software You launch the KODAK EZ200 Software through the photo imaging application of your choice when you connect the camera to your PC with the provided USB cable. 1 Connect the camera to your computer with the provided USB cable. 2 Press the Shutter button and select your imaging application. The imaging application and EZ200 Software open. For complete instructions on starting and using EZ200 Software with your camera, see Chapter 4, Using Your EZ200 Camera as a PC Camera. 33 Chapter 5 Getting Started with ARCSOFT PHOTOIMPRESSION 2000 Working With Your Existing Pictures Edit and enhance the pictures that you took and stored on your camera. Make sure you download your pictures from the camera before starting (see page 23). From the Start menu on your desktop, select Programs. 2 Select ArcSoft PhotoImpression 2000 to open the application. 3 Click Get Photo. 1 4 Select From File and click Browse. 5 Browse to the location on your hard drive where you saved your EZ200 pictures. 6 Select the pictures you want and begin using ARCSOFT PHOTOIMPRESSION to edit, print, and share your pictures. For more details on using ARCSOFT PHOTOIMPRESSION features, click the Help (?) button at the top of the screen or visit ARCSOFT’s website at www.arcsoft.com. 34 Chapter 5 Getting Started with ARCSOFT VIDEOIMPRESSION Working With Your Existing Video Clips Edit and enhance the silent movie clips that you recorded and stored on your camera. Make sure you download your clips from the camera before starting (see page 23). From the Start menu on your desktop, select Programs. 2 Select ArcSoft VideoImpression to open the application. 3 Click New. 1 4 Click Get. 5 Browse to the location on your hard drive where you saved your EZ200 video clips. 6 Select a video clip and begin using ARCSOFT VIDEOIMPRESSION to have fun with your video files. For more details on using ARCSOFT VIDEOIMPRESSION features, click the Help (?) button at the top of the screen or visit ARCSOFT’s website at www.arcsoft.com. 35 Chapter 5 Recording Video Use ARCSOFT VIDEOIMPRESSION to record video clips through your KODAK EZ200 Digital Camera. Connect the EZ200 Digital Camera to your PC (see page 21). 2 From the Start menu on your desktop, select Programs. 3 Select ArcSoft VideoImpression to open the application. 4 Click New. 1 5 Click Capture. The EZ200 Digital Camera displays live video on the screen. 6 Click Record to begin recording the live video. 7 Click Pause to end recording. 8 Click Save to name and save your video. For more details on using ARCSOFT VIDEOIMPRESSION features, click the Help (?) button at the top of the screen or visit ARCSOFT’s website at www.arcsoft.com. 36 Chapter 5 Getting Started with MICROSOFT NetMeeting Use MICROSOFT NetMeeting software with your KODAK EZ200 Digital Camera to hold a video conference with others over the Internet or your local Intranet. All participants must have MICROSOFT NetMeeting software installed on their computers and a camera to “view” the other parties. Starting MICROSOFT NetMeeting 1 Connect the EZ200 Digital Camera to your PC (see page 21). 2 From the Start menu on your desktop, select Programs. 3 From the program application choices, select MICROSOFT NetMeeting to open the application. NOTE: The Startup Wizard is an excellent way to walk through your first MICROSOFT NetMeeting operation. 37 Chapter 5 Starting a Video Conference Before you initiate a video conference call, you must ask the person you are calling for their IP address. If they do not know how to find it, you can tell them how—see the following section, “Finding Your IP Address” on page 39. Click Start Video to view your own live video. If your video image does not appear, select Video on the Tools pull-down menu. Then select Detach My Video and repeat step 1. If your video still does not appear, reboot the computer and go back to step 1. 2 In the Address bar, enter the IP address of the person you are calling. 3 Click Place Call. The person you are calling must have the MICROSOFT NetMeeting application open and must select Accept when called. This will start the video conference. 1 4 When the video conference is over, right-click the MICROSOFT NetMeeting icon to completely exit from the application. If you do not exit the application, MICROSOFT NetMeeting will run in the background and make the camera unavailable for use by other applications. If several people are involved in the video conference, only two people at a time may see each other. For further information on using MICROSOFT NetMeeting or establishing a video conference call, consult the Help menu available from the application or visit MICROSOFT’s website at www.microsoft.com. 38 Chapter 5 Finding Your IP Address To find your computer’s IP address: 1 Make sure you are connected to your Internet service provider. 2 From the Start menu on your desktop, select Run. 3 In the text box, type the following: winipcfg 4 Click OK. 5 In the IP Configuration window, select your Internet service provider from the drop down list. Your IP address appears in the IP Address text box. NOTE: The IP address can change each time you connect to your provider. We recommend that you ask the person you are calling for their IP address each time you initiate a video conference. 39 6 Tips and Troubleshooting At times, you may have questions about using your camera. This chapter can point you in the right direction for finding the answers quickly, so you can continue using your camera. Connecting Your Camera................................................page 40 Adjusting Your Monitor for Better Viewing ............................. 40 Getting Better Results from Your Printer ................................ 41 Troubleshooting..................................................................... 42 Connecting Your Camera If you are getting messages on your computer that state you are not connected, get help on our website at www.kodak.com. Click Service and Support. Adjusting Your Monitor for Better Viewing Your monitor display settings may need to be adjusted to view pictures from the camera. Refer to your computer User’s Guide for information on how to adjust your monitor display settings. 40 Chapter 6 Getting Better Results from Your Printer Because monitors and printers use different color systems, colors on your computer screen may not always match those in your documents or prints. To achieve more predictable results in your printed documents: ! Improve the quality of your paper. Copier paper may not offer the same results as coated paper or paper made especially for inkjet printers. ! Adjust your printer software settings. ! Use fresh ink cartridges. Do not use ink cartridges beyond their life expectancy. Remember the following tips for printing your pictures: ! For best results, print your pictures no larger than 3 x 5 inches (7.6 x 12.7 cm). ! Color printing takes more time than black and white. More complex pictures increase the printing and drying time. ! Color printing is more memory intensive than black and white. If your computer gives you an insufficient memory message, you may need to close some applications, change some settings, or add additional memory. ! Color prints may not photocopy as clearly as black and white. If you plan to photocopy your pictures, consider printing the document in grayscale. This setting is usually changed from the Print dialog box. ! Resizing the picture to a smaller size or printing the picture on glossy paper may increase the quality of the print. ! To improve the quality of your prints, you may want to print your pictures on KODAK Inkjet Snapshot Paper (Snapshot Paper). Snapshot Paper is made to work with most inkjet printers to give you clearer, crisper, and more detailed images on your prints. 41 Chapter 6 Troubleshooting If you are experiencing difficulties with your camera, check the following tables for possible solutions. Additional technical information is available in the ReadMe file located in the KODAK EZ200 folder on your hard drive. For updates to Troubleshooting information, visit our Web site at http://www.kodak.com. Computer Monitor Problem Cause The image on your monitor is jagged or inappropriately colored. The monitor is not set correctly. Solution Go to Start→Settings→Control Panel→Display Settings. Under Color, select a higher color depth (High Color, 16 bit or higher) EZ200 Software screen takes Screen resolution Go to up too much space on the is set too low. Start→Settings→Control screen. Panel→Display Settings. Under Screen Area, slide the indicator toward More. 42 Chapter 6 Camera Communications Problem Cause Computer cannot The USB cable is communicate with the not properly camera. connected to the camera or computer. There is a problem with your USB connection. The software is not installed. Solution Connect the cable to the camera and computer ports (see page 21). Visit our web site at www.kodak.com and click Service and Support. Install the software (see page 9). Camera Problem Cause Camera does not turn on. The batteries are not Remove and reinstall the batteries installed properly. (see page 2). The batteries are Replace the batteries (see page 2). exhausted. Solution 43 Chapter 6 Camera Problem Cause The shutter button does not work. The camera is not Turn on the camera (see page 2). turned on. The camera memory Download pictures to your is full. computer (see page 23) and delete pictures from the camera (see page 18). In Digital Camera Turn the focus ring to the mode, the focus ring setting (see page 12). is not set to the position. The batteries are Replace the batteries (see page 2). low. The camera sound is The shutter button is working. turned off. Turn the Camera Sound on (see page 6). Something was Keep hands, fingers, or other blocking the lens objects away from the lens when taking pictures. when the picture was taken. Leave space around your subject Your eye or the when centering the picture in the picture was not centered correctly in viewfinder. the viewfinder. Part of the picture is missing. Solution 44 Chapter 6 Camera Problem Cause Solution The picture is too dark. The subject is in front of a bright light (backlit). The picture is too light. Your scene is too harshly lit. The picture has a vertical stripe. The picture is not clear. Change your position so the light is not behind the subject. Reduce the light, move your subject, or change your picturetaking position. A very bright spot is Move your subject, or change your in the scene. picture-taking position. The lens is dirty. Clean the lens. See the Appendix. Subject is too close Stand at least 30 in. (0.75 m) away from your subject. when taking the picture in Digital Camera mode. The camera or your Hold the camera steady until the subject moved while picture is taken. the picture was taken. 45 Chapter 6 Camera Warnings Problem Cause The camera emits a low double-tone warning when the Shutter button is pressed half-way down. The camera emits a low double-tone warning when the Shutter button is pressed all the way down, the focus icon in the LCD blinks Low light warning, You can still take a picture. camera uses a slow Hold the camera steady or use shutter speed a tripod to prevent blurring. The camera emits a low double-tone warning when the Shutter button is pressed all the way down, the picture count in the LCD blinks Solution In Digital Camera mode (not connected to the PC), the focus ring is not set correctly. The camera does not operate. The camera memory is full. The camera does not operate. 46 Turn the focus ring to the setting (see page 12). Download pictures to your computer (see page 23) and delete pictures from the camera (see page 18). Chapter 6 KODAK EZ200 Software Problem Cause Solution Live video freezes, you The camera was cannot use unplugged while the application. application was running 47 Plug in the camera and click the Exit button. 7 Getting Help Help with your camera is available from your place of purchase, from Chapter 6 in this manual, or at any of the resources listed in this chapter. Software Help For help with the software packaged with your camera refer to the application’s online help, or contact the software manufacturer through their websites at: ARCSOFT PHOTOIMPRESSION, VIDEOIMPRESSION http://www.arcsoft.com MICROSOFT NetMeeting http://www.microsoft.com Kodak Online Services ! World Wide Web http://www.kodak.com (click Service and Support) Kodak Fax Support ! U.S. and Canada ! Europe ! U.K. 1-800-508-1531 44-0-131-458-6962 44-0-131-458-6962 48 Chapter 7 Telephone Customer Support If you have questions concerning the operation of KODAK software or the camera, you may speak directly to a customer support representative. Before You Call Before you call to speak to a customer support representative, please have the camera connected to your computer, be at your computer, and have the following information available: Operating system __________________________________________ Processor speed (MHz) _____________________________________ PC model _______________________________________________ Amount of memory (MB) ____________________________________ Exact error message you received ______________________________ Version of installation CD ____________________________________ Camera serial number ______________________________________ Telephone Numbers ! U.S.—call toll free, 1-800-235-6325, between the hours of 9:00 a.m. and U.S. 8:00 p.m. (Eastern Standard Time) Monday through Friday. ! Canada—call toll free, 1-800-465-6325, between the hours of 9:00 a.m. and Canada 8:00 p.m. (Eastern Standard Time) Monday through Friday. ! Europe—call the Kodak Digital Imaging Support Centre toll free number Europe associated with your location, or the U.K. toll line, 44-0-131-458-6714, between the hours of 09.00 and 17.00 (GMT/CET) Monday through Friday. 49 Chapter 7 ! Outside the U.S., Canada, and Europe—calls are charged at National Rate. Europe Austria/Osterreich Belgium/Belgique Denmark/Danmark Ireland/Eire Finland/Suomi France Germany/Deutschland Greece Italy/Italia Netherlands/Nederland Norway/Norge Portugal Spain/Espana Sweden/Sverige Switzerland/Schweiz/Suisse UK International Toll Line International Toll Fax Number 0179 567 357 02 713 14 45 3 848 71 30 01 407 3054 0800 1 17056 01 55 1740 77 069 5007 0035 0080044125605 02 696 33452 020 346 9372 23 16 21 33 021 415 4125 91 749 76 53 08 587 704 21 01 838 53 51 0870 2430270 +44 131 4586714 +44 131 4586962 50 8 Warranty and Regulatory Information Limited Warranty Kodak warrants the KODAK EZ200 Digital Camera (excluding batteries) to be free from malfunctions and defects in both materials and workmanshop for one year from the date of purchase. Retain the original dated sales receipt. Proof of the date of purchase will be required with any request for warranty repair. Limited Warranty Coverage THIS LIMITED WARRANTY WILL BE HONORED ONLY WITHIN THE GEOGRAPHICAL LOCATION THAT THE KODAK EZ200 DIGITAL CAMERA WAS PURCHASED. Kodak will REPLACE the KODAK EZ200 Digital Camera if it fails to function properly during the warranty period, subject to any conditions and/or limitations stated herein. Such replacement is the sole remedy under this warranty. If it is necessary to replace the entire product, it may be replaced with a remanufactured product. 51 Chapter 8 Limitations Request for Warranty service will not be accepted without proof of date of purchase, such as a copy of the original dated KODAK EZ200 Digital Camera sales receipt. (Always keep the original for your records.) This warranty doesn’t apply to the batteries used in this camera. This warranty does not cover circumstances beyond Kodak’s control, nor problems caused by failure to follow the operating instructions in the KODAK EZ200 Digital Camera User’s Guide. THIS WARRANTY DOES NOT APPLY WHEN FAILURE IS DUE TO SHIPPING DAMAGE, ACCIDENT, ALTERATION, MODIFICATION, UNAUTHORIZED SERVICE, MISUSE, ABUSE, USE WITH INCOMPATIBLE ACCESSORIES OR ATTACHMENTS, FAILURE TO FOLLOW KODAK’S OPERATION, MAINTENENCE OR REPACKING INSTRUCTIONS, FAILURE TO USE ITEMS SUPPLIED BY KODAK (SUCH AS ADAPTERS AND CABLES), OR CLAIMS MADE AFTER THE DURATION OF THIS WARRANTY. Kodak makes no other express or implied warranty for this product. In the event that the exclusion of any implied warranty is ineffective under the law, the duration of the implied warranty will be one year from the purchase date. The option of replacement is Kodak’s only obligation. Kodak will not be responsible for any special, consequential or incidental damages resulting from the sale, purchase, or use of this product, regardless of the cause. Liability for any special, consequential or incidental damages (including but not limited to loss of revenue or profit, downtime costs, loss of the use of the equipment, cost of substitute equipment, facilities or services, or claims of your customers for such damages resulting from the purchase, use or failure of the product), regardless of cause or for breach of any written or implied warranty is expressly disclaimed and excluded herefrom. 52 Chapter 8 Your Rights Some states or jurisdictions do not allow exclusion or limitation of incidental or consequential damages, so the above limitation or exclusion may not apply to you. Some states or jurisdictions do not allow limitations on how long an implied warranty lasts, so the above limitation may not apply to you. This warranty gives you specific rights, and you may have other rights which vary from state to state or by jurisdiction. Outside the United States In countries other than the United States, the terms and conditions of this warranty may be different. Unless specific Kodak warranty is communicated to the purchaser in writing by a Kodak company, no warranty or liability exists beyond any minimum requirements imposed by law, even though defect, damage, or loss may be by negligence or other act. Regulatory Information FCC Compliance and Advisory This device complies with Part 15 of the FCC Rules. Operation is subject to the following two conditions: 1) this device may not cause harmful interference, and 2) this device must accept any interference received, including interference that may cause undesired operation. This equipment has been tested and found to comply with the limits for a Class B digital device, pursuant to Part 15 of the FCC Rules. These limits are designed to provide reasonable protection against harmful interference in a residential installation. This equipment generates, uses, and can radiate radio frequency energy and, if not installed or used in accordance with the instructions, may cause harmful interference to radio communications. However, there is no guarantee that interference will not occur in a particular installation. 53 Chapter 8 If this equipment does cause harmful interference to radio or television reception, which can be determined by turning the equipment off and on, the user is encouraged to try to correct the interference by one or more of the following measures: 1) reorient or relocate the receiving antenna; 2) increase the separation between the equipment and the receiver; 3) connect the equipment to an outlet on a circuit different from that to which the receiver is connected; 4) consult the dealer or an experienced radio/TV technician for additional suggestions. Any changes or modifications not expressly approved by the party responsible for compliance could void the user’s authority to operate the equipment. Where shielded interface cables have been provided with the product or specified additional components or accessories elsewhere defined to be used with the installation of the product, they must be used in order to ensure compliance with FCC regulation. Canadian DOC Statement DOC Class B Compliance—This digital apparatus does not exceed the Class B Compliance— limits for radio noise emissions from digital apparatus set out in the radio interference regulations of the Canadian Department of Communications. Obervation des normes-Class B—Le B— présent appareil numérique n’émet pas de bruits radioélectriques dépassant les limites applicables aux appareils numériques de la Classe B prescrites dans les règlements sur le brouillage redioélectrique édictés par le Ministère des Communications du Canada. 54 9 Appendix This appendix serves as a resource for specific technical information and care for your camera, and contains the following information: EZ200 Camera Specifications .........................................page 56 General Camera Maintenance................................................. 58 General Safety ........................................................................ 58 Using Your Batteries............................................................... 59 55 Chapter 9 EZ200 Camera Specifications Camera Specifications Pixel Resolution Video Clip 160 x 120 (by image type, see page 31) Still picture (High quality) 640 x 480 Still picture (Web quality) Burst image 320 x 240 Video clip, Digital Camera 20 fps@QSIF (160 x 120) Video streaming, PC Camera 30 fps@CIF (352 x 288) 26 fps@VGA w/500 MHz system 15 fps@VGA w/266 MHz system Frame Rate (by image type) Color 24-bit, millions of colors Picture File Format JPEG (stills) AVI (video) Picture Storage 4 MB internal memory Viewfinder Optical Galilean 56 Chapter 9 Camera Specifications Lens Power Aperture Focal Length 0.18 in. (4.7 mm) Focus Range Digital Camera mode mode: 30 in. (75 cm) to infinity PC Camera mode mode: 2 in. (5 cm) to infinity Digital Camera mode 4, AAA alkaline batteries PC Camera Camera mode mode Power supplied by PC through USB .25 in. (.006 m) threaded Tripod Socket Dimensions f/2.3 Width 3.6 in. (92 mm) Depth 1.4 in. (36.5 mm) Height 2.7 in. (68.6 mm) Weight 3.2 oz. (90 g) without batteries 4.7 oz. (134.3 g) with batteries Operating Temperature 32 to 104° F (0 to 40° C) Storage Temperature -25 to 160° F (-32 to 70° C) 57 Chapter 9 General Camera Maintenance ! Clean the outside of the camera by wiping with a clean, dry cloth. Never use harsh or abrasive cleaners or organic solvents on the camera or any of its parts. ! Clean the lens: Do not use cleaning solutions unless they are designed specifically for camera lenses. Do not wipe the camera lens with chemically treated eyeglass lens tissue. It may scratch the lens. 1 Blow gently on the lens to remove dust and dirt. 2 Moisten the lens by breathing lightly on it. 3 Wipe the lens gently with a soft, lint-free cloth or an untreated lenscleaning tissue. General Safety ! To keep from damaging your camera, avoid exposing it to moisture and extreme temperatures. ! Do not allow any chemicals, such as suntan lotion, to come into contact with the painted surface of the camera. ! Never disassemble or touch the inside of the camera. ! If you notice smoke or a strange smell coming from the camera, immediately turn off the camera, wait a few minutes until the camera cools, then remove the batteries. ! If you use the camera in an airplane, observe instructions of the airline company. Radio waves emitted by the camera may affect the airplane instruments. 58 Chapter 9 Using Your Batteries ! Keep all batteries away from children. ! Your camera has been designed to operate correctly using four, 1.5-volt AAA alkaline batteries. Kodak recommends using KODAK Photolife AAA Alkaline Batteries in the camera. ! Remove the batteries when storing the camera for extended periods of time. ! Always follow your battery manufacturer’s directions fully. Do not attempt to disassemble, short circuit, or subject the battery to high temperature or fire. ! Replace all batteries of a set at the same time. New batteries should not be mixed with used ones. Do not mix different grades or brands of batteries. Failure to observe this precaution may result in some batteries in a set being driven beyond their normal exhaust point and increase their possibility of leakage. ! In the unlikely event that battery fluid leaks onto your skin, immediately wash the affected skin with soap and plenty of water. Customers inside the US can contact Kodak Health, Safety and Environment Information at 1-716-7225151 in the U.S. Customers outside the U.S. should contact their local health care provider. ! We do not recommend the use of rechargeable batteries in the KODAK EZ200 Digital Camera. ! Battery performance is reduced at temperatures below 32°F (0°C). Carry spare batteries when using your camera in cold weather, and keep them warm until you are ready to take pictures. Do not discard cold batteries that do not work. Once warmed, they may be usable. ! When disposing of batteries, follow the manufacturer’s instructions and any local and national regulations. Kodak suggests customers take advantage of any community battery recycling programs that may exist in your area. Contact your local waste remover or recycler for details. Service agreements are available in some countries. Please contact a dealer of Kodak products for more information. 59 B Index A adjusting focus, digital camera mode 12 focus, pc camera mode 25 monitor 40 anti flicker setting 32 appendix battery guidelines 59 camera specifications 56 maintenance 58 safety 58 ARCSOFT PHOTOIMPRESSION getting started 34 installing 9 ARCSOFT VIDEOIMPRESSION getting started 35 installing 9 auto shutoff 3 60 base, camera 20 batteries checking power level 4 guidelines 59 loading 2 safety 59 tips 59 burst feature 16 C camera 3 base 20 cleaning 58 communication, problems 43 connected to pc 19 connecting to pc 21 deleting images 18 downloading pictures 23 maintenance 58 problems 43–45 safety 58 settings 32 software included 9 sounds, turn on/off 6 specifications 56 Index typical sounds 7 using as digital camera 11 using as pc camera 19 using not connected to pc 11 warnings 46 Canadian compliance 54 capture mode 13 cleaning camera 58 lens 58 communications, camera 43 compliance Canadian 54 FCC 53 computer problem with monitor 42 system 8 conferencing, live video 27, 38 connecting camera to pc 21 help 40 USB cable 21 customer support numbers 49 focus setting 12 taking a series, burst 16 taking silent movie clips 17 taking still pictures 14 using camera in 11 downloading images 23 E Exit button 30 EZ200 Software installing 9 overview, screens 29 problems 47 starting 21 using 29 F fax numbers, support 48 FCC compliance 53 file formats 56 finding IP address 39 flicker, preventing 32 focus setting digital camera mode 12 pc camera mode 25 frame rate 56 D deleting images from camera 18 digital camera mode 1 deleting images 18 61 Index including yourself in picture 15 information, picture 31 installing batteries 2 software 8, 9 IP address, finding 39 G Get Images button 30 getting started 1 See also, front cover See also, front of book guidelines, batteries 59 H K help camera care 58 connecting to pc 40 online service 48 software 48 telephone support 49 tips and troubleshooting 40 KODAK EZ200 Software getting help 48 installing 9 problems 47 starting 21 using 29 L I lcd camera status 3 overview 3 lens cleaning 58 specifications 57 live video conferencing 27, 38 live video display 29 loading batteries 2 software 8, 9 icons, lcd battery power 4 burst 13 camera sounds 6 capture modes 13 focus setting 12 movie clip 13 overview 3 quality 13 self-timer 13 speaker on/off 6 image types 32 62 Index M maintenance, camera 58 MICROSOFT NetMeeting software getting started 37 installing 9 modes capture 13 digital camera 1, 11 pc camera 1, 19 monitor adjusting 40 problems 42 movie clips digital camera mode 17 pc camera mode 27 N NetMeeting software getting started 37 installing 9 P PHOTOIMPRESSION software getting started 34 installing 9 picture/video count, lcd 5 pictures downloading to pc 23 remaining, lcd 5 saving in pc camera mode 26 storing on pc 22 taking in digital camera mode 11–17 taking in pc camera mode 24 viewing information 31 pixel resolution 56 power checking batteries 4 turning camera on and off 2 power save feature 3 printing improving results 41 tips 41 R pc camera mode 1 downloading pictures 23 downloading videos 23 saving still pictures 26 using camera in 19 RAM 8 ReadMe file 42 regulatory information 53, 54 requirements 8 63 Index requirements, system 8 resolution, pixels 56 reviewing picture information 31 ring, focus setting for digital camera 12 setting for pc camera 25 S safety 58 Save All button 30 saving pictures download from camera 23 pc mode 26 seconds remaining 5 self-timer cancelling 15 using 15 series of pictures, burst 16 service and support fax numbers 48 Kodak web site 48 telephone numbers 49 Settings button 30 settings, camera 32 shut down, auto 3 silent movie clips, taking 17 software 64 ARCSOFT PHOTOIMPRESSION 9, 34 ARCSOFT VIDEOIMPRESSION 9, 35 getting help 48 included with camera 9 installing 8, 9 KODAK EZ200 9, 21, 29 MICROSOFT NetMeeting 9, 37 using 28 sounds, camera list of typical 7 turn on/off 6 warning tone 7 warnings, troubleshooting 46 speaker on/off 6 specifications camera 56 system 8 status display, lcd 3 still pictures digital camera mode 14 pc camera mode 24 storage capacity, camera 56 storing pictures on pc 22 support numbers 49 system requirements 8 Index T U Take Picture button 30 taking pictures burst 16 choosing a mode 13 in digital camera mode 14 in pc camera mode 24 including yourself 15 silent movie clips 17 video clips, pc mode 27 telephone support 49 temperature specifications 57 thumbnail images 31 tips battery guidelines 59 connecting your camera 40 maintenance 58 monitor settings 40 printing 41 ReadMe file 42 safety 58 Transfer All button 30 Transfer button 30 troubleshooting 40, 42–46 turning camera on and off 2 USB cable, connecting 21 using batteries 59 digital camera 11 pc camera 19 software 28 V video clips digital camera mode 17 in VIDEOIMPRESSION 35, 36 pc mode 27 video conferencing 27, 38 video/picture count 5 VIDEOIMPRESSION software getting started 35 installing 9 viewing picture information 31 W warning tone 7 warnings, camera sounds 46 warranty limitations 52 web site, Kodak 1, 48 WINDOWS system requirements 8 65