1
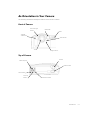
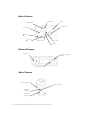
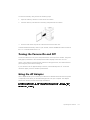
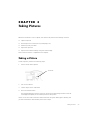
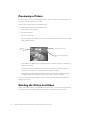
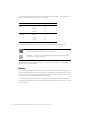
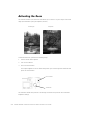
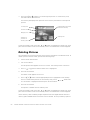
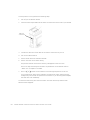
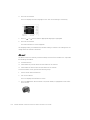
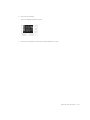
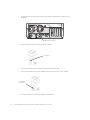
.2'$.',*,7$/6&,(1&('&3OXV=RRP&DPHUD 86(5·6*8,'( ZZZNRGDNFRP .2'$.',*,7$/6&,(1&('&3OXV=RRP&DPHUD 86(5·6*8,'( ZZZNRGDNFRP ____________________ Information in this document is subject to change without notice. © 1998 Dell Computer Corporation. All rights reserved. © 1998 Eastman Kodak Company. All rights reserved. Reproduction in any manner whatsoever without the written permission of Dell Computer Corporation is strictly forbidden. Trademarks used in this text: Dell is a registered trademark and DellWare is a registered service mark of Dell Computer Corporation; Kodak is a registered trademark and KODAK DIGITAL SCIENCE, FlashPix, and Photolife are trademarks of Eastman Kodak Company; Microsoft, Windows, and Windows NT are registered trademarks of Microsoft Corporation. Other trademarks and trade names may be used in this document to refer to either the entities claiming the marks and names or their products. Dell Computer Corporation disclaims any proprietary interest in trademarks and trade names other than its own. The FlashPix format is defined in a specification and test suite developed and published by Kodak in collaboration with Microsoft, Hewlett-Packard, and Live Picture. Only products that meet the specification and pass the test suite may use the FlashPix name and logo. October 1998 P/N 3066D 6DIHW\,QVWUXFWLRQV When using your digital camera, always follow these basic safety precautions. :$51,1* 8VH RI FRQWUROV DGMXVWPHQWV RU SURFHGXUHV RWKHU WKDQ WKRVH VSHFL ILHG LQ WKH .RGDN GRFXPHQWDWLRQ PD\ UHVXOW LQ H[SRVXUH WR VKRFN HOHFWULFDO KD]DUGV DQGRU PHFKDQLFDO KD]DUGV Read and understand all instructions before using the camera. To reduce the risk of electric shock, do not immerse the digital camera in water or any other liquid. Never disassemble or touch the inside of the camera. This action could result in electrical shock. Service or repair work should be done by a qualified service person. Incorrect reassembly can cause electric shock. To keep from damaging your camera, avoid exposing it to moisture and extreme temperatures. Only use approved batteries in your digital camera. If you notice smoke or a strange smell coming from the camera, immediately turn off the camera, wait a few moments until the camera cools, and then remove the batteries. Do not attempt to disassemble, recharge, short circuit, or subject the batteries to high temperatures or fire. Only use the AC adapter supplied with the digital camera. Use of an accessory attachment not provided or recommended by Kodak may cause fire, electric shock, or injury. v vi &RQWHQWV &KDSWHU ,QWURGXFWLRQ Features . . . . . . . . . . . . . . . . . . . . . . . . . . . . . . . . . . . . . . . . . . . . . . . . . . . . . . . . . . . . . .1-1 Camera Kit Contents . . . . . . . . . . . . . . . . . . . . . . . . . . . . . . . . . . . . . . . . . . . . . . . . . . . . .1-1 Digital Camera Software . . . . . . . . . . . . . . . . . . . . . . . . . . . . . . . . . . . . . . . . . . . . . . . . . .1-2 Camera Accessories . . . . . . . . . . . . . . . . . . . . . . . . . . . . . . . . . . . . . . . . . . . . . . . . . . . . .1-2 An Orientation to Your Camera . . . . . . . . . . . . . . . . . . . . . . . . . . . . . . . . . . . . . . . . . . . . .1-3 Front of Camera . . . . . . . . . . . . . . . . . . . . . . . . . . . . . . . . . . . . . . . . . . . . . . . . . . . . .1-3 Top of Camera . . . . . . . . . . . . . . . . . . . . . . . . . . . . . . . . . . . . . . . . . . . . . . . . . . . . . .1-3 Back of Camera . . . . . . . . . . . . . . . . . . . . . . . . . . . . . . . . . . . . . . . . . . . . . . . . . . . . .1-4 Bottom of Camera . . . . . . . . . . . . . . . . . . . . . . . . . . . . . . . . . . . . . . . . . . . . . . . . . . .1-4 Side of Camera. . . . . . . . . . . . . . . . . . . . . . . . . . . . . . . . . . . . . . . . . . . . . . . . . . . . . .1-4 &KDSWHU 2SHUDWLQJWKH&DPHUD Installing Batteries . . . . . . . . . . . . . . . . . . . . . . . . . . . . . . . . . . . . . . . . . . . . . . . . . . . . . . .2-1 Battery Usage Guidelines. . . . . . . . . . . . . . . . . . . . . . . . . . . . . . . . . . . . . . . . . . . . . .2-2 Removing and Inserting Memory Cards . . . . . . . . . . . . . . . . . . . . . . . . . . . . . . . . . . . . . .2-2 Turning the Camera On and Off . . . . . . . . . . . . . . . . . . . . . . . . . . . . . . . . . . . . . . . . . . . .2-3 Using the AC Adapter . . . . . . . . . . . . . . . . . . . . . . . . . . . . . . . . . . . . . . . . . . . . . . . . . . . .2-3 Caring for the Camera . . . . . . . . . . . . . . . . . . . . . . . . . . . . . . . . . . . . . . . . . . . . . . . . . . . .2-4 &KDSWHU 7DNLQJ3LFWXUHV Taking a Picture . . . . . . . . . . . . . . . . . . . . . . . . . . . . . . . . . . . . . . . . . . . . . . . . . . . . . . . . .3-1 Previewing a Picture . . . . . . . . . . . . . . . . . . . . . . . . . . . . . . . . . . . . . . . . . . . . . . . . . . . . .3-2 Deleting the Picture Just Taken . . . . . . . . . . . . . . . . . . . . . . . . . . . . . . . . . . . . . . . . . . . .3-2 Adjusting the Exposure Value . . . . . . . . . . . . . . . . . . . . . . . . . . . . . . . . . . . . . . . . . . . . . .3-3 Changing Exposure Compensation . . . . . . . . . . . . . . . . . . . . . . . . . . . . . . . . . . . . . .3-3 Turning On Exposure Lock . . . . . . . . . . . . . . . . . . . . . . . . . . . . . . . . . . . . . . . . . . . . .3-4 vii Adjusting Camera Settings Using the Status Display . . . . . . . . . . . . . . . . . . . . . . . . . . . .3-4 Pictures Remaining . . . . . . . . . . . . . . . . . . . . . . . . . . . . . . . . . . . . . . . . . . . . . . . . . .3-5 Self-Timer . . . . . . . . . . . . . . . . . . . . . . . . . . . . . . . . . . . . . . . . . . . . . . . . . . . . . . . . . .3-5 Memory Card Status . . . . . . . . . . . . . . . . . . . . . . . . . . . . . . . . . . . . . . . . . . . . . . . . .3-6 Close Up. . . . . . . . . . . . . . . . . . . . . . . . . . . . . . . . . . . . . . . . . . . . . . . . . . . . . . . . . . .3-6 Flash . . . . . . . . . . . . . . . . . . . . . . . . . . . . . . . . . . . . . . . . . . . . . . . . . . . . . . . . . . . . . .3-7 Resolution . . . . . . . . . . . . . . . . . . . . . . . . . . . . . . . . . . . . . . . . . . . . . . . . . . . . . . . . .3-7 Quality . . . . . . . . . . . . . . . . . . . . . . . . . . . . . . . . . . . . . . . . . . . . . . . . . . . . . . . . . . . .3-8 Battery Status . . . . . . . . . . . . . . . . . . . . . . . . . . . . . . . . . . . . . . . . . . . . . . . . . . . . . .3-9 Activating the Zoom . . . . . . . . . . . . . . . . . . . . . . . . . . . . . . . . . . . . . . . . . . . . . . . . . . . .3-10 &KDSWHU 5HYLHZLQJ3LFWXUHV Viewing Pictures on the Camera . . . . . . . . . . . . . . . . . . . . . . . . . . . . . . . . . . . . . . . . . . . .4-1 Deleting Pictures . . . . . . . . . . . . . . . . . . . . . . . . . . . . . . . . . . . . . . . . . . . . . . . . . . . . . . . .4-2 Magnifying Pictures. . . . . . . . . . . . . . . . . . . . . . . . . . . . . . . . . . . . . . . . . . . . . . . . . . . . . .4-3 Viewing Pictures or Running a Slide Show on a TV. . . . . . . . . . . . . . . . . . . . . . . . . . . . . .4-3 &KDSWHU $GMXVWLQJ&DPHUD6HWWLQJV Quality . . . . . . . . . . . . . . . . . . . . . . . . . . . . . . . . . . . . . . . . . . . . . . . . . . . . . . . . . . . . . . . .5-2 Resolution . . . . . . . . . . . . . . . . . . . . . . . . . . . . . . . . . . . . . . . . . . . . . . . . . . . . . . . . . . . . .5-3 Template . . . . . . . . . . . . . . . . . . . . . . . . . . . . . . . . . . . . . . . . . . . . . . . . . . . . . . . . . . . . . .5-3 Date Stamp . . . . . . . . . . . . . . . . . . . . . . . . . . . . . . . . . . . . . . . . . . . . . . . . . . . . . . . . . . . .5-4 File Type . . . . . . . . . . . . . . . . . . . . . . . . . . . . . . . . . . . . . . . . . . . . . . . . . . . . . . . . . . . . . .5-5 Quickview . . . . . . . . . . . . . . . . . . . . . . . . . . . . . . . . . . . . . . . . . . . . . . . . . . . . . . . . . . . . .5-6 Date and Time . . . . . . . . . . . . . . . . . . . . . . . . . . . . . . . . . . . . . . . . . . . . . . . . . . . . . . . . . .5-7 LCD Brightness . . . . . . . . . . . . . . . . . . . . . . . . . . . . . . . . . . . . . . . . . . . . . . . . . . . . . . . . .5-8 Format Memory Card . . . . . . . . . . . . . . . . . . . . . . . . . . . . . . . . . . . . . . . . . . . . . . . . . . . .5-9 Video Out . . . . . . . . . . . . . . . . . . . . . . . . . . . . . . . . . . . . . . . . . . . . . . . . . . . . . . . . . . . .5-10 Language . . . . . . . . . . . . . . . . . . . . . . . . . . . . . . . . . . . . . . . . . . . . . . . . . . . . . . . . . . . . .5-11 About . . . . . . . . . . . . . . . . . . . . . . . . . . . . . . . . . . . . . . . . . . . . . . . . . . . . . . . . . . . . . . . .5-12 &KDSWHU 7UDQVIHUULQJ3LFWXUHV)URPWKH&DPHUD WRWKH&RPSXWHU Serial Cable Connection . . . . . . . . . . . . . . . . . . . . . . . . . . . . . . . . . . . . . . . . . . . . . . . . . .6-1 Infrared Connection . . . . . . . . . . . . . . . . . . . . . . . . . . . . . . . . . . . . . . . . . . . . . . . . . . . . . .6-3 viii &KDSWHU 7URXEOHVKRRWLQJ Monitor Checks . . . . . . . . . . . . . . . . . . . . . . . . . . . . . . . . . . . . . . . . . . . . . . . . . . . . . . . . .7-1 Memory Card Checks . . . . . . . . . . . . . . . . . . . . . . . . . . . . . . . . . . . . . . . . . . . . . . . . . . . .7-1 Camera Checks . . . . . . . . . . . . . . . . . . . . . . . . . . . . . . . . . . . . . . . . . . . . . . . . . . . . . . . . .7-2 LCD Messages . . . . . . . . . . . . . . . . . . . . . . . . . . . . . . . . . . . . . . . . . . . . . . . . . . . . . . . . .7-4 Printing Tips. . . . . . . . . . . . . . . . . . . . . . . . . . . . . . . . . . . . . . . . . . . . . . . . . . . . . . . . . . . .7-4 Monitor Adjustment . . . . . . . . . . . . . . . . . . . . . . . . . . . . . . . . . . . . . . . . . . . . . . . . . . . . .7-5 Reinstalling the Camera Software . . . . . . . . . . . . . . . . . . . . . . . . . . . . . . . . . . . . . . . . . . .7-5 Getting Help . . . . . . . . . . . . . . . . . . . . . . . . . . . . . . . . . . . . . . . . . . . . . . . . . . . . . . . . . . .7-6 ,QGH[ ix x &+$37(5 ,QWURGXFWLRQ Congratulations on your purchase of the new KODAK DIGITAL SCIENCE™ DC210 Plus Zoom camera that captures pictures digitally without the use of film. The camera connects to the serial port of your computer to transfer pictures. NOTE: The camera includes an infrared transceiver to use with computers that include an infrared port. )HDWXUHV The DC210+ camera provides the following features: 2X zoom lens (29 to 58 millimeters) to zoom in on subjects and a close-up option to set the focus at 8 inches (20 centimeters) Built-in flash with red-eye reduction Status display of camera settings Removable memory card Video-out capabilities that allow you to connect and run a slide show on your TV Color liquid crystal display (LCD) to immediately see or preview your pictures Software to easily transfer pictures from the camera to your computer A mode dial to activate one of four different functions on the camera: Capture — Takes, previews, or deletes last picture taken and adjusts the exposure. Review — Reviews or deletes pictures. Preference — Adjusts camera settings. Connect — Camera communicates with your computer. &DPHUD.LW&RQWHQWV Your DC210+ camera kit includes the following items: DC210+ camera Carrying case Introduction 1-1 Memory card (installed in camera) AC adapter Four Kodak® Photolife™ AA batteries Quick Reference card and this guide Serial cable Video output cable For information on using the memory card and power sources with the camera, refer to Chapter 2, “Operating the Camera.” 'LJLWDO&DPHUD6RIWZDUH Dell installed the following software on the hard-disk drive of your computer before shipping your computer system and camera: Picture Easy — Picture-processing software that allows you to transfer, organize, edit, share, and print pictures taken with your camera. For more information on this software, refer to the “Using the Picture Easy Software” section of the online KODAK DIGITAL SCIENCE DC210 Plus Zoom Camera User’s Guide. The guide can be accessed by clicking the Start button on the Microsoft® Windows® desktop, pointing to Programs—> Dell Documents, and clicking Kodak DC210+ Camera User’s Guide. Mounter software — Allows you to view, transfer, or delete pictures stored on the camera’s memory card through your operating system. TWAIN software — An industry-standard interface that allows you to directly transfer pictures stored on the camera’s memory card into a TWAIN-compliant application program, such as Adobe PhotoDeluxe. Store the backup software CD that came with your system in a safe place in case you ever need to reinstall the software. &DPHUD$FFHVVRULHV The following accessories are available for your camera: Additional memory cards Memory card reader Snapshot and photographic quality paper To order any of these accessories, contact DellWare® at 1-800-753-7201 in the U.S. or a Kodak dealer in the U.K. 1-2 KODAK DIGITAL SCIENCE DC210 Plus Zoom Camera User’s Guide $Q2ULHQWDWLRQWR<RXU&DPHUD The following illustrations identify the features of the DC210+ camera. )URQWRI&DPHUD self-timer light sensor viewfinder flash infrared transceiver flash sensor lens light sensor 7RSRI&DPHUD shutter status display power button flash button close-up button self-timer button Introduction 1-3 %DFNRI&DPHUD viewfinder Ready light zoom mode dial LCD screen button button Do-It button button button %RWWRPRI&DPHUD battery door memory card eject switch tripod socket 6LGHRI&DPHUD memory card door serial connector video-out connector AC adapter connector 1-4 KODAK DIGITAL SCIENCE DC210 Plus Zoom Camera User’s Guide &+$37(5 2SHUDWLQJWKH&DPHUD This chapter describes basic camera operations, such as using batteries and the AC adapter, inserting and removing the memory card, and turning the camera on and off. This chapter also provides maintenance procedures for the camera. ,QVWDOOLQJ%DWWHULHV The DC210+ camera comes with four Kodak Photolife AA batteries. Standard 1.5-volt (V) alkaline, 1.5-V lithium, or rechargeable 1.2-V nickel cadmium (Ni-Cd) or nickel metal hydride (Ni-MH) batteries may be used. To install the batteries, perform the following steps: 1. Place your thumb on the battery door. 2. Slide the battery door away from the camera. 3. Insert the batteries as indicated on the battery door and close the door. Remove the batteries if the camera will not be used for an extended period of time. Doing so extends battery life and prevents camera damage from battery leaks or corrosion. If the batteries are removed from the camera for more than a few minutes, the camera’s date and time features are deleted and must be reset. For information on setting the date and time, refer to “Date and Time” in Chapter 5. :$51,1* 7DNH FDUH Z hen removing the batteries as they may be hot. Allow them to cool before touching them. Operating the Camera 2-1 %DWWHU\8VDJH*XLGHOLQHV Battery life depends significantly on age, usage conditions, type, and brand. In general, digital cameras are very demanding on batteries. In Kodak lab tests, Ni-MH rechargeable batteries delivered the best results in a variety of conditions. Ni-MH batteries are designed for high-demand devices like digital cameras, and they do not exhibit the memory effects seen with other rechargeable technologies. If you use alkaline batteries in your camera, obtain “photo-flash grade” alkaline batteries. These types of batteries last more than twice as long in digital cameras as ordinary alkaline batteries. Ni-Cd batteries work well in digital cameras, but they typically provide the shortest duty cycle (usable power) between charges. Lithium batteries typically provide the longest overall battery life, but they carry a higher cost-per-picture than other nonrechargeable battery types. While using your batteries, observe the following guidelines: Always follow your battery manufacturer’s directions fully. Replace the batteries when they are low. Otherwise, the camera may shut down with its lens extended. Limit continuous LCD preview or review operations to less than 20 minutes per session. If you anticipate using your camera for longer periods in these modes, Kodak recommends that you use the AC adapter with the camera. Dispose of batteries according to federal and local regulations. 5HPRYLQJDQG,QVHUWLQJ0HPRU\&DUGV The DC210+ camera comes with a KODAK DIGITAL SCIENCE picture card (memory card). The reusable memory card stores the pictures taken with the camera. The memory card is required for camera operation. NOTE: Use only certified memory cards in your camera that carry the CompactFlash logo. &$87,21 'R QRW HMHFW RU LQVHUW D FDUG ZKHQ WKH UHDG\ OLJKW LV EOLQNLQJ 'RLQJ VR PD\ GDPDJH \RXU SLFWXUHV RU FDPHUD To remove the memory card, perform the following steps: 1. Open the memory card door on the side of the camera. 2. Press the eject button on the bottom of the camera. The card partially slides out of the slot. 3. 2-2 Take hold of the card, carefully remove it from the slot, and close the card door. KODAK DIGITAL SCIENCE DC210 Plus Zoom Camera User’s Guide To insert the memory card, perform the following steps: 1. Open the memory card door on the side of the camera. 2. Hold the memory card with the connecting end pointed at the camera. 3. Push the card all the way into the card slot and close the card door. To obtain additional memory cards for your camera, contact DellWare at 1-800-753-7201 in the U.S. or a Kodak dealer in the U.K. 7XUQLQJWKH&DPHUD2QDQG2II To turn the camera on or off, press the power button on the top of the camera. The green ready light (on the back of the camera) and the status display screen turn on or off. NOTE: If the camera is turned off while a picture is being processed, the camera finishes processing the picture before turning off. If your camera is idle for approximately 5 minutes, it automatically turns off. To turn the camera on again, press the camera’s power button. 8VLQJWKH$&$GDSWHU An AC adapter allows you to connect your camera to a standard electrical outlet. AC power is especially useful when you are transferring pictures into your computer. The adapter powers the camera, but does not charge the batteries. :$51,1* 2QO\ XVH WKH $& DGDSWHU GHVLJQHG IRU WKH '& FDPHUD 8VH RI DQ\ RWKHU DGDSWHU PD\ YRLG WKH ZDUUDQW\ DQG FDQ FDXVH FDPHUD IDLOXUH ILUH HOHFWULF VKRFN RU LQMXU\ Operating the Camera 2-3 To connect the AC adapter to the camera, perform the following steps: 1. Insert the AC adapter into the AC adapter connection on the side of your camera. AC adapter connection 2. Connect the other end of the adapter to a wall outlet. 3. Turn on the camera. NOTE: The battery icon does not appear on the status display when an AC adapter is used. &DULQJIRUWKH&DPHUD Clean the outside of the camera by wiping it with a clean, dry cloth. Never use harsh or abrasive cleaners or organic solvents on the camera or any of its parts. To clean the camera lens and liquid crystal display (LCD) screen, perform the following steps. :$51,1* 'R QRW XVH FOHDQLQJ VROXWLRQV XQOHVV WKH\ DUH GHVLJQHG VSHFLILFDOO\ IRU FDPHUD OHQVHV 'R QRW ZLSH WKH FDPHUD OHQV RU /&' VFUHHQ ZLWK FKHPLFDOO\ WUHDWHG H\HJODVV OHQV WLVVXH DV LW PD\ VFUDWFK WKH OHQV 2-4 1. Blow gently on the lens or LCD screen to remove dust and dirt. 2. Moisten the lens or LCD screen by breathing lightly on it. 3. Wipe the lens or LCD screen gently with a soft, lint-free cloth or an untreated lenscleaning tissue. KODAK DIGITAL SCIENCE DC210 Plus Zoom Camera User’s Guide &+$37(5 7DNLQJ3LFWXUHV When the mode dial is set to Capture, the camera can perform the following functions: Capture a picture Preview pictures on the liquid crystal display (LCD) Delete a picture just taken Adjust the exposure Adjust some camera settings using the status display Each of these functions is explained in this chapter. 7DNLQJD3LFWXUH To take a picture, perform the following steps: 1. Set the mode dial to Capture. mode dial 2. Turn on the camera. 3. Center subject in the viewfinder. 4. Press the shutter button. The green Ready light, Memory Card icon, and Pictures Remaining number on the status display blink rapidly as the camera processes the picture. NOTE: You do not need to hold the camera still while the green Ready light is blinking, but you will not be able to take another picture until it stops. Taking Pictures 3-1 3UHYLHZLQJD3LFWXUH You can use the LCD as a live viewfinder while in Capture mode. This function allows you to preview your picture before it is taken. NOTE: Preview significantly shortens battery life. To activate Preview, perform the following steps: 1. Set the mode dial to Capture. 2. Turn on the camera. 3. Press the Do-It button. The LCD displays the subject that is viewed from the viewfinder with the icons of activated camera features. Exposure Lock icon Template icon Exposure Compensation icon . The Template icon appears if the template option is activated. Refer to “Template” in Chapter 5 for details. The Exposure Lock icon appears if the exposure lock option is activated. Refer to “Turning On Exposure Lock” found later in this chapter for details. The Exposure Compensation icon appears if the exposure value is adjusted. Refer to “Changing Exposure Compensation” found later in this chapter for details. To exit Preview, press the Do-It button again. Preview automatically turns off when the camera is turned off. 'HOHWLQJWKH3LFWXUH-XVW7DNHQ NOTE: This delete feature is only available when the picture is shown on the LCD and the Quickview option is activated. Refer to “QuickView” in Chapter 5 for more details. 3-2 KODAK DIGITAL SCIENCE DC210 Plus Zoom Camera User’s Guide To delete the picture that was just taken without leaving Capture mode, perform the following steps: 1. Set the mode dial to Capture. 2. Turn on the camera. 3. Take a picture. The picture is displayed on the LCD. 4. Press the button. The delete screen appears in the LCD. NOTE: The picture must be showing on the LCD screen to activate the delete screen. button button Do-It button button 5. Press the or 6. Press the Do-It button. button button until the correct delete option is highlighted. The picture is deleted from the memory card. To exit, press the or button until NO is highlighted, and then press the Do-It button. $GMXVWLQJWKH([SRVXUH9DOXH The camera’s exposure value (EV) can be adjusted from –2.0 to +2.0 EV in 0.5 increments while in Capture mode. A +1.0 adjustment in EV doubles the amount of light allowed to reach the charge coupled device (CCD) in your camera. A –1.0 adjustment in EV halves the amount of light allowed to reach the CCD in your camera. If your pictures are too dark, increase (+) the exposure compensation setting. If they are too light, decrease (–) the exposure compensation setting. &KDQJLQJ([SRVXUH&RPSHQVDWLRQ To change exposure compensation, perform the following steps: 1. Set the mode dial to Capture. 2. Turn the camera on. Taking Pictures 3-3 3. Press the button. The LCD displays the Exposure Compensation screen. buttons to adjust the exposure. 4. Press the and 5. Press Do-It to select the exposure setting. The exposure setting automatically resets to 0.0 EV when the camera is turned off. 7XUQLQJ2Q([SRVXUH/RFN Use Exposure Lock to take a sequence of pictures that require the same exposure. When this setting is activated, the camera maintains a constant exposure setting. To turn on Exposure Lock, perform the following steps: 1. Set the mode dial to Capture. 2. Turn the camera on. 3. Press the button two times. The Exposure Compensation screen appears, followed by the Exposure Lock screen. NOTE: Press the button a third time to exit the Exposure menu. 4. Press the button until ON is highlighted. 5. Press the Do-It button. or The Take a Picture screen appears. 6. In the viewfinder, center the area in which you want to lock the exposure. 7. Press the shutter button to lock in the exposure setting. The Exposure Lock setting automatically resets when the camera is turned off. $GMXVWLQJ&DPHUD6HWWLQJV8VLQJWKH6WDWXV 'LVSOD\ The status display, located at the top of your camera, allows you to view and change some camera settings. The following sections offer detailed descriptions of status display settings. NOTE: The camera must be turned on to view the status display. 3-4 KODAK DIGITAL SCIENCE DC210 Plus Zoom Camera User’s Guide Quality icon Resolution icon Pictures Remaining icon Battery Status icon Self-Timer icon Flash icon Card Status icon Red-eye Reduction icon Close-Up icon 3LFWXUHV5HPDLQLQJ The Pictures Remaining icon changes automatically to indicate the remaining number of pictures that can be stored at the current quality and resolution setting. You may not select or change the Pictures Remaining icon. When the card’s memory is full, the status display indicates Full. You must delete existing pictures or change memory cards to capture additional pictures. To save pictures, transfer them to your computer before deleting them. For more information on how to move or delete pictures, see “Deleting the Picture Just Taken” found earlier in this chapter and “Deleting Pictures” in Chapter 4. NOTE: The Pictures Remaining number does not always change by one when a picture is taken if the picture content is easily compressed. 6HOI7LPHU Activating the Self-Timer option creates a 10-second delay between the time you press the shutter button and when the picture is taken so you can include yourself in the picture. To activate this function, perform the following steps: 1. Set the mode dial to Capture. 2. Turn on the camera. 3. Press the self-timer button. The Self-Timer icon appears on the status display. 4. Place the camera on a flat, steady surface or tripod. Taking Pictures 3-5 5. Press the shutter button. The red self-timer light, located on the front of the camera, turns on and stays lit for 8 seconds. The self-timer light flashes for 2 additional seconds just before the picture is taken. Self-Timer returns to the off setting once the picture is taken. To stop this function, press the self-timer button again before the picture is taken. 0HPRU\&DUG6WDWXV The Card Status icon changes automatically to indicate if there is a memory card inserted in the camera. You may not select or change this icon. No card inserted — Pictures cannot be taken. Card inserted — Pictures are saved to the card’s memory. &ORVH8S The camera includes a close-up button that allows you to set the camera’s focus distance at 8 inches (20 centimeters [cm]). The red-eye reduction option for the flash setting is not available when Close Up is on. NOTE: To accurately capture the picture in Close Up, the Preview option automatically starts when the close-up button is pressed. Refer to “Previewing a Picture” found earlier in this chapter for detailed information. To deactivate the Preview option, press the Do-It button. To turn on the Close Up setting, perform the following steps: 1. Set the mode dial to Capture. 2. Turn on the camera. 3. Press the close-up button. The Close Up icon appears on the status display. 4. View the subject on the LCD display to accurately capture the picture. To cancel Close Up, press the close-up button again. The Close Up icon disappears from the status display. The Close Up setting is automatically turned off when the camera is turned off. 3-6 KODAK DIGITAL SCIENCE DC210 Plus Zoom Camera User’s Guide )ODVK The camera is equipped with a built-in flash that offers an optional red-eye reduction feature. The flash has an effective range of approximately 1.6 to 9.8 feet (0.5 to 3 meters). There are five Flash settings: Auto — Flash fires automatically when the shutter button is pressed and the camera determines that there is not enough light. This is the default setting. Auto Red-eye — Works the same as Auto except the flash fires once before the picture is taken to reduce the chance of red-eye and then flashes a second time when the picture is taken. Fill — Flash fires every time you press the shutter button. Use this setting when the lighting is poor or when your subject is lit from behind. Fill Red-eye — Works the same as Fill flash setting except the flash fires once before the picture is taken to reduce the chance of red-eye and then flashes a second time when the picture is taken. Off — Flash is turned off and does not fire. To change the Flash setting, perform the following steps: 1. Set the mode dial to Capture. 2. Turn on the camera. 3. Press the flash button to scroll through and select the appropriate Flash settings. Flash returns to its default setting when the camera is turned off. 5HVROXWLRQ Resolution indicates the size of the picture in pixels. The camera can be set to capture pictures in a high or standard resolution. Your pictures include more detail with high resolution, but they will use more memory on the card than at the standard resolution setting. Taking Pictures 3-7 You can switch freely between the two settings when taking pictures. The number of pictures the camera is able to store varies accordingly. 5HVROXWLRQ 4XDOLW\ 1XPEHU RI 3LFWXUHV High Best 20 Better 28 Good 45 Best 41 Better 57 Good 87 Standard The Resolution setting is indicated on the status display using the following icons: High — Picture size is 1152 x 864 pixels. This is the default setting. Use this setting when your pictures are to be printed. Standard — Picture size is 640 x 480 pixels. Use this setting when the pictures are for e-mail or online use. The Resolution setting is changed using the Preferences mode. Refer to “Resolution” in Chapter 5 for more information. 4XDOLW\ You may set your camera to capture pictures in a Good, Better, or Best quality setting. The Quality setting indicates how much the picture is compressed to save space on the memory card. Your pictures include more detail with the Best or Better setting, but they will use more memory on the card than with the Good setting. You may switch freely between the three settings when taking pictures. The number of pictures the camera can store varies accordingly (refer to the picture count table in the previous subsection). 3-8 KODAK DIGITAL SCIENCE DC210 Plus Zoom Camera User’s Guide The Quality setting is indicated on the status display using the following icons: Good — Use this setting to maximize the number of pictures stored. Pictures taken with this setting are suitable for computer and TV viewing. Better — Use this setting for general picture taking and to store a large number of pictures. Best — Use this setting when image quality is very important for maximum picture quality, especially for larger sized or zoom prints. The Quality setting is changed using the Preferences mode. See “Quality” in Chapter 5 for more information. %DWWHU\6WDWXV The camera comes with four Kodak Photolife AA batteries. Standard 1.5-V alkaline, 1.5-V lithium, or rechargeable 1.2-V nickel cadmium (Ni-Cd) or nickel metal hydride (Ni-MH) batteries may be used. The battery power icon changes automatically. You may not select or change this icon. NOTE: To retain the Date/Time setting, replace the batteries as soon as the battery power icon begins to blink. Full — Batteries are fully charged. Low— Batteries need to be replaced. Blinking — Batteries are insufficient to run camera and need to be replaced. NOTE: Pictures on memory cards are not lost if the batteries are depleted. Taking Pictures 3-9 $FWLYDWLQJWKH=RRP The camera includes a 2X zoom lens that allows you to zoom in on your subject from wide angle (29 millimeters [mm]) to telephoto (58 mm). wide angle telephoto To activate the zoom, perform the following steps: 1. Set the mode dial to Capture. 2. Turn on the camera. 3. Press the zoom button. The subject appears closer or farther away when you look through the viewfinder and press the zoom button. zoom button mode dial The camera’s default lens position is wide angle. All other lens positions are considered telephoto settings. 3-10 KODAK DIGITAL SCIENCE DC210 Plus Zoom Camera User’s Guide &+$37(5 5HYLHZLQJ3LFWXUHV When the mode dial is set to Review, you may use the liquid crystal display (LCD) to view the pictures stored on the memory card. Using the Overlay screen, the camera can perform the following functions: View the amount of unused memory left on the memory card View thumbnails of the pictures Delete one or all pictures from the memory card View pictures and run a slide show from the camera on your TV NOTE: To conserve battery life, Dell recommends that you use the AC adapter with the camera when it is in Review mode. 9LHZLQJ3LFWXUHVRQWKH&DPHUD To view pictures on the camera, perform the following steps: 1. Set the mode dial to Review. 2. Turn on the camera. The Overlay screen appears on the LCD screen with the last picture taken. mode dial LCD screen Reviewing Pictures 4-1 3. Press the and buttons to scroll through the pictures. To continuously scroll, hold down one of these buttons. The memory bar displays the space left on the memory card and the current picture position. highlighted picture from center of filmstrip Overlay icon Delete icon Magnify icon memory bar filmstrip of pictures on memory card button to highlight the Overlay icon. Then To exit the Overlay screen, press the or press the Do-It button to turn off the Overlay screen. The main Review screen reappears. 'HOHWLQJ3LFWXUHV You can delete one or all of the pictures on the memory card when in the Review mode. To delete a picture in Review mode, perform the following steps: 1. Set the mode dial to Review. 2. Turn on the camera. The last picture taken appears on the LCD screen. The Overlay screen is turned on. or button until the Delete icon is highlighted. 3. Press a 4. Press the Do-It button. The delete screen appears on the LCD. 5. Press a or button until the appropriate picture is highlighted on the filmstrip. NOTE: To delete all the pictures on the memory card, press a ALL PICTURES is highlighted and then press the Do-It button. 6. or button until Press the Do-It button. That picture is deleted from the memory card. button to highlight the Overlay icon. Then To exit the Overlay screen, press the or press the Do-It button to turn off the Overlay screen. The main Review screen reappears. NOTE: Memory cards containing images captured from other digital cameras have less memory space available when used in the DC210+ camera. To free up memory space on 4-2 KODAK DIGITAL SCIENCE DC210 Plus Zoom Camera User’s Guide the memory card, you must delete the images in the camera model that captured those images. 0DJQLI\LQJ3LFWXUHV The Magnify feature allows you to view the current picture at 2x size on the LCD screen when in Review mode. To magnify a picture in Review mode, perform the following steps: 1. Set the mode dial to Review. 2. Turn on the camera. The last picture taken appears on the LCD screen. The Overlay screen is turned on. 3. Press a or button until the appropriate picture is highlighted on the filmstrip. 4. Press a 5. Press the Do-It button. button until the Magnify icon is highlighted. or The LCD displays a magnified view of the selected picture. 6. Use the , , , or buttons to scroll to different parts of the picture. To cancel the Magnify feature, press the Do-It button. The Overlay screen reappears. button to highlight the Overlay icon. Then To exit the Overlay screen, press the or press the Do-It button to turn off the Overlay screen. The main Review screen reappears. 9LHZLQJ3LFWXUHVRU5XQQLQJD6OLGH6KRZRQ D79 The Video-out feature allows you to connect the camera to a TV and then view or run a slide show of the pictures from the memory card on your TV. This feature is especially useful when sharing pictures with family and friends. NOTE: The camera’s LCD screen is disabled when the video output cable is attached to the camera. Reviewing Pictures 4-3 To view pictures on a TV, perform the following steps: 1. Turn off your TV and the camera. 2. Insert the video output cable into the video-out connection on the side of your camera. video-out connection 3. Connect the other end of the cable to the video-in connection on your TV. 4. Turn on the camera and TV. 5. Set the mode dial on the camera to Review. 6. Set the TV to the correct video setting. The pictures that are stored on the memory card appear on the TV screen. NOTE: You may need to adjust the Video Out preference on the camera. Refer to “Video Out” in Chapter 5 for details. 7. Press a or button on the camera to scroll through the pictures on the TV. To run a slide show, press the Do-It button. The slide show starts, and the pictures change every five seconds for a period of five minutes. If you are using an AC adapter, the slide show runs indefinitely. To cancel the slide show, press the Do-It button. The slide show stops and the main Review screen reappears. 4-4 KODAK DIGITAL SCIENCE DC210 Plus Zoom Camera User’s Guide &+$37(5 $GMXVWLQJ&DPHUD6HWWLQJV When the mode dial is set to Preferences, the main Preferences screen appears on the liquid crystal display (LCD). The Preferences screen, illustrated below, allows you to adjust or activate the following camera settings: Quality icon Resolution icon Template icon Date Stamp icon File Type icon Quickview icon Date/Time icon default settings LCD Brightness icon Format Memory Card icon Video-Out icon Language icon About icon The following sections describe each of these settings. Adjusting Camera Settings 5-1 4XDOLW\ The Quality screen sets the picture quality to Best, Better, or Good. Refer to “Quality” in Chapter 3 for more information on picture quality. To set quality, perform the following steps: 1. Set the mode dial to Preferences. mode dial 2. Turn on the camera. The LCD displays the Preferences screen. button until the Quality icon (shown below) is highlighted. 3. Press the 4. Press the Do-It button. The LCD displays the main Quality screen. The current setting is checked (9). or button until the appropriate option is highlighted. 5. Press a 6. Press the Do-It button. The main Preferences screen reappears. The Quality setting is maintained until another setting is selected. This setting does not change when the camera is turned off. 5-2 KODAK DIGITAL SCIENCE DC210 Plus Zoom Camera User’s Guide 5HVROXWLRQ The Resolution screen sets the picture resolution to High (1152 x 864 pixels) or Standard (640 x 480 pixels). Refer to “Resolution” in Chapter 3 for more information on picture resolution. To set resolution, perform the following steps: 1. Set the mode dial to Preferences. 2. Turn on the camera. The LCD displays the Preferences screen. button until the Resolution icon (shown below) is highlighted. 3. Press the 4. Press the Do-It button. The LCD displays the main Resolution screen. The current setting is checked (9). or button until the appropriate option is highlighted. 5. Press a 6. Press the Do-It button. The main Preferences screen reappears. The Resolution setting is maintained until another setting is selected. This setting does not change when the camera is turned off. 7HPSODWH The Template screen selects a creative border and/or logo that is added to your picture when you take it. The memory card supplied with your camera includes seven templates. NOTE: If you take a picture with the template feature activated, the template cannot be removed from that picture. Adjusting Camera Settings 5-3 To select a template, perform the following steps: 1. Set the mode dial to Preferences. 2. Turn on the camera. The LCD displays the Preferences screen. button until the Template icon (shown below) is highlighted. 3. Press the 4. Press the Do-It button. The LCD displays the main Template screen. The current setting is checked (9). or button until the appropriate option is highlighted. 5. Press a 6. Press the Do-It button. The main Preferences screen reappears. NOTE: The template is visible after the picture has been taken with the camera in either Review mode or in Capture mode with Quickview activated. To turn off the template feature, press a or button until OFF is highlighted, and then press the Do-It button. The Template setting is maintained until another setting is selected. This setting does not change when the camera is turned off. 'DWH6WDPS The Date Stamp screen records the date on your pictures. To turn on Date Stamp, perform the following steps: 1. Set the mode dial to Preferences. 2. Turn on the camera. The LCD displays the Preferences screen. 5-4 KODAK DIGITAL SCIENCE DC210 Plus Zoom Camera User’s Guide 3. Press the button until the Date Stamp icon (shown below) is highlighted. 4. Press the Do-It button. The LCD displays the main Date Stamp screen. The current setting is checked (9). or button until the appropriate date stamp order is highlighted. 5. Press a 6. Press the Do-It button. The main Preferences screen reappears. The next time you take a picture the date stamp appears in the lower right-hand corner of the picture on the LCD screen. NOTE: The date stamp is visible after the picture has been taken with the camera in either Review mode or in Capture mode with Quickview activated. The date stamp cannot be removed from that picture. To turn off a date stamp, press a or button until OFF is highlighted, and then press the Do-It button. The Date Stamp setting is maintained until another setting is selected. This setting does not change when the camera is turned off. )LOH7\SH The File Type screen selects how the picture file is saved, in a FlashPix™ or JPEG (default setting) format. Select a format that is compatible with the software you use on your computer. NOTE: The Picture Easy software Dell installed on your system for use with the digital camera supports both formats. Adjusting Camera Settings 5-5 To set the file type, perform the following steps: 1. Set the mode dial to Preferences. 2. Turn on the camera. The LCD displays the Preferences screen. 3. button until the File Type icon (shown below) is highlighted on the PrefPress the erences screen. 4. Press the Do-It button. The LCD displays the main File Type screen. The current setting is checked (9). or button until the appropriate option is highlighted. 5. Press a 6. Press the Do-It button. The main Preferences screen reappears. The File Type setting is maintained until another setting is selected. This setting does not change when the camera is turned off. 4XLFNYLHZ The Quickview screen turns the camera’s Quickview setting on or off. When you take a picture with Quickview on, the picture momentarily appears on the LCD screen seconds after the picture is taken. NOTE: The Quickview option must be activated to use the delete feature available in Capture mode. Refer to “Deleting the Picture Just Taken” in Chapter 3 for more details. 5-6 KODAK DIGITAL SCIENCE DC210 Plus Zoom Camera User’s Guide To turn on Quickview, perform the following steps: 1. Set the mode dial to Preferences. 2. Turn on the camera. The LCD displays the Preferences screen. 3. button until the Quickview icon (shown below) is highlighted on the secPress the ond Preferences screen. 4. Press the Do-It button. The LCD displays the main Quickview screen. The current setting is checked (9). 5. Press a or button until ON is highlighted. 6. Press the Do-It button. The main Preferences screen reappears. The next time you take a picture, it appears for a moment on the LCD screen. button until OFF is highlighted, and then press To turn off Quickview, press a or the Do-It button. The Quickview setting is maintained until another setting is selected. This setting does not change when the camera is turned off. 'DWHDQG7LPH The Date and Time screen sets the camera’s date and time. To set the date and time, perform the following steps: 1. Set the mode dial to Preferences. 2. Turn on the camera. The LCD displays the Preferences screen. Adjusting Camera Settings 5-7 3. Press the button until the Date/Time icon (shown below) is highlighted on the Preferences screen. 4. Press the Do-It button. The LCD displays the main Date/Time screen with the current date and time listed. 5. Press a or 6. Press a 7. Repeat steps 5 and 6 until the information is correct. 8. Press the Do-It button. or button to highlight the day, month, year, hour, or minute setting. button to adjust the setting. The main Preferences screen reappears. The date and time setting is maintained until another setting is selected. This setting does not change when the camera is turned off. NOTE: If you remove the batteries from the camera for more than a few minutes or when the camera is on, the Date/Time setting is deleted and must be reset. /&'%ULJKWQHVV The LCD Brightness screen adjusts the brightness of the camera’s LCD screen. To make an adjustment, perform the following steps: 1. Set the mode dial to Preferences. 2. Turn on the camera. The LCD displays the Preferences screen. 5-8 KODAK DIGITAL SCIENCE DC210 Plus Zoom Camera User’s Guide 3. Press the button until the LCD Brightness icon (shown below) is highlighted on the Preferences screen. 4. Press the Do-It button. The LCD displays the main LCD Brightness screen. 5. Press a ate level. or button to adjust the brightness of the LCD screen to the appropri- The brightness of the LCD screen changes as the setting is adjusted. 6. Press the Do-It button. The main Preferences screen reappears. The LCD Brightness setting is maintained until another setting is selected. This setting does not change when the camera is turned off. )RUPDW0HPRU\&DUG The Format Memory Card screen formats the memory card while it is in the camera and sets up new directories and pointers on the card. &$87,21 :KHQ D PHPRU\ FDUG LV IRUPDWWHG LW HUDVHV HYHU\WKLQJ RQ WKH FDUG LQFOXGLQJ DQ\ SLFWXUHV DQG WHPSODWHV 7KH WHPSODWHV FDQQRW EH UHVWRUHG ZLWKRXW D PHPRU\ FDUG UHDGHU To format a memory card, perform the following steps: 1. Set the mode dial to Preferences. 2. Turn on the camera. The LCD displays the Preferences screen. Adjusting Camera Settings 5-9 3. Press the button until the Format Memory Card icon (shown below) is highlighted on the Preferences screen. 4. Press the Do-It button. The LCD displays the main Format Memory Card screen. 5. To format the card, press the Then press the Do-It button. button until CONTINUE FORMAT is highlighted. To stop the formatting operation, press a or highlighted, and then press the Do-It button. button until CANCEL FORMAT is 9LGHR2XW The Video Out screen sets the camera’s video output to National Television Standards Committee (NTSC) or Phase Alternating Line (PAL) format. The video-out format selected depends on your TV or video monitor. In most cases European countries use a PAL format, and other countries use an NTSC format. To set the video-out format, perform the following steps: 1. Set the mode dial to Preferences. 2. Turn on the camera. The LCD displays the Preferences screen. 3. 5-10 button until the Video Out icon (shown below) is highlighted on the PrefPress the erences screen. KODAK DIGITAL SCIENCE DC210 Plus Zoom Camera User’s Guide 4. Press the Do-It button. The LCD displays the main Video Out screen. The current setting is checked ( 9). or button until the appropriate option is highlighted. 5. Press a 6. Press the Do-It button. The main Preferences screen reappears. The Video Out setting is maintained until another setting is selected. This setting does not change when the camera is turned off. /DQJXDJH The Language screen selects a language interface for the camera. When you choose a specific language, the LCD screens on the back of the camera change to reflect the selected language. To select a language, perform the following steps: 1. Set the mode dial to Preferences. 2. Turn on the camera. The LCD displays the Preferences screen. 3. button until the Language icon (shown below) is highlighted on the PrefPress the erences screen. Adjusting Camera Settings 5-11 4. Press the Do-It button. The LCD displays the main Language screen. The current setting is checked (9). or button until the appropriate language is highlighted. 5. Press a 6. Press the Do-It button. The main Preferences screen reappears. The language setting is maintained until another setting is selected. This setting does not change when the camera is turned off. $ERXW The About screen is a view-only screen that keeps a record of the camera’s use. It provides the following information: Firmware version Total number of pictures taken over the lifetime of the camera Total number of flashes fired over the lifetime of the camera To view the About screen, perform the following steps: 1. Set the mode dial to Preferences. 2. Turn on the camera. The LCD displays the Preferences screen. 3. 5-12 button until the About icon (shown below) is highlighted on the PreferPress the ences screen. KODAK DIGITAL SCIENCE DC210 Plus Zoom Camera User’s Guide 4. Press the Do-It button. The LCD displays the About screen. 5. Press the Do-It button to return to the main Preferences screen. Adjusting Camera Settings 5-13 5-14 KODAK DIGITAL SCIENCE DC210 Plus Zoom Camera User’s Guide &+$37(5 7UDQVIHUULQJ3LFWXUHV)URPWKH &DPHUDWRWKH&RPSXWHU This chapter explains how to connect the camera to your Dell® computer and start the Picture Easy software. 6HULDO&DEOH&RQQHFWLRQ To connect the camera to your Dell computer with the serial cable provided with your camera, perform the following steps: 1. Set the mode dial to Connect. NOTE: While in Connect mode the camera is controlled by the computer. Except for the mode dial and power button, all other camera buttons are ignored. The Ready light indicates when the camera is on. mode dial Transferring Pictures From the Camera to the Computer 6-1 2. Plug one end of the serial cable into the 9-pin serial (COM) port on the back of your computer. serial port connector 3. Open the serial port door on the side of your camera. serial port 4. Plug the other end of the serial cable into the camera’s serial port. 5. Insert the AC adapter into the AC adapter connection on the side of your camera. AC adapter connection 6. 6-2 Connect the other end of the AC adapter to a wall outlet. KODAK DIGITAL SCIENCE DC210 Plus Zoom Camera User’s Guide 7. Turn on the camera. When the camera is correctly connected to your computer, three squares rotate on the status display: 8. Turn on your computer system. 9. Start the Picture Easy software by double-clicking the Picture Easy icon on your Windows desktop. You can also start the software by clicking the Start button, pointing to Programs—> Kodak—> Picture Easy Software, and clicking Picture Easy. For more information on this software, refer to the “Using the Picture Easy Software” section of the online KODAK DIGITAL SCIENCE DC210 Plus Zoom Camera User’s Guide. The guide can be accessed by clicking the Start button, pointing to Programs—> Dell Documents, and clicking Kodak DC210+ Camera User’s Guide. To cancel the connection, turn the mode dial to another setting or turn off the camera. ,QIUDUHG&RQQHFWLRQ Your computer must be set up with an infrared connection before the camera’s infrared transceiver can be used. NOTE: If you are using the camera’s infrared transceiver to connect to the computer and the camera automatically turns off because of inactivity, you need to press the camera’s power button to turn the camera back on. Transferring Pictures From the Camera to the Computer 6-3 6-4 KODAK DIGITAL SCIENCE DC210 Plus Zoom Camera User’s Guide &+$37(5 7URXEOHVKRRWLQJ This chapter provides tips and troubleshooting solutions for common problems you may experience while using your camera and software. If you are experiencing difficulties with your camera, check the sections for possible solutions. 0RQLWRU&KHFNV 3UREOHP &DXVH 6ROXWLRQ The image on your monitor is jagged or inappropriately colored. Monitor is not set correctly. Adjust your monitor display settings as described in “Monitor Adjustments” found later in this chapter. 0HPRU\&DUG&KHFNV 3UREOHP &DXVH 6ROXWLRQ The camera does not recognize your memory card. The memory card may not be ATAcompatible. Memory cards must be ATA-compatible to work with the camera. The memory card may contain compression or stacker software. Reformat any memory cards that contain compression or stacker software. Refer to the memory card documentation or “Format Memory Card” in Chapter 5 for instructions on reformatting the card. Troubleshooting 7-1 &DPHUD&KHFNV 3UREOHP &DXVH 6ROXWLRQ Ready light does not turn on and the camera does not work. Camera is not turned on. Turn on the camera and verify that the green Ready light turns on. Batteries are low or empty. Replace the batteries. Pictures remain in the camera’s memory when the battery is removed. Camera is not turned on. Turn on the camera and verify that the green Ready light turns on. Mode dial is not set to Capture. Set the mode dial to Capture. Ready light is blinking. Camera is processing picture. Wait until Ready light stops blinking before attempting to take another picture. The status display reads Full. The memory card is full. Transfer pictures to your computer or insert a memory card that has available memory. Camera is connected to the computer. Disconnect camera from computer. Batteries are not properly installed. Remove the batteries and install them according to the directions on the outside of the battery door. Batteries are weak or dead. Install new batteries. Something was blocking the lens when you took the picture. Keep hands, fingers, or other objects away from the lens when taking pictures. Your eye or the picture was not centered correctly in the viewfinder. Leave space around the subject when centering the picture in the viewfinder. Shutter button does not work. Camera does not turn on. Part of the picture is missing. 7-2 KODAK DIGITAL SCIENCE DC210 Plus Zoom Camera User’s Guide 3UREOHP &DXVH 6ROXWLRQ Picture is too dark. Flash is not on or did not go off. Turn on the flash. Refer to “Flash” in Chapter 3. The subject is too far away from the flash. Move so there is no more than 10 ft (3 m) between the camera and the subject. The subject is in front of a bright light. Change your position so the light is not behind the subject. The flash is not needed. Change to automatic flash. Refer to “Flash” in Chapter 3. The subject was too close when you used the flash. Move so there is at least 1.6 ft (0.5 m) between the camera and the subject. The light sensor is covered. Hold the camera so your hands or other objects do not cover the light sensor. Stored pictures are damaged. The memory card was removed when the Ready light was blinking. Make sure the Ready light is not blinking before removing the memory card. Pictures remaining number does not decrease. The image resolution does not take up sufficient space to decrease the picture remaining number. The camera is operating normally. Continue taking pictures. Picture is not clear. The lens is dirty. Clean the lens. Refer to “Caring for the Camera” in Chapter 2. The subject was too close when you took the picture. Move so that there is at least 1.6 ft (0.5 m) between the camera and the subject. Stand at least 8 in (20 cm) away for close-ups and at least 3.28 ft (1 m) for telephoto pictures. Subject or camera moved during picture taking. Hold camera steady during picture taking until after the flash (or the second flash if the camera flash is set for redeye reduction). The memory card may not contain the templates. Only the original memory card contains templates. Templates are lost when the memory card is formatted. Instructions for replacing the templates can be found on the Kodak Web site at www.kodak.com. Picture is too light. Templates do not work. Troubleshooting 7-3 3UREOHP &DXVH 6ROXWLRQ Date and time lost. Date and time information is lost if the batteries totally discharge. Change the batteries before they totally discharge. Do not open the battery door while the camera is on. /&'0HVVDJHV 0HVVDJH &DXVH 6ROXWLRQ Memory Card is Full. Memory card is full and cannot hold additional pictures. Transfer pictures to your computer or insert a memory card that has available memory. No Memory Card. There is no memory card inserted in the camera. Insert a memory card in the camera. Cannot read memory card. Memory card is corrupted. Insert a new memory card or format the memory card. Cannot establish connection. The camera cannot communicate with the computer. Make sure the camera is connected to the computer’s serial port. Camera needs service. The camera is malfunctioning. Contact Dell for camera service or repair. Refer to “Getting Help” found later in this chapter. 3ULQWLQJ7LSV You may notice that the colors on your computer screen do not always match those in your documents or prints. This happens because monitors and printers use different color systems. You may be able to achieve more predictable results in your printed documents by taking the following actions: 7-4 Improve the quality of your paper. Copier paper may not offer the same results as coated paper or paper made especially for inkjet printers. Adjust your printer software settings. Use fresh ink cartridges. Do not use ink cartridges beyond their life expectancy. KODAK DIGITAL SCIENCE DC210 Plus Zoom Camera User’s Guide Keep these tips in mind when printing: Color printing takes more time. Complex documents require more printing and drying time. Color printing is more memory intensive than black and white. If your computer gives you an insufficient memory message, you may need to close some application programs, change some settings, or add additional memory. Color prints may not photocopy as clearly as black and white. If you plan to photocopy documents, consider printing the document in gray scale. This setting is usually changed from the Print menu. Resizing the picture to a smaller size or printing the picture on glossy paper may increase the quality of the print. To improve the quality of your prints, you may want to print your pictures on KODAK DIGITAL SCIENCE snapshot paper. This paper works with most inkjet printers and gives you clearer, crisper, and more detailed images on your prints. 0RQLWRU$GMXVWPHQW Your monitor display settings may need to be adjusted to view pictures from the camera. To do so, perform the following steps: 1. Double-click the My Computer icon. 2. Double-click the Control Panel icon. 3. Double-click the Display icon and click the Settings tab. 4. Select the highest available setting for Color Palette and click the OK button. 5HLQVWDOOLQJWKH&DPHUD6RIWZDUH To reinstall the camera software, perform the following steps: 1. Close all open application programs. 2. Place the camera software CD into your CD-ROM drive. 3. In the Welcome window, click the Next button. 4. Read the license agreement, and click the Yes button to accept the software license agreement. If you do not accept the license you cannot install the software. 5. Select the software item you want to install and click the Next button. 6. Select the name of the program folder and click the Next button. If necessary, type a new folder name or select from the Existing Folders list. Troubleshooting 7-5 7. Verify the settings, and then click the Next button. A progress screen appears while the software is installed. 8. Select the preferred restart option and click the Finish button. NOTE: If you installed the mounter software you must restart your computer. *HWWLQJ+HOS Additional tips and troubleshooting instructions are available on the Kodak Web site at www.kodak.com. If problems persist, contact Dell Computer Corporation for technical assistance (refer to the “Getting Help” chapter of your system Reference and Troubleshooting Guide). 7-6 KODAK DIGITAL SCIENCE DC210 Plus Zoom Camera User’s Guide ,QGH[ $ AC adapter connecting, 2-3 accessories, 1-2 adjusting the exposure value, 3-3 % batteries installing, 2-1 removing, 2-1 status, 3-9 types, 2-1, 2-2, 3-9 usage guidelines, 2-2 camera settings (continued) File Type, 5-5 Format Memory Card, 5-9 Language, 5-11 LCD Screen Brightness, 5-8 Quality, 5-2 QuickView, 5-6 Resolution, 5-3 Template, 5-3 Video Out, 5-10 camera settings, changing activating Self-Timer, 3-5 selecting Flash settings, 3-7 selecting quality setting, 3-8 selecting the resolution, 3-7 zooming, 3-10 Capture mode, 3-1 Close Up icon, 3-6 & camera accessories, 1-2 features, 1-1, 1-3 package contents, 1-1 software, 1-2 troubleshooting, 7-2 viewing information about, 5-12 camera modes about, 1-1 Capture, 3-1 Preferences, 5-1 Review, 4-1 camera settings About, 5-12 adjusting, 3-5 Date and Time, 5-7 Date Stamp, 5-4 connecting AC adapter, 2-3, 6-2 connecting the camera to a computer infrared connection, 6-3 using serial cable, 6-1 connecting the camera to a TV, 4-3 ' dark pictures, 3-3 date stamp, 5-4 date, setting, 5-7 deleting last picture taken, 3-2 deleting one or all pictures, 4-2 Index 1 ( 0 error messages, 7-4 magnifying a picture in Review mode, 4-3 exposure compensating for dark or light pictures, 3-3 memory card deleting pictures from, 4-2 formatting, 5-9 inserting and removing, 2-2 Memory Card icon, 3-6 troubleshooting, 7-1 viewing available memory, 4-1 viewing pictures on, 4-1 Exposure Compensation icon, 3-2 Exposure Lock icon, 3-2 ) Memory Card icon, 3-6 file types, 5-5 messages, 7-4 Flash settings, 3-7 monitor adjustments, 7-5 checks, 7-1 FlashPix file format, 5-5 formatting memory cards, 5-9 * getting help, 7-6 , infrared connection, 6-3 mounter software, 1-2 1 NTSC format, 5-10 2 Overlay screen, 4-1 inserting a memory card, 2-2 installing batteries, 2-1 3 JPEG file format, 5-5 PAL format, 5-10 Picture Easy software, 1-2, 6-3 picture quality, 3-8, 5-2 Pictures Remaining icon, 3-5 / language, setting, 5-11 LCD messages, 7-4 LCD screen brightness, 5-8 light pictures, 3-3 2 Preferences mode, 5-1 Preferences screens About, 5-12 about, 5-1 Date Stamp, 5-4 Date/Time, 5-7 File Type, 5-5 KODAK DIGITAL SCIENCE DC210 Plus Zoom Camera User’s Guide Preferences screens (continued) Format Memory Card, 5-9 Language, 5-11 LCD Screen Brightness, 5-8 Quality, 5-2 Quickview, 5-6 Resolution, 5-3 Template, 5-3 Video Out, 5-10 Preview exiting, 3-2 Exposure Compensation icon, 3-2 Exposure Lock icon, 3-2 Template icon, 3-2 previewing a picture, 3-2 setting the language, 5-11 setting the resolution, 3-7 setting the Self-Timer option, 3-5 setting the time, 5-7 slide show, 4-4 software about, 1-2 mounter, 1-2 Picture Easy, 1-2, 6-3 reinstalling, 7-5 TWAIN, 1-2 status display icons, 3-5 previewing a picture just after taking it, 5-6 printing tips, 7-4 4 7 taking pictures, 3-1 adjusting the exposure value, 3-3 technical assistance, 7-6 Quality icon, 3-8 Template icon, 3-2 Quickview option, 5-6 templates, using, 5-3 time, setting, 5-7 5 reinstalling software, 7-5 removing a memory card, 2-2 resolution, 3-7, 5-3 Review mode, 4-1 6 troubleshooting camera checks, 7-2 getting help, 7-6 LCD messages, 7-4 memory card checks, 7-1 monitor adjustments, 7-5 monitor checks, 7-1 printing tips, 7-4 reinstalling camera software, 7-5 TWAIN software, 1-2 safety instructions, v screen brightness, 5-8 Self-Timer icon, 3-5 serial cable connection, 6-1 setting the date, 5-7 9 video output format, 5-10 viewing a slide show on TV, 4-4 viewing available memory, 4-1 Index 3 viewing camera information, 5-12 viewing pictures on memory card, 4-1 viewing pictures on TV, 4-3 4 = zooming, 3-10 KODAK DIGITAL SCIENCE DC210 Plus Zoom Camera User’s Guide 3ULQWHGLQWKH86$ 31'


![USER MANUAL - [Ti] CCTV & Alarms](http://vs1.manualzilla.com/store/data/006900628_1-c3a0a7db8b1d500fbda94f290f289f51-150x150.png)