1
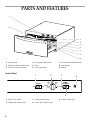
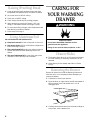
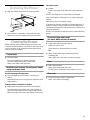
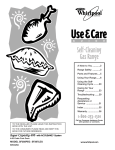
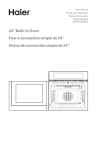
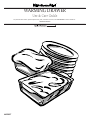
®
WARMING DRAWER
For questions about features, operation/performance, parts, accessories or service, call: 1-800-422-1230 or visit our website at...
www.kitchenaid.com
4452827
TABLE OF
CONTENTS
WARMING DRAWER SAFETY ........................................ 3
PARTS AND FEATURES.................................................. 4
BEFORE USING YOUR WARMING DRAWER.................. 5
Electrical Requirements .................................................... 5
USING YOUR WARMING DRAWER.................................. 5
Setting the Controls .......................................................... 5
Positioning Racks and Pans ............................................. 6
How to Use ....................................................................... 7
Warming Serving Bowls and Plates ................................. 7
Raising (Proofing) Bread ................................................... 8
Using Aluminum Foil ......................................................... 8
CARING FOR YOUR WARMING DRAWER ...................... 8
Drawer Slides .................................................................... 8
Removing the Drawer ....................................................... 8
Replacing the Drawer........................................................ 9
Cleaning the Drawer.......................................................... 9
TROUBLESHOOTING....................................................... 10
ASSISTANCE OR SERVICE ............................................. 10
WARRANTY....................................................................... 12
2
WARMING DRAWER SAFETY
Your safety and the safety of others is very important.
We have provided many important safety messages in this manual and on your appliance. Always read and obey all
safety messages.
This is the safety alert symbol.
This symbol alerts you to hazards that can kill or hurt you and others.
All safety messages will be preceded by the safety alert symbol and the word “DANGER” or
“WARNING.” These words mean:
DANGER
You will be killed or seriously injured if you don't
follow instructions.
WARNING
You can be killed or seriously injured if you don't
follow instructions.
All safety messages will identify the hazard, tell you how to reduce the chance of injury, and tell you what can
happen if the instructions are not followed.
IMPORTANT SAFETY INSTRUCTIONS
WARNING: To reduce the risk of fire, electrical
shock, injury to persons, or damage when using the
warming drawer, follow basic precautions, including
the following:
■ Proper Installation – Be sure the warming drawer is
properly installed and grounded by a qualified
technician.
■ Never Use the Warming Drawer for Warming or
Heating the Room.
■ Do Not Leave Children Alone – Children should not
be left alone or unattended in area where warming
drawer is in use. They should never be allowed to sit
or stand on any part of the warming drawer.
■ Wear Proper Apparel – Loose-fitting or hanging
garments should never be worn while using the
warming drawer.
■ User Servicing – Do not repair or replace any part of
the warming drawer unless specifically recommended
in the manual. All other servicing should be referred
to a qualified technician.
■ Storage in Warming Drawer – Flammable materials
should not be stored in a warming drawer.
■ Do Not Use Water on Grease Fires – Smother fire or
flame or use dry chemical or foam-type extinguisher.
■ Use Only Dry Potholders – Moist or damp potholders
on hot surfaces may result in burns from steam. Do
not let potholder touch hot heating elements. Do not
use a towel or other bulky cloth.
■
■
■
■
Use Care When Opening Door – Let hot air or steam
escape before removing or replacing food.
Do Not Heat Unopened Food Containers – Build-up
of pressure may cause container to burst and result
in injury.
Placement of Warming Drawer Racks – Always place
warming drawer racks in desired location while
warming drawer is cool. If rack must be moved while
warming drawer is hot, do not let potholder contact
hot heating element in warming drawer.
DO NOT TOUCH HEATING ELEMENTS OR
INTERIOR SURFACES OF WARMING DRAWER –
Heating elements may be hot even though they are
dark in color. Interior surfaces of a warming drawer
become hot enough to cause burns. During and after
use, do not touch, or let clothing or other flammable
materials contact heating elements or interior surfaces
of warming drawer until they have had sufficient time
to cool. Other surfaces of the warming drawer may
become hot enough to cause burns – among these
surfaces are warming drawer vent openings and
surfaces near these openings and warming drawer
doors.
SAVE THESE INSTRUCTIONS
3
PARTS AND FEATURES
1
2
3
4
5
6
7
8
9
1. Control Panel
4. Pan Support and Locator
7. Consumer Information Number
2. Model and Serial Number Plate
5. Pans
8. Drawer Slide
3. Moist-Dry Slide (not shown)
6. “ON” Light Viewer
9. Gasket
Control Panel
1
2
MED
LO
POWER
ON
3
MED
OFF
4
TIMER
OVERRIDE
MED
HI
HIGH
OFF
ON
5
1. Power “ON” Switch
3. Timer Override Switch
2. Temperature Control Knob
4. Power “ON” Indicator Light
4
5. Timer Override Light
BEFORE USING
YOUR WARMING
DRAWER
USING YOUR
WARMING
DRAWER
Electrical Requirements
Setting the Controls
WARNING
WARNING
Food Poisoning Hazard
Do not let food sit for more than one hour before
or after cooking.
Doing so can result in food poisoning or
sickness.
Electrical Shock Hazard
Plug into a grounded 3 prong outlet.
Do not remove ground prong.
Do not use an adapter.
Do not use an extension cord.
Failure to follow these instructions can result in
death, fire, or electrical shock.
It is important to make sure you have the proper electrical
connection:
A 115 Volt, 60 Hz., AC only 15 or 20 amperes electrical
supply, properly grounded in accordance with the National
Electrical Code and local codes and ordinances, is
required.
It is recommended that a separate circuit, serving only
your warming drawer, be provided.
Recommended grounding method
For your personal safety, this appliance must be grounded.
This appliance is equipped with a power supply cord
having a 3 prong grounding plug. To minimize possible
shock hazard, the cord must be plugged into a mating,
3 prong, grounding-type wall receptacle, grounded in
accordance with the National Electrical Code and local
codes and ordinances. If a mating wall receptacle is not
available, it is the personal responsibility of the customer
to have a properly grounded, 3 prong wall receptacle
installed by a qualified electrician.
Power “ON” switch
Press the Power “ON” switch to turn the unit on.
Power “ON” Indicator light
The Indicator light is located on the right side of the Timer
Override switch. Once the power is turned on, the red
indicator light will illuminate. When the unit is turned off
automatically or manually, the Indicator light will go out
and the drawer will begin to cool.
Temperature control knob
The temperature is controlled by rotating the control knob
to the desired setting. The temperature ranges from
approximately 90º F (Lo) to 225º F (Hi).
Timer
The Warming Drawer has an automatic 4 hour timer. After
4 hours, the unit will shut off. Although the automatic timer
is set for a 4 hour period, do not leave any food items in
the Warming Drawer for more than one hour. Bacterial
growth may occur.
NOTE: The Timer can be turned off using the Timer
Override switch.
5
Timer Override switch
The Timer Override switch allows you to run the unit past 4
hours, until it is turned off manually with the Power switch.
It is recommended that the switch be left in the OFF
position, unless longer warming times are required. When
the Override switch is in the ON position, the light on the
switch will illuminate to notify that the Timer has been
bypassed.
IMPORTANT: Although the Timer can be bypassed by
using the Timer Override switch, never allow food items to
remain in the Warming Drawer longer than one hour.
Bacterial growth may occur.
High position
lets you stack items in the drawer.
To stack items:
■
Moist-Dry slide.
Rack will fit from front to back or side to side.
NOTE: When placing front to back, drawer must be
fully open.
MOIST
DRY
The Moist-Dry slide allows you to open or close the vent
slots in the door. The MOIST setting holds the moisture in.
The DRY setting allows steam/moisture to escape from the
drawer.
■
■
To keep foods moist, put slide on MOIST, closing
vents. Closing the vents seals the drawer, keeping hot
food soft and moist.
■
It may be necessary to cover some foods and use a
higher temperature setting with larger loads.
■
To warm both cooked foods and empty serving dishes
at the same time, place the serving dishes on the
drawer bottom during preheat and the food on the high
rack position after preheat.
■
Foods contained in heat-safe glass or glass ceramic
utensils may require a higher temperature setting than
food contained in metal utensils.
■
Extra time should be allotted for the drawer
temperature to stabilize, when adding items or
checking food.
NOTE: Condensation may form on inner surfaces.
Pans
To keep foods crisp, put slide on DRY, opening vents.
With the vents open the moisture is released from the
drawer, keeping hot food crisp.
■
The pans provided can withstand oven temperatures
and are approved for oven cooking.
■
If not cooking in pan, warm pans during preheat time.
Food temperature will fall below recommended levels if
pan is not warm.
■
Ensure pan support is properly installed in locator
notch before inserting pans.
Positioning Racks and Pans
Dual level rack
30" shown (27" not shown)
The rack accompanying your drawer can be used in two
different positions, high and low.
Low position
raises the utensil ¹⁄₂ inch from bottom of drawer.
1
2
1. Storage notch
2. Locator pan support
NOTE: 27" model comes with only 2 pans.
■
6
When not using pans, place locator pan support in
storage notch.
Heat and Vent
Settings
Pan usage
or rack
position
Coffee cake
MED - MOIST
low rack
■
Cooked cereal
MED HI - MOIST
low rack
■
Eggs
HI - MOIST
pan
HI - MOIST
low rack
LO- 5 minutes
■
Fish, seafood
(breaded)
(no breading)
MED- 8 minutes
■
Fried foods
Hi - MOIST
pan
■
Gravy, cream
sauces
HI - MOIST
low rack
Ham
MED HI - MOIST
low rack
Hors d'oeuvres
(crisp)
(soft)
HI - MOIST
pan
Lamb
MED HI - MOIST
low rack
Pancakes, waffles
HI - MOIST
pan
Pies, single crust
MED - MOIST
high rack
Pies, double crust
MED LO - DRY
high rack
Pizza
HI - MOIST
low rack
Pork
MED HI - MOIST
low rack
Potatoes, baked
MED - MOIST
high rack
■
Potatoes,
mashed
MED HI - MOIST
low rack
■
Poultry
HI - MOIST
low rack
■
Vegetables
MED HI - MOIST
low rack
How to Use
Food
The Warming Drawer is intended to hold hot foods warm
after cooking and is not intended for cooking foods.
1. Press the Power “ON” switch to turn the unit on.
2. Select MOIST or DRY setting.
3. Set drawer to desired temperature setting (example:
LO, MED LO, MED, MED HI, HI).
4. Allow drawer to preheat:
HI- 10 minutes
■
Preheat with rack and/or pans in desired position, if
using accessories.
■
Preheat empty serving dishes when preheating
drawer.
5. Place hot cooked food in cooking utensil or heat-safe
serving dish/container. Place food in drawer.
■
Aluminum foil can be used to cover food.
■
Do not use plastic wrap to cover foods.
■
■
Temperature control chart
You can set the drawer temperature anywhere between
LO--HI. When keeping several foods hot, set the drawer to
the food requiring the highest temperature setting. Place
item(s) requiring the highest temperature on the rack and
those items requiring the lowest temperature on the
bottom of the drawer.
■
Cover suggested for foods listed below (■)
Heat and Vent
Settings
Pan usage
or rack
position
Bacon
MED HI - MOIST
pan
Beef, medium
and well done
MED HI - MOIST
low rack
Bread, hard rolls
MED - DRY
low rack
Bread, soft rolls
MED - MOIST
low rack
Casseroles
MED - MOIST
high rack
Casseroles
MED HI - MOIST
low rack
Food
■
■
Warming Serving Bowls and
Plates
■
Use only cookware approved for oven use. Follow
cookware manufacturer’s instructions, especially when
using glass or plastic cookware.
7
Raising (Proofing) Bread
CARING FOR
YOUR WARMING
DRAWER
1. Cover dough with lightly oiled wax paper and place
temperature safe pan(s) directly on bottom of drawer.
2. Set control knob to PROOF setting.
3. Place vent on MOIST setting.
4. Check dough periodically for proofing progress.
5. Verify doneness by pressing 2 fingers ¹⁄₂ inch into
dough; if indentation remains, the dough is ready.
WARNING
6. For second proofing of dough, place temperature safe
bowl directly on bottom of drawer.
7. Follow steps 2 through 4.
Using Aluminum Foil
Do not line drawer with aluminum foil.
■
Keep food covered if it was cooked with a cover on it.
■
Use narrow strips of foil to shield piecrust edges from
further browning in drawer.
■
Place tent-shaped foil loosely over meat or poultry to
prevent dryness and further browning while in the
drawer.
■
The use of aluminum foil to cover foods may cause
moisture to collect and drip into the drawer.
Explosion Hazard
Do not store flammable materials such as
gasoline near this appliance.
Doing so can result in death, explosion, or fire.
Drawer Slides
■
The drawer slides allow you to fully extend the drawer
for easier cleaning. If necessary, the drawer can be
removed.
■
Load capacity for the drawer and slides is 100 lbs
(45 kg).
Removing the Drawer
Remove all items from inside the Warming Drawer and
allow the unit to cool completely before attempting to
remove the drawer.
1. Pull drawer to its full open position.
2. Press tab down on right (shown) and lift tab upward on
left (not shown), then slide drawer out 1 inch to
disengage latch.
3. Carefully remove the drawer from the slides holding on
to the sides, not the drawer front.
8
Hard water spots
Replacing the Drawer
■
Vinegar
Swab or wipe with cloth. Wipe with clean water and
dry.
1. Align the drawer guides with the receiving slides.
DO NOT use steel wool or soap-filled scouring pads.
Rub in the direction of the grain line to avoid marring the
surface.
Always wipe dry to avoid water marks.
If commercial cleaners are used, follow label directions. If
product contains chlorine (bleach), rinse thoroughly with
clean water and dry with a soft lint-free cloth. Chlorine is a
corrosive substance.
2. Push drawer in completely. Gently open and close
drawer to ensure it is seated properly on the slides.
Cleaning the Drawer
DO NOT let commercial cleaners come in contact with the
gasket.
Oven door glass and handle
(for black, white and biscuit models)
■
Before cleaning, always make sure that all controls are
turned off and the drawer is cool. Refer to the instructions
on the containers of all cleaning products before using
them to clean your drawer.
Control knob
■
Make sure oven is cool.
Follow directions provided with the cleaner.
OR
■
Soap and water
Pans
■
Stainless steel surfaces (control panel, drawer
cavity and drawer front)
Wipe with damp cloth or sponge, then wipe with clean
water and dry.
Mild soap and water
Wash, rinse and dry with soft cloth.
DO NOT put in dishwasher, discoloration will occur.
Routine cleaning and fingerprints
Liquid detergent/soap and water, or all-purpose
cleaner
Warm, soapy water and a nonabrasive, plastic
scrubbing pad
Wash, wipe with clean water, and dry thoroughly.
Do not use steel wool or abrasive cleaners.
Pull knob straight away from control panel.
Wash, rinse and dry with soft cloth.
■
Paper towel and spray glass cleaner
Oven rack
■
Steel-wool pad and warm, soapy water
Wash, rinse and dry thoroughly.
Stubborn stains and baked-on residue
■
Mildly abrasive cleanser or stainless-steel cleaners
To avoid marring the surface, rub in the direction of
grain lines with a damp cloth or sponge and cleanser.
Wipe thoroughly with clean water. Repeat if necessary.
9
TROUBLESHOOTING
Drawer does not work
Is the drawer connected to a power source?
■
■
Before calling for assistance or service, please check
“Troubleshooting.” It may save you the cost of a service
call. If you still need help, follow the instructions below.
Refer to installation instructions to ensure proper
installation.
When calling, please know the purchase date and the
complete model and serial number of your appliance. This
information will help us to better respond to your request.
Has the household fuse or circuit breaker been
tripped?
If you need replacement parts
Replace the fuse or reset the circuit.
Power switch is in the “ON” position and the indicator
light is not illuminated.
■
ASSISTANCE
OR SERVICE
Reset unit by turning the Power switch to “OFF” and
then “ON”. The unit was in the timer mode and ran out
of time.
If you need to order replacement parts, we recommend
that you only use factory specified replacement parts.
Factory specified replacement parts will fit right and work
right because they are made with the same precision used
to build every new KitchenAid® appliance.
To locate factory specified replacement parts in your area,
call our Consumer Assistance Center telephone number or
your nearest designated service center.
Drawer does not slide properly
In the U.S.A.
Has the drawer been mounted properly on the slides?
■
Remove and remount the drawer on the slides. See the
“Caring for Your Warming Drawer” section for
instructions.
Has the drawer been over-loaded?
■
Call the KitchenAid Consumer Assistance Center
toll free: 1-800-422-1230.
Our consultants provide assistance with:
■
Features and specifications on our full line of
appliances.
Is the drawer load uneven?
■
Installation information.
Redistribute the contents to balance the weight evenly.
■
Use and maintenance procedures.
■
Accessory and repair parts sales.
■
Specialized customer assistance (Spanish speaking,
hearing impaired, limited vision, etc.).
■
Referrals to local dealers, repair parts distributors, and
service companies. KitchenAid designated service
technicians are trained to fulfill the product warranty
and provide after-warranty service, anywhere in the
United States.
Weight inside drawer should not exceed 100 lbs.
■
There is excessive moisture on the drawer
Did you allow preheating time?
■
Preheat the drawer before each use. See “Using Your
Warming Drawer” section for instructions.
Is the Moist-Dry setting correct?
■
Set the Moist-Dry slide to “DRY” to vent the moisture.
Did you cover food with aluminum foil?
■
See the “Using Aluminum Foil” section for instructions.
Drawer did not shut off automatically
■
Have you bypassed the timer?
Check the Timer Override switch, if the light is “ON”
you have to shut drawer off manually. The Timer
Override switch must be in the “OFF” position for the
Timer to function properly.
To locate the KitchenAid designated service company
in your area, you can also look in your telephone
directory Yellow Pages.
For further assistance
If you need further assistance, you can write to KitchenAid
with any questions or concerns at:
KitchenAid Brand Home Appliances
Consumer Assistance Center
c/o Correspondence Dept.
2000 North M-63
Benton Harbor, MI 49022-2692
Please include a daytime phone number in your
correspondence.
10
WARRANTY KITCHENAID® WARMING DRAWER
FULL ONE-YEAR WARRANTY
For one year from the date of purchase, when this Warming Drawer is operated and maintained according to instructions attached to or
furnished with the product, KitchenAid will pay for factory specified replacement parts and repair labor to correct defects in materials or
workmanship. Service must be provided by a KitchenAid designated service company.
KitchenAid will not pay for:
1. Service calls to correct the installation of your Warming Drawer, to instruct you how to use your Warming Drawer, to replace house
fuses or correct house wiring.
2. Repairs when your Warming Drawer is used in other than normal, single-family household use.
3. Damage resulting from accident, alteration, misuse, abuse, fire, flood, acts of God, or use of product not approved by KitchenAid.
4. Replacement parts or repair labor costs for units operated outside the United States.
5. Pickup and delivery. This product is designed to be repaired in the home.
6. Repairs to parts or systems resulting from unauthorized modifications made to the appliance.
KITCHENAID CORPORATION SHALL NOT BE LIABLE FOR INCIDENTAL OR CONSEQUENTIAL DAMAGES.
Some states do not allow the exclusion or limitation of incidental or consequential damages, so this exclusion or limitation may not
apply to you. This warranty gives you specific legal rights, and you may also have other rights which vary from state to state.
Outside the United States, a different warranty may apply. For details, please contact your authorized KitchenAid dealer.
If you need service, first see the “Troubleshooting” section of this book. After checking “Troubleshooting,” additional help can be found
by checking the “Requesting Assistance or Service” section or by calling the KitchenAid Consumer Assistance Center, 1-800-422-1230
(toll-free), from anywhere in the U.S.A.
9/99
Keep this book and your sales slip together for future
reference. You must provide proof of purchase or
installation date for in-warranty service.
Dealer name _________________________________________
Write down the following information about your Warming Drawer
to better help you obtain assistance or service if you ever need it.
You will need to know your complete model number and serial
number. You can find this information on the model and serial
number label, located on your appliance as shown in the Parts
and Features section of this book.
Phone number _______________________________________
Address ____________________________________________
Model number _______________________________________
Serial number _______________________________________
Purchase date _______________________________________
4452827
© 1999. All rights reserved.
® Registered Trademark of KitchenAid, U.S.A.
10/99
Printed in U.S.A.