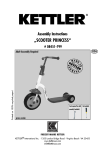
1
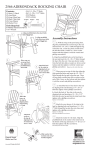
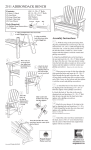
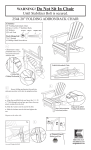
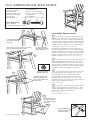
2533 ADIRONDACK BAR STOOL
Contents:
(1) Seat, (1) Back
(2) Arm Rests
(2) Front Chair legs
(2) Back Chair legs
(1) Footrest
(2) Side Braces
(1) Short Cross Brace
(4) Cross Braces
(22) 1/4 - 20 x 2” Bolts
(6) 1/4 - 20 x 2 1/2” Bolts
(12) Washers
(12) Locknuts
Locknut
Washer
1/4-20 x 2” Bolt
Tools Required:
7/16” Wrench
#3 Phillips Head Screwdriver
1.
Assembly Instructions
1.
a. Align predrilled then
insert bolts to attach
front legs.
b. Align predrilled
Place arm rest on top of chair legs, align
front predrilled holes, insert bolt.
holes then insert bolts
to attach back legs.
2.
a. With the wing on the post facing front,
align the predrilled holes on front leg to the seat
and insert the 1/4 - 20 x 2” Bolts through the leg
in thru the seat. Clean any plastic residue from the
bolt then slide a washer on. Screw on the locknut
and then tighten it with the wrench and phillips
screwdriver. Repeat on the other front leg.
b. Align the predrilled holes on the back leg to
the seat and insert the 1/4 - 20 x 2” Bolts through
the leg in thru the seat. Clean any plastic residue
from the bolt then slide a washer on. Screw on the
locknut and then tighten it with the wrench and
phillips screwdriver. Repeat on the other back leg.
2.
Place arm rest on top of chair legs align the
front predrilled holes and insert the 1/4 - 20 x 2”
Bolts through the leg and in thru the arm. Clean
off any plastic residue then slide a washer on the
end of bolt. Screw on the locknut and then tighten
it with the wrench and phillips screwdriver.
Properly Seated
Washer and Nut.
3.
3b.
Attach the back of the
chair by aligning holes
on the arm and the seat
to insert bolt.
3.
a. Attach the back of the chair to the seat
by aligning holes and inserting a 1/4 - 20 x 2”
Bolt then tighten with a phillips screwdriver.
b. Attach the back of the chair to the arm by
aligning holes and inserting a 1/4 - 20 x 2 1/2”
Bolt thru the arm, leg and into the chair back, then
tighten with a phillips screwdriver.
Repeat on both sides.
3a.
4.
Attach the cross braces of the chair to the
legs by aligning holes and inserting a 1/4 - 20 x
2” Bolt through the leg into the cross brace and
tighten with a phillips screwdriver.
Repeat on other leg.
Do Front and Back cross braces.
4.
Attach the braces to
the legs by aligning
holes and inserting
a 2” bolt.
Slide washer then
locknut onto end of
bolt then tighten.
Copyright © Kettler USA 309.01
Assembly Instructions continued
5.
5.
a. Bolt the left and right side braces onto the front legs
by aligning the predrilled holes and inserting a 1/4 - 20
x 2 1/2” Bolt. Clean any plastic residue from the bolt
then slide a washer on. Screw on the locknut and then
tighten it with the wrench and phillips screwdriver.
b. Then align the side braces to the holes on the
back legs, place the short brace across between them
aligning with the predrilled holes. Insert the 1/4 - 20
x 2 1/2” thru the leg, in thru the side brace and into
the short brace. Tighten with the phillips screwdriver.
3b.
3a.
3b.
3a.
Repeat on the other front leg.
Short brace goes in between the side
braces on the back of the stool.
3a. Aligning holes on the
front leg and the side brace
then insert the bolt, slide on
a washer, screw on a locknut
and tighten.
3b. Aligning holes
on the side brace with
the back leg, place
the short brace in
then insert bolt.
6.
6.
Place the footrest on the side braces align the front
predrilled holes and insert the 1/4 - 20 x 2” Bolts through the
footrest and into the end hole of the brace then tighten it with the
phillips screwdriver.
Place the footrest on the side
braces align the front predrilled
holes and insert the bolts.
Care & Maintenance
Ocean Comfort products are constructed from HDPE (High Density Polyethelene), primarily a
recycled material. UV inhibitors are also added to resist fading. Simply maintain your furniture by
cleaning with soap and warm water to ensure its long lasting beauty. A soft bristle brush can be used
on any tough to clean stains. Stainless steel hardware is used in the assembly of these products and
should be rinsed regularly with fresh water if being used in a coastal environment.
KETTLER Limited Warranty
Ocean Comfort products are guaranteed for a period of 20 years (for residential use) and 5 years (for
commercial use), starting from original purchase date. This warranty covers defects in materials and/or
workmanship and does not apply to the hardware.
Warranty not applicable to any products deemed as misused, abused or damaged due to an uncontrollable act
of nature.
*For Parts and Service, please contact us directly at 866-804-0440 or email [email protected] Made in the U.S.A.
KETTLER® International Inc. • 1355 London Bridge Road • Virginia Beach, VA 23453
www.kettlerusa.com • [email protected]