1
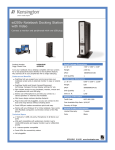
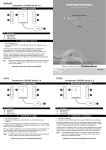
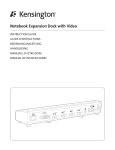
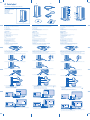
A
B
sd200v Notebook docking station with video
L
F
G
QUICK START GUIDE
GUIDE DE DEMARRAGE RAPIDE
C
KURZANLEITUNG
H
SNELSTARTGIDS
GUIDA VELOCE
MANUAL DE INICIO RÁPIDO
I
D
J
K
E
sd200v
Noteb
ook doc
king sta
tion wit
h
M
N
O
P
Q
video
English
Français
Deutsch
Contents
Contenu
Inhalt
A. sd200v Notebook docking station with video
B. USB 2.0 cable
C. Power adapter
D. Software Installation CD and Instruction Guide
E. Quick Start Guide
A. Station d'accueil avec vidéo sd200v pour ordinateur portable
B. Câble USB 2.0
C. Alimentation
D. CD d'installation du logiciel et Guide d'instructions
E. Guide de démarrage rapide
A. sd200v Notebook-Dockingstation mit Video
B. USB 2.0-Kabel
C. Netzteil
D. Software-Installations-CD und Bedienungsanleitung
E. Kurzanleitung
Components
Composants
Komponenten
Back
F. Stereo audio output
G. Microphone input
H. 4 USB 2.0 ports with status indicator lights
I. VGA video output
J. USB upstream connector
K. Power adapter jack
Arrière
F. Sortie audio stéréo
G. Entrée microphone
H. 4 ports USB 2.0 avec voyants lumineux d'état
I. Sortie vidéo VGA
J. Connecteur USB
K. Prise pour alimentation
Rückseite
F. Stereo-Audioausgang
G. Mikrofoneingang
H. 4 USB-2.0-Schnittstellen mit Statusanzeigen
I. VGA-Videoausgabe
J. Vorgeschalteter USB-Anschluss
K. Netzteilbuchse
Front
L. Power/connection indicator light
M. Display mode indicator light 2
N. Display mode indicator light 1
O. DualView button
P. Front USB connection status light
Q. USB 2.0 port
Avant
L. Voyant lumineux d'alimentation/connexion
M. Voyant lumineux du mode d'affichage 2
N. Voyant lumineux du mode d'affichage 1
O. Bouton DualView
P. Voyant d'état de la connexion USB avant
Q. Port USB 2.0
Vorderseite
L. Strom-/Verbindungs-Indikatoranzeige
M. Indikatoranzeige 2 für Anzeigemodus
N. Indikatoranzeige 1 für Anzeigemodus
O. Taste “DualView”
P. Statusanzeige für Front-USB-Anschluss
Q. USB 2.0-Schnittstelle
Set Up and Connect Docking Station
Installation et connexion de la station d'accueil
Einrichten und Verbinden der Dockingstation
1 Insert CD into notebook.
1 Insérez le CD dans votre ordinateur portable.
1 Legen Sie die CD in das Notebook ein.
2 Follow onscreen instructions.
Note: During the installation, notebook screen may go blank for a few seconds.
This is a normal part of the installation process.
3 Reboot notebook if prompted.
4 Attach power adapter to docking station and to working wall outlet.
2 Suivez les instructions apparaissant à l'écran.
Remarque : pendant l'installation, l'écran de votre ordinateur portable risque
d'être vide pendant quelques secondes. Ceci est normal.
3 Redémarrez l'ordinateur lorsque vous y êtes invité.
4 Branchez l'alimentation sur la station d'accueil et sur une prise de courant.
2 Befolgen Sie die Anweisungen auf dem Bildschirm.
Hinweis: Während der Installation ist auf dem Notebook-Bildschirm möglicherweise
für einige Sekunden keine Anzeige mehr zu sehen. Dies ist bei der Installation normal.
3 Starten Sie das Notebook neu, wenn Sie dazu aufgefordert werden.
4 Verbinden Sie das Netzteil mit der Dockingstation und einer funktionstüchtigen
Steckdose.
5 Attach USB 2.0 cable to USB upstream connector on docking station.
6 Attach USB 2.0 Cable to USB port on notebook.
5 Connectez le câble USB 2.0 au connecteur USB sur la station d'accueil.
5 Stecken Sie das USB 2.0-Kabel mit dem vorgeschaltetem USB-Anschluss an der
Dockingstation.
6 Branchez le câble USB 2.0 au port USB sur votre ordinateur portable.
6 Stecken Sie das USB 2.0-Kabel in die USB-Schnittstelle des Notebooks.
7 Connect devices—mice, monitor, and so on—to docking station.
7 Connectez les périphériques—souris, moniteur, etc.—à la station d'accueil.
7 Verbinden Sie Geräte – Maus, Bildschirm usw. – mit der Dockingstation.
8 (Optional) If monitor is connected, adjust display settings:
a Right-click Kensington icon
in taskbar.
b Select Extended (DualView) or Clone.
c Select desired screen resolution.
Extended mode (Dualview)
8 (Facultatif) Si vous connectez un moniteur, réglez les paramètres d'affichage :
a Cliquez avec le bouton droit de la souris sur l'icône Kensington
dans la
barre des tâches.
b Sélectionnez Etendue (DualView) ou Clone.
c Sélectionnez la résolution d'écran souhaitée.
8 Optional) Passen Sie die Anzeigeeinstellungen an, wenn ein Monitor
angeschlossen ist:
a Klicken Sie mit der rechten Maustaste auf das Kensington Symbol
der Taskbar.
b Wählen Sie Erweitert (DualView) oder Klon.
c Wählen Sie die gewünschte Bildschirmauflösung.
in
Mode Etendue (Dualview)
Erweiterter Mode (Dualview)
Clone mode
9 (Optional) To view detailed Instruction Guide, go to Start/All Programs/sd200v.
Mode Clone
9 (Facultatif) Pour afficher le guide d'instructions détaillé, sélectionnez
Démarrer/Tous les programmes/sd200v.
Klonmodus
9 (Optional) Um detaillierte Informationen in der Bedienungsanleitung anzuzeigen, wählen Sie Start/Alle Programme/sd200v.
A
B
C
L
F
G
H
D
E
sd200
v Docki
ng Sta
tion wi
th
M
N
I
O
J
P
K
Q
Video
2
1
Nederlands
Italiano
Español
Inhoud
Contenuto
Contenido
A. sd200v-dockingstation met video voor notebooks
B. USB 2.0-kabel
C. Voedingsadapter
D. Software-installatie-CD en handleiding
E. Snelstartgids
A. Dock di espansione sd200v per notebook con video
B. Cavo USB 2.0
C. Alimentatore di corrente
D. CD di installazione del software e Manuale di istruzioni
E. Guida veloce
A. Replicador de puertos sd200v con video para portátil
B. Cable USB 2.0
C. Adaptador de alimentació
D. CD de instalación de software y Manual de instrucciones
E. Guía de inicio rápido
Onderdelen
Componenti
Components
Achterzijde
F. Stereo audio-uitgang
G. Microfooningang
H. 4 USB 2.0-poorten met statusindicatielampjes
I. VGA-video-uitgang
J. USB-upstreamconnector
K. Aansluiting voedingsadapter
Lato posteriore
F. Uscita audio stereo
G. Ingresso del microfono
H. 4 porte USB 2.0 con spie di stato di funzionamento
I. Uscita video VGA
J. Connettore upstream USB
K. Jack dell'alimentatore di corrente
Parte trasera
F. Salida de audio estéreo
G. Entrada de micrófono
H. 4 puertos USB 2.0 con indicadores luminosos de estado
I. Salida de vídeo VGA
J. Conector de la fuente de datos USB
K. Clavija del adaptador de alimentación
Voorzijde
L. Voedings-/verbindingsindicatielampje
M. Indicatielampje weergavemodus 2
N. Indicatielampje weergavemodus 1
O. Button DualView
P. USB-verbindingslampje (voor)
Q. USB 2.0-poort
Lato anteriore
L. Spia di alimentazione/connessione
M. Spia 2 della modalità di visualizzazione
N. Spia 1 della modalità di visualizzazione
O. Pulsante DualView
P. Spia anteriore di stato della connessione USB
Q. Porta USB 2.0
Parte frontal
L. Indicador luminoso de alimentación/ conexión
M. Indicador luminoso de modo de visualización 2
N. Indicador luminoso de modo de visualización 1
O. Botón DualView
P. Indicador de estado de conexión USB frontal
Q. Puerto USB 2.0
Dockingstation installeren en verbinden
Installazione e collegamento del dock di espansione
Instalación y conexión del replicador de puertos
1 Plaats de CD in het notebook.
1 Inserire il CD nel notebook.
1 Inserte el CD en el equipo.
2 Volg de aanwijzingen op het scherm.
Opmerking: tijdens de installatie krijgt u mogelijk enkele seconden een blanco
scherm. Dit is een normaal onderdeel van het installatieproces.
3 Start het notebook opnieuw op, indien hierom wordt gevraagd.
4 Sluit de voedingsadapter aan op het dockingstation en een stopcontact.
2 Seguire le istruzioni visualizzate sullo schermo.
Nota: durante l'installazione lo schermo del notebook può restare nero per alcuni
secondi. Si tratta di una parte normale del processo d'installazione.
3 Riavviare il notebook se richiesto.
4 Collegare l'alimentatore di corrente al dock di espansione e alla presa a muro.
2 Siga las instrucciones que aparecen en pantalla.
Nota: durante la instalación es posible que se vaya la imagen de la pantalla del
portátil. Esto forma parte del proceso normal de instalación.
3 Reinicie el portátil si se le pide.
4 Una el adaptador de alimentación al replicador de puertos y a la toma de pared.
5 Sluit de USB 2.0-kabel aan op de USB-upstreamconnector op het dockingstation.
5 Collegare il cavo USB 2.0 al connettore upstream USB presente sul dock di
espansione.
5 Conecte el cable USB 2.0 al conector de la fuente de datos USB del replicador
de puertos.
6 Collegare il cavo USB 2.0 alla porta USB del notebook.
6 Una el cable USB 2.0 al puerto USB del portátil.
7 Collegare le periferiche (mouse, tastiera, monitor e così via) al dock di espansione.
7 Conecte dispositivos: ratones, monitor, etc. al replicador.
8 (Opzionale) Se il monitor è connesso, modificare le impostazioni del display.
a Fare clic con il pulsante destro del mouse sull'icona Kensington
nella barra
di sistema.
b Selezionare Estesa (DualView) o Clonazione.
c Selezionare la risoluzione desiderata per lo schermo.
8 (Opcional) Si el monitor está conectado, ajuste los parámetros de visualización:
a Haga clic con el botón derecho en el icono de Kensington
de la barra
de tareas.
b Seleccione Extendido (DualView) o Clon.
c Seleccione la resolución de pantalla deseada.
6 Sluit de USB 2.0-kabel aan op de USB-poort op het notebook.
7 Sluit apparatuur—muizen, monitor, enz.—aan op het dockingstation.
8 (Optioneel) Als de monitor wordt aangesloten, past u de weergave-instellingen aan:
a Klik met de rechtermuisbutton op het Kensington-pictogram
in het
systeemvak.
b Selecteer Extended (DualView) (Uitgebreid (DualView)) of Clone (Kloon).
c Selecteer de gewenste schermresolutie.
Extended mode (Dualview) (Uitgebreid (DualView))
Modus Clone (Kloon)
9 (Optioneel) Ga voor de gedetailleerde handleiding naar Start/Alle
programma's/sd200v.
Modalità estesa (Dualview)
Modo extendido (DualView)
Modalità di clonazione
Modo clon
9 (Opzionale) Per visualizzare il Manuale di istruzioni dettagliato, andare su
Start/Tutti i programmi/sd200v.
9 (Opcional) Para ver el Manual de instrucciones detallado, vaya a Inicio/Todos los
programas/sd200v.
901-2004-00