Transcript
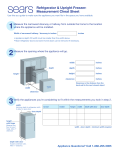
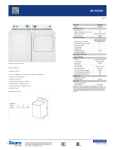
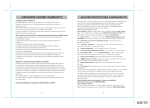
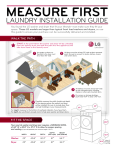
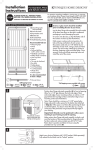
walk the path laundry installation guide You found the Kenmore Elite washer and dryer that fit your lifestyle – now make sure they fit your space. These Kenmore Elite models are larger than typical front load washers and dryers, so use this guide to ensure your purchase can be successfully delivered and installed. ® NEW Kenmore Elite Epic Capacity 5.1 cu. ft. Washer (41072/3) and 9.0 cu. ft. Steam Dryer (9/81072/3) Four simple steps to help ensure a successful delivery. Step 1 – Measure the Washer/Dryer Space Carefully measure the opening where the washer & dryer will be installed. Take door, floor and wall moldings into consideration. Note: It is important to allow 5" of extra space for venting the dryer. Also, allow 1" on all sides of both the washer and dryer to reduce noise. Record the space dimensions here: Height Width Depth Your new Kenmore Elite washer and dryer pair requires a MINIMUM AREA of 60" W x 40-7/8" H x 37-3/8" D to allow for proper spacing and venting. (If you add pedestals, the minimum height is 54-3/4"). Does the new laundry pair fit your current space? Washer Dryer width height depth depth (door open) height (with pedestal) width of pair 29" o fits 29" o fits 40-7/8" o fits 40-7/8" o fits 32-3/8" o fits 32-3/8" o fits 57" o fits 57" o fits 54-3/4" o fits 54-3/4" o fits (side by side installation) 60" o fits Step 2 – Walk the Delivery Path ■■ ■■ ■■ Starting at the point where the washer and dryer will be unloaded from the delivery truck, walk the path the machines will take from there to the laundry room. Measure every gate, doorway, corner, stairway, and any other narrow place in the delivery path. Check the measuring hints in Step 3 to make sure you don’t miss any obstructions. Step 3 – Measure Possible Obstructions Measure the opening of any gates, arbor, etc. to make sure it is at least as wide as the washer and/or dryer. Doors: ■■ ■■ ■■ ■■ Open the door and measure the distance from the edge of the door to the door jamb. With the door open, measure from jamb to jamb. Measure the screen door from frame to frame if it is narrower than the door jambs. If your screen door has a closer and/ or a latch, measure from the latch to the closer bracket. Halls & Corners: ■■ ■■ Measure the narrowest spots in hallways. Look for items mounted on walls, such as shelves, that might make the passage narrower. Measure corners, such as stairway landings. If both sides of a corner are narrow, you may not be able to make the turn with the appliance. Record the narrowest hallway/doorway/gate measurement here: Step 4 – Prepare for a Smooth Installation ■■ ■■ ■■ If the doorway is too narrow and the door cannot be opened fully, remove the door. Fixed pin hinges will need to be unscrewed to remove the door. Handrails may have to be removed from narrow stairs. If the space is not deep enough for the appliances PLUS a dryer duct, you may need to use special venting components. Ask your sales associate for more information. ® SC021308