1
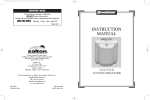
tJVVINIIZM
;:) iVI/41MUi4L.
AUTOMATIC BREADMAKER
Model 48487
CAUTION:
e
Safety
Before using this Breadmaker, read this
e
manual and follow all its Safety Rules
e
Operation
Cleaning
and Operating instructions.
e
Recipes
DPP60671
OWNERBMANUAL.(TR2205
01118_9tDPPO0871
Sears, Roebuck
and Co., Hoffman
Estates,
IL 60179
USA
WARRANTY
........................................................................................................................
2
!
IMPORTANT
SAFETY
YOUR KENMORE
INSTRUCTIONS
AUTOMATIC
............................................................................
BREADMAK_R
............................................................
OVERVIEW
........................................................................................................................
OPERATING
INSTRUCTIONS
Bread Pan Instructions
Operating
......................................................................................
2
3-4
5
6-12
................................................................................................
6
Tips ................................................................................................................
6
Making Dough and Baking Bread
Super Rapid Breads
Using the Timer
..............................................................................................
....................................................................................................
Using the Pause Feature
Add-In Beeper
...............................................................................
............................................................................................
............................................................................................................
7-8
9-11
12-13
13
!4
Convection
Cool Down ................................................................................................
i4
Jam Cycle
...................................................................................................................
14
For Best Baking Results ..............................................................................................
MAINTENANCE,
STANDARD
BREAD
CAKE RECIPES
JAM RECIPES
KNEADING
CLEANING,
RECIPES
AND STORAGE
................................................................
........................................................................................
..........................................................................................................
..................................................................................................................
AND BAKING
CYCLE
CHARTS
..............................................................
Basic Bread Cycle Chart ........................................................................................
Whole Wheat Bread Cycle Chart ..........................................................................
French Bread Cycle Chart ......................................................................................
Fruit & Nut Bread Cycle Chart ................................................................................
Cake, Jam, Pizza Dough and Dough Cycle Chart ................................................
TROUBLESHOOTING
................................................................................................
15
16
i7
18-19
20
21-23
21
21
22
22
23
24-25
FULL
ONE
YEAR
WARRANTY
tf this product fails due to a defect in material or workmanship
date of purchase, Sears will replace it free of charge.
To obtain replacement
under this warranty,
This warranty gives you specific
vary from state to state.
Sears, Roebuck
within one year from the
return this product to place of purchase,
legal rights, and you may also have other rights which
and Co., Dept. 817WA,
Hoffman
Estates,
IL 60179
IMPORTANT SAFETY INS'r RUCTIONS
When using electrical appliances, especially when children are present,
precautions should always be followed, including the following:
READ ALL INSTRUCTIONS
1.
2,
3.
4.
5,
6.
7,
Do not touch hot surfaces.
BEFORE
Use handles
or knobs, Always use oven mitts when
handling hot materials and allow metal
parts to coo! before cleaning.
Unplug this product from wall outlet
when not in use and before cleaning,
Allow to cool thoroughly before putting
on or taking off parts.
Do not immerse appliance in water or
any other liquid,
Close supervision is necessary
when any appliance is used by or
near children.
Do not allow anything to rest on the
power cord, Do not plug in cord where
persons may wa!k or trip on it,
Do not operate this or any appliance
with a frayed or damaged cord or plug
or after the appliance malfunctions or
has been dropped or damaged in any
manner, Return appliance to the nearest authorized service facility for
examination,
repair, or adjustment.
Avoid contact with any moving parts.
basic safety
USING.
8.
The use of accessory attachments
not
recommended
by the manufacturer
may result in fire, electric shock, or
injury to persons,
9. This appliance is intended for household use only. Do not use outdoors or
for commercial purposes.
10, Do not let the cord hang over the edge
of a table or counter, or touch hot surfaces, Do not place on an unsteady
cloth-covered
surface,
or
1!, Do not place the appliance near a hot
gas or electric burner, or in a heated
oven,
12. Do not use the appliance
its intended use.
for other than
13, Keep the appliance at least 2 inches
away from walls or any other objects
when in use,
t4, To disconnect, grip the plug and pull the
plug from the wall outlet. Never pull on
"
the cord.
/
SAVE tHESE INS'I'RUC IONS
2
/
/
8
...,.,,, .......................................
• ...................................................................................
1,
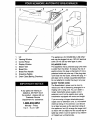
Lid
2,
3,
Viewing Window
Contro! Panel
4,
5.
Display Window
Steam Vent
6.
Bread Pan
7.
Bread Pan Handle
8.
9.
Kneading Paddle
Oven Case (Baking
,.......
: ....................................
This appliance is for HOUSEHOLD USE ONLY
and may be plugged into any t20V AC electrical
outlet. Do not use any other type of outlet,
POLARIZED
Chamber)
PLUG
This appliance has a polarized plug (one blade
is wider than the other). To reduce the risk of
electric shock, this plug is intended to fit into a
polarized outlet only one way. if the plug does
not fit fully into the outlet, reverse the plug. if it
still does not fit, contact a qualified electrician,
Do not attempt to modify the plug in any way.
SHORT POWER CORD
If any parts are missing or
defective, DO NOT return
this product, please call our
Customer Service
Department
for assistance,
1-800-233-9054
MondayFriday
9 a.m. - 5 p,m, CST
The Breadmaker's power cord is short to
reduce your risk of becoming entangled in or
tripping over a long cord. You can obtain a
longer, detachable power-supply cord or
extension cord, but be careful when using
breadmaker equipped with extra cord length.
if you are using a longer detachable powersupply cord or extension cord, (1) the marked
electrical rating of the extension cord should
be at least as great as the electrical rating of
the appliance, and (2) arrange the longer cord
so that it will not drape over the counter top or
table top where it can be pulled on by children
or tripped over unintentionally.
3
THE CONTROL
PANEL
B,
Timer
Use these buttons to change time
shown in Display Window,
C,
"-C
D.
E.
F,
Window
Shows your selection and timer setting.
Cycle Selection
Options--select
V
Each time you press the V button,
the timer is set back 10 minutes.
Hold the V button down for fast
reverse,
Select
Press this button to select the desired
until your choice is indicated.
Start
Press this button to start the Baking
cycle and the Timer. The PAUSE
function can be activated only after the
machine has started a program, For
complete details, see "USING THE
PAUSE FEATURE."
\E
Display
Each time you press the h button,
the timer advances 10 minutes,
Hold the h button down for fast
forward,
Baking cycle, Each time yoLI press this
button, the indicator arrow moves to
the next selection. Press this button
"D
A.
A
Stop
Press this button for a full second to stop
Baking cycle, Timer setting, or program.
Super Rapid
The Super Rapid program is convenient
for baking a hot fresh loaf of bread in
under an hour.
from the following bread choices:
Type
Crust
Basic Bread
Light, Medium
or Dark
1.5 lb. or 2,0 Ib.
Basic Bread Rapid
Light, Medium
or Dark
t ,5 tb, or 2,0 lb.
Whole Wheat
Light, Medium
or Dark
1 51b
Whole Wheat Bread Rapid
French Bread
Light, Medium
or Dark
1 5 lb, or 2,0 lb.
Light, Medium
1.5 lb. or 2.0 lb.
French Bread Rapid
Fruit & Nut Bread
Light, Medium
or Dark
or Dark
Light, Medium
or Dark
1.5 lb. or 2,0 lb.
Fruit & Nut Bread Rapid
Light, Medium
or Dark
t .5 lb. or 2.0 lb.
Bread
Loaf Size
or2.01b.
1,5 lb. or 2.0 lb.
Super Rapid Breads
Not Applicable
! , 1.5 or 2,01b.
Batter BreadTM!Cake
Not Applicable
Not Applicable
Jam
Not Applicable
Not Applicable
Dough
Not Applicable
Not Applicable
Pizza Dough
Not Applicable
Not Applicable
Bake Only
Not Applicable
Not Applicable
CAUTION:
With your new Kenmore Automatic
Breadmaker, you can do the following:
!
•
Create many types of breads .....
program by loaf size and crust color.
During use, the internal parts of the
Breadmaker and the area around the
Steam Vent are HOT,
Use pre-package bread mixes. Follow
instructions for use on each package.
To protect young children, keep your
Kenmore Breadmaker
out of their
reach when the machine is not being
closely supervised--especially
during
the Kneading and Baking cycles,
Bake a loaf of bread from scratch.See
Recipe and Menu Planner included with
your Breadmaker for many tasty options.
Use the Breadmaker
Make dough for roils or loaves you'll
bake in your regular oven. Use the
Dough cycle to do the mixing and
kneading for you. Then, shape and
bake the bread yourself,
on a flat, hard,
stable surface. DO NOT place it near a
flame or heat, or on a soft surface (such
as a towel, tablecloth,
or carpeting),
To avoid burns, stay clear of and do
not cover the Steam Vent during
Kneading and Baking cycles, Also,
DO NOT touch Viewing Window as it
gets very hot,
Activate PAUSE and remove dough
for shaping, filling, braiding, and more.
Activate PAUSE and score the top of
your loaf for a rustic-style bread or
make a decorative crust with roiled
Unplug Breadmaker when not in use
or before cleaning. After baking, wait
for the machine to cool completely
before touching or cleaning Bread Pan
or Oven Case without oven mitts.
oats, poppy seeds, etc.
Make non-yeast Batter Breads TM,
cakes, jam, and pizza dough
Never use metal utensils
Maintain currently activated program
during power failures A power failure
back-up stores the active program for
up to 30 minutes, If power is reconnected within 30 minutes, the machine
returns to baking your bread at the
point where it left off
or scouring
pads with this Breadmaker. These can
scratch the Bread Pan's non-stick
surface,
Never use the Bread Pan on a gas or
electric cooktop or on an open flame.
Always remove the Kneading Paddle
from the bread prior to slicing,
IMPORTANT: If a power failure lasts
longer than 30 minutes, and you are
using any dairy products,perishables,
or meats in your bread, discard the
contents of the recipe and start again
with fresh ingredients, This is for health,
sanitary and other considerations
NOTE: Power failure back-up does not
apply to power surges. If your home
experiences frequent power surges,
we recommend always using a surge
protection device.
R
BREAD PAN INSTRUCTIONS
To insert Bread Pan into Breadmaker,
OPERATING TIPS
•
seat it into Oven Case and press down
until it snaps into place, Remember to
insert Kneading Paddle first, then add all
during or just after Baking
bread, use a non-metal utensil to gently
remove it.
CAUTION:
The Kneading Paddle may
be very hot. Never remove it from hot
bread with bare hands,
Take care not to scratch the Kneading
Paddle,
!, 2, 3! 1, 2, 3!
We'll say this again, because it's so
important, Always put your ingredients
into the Bread Pan in this order:
!,
Wet -- water, milk, oi!s, fats
2. Dry -- salt, powdered
sugar, flour
milk, grains,
3. Yeast -- Do not use yeast past
expirat!on date.
cycle.
It is normal for the Viewing Window to
experience condensation
during the
latter part of the rising cycle, prior to
the activation of baking. As the bread
bakes, the moisture wil! evaporate.
ingredients BEFORE inserting Bread
Pan into Oven case.
To remove Bread Pan from Oven Case,
use an oven mitt to hold Handle and lift
gently. When you remove Bread Pan after
baking, BE SURE TO WEAR OVEN
MITTS to prevent burning. After you
remove the loaf by turning the Bread Pan
upside down and gently shaking it, check
to see that the Kneading Paddle is
removed from the loaf, tf it is stuck in the
Use oven mitts when working with hot
bread or any part of the Breadmaker
•
Don't open Lid excessively during
baking, This causes bread to bake
improperly.
O
Do not unplug Breadmaker
during
Kneading or Baking cycles. This will
stop the operation.
•
Whole Wheat cycles have a rest period for up to 30 minutes before kneading begins, No movement occurs in
the Bread Pan, This is normal.
After baking, a controlled Keep Warm
phase will begin for each selection
(except Dough and Jam), This will help
to reduce condensation
between loaf
and Bread Pan, However, it is best to
remove bread as soon as possible
after completing
Baking cycle,
If a dough cycle was chosen, remove
ball of dough as soon as the breadmaker has completed the dough cycle,
Turn dough out of the pan onto a
clear_, floured surface. Shape, bake, or
store the dough as you planned.
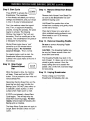
Step 1. Remove Bread Pan
Open Lid and remove
Step 5. insert Bread Pan into Oven
Case i
Bread Pan,
Using the Bread Pan Handle, lift Bread
Pan straight out of the machine.
Step 2. Position
Kneading
Paddle
Place Bread Pan into Oven Case.
(See "INSERTING AND REMOVING
BREAD PAN.") Close lid and plug
Breadmaker into a 120V wall outlet.
Once plugged in, the Breadmaker display window automatically
opens to
Basic White Bread, 2 lb., Medium
Crust.
.. ..........
"
Position Kneading Paddle on Drive
Shaft. Match the flat side of the Drive
Shaft to the flat part of the hole in the
Kneading Paddle, Be sure the paddie
is in place, although the fit may seem
slightly loose.
Step 6' Select Bread Cycle GELECT"
.......... _
Press the SELECT button to
Step 3. Place ingredients into Bread
Pan
Place ingredients
choose the bread cycle you would like.
Beginning with Basic (white), the selec.
tot will move through the types of bread
settings in the following order:
into Bread Pan. For
best results, add all liquid ingredients
first; then, beginning with salt, add all
dry ingredients EXCEPT yeast.
Basic (white)
Whole Wheat
Fruit and Nut (sweet)
French*
Cake/Batter Bread
Jam
Step 4. Add yeast
Yeast can be the "make
or break"
ingredient in your recipe. Follow these
simple steps and you shouldn't have
any yeast problems in baking.
Pizza Dough
Bread Dough
Bake Only
Yeast is always the last ingredient to go
in the Bread Pan, Make a shallow well
*The French cycle is for breads with
crisper crusts, especially those that
are lowest in sweeteners,
such as
French and italian breads,
in the direct center of the dry mixture
sitting in the pan; no deeper than the
first joint of your index finger,
,,.,,,s.,.c,,
o.,s,z. 1
Double check that the yeast is not
past the date code on its envelope or
label. Add the called-for measure of
yeast directly into the shallow
made ifi the Bread Pan,
Press the LOAF button to
•
choose the size loaf you want to bake,
You may either choose a 2 Ib. or 1,5 lb.
bread. This cycle can be prompted for
48 settings.
welt you
Always be sure to keep yeast from
water/liquids
and salt. Premature mix-
NOTE:
ing with either of these two ingredients
will have a dramatic effect on the
ed for: Batter Bread, Cake, Jam,
Dough, Pizza Dough, or Bake Only.
yeast, Keep yeast away from liquids
(or it will start to activate immediately)
and salt (or it may not activate at all).
For more details, see "Troubleshooting" at the end of this manual,
Step 8.
LOAF control cannot be activat-
Select Crust Color
_
rrlr_"_
Press the CRUST button to
choose light, medium, or
dark crust, You may choose crust types
on Basic White, Whole Wheal Fruit and
Nut, and French breads only.
Always follow proper ingredient order-especially on delay bake preparations.
7
Step 9. Start Cycle
_,_.,.. ,__'_
Step !!.
Press START to act rate the
Breadmaker, The breadmak-
Remove loaf of bread from Bread Pan
as soon as the Breadmaker has com-
er has already calculated your various
settings and selections, and your recipe
is now on its way to being prepared,
First, the machine mixes the ingredients, Then, it begins the Kneading
process, During this process, the yeast
begins to activate, The Viewing
Window may begin to "fog" with condensation, This is a normal part of the
process, The condensation wi!! gradual.
ly disappear durtng baking.
Whole Wheat cycles have a "rest"
period for up to 30 minutes before
kneading begins, No movement
occurs in the pan, This is normal.
For special cycles, such as Jam, the
Breadmaker follows the processes
outlined in the cycle charts at the end of
this manual.
Step !0. Stop Cycle/
Remove Bread
Pan
When the bread is done, the machine
will beep, Press and hold the STOP
button, Put on protective oven mitts and
remove Bread Pan,
Remember
that the Bread Pan and the
bread loaf are both very hot after the
Baking Cycle! DO NOT place either on
a tablecloth, plastic surface, or other
surface which might scorch or melt,
If STOP is not pressed, a Keep Warm
Cycle begins. This wil! help keep the
bread from becoming soggy, For best
results, remove bread immediately after
Baking cycle is complete.
The Keep Warm Cycle does not apply to
Dough, Batter Breads/Cakes
and Jam
cycles.
1
Remove Bread from Bread
Pan
pleted the baking cycle.
Hold Bread Pan upside down a few
inches from countertop and gently shake
out the loaf of bread.
Place loaf of bread on a wire rack or
other ventilated cooling surface to coot.
Allow bread to cool !5.30 minutes
before slicing.
Step
12,
Remove
Kneading
Be sure to remove Kneading
before slicing,
Paddle
Paddle
CAUTION:
The Kneading Paddle may
be very hot, Never remove it from hot
bread with bare hands.
The Kneading Paddle may stick in the
loaf of bread, If it does, use a non-metal
utensil to gently remove it from the
bread, taking care not to scratch the
paddle. Use a knife with a serrated edge
for best slicing.
Step 13. Unplug Breadmaker
Always unplug your Automatic
Breadmaker immediately after use.
SUPER
The Super Rapid program, with hotter rise
and bake temperatures, is convenient for
baking a hot fresh loaf of bread in under
RAPID PROGRAM
HINTS
•
Water temperatures
! 15°F/43°-46"C/
•
Larger amounts of Quick-Rise TM,
RapidRise TM, Bread Machine or
Instant Active Dry yeast must be used.
They may be substituted in equal
amounts.
Add ingredients to the bread pan in the
order listed. Refer to "For Best Baking
Results" for measuring information.
Place
the bread pan in the bread maker.
•
The dough ball for the Super Rapid
program should be a very soft, sticky
to the touch, loose ball with a smooth
texture. Do not add extra flour,
Step 2
Close the lid.
°
Check the dough at the beep, and if
necessary, use a rubber spatula to
push any flour or dough from the sides
of the bread pan down into the dough
ball,
°
As a result of the increased temperatures during the rise and bake
process, the loaf of bread produced
from this program may have a dark
crisp crust with a split on the top side
of the loaf.
an hour. The longer bread programs, with
lower rise and bake temperatures,
will
bake a taller more developed loaf of bread.
Step 1
Select the Super
Rapid program,
START.
and press
r
IsTART
..................
_
Step 3
When finished baking, remove bread pan
from the bread maker, invert and shake to
remove the loaf, Allow loaf to cool stand*
ing upright on a wire rack before slicing.
must be 110 °.
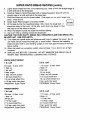
SUPER RAPID BREAD RECIPES
We suggest starting your Super Rapid bread baking with this White Bread Recipe, Refer
to "For Best Baking Results" for measuring information.
Follow each step carefully,
noticing the water temperatures
must be between 110°-115'F/43°-46°C
and that QuickRise TM, RapidRise TM, Bread Machine or instant Active Dry yeast must be used.
WHITE BREAD
1,5 lb. Loaf
2.0 lb. Loaf
1 i/4 cups water
2 1/2 tbsp. oil
1 1/2 tsp, salt
2 tbsp, sugar
1 1/2 tbsp. dry milk powder
3 cups bread flour
5 I/2 tsp, quick-rise yeast
PROGRAM:
Super Rapid
! 1/2 cups + 3 tbsp, water
!/4 cup Oil
2 tsp. salt
3 tbsp, sugar
2 tbsp. dry milk powder
4 cups bread flour
6 3/4 tsp. quick-rise yeast
PROGRAM:
Super Rapid
Method:
1.
2,
3.
4,
Remove the bread pan from the bread maker, Attach the kneading blade onto the
shaft. Have all ingredients
ready, Make sure all ingredients, except water, are at
room temperature.
Use a liquid measuring cup to measure the water (110'-1t5°F/43°-46°C)
and pour
into the bread pan.
Use a measuring spoon to measure the oil and add to the bread pan,
Use a measuring spoon to measure the sugar,, salt and dry milk; level off with the
straight edge of a knife and add to the bread pan.
9
SUPER RAPID BREAD RECIPES (contd.)
5,
7.
Lightly spoon bread flour into a dry measuring cup; level off with the straight edge of
a knife and add to the bread pan,
Carefully measure Quick-Rise yeast with a measuring spoon; level off with the
straight edge of a knife and add to the bread pan,
Place the bread pan into the bread maker. Push down on rim until it snaps into
8,
9,
0 co
co,
o,oo
6.
Select Super Rapid program and press START.
At the beep during the kneading process (:53), check the dough ball, It
--should be sticky to the touch, At this time, push down any dough or flour
that may be on the sides of the pan,
10, When the beeper sounds the bread has finished baking.
!!. Use oven mitts to carefully remove the bread pan.
CAUTION: THE OVEN CAVITY, BREAD PAN, KNEADING BLADE AND BREAD W!LL
BE VERY HOT.
USE OVEN
MITTS.
12, Turn bread pan upside down and shake several times to release the bread. Do not
use metal utensils inside !he bread pan or bread maker, Remove the kneading
blade and allow loaf to cool standing upright on wire rack approximately
20 minutes
before cutting.
13. When the bread has completely cooled, approximately
1 hour, store in an air tight
container,
14, UNPLUG UN!T BEFORE CLEANING,
DO NOT IMMERSE THE BREAD PAN IN
WATER, SEE "MAINTENANCE,
CLEANING AND STORAGE,"
WHITE WHEAT
BREAD
1 lb. Loaf
2.0 Ib, Loaf
3/4 cups + 3 tbsp, water
1 tbsp. oi!
1 tsp, salt
3 tbsp. sugar
1 tbsp. dry milk powder
1 3/4 cups bread flour
1/2 cup whole wheat flour
4 !/2 tsp, quick-rise yeast
PROGRAM:
Super Rapid
1 1/2 cups + 3 tbsp. water
3 tbsp, oi!
2 tsp, salt
!/4 cup sugar
2 tbsp. dry milk powder
3 1/2 cups bread flour
1/2 cup whole wheat flour
6 tsp, quick-rise yeast
PROGRAM:
Super Rapid
FRENCH
BREAD
1 !b. Loaf
2.0 lb. Loaf
3/4 Cups + 3 tbsp. water
1 tbsp. oil
3/4 tsp, salt
2 !/2 tsp. sugar
2 !/4 cups bread flour
3 !/2 tsp. quick, rise yeast
PROGRAM:
Super Rapid
1 1/2 cups + 2 tbsp, water
3 tbsp, oil
! 1/2 tsp, salt
1 !/2 tbsp, sugar
4,1/3 cups bread flour
6 tsp. quick-rise yeast
PROGRAM:
Super Rapid
SUPER RAPID BREAD RECIPES (contd.)
ITALIAN
BREAD
1 Ib, Loaf
2,0 lb. Loaf
1
4
1
2
1 1/2 cups + 1 tbsp. water
2 tbsp, oil
2 tsp, salt
1/4 cup sugar
2 tbsp. dry milk powder
1 tbsp, dried Italian seasoning
4 cups bread flour
6 3/4 tsp, quick-rise yeast
PROGRAM:
Super Rapid
cUp + 1 tbsp. water
tsp. oi!
tsp, salt
tbsp. sugar
1 tbsp. dry milk powder
1 1/2 tsp. dried Italian seasoning
2 1/4 cups bread flour
4 1/2 tsp, quick-rise yeast
PROGRAM:
Super Rapid
HONEY
GRANOLA
BREAD
2.0 lb. Loaf
1 1/2 cups + 1 tbsp. water
6 tbsp, oil
2 1/2 tbsp, honey
2 tsp, salt
3 tbsp, dry milk powder
4 1/4 cups bread flour
1 cup granola cereal
6 3/4 tsp, quick-rise yeast
PROGRAM:
Super Rapid
CINNAMON
RAISIN
BREAD
1 lb. Loaf
2.0 ib, Loaf
1 cup + 1 tbsp, water
1 tbsp, oil
2 1/2 tbsp. brown sugar
1 tsp. salt
,
1 tbsp. dry milk powder
2 1/4 cups bread flour
3/4 tsp. cinnamon
1/3 cup walnuts
1/3 cup raisins
4 1/2 tsp. quick-rise yeast
PROGRAM:
Super Rapid
1 t/4 cups + 1 tbsp. water
7 tsp. oil
3 1/2 tbsp. brown sugar
1 !/2 tsp, salt
1 1/2 tbsp, dry milk powder
3 !/2 cups bread flour
1 tsp, cinnamon
1/2 cup walnuts
1/2 cup raisins
6 3/4 tsp. quick-rise yeast
PROGRAM:
Super Rapid
11
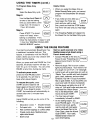
USING
THE TIMER
DELAYED
BAKING
You can program the Breadmaker to delay
preparing and baking the loaf for up to ! 3
hours from the time you press the START
button,
To Program Delayed Baking
Step 1.
Add ingredients, as usual, taking care
not to let the yeast and liquid ingredients mix,
Set the timer for the number of hours there
wilt be between
the time you set it and the
Step 2.
time you want the bread to finish baking.
For example:
It's 8:15 a.m, and you want the bread to
be finished at 7:00 p.m, the same day.
The time difference from 8:!5 a,m. to
Close Breadmaker
plug it into a 120V electrical
outlet,
Step 3,
7:00 p,m, is !0 hours, 45 minutes.
Set the timer for 10 hours, 45
minutes,
It's 9:00 p,m. and you want breakfast
bread ready at 6;30 a.m. the next
morning. The number of hours + minutes from 9:00 p.m. to 6:30 a.m. is 9
hours, 30 minutes,
Set the timer for 9 hours,
30 minutes,
CAUTION:
DO NOT use delayed baking
for recipes containing perishable ingredients
such as Dairy Products (eggs, milk, cheese,
yogurt), Meats (cooked or uncooked), Flsh,
or Poultry, These ingredients may begin to
spoil before baking begins and create a
health hazard if eaten,
1, 2, 3! !, 2, 31
Remember to always put your ingredients into the Bread Pan in the following
order;
I.
Wet -- water, m!lk, oi!s, fats
2. Dry - salt, powdered milk, grains,
sugar, flour
3. Yeast -- Do not use yeast past
expiration date.
Keep yeast away from liquids (or it will
start to activate immediately) and salt (or
it may not activate at all).
lid and
Select the desired cycle, loaf
size, and crust co]or,
Step
4.
Press the h Timer button
once for each 10 minutes
you wish to delay the finish
time, Press the V button to subtract
time if you enter too much. The time
amount shows in the Display Window,
Press and hold either A
or V to fast
forward or fast reverse time,
NOTE: Actual
change,
baking times wilt not
Step 5.
Press START to begin Timer,
................
countdown, The colon (:) in the time
shown in the Display Window wilt begin
to flash, This lets you know that the
Timer has started, When the Display
Window shows 0:00, baking is complete.
NOTE: Always set timer for the shortest
time possible. Because ingredients are
partia!ly combined in the Bread Pan, the
dough may tend to deteriorate if left
unbaked for too many hours, especially
on a warm or humid day.
BAKE ONLY
You can set the Timer to bake breads from
store-bought
frozen dough or dough you
have made and saved, You can also warm
up a previously
made loaf.
USING
THE TIMER
(contd.)
To Program Bake Only
Helpful
Step 1.
Select the Bake Only cycle.
GEL"
When you select the Bake Only or
Batter Breads/Cake
cycle, you cannot
program the Breadmaker for delayed
baking.
Step 2.
Use the Up Aand Down V
arrows to set the baking
time you want within a time
range from t5 minutes to
1 hour, 50 minutes.
Step
Hints:
TIMER
if you make an error after you
have begun the Timer program and you wish to start
over, press and hold the STOP button.
The Timer will ctear and you may begin
again.
SET
@
3.
Press START, The breadI STARTI
\7-mj
maker will "beep" when
baking is completed.
Then,
follow the instructions in steps 10 and
11 from the "MAKING DOUGH AND
BAKING BREAD" section.
,,The Kneading Paddle isn't placed into
the Bread Pan for the Bake Only cycle,
USING THE PAUSE FEATURE
Your Kenmore
Automatic
Breadmaker
has
a traditional, horizontal loaf pan. This
feature, in combination
with the PAUSE
button, allows you to be very creative with
bread machine baking.
When you press and hold PAUSE for 2 full
seconds, the bread machine will stay "on
hold" for up to 10 minutes. You can press
PAUSE at any time, during any cycle.
To activate pause mode,
press and hold PAUSE button
for 2 seconds. You will hear a
beep when pause begins.
To resume
the cycle,
press
Here's a quick example of a rolled,
Mediterranean-style
bread using a
French bread recipe:
(see "Kneading
andof _PAUSE _
" Knead
Activate 3 PAUSE
at the end
Baking Cycle Charts" for time
............
details.)
,
Remove dough, Roll it out on a clean,
lightly floured surface. You'll want to roll
the dough into an 8-!/2" x 13" rectangle.
• Lightly brush with a good olive oil, such as
Tassos. Then, sprinkle with fresh chopped
garlic, basil, rosemary, and sun-dried
tomatoes. Top with 1/3 cup of crumbled
feta or goat cheese. If you would like, you
could even add 2-3 slices of prosciutto,
,
begin again,
START
and the
at the
machine
point where
will
_sT A ........
RTI
it left off. If you forget to press
START, the machine will automatically
reactivate after the 10 minutes have
elapsed.
Using PAUSE will let you do some of the
following:
•
Decorative
•
Pul!-apart
•
Add crumble toppings
•
Create rustic-style,
style roiled bread,
Score crust
•
crusts
rolls
•
Braided
breads
-
Monkey
breads
to coffee cakes
Roll the dough up tightly into an 8-1/Z'
wide roll. Tuck ends under and place into
the Bread Pan, Return Bread
f ............ _
Pan to the Breadmaker, close ( ,_'TA_'T I
the tld and touch START.
• The final rise will begin,
immediately followed by BAKE.
....
• As the baking begins, you
could PAUSE again. You can _,-,^, ,o,,1
score the top crust, gently
mist the loaf with cold water,
return the Bread Pan to the
(_ _......
Mediterranean-
Oven Case, close the lid and
touch START, Your rustic,
Mediterranean
bread will
13
soon finish baking,
_START
_ii iiiiiiii
ADD-IN BEEPER
Your Kenmore Breadmaker comes with a
terrific feature called the "Add-In Beeper."
The "Addqn Beeper" should be used when
you want to add nuts, fruits, herbs,
chopped veggies, oats, etc. to the dough,
The beeper will sound several minutes
pr!or to the end of Knead 2, approximately
23 minutes from the activation of the initial
•
•
•
°
kneading.
sugar, fruit, and pectin are necessary
for a good set.
Use only ripe fruit (not overripe or
underrtpe) for best flavor,
DO NOT puree fruit. Crush with a
potato masher or food processor, Jam
should have bits of fruit in it.
Recipes should not exceed 3 t/2 cups.
Be sure to measure fruit before it is
crushed, not after.
,
Why is this beeper necessary?
You'll find
that, if you add raisins, rolled oats, seeds,
or herbs into the pan with the initial
ingredients, several factors may effect your
final loaf.
First, dehydrated foods wil! rehydrate
quickly and break down into small flecks,
So, if you want plump raisins in your raisin
bread, add them after the beeper signal.
Secondly, certain add-ins such as sundried tomatoes will color the bread to a red
Remove stems, seeds, or pits from
fruit before crushing.
,
NOTE: You cannot use the Timer for
delayed
With Kneading Paddle in position,
crushed fruit to Bread Pan.
2,
Add remaining ingredients.
Step 3.
insert Bread Pan into Oven Case.
Close lid,
you to.
Step 5.
4.
choose
Jam cycle,
Press SELECT
button to
COOL-DOWN
breadmaker
has a very
important feature; true convection cool
down, Towards the end of the baking
cycle, a convection fan will activate.
Not only does the fan circulate air within
the bread case, helping prevent condensation forming between the crust and baking
pan, it also makes for a better crust and
even browning,
add
Step
Step
Your Kenmore
in the Jam Cycle.
Step1,
or dark pink, as well as break down. Again,
if you'd like chunks of sun-drieds in the
bread, add them when the beeper reminds
CONVECTION
operation
_SELEcT_
Press START, The machine
wi!lpre-heatfor
,Sminutes
_START,
I
before any movement
.......................
occurs. After pre-heating,
..................
the jam wil! heat and mix for approximately 50 minutes, then coot for an
additional 10 minutes. The machine
wil! beep when the cycle is complete.
Step 6.
Press STOP,
Use
oven
fQT/'_D
The Jam cycle makes your favorite jams.
mitts to remove Bread Pan. L_'_'_J
Step 7,
Pour hot jam into a heat-proof container, Leave i/2 inch of space at top
of container,
JAM CYCLE
Step
This function keeps the bread from becom _
ing soggy if not removed immediately.
See "RECIPES"
at the end of this manual.
For best results:
•
DO NOT reduce sugar or use sugar
substitutes.
The exact amounts of
8.
Cover tightly to store. Jam will thicken
upon cooling and storage.
)
Measure ingredients accurately, using
a good set of measuring cups and
spoons or a scale. Make sure to level
all dry ingredients when measuring.
Inaccurate measurements could cause..
unexpected results,
1, 2, 3!
Remember, always put your ingredients into the Bread Pan in this order:
1.
=
Be precise in measuring water.
.
Use fresh ingredients.
Since moisture is an enemy to flour,
be sure to store flour in an airtight
container.
1, 2, 3!
Wet--
water, milk, oils.fats
Dry -- salt, powdered milk,
grains, sugar, flour
Yeast -- do not use yeast past
expiration date.
When using Timer, we recommend setting it for as short a time as possible.
Because ingredients are partially combined in the Bread Pan, the dough may
tend to deteriorate if left too many hours,
especially on a warm or humid day,
To keep yeast active, store it_inan
airtight container in the refrigerator,
DO NOT use yeast if the date code
on the packet has expired.
Keep Lid closed during Baking cycle.
Opening it excessively causes uneven
baking.
We recommend using bread flour for
baking with this bread machine. There
are white, whole wheat and blended
bread flours. If you cannot find bread
flour, "all-purpose" flour is an acceptable substitute.
After cooling and slicing bread, store it
in a plastic bag or plastic wrap to prevent it from drying out.
if you are baking a whole grain, rye,
oat, or pumpernickel bread, and
cannot find bread flour or allpurpose flour, you will need to add
gluten to the recipe, Why?
Because heavy, hard flours such as
stone ground whole wheat and dark
rye need a "boost" of protein to
allow them to knead and rise.
Gluten is available at most large
grocery chains in the baking section,
The manufacturers directions for
measurements should be followed.
if you are using a heavy stone
ground whole wheat flour for a 2 lb.
recipe (4-4 t/2 cups), you will need
to add 1/3 cup of gluten to the dry
ingredients.
15
MAINTENANCE
This Automatic Breadmaker requires
maintenance.
It contains no user-
3_
little
serviceable parts inside the housing.
Contact qualified personnel if the product
requires servicing.
CLEANING
CAUTION:
Breadmaker
To avoid electric shock,
before cleaning!
unplug
The Bread Pan and Kneading Paddle have
non-stick surfaces for easy clean-up,
1. After baking each loaf of bread, unplug
Breadmaker and discard any crumbs,
2. Remove Bread Pan from Oven Case.
Remove Kneading Paddle from Bread
Pan, Wash the Bread pan and Kneading paddle, inside and out, with warm,
soapy water and a plain sponge or cloth.
Avoid scratching the non-stick surfaces.
DO NOT PUT BREAD PAN OR
KNEADING PADDLE IN A DISHWASHER OR SOAK IT IN WATER FOR
LONG PERIODS OF T!ME.
Wipe inside of Lid and oven Case with
a damp cloth or sponge. !f residue has
scorched on heating plate, scrub with a
non-abrasive
scrubbing pad and wipe
clean. Do not immerse appliance in
water or any other liquids. The Lid
can be removed for cleaning.
DO NOT
PUT LID IN DISHWASHER,
This wil!
cause the lid to warp,
DO NOT use vinegar, bleach, or harsh
chemicals to clean the Breadmaker.
DO NOT soak Bread Pan for a long
period of time--this
could interfere with
the Drive Shaft operation,
Be sure machine is completely cooled
before storing,
The inner casing contains the heating
element and drive base, When cleaning, NEVER pour water, solvents, or
cleaning solutions into this area.
NOTE: For best results, always use Bread Flour or All Purpose Flour for these bread
recipes,
Do not use self-rising
or cake flour.
BASIC WHITE BREAD
1.5 lb. Loaf
2.0 lb, Loaf
!
2
i
2
1
3
1
1
2
2
3
2
4
2
cup + 2 tbsp, water
tbsp. Canola oil
!/2 tsp. salt
tbsp. sugar
1/2 tbsp, dry milk powder
1/4 cups white bread flour
3/4 tsp, active dry yeast
WHOLE
WHEAT
1/4 cups + 2 tbsp. water
tbsp. Canola oil
tsp, salt
tbsp. sugar
tbsp, dr,), milk powder
1/2 cups white bread flour
tsp. active dry yeast
BREAD
1.5 lb, Loaf
2.0 lb, Loaf
i cup + 2 tbsp. water
2 tbsp, oil
1 1/2 tsp, salt
3 tbsp, brown sugar
2 tbsp, dry milk powder
3 1/4 cups whole wheat bread flour*
3 i/2 tsp, active dry yeast
1
3
2
4
3
4
4
1/4 cups water
tbsp, oil
tsp, salt
tbsp, brown sugar
tbsp, dry milk powder
i/3 cups whole wheat bread flour*
1/2 tsp. active dry yeast
* For best results when not using bread flour, we recommend
adding Gluten to the
recipe. Add 1/3 cup of Gluten to a 2 lb, recipe, If whole wheat flour is stone ground,
may need to add up to 1/2 cup of Gluten.
EASY FRENCH
BREAD
1.5 Ib, Loaf
2,0 lb. Loaf
i
1
1
1
3
1
1
2
i
2
4
1
cup + 2 tbsp, water
tbsp. olive oil
tsp. salt
1/4 tsp, sugar
1/4 cups white bread flour
1/4 tsp. yeast
!13 cups water
tbsp, Olive oil
1/2 tsp, salt
tsp. sugar
cups white bread flour
1/2 tsp. yeast
i
More recipes are included
in the Recipe
Planner,
17
you
PEANUT CAKE
! !/2 cups all purpose
1 tsp. baking powder
3/4 tsp, baking soda
1/4 tsp, salt
1/2 cup white sugar
2 eggs, large
flour
1/2 cup low-fat yogurt
1/2 cup crunchy peanut
!/4 cup apple sauce
1/4 cup water
1 tsp. vanilla extract
butter, softened
Combine first four ingredients and mix wel!, Set aside, Place eggs, yogurt, peanut butter,
apple sauce, water, vanilla extract and sugar in the baking pan in that order. Close the lid
and start the cake cycle, When continuous mixing begins, add the flour mixtu're in a slow,
steady stream. Close the lid. Allow the cake to coo! uncovered in the refrigerator for
25-30 minutes before attempting to remove it from the pan.
PINEAPPLE-COCONUT
CLAFOUTI
1 1/2 cups all purpose flour
1 tsp. baking powder
1/2 tsp, baking soda
1/2 tsp, salt
3/4 cups white sugar
2 eggs, large
CAKE
1/2 cup milk, whole
1/2 cup canned pineapple chunks, drained
!/4 cup pineapple juice (from can)
t/2 cup sweetened shredded coconut
1 tsp. vanilla extract
Combine first four ingredients and mix well. Set aside, Place pineapple, pineapple juice,
eggs, milk, coconut, sugar, and vanilla in the baking pan and place it in the machine.
Close the lid and start the cake cycle. When continuous mixing begins, add the flour
mixture in a slow, steady stream, Close the lid. Allow the cake to cool uncovered
refrigerator for 25-30 minutes before attempting to remove it from the pan.
DEVIL'S
FOOD
POUND
! 1/2 cups all purpose
1 cup cocoa powder
1/4 tsp. nutmeg
1 tsp, baking powder
3/4 tsp. baking soda
1/2 tsp, salt
CAKE
flour
In a small bow!, combine
in the
1 cup white sugar
!/2 cup low-fat yogurt, plain
1/2 cup farmer's cheese, softened
1/2 cup semi-sweet chocolate chips
! egg, large
1 oz, (shot glass) whiskey
the first six ingredients
and mix well, Set aside.
or rum
Place the egg,
yogurt, cheese, whiskey, chocolate chips and sugar in the baking pan in that order, Place
the pan in the machine and close the lid. Start the cake cycle, When continuous mixing
begins, add the flour mixture in a slow, steady stream, Close lid. Allow the cake to cool
uncovered in the refrigerator 25-30 minutes before attempting to remove it from the
baking pan, Use a spatula to help loosen the cake if necessary.
CINNAMON-RAISIN
2 cups al! purpose
COFFEE
CAKE
flour
! cup white sugar
t 1/4 cup milk, whole
1/2 cup butter or shortening,
2 eggs, large
2 tbsp. dark raisins
! tbsp. baking powder
1 tsp. vanilla ext_ract
melted
1/4 tsp, salt
Place milk, butter, eggs and vanilla extract in the baking pan. Add remaining
and start the cake cycle. Dust with powdered sugar after cake has cooled.
LEMON-RAISIN
"CHEEZY"
1 1/2 cups al! purpose
ingredients
CAKE
flour
i/3 cup water, hot
! cup farmer's cheese (crumbled, small)
1/4 low-fat cream cheese (cut in small pieces)
i/2 cup white sugar
2 eggs, large
2 tbsp, golden raisins, soaked
1 tbsp, baking powder
i tsp, lemon extract
Have all ingredients at room temperature
(1 1/2 - 2 hours), tt is very important that the
cheeses are soft and in small pieces or they wil! not mix properly. Place cheese, egg,
raisins, hot water, and lemon extract in baking pan. Add the remaining ingredients and
start the cycle. Makes about a 2 Ib. cake.
CRANBERRY-WALNUT
CAKE
1 1/2 cups all purpose flour
!/3 cup chopped walnuts
I/2 tsp. cinnamon
3/4 tsp baking powder
3/4 tsp. baking soda
1/2 tsp, salt
1 cup fresh or frozen cranberries,
1 cup white sugar
2 eggs, large
1/4 cup canola oil
! tbsp. orange juice
1/2 tsp, orange extract
1 tsp, vanilla extract
whole
Crush the cranberries and mix with the sugar. Place in the baking pan and let stand for
10 minutes. Add the eggs, oil, orange juice and orange and vanilla extracts to the pan
and place it in the machine. Close the lid and start the cake cycle, Combine the first six
ingredients and mix well, When continuous mixing begins, add the flour mixture to the
pan in a slow, steady stream. Close the lid. Allow the cake to cool uncovered in the
refrigerator for 25-30 minutes before attempting to remove it from the baking pan.
=
tQ
STRAWBERRY-RHUBARB
JAM
3/4 cup (8 oz.) strawberries,
hulled
3/4 cup (8 oz.) rhubarb, roughly chopped
! 2/3 cups (13 oz,) white sugar
Place all ingredients in baking pan and start the jam cycle. The strawberries should be
very ripe and sweet and the rhubarb firm and crisp. Try adding 1 tbsp. of this jam to a
small container of plain, low-fat yogurt,
RASPBERRYJAM
1 1/2 Cups (12 oz,) red or black raspberries
1 1/2 cups (!2 oz.) white sugar
2 tbsp. honey
Place al! ingredients in baking pan and start the jam cycle. This jam will be very liquid
when cycle is completed.
It can be strained to eliminate the seeds, if desired, The jam
wil! thicken when completely cooled.
BLUE K!W! MANGO
JAM
3/4 cup (6 oz.) kiwi fruit, peeled and chopped
3/4 cup (6 oz.) mango, peeled and chopped
! 1/2 cups (!2 oz,) white sugar
! tsp. lemon zest, grated
! tsp. orange zest, grated
4 drops blue food coloring
Place all ingredients in baking pan and start the jam cycle. The kiwi fruit should be ripe
but not mushy while the mango should be barely ripe. Lemon and orange zest are grated
from the surface of the pee!, Make sure some of the bitter white rind is included.
PEACH-RA!SIN
JAM
1 t/2 cups (!2 oz,) ripe peaches,
1 1/2 cups + 1 tsp, white sugar
2 tbsp. golden raisins, soaked
pitted
! tbsp. brown sugar
2 whole cloves
1/8 tsp, ground
allspice
Place all ingredients in baking pan and start the jam cycle, For best results, fruit and
sugar should be weighed on a small kitchen or postal scale. 1 !/2 cups of fruit or white
sugar weighs 12 oz,
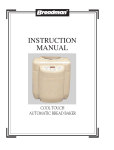
Basic Bread
s_+ect+on
Course
CRUST Contr0i
Light
Bemic Rapid Bread
}
Medium
Dark
Lighl
Medium
Dark
-,
LOAF Con{toi
1.5 Ibs.
20 Ibs.
1.5 tbs.
.................
20 Ibs.
1.5 Ibm,.
2:0 lbs
1.5 Ibs.
20 Ibs,
t,5 ibs.
Knead ?
-
.....
....
-,
........
,
r,,.
O0
O0
O0
O0
03
3 rain+
5 rain,
3 rain.
5 raii!
3 min.
....................
Knead2
.......
22 rain
--
03
r
20 _in
22 men
20 rain.
.............
5 rnin
•
22. min
I.
. ......
"
'
"'
20 rain
"'
t
O0
(30
3 rain.
$ m_nr
" ............
e
20 rain.
r
.......
22 men.
• .............,
O0
03
.5rain.
3 rain.
t_
..........
,
2.0 Ibs,
+:
• ............
O0
:
22 rain.
w
.........
Inin,
Preheat
, ,,,.,,
3
..................
1.5 Ibs
;[: i.... r
DelayTFmer
Range 3:0_14300 3:10113:003:t5-13:0_ 3:20d3;00 3:2543:0013:30q3:00 1:47-13:00 1:5043:00
..........
2,0 lbs
.....
5 mini
,......
20 men,
•
*,
IX)
,
22 rain+
•
20 rain
, ........
Rise !
40 mi_q
40 rain.
40 rain
40 rain
40 rnm
40 In_n
13 mtn.
13 ram.
13 men
13 mJn.
t 3 rain.
13 rain.
Knead3
10_e,c
10 _e¢
10 _,ett
10 _eC
t 0 _ec
10 see
O0
O0
O0
oo
O0
03
Flis, 2
25 mm
25 mFn
25 rain
25 rain
25 men,
26 in+n,
OO
03
O0
O0
O0
03
Knea{l 4
! 5 set:
15 se¢.
15 sec.
f 5 se{;,
15 sec,
15 se_i.
t 0 sec.
10 sec.
10 sec,
10 sec.
10 see,,
t 0 sec,
R_se3
50 rain.
50 rain.
50 rain,
50 min_
50 rair_,
50 mm
32 rain_
32 rain+
32 rain
.........
BaXing
31 rain,
40 rain
4b m_h, ' 50 rain+
.....
ConvectionCool
Down
10 rain
'
55 rain
,+
!0 rein,
10 min+
Totai
r,me
30?
3,to 3:,5
KeepWarm
! hr,
1 hr,
!0 rain,
60 rain,
......
....
lO rain,
10 rain
37' rain,
40 mi_
........... .
,
O0
I hr.
I hr
f hr
1 hr.
I
45 rain
32 men.
..............
32 rain
'
......
55 rain
1 hr
................
O0
O0
+To
_ hi:
'......... '"'
50 rain,
u
O0
3 30
32 rain.
'
DO
zoo
! hr
1 hrJ
O0
,:o5 2to
I hr,
t hi,
! hr.
Co,Jibe
Whole Wheat Bread*
se++_o.
Whole Wheat Rapid Bread*
....................
,,,
CRUST Controt
LOAFContto{
Light
1,5 Ibs
Dark
Medium
20 Ibs
15 Ibs,
Delaytimer Ran#e 338-!3:00 3:404300 343-13_
20 Ibs.
!.5 Ib_
...................
Light
2.0 Ib_
!5 Ibm,
20 Ibs.
!15 +bs
30 rain.
30 rain.
Knead I
3 rain.
5 rain.
....
30 rain.
3 rain.
t
......
15 Ibs.
20 Ibm.
30 re+n.
5 m+n
5 men:
5 rain
5 rain.
5 rain.
5 men+
5 rain,
3 men.
5 rain.
3 Inln.
5 rain
3 rain+
5 rain
3 rain,
5 rain.
15 rain,
f7 rain
15 rain
17 rain
15 rain
30 m(n.
30 m+n
30 rain
30 rain.
u
.........
i
..........
H
..............
17min
t5 mitL
17 rain.
15 rain.
17 min.
Rise t
45 min.
45 rain.
45 rain,
45 rain.
45 rain.
45 rain.
30 rain. 30 men+
•
10 sec.
20 Ibs,
30 rain.
15 rain.
10 sec
Dark
30 rain.
t7 m_n+
10 sec
...............
ili i++;+++o;i;oo +++o+
Knead 2
Knead3
.........
3:45,1300
I
Preheat'
=
Medium
t0 sec,
10 sec.
......
10 Sec,
i
.........
+
DO
Do
O0
03
O0
oo
,
Rise 2
25 rain.
25 rein+
25 rain.
25 rain.
25 min,
25 ram
O0
O0
O0
O0
03
03
Knead 4
10 Sec,
10 sec
10 sec+
to sec.
10 se¢,
| 0 sec,
I0 se_
110,_e¢
10 sec+
t 0 sec.
10 sac.
10 sac,
Rise 3
45 rain,
45rain.
45m=n.
45 rain+
45rain.
45rain.
40ram.
40rain.
40 rain
40 rain.
40 rair_.
40 rain.
Baking
43 rnin.
45 rain,
48 ram
50 rain.
57 rain,
60 rain
38 rain.
40 rain+
43 mir_
45 rain.
52 rain
55 rain.
ConvectionCool
Down
?0 rain.
10 rain,
!0 Inin,
t0 rain,
10 rairi,
iO rain.
O0
O0
O0
O0
O0
03
Tote!Tirae
3:38
3:40
3:43
3:45
3:52
3:55
2:I3
2:15
2:!8
2;20
2:27
2:30
KeepWarm
1 ht+
1 hr.
! hr.
1 hr.
1 hf,
1 hr.
1 hr.
t hr.
1
! hi,
1 hr,
•
hi,
1
hi+
Whole Wheat cycles have a rest period for up to 30 minutes before kneading begins.
No movement occurs In the Bread Pan, This is normal.
2i
Couf_
1 .................................................................
s. Jon
t.........................................................
French Bread
French Rapid Bread
,,,,,,,,
.....
CRUSTControl
Light
LOAF Control
15 tbs
Medium
20 the
t5 Ibs
DeiayTimerRange 3:27-t3:00 3301300
Preheat
IX)
KneadI
3 rain
...........
_
....
,
Knead2
m
t5 tbs
Light
20 lbs
335-13:00 3.40,!3:00 345!300
O0
O0
O0
O0
5 rain
3 min
5 rain
3 rain
5 rain
11
i
22 rain
i
....
' '
._
22 rnin
20 rain
.........
i
i
40 rain
40 rain
40 mm
40 rain
40 rain
40 rnm
Knead3
10_ec
10 sec
!0 sec
!0 sec
10sec
10 sec
Rise2
30 rain
30 min
30min
30 mm
30 rain
30 min
......
t0 seC
........
;:
....
Rise3
10 sec
;
............
60 rain,
10 se¢
;
60 rain
....
10 soc+
; ...........
60 mm
60 min
..........
Baking
t0 s_
;
€
60 rnin
_
.....
",
3 rain
_
20 rain
........
.....
25 rain
O0
,
!5
O0
:
........
5 min
3 min
'
20 rain
......
00
5 min
1'1
I
......
22 rain
t...........
20 rain
t ............
25 rain
25 rain
O0
O0
00
00
O0
i ..........
10sec
_
20 Ibs
25 rain
O0
i ...................
t0 see
_
O0
O0
O0
11 .....
00
i ..........
25 rain
bs
2:45-1300 2:50-13:00
.......
22 rain
O0
i
_
i ....
25 m n
...................
80 rain
20 Ibs
O0
5 min
.........
|0 S_Cr 10see
.......
w
r
t5 Ibs
00
22 rain
....
Rise 1
Knea_4
_'r
,.............
Dark
2:30-!3:00 2;35,t3:00 ;_40!300
3 min
rf
,,.,,
Medium
20 tbs
O0
r r
25 rain
15 Ibs
3:50-t300 227f300
O0
25 rnin
_ I ............
20 Ibs
..............
22 rain
.....
Dark
t0 sec
j<
00
,......... i
.........
.......
10 sec
, ......
10 Sec
........
55 rain
55 min
55 min
55 rnin
55 rain
55 rain
............................
42 rain
45 rain
50 rain
55 rain
60 rain
65 rain
42 rain
45 rain
50 rain
55 rain
t hr
65 rain,
t0 rain
10 rain
10 rain
10 rnin
10 rain>
10 rain
O0
O0
O0
00
O0
013
TotalTime
327
330
3:35
340
345
3 50
227
230
235
2:40
245
250
KeepWarm
t hr
t hr
I hr
1 hr
1 hr
1 hr
t hr
1 hr
1 hr
1 hr
1 hr
! hr
Convection
Cool
Down
CourSe
Fruit & Nut Bread
Selection
Fruit & Nut Rapid Bread
..... -, L.............
CRUSTControl
Light
LOAF Control
t5 lbs
DeiayTimerRsn_}e 3221300
Preheat
Medium
Dark
t 5 b_
20 !bs
t5 tb&
3254300
330-13100 33543,00 3:401300 3:4543:00 _221300 2251300
15 Ibs
",..........
,...........
,,
Medium
2{) Ibs
00
20 Ibs
,,';
Light
20 Ibs
15 lb&
Dark
20 Ibs
t5 lbs
20 tbs
2:3043:00 23513100 ;_'4043:00 2451300
oo
o0
O0
00
00
00
O0
00
00
00
O0
Kneao 1
3 mm
5 rain
3 rain
5 rain
3 rain
5 mm
3 min
5 rain
3 mift
6 rain
3 rain
5 min
Knead2
22 min
20 rain
22 rain
20 rain
22 rain
20 min
22 rain
20 rain
22 rain
20 rnjn
22 rain
20 rain
25 rain
25 mn
25 rain
25 rain
25 min
25 rain
_0 mm
20 mm
20 rain
20 rain
20 min
20 rain
!0 sec
!0 sec
lO sec
10sec
10sec. I0sec,
00
O0
OO
00
00
O0
25 mm
OO
O0
O0
O0
O0
00
Rise
1
Knead3
Rise 2
....
25 rain
*
J
....
25 rain
J
........
25 rain
_.
25 rain
4
...........
|
25 min
|
,
............................................
5 sec
5 sec
5 sec
5 sec
5 sec
5 sec
10_ec
_0 sec
10se_
_0 sec
tOsec
10sec
Rise3
85 mm
66 rain
65 rain
65 rain
65 rain
65 rain
45 rain
45 rain
45 m n
45 rmn
45 min
45 m n
5aking
52 mm
55 rain
t hr
65 rain
70 ram.
75 mm
52 mfn
_+
_
60
65
7Q mln,
75
Conv_!ion Cool
)own
10 rain
I0 rain
t0 rain
TotalTime
3;22
325
330
KeepWarm
t hr,
I hr,
I hr
Knead4
10 rain. 10 rain. 10jnin
00
335
3413
345
2:22
1 hr
I hr
1 hr
! hr
......................................
71111
OO
i
mii_
flllr.
O0
O0
OO
O0
225
2'30
2'35
2:40
2:45
t nr
t h
I hr
! nr
1 hr
1
*When
adding
beeper
activates
fruits
nut
herbs
23 minutes
etco to doughs
into the bread's
wait to hear the
cycle
PP
mln
add
in
beeper
The
!
Course
Selecl_on
CRUSTControl
NiA
NIA
NtA
NiA
NIA
LOAFCenlro$
NfA
NfA
NIA
NiA
NIA
getayTimet'Bange1150
!:15.13:000:50.13:001:25.13:00
Preheal
O0
!5 mln,
00
O0
00
Knead1
1rain,
00
5 rain.
5 rain
00
Knead2
3rain. ,
00
!Stain,
20mir_,
00
Rise!
2 rain.
O0
30 rain,
B0rain,
00
Knead3
2 rain.
O0
O0
OO
00
Rise2
I rain
O0
00
00
00
Knead4
2 min,
O0
00
00
00
O0
O0
O0
O0
O0
Baking
89 rain
50 min.
00
00
40 min
Convection
Cool
Down
10rain. I0rain,
O0
O0
Rise3
....
'
I0rain.
j.
..........
T0talTime
1:50
t115
0:50
'_25
0:15_2:00
KeepWarm
! hr
00
00
00
00
* You can "Bake Only" from 15 minutes to 1
hour, 50 minutes.
See page 9 and i0, "Using
the Timer_Bake
Only" for more details.
23
PROBLEM
POSSIBLE
CAUSE
POSSIBLE
SOLUTION
MACHINE,.
1, Does not begin cycle
after pushing START
Machine not plugged
in; SELECT not
pressed prior to
START; machine too
hot
,
cool (about 20 minutes),
2, Stops and displays
"ALERT"
2. Machine unplugged;
power outage
3. Will not let me set the
Timer
3. Timer cannot be set
for "Jam" cycle
3_
4. "_H" displays when
you press START
4. Machine
At
5. " L" displays when
you press START
5. Machine
6, "H:i", "H:HH", "L:LL",
"S'.SS", "888", or blank
boxes appear when
you press START
6. Error code message
too hot
Plug in machine; make selection by pressing SELECT
before START; remove Bread
Pan and allow machine to
,
Plug in machine; see
"Operating Instructions"
page 6.
Do not attempt
for Jam cycle.
Remove
5_
to use timer
Bread Pan and
allow machine
20 minutes).
is too cold
on
to cool (about
Unplug machine and allow it
to reach room temperature
6, Press STOP to clear display,
if display does not clear, unplug machine and contact
Customer Service Dept. at
1-800-233-9054