1
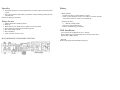
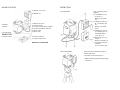
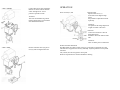
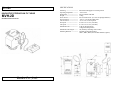
SPECIFICATIONS
Kenko
INNOVATIVE STRONG PAN-TILT HEAD
MVH-2D
INSTRACTION MANUAL
Kenko Co., Ltd.
Mounting: -----------------------Operating temperature: --------Dimensions: --------------------Weight: --------------------------Power Source -------------------Pan movement: -----------------Tilt movement: -----------------Pan speed: ----------------------Tilt speed: ----------------------Maximum Load: ----------------
Horizontal and upright or inverted position
-10ºCto 45ºC
90w X 144H X 106D mm
1.45kg
DC12V 270mA max. (8 X AA size penlight batteries)
-150º to +150º in horizontal plane
-30º to +30º in vertical plane
2.0º/sec. To 6.5º/sec. (Variable)
0.7º/sec. To 2.2º/sec. (Variable)
5.0kg in upright position
3.0kg in inverted position
Maximum Cable length: ------- 7m (200m by extending control cable)
Mounting Brackets: ------------- PT-M2D Ceiling Mount Plate,
WH-1, WH-2, WH-4, PT-W3 Wall Mounts (Option)
Specialty
1. PAN-TILT HEAD is set on the tripod and use for Video camera with wired remote
control.
2. Pan (vertical) and Tilt (horizontal) is possible to control and also possible pan and
Tilt same time.
Possible to adjust speed variable.
Notice for use
1.
2.
3.
4.
5.
6.
7.
Must be fastened to mounting surface.
Keep dry.
Body must be level. When not level function is not maximized.
Put in plastic bag when boxed in foam polystyrene.
Don’t drop and give shock.
Don’t dismantle.
After use Power switch (13) off.
MVH-2D REMOTE CONTROLER CONECTION
Battery
Battery lifetime
1. Normal AA battery good for 2hours to operate.
2. After use turn off power switch (13) or remove to remote controller.
Power drain will occur if unit is not switched off.
Attention for battery
1. + - Must be carefully install.
2. Do not mix old and new battery.
3. Do not mix different type of battery.
Wall Installation
Screw size for this equipment use for ¼ - 20UNC.
When install ting to be careful check area to include camera space.
Option WH-1, WH-2, WH-4,
Attention!
When using upside-down maximum load is 3kg.
NAME OF PARTS
INSTRCTION
(1) Battery cover screw
1.PUT BATTRY
Type: AA Battery 8pces
(Option).
• Loosen Battery cover
fix screw (1)
Battery box (2) take
out.
• Put Battery with care +
& - in to Battery box
(2)
Battery is each side
4pces.
• Put Battery box cover
(3) to Battery box (2)
and install Battery
cover screw (1).
• Battery box cover (3)
slide to
Battery box holder (4).
• Put Cable for Remote
controller
(5) on (6) Power jack
(2) Battery box
(8)Camera
Fix knob
(7) Fixed Stand
(3) Battery box cover
(13) Power switch
(9) Connecter for Remote controller
(10) Cable for Remote controller
(5) Power cable
(6) Power jack
MAIN UNIT
(12)Control lever
(14) Power indicator
(11) Speed control lever
REMOTE CONTROLER
2.PUT ON TRIPOD
This unit must be installed on tripod or
another stable base.
• Tripod screw fixes on Stand (7).
•
Before installing tripod must keep tripod
head level.
3.SET CAMERA
Camera direction is same as diagram.
Balance of camera and lens must be
center and tight screw. Screw
position is possible to slide.
Attention!
This unit can hold Max.5kg camera
(balance height 6cm). Not in balance
will diminimize functions.
OPERATION
Power switch (13) ON
• Speed control
Speed control lever (11)
slid to left be low Right is High
speed.
Not possible to adjust Pan and Tilt
separately.
Attention!
Tilt speed will be change depend on
weight of camera or direction.
• Function
Control lever function is same as
diagram direction.
Possible to move Pan and Tilt same
time.
Attention!
After use make power switched off.
4.SET CABEL
Remote controller cable (10) put on
Unit (9) same as diagram direction.
SLIP FUNCTION FOR PAN
Pan (Horizontal) by remote control is from [ 0 ] point left or right about 150º each.
This unit have slip system Fix stand (7) and body. Anytime possible to turn by hand.
Attention!
Tilt (vertical) have NO slip system. Don’t push.
When use slip function be careful to handle for cableing.