1
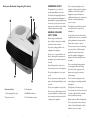
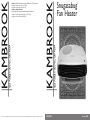
Snugasabug
Fan Heater
Kambrook 461 Plummer Street, Port Melbourne 3207, Australia
Customer Service Line 1300 139 798
Customer Service Fax 1800 621 337
Kambrook New Zealand,
Private Bag 94411, Greenmount, Auckland, New Zealand
Customer Service Line/Spare Parts 09 271 3980
Customer Service Fax 0800 288 513
Due to continual improvement in design or otherwise, the product you purchase may differ slightly from the illustrations in this book. Issue 1/06
™
KFH280
Issue 1/06
KAMBROOK SAFETY
Know your Kambrook Snugasabug Fan Heater
1
2
5
Do not operate any appliance with a
damaged cord, plug or after the appliance
malfunctions or has been dropped or
damaged in any manner. Return to a
qualified electrical person for examination,
electrical or mechanical adjustment,
service or repair.
Congratulations on your choice of
another quality Kambrook product.
Your Kambrook Snugasabug Fan Heater
has been designed and manufactured to
high standards of engineering.With proper
use and care, you can expect to receive
many years of trouble free service. Please
read these instructions carefully.
This appliance is intended for household
use only and not for commercial or
industrial use.
GENERAL CARE AND
SAFTY GUIDE
Use this heater only as described in this
manual.Any other use is not recommended
by the manufacturer and may cause fire,
electric shock or injury to persons.
Before using your radiant heater,
please read these instructions carefully
and retain for future reference.
The most common cause of overheating
is deposits of dust or fluff entering the
appliance. Ensure these deposits are
removed regularly by unplugging the
appliance and vacuum cleaning air vents
and grilles.
Use only the voltage specified on the
rating plate of the appliance.
Do not cover or restrict airflow to the
inlet of exhaust grilles in any manner as
the appliance may overheat and become
a fire risk.
Do not place appliance close to a heat
source.
Do not use abrasive cleaning products
on this appliance. Clean with a damp
cloth rinsed in hot soapy water only.
Always remove plug from the mains
before cleaning.
Do not operate in areas where gasoline,
paint or other flammable liquids are used
or stored.
Do not connect the applicance to the
mains voltage until completely assembled
and adjusted.
Do not use the appliance to dry clothes.
This applicance is hot when in use.
To avoid burns, do not let bare skin touch
hot surfaces. Switch off and use handles
where provided when moving.
Keep all objects at least 1 metre from
the front, sides and rear of the appliance.
3
4
Controls and Parts
3.Tilt adjustment
1. 2 heat settings plus fan only
4. On/Off Neon indicator
2.Thermostat control
5.Thermo Guard protected
Do not insert or allow foreign objects to
enter any ventilation or exhaust opening,
as this may cause and electric shock, fire
or damage to the appliance.
Always operate on a flat horizonatal surface.
Do not operate with cordset coiled as a
build up of heat is likely, which could be
sufficient to become a hazard.
1
2
The use of an extension cord with this
appliance is not recommended.
OPERATING
INSTRUCTIONS
Do not remove plug from power socket
until the appliance has been switched off.
Always choose a safe location for the
heater, keeping in mind the safety
precautions outlined. All of the controls
are located on the top of the heater for
easy accessibility and are protected by a
plastic control flap.
Do not remove plug from power socket
by pulling flex – always grip plug.
Always unplug appliance when not in use.
Do not allow cord to come in contact
with heated surfaces during operation.
Neon Indicator
The heater has a power available red light.
When the heater has been turned on at
the wall, the light will be illuminated
indicating power is available to the heater.
Do not run cord under carpeting, throw
rugs, runners or the like. Arrange cord
away from traffic areas so that it will not
be tripped over.
Heat Controll Switch
Do not twist, kink or wrap the cord
around the appliance, as this may cause
the insulation to weaken and split. Always
ensure that all cord has been removed
from the cord storage area.
Your heater is fitted with a multi-positional
rotary switch.The control switch
positions are:
0
Off
Do not store appliance while it is still hot.
∞
Fan only
This appliance is not intended for use by
young children or infirm persons without
supervision.
I
Low heat – 1200W
II
High heat – 2400W
Young children should be supervised to
ensure they do not play with the appliance.
Check that the heat control switch is set
to the off position before plugging the
heater into the mains supply.
The appliance must not be located
immediately below a socket-outlet.
Fan
The fan setting is used to circulate the
room air.
Do not use this appliance in the
immediate surrounds of a bath, shower
or swimming pool.
Turn the thermostat clockwise until the
maximum temperature setting is reached.
If the supply cord is damaged, it must be
replaced by a qualified electrical person
in order to avoid a hazard.
The fan will now circulate the room air.
Heating
Tilt Base
Turn the Heat Control Switch to the
desired power level (I or II).
The direction of the airflow may be
adjusted by tilting the body of the heater
up and down. Stopper pins are fitted to
limit the angle of adjustment.
Turn the thermostat knob clockwise
until the maximum temperature setting
is reached.
CLEANING INSTRUCTIONS
Thermostat
The heater requires regular cleaning to
ensure trouble free operation.
The thermostat is used to control the
room temperature. It acts as a switch and
does not vary the amount of heat output
from the heater.
1. Unplug the heater from the mains
supply before cleaning.
2. Use a damp cloth to clean the exterior
of the heater.
Turn the thermostat knob clockwise
until the maximum temperature setting
is reached.
3. Use a vacuum cleaner to remove dust
and fluff from the inlet and outlet grilles.
If the desired room temperature is
reached, slowly turn the thermostat
knob anti-clockwise until you hear a
click.The heater will stop operating.
4. Ensure the heater is dry before plugging
back into the mains supply.
The heater will now turn on and off
automatically maintaining the room
temperature that you have set.
Frost Watch
The frost watch setting is used to prevent
the room temperature from falling below
approximately 5ºC.
Choose the power level desired on the
heat control switch.
Turn the thermostat knob to the * symbol
(minimum setting).The heater will now
switch on automatically if the room
temperature falls below 5ºC.
Do not use this appliance outdoors, or
on wet surfaces. Avoid spilling liquid on
the appliance.
3
4
Notes
KAMBROOK
12 MONTH
WARRANTY
If the product includes one or a number
of accessories only the defective accessory
or product will be replaced.
KAMBROOK warrants the purchaser
against defects in workmanship and
material, for a period of 12 months from
the date of purchase (3 months
commercial use).
In Australia, this KAMBROOK Guarantee
is additional to the conditions and
guarantees which are mandatory as
implied by the Trade Practices Act 1974
and State Territory legislation.
Guarantee and purchase receipt for this
product are to be retained as proof of
purchase and must be presented if making
a claim under the terms of the
KAMBROOK guarantee.
For service, spare parts or product
information in Australia, please call
KAMBROOK on the Customer Service
Line 1300 139 798.
KAMBROOK reserves the right to
replace or repair the appliance within
the warranty period.
For service, spare parts or product
information in New Zealand, please
call KAMBROOK New Zealand,
Greenmount, Auckland Phone 0800 273 845
Fax 0800 288 513. For spare parts phone
0800 273 845.
Warranty does not apply to any defect,
deterioration, loss or injury or damage
occasioned by, or as a result of the misuse
or abuse, negligent handling or if the product
has not been used in accordance with the
instructions.The guarantee excludes
breakages and consumable.
If claiming under this guarantee the product
must be returned freight prepaid.
This warranty is void if there is evidence
of the product being tampered with by
unauthorised persons.
YOUR PURCHASE RECORD (Please complete)
Attach a copy of purchase
receipt here.
DATE OF PURCHASE______________________________________________________
MODEL NUMBER ________________________________________________________
SERIAL NUMBER (If applicable) ______________________________________________
Please don’t return purchase record
unless you are making a claim
PURCHASED FROM ______________________________________________________
5
6